B. Setting Preferences
The Preferences Dialog Box
The Preferences dialog box contains seven tabbed windows (Figure B.1), which let you specify settings for many Pro Tools session parameters.
Figure B.1. The Preferences dialog box’s seven tabbed windows.

To open the Preferences dialog box
• Choose Setup > Preferences (Figure B.2).
Figure B.2. Choose Setups > Preferences.
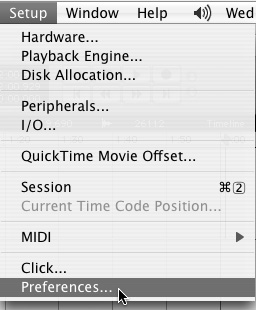
The Preferences dialog box opens.
Display Preferences
The settings on the Display tab (Figure B.3) let you customize many Pro Tools viewing features. Preferences include:
Basics section
Draw Grids In Edit Window: This setting displays grid lines in the Edit window. To define a grid size, enter a value in the Edit window’s Grid Value field.
Figure B.3. Display preferences.
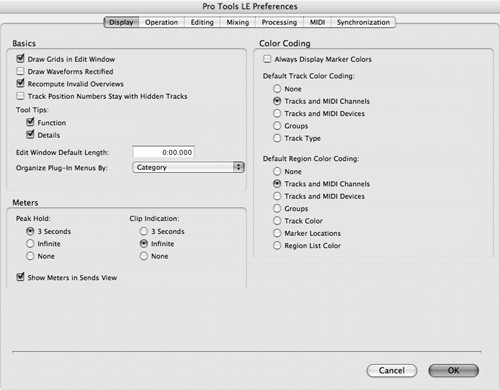
Draw Waveforms Rectified: This setting shows waveforms summed together in a single positive direction starting at the bottom of the track. This lets you see more waveform detail in reduced track height views. It’s especially useful when you’re editing volume-level automation data.
Recompute Invalid Overviews: This setting prompts Pro Tools to re-create overviews of missing or corrupted waveform display data.
Track Position Numbers Stay With Hidden Tracks: When this setting is selected, hidden tracks keep their track numbers. When not enable, only visible tracks retain their track numbers.
Tool Tips display options
Function: Displays an item’s basic function.
Details: Displays information about an item, such as name, parameter values, and input and output assignments.
Edit Window Default Length: This lets you set a default recording length for the Edit window in hours, minutes, seconds, and frames. The maximum session length is 13 hours at 48 kHz.
Organize Plug-In Menus By options: Pro Tools provides the following options for displaying and organizing plug-ins in the plug-in pop-up menu.
Flat List: Displays all plug-ins in one long list.
Category: Organizes and displays plug-ins by effects type. For example, all EQ plug-in effects are under the EQ category.
Category and Manufacturer: This option orders plug-ins first under the effects type. The secondary menu lists the plug-ins’ parent company.
Meters section
Peak Hold options
These options determine how long the peak indicators on the track meters stay lit after a peak is detected.
• 3-Second: Displays last peak level for three seconds.
• Infinite: Displays last peak level until you clear it by clicking the level indicator.
• None: No hold; meter moves freely.
Clip Indication options
These options determine how long clip indicators on plug-in, send, and track level meters remain lit after a signal has clipped.
• 3-Second: Displays last clip detected for three seconds.
• Infinite: Displays last clip detected until you clear it by clicking the level indicator.
• None: No hold; meter moves freely.
• Show Meters In Sends View: This setting displays the level meters of individual send controls in the Sends view. The Show Meters preference can tax CPU power, so disable it if you have a slow computer.
Color Coding section
Always Display Marker Colors: This setting lets you view Marker colors in the Markers ruler, even if you turn off settings for Marker Locations in the Default Region Color Coding section.
Default Track Color Coding
These options determine the default color assignments for tracks in the Edit and Mix windows.
• None: Turns off color assignments to tracks.
• Tracks and MIDI Channels: Assigns colors to waveforms according to the track number and MIDI channel assignment.
• Tracks and MIDI Devices: Assigns colors to waveforms according to the track number and MIDI device type.
• Groups: Assigns colors to waveforms according to group ID.
• Track Type: Assigns a color to each track according to its type (audio, MIDI, instrument, aux. input, or master fader).
These options determine the default color assignments for regions in the track playlist.
• None: Turns off color assignments for regions. Regions appear black in track playlist.
• Tracks and MIDI Channels: Assigns colors to each region in the Edit window according to the track number and MIDI channel assignment.
• Tracks And MIDI Devices: Assigns colors to each region in the Edit window according to the track number and MIDI device type.
• Groups: Assigns colors to waveforms according to group ID.
• Track Color: Assigns colors to regions based on the color of the track.
• Marker Locations Assigns a color to data across all tracks based on the nearest preceding maker.
• Region List Color: Assigns colors to each region based on its color in the Regions list.
Operation Preferences
The settings on the Operation tab (Figure B.4) determine the function of various Pro Tools recording and playback features. Preferences include:
Transport section
Timeline Insertion/Play Start Marker Follows Playback: When this setting is selected, the cursor automatically updates to the track location where playback stops.
Figure B.4. Operation preferences.
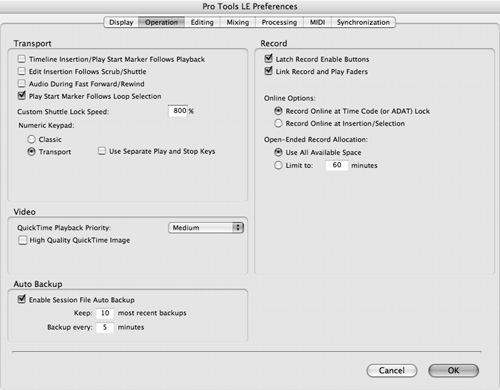
Edit Insertion Follows Scrub/Shuttle: When this setting is selected, the cursor automatically updates to the track location where scrubbing stops.
Audio During Fast Forward/Rewind: This setting makes audio audible during fast-forward and rewind.
Play Start Marker Follows Loop Selection: When this option is selected, the Play Start Marker snaps to the Timeline Selection Start Marker when you change the Timeline Selection. When deselected, the Play Start Marker doesn’t move with the Timeline selection.
Custom Shuttle Lock Speed:
This option lets you set the highest fast-forward Shuttle Lock speed when in Shuttle Lock mode, with available settings from 50–800%.
Numeric Keypad Mode: This setting lets you determine the function of the numeric keypad (options include Classic and Transport). For more information on the Numeric Keypad Mode, see the Pro Tools Reference Guide.
Record section
Latch Record Enable Buttons: This setting lets you record-enable multiple tracks simultaneously.
Link Record And Play Faders: This option prevents volume faders from inadvertently changing positions when switching between record and playback modes.
Online Options: This setting lets you determine how recording is initiated when Pro Tools is set to receive time code from an external source.
• Record Online At Time Code (or ADAT) Lock: Online recording begins as soon as Pro Tools receives and locks to incoming time code or ADAT signal.
• Record Online At Insertion/Selection: Online recording begins at a chosen insertion point in a track. Recording continues until Pro Tools stops receiving time code. If you make a selection, Pro Tools records online for the length of the selection.
Open Ended Record Allocation: This setting lets you determine how much hard drive space is dedicated for recording.
• Use All Available Space: Allocates the hard drive’s entire available space. This can slow down performance on some hard drives.
• Limit To: Sets the maximum allowable recording duration (in minutes). This can improve performance on some hard drives.
Video section
QuickTime Playback Priority options
This option lets you set the priority of movie playback relative to screen updates in the Pro Tools windows.
High Quality QuickTime Image
This option sets QuickTime movies to play back at the highest resolution. Deselect this option if you experience performance issues while playing back a session with video.
Auto Backup section
Enable Session File Auto Backup: This setting lets you enable the AutoSave feature and select the frequency and quantity of saves.
Editing Preferences
The settings on the Editing tab (Figure B.5) determine the function of various Pro Tools editing features. Preferences include:
Regions section
Region List Selection Follows Edit Selection: When this preference is chosen, selecting a region in a track also selects it in the Regions list.
Figure B.5. Editing preferences.
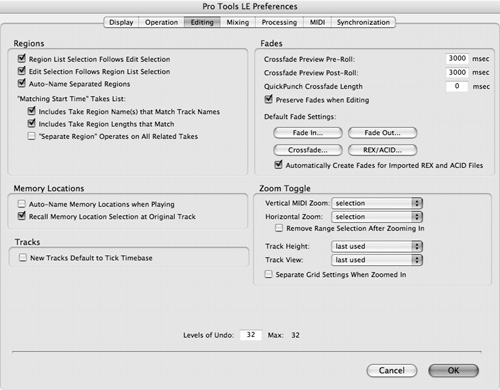
Edit Selection Follows Region List Selection: When selected, selecting a region in the Regions list causes Pro Tools to highlight that region in a track.
Auto-Name Separated Regions: This setting automatically names newly separated regions by appending a number to each region’s name.
“Matching Start Time” Takes List: Command-clicking (Macintosh) or Control-clicking (Windows) in a track displays a list of regions whose start times match the current cursor location. The following preferences determine which takes appear in this list:
• Includes Take Region Name(s) That Match Track Names: Only regions that share names with the track/playlist appear in the Takes List pop-up menu.
• Includes Take Region Lengths That Match: Only regions that match the length of the current selection appear in the Takes List pop-up menu.
• “Separate Region” Operates On All Related Takes: Editing a region with the Separate Region command affects all other related takes with the same user time stamp. This helps you compare different sections from a group of related takes.
Auto-Name Memory Locations When Playing: When this preference is selected, Pro Tools gives default names to new memory locations based on their time locations.
Recall Memory Location Selection at Original Track: When selected, memory locations that recall a selection also recall the track in which the selection was made.
Tracks section
New Tracks Default to Tick Timebase: When this option is selected, all newly created audio tracks are automatically tick-based. When deselected, newly created audio tracks are sample-based.
Fades section
Crossfade Preview Pre-Roll: This setting lets you specify the amount of pre-roll added when you audition crossfades in the Fades dialog box.
Crossfade Preview Post-Roll: This setting lets you specify the amount of post-roll added when you audition crossfades in the Fades dialog box.
QuickPunch Crossfade Length: This setting lets you specify a default length for crossfades created during QuickPunch recording. Crossfades occur before punch-in and after punch-out.
Preserve Fades When Editing: When selected, Pro Tools preserves fade-ins and fade outs, and converts separated crossfades into corresponding fade-ins and fade-outs when regions are edited in tracks.
Default Fade Settings:
• Fade In: Selects the default envelope shape for fade-ins.
• Crossfade: Selects the default envelope shape for crossfades.
• Fade Out: Selects the default envelope shape for fade-outs.
• REX/ACID: Selects the default envelope shape for crossfades between regions in REX or ACID files.
Automatically Create Fades for Imported REX and ACID files: When selected, this option automatically applies crossfades between regions when you import REX or ACID files.
Zoom Toggle section
Vertical MIDI Zoom: This option sets the vertical zoom for MIDI tracks when you use Zoom Toggle.
Horizontal Zoom: This option sets the horizontal zoom that is automatically displayed when you use Zoom Toggle.
Remove Range Selection After Zooming In: When this option is selected, the current Edit selection changes to an Edit cursor when you use Zoom Toggle.
Track Height: This option sets the track height that is automatically displayed when you use Zoom Toggle.
Track View: This option sets the track view that is automatically displayed when you use Zoom Toggle.
Separate Grid Settings When Zoomed In: When this option is selected, the current Grid setting is retained when Zoom Toggle is used. When this option is deselected, the grid setting stored with the Zoom Toggle is used.
Levels Of Undo: This setting lets you choose the maximum number of actions (up to 16) that can be undone with the multiple undo feature.
Mixing Preferences
The settings on the Mixing tab (Figure B.6) determine the function of various Pro Tools mixing and automation features. Preferences include:
Setup section
Sends Default To “–INF”: This sets the initial fader level of newly created sends to minus infinity (no audible signal level).
Figure B.6. Mixing preferences.
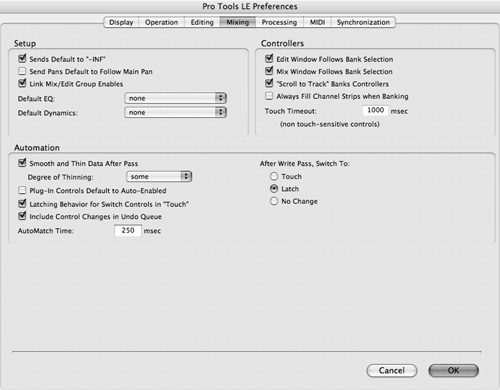
Send Pans Default to Follow Main Pan: When this option is selected, pan controls on newly created sends are set to follow the pan controls of the track.
Link Mix/Edit Group Enables: This setting links the enabling and disabling of Mix and Edit groups. For example, enabling Group A in the Edit window automatically enables Group A in the Mix window.
Default EQ: This setting lets you choose any EQ plug-in as a default, making it available for quick assignment at the top of the plug-in menu,
Default Dynamics: This setting lets you choose any Dynamics plug-in as a default, making it available for quick assignment at the top of the plug-in menu,
Edit Window Follows Bank Selection: This setting automatically updates the view of tracks in the Edit window whenever you switch banks on an external MIDI controller.
Mix Window Follows Bank Selection: This setting automatically updates the view of tracks in the Mix window whenever you switch banks on an external MIDI controller.
“Scroll To Track” Banks Controllers: This option lets you bank faders of a control surface to a numbered track when using the Scroll to Track command (Track > Scroll to Track).
Always Fill Channel Strips when Banking: This setting maximizes the number of channels that appear on control surfaces when banking tracks.
Touch Timeout: This setting lets you specify how quickly automation recording stops or times out after you stop moving a MIDI controller in Touch mode.
Automation section
Smooth and Thin Data After Pass: When this preference is selected, automation is smoothed and thinned by the amount specified by the Degree Of Thinning option.
Plug-In Controls Default to Auto-Enabled: When selected, all controls of newly inserted plug-ins are automatically enabled for automation.
Latching Behavior for Switch Controls in “Touch”: When this option is selected, automatable switched controls (such as mute) that are in Touch mode will latch in their current state after they are touched.
Include Control Changes in Undo Queue: When this option is selected, mixer control changes, such as moving a volume fader or a pan slider, are entered into the Undo queue, and are undone along with other Pro Tools operations.
AutoMatch Time: This setting lets you specify how quickly a fader or other control returns to its previously automated level after automation recording stops.
After Write Pass, Switch To: This option directs Pro Tools to switch to an appropriate automation mode after writing a pass of automation. Choose from Touch, Latch, or No Change.
Processing Preferences
The settings on the Processing tab (Figure B.7) determine the function of many Pro Tools DSP (digital signal processing) features. Preferences include:
AudioSuite section
Buffer Size: This setting lets you set a memory buffer size for audio processing and for previewing AudioSuite plug-ins. Smaller buffers are recommended for previewing plug-ins; larger buffers for processing files.
Figure B.7. Processing preferences.
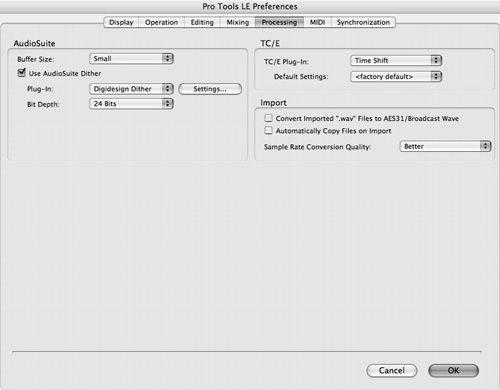
AudioSuite Dither: Dither is randomized noise added to a digital audio signal to help reduce distortion. For more information on dither, see Chapter 15: Adding Effects to a Mix. Pro Tools lets you customize the following AudioSuite dither functions:
• Use AudioSuite Dither: When this preference is selected, dither is applied to specific audio processing tasks.
• Dither Plug-In: This setting lets you specify the plug-in used for dither processing when the Use AudioSuite Dither option is selected.
• Edit Settings: This setting lets you apply either normal or noise-shaped dither to Digidesign’s dither plug-in.
• Bit Depth: This setting lets you select a bit depth for dithered audio.
TC/E section
TC/E Plug-In: This setting lets you choose the Time Compression/Expansion plug-in used when you perform edits with the TC/E Trim tool.
Default Settings: This lets you choose a Plug-In Settings file for the TC/E Plug-In when it is invoked by the TC/E Trim tool.
Import section
Convert imported “.wav” files to AES31/BroadcastWave: When selected, imported WAV files are automatically converted to AES31/EBU Broadcast standard format.
Automatically Copy Files on Import: When selected, Pro Tools automatically copies all imported audio files to the session’s Audio Files folder regardless of sample rate, bit-depth, or conversion requirements.
Sample Rate Conversion Quality: This setting lets you select the sample rate conversion quality for several Pro Tools conversion features including importing, bouncing, and saving audio.
MIDI Preferences
The settings on the MIDI tab (Figure B.8) include:
Basics section
Play MIDI Notes when Editing: When this preference is selected, MIDI notes will sound when you insert them with the Pencil tool or drag them with the Grabber tool into a MIDI track.
Figure B.8. MIDI preferences.
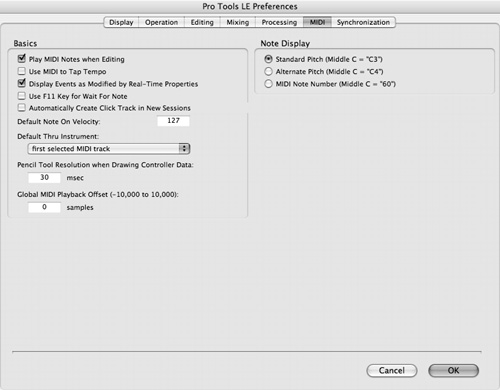
Use MIDI to Tap Tempo: When this option is selected, you can tap a key on a MIDI keyboard to enter a tempo into Pro Tools.
Display Events as Modified by Real-Time Properties: When this option is selected, the effects of Real-Time Properties on MIDI notes are displayed in the Edit window and the MIDI Event List.
Use F11 Key for Wait For Note: This setting lets you use the F11 key to put MIDI recording in Wait for Note mode.
Automatically Create Click Track in New Sessions: When this option is selected, Pro Tools automatically adds a click track when you create a new session.
Default Note On Velocity: This setting lets you specify the default Note On Velocity for MIDI notes inserted in the Edit window and MIDI Event list.
Default Thru Instrument: This setting lets you choose a default instrument where Pro Tools will route all incoming MIDI data. This saves you the trouble of creating a MIDI track to hear a particular MIDI device and channel.
Pencil Tool Resolution when Drawing Controller Data: This setting lets you specify a default resolution for MIDI controller data created with the Pencil tool. Lower resolutions help avoid creating unnecessarily dense controller data. The value range is 1 to 100 milliseconds.
Global MIDI Playback Offset: This setting lets you specify an offset in samples to compensate for MIDI latency.
MIDI Note Display: This setting determines how pitches for MIDI notes are displayed in the Edit window and the MIDI Event list.
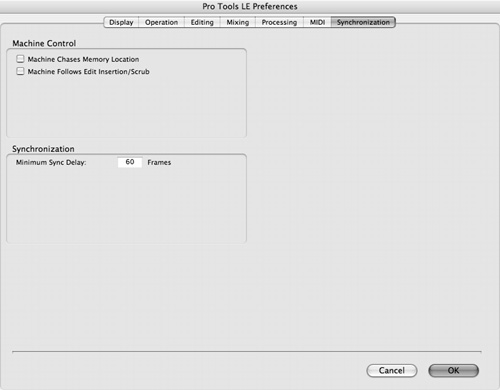
Synchronization Preferences
The settings on the Synchronization tab include:
Machine Control section
These settings let you determine how the transport of a connected MIDI Machine Control device responds to Pro Tools.
• Machine Chases Memory Location: The connected transport chases to a selected memory location.
• Machine Follows Edit Insertion/Scrub: The connected transport follows to a new insertion point or chases to a location where scrubbing begins.
Synchronization section
Minimum Sync Delay: This option lets you specify the amount of time external devices need to achieve synchronization lock when using Machine Control.
Figure B.9. Synchronization preferences.