
16. Automating a Mix
Not long ago engineers, producers, and band members alike engaged in a Twister-like ritual known as “performing” the final mix on the board. Pulling off such a mix was no easy feat: For instance, if one person failed to turn up a guitar or vocal on the mixing board, the entire mix had to be scrubbed—and performed again from scratch. Needless to say, more than a few good mixes (and tempers) were lost in this process.
Thankfully, computer automation has made this arduous mix choreography a thing of the past. Pro Tools automation remembers your mix moves and plays them back exactly as you performed them. This can save you a huge amount of time. You can build mixes in logical stages, and, if you make a mistake, a simple tweak fixes it—no more redoing mixes from scratch.
This chapter shows you how to use Pro Tools automation. You’ll learn how to write an automation pass, and how to edit and view automation data. We’ll also discuss how to thin unneeded automation data—a trick that enhances both automation and CPU performance.
About Automation Modes
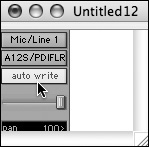
Each channel strip in the Pro Tools Mix and Edit windows provides an Automation Mode selector (Figure 16.1), which lets you choose how track automation is written and played back. Choose from the following automation modes:
Off Mode: Off mode turns off automation for all automation parameters.
Figure 16.1. The Automation Mode selector lets you choose how track automation is written and played back.

Read Mode: Read mode plays back automation that was previously written for a track.
Touch Mode: Touch mode writes automation data only when you click on an automation parameter with the mouse. When you release the mouse, automation writing stops and the parameter returns to its previously automated position.
Latch Mode: Latch mode is similar to Touch mode: It writes automation only when you click on an automation parameter with the mouse. Latch mode, however, continues to write automation until you stop playback. This mode is particularly useful for automating pan controls and plug-ins, since it doesn’t revert to its previous position when you release a control.
Write Mode: Write mode writes automation data during playback. It erases any preexisting automation data on the track. After you record automation data in Write mode, Pro Tools automatically switches to Touch mode. This prevents you from accidentally overwriting automation data on further playback.
Enabling Automation
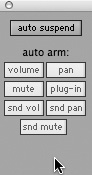
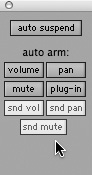
The Automation Enable window (Figure 16.2) lets you enable (or suspend) automation writing for the following automation parameters:
• Volume
• Pan
• Mute
• Send Level (Volume)
• Send Pan
• Send Mute
• Plug-in parameters
Figure 16.2. The Automation Enable window.
To enable automation writing on all tracks
1. Choose Window > Automation Enable (Figure 16.3).
Figure 16.3. To open the Automation Enable window, choose Window > Automation Enable.
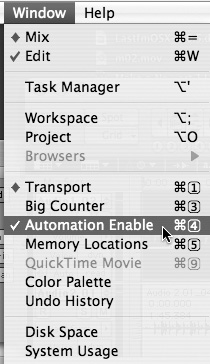
The Automation Enable window appears.
2. Select the automation parameters that you want to automate.
To suspend automation writing on all tracks
1. Choose Window > Automation Enable.
2. To suspend automation writing on all tracks, click the Auto Suspend button (Figure 16.4).
Figure 16.4. To suspend automation writing on all tracks, click the Auto Suspend button in the Automation Enable window.
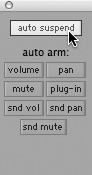
or
To suspend automation writing of a specific parameter on all tracks, click the button for that parameter.
To suspend automation writing and playback on individual tracks
1. In the Edit window, set the Track View selector to show the automation parameter that you want to suspend.
2. To suspend automation writing and playback for the displayed parameter, Command-click (Macintosh) or Control-click (Windows) on the name of the displayed parameter in the Track View selector (Figure 16.5).
Figure 16.5. Command-click (Macintosh) or Control-click (Windows) the name of the displayed parameter in the Track View selector to suspend automation writing and playback.
![]()
or
To suspend writing and playback of an automation parameter on all tracks, Command-Option-click (Macintosh) or Control-Alt-click (Windows) on the name of the automation parameter in the Track View selector.
Writing Automation
Pro Tools lets you write automation in real time by simply moving the controls for the desired parameter during playback. As you move the controls, Pro Tools records (or writes) these moves. This is called an automation pass.
To write automation on a track
1. Choose Window > Automation Enable.
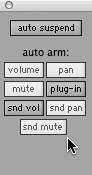
2. Enable the track parameters that you want to automate (Figure 16.6).
Figure 16.6. Enable the track parameters that you want to automate in the Automation Enable window.
3. Select an automation mode for each track that you want to automate (Figure 16.7).
Figure 16.7. Select an automation mode for each track that you want to automate.
For the initial automation pass, select Write mode.
4. Click Play to begin writing automation.
Move the controls that you want to automate.
5. When you’ve finished writing automation, click Stop.
After the first automation pass, you can write additional automation to the track without erasing the previous pass. To do so, set the automation mode to Touch or Latch.
To write additional automation to a previous automation pass
1. Link the Edit and Timeline selections.
2. In the Edit window, make a selection or place the cursor in the location where you want to write automation (Figure 16.8).
Figure 16.8. Make a selection or place the cursor in the location where you want to write automation.
3. Select Touch or Latch mode (Figure 16.9) on the tracks that you want to automate.
Figure 16.9. To write additional automation to a previous automation pass, select Touch or Latch from the Automation mode selector.

4. Click Play and begin writing automation.
Move the controls that you want to automate.
5. When you’ve finished writing automation, click Stop.
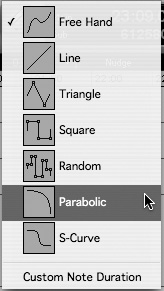
• You can use the Pencil tool (Figure 16.10) to draw automation directly into an automation playlist. The Pencil tool provides seven shapes: Free Hand, Line, Triangle, Square, Random, parabolic and S-curve (Figure 16.11). Experiment with them and see which one works for you. For more information on drawing automation, see the Pro Tools Reference Guide.
Figure 16.10. The Pencil tool in the Edit window lets you edit automation by moving points along a line graph.
![]()
Figure 16.11. The Pencil tool’s seven shapes.
Viewing Automation
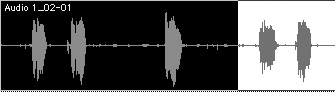
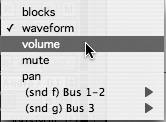
Pro Tools creates a separate automation playlist for each automation parameter that you write. Unlike track playlists, which can display multiple region configurations, an automation playlist displays only a single automation line graph for each parameter. The Track View selector lets you view automation playlists.
To show automation data
• Click the Track View selector and choose the automation playlist that you want to view (Figure 16.12).
Figure 16.12. To view an automation parameter, click the Track View selector and choose from the pop-up menu.
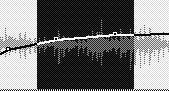
The selected automation playlist appears in the track. The automation playlist displays an editable line graph representing the value of the automation parameter against time. Waveforms are displayed behind the line graph and appear lighter in color (Figure 16.13).
Figure 16.13. The Volume automation playlist as an editable line graph.

• To toggle between Waveform and Volume views, select the track that you want to toggle, and then press Control-Minus (Macintosh) or Start-Minus (Windows).
Automating Sends
Pro Tools lets you write automation for send volume, send mute, and send pan (for stereo and multichannel sends only). This lets you precisely control effects levels and placement during a mixdown.
To write send volume, mute, or pan automation
1. Choose Window > Automation Enable.
2. Enable the send automation parameters that you want to automate (Figure 16.14).
Figure 16.14. Select the send parameters that you want to automate from the Automation Enable window.
3. Choose Write mode as the automation mode for the initial pass.
4. Display an individual send control, or display a send Output window.
5. Click Play and begin writing automation.
Move the send controls that you want to automate.
6. When you’ve finished writing automation, click Stop.
• You can apply send volume and send mute automation to all members of a group. For more information, see Appendix B: Setting Preferences.
Automating Plug-ins
Pro Tools lets you write automation for most plug-in parameters. First, however, you must enable the parameters that you want to automate using the Plug-in Automation dialog box.
To enable plug-in automation
1. Open the window of the plug-in that you want to automate.
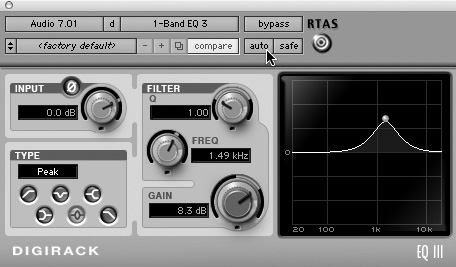
2. Click the AutomationEnable button (Figure 16.15).
Figure 16.15. To enable plug-in automation, click the Automation-Enable button in the plug-in window.
The Plug-in Automation dialog box appears (Figure 16.16).
Figure 16.16. The Plug-in Automation dialog box lets you select plug-in parameters to automate.
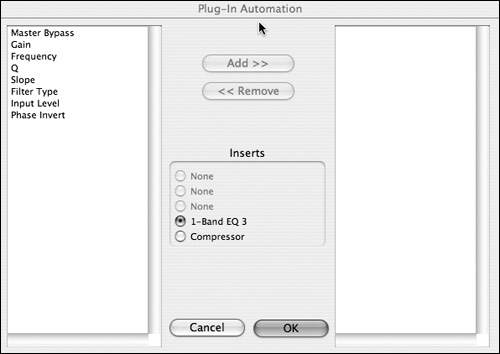
3. Select the parameters to automate.
4. Click Add.
5. Click OK.
The selected parameters become lit, indicating automation is active on those parameters.
To enable all plug-in parameters simultaneously
1. Open the window of the plug-in you want to automate.
2. Control-Option-Command-click (Macintosh) or Control-Alt-Start-click (Windows) on the plug-in’s Auto button.
All plug-in parameters become lit, indicating plug-in automation is active.
1. Make sure the desired parameter is automation-enabled.
2. Choose an automation mode on the track in which the plug-in is inserted.
For an initial pass, choose Write mode.
3. Click Play to begin writing automation.
4. Move the controls that you want to automate.
5. When you’ve finished writing plug-in automation, click Stop.
Protecting Written Automation with Automation Safe mode
Once you’ve written plug-in automation, use the Automation Safe button to protect it from being overwritten.
To place plug-in automation in Safe mode
1. Open the window for the plug-in.
2. Select the Automation Safe button (Figure 16.17).
Figure 16.17. The Automation Safe button protects plug-in automation from being overwritten.

The plug-in is placed in Automation Safe mode: Plug-in automation becomes inactive and cannot be overwritten.
Editing Automation
Pro Tools displays automation data as a line graph with editable breakpoints. You can graphically edit automation data by moving these breakpoints within a track’s automation playlist. Dragging breakpoints up or down increases or decreases their value, respectively, whereas dragging them to the left or right makes the automation event occur earlier or later on the timeline.
Pro Tools lets you use standard Edit commands (Cut, Copy, and Paste) to edit automation data. In addition, Pro Tools 7 provides Special Edit commands (Special Cut, Special Copy, and Special Paste), specifically for editing automation data.
Graphically editing automation breakpoints
To graphically edit automation breakpoints, display the automation parameter that you want to edit by choosing it from the Track View selector. Then do one of the following:
To create a breakpoint
• Click with the Grabber (or the Pencil) tool on the automation playlist’s line graph (Figure 16.18).
Figure 16.18. To create a breakpoint, click with the Grabber (or the Pencil) on the automation playlist’s line graph.

To move a breakpoint
• Click an existing point on the line graph with the Grabber tool and drag it to a new position (Figure 16.19).
Figure 16.19. To move a breakpoint, click an existing point on the line graph and drag it to a new position.
To move several breakpoints at once
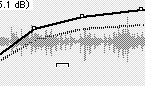
1. Select a range in the automation playlist that contains the breakpoints that you want to move (Figure 16.20).
Figure 16.20. Select a range in the automation playlist that contains the breakpoints that you want to move.
2. Press the Plus key to nudge the breakpoints to the right (later in the timeline) or the Minus key to nudge them to the left (earlier in the timeline). The breakpoints move by the current nudge value.
To change all breakpoint values in a region
• Click in the region with the Trimmer and drag the breakpoints up to increase their value or down to decrease their value (Figure 16.21).
Figure 16.21. Click in the region with the Trimmer and drag breakpoints up or down to increase or decrease their value.
Cutting, copying, and pasting automation
You can also use traditional Cut, Copy, and Paste commands to edit automation data.
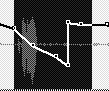
When you cut a selected range of automation data (Figure 16.22), Pro Tools adds anchor breakpoints to the data’s beginning and end points. This preserves the value and slope of the breakpoints on the line graph inside the cut selection. It also preserves a portion of the slope of the line graph before and after the cut region (Figure 16.23). When you paste the cut selection, the anchor breakpoints are also pasted (Figure 16.24).
Figure 16.22. A selected range of automation data.

Figure 16.23. After the selected automation is cut, Pro Tools adds anchor breakpoints at the beginning and end of the cut region.
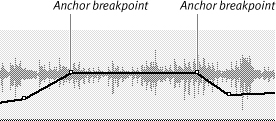
Figure 16.24. When a cut (or copied) selection is pasted, the anchor breakpoints are also pasted.
Copying automation data does not affect the selected region. When you paste a copied selection, however, anchor breakpoints are also pasted.
Deleting automation
To delete automation data, display the automation parameter that you want to edit by selecting it from the Track View selector. Then do one of the following:
To delete a single breakpoint
• With the Grabber or Pencil tool, Option-click (Macintosh) or Alt-click (Windows) the breakpoint.
1. Use the Selector to select a range that contains the breakpoints (Figure 16.25).
Figure 16.25. Select the range of automation data you want to delete.
2. Press Delete (Macintosh) or Backspace (Windows).
All breakpoints within the selected range are erased (Figure 16.26).
Figure 16.26. Deleting a selection of automation data erases any breakpoints contained within the selection.
To delete all automation data of the displayed parameter
1. Click with the Selector in the track and choose Edit > Select All.
2. Press Delete (Macintosh) or Backspace (Windows).
To delete all automation data in all automation playlists on a track
1. Use the Selector to select a range of data to be removed.
2. Press Control-Delete (Macintosh) or Start-Backspace (Windows).
Pro Tools removes all automation data within the selected range on each of the track’s automation playlists.
• In Waveform view, cutting or copying a section of an audio track’s waveform will also cut or copy any automation data associated with it.
• On auxiliary inputs, Instrument tracks, or master faders, only displayed automation data is cut or copied. To cut or copy all automation data on these track types, press Control while cutting or copying.
• Don’t confuse cutting automation data with deleting it. When you delete a selected range of automation, all automation data is removed and no anchor breakpoints are created. This can alter the shape of the automation line graph.
Using Special Edit commands to edit automation
Special Edit commands (new in Pro Tools 7) are identical to regular Edit commands except they act only upon automation data (volume, pan, mute, and plug-in automation) on audio, auxiliary input, master fader, and instrument tracks. You can also use Special Edit commands to edit MIDI controller data.
Special Edit commands can be used to edit track automation data regardless of the track view. For example, you can edit volume, pan, and mute automation on a track without switching out of Waveform view. This reduces the steps involved in editing automation, and thus can speed up and simplify certain automation editing tasks.
Each Special Edit command includes a submenu, containing options for applying the command as follows:
Copy Special
• All Automation: Copies all automation data or MIDI controller data, shown or not.
• Pan Automation: Copies only pan automation data or MIDI pan data, shown or not.
• Plug–in Automation: Copies only plug-in automation data that is shown.
Cut Special
• All Automation: Cuts all automation data or MIDI controller data, shown or not.
• Pan Automation: Cuts only pan automation data or MIDI pan data, shown or not.
• Plug–in Automation: Copies only plug-in automation data that is shown.
Paste Special
• Merge: Pastes MIDI note data in clipboard to a selected destination and merges it with preexisting MIDI note data.
• Repeat to Fill Selection: Pastes unlimited copies of audio and MIDI regions, automation data, or MIDI controller data from the clipboard to fill the selected location.
• To Current Automation Type: Pastes automation or MIDI controller data from the clipboard to the selected destination as the “current” automation type. This lets you use automation data interchangeably between all types of automation; and you can use MIDI data interchangeably between all MIDI functions.
Clear Special
• All Automation: Clears all automation and MIDI controller data, shown or not.
• Pan Automation: Clears only pan automation data or MIDI pan data, shown or not.
• Plug–in Automation: Clears only plug-in automation data that is shown.
To copy automation data from one track to another track using Copy Special
1. Click the Track View selector to view track automation (volume, pan, mute).
2. Using the Selector tool, select the track playlist (or portion of a track’s playlist whose automation you want to copy) (Figure 16.27).
Figure 16.27. Select the automation data that you want to copy.

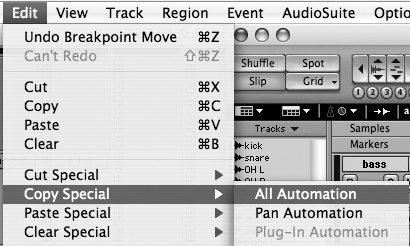
3. Choose Edit > Copy Special > All Automation (Figure 16.28).
Figure 16.28. To copy the selected automation data, choose Edit > Copy Special > All Automation.
All automation data in the playlist selection is copied to the clipboard.
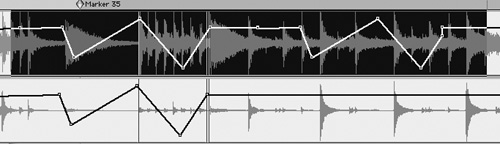
4. Choose Edit > Paste Special > Repeat to Fill Selection.
All automation in the clipboard is pasted to the selected track. If your track selection exceeds the length of the inserted automation, the automation is repeated (multiple times if necessary) to fill the entire selection (Figure 16.29).
Figure 16.29. To paste the copied automation data to a selected track area, choose Edit > Paste Special > Repeat to Fill Selection. The automation is copied to the selected area of the region loop and repeated as many times as necessary to fill the selected area.
For additional information on Special Edit commands, see the Pro Tools Reference Guide.
Automating Looped Regions
Looping an audio region does not loop any automation data associated with the source region. This lets you add new automation across any portion of the loop (and it frees you from automation cleanup tasks).
You can copy and paste automation from the source region to individual loop iterations using the Special Copy and Special Paste Repeat to Fill Selection commands.
To copy and paste automation from the source regions to individual loop iterations
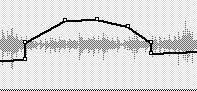
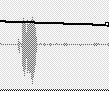
1. Select the source region (Figure 16.30).
Figure 16.30. Select the source region of the region loop containing the automation data you would like to extend over the region loop.

2. Choose Edit > Copy Special > All Automation or Pan Automation, or Plug-in Automation, depending on the automation you want to copy.
3. Select the looped region.
4. Choose Edit > Paste Special > Repeat to Fill Selection.
The automation data from the source region is pasted and repeated to fill the loop iterations (Figure 16.31).
Figure 16.31. To paste the copied automation from the source region to individual loop iterations, choose Edit > Paste Special > Repeat to Fill Selection. The automation data from the source region is pasted to the selected loop iterations.

Thinning Automation
Pro Tools lets you reduce, or thin, the density of automation data written during an automation pass. This helps clear memory allocated to automation, which can enhance automation-writing efficiency and improve CPU performance.
Pro Tools provides two ways to thin automation data: The Smooth and Thin Data After Pass option in the Automation Preferences window and the Thin Automation command.
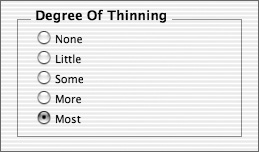
When the Smooth and Thin Data After Pass option is selected (Figure 16.32), Pro Tools automatically thins the automation breakpoint data after each automation pass. You can also select the amount of thinning from the Degree of Thinning option in the Automation Preferences window, including None (no thinning), Little, Some, More, and Most (maximum thinning) (Figure 16.33). For additional automation preferences, see Appendix B: Setting Preferences.
Figure 16.32. The Smooth and Thin Data After Pass option in the Automation Preferences window.
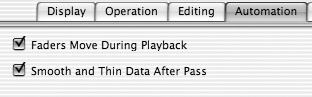
Figure 16.33. Select the amount of automation thinning from the Degree of Thinning option in the Automation Preferences window.
The Thin Automation command lets you selectively thin areas in a track where automation data is too dense.
To use the Thin Automation command
1. In the Edit window, click the Track View selector to display the automation parameter that you want to thin.
2. With the Selector, highlight the automation data that you want to thin.
3. Choose Edit > Thin Automation to thin the selected automation.
The selected automation data is thinned by the amount set in the Degree of Thinning option in the Automation Preferences window.