
18. Recording MIDI
This chapter helps you to record MIDI into Pro Tools. You’ll learn how to set up MIDI interfaces and devices so Pro Tools can use them, and how to select inputs and outputs for MIDI tracks. Next, you’ll learn how to record single and multiple MIDI tracks into Pro Tools, and how to punch record MIDI. We’ll also cover two types of loop recording as well as how to import and export MIDI files to exchange data with other programs.
What Is MIDI?
The MIDI (Musical Instrument Digital Interface) communication protocol was originally designed to allow synthesizers created by different manufacturers to communicate with each other. MIDI became the glue that held together multiple keyboard and sound module setups. From very early in the computer music era, it also served as the protocol between computers and keyboards. Today, MIDI is most commonly used to record and play parts performed on a keyboard to trigger sounds in a synthesizer.
You can also use MIDI to:
• Send time code for synchronization
• Send Beat Clock information so all synthesizers receive the same tempo
• Modify parameters in synthesizers, samplers, and effects via controller information
• Send program and patch change commands to recall sounds and settings in external boxes.
MIDI terms
The following are some common terms relating to MIDI equipment and software.
MIDI channels: Each MIDI cable is capable of sending and receiving data on up to 16 channels. Each channel is generally reserved for a different instrument sound. For example, channel 10 is often reserved for drum sounds.
MIDI interface: A MIDI interface is a hardware device that connects to a computer to send and receive MIDI. MIDI interfaces can be simple devices that have 16 channels of MIDI send and receive, or complex devices that move hundreds of channels of MIDI to and from a computer. Many MIDI interfaces use USB connections, which provide self-powering (no AC connection required) and faster data transfer.
Controller: A controller is any device that’s used to send MIDI without necessarily making a sound on its own. A keyboard controller, for example, can be used to trigger drum sounds in a sampler. As another example, a wind controller mimics the playing technique of a reed instrument but is connected via MIDI to control the sounds of another MIDI sound generator.
Sampler: A sampler is a sound generator that takes individual sounds, or samples, and plays them back when triggered by a MIDI note. Many samplers can be used to both mimic real instruments, such as a piano, and to radically modify sounds in creative ways. Samplers are often used to trigger loops as well.
Synthesizer: A synthesizer is an electronic instrument used to make sounds. There are many different kinds of synthesizers and different methods for synthesizing sounds, including analog, sample playback, wave-table, granular, physical modeling, and virtual analog synthesis.
MIDI keyboard: A MIDI keyboard is a device with piano- or organ-style keys that sends MIDI information when played. Keyboards often include onboard sounds in a synthesizer or sampler. In such cases, they can be used to play back the internal sounds as a synthesizer or as a MIDI controller for other instruments.
Sound module: A sound module is a MIDI synthesizer without a keyboard. A module can include any of the capabilities of a synthesizer but must be triggered by an external MIDI device to make sounds.
Sequencer: A sequencer is a recorder that records MIDI instead of audio. Sequencers can be hardware devices or computer programs that are used to record, edit, and play back MIDI data. Sequencers can work with not only MIDI notes but controller and sysex (system exclusive) data as well.
Keyboard workstation: A keyboard workstation is a keyboard that includes an onboard synthesizer, sequencer, and effects, and often, a sampler. Originally conceived as “one-stop shopping” for full audio production, keyboard workstations are more often used today as hot-rod controllers and for onstage performance.
Virtual instrument: A virtual instrument is a software version of an instrument, often a plug-in, that can be controlled with an external MIDI device. A virtual instrument might simulate an acoustic instrument or a hardware synthesizer, play samples, or be a completely original instrument.
The Difference Between MIDI and Audio
MIDI data is merely a set of instructions that tells any MIDI-compatible device what notes to play. MIDI data is represented in Pro Tools by a piano-roll style matrix of notes, or by a list of events, which can be converted into sound by a MIDI instrument such as a synthesizer. Audio data is a reproduction of actual sounds. Audio is represented in Pro Tools by a waveform.
MIDI offers several powerful advantages over audio. MIDI is a tempo-based protocol. Unlike an audio sample, a MIDI note is not recorded at a specific moment in time; rather, it’s recorded at a particular bar and beat location (such as bar 34, beat 3, tick 117). This means that if you change the tempo or meter of a project, the tempo and meter of the MIDI tracks automatically change as well.
MIDI tracks are also much more pitch and sound independent than audio tracks. An audio file in a bass track, for example, will always play back exactly as it was recorded. A MIDI track, however, contains a series of separate events that the computer plays back at a certain time and place, according to your instructions, such as, “at bar 35, beat 1, send a C# out of port 3.” With a few mouse clicks, you can make that C# play back a completely different sound on a different synthesizer. Or, you can transpose the note or copy it to a different track so it plays back two different sounds at the same time. This flexibility is part of the charm of MIDI: Because it’s so easy to make changes, you can quickly try out different ideas.
While plenty of music is still made without MIDI or synthesizers, each year sees more MIDI in all stages of production. MIDI-based notation programs have become indispensable songwriting tools. Most dance, hip-hop, and techno music begins with a sequencer and MIDI. And as production techniques from styles like sampling and looping work their way into pop and rock productions, MIDI and sequencing are along for the ride. In addition, nearly all digital effects units have deep MIDI implementation, giving MIDI-savvy musicians new creative control regardless of the kind of music they make.
MIDI in Pro Tools
Although MIDI and audio are quite different, working with MIDI in Pro Tools feels much like working with audio in Pro Tools. If you understand Pro Tools’ audio features, you’ll find the MIDI functions to be intuitive.
MIDI tracks
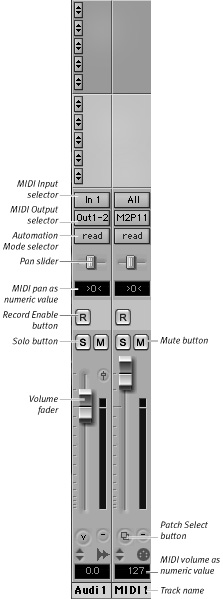
Like audio tracks, MIDI tracks are displayed in the Mix window as channel strips (Figure 18.1). Although both channel strips have a number of similar controls, such as solo, pan, and mute, MIDI track channel strips do have some differences. For example, MIDI tracks have no audio to send or bus, so their channel strips don’t have controls for audio interface sends, RTAS plug-ins, or audio buses. Instead, MIDI track channel strips include controls for selecting MIDI inputs and outputs.
Figure 18.1. An audio track channel strip (left) and MIDI track channel strip (right) in the Mix window.
Instrument tracks
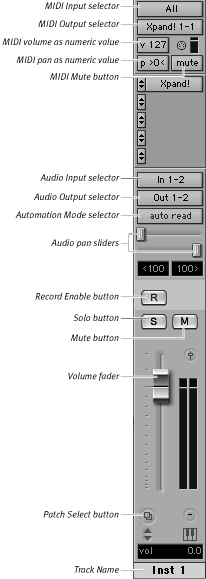
An instrument track is a combination of a MIDI track and an auxiliary input track (Figure 18.2). An instrument track lets you route MIDI input to virtual instrument plug-ins inserted on the track, and route the plug-in to the session’s audio outputs. Before Pro Tools 7, you needed a separate MIDI track for the MIDI input and an auxiliary input track for the plug-in output.
Figure 18.2. An instrument track channel strip in the Mix window.
MIDI and instrument tracks in the Edit window
The Edit window displays MIDI and instrument tracks horizontally with MIDI notes running from left to right, sort of like a player piano roll (Figure 18.3). The buttons to the left of the tracks (Figure 18.4) serve many of the same functions as their audio track counterparts, such as the ability to resize, solo, mute, and name tracks.
Figure 18.3. The Edit window displays audio tracks (top), instrument tracks (middle), and MIDI tracks (bottom) horizontally.
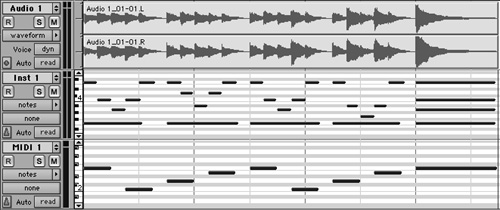
Figure 18.4. Track controls for MIDI and instrument tracks in the Edit window.

MIDI Event List
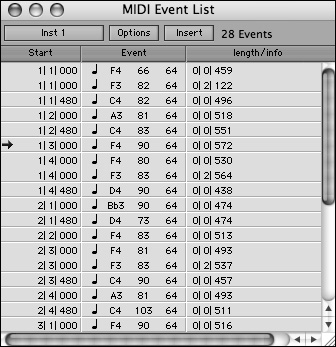
You can also view and edit MIDI data in the MIDI Event List. The MIDI Event List lets you make precise, numeric-based edits on all MIDI tracks data. In the MIDI Event List you can trigger notes by selecting them, and you can enter notes and other MIDI controller data using the MIDI Event List’s Insert pop-up menu.
To open the Event List editor
• Select Event > MIDI Event List, or press Option-Equal (Macintosh) or Alt-Equal (Windows).
The MIDI Event List window opens (Figure 18.5).
Figure 18.5. The MIDI Event List editor.
MIDI Setup in Mac OS X
Mac OS X includes Apple’s audio setup utility called Audio MIDI Setup (AMS), which automatically finds your audio and MIDI interfaces and devices (Figure 18.6).
Figure 18.6. The Audio MIDI Setup window in Mac OS X.

Most MIDI interfaces and devices connect directly to the Mac through USB ports, and the interfaces do not require external power because the USB port supplies the power. That means you simply plug in the device and the Mac’s Audio MIDI Setup detects the connection.
To set up a MIDI device on Mac OS X
1. In Pro Tools, choose Setup > MIDI > MIDI Studio.
The Audio MIDI Setup window opens.
2. In the Audio MIDI Setup window, click MIDI Devices. If the drivers are installed properly, connected MIDI interfaces or devices appear on the MIDI Devices page.
If your MIDI device is a keyboard controller, it automatically appears as an input device for MIDI and instrument tracks, and your setup is complete.
If your MIDI device is a MIDI interface (such as Mbox 2), you can add other devices that are connected to it.
3. Click Add Device.
4. Connect the new device to the MIDI interface by dragging a connection from the input and output of the interface icon to the output and input of the new device icon (Figure 18.7).
Figure 18.7. A configured MIDI device in Audio MIDI Setup.

Once your device is in the MIDI setup, you can exit Audio MIDI Setup and begin recording MIDI into Pro Tools.
MIDI Setup in Windows XP
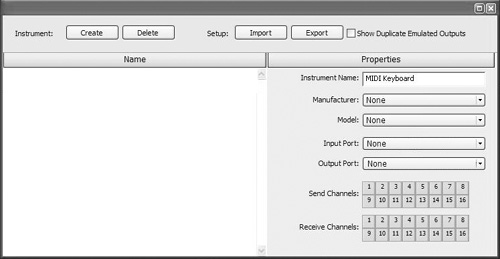
Windows XP includes an application called MIDI Studio Setup (MSS), which lets you configure MIDI interfaces and devices connected to your system (Figure 18.8).
Figure 18.8. The MIDI Studio Setup window in Windows XP.
To set up a MIDI device in Windows XP
1. In Pro Tools, choose Setup > MIDI > MIDI Studio.
The MIDI Studio Setup window opens.
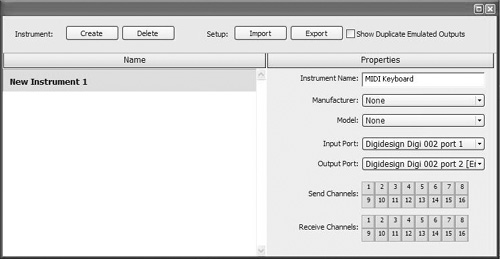
2. Click Create to add a new instrument.
3. Enter a name in the Instrument Name field.
4. Choose the Input Port and Output Port that you’ve used to connect your MIDI instrument (Figure 18.9).
Figure 18.9. A configured MIDI device in MIDI Studio Setup.
5. Close the MIDI Studio Setup window.
Once your device is in the MIDI setup, you can exit MIDI Studio Setup and begin recording MIDI into Pro Tools.
Setting Up a MIDI Track
If you are controlling an external MIDI device or a softtware synthesizer application that can accept MIDI inputs, you’ll record to a MIDI track in Pro Tools.
To add a MIDI track to your session
1. Select Track > New, or press Shift-Command-N (Macintosh) or Shift-Control-N (Windows).
The New Track dialog box appears.
2. Select MIDI Track from the pop-up menu (Figure 18.10).
Figure 18.10. Create a new MIDI track.

3. Enter the number of tracks and click Create.
Setting Up an Instrument Track
If you are using a virtual instrument plug-in, you can record to an Instrument track instead of a MIDI track.
To add an instrument track to your session
1. Select Track > New, or press Shift-Command-N (Macintosh) or Shift-Control-N (Windows).
The New Track dialog box appears.
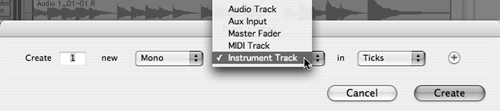
2. Select Instrument Track from the pop-up menu (Figure 18.11).
Figure 18.11. Create a new instrument track.
3. Enter the number of tracks and click Create.
4. Choose View > Mix Window > Instruments to show the Instruments view in the track.
5. Click an Insert selector on the instrument track and choose an instrument plug-in. In this example, Digidesign’s free Xpand! synthesizer plug-in is used.
The MIDI Output of the instrument track is automatically set to the instrument plug-in.
Selecting MIDI Inputs
In order to record MIDI into Pro Tools, you must first enable your MIDI devices for input, and then select a particular channel on the device for recording.
To enable MIDI inputs for use with Pro Tools
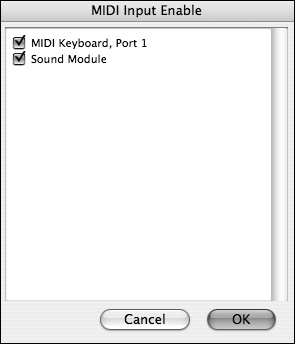
1. Select Setup > MIDI > Input Devices.
The MIDI Input Device panel opens.
2. Select the check box next to each input device that you want to use, and click OK (Figure 18.12).
Figure 18.12. In this window, two input devices are active.
The devices that you selected are now available for recording MIDI into Pro Tools.
Once you enable a MIDI input, you must select an input source for each track that you will record.
To choose a MIDI input for a MIDI or instrument track
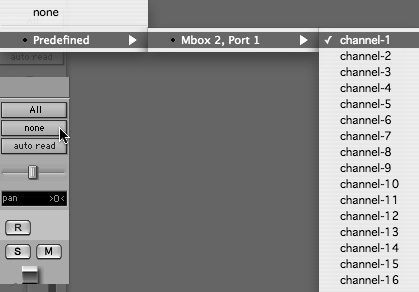
1. In the Mix window, click the MIDI Input selector on the MIDI track (Figure 18.13) or instrument track (Figure 18.14) channel strip.
Figure 18.13. The MIDI Input selector on a MIDI track.

Figure 18.14. The MIDI Input selector on an instrument track (Instrument view).

The MIDI Input pop-up menu opens. You can use it to browse to any channel of any input in your MIDI studio.
2. Choose an input from a MIDI input device on the pop-up menu.
The device becomes the input for the selected track.
• Pro Tools has a unique MIDI Input setting called All. While many MIDI studios have a large number of MIDI devices that can send and receive on any of 16 channels, often only one device will really ever send MIDI. This device, called a master controller, is usually a keyboard or synthesizer that’s used to play back all of the other MIDI equipment in the studio. Selecting All as the input is often the easiest way to select your master controller when no other devices are sending MIDI.
• Depending on how you want to route MIDI data in your studio, you might want to select Options > MIDI Thru. The MIDI Thru command echoes all incoming MIDI data back to the same device and channel from which it came. This is often the easiest way to set up MIDI, since parts will automatically trigger on the correct device and channel. MIDI Thru often works best with simple MIDI setups.
• If you use MIDI Thru, turn the local setting on your synthesizer to Off. This keeps you from hearing the same note twice—once when you press a key on your synthesizer and again when that same MIDI note is echoed by Pro Tools with MIDI Thru.
Sending MIDI Out of Pro Tools
If you are using an external device to play back a MIDI track, you must select the output channel for that track to send MIDI to the device.
To send MIDI from Pro Tools to an external MIDI device
1. In the Mix window, click the MIDI Output selector on the MIDI track channel strip.
The MIDI Output pop-up menu displays the available outputs (Figure 18.15).
Figure 18.15. The MIDI Output selector pop-up menu lets you select where MIDI is sent out of Pro Tools.
2. Choose the output to which you want to send MIDI information.
The device becomes the output for the selected track.
• If you send MIDI from Pro Tools to another device and the device sends it back to Pro Tools, a MIDI feedback loop can result—and it can sound nearly as awful as audio feedback. There are a number of ways to fix feedback loops, but this is one situation where you shouldn’t use the All input setting mentioned earlier. If you’re getting MIDI feedback loops, look carefully at things like MIDI Thru, local settings on your synthesizers, and general MIDI routing. Usually, you’ll be able to find where the loop originated and fix it by changing input, output, or thru settings.
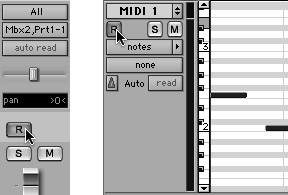
• Most sequencers assume that when a MIDI channel is active, it should be routing MIDI in and out of the program. Pro Tools, however, treats MIDI more like audio than most sequencers do: In order for a MIDI input to send to an output in Pro Tools, you must click the Record Enable button in either the MIDI track channel strip or in the Edit window’s Track menu (Figure 18.16). Think of it like Record monitoring, but for MIDI.
Figure 18.16. Click the Record Enable button in either the MIDI track channel strip (left) or the Edit window’s Track controls (right) to monitor MIDI output.
Monitoring external MIDI instruments without a mixer
You can monitor an external MIDI instrument by connecting its audio output directly into the line-level inputs of your audio interface.
To monitor the audio output of your external MIDI device in Pro Tools
1. Select Track > New, or press Shift-Command-N (Macintosh) or Shift-Control-N (Windows).
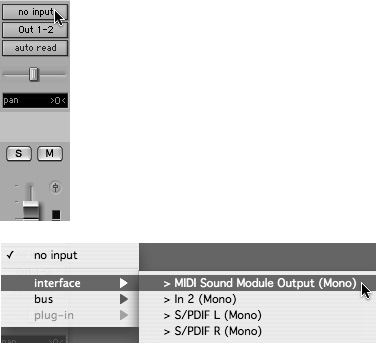
2. Create a mono or stereo auxiliary input track.
3. Click the input selector of the auxiliary input track, and choose the input to which your MIDI device audio output is connected (Figure 18.17).
Figure 18.17. Click the Input selector of the auxiliary input track, and select the audio input for your external MIDI device.
4. Adjust the input level with the volume fader on the auxiliary input track.
5. To record the incoming signal, reassign the output of the auxiliary input channel to a bus and create an audio track whose input is assigned to the same bus.
Creating a Click Track for Recording
Any time you are recording bar- and beat-based material, it’s helpful to record with a click track. By recording to a click, your performance is more likely to line up with the beats, making it easier to edit and arrange later. Pro Tools makes it easy to set up a click track.
To set up a click track
1. Select Track > New, or press Shift-Command-N (Macintosh) or Shift-Control-N (Windows).
2. Create a mono auxiliary input track.
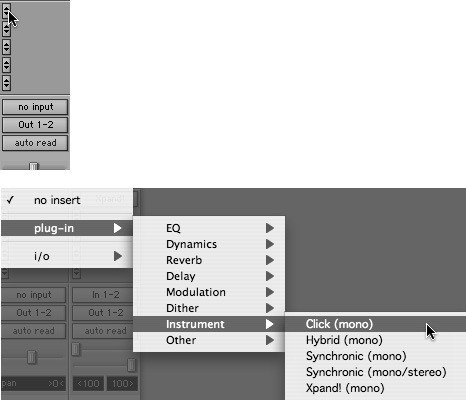
3. Click an Insert selector on the track and choose the Click plug-in (Figure 18.18).
Figure 18.18. Insert the Click plug-in on the auxiliary input track.
4. Select Options > Click to enable the click.
5. Click Play in the Transport window to start playback.
6. Adjust the click level with the volume fader on the auxiliary input track.
• You can choose whether to play the click during playback, recording, or both by choosing Setup > Click and selecting from the available options (Figure 18.19).
Figure 18.19. The Click options determine when the click track is heard.

Recording MIDI
After all of this configuring, clicking, and meandering about in Pro Tools, you can finally record MIDI onto your MIDI or instrument track.
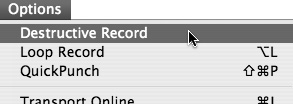
• Put Pro Tools in Non-Destructive Record mode (Figure 18.20) whenever you are recording MIDI. Although it doesn’t directly affect MIDI, using Non-Destructive Record mode will prevent you from inadvertently messing up an audio track.
Figure 18.20. Be sure to deselect Destructive Record mode when you record MIDI.
To record on a single MIDI or instrument track
1. As described earlier, select a MIDI channel input in the Mix window to record, select the device and output, and then click the Record Enable button on the track.
2. Click the Record and Play buttons in the Transport window (Figure 18.21).
Figure 18.21. Recording on a MIDI track.
Play your MIDI controller, synthesizer, or other MIDI data-generating equipment.
3. When you’re finished recording, click Stop.
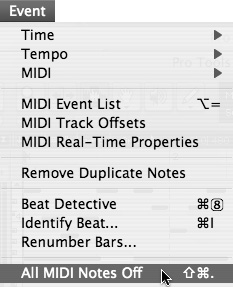
• If you wind up with a MIDI feedback loop, a stuck note in a synthesizer or sampler, or some other MIDI disaster, clicking Stop won’t always fix the problem. Instead, choose Event > All MIDI Notes Off (Figure 18.22). This sends a command to all MIDI devices to immediately silence them.
Figure 18.22. Don’t panic! The All MIDI Notes Off command should make your gear stop squawking.
Recording Multiple MIDI Tracks
While MIDI tracks are recorded individually more often than audio tracks are, sometimes it’s necessary to track multiple MIDI tracks simultaneously—for instance, when you’re recording more than one musician, when you’re transferring parts from one sequencer to another, or when a keyboard is split so that it plays back on different channels on different parts of the keyboard.
Let’s use the latter scenario as an example: The bottom two octaves of a keyboard are playing a bass sound on MIDI channel 1 while the right hand plays a keyboard sound on the top octaves transmitting on MIDI channel 2.
To record two MIDI tracks simultaneously
1. Create two new MIDI tracks as described earlier.
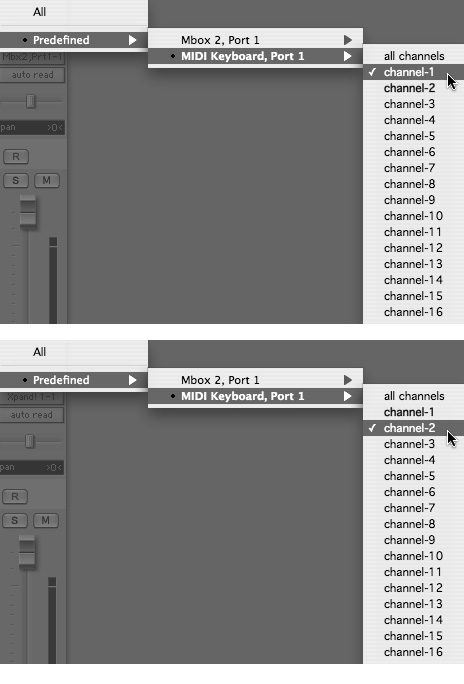
2. Set the inputs to different MIDI channels.
In this example, the first track records MIDI channel 1 of the controller, and the second track records MIDI channel 2 of the controller (Figure 18.23).
Figure 18.23. Select a different input for each MIDI track.
3. Send each MIDI channel output to a different device.
In this case, send the first track to channel 1 of the Mbox 2 MIDI out, and send the second track to the Xpand! virtual instrument plug-in (Figure 18.24).
Figure 18.24. Set the MIDI outputs to play different sounds.

4. Record-enable both tracks.
To record-enable multiple MIDI tracks, hold down the Shift key while clicking the Record Enable buttons on all of the channels you want to record.
5. In the Transport window, click the Record and Play buttons.
6. When you’re finished recording, click Stop.
• Splitting inputs to their own tracks is also useful for keeping controller, MIDI automation, or other MIDI information on its own track. It’s just easier to follow that way.
• You can also record one input to two tracks. Why would you want to do this? Each track can trigger different sounds from the same notes by routing them to different synthesizers or different patches on the same synthesizer. For example, a single MIDI performance copied on multiple tracks can trigger an electric piano sound while also playing a string sound.
Punch-Recording MIDI
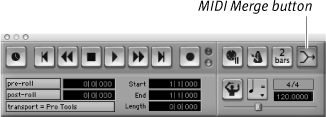
Punch-recording MIDI is similar to punch-recording audio. When punching MIDI, however, you use the MIDI Merge feature to determine how new MIDI data is recorded. You can turn this feature on and off with the MIDI Merge button, located in the Transport window (Figure 18.25).
Figure 18.25. The MIDI Merge button is located on the right side of the Transport window.
How MIDI Merge works
When MIDI Merge is on, incoming MIDI data is added to the existing MIDI on the track. The existing recorded data remains unchanged. When MIDI Merge is off, incoming MIDI data overwrites the MIDI data on the track.
MIDI Merge is useful, for example, if you have a drum pattern that you like and want to record another kick drum in some places. On the other hand, turning MIDI Merge off is helpful if you have a drum track that you like overall, but you want to redo a bar or two.
To punch-record MIDI
1. Create a new MIDI or instrument track, if necessary, and record-enable it.
If you want to punch-record an existing track, record-enable that track.
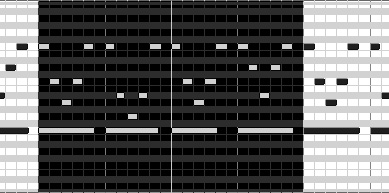
2. With the Selection tool, select the section of the track where you want to record (Figure 18.26).
Figure 18.26. Select the part of the MIDI track that you want to punch-record.
3. Set the MIDI Merge button to either On or Off.
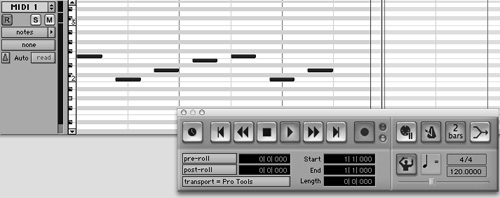
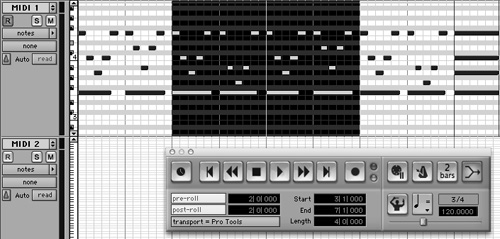
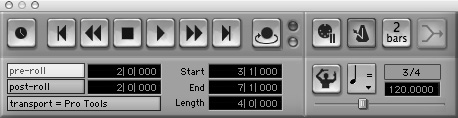
4. Set the pre-roll amount in the Transport window and turn pre-roll on. Do the same for post-roll, if you’d like (Figure 18.27).
Figure 18.27. All set to punch. The track is record-enabled, four bars are selected, MIDI Merge is on, and pre- and post-roll are set to two bars.
5. Click Record and then Play in the Transport window.
• To punch-record multiple MIDI tracks simultaneously, select all the tracks you want to punch and record-enable all of them. (The MIDI Merge setting applies to all punched tracks.) Remember to set the track inputs correctly.
• Because MIDI is a tempo-based protocol, it’s almost always best to work with it in Grid mode. Whether you’re selecting, editing, moving, or recording MIDI tracks, stay in Grid mode unless there’s a good reason to do otherwise.
Loop Recording MIDI
Pro Tools offers two distinct modes for loop recording MIDI. The first, called Loop Playback, lets you add individual parts or notes to a looped section, building a full MIDI part over many passes. This method is most commonly used to program drum parts. On the first pass, you record the kick drum; on the next pass, the snare; then the closed hi-hats; and finally, the open hi-hats on select beats. Looping in real time is an intuitive and creative way to program drum loops.
The second loop recording mode, called Loop Record, is more akin to the way Pro Tools is used to record audio in Loop mode. In Loop Record mode, the same section is looped, and each performance becomes its own MIDI region. This is generally used to work out parts or try new things. Because there’s no need to start and stop the recording process, the creative juices can keep flowing, and you can retrieve the serendipitous events later. We’ll cover both methods.
To build a part in Loop Playback mode
1. Create a new MIDI or instrument track, or select an existing track in your session.
2. In the Edit window, select the bars to be looped with the Selection tool (Figure 18.28).
Figure 18.28. The selected bars will be loop-recorded. Note that record-enable is active.
3. Record-enable the track either in the MIDI track channel strip or the Edit window, and select the MIDI input and output.
4. If you want to hear a lead in, set the pre-roll amount in the Transport window.
Click the Pre-Roll button to activate it.
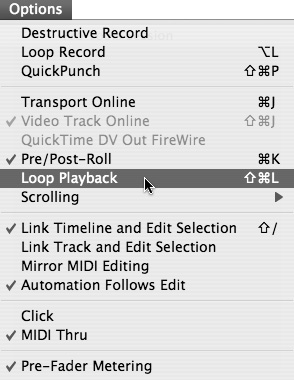
5. Select Options > Loop Playback to activate loop playback (Figure 18.29).
Figure 18.29. To build a MIDI part by looping, activate Loop Playback in the Options menu.
6. Click the MIDI Merge button to activate it (Figure 18.30).
Figure 18.30. The Transport window is set for loop-recording: MIDI Merge is on, the Play button displays the Loop Playback indicator, and pre-roll is set.

Each looped pass will add notes to the selected part in the MIDI track.
7. Click Record and then Play in the Transport window.
You can now add new MIDI notes and other data with each pass.
8. When you’re finished recording, click Stop.
To record multiple MIDI takes in Loop Record mode
1. Create a new MIDI track or select an existing track in your session.
2. Select a section for the looped takes with the Selection tool.
3. Record-enable the track, and select inputs and outputs.
4. Turn pre-roll on and set the pre-roll amount in the Transport window, if you’d like.
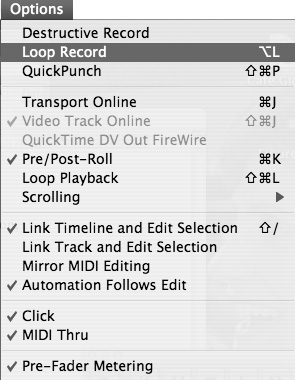
5. Select Options > Loop Record to activate loop-recording (Figure 18.31).
Figure 18.31. Activate Loop Record in the Options menu.
The Record button displays the Loop indicator (Figure 18.32).
Figure 18.32. The Transport window set for loop-recording.
6. Click Record and Play to begin tracking.
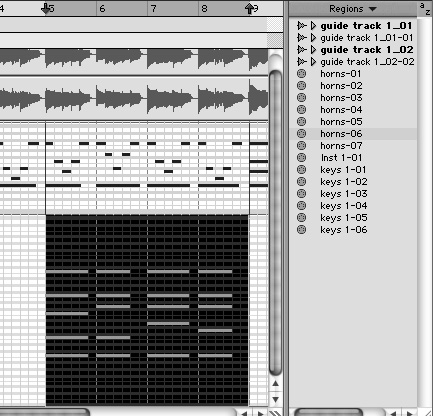
Each pass creates a new numbered MIDI region in the Regions list (Figure 18.33). (We’ll cover MIDI regions more in Chapter 19: Editing MIDI.)
Figure 18.33. Each loop-recorded take is now in the MIDI Regions list. Take 6 has been dragged to the playlist and is selected.
• You can move, edit, copy, or paste into the session any MIDI regions created by loop-recording. It edits like audio, but it’s MIDI. It is very helpful to do this in the Edit window with your track view set to Regions. In Regions view, you can cut and copy regions aligned to your Grid (Grid mode), which is easier to manage than in the Notes view.
• Because new MIDI regions are created with each loop in Loop Record mode, it’s impossible to merge MIDI data; therefore, MIDI Merge is disabled in Loop Record mode.
Sysex Data and Pro Tools
Many MIDI parameters are defined in the MIDI protocol. Volume, for instance, is always on controller 7. Although this standardization can be helpful for various tasks, vendors can define MIDI events and meszThis specialized MIDI data is called system exclusive, or sysex, data.
Sysex has all manner of uses for those willing to deal with it. One of the more common uses is to do a sysex dump, in which a MIDI device sends all of its current settings as sysex data. After it’s recorded into a Pro Tools session, the sysex data can be played back to the device to reset it to the correct state when you next work on that session.
To record sysex data into Pro Tools
1. Create a new MIDI track or select the track in which you want to record the sysex data.
2. Select the correct input in the Mix window for the device that will be sending sysex data.
3. Record-enable the track.
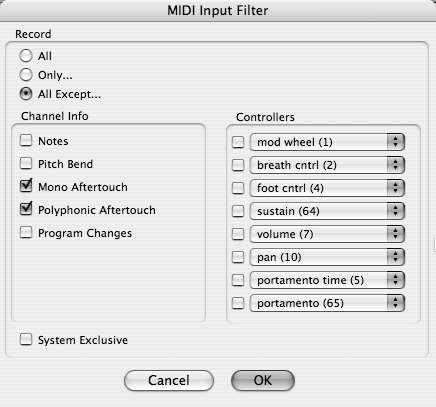
4. Select Setup > MIDI > Input Filter (Figure 18.34).
Figure 18.34. Select Setup > MIDI > Input Filter.

The MIDI Input Filter dialog box appears.
5. By default, Pro Tools allows sysex data to record.
Confirm that the System Exclusive option is deselected in the dialog box, and then click OK to close it (Figure 18.35).
Figure 18.35. Confirm that sysex will not be filtered out and can be recorded.
6. Click the Return to Zero button in the Transport window.
Sysex is almost always used to set up a MIDI device. Sysex data should be at the beginning of a track.
7. Click Record and then Play to begin recording.
8. Initiate a sysex dump on the MIDI device.
9. Click Stop when the device is finished sending MIDI.
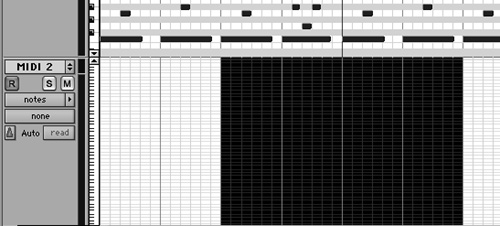
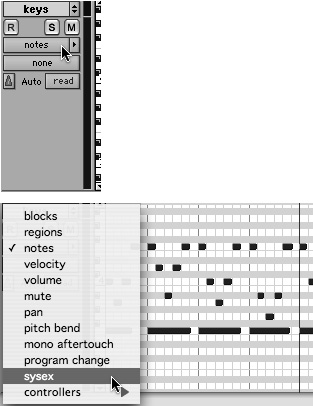
• Sysex data does not automatically display in the track where it’s recorded. Click the Track View pop-up menu and select sysex to see the data on the track (Figure 18.36).
Figure 18.36. Setting a track to view sysex data is the only way to confirm that everything was recorded properly.
• Every MIDI device has a different way of initiating a sysex dump. Many have a Vulcan Death Grip kind of thing where three buttons on different parts of the device have to be pushed at the same time. Many devices also have a command on their Global or MIDI menu. Check your device’s manual.
• Part of the beauty of sysex is that it gets around the need for saving presets or writing down parameters for an effect or a synthesizer. You can take your project to a different studio with the same gear, drench the studio with sysex, and voila! The devices in the studio are now set up just like your home studio was when the sysex was recorded.
• Sysex data can be extremely dense, and not all MIDI devices and interfaces deal with it very well. If, after a few tries, sysex isn’t recording correctly, you may need to resort to pencil and paper for parameter settings.
Working with MIDI Files
At some time, you may need to work with another sequencer—perhaps to transfer a part written in a different program or on a keyboard workstation into Pro Tools. Or, you might need to move Pro Tools MIDI tracks into a live situation or export MIDI from a Pro Tools session into another program.
To do this, you need to use a Standard MIDI File (SMF). There are two kinds of SMFs: Type 0 and Type 1. Type 0 SMFs save all MIDI channel data from a session into one MIDI track. When imported, a Type 0 SMF shows up as a single MIDI track. Type 1 SMFs save each channel of MIDI data from a session to a separate MIDI track. When imported, a Type 1 SMF is “exploded” to individual MIDI tracks.
Type 1 SMFs are by far the more popular way to move MIDI files around, but Type 0 files can be more efficient in some cases. For example, some hardware sequencers work better with Type 0 SMF files.
To import a MIDI file to a session
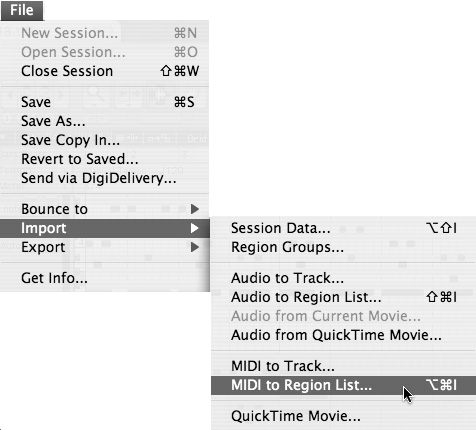
1. Select File > Import > MIDI to Track (Figure 18.37).
Figure 18.37. Select File > Import > MIDI to Track.

A standard dialog box opens.
2. Navigate to the file that you want to import.
3. Click Open.
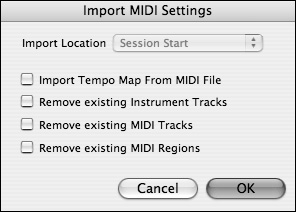
The Import MIDI Settings dialog box opens.
4. Choose whether you want to use the tempo from the file you’re about to import or use the tempo of the current Pro Tools session. Also, choose whether you want to keep or remove existing instrument tracks, MIDI tracks, and MIDI regions in the session (Figure 18.38).
Figure 18.38. Choose which tempo to use and which tracks to keep in the current session.
Pro Tools imports the MIDI file. If the file includes multiple tracks in a Type 1 SMF, each track will get its own MIDI track in the session. A MIDI region for each track appears in the Regions list.
6. Select the proper playback device and channel for each MIDI track in the Mix window.
• In some situations, you will not want to create new tracks for each track in a Type 1 SMF. For example, if you’ve created 32 drum patterns on a MIDI drum machine and want to try out a few of them, you can import a file directly to the Regions list without making a new track (Figure 18.39). After you import the file, you can drag the individual regions to tracks and edit them like any other MIDI region.
Figure 18.39. You can add a MIDI file to the Region list without creating a new track.
• In Pro Tools 7, you can import MIDI files by dragging them from a DigiBase browser in the same ways you can import audio files: Drag MIDI files to an empty space in the Edit window to create new tracks or drag them into the Regions list to import them without creating new tracks.
• As you import an SMF, it may require a little more effort to get it to play right. If you import an SMF with 16 instrument tracks, you’ll need to reassign each track to the proper MIDI device and the proper patch (sound). It’s a good idea to name the track with the sound and device/channel in the exporting program.
1. Select File > Export > MIDI (Figure 18.40).
Figure 18.40. Select File > Export > MIDI.

A standard dialog box opens.
2. Name the file and navigate to the folder where you want to save it.
3. Select an SMF file option from the pop-up menu (Figure 18.41):
Select 0 if you want to export the MIDI in your session as a single-track file.
Figure 18.41. Choose which type of SMF to export.

or
Select 1 if you want to export the MIDI in your session as a multiple-track file.
4. Click Save.