Chapter 4 Navigating Nautilus
Nothing on your computer is more important than data. Other than playing games (and even there), computers are about storing and dealing with information. That’s why being able to work well with that data—moving, copying, renaming, and deleting it—is vitally important to getting comfortable in your Linux world.
That means it is time to revisit your new old friend, Nautilus, the GNOME file browser.
There’s a saying in the Linux world that “everything is a file” (a comment attributed to Ken Thompson, the developer of UNIX). That includes directories. Directories are just files with lists of files inside them. All these files and directories are organized into a hierarchical file system, starting from the root directory and branching out.
![]() Note Folders and directories are the same thing. The terms can be used interchangeably. I tend to think of them as directories, but if you are more comfortable thinking of them as folders, don’t worry. Depending on the application, you’ll see both terms used.
Note Folders and directories are the same thing. The terms can be used interchangeably. I tend to think of them as directories, but if you are more comfortable thinking of them as folders, don’t worry. Depending on the application, you’ll see both terms used.
The root directory (referred to as slash, or /) is aptly named. If you consider your file system as a tree’s root system spreading out below the surface, you start to get an idea of just what things look like. Under the root directory, you’ll find folders called usr, bin, etc, tmp, and so on. Let’s open Nautilus and have a look at this structure.
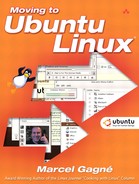
Click Places on your top panel and select Home Folder. This brings up the file browser in your home folder. If your navigation panel isn’t up (Nautilus’ left side panel), press <F9> to open it. You’ll see a number of entries, including your home directory. On the left, Nautilus shows a small list of important places on your system, primarily in your home folder. This side panel is the navigation panel. Pressing <F9> hides (or brings forward) the navigation panel. Beside the Places label, there is an arrow, alerting you to the fact that this is actually a button with a drop-down list of options. Click that button now and select Tree for your view. In all likelihood, you’ll see two entries: one for Home Folder and another for File System. To the left of each entry is a small arrow. Click the one beside File System (or double-click the folder) to get a top-down view of your Ubuntu Linux system (see Figure 4-1).
On the right, the contents of the current place (or location) are displayed. If this is a directory (like your home directory), the various directories will appear as folder icons. These are all system directories, and they will contain all the programs that make your Linux system run, including documentation, devices, and device drivers. For the most part, you aren’t going to be touching the files under File System. Accidentally changing things around in this part of your system probably isn’t a good thing (it could render your system inoperative), which is why everyone logs in with their own accounts.
![]() Tip When you look at your files and folders in Nautilus, they are arranged alphabetically. Usually, this is what you want, but you can also sort them by size, modification date, file type, and more. Just click View on the Nautilus menu bar and check out the Arrange Items submenu. You can even choose to arrange them manually.
Tip When you look at your files and folders in Nautilus, they are arranged alphabetically. Usually, this is what you want, but you can also sort them by size, modification date, file type, and more. Just click View on the Nautilus menu bar and check out the Arrange Items submenu. You can even choose to arrange them manually.
One of the directories under the root is called home and inside that directory, you’ll discover other directories, one for each login name on your system. These are the individual home directories, and it is where you’ll find your personal files and directories. If you want to store personal documents, music files, or pictures, this is the place. Once you are in Nautilus, you can jump to your home directory by clicking the Home icon or clicking Go on the menu bar and selecting Home (keyboard jockeys can just press <Alt+Home>). This is your $HOME.
![]() Quick Tip My use of
Quick Tip My use of $HOME isn’t just to be silly. The system can recognize some things based on environment variables, symbolic names that can refer to text, numbers, or even commands. In the DOS/Windows world, you had similar variables—for instance, the PATH in your AUTOEXEC.BAT file. $HOME is an environment variable assigned to every person who logs in. It represents a person’s home directory. If you want to see all the environment variables assigned to your session, shell out and type the following command:
env
Try this. Over on the left side of the Tree view, click the small arrow beside the home directory. As you saw earlier, the Tree view expands to show the folders in your own personal directory. Notice that the right-pointing arrow is now a down-pointing arrow. If you click it again, the directory view collapses. With the home directory expanded, click your personal directory. You should see a few items appear in the right-side view, including one icon labeled Desktop. For an example, see Figure 4-2. On the left side, the home folder is expanded, and the right-side view shows the same folder collapsed.

Before you do anything else, I want you to reopen Nautilus in your home folder (click Places and select Home Folder). There’s a very special folder there called Desktop. Now, look down in your bottom panel, over on the far left side of the screen. Do you see the Desktop icon there? It looks like an old-fashioned desktop blotter with a pencil and a piece of paper on it. Pause your mouse cursor over it, and the tooltip displays Click Here to Hide All Windows and Show the Desktop. Click it, and your desktop appears, free of windows. Click it again, and everything returns to normal.
Now, I’m going to briefly jump ahead in the book and have you create a folder on your desktop. Right-click anywhere on that empty desktop and a pop-up menu appears. The top entry in that menu is Create Folder. Click that and a folder appears on your desktop with the label Untitled Folder beneath it (see Figure 4-3). Type in a name and press <Enter>.

I am having you do this because I want you to remember something later when I have you create icons on your desktop. The desktop you are looking at when you work with your Ubuntu system is that Desktop folder in your home directory. If you create a folder on the desktop, use Nautilus to view your home folder, and then double-click the Desktop folder, you will see your newly created folder in the Desktop folder. The same is true for image files or songs or video clips. If it’s on your desktop, it’s in the Desktop folder. Even those icons on your desktop are files or directories. Cool? Let’s move on.
![]() Shell Out Open a terminal shell by selecting Terminal from the Accessories submenu under the top panel Applications menu. At the shell prompt, type
Shell Out Open a terminal shell by selecting Terminal from the Accessories submenu under the top panel Applications menu. At the shell prompt, type ls Desktop. The ls command lists the contents of your Desktop directory. Compare what you see there with the icons currently on your graphical desktop. Do the names look familiar? When you are done, type exit to close the terminal.
Directories (and subdirectories) usually show up as folders, although this isn’t a hard and fast rule because you can customize this. Nevertheless, some directories have different icons right from the start—the Desktop icon you just visited being one of them.
To move from folder to folder, you can simply click a folder in the Tree view or double-click a folder icon in the right pane or the Places view. You can also move around the directory tree by using your cursor keys. You’ll see the highlight bar move from directory to directory. To see the contents in the main window, move to a folder and press <Enter>. To go up a level in the directory tree (rather than folder by folder), press <Alt+Up Arrow>.
There’s another way, as well. If you look up at the menu bar, you’ll see an up arrow, a left-pointing arrow, and a right-pointing arrow (see Figure 4-4). Next to that is an icon to stop a listing (if it is taking a long time), to reload a location of folder, and finally, and icon labeled Home. Clicking that house icon always takes you back to your personal home directory. Clicking the up arrow moves you up the directory tree, and the left arrow takes you back to whatever directory you were last visiting.
![]() Tip When you look at your home folder using Nautilus, there are more files and folders than you actually see. So-called hidden files (those prefixed by a dot) aren’t shown in the default view. Star Trek fans can think of it as a cloaking device for files. To see all files, including hidden files, click View from the menu bar and select Show Hidden Files. Keyboard jockeys can just press <Ctrl+H> to cycle back and forth between the views.
Tip When you look at your home folder using Nautilus, there are more files and folders than you actually see. So-called hidden files (those prefixed by a dot) aren’t shown in the default view. Star Trek fans can think of it as a cloaking device for files. To see all files, including hidden files, click View from the menu bar and select Show Hidden Files. Keyboard jockeys can just press <Ctrl+H> to cycle back and forth between the views.
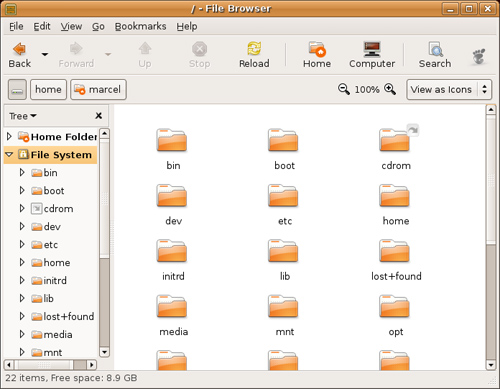
Sometimes, the quickest way to navigate your file system (assuming you know the folder you want to be in) is simply to type it in the location bar. Looking at Nautilus, you might be wondering where this location bar is. Click Go on the menu bar, then select Location (or press <Ctrl+L>). An empty field labeled Go To appears just below the navigation toolbar (see Figure 4-5). From here, you can type in whatever you want—for example, /home/marcel/Songs/Rock. Press <Enter> and the location bar vanishes.
Your Ubuntu Linux system may not have a lot of files in your home folder, but that won’t last long; I promise. There’s an old adage that suggests, “data will grow to fill all available disk space.” In my experience, that’s a fact. In time, that big drive of yours just won’t seem big enough.
This means that at some point, you are going to have some trouble finding the files you created. It’s a good thing Nautilus has a quick find built in. I’ve got a lot of music ripped on my Linux system (see Chapter 17). I like to listen to it when I work. Let’s pretend that I want to find out in which folder my Pink Floyd songs are stored. Just press <Ctrl+F> and a Search box appears. Type in some part of the filename you are searching for (for example, Pink Floyd) and press <Enter>. Nautilus displays the results in the main window (see Figure 4-6).

We should spend a couple of minutes looking at the left panel—or as I like to call it, the navigation panel. You’ve already seen how to use it to switch from a Places view to a Tree view of your file system. But wait (as they say on television), there’s more. As you recall, there is a drop-down list that lets you change the way you look at your system. I’ve already had you switch from Places view to Tree view and that has affected how you navigate your file system. However, there are other interesting options in that list and I’d like to look at them now (see Figure 4-7).

Because we’ve already covered Places and Tree, I’m going to continue with Information. When you click here, the side window displays information about the current folder. That includes the name of the folder, its icon (you can change the default icon for each folder, which is covered later), the number of items in that folder, and the date it was last modified (when files were added or removed).
The next possible selection is History. Clicking here shows you recent folders you have visited (in the order you visited them), network folders, FTP sites, and any searches you may have performed. This last item is particularly cool because if you need to, you can revisit a particular search by double-clicking it in the history listing. The same holds true for folders. Double-click and there you are.
![]() Tip If you want to be able to quickly come back to a particular folder or site, you can bookmark that location by clicking Bookmarks on the menu bar and selecting Add Bookmark (you can also press <Ctrl+D>). To go back to a bookmark, click Bookmarks again and select it with a click.
Tip If you want to be able to quickly come back to a particular folder or site, you can bookmark that location by clicking Bookmarks on the menu bar and selecting Add Bookmark (you can also press <Ctrl+D>). To go back to a bookmark, click Bookmarks again and select it with a click.
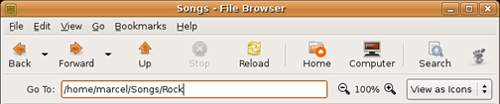
Now, we come to Notes. With every folder, you can add notes about the content. This is free-form text that helps you identify the contents or alert you that there is something of note there. For instance, let’s say you’ve got a folder named Holiday Shots and inside that folder is where you keep those really embarrassing photos from the company Christmas party. You might want to add a note to that effect as a reminder a few months later. When you do that, a small note appears to be pinned to your folder (see Figure 4-8).
This little added decoration on the folder segues very nicely into the last choice in our little side panel list, and that’s the Emblems selection. Click here and the side panel fills up with a list of graphical icons (see Figure 4-9). These are designed to give you a quick way to identify the importance or relevance of a particular file or folder.

All you have to do is click one of those icons and drag it over to a file or folder. There are tons of these emblems with names like Art, Certified, Cool, Favorite, Important, Oh No!, and more. Should you find that you have added too many emblems (since you are doing that right now!), drag the Erase icon (located at the top of the list) onto your file or folder. The emblems you added there vanish.
When I was telling you about history and bookmarks, I casually tossed out the idea that you could use Nautilus to visit FTP sites and other network locations, including Windows shares, WebDAV servers, and more. To establish a network connection, click File on the Nautilus menu bar and select Connect to Server. A connection dialog appears, from which you can establish your connection (see Figure 4-10).
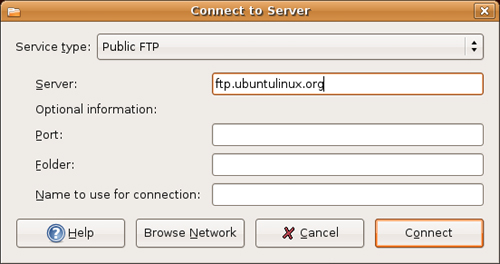
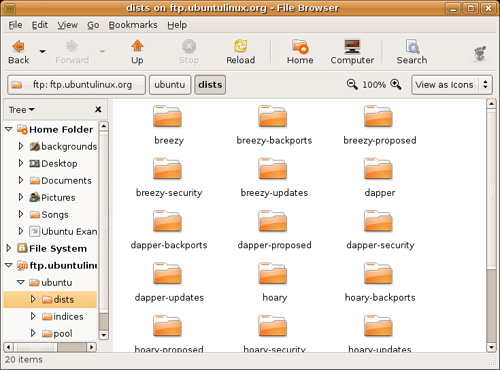
Next to the Service Type label, there is a drop-down box from which you can select the type of server. Your options are SSH, Public FTP, FTP (with login), Windows share, WebDAV, secure WebDAV, and custom location. For this example, let’s choose a public FTP server, one with an anonymous login. In the Server field, enter the name of the server you are trying to connect to (for example, ftp.ubuntulinux.org). That’s really all you need to do. Click Connect and Nautilus opens that network folder (see Figure 4-11). Navigation of that remote folder is the same as it would be on your own system.
Another way to do this is to click Go on the menu bar, then select Location (or press <Ctrl+L>. I told you about this a little earlier for local folders but it works here as well. To get to the same FTP site, you could type the following URI (Universal Resource Identifier) in the location field.
ftp://[email protected]/
The best way to discover the format of these connections is to connect to a network resource, then press <Ctrl+L>. The current URI will be visible.
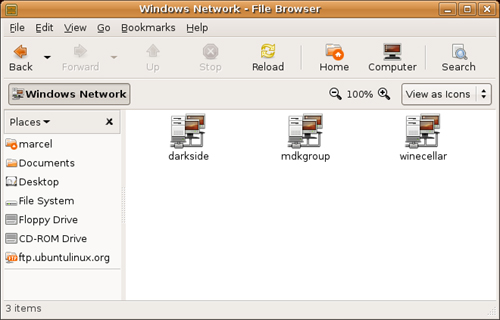
Another way to access network resources is to select Network Servers from the Places menu. This is particularly useful if you have Windows machines connected into your network. A Nautilus window appears with a Windows Network icon. Double-click that icon and the Windows domains and workgroups on your network appear (see Figure 4-12). Double-click any of the workgroup icons and you can browse individual machines in that workgroup.
To get to the Windows share browser directly, press <Ctrl+L> in any Nautilus window, then enter smb:/// in the Location field.
You can create, copy, move, rename, and delete files and directories by using Nautilus, but before you can do any of these things, you need to select a file or directory. Selecting files is something you will be doing a lot, so let’s start with that. Place your mouse cursor just outside one of the icons of your choosing. Now, drag the cursor across the icon and notice the highlight box you are creating as you drag. You’ll know a file is selected because it becomes highlighted. Right-clicking also selects a file but in a somewhat different way, bringing up a menu dialog that then asks you what you want to do with that file.
Don’t forget your cursor keys either. Moving left, right, up, or down highlights whatever file or directory you happen to be sitting on. You can then click on Edit in the menu bar (or press <Alt+E> to get to the Edit menu) and decide what it is you want to do with the file. I’ll talk about those decisions in a moment.
Sometimes, one file just isn’t enough—you need to select multiple files. The easiest way of all is with the mouse. Left-click to the top and left of the icon you want to start with, then drag your cursor across a series of icons. Notice again the highlight box that surrounds the files and directories you select. Perhaps you just want a file here and a file there. How do you pick and choose multiple files, you ask? Simply hold down the <Ctrl> key and click with the mouse. Let’s say that you have selected a group of four files, and you want one further down in your directory. Let go of the mouse button (but keep holding down the <Ctrl> key), position your mouse to the top and left of the next group of icons, and select away. As long as you continue to hold down the <Ctrl> key, you can pick up and select files here and there at will.
It is also possible to do all these things with the cursor keys by simply moving your cursor over the file you want to start with, holding down the <Shift> key, and moving the cursor to the left (or whatever direction you like). As you do this, you’ll notice file after file being selected. Try it for yourself. For nonsequential selection, use the <Ctrl> key as you did with the mouse. Select (or deselect) the files by pressing the spacebar. When your cursor is sitting on the file you want, press the spacebar, and your files will be highlighted.
Finally, and probably quite important for the future, you can also select by extension. Let’s say that you want to select all the files with an .mp3 or .doc extension in your directory. Click Edit on the menu bar, then click Select Pattern. A small window pops up, asking you for an extension. If you want all the .mp3 files, you enter *.mp3. The .mp3 extension limits your selection to a certain type of file, whereas the asterisk says, “give me everything” that matches.
If you aren’t already running Nautilus, start it up now and make sure you are in your personal home directory. In the main Nautilus window, right-click any blank area and look at the menu that pops up. Click the first item on that menu, conveniently labeled Create Folder. Of course, this is a refresher of what I told you earlier in the chapter, but instead of your desktop, this is happening inside the main Nautilus window. An Untitled Folder appears waiting for you to give it a more appropriate name. This folder can be pretty much anything you like. If this directory will house your music files, perhaps its name should be Music.
![]() Tip Cool trick time. Earlier I had you create a folder on the desktop, then look at the Desktop folder in Nautilus. Why not double-click on the Desktop folder in Nautilus, create a folder, then go back and look at your desktop?
Tip Cool trick time. Earlier I had you create a folder on the desktop, then look at the Desktop folder in Nautilus. Why not double-click on the Desktop folder in Nautilus, create a folder, then go back and look at your desktop?
Just remember that you can create folders inside other folders, and you can start organizing things in a way that makes sense. For instance, you might want to create folders called Rock, Jazz, Hip Hop, and Classical in your Music folder.
You created a folder called Classical, and you really meant Opera. To rename a file or directory, select it, right-click to get the menu, and then choose Rename. The name is highlighted under the appropriate icon—just type the new name and press <Enter>. Alternatively, select it and choose Rename from the Edit menu in the menu bar. The easiest way of all is to press <F2> after you have selected the file or directory.
![]() Shell Out Open a terminal shell and type
Shell Out Open a terminal shell and type ls to see your directories. Renaming a file or directory from the shell is easy using the mv command. Why move to rename? Because renaming involves copying to a new location first, then deleting the old file. Type mv oldname newname and press <Enter>. For instance, to change your Classical directory to Opera, you would type the following command:
mv Classical Opera
Ah! This is where you learn another great trick with Nautilus. An easy way to copy a file from one directory to another is to fire up two versions of Nautilus. (I usually close the side navigation panel in one version.) You can also right-click a folder in the Tree view and select Open in New Window from the pop-up menu. In the first window, you find the file (or files) you want to copy. In the second Nautilus window, you locate the directory to which you want those files copied. Hold down the <Ctrl> key and simply drag the file from one window into the other. Your file is copied.
Copying and moving files is similar, but instead of holding down the <Ctrl> key, you just drag the file or folder into the new location. Both copying and moving involve a copy. The difference is in what happens after the copy is done. In one case, you copy the file over and keep the original, thus giving you two copies of the same file but in different places. A move, on the other hand, copies the file and deletes the original from where it was.
Here’s an interesting trick for you. Click the file or folder you want to move, then before you drag it anywhere, hold down the <Alt> key. A little menu pops up, asking whether you want to copy the file here or move it here (see Figure 4-13).
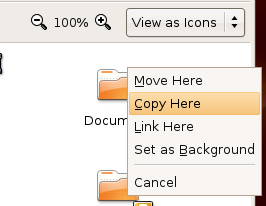
Another easy trick is to select the file you want, right-click to get the menu, and then click Copy. Now, go into the folder where you would like this file to appear, right-click somewhere on a blank space of Nautilus’ main window, and click Paste from the pop-up menu. You can also specify the Copy and Paste options from the menu bar under Edit.
![]() Shell Out The Linux command to copy is
Shell Out The Linux command to copy is cp. If you want to copy a file called big_report to notsobig_report, you would type the following command:|
cp big_report notsobig_report
If you want to play it safe when copying files, use the -i flag and the cp program will warn you before it overwrites another file by the same name.
cp -i big_report notsobig_report
If you’re following along, you probably noticed that the pop-up menu for dragging and dropping a file offered a Link Here option. A link is a kind of copy that doesn’t take up much space. In the world of that other OS, you probably thought of links as shortcuts. Links let you create a pseudo-copy of a file or directory that doesn’t take up the space of the original file. If you want a copy of a particularly large file to exist in several places on the disk, it makes more sense to point to the original and let the system deal with the link as though it were the original. It’s important to remember that deleting a link doesn’t remove the original file, just the link.
Let’s say that you copy a file by holding down the <Alt> key and that you select Link Here from the pop-up menu. When the icon shows up on your desktop, there is a little arrow in the top-right corner of the icon indicating that this is a link. The full path to the file is the name or the file you just linked to.
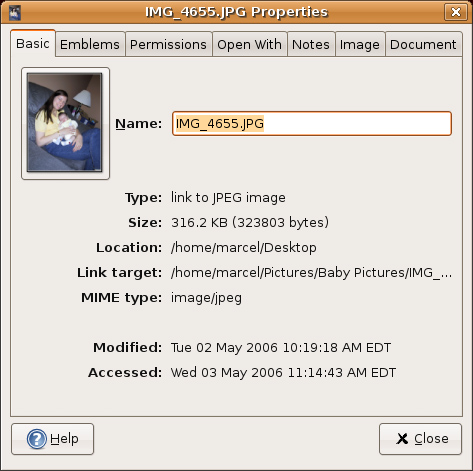
If you want to see a different name for this file, right-click the link you just created and select Properties. A dialog appears with seven tabs, the first of which is labeled Basic, which holds the link name (see Figure 4-14). Emblems, the second tab, allows you to select and add emblems (which I covered earlier) from the Properties dialog. Permissions represents security-related information. Open With lets you specify the default application that opens this file when you double-click it. Notes allows you to attach comments to files or folders. Finally, the Image and Document tabs are strictly informational.
![]() Tip You can change the properties of any file or folder, not just links, in this way. The number of tabs, however, may vary depending on the file type or whether you are dealing with folders or files.
Tip You can change the properties of any file or folder, not just links, in this way. The number of tabs, however, may vary depending on the file type or whether you are dealing with folders or files.
On the Basic tab, you should see an icon next to the name of the file you are linking to. If the file is an image, you’ll see a thumbnail, as in Figure 4-14. You can change that icon by clicking it and selecting a new one using the Select Custom Icon dialog that appears (see Figure 4-15). The idea here is that you navigate your disk looking for an icon that suits you. To make that job a little easier, there’s a preset location on the left for pixmaps. Click here and you are taken to the part of your system where icons are generally stored.
To see if an icon is right for you, click the icon in the main listing (center) and look to the right in the preview area. When you have something that appeals to you, either double-click it, or click the Open button.
This is your first look at Linux security—this time at the file (or directory) level. Under that Permissions tab, you’ll see a list of access permissions (see Figure 4-16).

This is how you go about changing permissions on a file, making it executable or providing read and write access to another user (for a more detailed exploration of file permissions, see Chapter 21). There are, however, a couple of other ways to identify file permissions that don’t involve opening up a properties dialog for every file. When you look at your file listing in the main Nautilus window, you see a name listed under the file or folder and nothing else. Try this.
Click Edit on the Nautilus menu bar and select Preferences. A five tabbed window appears. Click the Display tab and look near the top under the Icon Captions header. There are three buttons, each of which is a drop-down list. The first has None selected. Change that to Permissions (as you can see, there are several options here). Instantly, any file displayed in the main Nautilus window will have the permissions listed next under the name.
Before you click Close, click the List Columns tab. This defines what information gets listed when you choose Nautilus’ list view as opposed to the icon view. Click Permissions here and then click Close. Look at the Nautilus menu bar on the far right. Directly below the icon bar on the right, there’s a button labeled View as Icons. Click this button and a drop-down list appears allowing you to change the view from icons to text (see Figure 4-17).
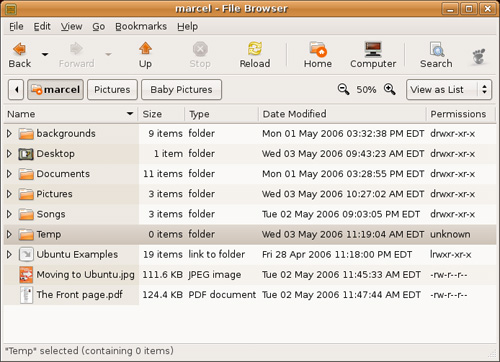
There are actually 10 columns describing permissions for a file. For the most part, you’ll see either a hyphen or a d in the first column, representing a directory. The next nine columns are actually three sets of three columns. Those other nine characters (characters 2 through 10) indicate permissions for the user or owner of the file (first three), the group (second group of three), and others or everyone else (last three). If you look at an image and see -rw-rw-r--, you’ll see that the user and group have read and write permissions. All others have read-only permission, the same permission everyone else has. The r stands for read, the w for write, and the x (not seen above) for executable.
![]() Shell Out Want to see the permissions at the shell prompt? Simply add
Shell Out Want to see the permissions at the shell prompt? Simply add -l to the ls command, like this:
ls -l directory_name
From time to time during your Linux experience, you have to change permissions, sometimes to give someone else access to your directories or files or to make a script or program executable. By using the Permissions tab, you can select read, write, or execute permissions for the owner (yourself), the group you belong to, and everyone else by checking off the permissions in the appropriate check boxes.
Every once in a while, a file or directory has outlived its usefulness. It is time to be ruthless and do a little cleaning of the old file system.
As you’ve no doubt come to expect, there are several ways to get rid of an offending file or directory. The friendliest and safest method is to drag the file from Nautilus to the wastebasket icon over on the right side of your lower panel. For the novice, this is a safer method because items sent to the trash can be recovered—until you take out the trash, that is. Until that time, you can click the trash can icon and (you guessed it) a Nautilus window appears, showing you the items you have sent to the trash. These items can then be moved (or copied) back to wherever you need them. To remove files from the trash permanently, right-click the trash can icon and click Empty the Wastebasket.
I did say that there are other ways of deleting a file. From inside Nautilus, you can select a file or directory, right-click, and select Move to Wastebasket. There’s also the command line if you need a break from all that clicking.
You now have a pretty good grasp of Nautilus and what it can do for you. Starting from the Places menu on the top panel is the best way to take Nautilus where you want it to go. There are, or can be, some other interesting places in that menu.
For instance, select Computer from the Places menu and Nautilus opens up with a bird’s eye view of your system. A Filesystem icon starts you at the top level of your file system tree. Your floppy drive appears here as does another icon representing your CD-ROM or DVD drive. There can be several icons depending on how many drives are on your system (see Figure 4-18). These days, it’s not unusual for people to carry around a USB key or USB pen drive. If you plug one of these in to your Ubuntu system, it becomes one of the interesting places you can visit.

I’m hoping that you are walking away from this chapter with an appreciation for the power and flexibility of the tools you have at your disposal. Nautilus may well become your most important application by the time you are finished reading this book. I’ve barely touched on some of its capabilities. Never fear; you’ll see more of Nautilus as we progress through the book. From the file browser, you can play music, launch video clips, read PDF files, burn a CD, and more.
By now, you’re starting to feel like this isn’t so difficult after all. In fact, it’s probably starting to feel pretty familiar. After all, there are many similarities in desktop environments, and working with GNOME isn’t like working in a totally alien environment. Well, it’s time to make your new virtual home even more of a home. It is time to personalize your desktop experience.
In the next chapter, we’ll talk about changing your background, adding icons, setting up a screensaver, and all those other things that help make your desktop yours and yours alone.