Chapter 21 Taking Command of Ubuntu Linux
Think of this chapter as an extended Shell Out section. That means it is time to transform you into a master or mistress of the shell. In deciding to join me here, you have identified yourself as one of the bold and curious explorers who really wants to know his Linux systems. Sure, it is possible to work day in and day out with your Linux system and rarely use the command line, but the command line is power. Your reward for continuing to this next level is a deeper understanding of your system and the power to make it do whatever you want.
The things I want to talk about here are basic commands that will serve you well throughout your time with Linux. One of the things I hope to show you is how flexible some of these commands are. With most, you can modify the basic function with command-line switches, flags, or options, and thereby have them yield far more information than a simple execution of the command itself. A little thirst for exploration will open you up to the real potential of everyday commands.
Before I wrap up this chapter, I will also cover editors. Editors aren’t a luxury or an option but an eternal necessity in the life of the system administrator. Every once in a while, you will have to edit some configuration file or other in order to get your work done. I’ll give you some pointers for making this as simple and painless as possible.
When you talk about commands, it invariably means working at the shell level: the command prompt. That’s the dollar sign prompt ($), and it is common to many command shells. Some of the commands I will give you require administrative privileges. When this is necessary, I’ll have you type sudo before the command, at which point you will be asked for your password. It is possible to maintain administrative privileges over the course of several commands by typing sudo -i. When you are running in admin mode, you will see a different prompt (#), which goes by many names. In North America, we call it the pound sign or the hash mark. My English lit friends tell me it’s an octothorpe. Others call it the tic-tac-toe board.
To exit admin mode, you just type exit. However, in my examples, I’ll prepend all admin commands with sudo. Whether you choose to enter an extended admin session is something I leave up to you. That said, for most of this chapter, a non-admin, dollar-sign prompt ($) is the way to go. Never run as the administrator unless you need to.
If you are running from a graphical environment, as you likely are, start a Terminal session by clicking Applications on the top panel, and selecting Terminal from the Accessories submenu. The GNOME terminal program supports tabbed shells so you can run multiple shell sessions from one terminal window (see Figure 21-1). Just click File on the menu bar and select Open Tab. You can then click back and forth from one shell to the other. You can even cut and paste between sessions. This is very handy if you are working on multiple systems.

As you work your way through this chapter, you’ll notice that I toss in little boxes like the one that follows. If these commands are not already in your arsenal, spend a few minutes playing with them and finding out what they do.

Let me tell you the secret of computers, operating systems, and the whole industry that surrounds these things: Everything is data. Information is the be all and end all of everything we do with computers. Files are the storehouses for that information and learning how to manipulate them, use and abuse them, and otherwise play with them will still be the point of computers twenty years from now.
The next thing I want to talk about is the three most overlooked files on your system: standard in, standard out, and standard error. A facility in manipulating these “files” will provide you with amazing flexibility when it comes to doing your work.
Valid filenames may contain almost any character. You do have to pay some attention to the names you come up with. Your Linux system allows filenames up to 255 characters in length. How you define filenames can save you a lot of hassle, as I will soon demonstrate.
Some valid filename examples include the following:
fish
duck
program_2.01
a.out
letter.to.mom.who.I.dont.write.often.enough.as.it.is
.bash_profile
Notice the last name in particular. It starts with a dot (or a period, if you prefer). Normally, this type of file is invisible with a default listing. Starting a filename with a dot is a way to make a file somewhat invisible. This is good to know if you don’t want to burden file listings with a lot of noise. It is also the way that a cracker might hide her tracks should she break into your system—by creating a directory that starts with a dot. To see these so-called dot files, use the ls command with the -d flag (ls -d).
The ls command seems so simple, and yet it has a number of options that can give you tons of information. Change to something like the /etc directory and try these options:
cd /etc
ls --color
ls –b
ls –lS
ls –lt
The first listing shows different types of files and directories in color. The second (-b) shows octal representations for files that might have been created with control characters. Depending on the terminal you are using, the default is to show question marks or simply blanks. If you need to access (or delete) the file, it helps to know what it is really called. The third and fourth options control sorting. The -ls option gives you a long listing (lots of information) sorted by file size. The last option (-lt) sorts by time with the newest files at the top of the list and the oldest at the bottom.
Metacharacters are special characters that have particular meaning to your shell—the dollar sign or hash mark prompt where you do your work. The two metacharacters I want to look at are the asterisk and the question mark. The following is what they mean to the shell:
* Match any number of characters
? Match a single character
Extending our talk of listing files, you could list all files containing ackle by using this command:
$ ls *ackle*
hackle hackles tackles
Similarly, you could find all the words that start with an h like this:
$ ls h*
hackle hackles
Now, if you want to see all the seven-letter words in your directory, use this command:
$ ls ???????
hackles tackles
Each question mark represents a single letter position.
In Chapter 4, I showed you how to look at file permissions with Nautilus. When you use the ls -l command, you are doing the same thing; look at basic Linux security at the file (or directory) level. Here is an example of a long ls listing:

The first entry under the total column shows a directory (I’ll talk about the next nine characters in a moment). The first character is a d, which indicates a directory. At the end of each line, you find the directory or filename—in my example, they are presents, wishlist, and griflong. Because the first character in the permissions field is d, presents is a directory.
The other nine characters (characters 2 through 10) indicate permissions for the user or owner of the file (first three), the group (second group of three), and others or everyone else (last three). In the first line, user root has read (r), write (w), and execute (x) permissions, whereas the system group has only read and execute. The three dashes at the end imply that no one else has any permissions. The next two files are owned by the user called zonthar.
![]() Quick Tip Remember user, group, and other (
Quick Tip Remember user, group, and other (ugo). You will find them useful later when I cover changing file and directory permissions.
When you take your first look at valid filenames, remember that I mentioned that files starting with a period are hidden. As a result, creating directories or files in this way is a favorite trick of system crackers. Get used to the idea of listing your directories and files with a -a option so that you see everything that’s there. Look for anything unusual.
Keep in mind, however, that a number of applications create dotted directory names in your home directory so that you are generally not burdened with seeing all these configuration areas. That’s great, except that you should know what you’ve got on your disk. Always balance your need for convenience with a healthy curiosity. A quick ls –a in your home directory shows you some files (and directories) you will become very familiar with as time goes on. Here is an example of what you will see:
.Xauthority .bash_history .bash_profile .gnupg .gnome2
Every once in a while, you do a listing of your directory and some strange file appears that you just know isn’t supposed to be there. Don’t panic. It’s not necessarily a cracker at work. You may have mistyped something and you just need to get rid of the error. The problem is that you can’t. Case in point: I accidentally created a couple of files with hard-to-deal-with names. I don’t want them there, but trying to delete them does not work. Here are the files:
-another_file
onemorefile
Here’s what happens when I try to delete them:
$ rm -another_file
rm: invalid option -- a
Try 'rm --help' for more information.
What about that other file?
$ rm onemorefile
rm: cannot remove 'onemorefile': No such file or directory
The problem with the first file is that the hyphen makes it look like I am passing an option to the rm command. To get around this problem, I use the double-dash option on the rm command. Using two dashes tells the command that what follows is not an option to that command. Here I go again:
$ rm -- -another_file
$
Bravo! By the way, this double-dash syntax applies to many other commands that need to recognize potentially weird filenames. Now, what about the second file? It looked fine, didn’t it? If you look very closely, you see that there is a space in front of the leading o, so simply telling rm to remove the file doesn’t work either, because onemorefile is not the filename. It is actually “onemorefile” (preceded by a space). So, I need to pass the space as well; to do that, I give the full name (space included) by enclosing the filename in double quotes.
$ rm " otherfile"
$
When you delete a file with Linux, it is gone. If you didn’t really mean to delete (or rm) a file, you quickly find out if you have been keeping good backups. The other option is to check with the rm command before you delete a file. Rather than simply typing rm followed by the filename, try this instead:
rm -i file_name1 file_name2 file_name3
The -i option tells rm to work in interactive mode. For each of the three files in the example, rm pauses and asks if you really mean it.
rm : remove 'file_name1'?
If you like to be more wordy than that, you can also try rm --interactive file_name, but that goes against the system administrator’s first principle.
![]() System Administrator’s First Principle Simplifying things. If your solution makes things more complicated, something has gone terribly wrong.
System Administrator’s First Principle Simplifying things. If your solution makes things more complicated, something has gone terribly wrong.
Of course, in following the system administrator’s first principle, you could remove all the files starting with the word file by using the asterisk:
rm -i file*
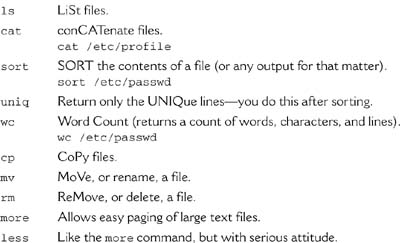
You might find that you want to use the -i option every time you delete something, just in case. It’s a lot easier to type Y in confirmation than it is to go looking through your backups. The problem is that you are adding keystrokes, and everyone knows that system administrators are notoriously lazy people. Then, there’s that whole issue of the first principle—that’s why we shortened list to ls, after all. Don’t despair, though—Linux has a way. It is the alias command.
alias rm='rm -i'
Now, every time you execute the rm command, it checks with you beforehand. This behavior is only in effect until you log out. If you want this to be the default behavior for rm, you should add the alias command to your local .bashrc file. If you want this to be the behavior for every user on your system, you should add your alias definitions to the system-wide version of this file, /etc/bashrc, and save yourself even more time. There may already be alias definitions set up for you, even if only one or two. The first way to find out what has been set up for you is to type the alias command on a blank line.
$ alias
alias ls='ls --color=auto'
Using the cat command, you can look in your local .bashrc file and discover the same information.
marcel@ubuntu:~$ cat .bashrc
# enable color support of ls and also add handy aliases
if [ "$TERM" != "dumb" ]; then
eval "`dircolors -b`"
alias ls='ls --color=auto'
#alias dir='ls --color=auto --format=vertical'
#alias vdir='ls --color=auto --format=long'
fi
# some more ls aliases
#alias ll='ls -l'
#alias la='ls -A'
#alias l='ls -CF'
As you can see, there are other suggested aliases that you can uncomment by removing that leading hash mark. Incidentally, here are a few I like to add to everyone’s .bashrc file (or to the global /etc/bash.bashrc):
Isn’t this interesting? Notice the two other commands here, the cp (copy files) and mv (rename files) commands, both of which have the -i flag as well. They too can be set to work interactively, requiring your verification before you overwrite something important. Let’s say that I want to make a backup copy of a file called important_info using the cp command.
cp important_info important_info.backup
Perhaps I am actually trying to rename the file (rather than copy it). For this, I would use the mv command.
mv important_info not_so_important_info
The only time you would be bothered by an “Are you sure?” type of message is if the file already existed. In that case, you would get a message like the following:
mv: overwrite 'not_so_important_info'?
Inevitably, you’re next question is this: What do you do if you are copying, moving, or removing multiple files and you don’t want to be bothered with being asked each time when you’ve aliased everything to be interactive? Use the -f flag, which, as you might have surmised, stands for force. Once again, this is a flag that is quite common with many Linux commands—either a -f or a --force.
Imagine a hypothetical scenario in which you move a group of log files daily so that you always have the previous day’s files as backup (but just for one day). If your mv command is aliased interactively, you can get around it like this:
mv -f *.logs /path_to/backup_directory/
![]() Musing Yes, I know that
Musing Yes, I know that mv looks more like move than rename. In fact, you do move directories and files using the mv command. Think of the file as a vessel for your data. When you rename a file with mv, you are moving the data into a new container for the same data, so it isn’t strictly a rename—you really are moving files. Looking at it that way, it doesn’t seem so strange. Sort of.
The reverse of the alias command is unalias. If you want your mv command to return to its original functionality, use this command:
unalias mv
It may sound complicated, but it isn’t. Standard in (STDIN) is where the system expects to find its input. This is usually the keyboard, although it can be a program or shell script. When you change that default, you call it redirecting from STDIN.
Standard out (STDOUT) is where the system expects to direct its output, usually the terminal screen. Again, redirection of STDOUT is at the discretion of whatever command or script is executing at the time. The chain of events from STDIN to STDOUT looks something like this:
standard in -> Linux command -> standard out
STDIN is often referred to as fd0, or file descriptor 0, whereas STDOUT is usually thought of as fd1. There is also standard error (STDERR), where the system reports any errors in program execution. By default, this is also the terminal. To redirect STDOUT, use the greater-than sign (>). As you might have guessed, to redirect from STDIN, you use the less-than sign (<). But what exactly does that mean? Let’s try an experiment. Randomly search your brain and pick a handful of names. Got them? Good. Now type the cat command and redirect its STDOUT to a file called random_names.
cat > random_names
Your cursor just sits there and waits for you to do something, so type those names, pressing <Enter> after each one. What’s happening here is that cat is taking its input from STDIN and writing it out to your new file. You can also write the command like this:
cat - 1> random_names
The hyphen literally means standard in to the command. The 1 stands for file descriptor 1. This is good information, and you will use it later. Finished with your random names list? When you are done, press <Ctrl+D> to finish. <Ctrl+D>, by the way, stands for EOF, or end of file.
Marie Curie
Albert Einstein
Mark Twain
Wolfgang Amadeus Mozart
Stephen Hawking
Hedy Lamarr
^D
If you cat this file, the names are written to STDOUT—in this case, your terminal window. You can also give cat several files at the same time. For instance, you could do something like this:
cat file1 file2 file3
Each file would be listed one right after the other. That output could then be redirected into another file. You could also have it print out the same file over and over (cat random_names random_names random_names). cat isn’t fussy about these things and deals with binary files (programs) just as quickly. Beware of using cat to print out the contents of a program to your terminal screen. At worst, your terminal session locks up or rewards you with a lot of beeping and weird characters.
![]() Quick Tip If you get caught in such a situation and all the characters on your screen appear as junk, try typing
Quick Tip If you get caught in such a situation and all the characters on your screen appear as junk, try typing echo and then pressing <Ctrl+V> and <Ctrl+O>. If you can still type, you can also try typing stty sane and then pressing <Ctrl+J>. This works on every system, but some systems, including your Ubuntu system, also provide a command called reset, which returns your terminal session to some kind of sane look.
Redirecting STDIN works pretty much the same way, except that you use the less-than sign instead. Using the sort command, let’s take that file of random names and work with it. Many commands that work with files can take their input directly from that file. Unless told otherwise, cat and sort will think that the word following the command is a filename. That’s why you did the STDIN redirection thing. Yes, that’s right: STDIN is just another file. Sort of.
sort random_names
Of course, the result is that you get all your names printed out in alphabetical order. You could have also specified that sort take its input from a redirected STDIN. It looks a bit strange, but this is perfectly valid.
marcel@ubuntu:~$ sort < random_names
Albert Einstein
Hedy Lamarr
Marie Curie
Mark Twain
Stephen Hawking
Wolfgang Amadeus Mozart
One more variation involves defining your STDIN (as you did previously) and specifying a different STDOUT all on the same line. In the following example, I redirect from my file and redirect that output to a new file:
sort < random_names > sorted_names
Sometimes, the thing that makes the most sense is to feed the output from one command directly into another command without having to resort to files in between at every step of the way. This is called piping. The symbolism is not that subtle: Imagine pieces of pipe connecting one command with another. Not until you run out of pipe does the command’s output emerge. The pipe symbol is the broken vertical bar on your keyboard usually located just below or (depending on the keyboard) just above the Enter key and sharing space with the backslash key. Here’s how it works:
cat random_names | sort | wc –w > num_names
In the preceding example, the output from the cat command is piped into sort, whose output is then piped into the wc command (that’s word count). The -w flag tells wc to count the number of words in random_names. So far, so good.
That cat at the beginning is actually redundant, but I want to stack up a few commands for you to give you an idea of the power of piping. Ordinarily, I would write that command as follows:
sort random_names | wc –w > num_names
The cat is extraneous because sort incorporates its function. Using pipes is a great timesaver because you don’t always need to have output at every step of the way.
Suppose that you want to send the output of a command to another command, but you also want to see the results at some point. Using the previous word count example, if you want a sorted list of names, but you also want the word count, you might have to use two different commands: one to generate the sorted list and another to count the number of words. Wouldn’t it be nice if you could direct part of the output one way and have the rest continue in another direction? For this, use the tee command.
sort random_names | tee sorted_list | wc –w > num_names
The output from sort is now sitting in a file called sorted_list, whereas the rest of the output continues on to wc for a word count.
What about STDERR? Some commands (many, in fact) treat the error output differently than the STDOUT. If you are running the command at your terminal and that’s all you want, there is no problem. Sometimes, though, the output is quite wordy and you need to capture it and look at it later. Unfortunately, using the STDOUT redirect (the greater-than sign) is only going to be so useful. Error messages that are generated (such as warning messages from a compilation) go to the terminal as before. One way to deal with this is to start by redirecting STDERR to STDOUT, and then redirect that to a file. Here’s the line I use for this:
command_name 2>&1 > logfile.out
Remember that file descriptor 2 is STDERR and that file descriptor 1 is STDOUT. That’s what that 2>&1 construct is all about. You are redirecting fd2 to fd1 and then redirecting that output to the file of your choice. Using that program compilation example, you might wind up with something like this:
make –f Makefile.linux 2>&1 > compilation.output
If the command happens to be verbose by nature and doesn’t have a quiet switch, you can redirect that STDOUT and STDERR noise to what longtime Linux users like to call the bit bucket, a special file called /dev/null—literally, a road to nowhere. Anything fed to the bit bucket takes up no space and is never seen or heard from again. When I was in school, we would tell people to shut up by saying, “Dev null it, will you?” As you can see, we were easily amused.
To redirect output to the bit bucket, use the STDOUT redirection.
command –option > /dev/null
If, for some strange reason, you want to sort the output of the random_names files and you do not want to see the output, you can redirect the whole thing to /dev/null in this way:
sort random_names > /dev/null
Using the program compilation example where you had separate STDOUT and STDERR streams, you can combine the output to the bit bucket.
make –F makefile.linux 2>&1 /dev/null
That’s actually a crazy example because you do want to see what goes on, but redirecting both STDOUT and STDERR to /dev/null is quite common when dealing with automated processes running in the background.
There is another batch of commands suited to working with directory files (directories being just another type of file).

One way to create a complicated directory structure is to use the mkdir command to create each and every directory.
mkdir /dir1
mkdir /dir1/sub_dir
mkdir /dir1/sub_dir/yetanotherdir
You could save yourself a few keystrokes and use the -p flag. This tells mkdir to create any parent directories that might not already exist. If you happen to like a lot of verbiage from your system, you could also add the --verbose flag for good measure.
mkdir –p /dir/sub_dir/yetanotherdir
To rename or move a directory, the format is the same as you used with a file or group of files. Use the mv command.
mv path_to_dir new_path_to_dir
Removing a directory can be a bit more challenging. The command rmdir seems simple enough. In fact, removing this directory was no problem:
$ rmdir trivia_dir
Removing this one, however, gave me an error:
$ rmdir junk_dir
rmdir: junk_dir: Directory not empty
You can only use rmdir to remove an empty directory. There is a -p option (as in parents) that enables you to remove a directory structure. For instance, you could remove a couple of levels like this:
rmdir -p junk_dir/level1/level2/level3
![]() Warning Beware of the
Warning Beware of the rm –rf * command. Better yet, never use it. If you must delete an entire directory structure, change the directory to the one above it and explicitly remove the directory. This is also the first and best reason to do as much of your work as possible as a normal user and not root. Because root is all powerful, it is quite capable of completely destroying your system. Imagine that you are in the top-level directory (/) instead of /home/myname/junkdir when you initiate that recursive delete. It is far too easy to make this kind of mistake. Beware.
All the directories from junk_dir on down are removed, but only if they are empty of files. A better approach is to use the rm command with the -r, or recursive, option. Unless you are deleting only a couple of files or directories, you want to use the -f option as well.
$ rm –rf junk_dir
Yeah, I know. It’s a pretty cheesy pun, but I like it.
Because you’ve had a chance to play with a few directory commands, I’d like to take a moment and talk about a very special directory. Every user on your system has a home directory. That directory can be referenced with the $HOME environment variable. To get back to your home directory at any time, simply type cd $HOME and no matter where you were, there you are. Actually, you only need to type cd, press <Enter>, and you are home. The $HOME is implied.
The $HOME shortcut is great for shell scripts or anytime you want to save yourself some keystrokes. For instance, say you want to copy the file remote.file to your home directory and you are sitting in /usr/some_remote/dir. You could use either of the next two commands:
cp remote.file /home/my_username
cp remote.file $HOME
The second command saves you keystrokes, and the more time you spend doing system administration, the more you will love shortcuts like this. To save the maximum keystrokes, you can also use the tilde (~), a special character synonym for $HOME.
cp remote.file ~
What you can and can’t do with a file, as defined by your username or group name, is pretty much wrapped up in four little letters. Look at the following listing (using ls -l) for an example. The permissions are at the beginning of each line.

Each of these letters can be referenced by a number. They are r, w, x, and s. Their numerical representations are 4, 2, 1, and “it depends.” To understand all that, you need to do a little binary math.
Reading from right to left, think of the x as being in position 0. The w, then, is in position 1 and the r is in position 2. Here’s the way it works:

To specify multiple permissions, you can add the numbers together. If you want to specify both read and execute permissions, simply add 4 and 1 and you get 5. For all permissions (rwx), use 7.
File permissions are referenced in groups of three rwx sections. The r stands for read, the w means write, and the x denotes that the file is executable.
Although these permissions are arranged in three groups of three rwx combinations, their meaning is the same in all cases. The difference has to do with who they represent rather than the permissions themselves. The first of these three represents the user, the second trio stands for the group permissions, and the third represents everybody that doesn’t fit into either of the first two categories.
The commands you use for changing these basic permissions are chmod, chown, and chgrp.

Let’s pretend you have a file called mail_test and you want to change its ownership from the root user to natika. Because root is the only user that can make that change, you need to prepend your command with sudo. This is very simple.
sudo chown natika mail_test
![]() Tip Remember that you can also type
Tip Remember that you can also type sudo -i to enter a root shell, should you need to do several administrative commands. Then, just type exit to return to the regular non-admin shell.
You can also use the -R option to change ownership recursively. Let’s use a directory called test_directory as an example. Once again, it belongs to root and you want to make every file in that directory (and below) owned by natika.
sudo chown –R natika test_directory
The format for changing group ownership is just as easy. Let’s change the group ownership of test_directory (previously owned by root) so that it and all its files and subdirectories belong to group accounts.
sudo chgrp –R accounts test_directory
You can even combine the two formats. In the following example, the ownership of the entire finance_data directory changes to natika as the owner and accounts as the group. To do so, you use this form of the chown command:
sudo chown –R natika:accounts finance_data
![]() Quick Tip You can use the
Quick Tip You can use the -R flag to recursively change everything in a subdirectory with chgrp and chmod as well.
Now, you are aware that files (and directories) are owned by some user and some group. This brings us to the next question.
From time to time, you need to modify file permissions. One reason has to do with security. However, the most common reason is to make a shell script file executable. This is done with the chmod command.
For instance, if you have a script file called list_users, you make it executable with the following command:
chmod +x list_users
That command allows execute permissions for all users. If you want to make the file executable for the owner and group only, you specify it on the command line like this:
chmod u+x,g+x list_users
The u means user (the owner of the file, really), and g stands for group. The reason you use u for the owner instead of o is that the o is being used for “other,” meaning everyone else. The chmod +x list_users command can then be expressed as chmod u+x,g+x,o+x list_users. Unfortunately, this starts to get cumbersome. Now let’s look at a much more complicated set of permissions. Imagine that you want your list_users script to have read, write, and execute permissions for the owner, read and execute for the group, and read-only for anybody else. The long way is to do this is as follows:
chmod u=rwx,g=rx,o=r list_users
Notice the equal sign (=) construct rather than the plus sign (+). That’s because the plus sign adds permissions, and in this case you want them to be absolute. If the original permissions of the file allowed write access for other, the plus sign construct would not have removed the execute permission. Using the minus sign (–) removes permissions. If you want to take away execute permission entirely from a file, you can do something like this:
chmod –x list_users
One way to simplify the chmod command is to remember that r is 4, w is 2, and x is 1, and add up the numbers in each of the three positions. rwx is then 4 + 2 + 1, or 7. r-x translates to 4 + 1, and x is simply 1. That monster from the second to last example can then be rewritten like this:
chmod 751 list_users
Every time you create a file, you are submitted to a default set of permissions. Go ahead. Create a blank file using the touch command. I am going to call my blank file fish.
$ touch fish
Now have a look at its permissions by doing an ls –l.
$ ls -l
-rw-r--r-- 1 mgagne mgagne 0 2006-03-10 14:31 fish
Without doing anything whatsoever, your file has read and write permissions for both the user and group, and read permission for everybody else. This happens because you have a default file-creation mask of 002. You can discover this using the umask command.
$ umask
0022
The 2 is subtracted from the possible set of permissions, rwx (or 7). 7 – 0 remains 7, while 7 – 2 is 5. But wait—5 stands for r-x, or read and execute. How is it that the file only shows a read bit set? That’s because newly created files are not set executable. At best, they provide read and write permissions for everyone. Another way to display this information is by using the -S flag. Instead of the numeric output, you get a symbolic mask displayed.
$ umask -S
u=rwx,g=rwx,o=rx
If you have an application that requires you to provide a default set of permissions for all the files you create, change umask to reflect that inside your scripts. As an example, let’s pretend that your program or script creates text files that you want everyone to be able to read (444). Because the execute bit isn’t a factor anyway, if you mask out the write bit using a 2 all around, everybody will have read permission. Set your umask to 222, create another file (called duck this time), and then do an ls –l to check things out.
marcel@ubuntu:~$ umask 222
marcel@ubuntu:~$ touch duck
marcel@ubuntu:~$ ls -l
-r--r--r-- 1 mgagne mgagne 0 2006-03-10 15:26 duck
Aside from those three permission bits (read, write, and execute), there is one other very important one: the s bit, sometimes referred to as the setuid or setgid bit depending on its position.
The reasoning behind this particular bit follows. Sometimes, you want a program to act as though you are logged in as a different user. For example, you may want a certain program to run as the root user. This would be a program that you want a nonadministrative user to run, but (for whatever reason) this program needs to read or write files that are exclusively root’s. The sendmail program is a perfect example of that. The program needs to access privileged functions to do its work, but you want regular (nonroot) users to be able to send mail as well.
The setuid bit is a variation on the execute bit. To make the hypothetical program ftl_travel executable by anyone but with root’s privileges, you change its permissions as follows:
chmod u+s ftl_travel
The next step, as you might guess, is to combine full permissions and the setuid bit. Start by thinking of the setuid and setgid bits as another triplet of permissions. Just as you could reference r, w, and x as 4, 2, and 1, you can also reference setuid as 4, setgid as 2, and other (which you don’t worry about).
So, using a nice, complicated example, let’s make that command so that it has read, write, and execute permissions for the owner, read and execute permissions for the group, and no permissions for anyone else. To those with execute permission, though, you want to have it setuid. You could also represent that command either symbolically or in a numerical way.
chmod u=rwxs,g=rx,o= ftl_travel
chmod 4750 ftl_travel
The 4 in the front position represents the setuid bit. If you want to make the program setgid instead, you can change that to 2. And, yes, if you want the executable to maintain both the owner’s permissions and that of the group, you can simply add 4 and 2 to get 6. The resulting set of permissions is as follows:
chmod 6750 ftl_travel
Changing the setuid bit (or setgid) is not strictly a case of providing administrative access to nonroot users. This can be anything. You might have a database package that operates under only one user ID, or you may want all users to access a program as though they were part of a specific group. You have to decide.
![]() Important Note You cannot use the
Important Note You cannot use the setuid or setgid bit for shell scripts (although there are Perl hooks to do this). This doesn’t work for security reasons. If you need to have a script execute with a set of permissions other than its own, you have to write a little C program that wraps around your script and then allows the program rather than the script to have setuid (or setgid) permissions.
The lesson here is that making something setuid immediately raises security issues. Know why you are taking this approach and consider the risks.
One of the most useful commands in your arsenal is the find command. This powerhouse doesn’t get the credit it deserves. Generally speaking, find is used to list files and redirect (or pipe) that output to do some simple reporting or backups. There it ends. If anything, this should only be the beginning. As versatile as find is, you should take some time to get to know it. Let me give you a whirlwind tour of this awesome command. Let’s start with the basics:
find starting_dir [options]
One of those options is -print, which only makes sense if you want to see any kind of output from this command. You could easily get a listing of every file on the system by starting at the top and recursively listing the disk.
find / -print
Although that might be interesting and you might want to redirect that to a file for future reference, it is only so useful. It makes more sense to search for something. For instance, look for all the JPEG-type image files sitting on your disk. Because you know that these images end in a .jpg extension, you can use that to search.
find / -name "*.jpg" -print
Depending on the power of your system, this can take a while and you are likely to get a lot of Permission Denied messages (particularly as you traverse a directory called /proc). If you are running this as a user other than root, you likely get a substantial number of Permission Denied messages. At this point, the usefulness of find should start to become apparent because a lot of images stashed away in various parts of the disk can certainly add up as far as disk space is concerned. Try it with an .avi or .mpg extension to look for video clips (which can be very large).
If you are trying to locate old files or particularly large files, try the following example. Look for anything that has not been modified (this is the -mtime parameter) or accessed (the -atime parameter) in the last 12 months. The -o flag is the OR in this equation.
$ find /data1/Marcel -size +1024
( -mtime +365 -o -atime +365 ) -ls
A few techniques introduced here are worth noting. The backslashes in front of the round brackets are escape characters; they are there to make sure the shell does not interpret them in ways you do not want it to—in this case, the open and close parentheses on the second line. The first line also has a backslash at the end. This is to indicate a line break, as the whole command does not fit neatly on one line of this page. If you typed it exactly as shown without any backslashes, it would not work; however, the backslashes in the second line are essential. The preceding command also searches for files that are greater than 500KB in size. That is what the -size +1024 means because 1024 refers to 512-byte blocks. The -ls at the end of the command tells the system to do a long listing of any files it finds that fit my search criteria.
Earlier in this chapter, you learned about setuid and setgid files. Keeping an eye on where these files are and determining if they belong there are important aspects of maintaining security on your system. Here’s a command that examines the permissions on your files (the –perm option) and reports back what it finds.
find / -type f ( -perm -4000 -o -perm -2000 ) -ls
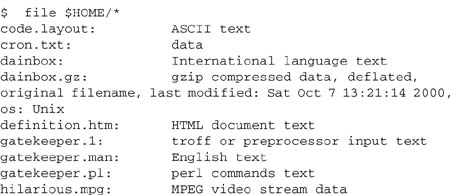
You may want to redirect this output to a file that you can later peruse and decide on what course of action to take. Now let’s look at another find example to help you uncover what types of files you are looking at. Your Linux system has another command called file that can deliver useful information on files and what they are, whether they are executables, text files, or movie clips. Here’s a sample of some of the files in my home directory as reported by file:
The next step is to modify the find command by adding a -exec clause so that I can get the file command’s output on what find locates.
$ find /data1/Marcel -size +1024
( -mtime +365 -o -atime +365 ) -ls -exec file {} ;
The open and close braces that follow -exec file mean that the list of files generated should be passed to whatever command follows the -exec option (in other words, the command you will be executing). The backslash followed by a semicolon at the end is required for the command to be valid. As you can see, find is extremely powerful. Learning to harness that power can make your administrative life much easier. You’ll encounter find again at various times in this book.
grep: Global regular expression parser.
That definition of the acronym is one of many. Don’t be surprised if you hear it called the gobble research exercise program instead. Basically, grep’s purpose in life is to make it easy for you to find strings in text files. This is its basic format:
grep pattern file(s)
As an example, let’s say you want to find out if you have a user named natika in your /etc/passwd file. The trouble is that you have 500 lines in the file.
$ grep natika /etc/passwd
natika:x:504:504:Natika the Cat:/home/natika:/bin/bash
Sometimes you just want to know if a particular chunk of text exists in a file, but you don’t know which file specifically. Using the -l option with grep enables you to list filenames only, rather than lines (grep’s default behavior). In the next example, I am going to look for natika’s name in my email folders. Because I don’t know whether natika is capitalized in the mail folders, I’ll introduce another useful flag to grep: the -i flag. It tells the command to ignore case.
$ grep -i -l natika *
Baroque music
Linux Stuff
Personal stuff
Silliness
sent-mail
As you can see, the lines with the word (or name) natika are not displayed—only the files. Here’s another great use for grep. Every once in a while, you want to scan for a process. The reason might be to locate a misbehaving terminal or to find out what a specific login is doing. Because grep can filter out patterns in your files or your output, it is a useful tool. Rather than trying to scan through 400 lines on your screen for one command, let grep narrow the search for you. When grep finds the target text, it displays that line on your screen.
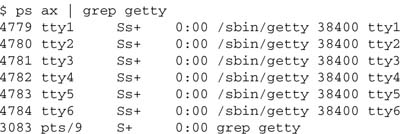
Here, the ps ax command lists the processes, and then the | pipes the output to the grep command. Notice the last line that shows the grep command itself in the process list. You use that line as the launch point to one last example with grep. If you want to scan for strings other than the one specified, use the –v option. Using this option, it’s a breeze to list all processes currently running on the system but ignore any that have a reference to root.
ps ax | grep –v root
And speaking of processes . . .
You are going to hear a lot about processes, process status, monitoring processes, or killing processes. Reducing the whole discussion to its simplest form, all you have to remember is that any command you run is a process. Processes are also sometimes referred to as jobs.
Question: So what constitutes a process?
Answer: Everything.
The session program that executes your typed commands (the shell) is a process. The tools I am using to write this chapter are creating several processes. Every terminal session you have open, every link to the Internet, every game you have running—all these programs generate one or more processes on your system. In fact, there can be hundreds, even thousands, of processes running on your system at any given time. To see your own processes, try the following command:

For a bit more detail, try using the u option. This shows all processes owned by you that currently have a controlling terminal. Even if you are running as root, you do not see system processes in this view. If you add the a option to that, you see all the processes running on that terminal—in this case, revealing the subshell that did the su to root.
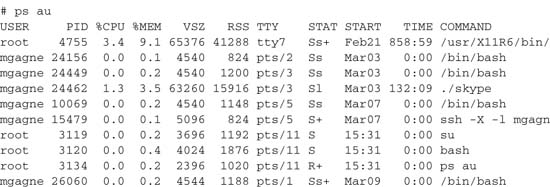
The most common thing you will do is add an x option. This shows all processes, controlled by your terminal or not, as well as those of other users. The administrator also wants to know about the l option, which stands for long. It is particularly useful because it shows the parent process of every process, because every process has another process that launched (or spawned) it. This is the parent process of the process ID. In sysadmin short form, this is the PPID of the PID. When your system starts up, the first process is called init. It is the master process and the superparent of every process that comes until such a time as the system is rebooted. Try this incarnation of the ps command for an interesting view of your system:
Again, this is a partial listing. You noticed, of course, that I threw a couple of new flags in there. The double w, or ww, displays each process’s command-line options. A single w truncates the options at a half a line.
The columns you see tell you a bit more about each process. The F field indicates the process flag. A 040 in that position indicates a process that forked, but didn’t exec, whereas a 140 means the same, but that superuser privileges were used to start the process. The UID field represents the user ID, whereas PID and PPID are the process and parent process ID that I covered earlier. PRI and NI (priority and nice number) are featured later when I discuss performance issues. In fact, there are quite a number of information flags for the ps command. Every system administrator should take some time to read the man page. More importantly, play with the command and the various flags. You will be enlightened.
With all the information displayed through ps, you are forgiven if your head is starting to hurt. It is a little like trying to see the forest but being overwhelmed by the sheer number of trees. And yet, all these processes are linked in some way. Luckily, your stock Linux distribution contains tools to make this easier. One of them is called pstree. Here’s a sample of what you get by simply typing the command and pressing <Enter>:
init--|--NetworkManager
|--NetworkManagerD
|--atd
|--bonobo-activati
|--clock-applet
|--cron
|--cupsd
|--2*[dbus-daemon]
|--dbus-launch
|--dd
|--dhcdbd
|--esd
|--events/0
|--fish-applet-2
|--gconfd-2
|--gdm----gdm--|--Xorg
|-x-session-managssh-agent
|--6*[getty]
|--gksu----synaptic
|--gnome-cups-icon---- {gnome-cups-icon}
|--gnome-keyring-d
|--gnome-panel----{gnome-panel}
|--gnome-power-man
|--gnome-screensav----fuzzyflakes
|--gnome-settings---- {gnome-settings-}
|--gnome-terminal--|--bash
|--gnome-pty-helpe
|--{gnome-terminal}
|--gnome-vfs-daemo---- {gnome-vfs-daemo}
This is only a partial listing, but notice that everything on the system stems from one super, ancestral process called init. Somewhere under there, I have a login that spawns a shell. From that shell, I start an X window session, from which spawns my GNOME display manager, then my login, and so on.
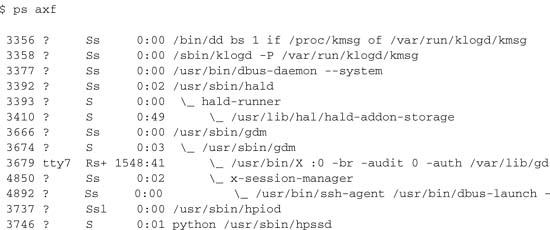
If you want a similar output, but in more detail, you can go back to your old friend, the ps command. Try the f flag, which in this case stands for forest, as in forest view. The following output is the result of my running ps axf. Again, this is a partial listing, but unlike the pstree listing, you also get process IDs, running states, and so on.
In the Linux world, you can find a number of programs devoted to deciphering those numbers, thereby making it possible to find out what processes are doing and how much time and resources they are using to do it and making it possible to manage the resultant information.
Once in a while, I start a process that I think is going to take a few seconds—like parsing a large log file, scanning for some text, extracting something else, sorting the output, and finally sending the whole thing to a file. All of these are very ad hoc in terms of reporting. The trouble is this: Two and a half minutes go by and I start to get a little impatient. Had I thought that the process would take a while, I might have started it in the background.
When you start a process (by typing a command name and pressing <Enter>), you normally start that process in the foreground. In other words, your terminal is still controlling the process and the cursor sits there at the end of the line until the process completes. At that point, it returns to the command or shell prompt. For most (not all) processes, you can run things in the background, thus immediately freeing up your command line for the next task. You do this by adding an ampersand (&) to the end of the command before you press <Enter>.
$ sh long_process &
However, I’ve already confessed that I wasn’t thinking that far ahead and as a result, I am sitting looking at a flashing cursor wondering if I did something wrong and just how long this process will take. Now, I don’t want to end the process, but I would like to temporarily pause it so I can look at its output and decide whether I want to continue. As it turns out, I can do precisely that with a running process by pressing <Ctrl+Z>.
$ sh long_process
Ctrl-Z
[1]+ Stopped sh long_process
The process is now suspended. In fact, if you do a ps ax and you look for long_process, you see this:

I added a few processes in the preceding command snapshot because I wanted to show the state of the processes. That S you see in the third column of most of these processes means they are sleeping. At any given moment or snapshot of your system, almost every single process are sleeping and a small handful show up with an R to indicate that they are currently running or runnable, sometimes referred to as being in the run queue. The T you see beside the suspended process means that it is traced, or suspended.
Two other states you might see processes in are D and Z. The D means that your process is in an uninterruptible sleep and it is likely to stay that way (usually not a good sign). The Z refers to a process that has gone zombie. It may as well be dead and will be as soon as someone gets that message across.
Getting back to the suspended process, you have a few choices. You can restart it from where it left off by typing fg at the shell prompt; in other words, you can continue the process in the foreground. The second option is to type bg, which tells the system (you guessed it) to run the suspended process in the background. If you do that, the process restarts with an ampersand at the end of the command as it did earlier.
$ bg
[1]+ sh long_process &
Your other option is to terminate the process, or kill it.
You can usually interrupt a foreground process by pressing <Ctrl+C>, but that does not work with background processes. The command used to terminate a process is called kill, which is an unfortunate name for a command that does more than just terminate processes. By design, kill sends a signal to a job (or jobs). That signal is sent as an option (after a hyphen) to a process ID.
kill –signal_no PID
For instance, you can send the SIGHUP signal to process 7612 like this:
kill –1 7612
Signals are messages. They are usually referenced numerically, as with the ever popular kill –9 signal, but there are a number of others. The ones you are most likely to use are 1, 9, and 15. These signals can also be referenced symbolically with these names.
Signal 1 is SIGHUP. This is normally used with system processes such as xinetd and other daemons. With these types of processes, a SIGHUP tells the process to hang up, reread its configuration files, and restart. Most applications just ignore this signal.
Signal 9 is SIGKILL, an unconditional termination of the process. Some administrators I know call this “killing with extreme prejudice.” The process is not asked to stop, close its files, and terminate gracefully. It is simply killed. This should be your last resort approach to killing a process and it works 99 percent of the time. Only a small handful of conditions ever ignore the –9 signal.
Signal 15, the default, is SIGTERM, a call for normal program termination. The system asks the program to wrap it up and stop doing whatever it was doing.
Remember when you suspended a process earlier? That was another signal. Try this to get a feel for how this works. If you are running in an X display, start a digital xclock with a seconds display updated every second.
xclock –digital –update 1 &
You should see the second digits counting away. Now, find its process ID with ps ax | grep xclock. Pretend the process ID is 12136. Let’s kill that process with a SIGSTOP.
kill –SIGSTOP 12136
The digits have stopped incrementing, right? Restart the clock.
kill –SIGCONT 12136
As you can see, kill is probably a bad name for a command that can suspend a process and then bring it back to life. For a complete list of signals and what they do, look in the man pages with this command:
man 7 signal
If you want to kill a process by specifying the symbolic signal, you use the signal name minus the SIG prefix. For instance, to send the –1 signal to xinetd, you could do this instead:
kill –HUP 'cat /var/run/xinetd.pid'
Note that those are backward quotes around the previous command string.
Now on to the wonderful world of editors. I’m talking here about computerized line editors, as opposed to those who want to know whether your book will be delivered in time for the original deadline.
There are times when you need to work with an editor, whether to edit a configuration file, write a script, or do some quick edits on the company Web site. In the Linux world, there are many alternatives, and your Ubuntu system comes with a few. Let me introduce you to a friendly new member of the family.
Your GNOME desktop comes with a very nice and powerful editor called gedit (command name gedit). With colorful language-sensitive syntax highlighting (sh, C, C++, Perl, HTML, and others), tabs, and a spell checker, gedit is easy and fun to work with. To see gedit in action, look at Figure 21-2. You can start gedit on its own or specify a filename to start with. Notice that I started my session using gksudo because I was editing a system script.
gksudo gedit /etc/profile
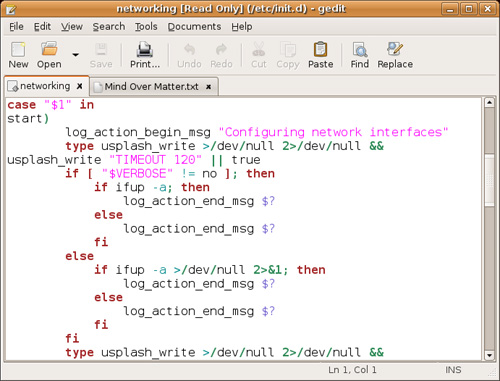
![]() Tip In the preceding example, I use
Tip In the preceding example, I use gksudo instead of sudo. This is a graphical frontend to sudo. It’s also the best (and correct) way to run a graphical command that requires administrative privileges via the <Alt+F2> quick-start.
As you can see by looking at Figure 21-2, gedit supports tabs, thereby making it simple to work on multiple files at the same time. Just click the tab to select the file you want to edit. Basic editing functions like cut, paste, find, and replace, are available directly below the menu bar. To edit a file without starting from a command line, click the Open icon, which opens up the standard GNOME file selector.
For years, I’ve been a fan of vim, the next editor I will discuss, but I appreciate the beauty of a simple, friendly editor like gedit. It’s easy-to-use with a learning curve close to zero. Still, there may be times when you don’t have access to gedit and times when a slow, remote connection makes a graphical editor too painful to consider. It’s at those times that you’ll be thankful for a simple shell window and vim to get your work done.
You can almost hear a fearsome voice echoing eerily around the walls of your office or home. If there is one editor that strikes fear in the hearts of newbies everywhere, it is certainly vi (or vim), the visual editor. vim stands for vi improved and is the version of vi that you find in your Linux system. Anyhow, pay no attention to that fearsome voice behind the program. vi is not so frightening after you get to know it. To start vi, enter the command name on its own or start it by specifying a filename.
vi /tmp/test_file
To start entering information, press <i> to go into insert mode. Type several lines and then press <Esc> when you are done editing. Moving around with vi is easy. Depending on the terminal emulator you are using, you can typically use your cursor keys. In the absence of cursor key control, the up, down, and sideways motions are all implemented with single keystrokes. To move left, press the letter <h>. To move right, press <l>. The letter k is up, and j is down.
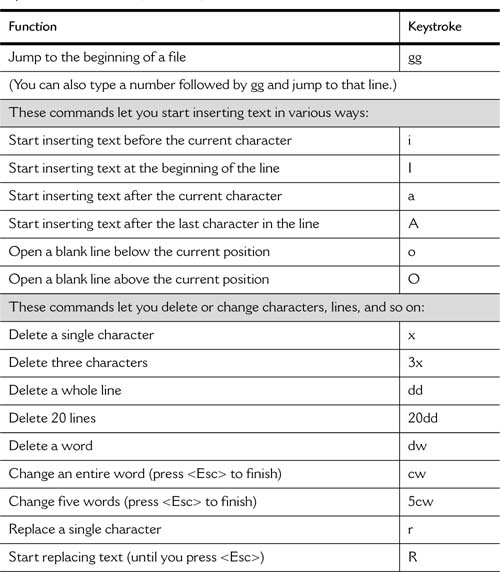
A little further on, I’ve included a quick cheat sheet.
When you work with vi, the <Esc> key is your friend. If you don’t know where you are or what mode you are in (insert, replace, or append), press the <Esc> key. You go back to normal vi command mode. Your second best friend is u or U, which stands for undo. The uppercase undo undoes every change to the current line and the lowercase undo undoes the last change only.
Finished editing? When it comes time to save your work, press <Esc> (to get out of whatever mode you are in) and type ZZ. Another way to exit is to type :wq (write and quit). At any time during an editing session, you can type :w to save your current work. Finally, if you really don’t want to save anything you have done, type :q! The exclamation point essentially says that you won’t take no for an answer. Had you modified the file and simply typed :q, vi would warn you that you were trying to exit from a modified file without having saved your changes.
Keystrokes for Functions

![]() Quick Tip Need help while in
Quick Tip Need help while in vi? Make sure you aren’t in insert or replace mode, and then type :help.
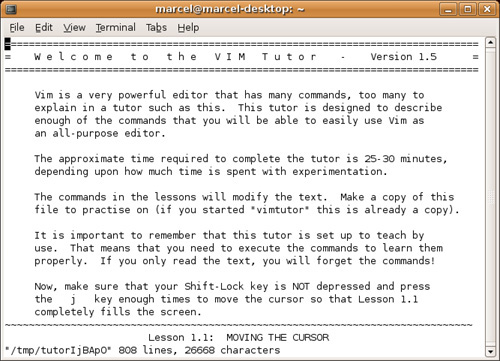
I urge you not to let vi frighten you. Get to know it. The likelihood that you will ever log on to a modern Linux (or UNIX) system that doesn’t have some form of vi installed is virtually nonexistent. That said, if you need more information than I’ve given you here, consider the vi tutor. This little tool is distributed as part of the vim documentation. It is essentially a text file that tells you what to do and how to do it as you read it. To start the tutor, type the following command:
vimtutor
When the tutorial starts, you should see a picture like the one in Figure 21-3. The entire tutorial takes between 25 and 30 minutes for most people to complete.
From time to time, you may find yourself trying to edit a file, but someone else, maybe you, is already editing it. That session may be open or something may have happened to terminate it accidentally. As a result, you get a nice, long-winded message along the lines of “swap file found” and a whole lot of information on what you can do about it. Here’s a shortened version of that message:
E325: ATTENTION
Found a swap file by the name "textfiles/.listing1.swp"
owned by: mgagne dated: Sun Dec 28 14:43:20 2003
file name: ~mgagne/textfiles/listing1
To locate these files, you can use the famous find command and look for anything with a .swp extension. Another and better way is to have vi report on these for you. You can check for the existence of swap files by using the -r option, which provides you with a little more information than the simple find.
Swap files found:
In current directory:
1. .linux_companies.swp
owned by: mgagne dated: Mon Sep 15 14:38:55 2003
file name: ~mgagne/textfiles/linux_companies
modified: YES
user name: mgagne host name: francois
process ID: 2266
2. .sas.swp
owned by: mgagne dated: Mon Sep 8 09:49:02 2003
file name: ~mgagne/textfiles/sas
modified: no
user name: mgagne host name: ultraman
process ID: 6340
In directory ~/tmp:
-- none --
In directory /var/tmp:
-- none --
In directory /tmp:
-- none --
The next time you need a reason to use vi over one of the other editors, consider some of these tricks for getting to what you want as quickly as possible.
vi +100 ftl_program.c
This takes you right to line 100 in the file called (in this case) ftl_program.c. This can be a great timesaver when you are compiling programs and something goes wrong, as in the following example:
gcc -O2 -Wall -c -o ftl_program.o ftl_program.c
ftl_program.c:100: parse error before `<'
make: *** [ftl_program.o] Error 1
Another useful start flag is the same one you use to search for text inside a file: the forward slash (/). In the next example, I want to get back to the same place I was working on in my file. To mark my place, I had written my name on a blank line. This vi starter gets me right to where I was working:
vi +/Marcel ftl_program.c
Note the plus sign before the slash.
gedit and vi (or vim) represent only two of many, many different editors available to the Linux user. Your Ubuntu Linux system comes with a few others. One of my old favorites is another nongraphical editor that makes a nice alternative for people who, having gotten up close and personal with vim, would prefer something else. It’s called Nano (command name nano), an enhanced editor based on Pico (in case you are curious). Nano, by the way, stands for Nano’s ANOther editor.
Yeah, I know.
PINE Information Center (the home of Pico)
http://www.washington.edu/pine/
Nano’s Home Page
vim Home Page