Chapter 2 Running and Installing the Ubuntu Live DVD
Included with this book is a full-featured Ubuntu Linux distribution that runs entirely from the DVD-ROM drive. That’s right. You can run Linux on your system without having to change your system or uninstall Windows. Then, when you are ready to make the jump official, the live DVD comes with a friendly installer that makes the process virtually painless.
![]() Note Because it is running from the DVD drive, Ubuntu Linux live DVD runs slower than if you actually install Linux and run it from the hard disk. Keep in mind that the performance you experience from the DVD is not indicative of the performance you can experience from a Linux hard-disk install. At their fastest, DVD-ROM drives are no match for even the slowest hard disk drive.
Note Because it is running from the DVD drive, Ubuntu Linux live DVD runs slower than if you actually install Linux and run it from the hard disk. Keep in mind that the performance you experience from the DVD is not indicative of the performance you can experience from a Linux hard-disk install. At their fastest, DVD-ROM drives are no match for even the slowest hard disk drive.
Running Ubuntu Linux is as easy as putting the DVD in the drive and booting. A couple of minutes later, you are working with a great looking, modern desktop (see Figure 2-1). This DVD is full of great software. There are tons of applications and literally thousands of programs on the disk. You’ll be able to send and receive email, surf the Web, write documents in your word processor, put together a budget using the spreadsheet package, play a few games, and a whole lot more. In fact, you should be able to follow along and play with the software you’ll explore in this book and do most of the things that are covered without having to install Ubuntu Linux at all.

The bootable DVD is a fantastic introduction to Ubuntu Linux, providing you with a no-commitment way to take Linux out for a spin; but there are limitations.
I’ve already covered one issue related to DVDs, that of performance. The other limitation is also DVD related. Because this bootable Linux does not install itself on your hard drive, you are limited to the packages on the DVD. In other words, you can’t add or install any new software. After you install Ubuntu Linux to your hard drive, this limitation will vanish and you can choose to install from thousands of great packages. In fact, the DVD includes all of the Ubuntu supported packages so you’ll have thousands more programs to choose from—all this without having to download from the Internet.
Loading the Ubuntu Linux live DVD is easy because there is no installation required.
Take your DVD and insert it into your DVD-ROM drive. Shut down Windows, and select Restart. Make sure your PC is set to boot from the DVD. Ubuntu Linux boots up to a nice, graphical screen with a simple menu (see Figure 2-2). Booting from the disk is the first option; just press Enter or wait. After a few seconds, the system will boot automatically. Before you do that, however, notice the menu option labeled Check CD for Defects. This is a very good idea if you plan on installing Ubuntu to your hard drive, and I highly recommend that you run this step.

![]() Note Most modern systems are set to boot directly from the DVD-ROM drive if a bootable DVD is found there. If your system does not, you may have to change the BIOS settings on your PC to allow this. This is generally done by pressing <Delete> or <F2> to enter Setup as the system is booting. (You will usually see such a message before the operating system starts to load.) Because the menus vary, it is impossible for me to cover them all, but look for a menu option that specifies the boot order. You’ll see something like A: first, then C: (i.e., your floppy drive, then the hard disk). Change the boot order so that it looks to the DVD first, save your changes, and then restart your system.
Note Most modern systems are set to boot directly from the DVD-ROM drive if a bootable DVD is found there. If your system does not, you may have to change the BIOS settings on your PC to allow this. This is generally done by pressing <Delete> or <F2> to enter Setup as the system is booting. (You will usually see such a message before the operating system starts to load.) Because the menus vary, it is impossible for me to cover them all, but look for a menu option that specifies the boot order. You’ll see something like A: first, then C: (i.e., your floppy drive, then the hard disk). Change the boot order so that it looks to the DVD first, save your changes, and then restart your system.
The boot process takes a few minutes as Ubuntu identifies devices, disks, network connections, sound cards, and so on. At some point, the screen will go dark as your video card is configured and X, the Linux graphical user interface, is started.
If the screen doesn’t respond instantly, don’t panic. Give it a few seconds. If nothing has happened even after you’ve waited awhile, it is possible that your video card is one of the rare ones not included in the distribution. Never fear, most (if not all) modern cards support VESA, and Ubuntu should fall back to this setting.
Problems, problems . . .
The DVD is amazingly good at automatically booting and running on a huge number of systems, but it isn’t perfect. There is only so much software that you can pack on one DVD and that includes drivers for hardware. That said, most problems with booting the Ubuntu live DVD can be resolved.
You might have noticed when the boot screen came up (refer to Figure 2-2) that there were a number of options at the bottom of the screen: <F1> Help, <F2> Language, and so on. Some of these are fairly obvious. Pressing <F1> gives you further assistance. If you don’t want to run Ubuntu with English as the default language, press <F2> and select an alternate from the list. Closely related is <F3>, which lets you select an alternate keyboard for the language of your choice.
Getting a proper graphical display is not generally a problem, but if all else fails and you still can’t get a good, clear screen, try pressing <F4> and selecting VGA as your video type. Ordinarily, Ubuntu scans for and assigns the proper video driver based on your card. Several accessibility options are also built in to the boot screen that allow users with visual impairments of varying degrees to choose a more suitable environment. There are also settings for users with minor motor difficulties who may have trouble with a mouse or other pointing device. You can access these at boot time by pressing <F5>.
As the system boots, most everything is done for you. This is what is referred to as Normal mode and it is the best choice, 99.9 percent of the time. For those who might want total control over every aspect of the boot, device detection, hardware configuration, and so on, it is possible to switch to Expert mode by pressing <F6>.
The biggest set of boot changes are those that can be added to the boot command prompt itself, directly beside the Boot Options label. For instance, it is possible that you might experience lockups on boot or strange hardware glitches that stop the system from booting, a not uncommon problem with buggy APIC controllers (Advanced Programmable Interrupt Controller). To disable the APIC, press <F6> to bring up the boot prompt, then add this line to the end of the existing options:
noapic
Press <Enter> and the machine will boot normally but with the APIC disabled. Some of the prompts do not deal with actual problems. They just speed things along. An example of this has to do with network configuration. Normally, the Ubuntu live DVD will configure its network card for DHCP with the idea that an address will automatically be provided by another machine on the network. You can always change this after the system is up (networking is covered in Chapter 7), but it is possible to force a static IP address at boot time.
disable_dhcp=true
To see a much more comprehensive list of boot parameters, press <F1> to enter the help screen, then press <F5> for an overview of boot parameters, <F6> for parameters dealing with specific machine hardware, <F7> for parameters related to disk controllers, and <F8> for those related to the boot process itself.
After the system has booted, you can start playing with Ubuntu Linux. From here, you can follow along in the book and try the various programs covered. To get you feeling at home quickly, however, let me give you a quick tour of the menus and I’ll show you what your system has to offer.
Looking at your Ubuntu desktop (refer to Figure 2-1), you can see that there is a gray panel running along the bottom and along the top of your screen. I will cover all the details of those panels, what they are, what they can do for you, and how you can modify them to suit your needs in Chapters 3 and 5. For the time being, I want you to look at the labels along the top panel and to the left. One says Applications, followed by Places, and finally, System. Each of these represents a menu of possibilities, granting you access to the great programs included with your Ubuntu Linux system, your computer’s hardware, storage devices, peripherals, and the tools you need to customize every aspect of your Ubuntu Linux experience.
Start by clicking the Applications button. Then, pause your mouse cursor over the Accessories menu, where you’ll see some handy system tools (see Figure 2-3).

The Alacarte Menu Editor (sounds yummy, doesn’t it?) is a program designed to let you add or remove, or even modify, menu items. Sometimes, a program doesn’t appear where you would like it to go or another program that you use regularly isn’t available there. Alacarte is how you change things. Calculator is a simple calculator when it starts, but it also provides advanced functions, including business, financial, and scientific functionality. Character Map is a program that makes it easy to insert international and special characters not directly available from your keyboard (useful when your last name has an é at the end).
The Dictionary looks up words using Internet accessible resources from dict.org. In Chapter 5, I’ll show you how to change the appearance of your desktop. If you feel like sharing your desktop’s new look with friends, Take Screenshot is the tool for you. Terminal is a means to access your system’s text command line. You’ll learn more about that as we progress through the book. Finally, the Text Editor provides a simple, yet powerful, means of editing and manipulating text files.
Move that mouse cursor down one and let’s have a look at the Games submenu (see Figure 2-4).

At some point, everybody needs a break, some time to relax and enjoy a little down time. How about trying one of the many solitaire games included in AisleRiot, or spending some time at the Blackjack table? A little Mahjongg, perhaps?
The collection of games included with your system is just the beginning. In Chapter 8, I’ll show you how to install hundreds of other games from dungeon crawlers to first-person shooters, high-end 3D action, puzzles, and strategy. Your Ubuntu Linux system could be the game machine you’ve been looking for.
Next, we are on to the Graphics submenu (see Figure 2-5).
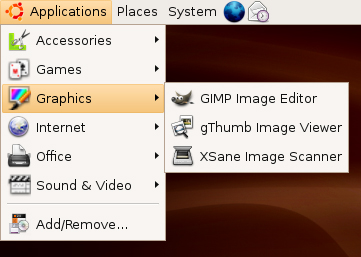
The GIMP Image Editor is an almost legendary piece of software, a powerful graphic manipulation package with dozens of built-in filters, special effects, and every tool you need to produce high-quality images. I cover the GIMP in detail in Chapter 17. The gThumb Image Viewer provides an easy-to-use way to navigate your folders and view your collection of digital art. Finally, if you have a scanner, the XSane Image scanning program will scan, copy, and fax.
The Internet submenu (see Figure 2-6) starts off with the Ekiga Softphone, a VoIP communication program that provides both audio and video. Those of you keeping track of such things will know that Ekiga started out as GnomeMeeting. For email, contact management, and a great way to stay organized, Evolution Mail handles these beautifully. You can read all about Evolution in Chapters 11 and 12.
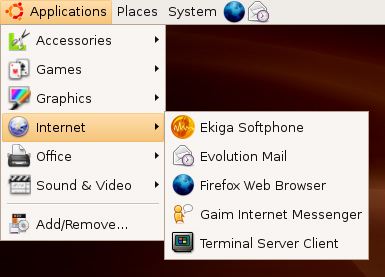
The hottest Web browser in cyberspace doesn’t come out of Redmond. No, it’s the Firefox Web Browser and after Chapter 10, it may well become your new best friend. An instant messaging client for AOL, another for MSN, and yet another for Jabber? Never! After learning about the Gaim Internet Messenger in Chapter 9, you’ll wonder how you ever used anything else. The Terminal Server Client is a great program that makes it possible to take control of another computer using VNC (Virtual Network Computing) or Microsoft Terminal Server.
I’ll wrap up this rapid-fire Internet tour by letting you know that Chapter 9 is also the place to learn about the XChat-GNOME IRC Chat client.
Let’s move down and have a look at the Office submenu (see Figure 2-7).

First on the menu is Evolution, which you saw back in the Internet menu with Evolution Mail. Because Evolution is so much more than just an email package, it qualifies as an invaluable office application. OpenOffice.org version 2 is a superb, and free, alternative to Microsoft Office, compatible with Microsoft Word, Excel, and PowerPoint files. It also does a whole lot more. OpenOffice.org Base is a powerful, integrated database application, which you’ll learn about in Chapter 16. OpenOffice.org Calc (see Chapter 14) is your spreadsheet program, similar to Microsoft Excel, whereas OpenOffice.org Draw is a flexible drawing program you can use to create all sorts of images including flow charts, organizational charts, logos, and so on. Impress, covered in Chapter 15, is a presentation package, compatible with Microsoft Powerpoint. Think of OpenOffice.org Math as a word processor for creating complex scientific formulas and equations, handy for the students out there. Finally, we come to what is perhaps the most important office tool of all, at least to this writer: OpenOffice.org Writer, a truly excellent word processing package.
Let’s look at the last of these submenus, Sound & Video (see Figure 2-8).

At the top of the list is the Movie Player, and its purpose is self-explanatory. With the Rhythmbox Music Player, you’ve got a great little jukebox program to organize your digital music, keep your ears entertained, and your spirit dancing. When you need to take your music with you, use the Serpentine Audio-CD Creator to build music CDs with collections of your favorite songs. Most of us have tons of music CDs in our collections. Getting them transferred to your PC is the job of the Sound Juicer CD Extractor. Sound Juicer is also an easy-to-use CD player. We wrap up this tour of multimedia applications, and applications in general, with the Sound Recorder, a simple program for recording sound clips.
What? I’m not done yet?
You are right; I’m not done. There is an Add/Remove menu item in that list. If you want to find out how incredibly easy it is to install software in Ubuntu Linux, get your Internet connection set up (see Chapter 7), and then read all about installing software in Chapter 8.
Next to the rather rich landscape of the Applications menu and its submenus, we find the Places menu (see Figure 2-9). Places primarily is a menu of physical storage locations, most of them disks or folders on your own system.

From here, you can quickly jump to your home folder, navigate the computer’s disks, create a CD or DVD using your writer, and search for files on your system. These storage resources don’t need to always be connected to your system. For instance, if you plug in a USB storage key, it will appear in the Places menu and you can access it without additional fuss.
Places can also show resources a network jump away, either on your local area network or on the Internet. If you have Windows machines with shared drives on your network, Network Servers will get you there with a click.
The final set of menus are both listed under the System label on the top panel. Before I tell you a bit about them, I would also like to let you know that the GNOME help system is available from the System menu. You can also lock your screen with a password (when you run off for coffee or a muffin) or log out of your current Ubuntu Linux session.
Now, let’s take a look at the Preferences submenu (see Figure 2-10).

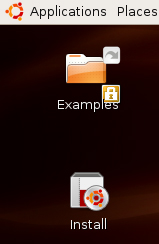
![]() Tip Near the top left of your screen are two very interesting icons. The Examples folder contains a number of sample documents, spreadsheets, images, and multimedia files to try with your Ubuntu Linux system. The Install icon, meanwhile, is your starting point for installing the Ubuntu Linux live DVD permanently onto your hard disk. I’ll discuss those steps shortly.
Tip Near the top left of your screen are two very interesting icons. The Examples folder contains a number of sample documents, spreadsheets, images, and multimedia files to try with your Ubuntu Linux system. The Install icon, meanwhile, is your starting point for installing the Ubuntu Linux live DVD permanently onto your hard disk. I’ll discuss those steps shortly.
The Preferences menu is all about personalizing the user experience, something I’ll cover in greater detail in Chapters 3 and 5. Because these are personal options, none of them require administrative privileges. You can set a screensaver, change the background, window decorations, or play with the colors. Pick one of the included themes and give your system a whole new look.
If the fonts look a little small, there’s a simple option for changing the size of what you see on the screen. And speaking of your screen, changing the screen resolution is easy and doesn’t require that you restart your graphical environment.
Okay, let’s wrap up this tour of your system menu with the Administration submenu (see Figure 2-11).
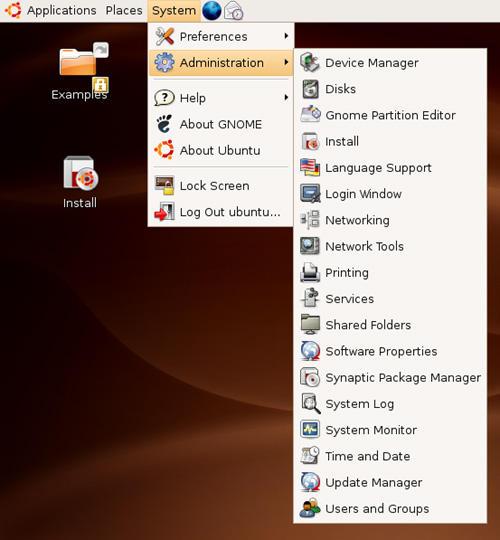
System administration may sound like something most people would rather stay away from, but it’s not all that scary. From time to time, you will want to do things on your system that affect everyone who logs in equally. Changes made under Preferences don’t affect anyone but the current user, and if your niece, Stephanie, chose some garish desktop colors, it wouldn’t affect you when you logged in.
Administration functions cover the gamut from setting up a printer to configuring your Internet access. You can share folders (so others on your home or office network can use them), look at system logs, change the look and feel of the login screen, and add users.
Perhaps one of the most important functions here involves updating and maintaining the packages on your system. Keeping up-to-date is one of the best ways to keep your system humming along nicely, and securely.
After you have played with your Ubuntu Linux live DVD for awhile, I’m confident that you are going to want to make the experience permanent. Linux is far superior to your old OS in many ways and after you install it to your hard drive, Ubuntu Linux will run much faster. Luckily, the process of installing Ubuntu Linux is practically pain free with Ubiquity. Answer a few simple questions and in a few minutes, you’ll have Ubuntu installed on your hard disk.
On your desktop, directly below the Examples folder, is an icon labeled Install(see Figure 2-12). Double-click the icon to start the Ubiquity Installer.
When you do this, the Ubiquity Installer window appears. The first screen is a welcome screen, but it is also a warning that installation is a process that will overwrite your current hard drive configuration (see Figure 2-13).
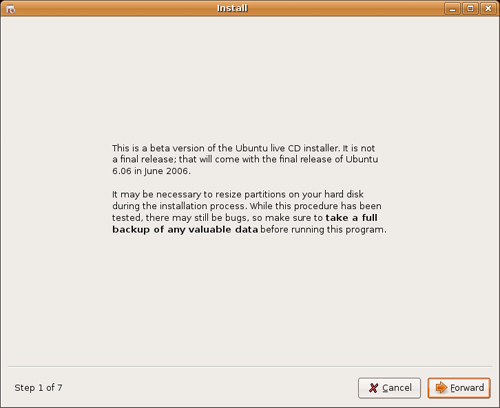
The warnings about making sure you have taken a backup of your data cannot be repeated too many times. Make a backup, then make another backup.
Click the Forward button and you are taken to the installation language selection screen (see Figure 2-14). This language will also be the default language when the system is fully installed. English is selected by default, but Ubuntu has been internationalized for dozens of languages. There’s no Klingon here, but Esperanto is available.

Make your choice, then click Forward to continue. The next screen is labeled “Where are you?” This is where you set your location and time zone. Select your location by clicking on the map. One click will zoom you in to an area from which you can fine tune your selection. There’s also a drop-down box labeled “Selected City” that you can use to the same effect but clicking on the map is more fun. Click Forward to continue.

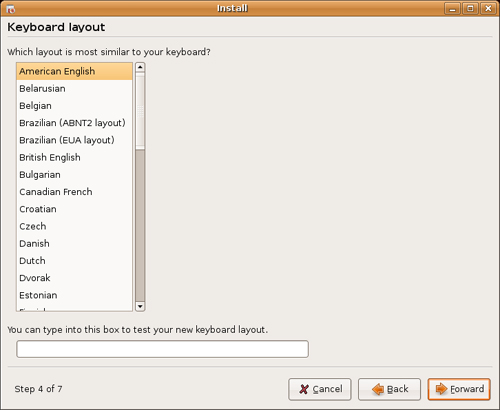
The next screen, labeled “Keyboard layout” sounds very much like the language selection screen (see Figure 2-16). Nevertheless, your keyboard layout may not necessarily reflect your language of choice. As a bilingual Canadian, I still use a keyboard with an “American English” layout because that selection most closely reflects my notebook’s keyboard. If you have an alternative keyboard, make your selection, then use the input box at the bottom of the screen to test your selection.
When you are satisfied, click Forward. A new window labeled “Who are you?” will appear. This is the personal identification window from which your initial user login will be created (see Figure 2-17).
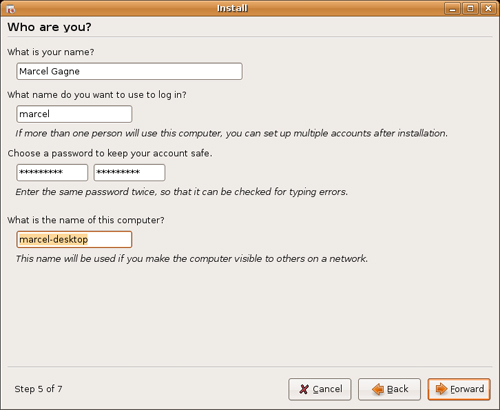
Enter your full name in the “What is your name?” field. In the second field labeled “What name do you want to use to log in?” select a username, preferably eight characters or fewer (although this isn’t a hard and fast rule), and tab to the Password field. When you enter the password, it is echoed back as stars (or asterisks) so don’t worry if you can’t see what you are typing. After this, you must enter the password again. This is to make sure that you typed what you thought you typed in the first password field. Finally, under the heading “What is the name of this computer?” enter a hostname for your system. By default, the installer will appends “-desktop” to your username, but you are free to select something else.
Click Forward and Ubiquity’s partitioning tool starts. A small window appears titled Starting up the partitioner. A progress bar keeps you posted as your disks are scanned and analyzed. A few seconds later, the main partitioning window appears. It is labeled “Select a disk”. Most people will have just one disk but if you have multiple disks, select one here and click Forward. The next window, labeled “Prepare disk space”, lets you select the amount of space you are willing to allocate (see Figure 2-18).
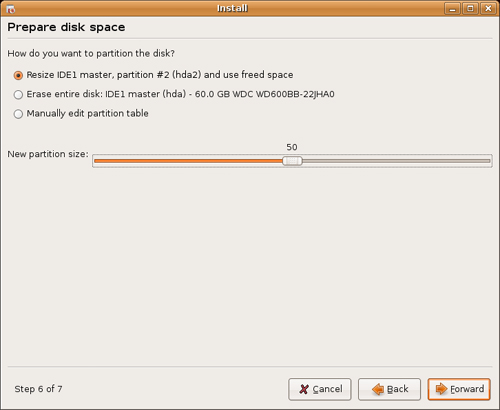
The information you see on the partitioning screen will vary from system to system. My test system has two hard drives to choose from. Yours may have a single drive with a Windows partition that you are happy to overwrite. Notice the first option in the list. It provides an option for resizing the current partition. This is particularly useful for those who are running Windows on their system and would like to have Ubuntu and Windows co-exist (yes, it is possible). If you select this option, the slider at the bottom of the list activates and you can use it to select the percentage of space you would like to have freed up.
![]() Tip Unfortunately, Windows is just as likely to be taking up the entire partition table. The trick is to shrink the existing Windows partition, thereby creating some space on which to install Linux. To do this, you must defragment your disk in Windows before going ahead and resizing your partitions. You do this by clicking the Start button and then selecting Programs | Accessories | System Tools | Disk Defragmenter.
Tip Unfortunately, Windows is just as likely to be taking up the entire partition table. The trick is to shrink the existing Windows partition, thereby creating some space on which to install Linux. To do this, you must defragment your disk in Windows before going ahead and resizing your partitions. You do this by clicking the Start button and then selecting Programs | Accessories | System Tools | Disk Defragmenter.
For this example, I’ve chosen to use the entire first disk (the biggest on this old computer).
After clicking forward past this point, a warning window appears asking if you are “Ready to install”. The choices you have made up to this point, including language, username, and so on, are all repeated for you here. If you chose to use the entire disk, like me, this is your last chance to stop before your hard drive is erased in preparation for installation. Read the dialog box carefully as it will also confirm the partitions to be created—this is particularly important if you chose to use the available free space or you opted for custom partitioning. If you are ready, have a good backup, or you simply don’t care about what’s on the PC, click Install to continue.
![]() Tip Have I mentioned that you should have a good backup of your system, in particular, your personal data?
Tip Have I mentioned that you should have a good backup of your system, in particular, your personal data?
A dialog box appears informing you of the progress as your disks are partitioned and formatted (see Figure 2-19).
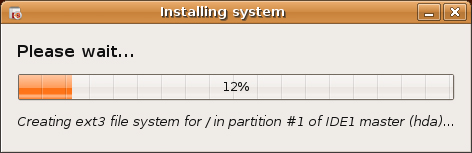
Although the excitement may be running high at this point, what happens next is only so exciting, and the amount of time it takes depends largely on how fast your processor is, how much memory your system has, and how fast your disk drives are. This is usually a good place to walk away and get a snack and something to drink. If you feel so inclined, you can watch the progress bar as your system is prepared and installed (see Figure 2-20).

Some time before that bar hits 100 percent, you’ll see a message at the bottom of the progress window informing you that it is configuring the system, creating the user, and configuring hardware, network, bootloader, and so on. These are the final steps in creating your new Ubuntu Linux system from the live DVD.
When the installation completes, a final dialog appears. Click “Reboot the computer” to finish the process. The system shuts down and the DVD is ejected. Make sure you remove the DVD, then press Enter to reboot your system.