Chapter 15 OpenOffice.org Impress (For When You Need to Impress Someone)
Once upon a time, even a simple business presentation could be quite a costly affair. The person putting together a presentation would create her presentation using a word processor (or pen and ink), then transfer it to a business graphics presentation tool. Alternatively, a special design service might be hired to take that next step, but eventually, the whole project would be sent to yet another service that would create 35-mm slides from the finished paper presentation.
On the day of the big meeting, the old carousel slide projector would come out, and the slides would be painstakingly loaded onto the circular slide holder. Then, the lights would dim, and the show would begin. With any luck, the slides would be in the right order, and the projector would not jam.
These days, we use tools that streamline this process, allowing us to create presentations, insert and manipulate graphical elements, and then play the whole thing directly from our notebook computers. The projectors we use simply plug into the video port of our computers. There are many software packages to do the job under Linux. The most popular (and the one I cover here) is part of the OpenOffice.org suite. It is called Impress. For those of you coming from the Microsoft world, Impress is very much like PowerPoint. In fact, Impress can easily import and export PowerPoint files.
After having worked with OpenOffice.org’s Writer and Calc, you should feel right at home when it comes to using Impress. Working with menus, inserting text, spell checking, and customizing your environment all work in exactly the same way. The editing screen is probably more like Calc than Writer in some ways. The Impress work area has tabbed pages so you can easily jump from one part of the presentation to the other. Each page is referred to as a slide. Given the history of business presentations—specifically, the making of these 35-mm slides—it’s probably no wonder that we still use the same terms when creating presentations with software like Impress.
To start Impress, go to the Application menu on the top panel and select OpenOffice.org Impress from the Office submenu. You can also start a new presentation from any other OpenOffice.org application, such as Writer or Calc. Just click File on the menu bar, select New, and choose Presentation from the submenu.
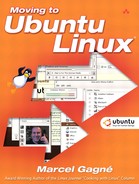
When you start up Impress for the first time, the Presentation Wizard appears and you are presented with a number of choices. You can start with an empty presentation (see Figure 15-1), work from a template, or open an existing presentation. Incidentally, some earlier versions of OpenOffice.org started with a blank page. You have the opportunity to select this behavior by clicking the Do Not Show This Wizard Again check box.
![]() Quick Tip At the time of this writing, OpenOffice.org ships with only a couple of Impress templates. As I’ve mentioned before, one of the differences between OpenOffice.org and StarOffice (its commercial sibling) is that StarOffice comes with a number of templates. That said, you can still download some free templates from
Quick Tip At the time of this writing, OpenOffice.org ships with only a couple of Impress templates. As I’ve mentioned before, one of the differences between OpenOffice.org and StarOffice (its commercial sibling) is that StarOffice comes with a number of templates. That said, you can still download some free templates from ooextras.sourceforge.net.
The Presentation Wizard allows you to select from existing presentations, as well as templates. For the moment, I’m going to stick with the very basics. Leave Empty Presentation selected, and click Next. Essentially, this starts us off with a blank slide. Step 2 gives us the opportunity to select a slide design (see Figure 15-2). You may find a few options for slide design here (these would be your templates). Choose <Original>. Before you click Next, pause first and have a look at the options for output medium. By default, Impress creates presentations designed for the screen (or a projector connected to your PC).

Step 3 lets you define the default means for slide transition (see Figure 15-3). You’ve seen these transitions; as someone shows a presentation, slides dissolve to show the next one or fly in from the left or drop like a trap door closing. At this stage of the game, pick one of these effects from the Effect drop-down box, and then choose the Speed of that transition. On the right side, there is a preview window that shows you what the effect looks like when you select it.

Directly below the slide transition selection, you select the presentation type. Your choices are Default and Automatic. By default, transition from slide to slide is done by pressing a key, whether it is <Enter> or the spacebar (you can define this). Presentations can also run without any intervention from the person giving the presentation. By selecting Automatic, you can define the amount of time between slides or between presentations. Accept the default setting here and click Create to start building your presentation.
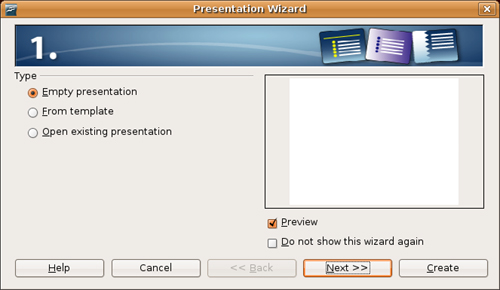
Now we have everything we need to start working on our presentation. Impress opens to a blank page that is divided into three main panes or frames (see Figure 15-4). On the left, small previews of all your slides are displayed (just a single blank one at this moment). If you chose a background, it is used in the slide previews. As you work, you can quickly move to any slide you want by scrolling down the lists and clicking the slide. Below each preview is the slide’s title. By default, the title is Slide, followed by the slide’s number in sequence. If you don’t like this naming convention, you can easily override it by right-clicking the title and selecting Rename Slide.

To the right, another pane is visible with a number of potential slide layouts having small preview images. This is the Tasks pane and it is further divided into four sections: Master Pages, Layouts, Custom Animation, and Slide Transition. By default, the Layouts section is open. From here, you can decide the appearance of the slide, the number of columns, title locations, and so on. If you pause over one of the images with your mouse cursor, a tooltip appears, telling you a little about the layout format.
Finally, there’s a rather large central pane with five tabs labeled Normal, Outline, Notes, Handout, and Slide Sorter. The normal view is where you do most of your work, creating and editing slides. The Outline view is a kind of bird’s eye overview of the whole presentation. You can reorder slides, change titles, and so on. The Notes view does pretty much what you expect; it provides an easy way to add notes to the slides. The Handout view is, I think, very handy. Sometimes, when you are doing a presentation, you are expected to provide printouts of the slides for those in attendance. With Handout, you can define how those printouts look and how many slides fit on a single page. Finally, we have the Slide Sorter, which is just a larger version of the Slides preview pane on the left. With a larger area, sorting slides is just that much easier. For now, we will be working with the Normal view.
You might notice that the various toolbars and menus have some resemblance to those of both Writer and Calc (discussed in the last two chapters). The menu bar sits just below the title bar, and the Standard bar is directly below that. Notice that the Formatting bar has a number of different options unique to working in the Impress environment. Along the bottom is the Drawing bar, which provides quick access to objects, drawing functions, 3D effects, and so on.
Let’s jump right in and create a presentation. From the Tasks pane, select the Layouts section, if it isn’t already open. Choose the Title, Clipart, Text layout by clicking it and it instantly appears in the main work area in the center (see Figure 15-5).
At any point, you can start the slide show by clicking Slide Show on the menu bar and selecting Slide Show. Pressing <F5> has the same effect. There isn’t much to see at this point, but you can do this from time to time to see how your presentation is coming along.
To start editing your slide, click (or double-click for images) the section you want to change. Make your changes by typing into that area. For the title, you might enter Introducing Linux! When you are happy with your changes, just click outside of the frame area. On the right, in the frame that says Click to Add an Outline, insert these bulleted points:
• What is Linux?
• Is Linux really free?
• What can it do?
• Advantages?
• Disadvantages?
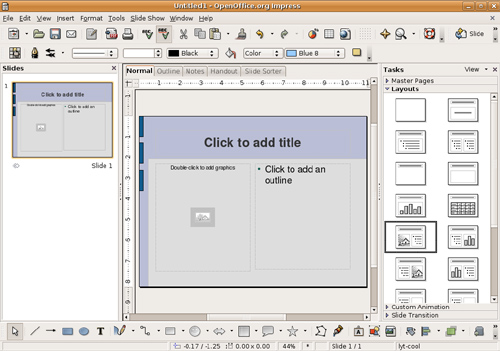
As you might have noticed, this outline serves as talking points that mirror the first chapter of this book. Now, on the left side, double-click the frame (as instructed on the default slide) and insert a graphic. The Insert Picture dialog appears, allowing you to navigate your folders and look for the perfect image (see Figure 15-6). Once again, this is a pretty standard GNOME file dialog. Take a look over on the lower left and you see a check box labeled Preview. Because you are looking for images, this is a good one to check on. The preview pane appears over on the right.
You can use any image you like here. For my image, I used Firefox to surf over to Larry Ewing’s Web site (www.isc.tamu.edu/~lewing/linux/), where I picked up my Tux graphic from the source. (I’ll tell you more about Tux at the end of this chapter.) You can choose another image if you prefer. When you have your image selected, click Open, and it replaces the default text in the left frame.
![]() Quick Tip Another option is to single-click the default image and press <Delete>. Then you can click Tools on the menu bar, select Gallery, and drag one of the included images onto your slide.
Quick Tip Another option is to single-click the default image and press <Delete>. Then you can click Tools on the menu bar, select Gallery, and drag one of the included images onto your slide.
That’s it. Your first slide is done. You might want to pause here and save your work before you move on. (Masterpieces must be protected.) Click File on the menu bar, select Save As, and then enter a filename for your presentation. I used Introducing Linux! as my title. Now click Save, and we’ll continue building this presentation.
At the right end of the Standard bar, there’s a button labeled Slide. Clicking this button inserts a new slide after whatever slide you happen to be working on. You can also click Insert on the menu bar and select Slide. Once again, you are presented with a blank slide, ready for your creative vision (as in Figure 15-4). In the left frame, a new blank slide appears below the preview of the completed first slide.
For this second slide, let’s select a new slide design. Go back to the Layouts section of your Tasks frame and select the slide design called Title, Text (see Figure 15-7). This is the second design from the top in the lefthand column. Remember to pause over the layout styles and a tooltip identifies them.

Because we had five points (after our introductory slide), let’s do a quick add of the next four slides by just clicking the Slide button on the Standard bar. You should now have tabs labeled Slide 1 through Slide 6.
Okay, click the tab for Slide 2, then click the top frame where it says Click to Add Title. Enter the first bullet point from Slide 1. Then repeat the process for the next four slides, inserting the appropriate bullet point as the title.
![]() Quick Tip You can give those slide labels more useful names by right-clicking them and selecting Rename Slide.
Quick Tip You can give those slide labels more useful names by right-clicking them and selecting Rename Slide.
As to what to enter in the text area of each slide, I leave that to either your imagination or your memory of Chapter 1. When you have finished entering all the information you want, save your work. I’m going to show you how to dress up those plain white slides.
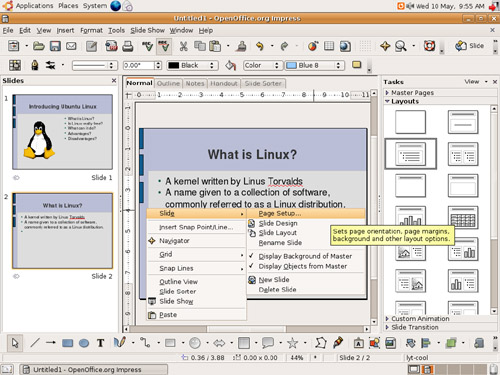
Right-click your slide (not the text), and select Slide from the pop-up menu. Now click Page Setup (see Figure 15-8).
You see a two-tabbed window (one says Page and the other Background). Click the Background tab. Notice that it’s a pretty boring page with nothing but a drop-down list labeled Fill, with None selected. Each item in the drop-down list provides an option for background selection, whether it is plain white, colors, gradients, hatching, or bitmaps. Click each to see the choices that they offer. The example in Figure 15-9 shows the Bitmap selection screen.

For example, you might choose the Linear blue/white gradient (a very business-looking background) or perhaps the Water bitmap. The choice is yours. When you click OK, you are asked whether you want this background setting to be for all slides. For now, click Yes.
All right. You’ve done a lot of work, so save your presentation. Click File on the menu bar and select Save (or Save As) from the menu. If you choose Save As, you have the opportunity to select the presentation format, whether native OpenOffice.org OpenDocument or Microsoft PowerPoint format.
Now, it’s time to see the fruits of your labors. Click Slide Show on the menu bar and select Slide Show. You can also use the <F5> keyboard shortcut. The slides transition with a touch of the spacebar or a mouse click. You can exit the presentation at any time by pressing the <Esc> key.
Here’s something you are going to find incredibly useful. Impress lets you export your existing presentation to HTML format. The beauty of this is that you can take your presentation and make it available to anyone with a Web browser. Best of all, the export functionality takes care of all the details associated with creating a Web site, including the handling of links and forward and back buttons.
To create an instant Web presentation in OpenOffice, here is what you do. Make sure that your current Impress presentation is open and that your work is saved. Click File on the menu bar and select Export. The Export dialog, looking very much like the standard GNOME file selector, appears. Make sure you select HTML Document from the File type drop-down list. Because all the generated pages appear in the directory you choose, it might make sense to create an empty directory, into which to save your files before entering a filename. That filename, by the way, is the HTML title page, normally called index.html. If you would like a different name, choose it here, minus the .html extension (for example, Linux_Intro), and click Save. A new window appears. This is the HTML Export dialog (see Figure 15-10).
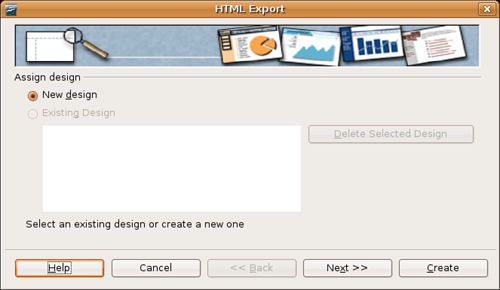
If this is your first HTML export, you only have one option on the first screen, and that is to create a new design. Click Next and you are presented with a few additional choices (see Figure 15-11).
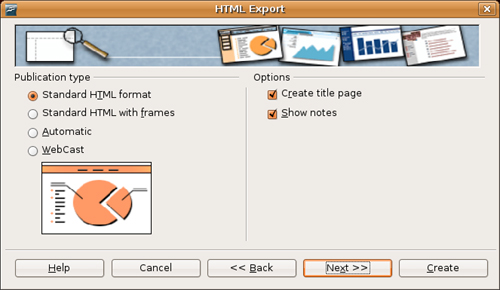
You are given the choice of several publication types. The default choice (and probably a very good one) is Standard HTML Format. You can also decide to create an HTML publication with frames, if you prefer. If you want to be totally in control of what your audience sees, you can also elect to create an automatic slide show (using HTML refresh times of whatever you choose) or a WebCast. When you have made your choice, click Next.
On the next window, you must decide the resolution of the images created for your Web publication (see Figure 15-12). The default is to use JPG images at 75 percent compression. You can elect to set this all the way up to 100 percent for the best quality possible, but be aware that the higher the quality, the larger the images and the slower the download time. If this presentation is meant to be viewed on your personal office network, it probably doesn’t matter. Notice as well that you can choose to use the PNG graphic format instead of JPG.

![]() Tip PNG (Portable Network Graphics) is a lossless, high-quality, and patent-free replacement for the GIF file format of old.
Tip PNG (Portable Network Graphics) is a lossless, high-quality, and patent-free replacement for the GIF file format of old.
You are also asked to choose the monitor resolution. This is an excellent question that is probably worth more than a few seconds of configuration. At some point in your history of surfing, you have come across a Web site where the Web page is larger than your browser window. To view the page, you need to move your horizontal slide bar back and forth just to read the text. Although we are used to scrolling up and down to read text, left to right scrolling is somewhat more annoying. If you want to be as inclusive as possible for your audience, use 640x480. That may be going overboard though. Most personal computer monitors these days will handle 800x600 without any problem and many people run 1024x768 displays. Is there a right answer? Probably not. Consider your target audience, make your decision based on those considerations, and then click Next.
One last thing before we move on. Notice the Effects check box. I’m not a big fan of Web pages that play sounds when I do things. You can choose to export sounds whenever slides advance. The best way to decide what you like is to try both. It’s all for fun, anyhow.
On the next window that appears, fill in title page information for the Web presentation. This is the author’s name (you), your email address, and a link back to your own Web site, if you want. Click Next, and you then have the opportunity to decide on the graphics you want to use for the forward and back buttons. If you don’t want to use graphical buttons, you don’t have to. In fact, the default is to use Text Only; so to use a particular button style, make sure you uncheck the check box (see Figure 15-13), select your button style, and click Next.

We are almost there. The final window lets you decide on the color scheme for the presentation. The default is simply to use the colors from the original Impress publication, but you can override this, as well as the color for hyperlinks and the Web page background. Make your choices and click Create. One last window appears, asking you to name the HTML design. This is a free-form text field. Enter a brief description, and click Save.
The process of exporting your presentation may take a few seconds or a few minutes, depending on the speed of your machine and the complexity of your presentation. To view the presentation, open your browser and point to the title page. That is all there is to it.
Before we wrap up, let’s revisit that Export dialog one more time. Click File from the menu and select Export. When the Export dialog appears, have another look at the File format selection box, just below the File Name field. The default is to export to an HTML document, but there are other options here. For one, we have a PDF export, the one button export (beside the printer icon on the standard bar) is common to Impress as well.
Notice as well that you have a Macromedia Flash export capability. Isn’t that interesting? Enter a filename for your presentation (no need to add the .swf extension). With a single click of the Export button, your presentation is saved to Macromedia’s Flash format. Now, your presentation is viewable from any browser with a Macromedia Flash or Shockwave plugin. The advantage of this over the HTML export is that all your animated slide transitions are preserved. Visitors to your site can view the presentation as it was intended.
Having made you run off to Larry Ewing’s site for a copy of Tux, I suppose I should take a moment to answer one of the most frequently asked questions in the Linux world. After all, every time you look at a Linux book, boxed set, or Web site, you stand a good chance of coming face to face with a fat, smiling penguin. You may well be wondering what Linux has to do with this penguin (see Figure 15-14). Well, for starters, his name is Tux, and he is the Linux mascot. The most famous version of Tux (and there are many) is Larry Ewing’s design.

The story behind Tux is the stuff of legend now and, like most legends, a little hard to pin down. Linus Torvalds was asked what he envisioned for a mascot. The answer from Linus was, “You should be imagining a slightly overweight penguin (*), sitting down after having gorged itself, and having just burped. It’s sitting there with a beatific smile—the world is a good place to be when you have just eaten a few gallons of raw fish and you can feel another ’burp’ coming.”
There is also another story where Linus claims he was attacked by a killer penguin at the Canberra Zoo, where he contracted “penguinitis,” a disease whose main symptom is that you “stay awake at nights just thinking about penguins and feeling great love towards them.”
That’s the thing about legends. They tend to get strange over time.
Before we move away from the classic office applications, I would like to take another moment to address the issue of templates. Although StarOffice, the nonfree commercial sibling of OpenOffice.org, comes with a number of templates for word processing, spreadsheets, and presentation graphics, OpenOffice.org is still quite light in this area. As I mentioned earlier, the Impress package includes only a couple of templates.
To that end, I’m going to remind you of the Web sites I mentioned at the end of Chapter 13. They are Travis Bauer’s OOExtras site and Scott Carr’s OpenOffice.org Documentation Project. Both are excellent starting points for adding to your collection of templates. Look for the links to both in the Resources section.
Perhaps, in time, you too will contribute to this growing body of work.
In the last two chapters, I mentioned that the KDE office suite, KOffice, offers similar components that you may want to consider. These include KWord for word processing and KCalc for spreadsheets. There’s also an alternative for presentation graphics and that is KPresenter. As before, you can use Synaptic to search for and install KOffice.
Remember that you do not need to be running KDE to run KOffice or any of its components. These applications work very nicely from the GNOME desktop.
KPresenter
http://koffice.kde.org/kpresenter/
Larry Ewing’s “Tux” (the Official Linux Penguin)
http://www.isc.tamu.edu/~lewing/linux/
Linux Logo Links at Linux.org
http://www.linux.org/info/logos.html
OOExtras
http://ooextras.sourceforge.net
OpenOffice.org Web Site
OpenOffice.org Documentation Project