
Chapter 16 OpenOffice.org Base
Computers have thousands of uses, but in the end, the most important things they do come down to two major and equally important functions. The first is mathematics. More specifically, the computer makes it possible to do complex (or simple) mathematics quickly. The key word here is quickly. Whether it is figuring out ballistic tables to better ensure the trajectory of a missile and cracking complex codes (as was the impetus for the computer’s development during World War II) or processing a company’s financial information, math is central to every computing operation.
The second most useful function a computer has is storing, sorting, and retrieving data quickly. (Again that word quickly.) Search engines like Google or Yahoo! are a testament to the computer’s power of sifting through large amounts of information. In doing so, businesses can locate a customer’s address in seconds, even though there may be millions of other customer records in the system. A hospital with thousands of patient records can pull up your medical history in a flash and update it with today’s visit. The online bookstore maintains your personal information so you can buy a book with a click or two. A year’s worth of financial information, arranged into a clear, concise report, appears on the printer seconds after the company accountant requests it.
As my wife, Sally, is fond of saying, “It’s all about the data.”
Storing data, or information, if you prefer, is what a database is all about. That’s why the addition of a database into the OpenOffice.org suite is so exciting. OpenOffice.org Base makes it possible to create your own databases, retrieve and modify information, perform queries, create reports, and so on. Base can attach to an existing database engine such as Oracle, Microsoft Access, MySQL, and many others using ODBC or JDBC. If all you need your database to do is simple operations, such as creating and maintaining a mailing list, OpenOffice.org base comes with the built-in HSQL database engine.
Because I mentioned mailing lists, let’s use that as the basis for our exploration of OpenOffice.org Base. When we are through creating the database, I’ll show you how to use it in another OpenOffice.org program, the Writer word processor. We’ll take the information from our mailing list and create mailing labels.
To start OpenOffice.org Base, click Applications in the top panel and select OpenOffice.org Base from the Office submenu (command name: oobase).
When you start OpenOffice.org Base, you are presented with the Database Wizard (see Figure 16-1). This is a simple wizard with only two screens, the first of which is to select or identify a database. Your options are to Create a New Database, Open an Existing Database File, or Connect to an Existing Database. Let’s just go ahead and create a new database by making sure that radio button is selected. Click Next.

The second step is where you must decide how to proceed after saving your database. There are only a few options on the second and final screen, but they are important and worth explaining (see Figure 16-2).
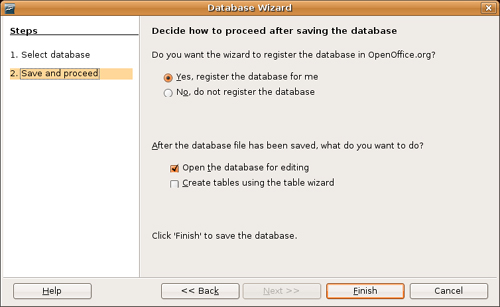
The first option has to do with registering a database. To quickly answer this question, ask yourself whether you want to use this database from inside other OpenOffice.org applications. If the answer is yes, click the radio button Yes, Register the Database for Me. Nothing stops you from creating a nonregistered database and then registering it later, but in this example at least, we want to use the database in OpenOffice.org Writer.
The next section gives you two options. The first, Open the Database for Editing, should be checked (you can create a database and get back to it later). You could, at this point, jump right in and Create Tables Using the Table Wizard but leave that unchecked for now.
When the Save As dialog makes its appearance, select a name and location for the database (see Figure 16-3). For this example, I’m going to create a simple mailing list database, which I’m going to call (wait for it) Mailing List.

That’s really all you need to do to create the database. Click Save and OpenOffice.org Base’s main window appears (see Figure 16-4). By default, the Forms view is selected but that’s only so useful if you haven’t set up your tables yet. Nevertheless, let’s take a look at the interface.
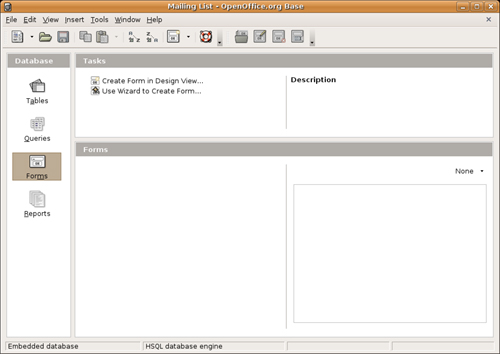
Along the top, directly below the menu bar is the Standard bar, looking less standard in OpenOffice.org Base than in any of the other components you have worked with. Running down the left side is an icon bar providing quick access to needed database functions, including Tables, Queries, Forms, and Reports. The main area to the right is divided horizontally into main areas. In the top part, we have Tasks. These tasks are all in some way related to the four database functions in the left sidebar. The bottom part of the window is for Forms.
Before we get too deep into all of this, we need to prepare the database to accept data. We do that by creating tables. Simply stated, tables define what our data looks like. You can even define multiple tables that further define bits of data in a master table. For instance, you can have a table that basically is an address list with first and last names, addresses, and so on. A second table might tie in to the person’s name, but the information may have to do with the number of hours he worked. The person’s name, in this case, might be the key you use to access both tables. A third table, using the same key, might be a list of movie rentals in the last year.
Let’s go ahead and create a table.
Yes, you could even have a table with recipes. Although that sounds like a tasty idea, I started out by saying my database was going to be a mailing list, so we will build an appropriate table.
The easiest way to get started is by using the Table Wizard. To do this, click the Table icon in the left sidebar. Now look at the top in the Tasks section. You see two entries there. The first, Create Table in Design View, is the more advanced approach, when you know what your data looks like. The second option is Use Wizard to Create Table. When you click this item, OpenOffice.org Base’s Table Wizard starts (see Figure 16-5).
![]() Tip When selecting the Table Wizard (or any of the Base wizards), you may get a message telling you that you need to turn on the Java runtime. First, you need to make sure you have a Java runtime installed. Luckily, OpenOffice.org automatically discovers its location. Click Tools on the menu bar, and then select Options. On the Options window, click Java from the sidebar, and then check the box Use a Java Runtime Environment.
Tip When selecting the Table Wizard (or any of the Base wizards), you may get a message telling you that you need to turn on the Java runtime. First, you need to make sure you have a Java runtime installed. Luckily, OpenOffice.org automatically discovers its location. Click Tools on the menu bar, and then select Options. On the Options window, click Java from the sidebar, and then check the box Use a Java Runtime Environment.
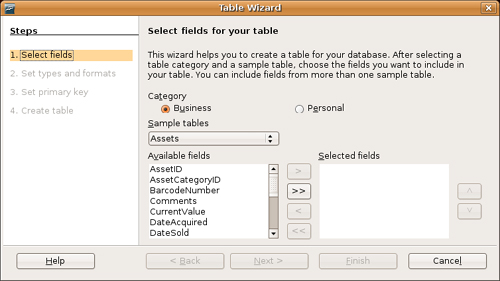
The Table Wizard comes with a number of predefined tables for common tasks. All of these table definitions are divided into two categories, Business and Personal. Click the radio button for one or the other, then click the Sample Tables drop-down box to browse the table types. Under Business, you find things like Assets, Customers, Employees, Expenses, Projects, Suppliers, and many more. The Personal list has items such as Accounts, CD-Collection, Diet Log, and Household Inventory, to name just a few. For now, click the Personal radio button and select Addresses from the table list. A list of fields appears below the radio button (see Figure 16-6).

If you scroll down that list of available fields, you see a lot more information than you actually need. You can click the double arrow in the middle (the right pointing one) and all the fields are selected. You can also select them one by one, as I have done in Figure 16-6. In the case of a simple mailing list, you may not need anything more than name, address, city, state, phone number, and email address. After you have finished selecting these fields, you can choose to click Finish or click Next to edit the format of each individual field. Let’s pretend that the definition and format of these fields are okay. Click Next to move to the primary key selection screen (see Figure 16-7).

The primary key selection screen is important because a key is how you access and store information in a table. Although you can search on any field, a key needs to be a unique piece of information under which the record is stored. A classic example is the Social Security Number (or Social Insurance Number), which is unique to the individual. You can let Base generate a primary key for you, and that is the default. By checking the Auto Value box, Base automatically generates a key with each record you create.
Your other options are to use an existing field (like that SSN/SIN) or to define a combination of your fields to create that uniqueness.
Let’s go with the default for now. Check the Auto Value box as well. Click Next and the final part of the wizard, the Create Table page, appears (see Figure 16-8). If you are using the wizard, Base suggests a name for the table, but you can call it anything you like. I’m going to accept the default of Addresses because that suits me just fine. Keep in mind that although our database is called Mailing List, there can be a lot more associated with a mailing list—the Addresses table is just a small part of it.
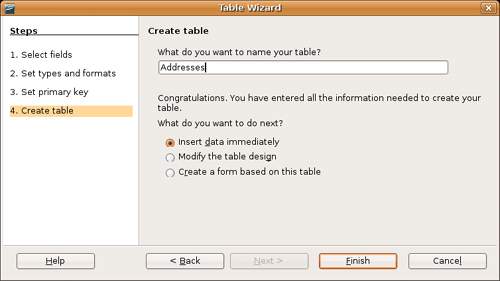
We are done with the wizard, but before you click Finish, you have one last choice to make, and three options to choose from. The first is to start adding data (I’ll show you that in a moment). The second is to go back and make other changes to the table design. The final choice is to create a form based on this table. I’ll show you what happens in both cases, but let’s start with the default option, Insert Data Immediately. When you do that, a spreadsheet-like window appears with rows of data and columns representing the fields in your table (see Figure 16-9).

There is one other item I’d like you to look at in the OpenOffice.org Base Tables view. It’s not a big deal, but it’s kind of cool, so I’m going to tell you about it.
In the lower part of the main screen (the Tables section), click the Addresses table (at this time, there is only one). Now, look to the right and you see a drop-down list with None selected. Click the button and select Document. You get a pretty cool little preview of your table and the data in it (see Figure 16-10).

Before we move on to the next step, I want to touch on the subject of creating a table in design view. There’s no question that using the wizard is by far the easiest way to do this, but using the design view isn’t much more difficult. It does have the advantage of giving you greater control over the format of your tables, but you have to think about what fields you want, and what you want those fields to look like (see Figure 16-11). In that respect, I recommend it only if you already have some experience in database and table design.

Now that we have this great database of names, let’s create a sheet of mailing labels. We do this with Writer, the word processor I covered in Chapter 13, but not with OpenOffice.org Base.
To begin, click File on the OpenOffice.org menu bar, and select Labels from the New submenu. You don’t have to be running Writer to do this. Any OpenOffice.org application is a perfect starting point for creating labels. A few seconds after making your selection, the Labels dialog appears (see Figure 16-12).
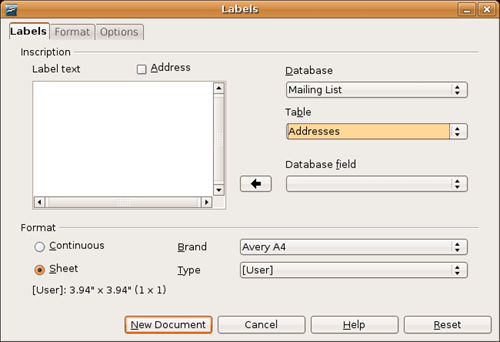
Start by looking on the right, under the Database heading. This is where registering the database, that little step we did at the beginning, pays off. OpenOffice.org Writer already knows about the various databases and can pick my Mailing List database from the drop-down list. Below that is another drop-down list labeled Table. Click here and select the table from which you will be pulling the information you need. At the bottom of the dialog, you can select the Brand label (for example, Avery Letter Size) and the type (for example, 5961 Address).
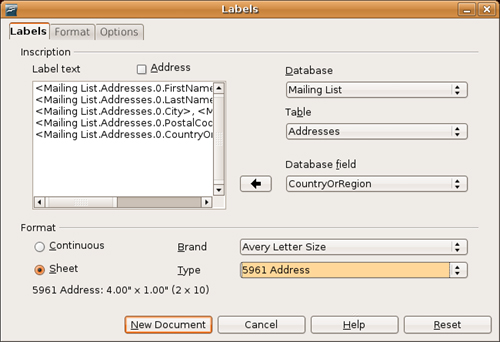
To the left, below Label Text, is where we build the label we will be printing. At this moment, there are no fields visible there. Look again to the right to the Database Field drop-down list. Click that list and you see all the fields that make up the records in your table. Select the Database Field you want, and then click the large arrow directly to the left. The field you selected appears in the Label Text window. Put a space after the field name, then select the last name, and click the arrow again. Press <Enter> to go to the next line in the Label Text window. Next is the address, city, and so on. You may want to put a comma between the city and province (or state). Line by line, transfer the fields that you want to have appearing in your finished label (see Figure 16-13).
Before we move on, let’s quickly have a look at the other two tabs, Format and Options. The Format tab allows you to fine-tune your label dimensions. This includes margins, columns, rows, and pitch. If you selected one of the commercial labels from the list, this information will be filled in for you and you shouldn’t have to worry about changing anything. Use the Options tab to select whether you are printing a full page of labels or a single label. The most interesting item here is a check box labeled Synchronize Contents. Check this box and you can edit a single label and synchronize the contents of all other labels with a click.
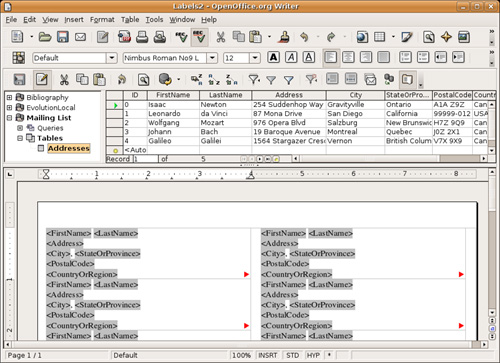
Go back to the Labels tab and click New Document to create your label document. Each label is pre-created with the field labels you selected in the proper place. At this stage of the game, there are no names or addresses in any of the labels, just the data fields. To populate these labels from your Mailing List database, you need to tell the new document where to get its information. To do that, click View on the menu bar and select Data Sources (you can also just press <F4>). The top part of your label document now shows the databases and tables available. Make sure you select the Addresses table from the database list. When you do, the records in that table appear in the right side of the data sources pane (see Figure 16-14).
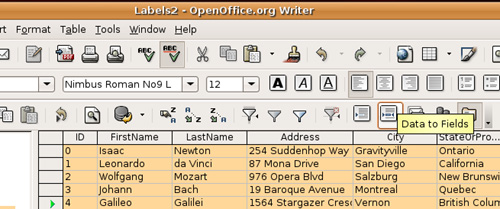
To populate your label document, you should now select which records you want included from the Table view at the top right. The easiest way to select them all is to click the button to the left of the top record, press the <Shift> key, then click the last record. You can also select individual records by holding down the <Ctrl> key and clicking the records you want. When you have made your selections, look at the secondary icon bar, directly above the data sources. There’s a button fourth from the right that displays a Data to Fields tooltip if you pause your mouse over it (see Figure 16-15).
Click the Data to Fields button and your document is instantly populated with all of the selected records (see Figure 16-16). You can save this document for later use or you can print the page using your chosen label stock.

In this chapter, I introduced you to the basics of using OpenOffice.org Base and showed you how to use the database tables in a word processing document. Obviously, this is just the beginning.
Using Base, you can create custom forms for data entry. Wizards make this easy but there is a manual forms creator as well. Simple or complex custom reports are also easily generated using the Report Wizard. You can perform queries, connect to external databases, build indexes, and more. OpenOffice.org Base provides useful database access tools for users at every level.