Chapter 18 If Music Be the Food of Love ... (Ubuntu Linux Multimedia)
Playing music on your Linux system is only the beginning of the multimedia experience. After all, multimedia isn’t just about music. It represents a cornucopia of sensory experience delivered digitally, comprised of text, audio, video, and endless combinations of the three.
Most modern Linux installations offer an impressive selection of programs to satisfy your cravings for the multimedia experience, from audio to video and everything in between. These programs include sound control systems, CD players, recorders, MIDI programs of varying flavors, music synthesizers, video players, music notation programs, and . . . the list goes on.
In this chapter, I’m going to cover some of the more popular multimedia tools for your Linux system. So, as old William Shakespeare might have said, “If music be the food of love, then multimedia must represent the smorgasbord.”
Think back for a moment to those days of old when Mom or Dad would yell into your bedroom to “TURN THAT NOISE DOWN!” Doesn’t that bring back memories? In particular, it brings back the memory that sometimes you just have to crank the tunes.
Most music or multimedia players you are likely to use under Linux have some kind of a volume control. Your speaker system likely has one, as well. There is, however, a third set of controls you should know about: the GNOME volume control. Look over to the right of the top panel and you should see an icon that looks like a speaker. Click that speaker icon and a simple volume slider appears (see Figure 18-1). This provides you with a fast means of making volume-level adjustments.
Under certain circumstances, you’ll want finer control over the levels of certain devices, at least better than the single slider can provide. Either double-click the top panel speaker icon or right-click the icon and select Open Volume Control from the drop-down menu. A Volume Control three-tabbed mixer panel appears with your system sound card’s name alongside (see Figure 18-2).

The various sliders correspond to various levels, from that of your hardware’s master levels to the PCM output, microphone inputs (under the Capture tab), and so on. Pause your mouse pointer over the sliders and a message describing the slider’s function appears at the bottom of the window.
![]() Note The number of sliders and controls vary from sound card to sound card and they may not all be activated by default. Click Edit on the menu bar, then select Preferences. Check boxes representing the possible input and output sources appear. To add one to your mixer control panel, check the appropriate box.
Note The number of sliders and controls vary from sound card to sound card and they may not all be activated by default. Click Edit on the menu bar, then select Preferences. Check boxes representing the possible input and output sources appear. To add one to your mixer control panel, check the appropriate box.
Now that you can easily modify the level of noise coming from your speakers, it’s time to get some music on.
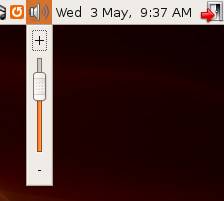
Try this. Get your hands on your favorite music CD and pop it into your Ubuntu system’s CD drive. As I write this, I’ve got my Pink Floyd Echoes album handy, so I’ll use that as an example. A few seconds later, the Sound Juicer application window appears (see Figure 18-3). Sound Juicer, which you can also start from the Sound & Video menu under Applications on the top panel, is the default CD player for Ubuntu.
Along the top, there are fields identifying the Title of the CD, the Artist, and the Genre. Directly below this information is a list of all the songs on that CD. Because I mentioned that this is the default CD player, I cover this aspect of the program first. Notice that all of the songs are selected when the CD is inserted (the check box to the left of the title).
Click the Play button, sit back, and enjoy the music. Each song on the CD is then played in sequence. As songs are played, the Play button turns into a Pause button. To skip a song, just double-click the song title you want to hear and Sound Juicer abandons your current selection and jumps to the track of your choice. Next to the track number, a little speaker icon appears showing you the song being played. The track title also appears in Sound Juicer’s title bar.
Sound Juicer is also a CD ripper, allowing you to make personal copies of your music to play on your Linux system or on a portable player. I’ll cover this in detail shortly, but I want to wrap up CD playing. That means I’m going to leave the Sound Juicer behind for a moment so I can tell you about another CD player.
Although it doesn’t come up automatically, and you can’t find it in the Applications menu, Ubuntu has another CD player that you might prefer, the GNOME CD player. If all you want to do is play your CDs and you want a simple, easy-to-use interface, look no further. Press <Alt+F2> to bring up your quick-start application starter and type in gnome-cd). The CD player launches (see Figure 18-4). Click the Play button, sit back, and enjoy.

![]() Tip If you can’t find the CD player, install it with Synaptic. Look for and install the
Tip If you can’t find the CD player, install it with Synaptic. Look for and install the gnome-media package.
On the left of the player, just above the Pause button, there’s a button with a tool icon. Click this button to bring up the CD player preferences dialog. Next to that is the standard list of controls to skip over songs, fast forward, or stop. On the far right of the CD player, there’s a vertical slider control. That’s a volume control.
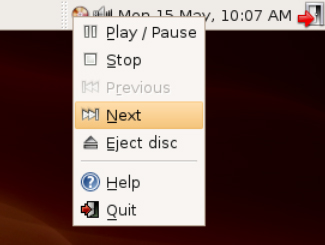
After the GNOME CD player has started, look in your top panel’s notification area and you see a small icon that looks like a CD. Left-click the icon and the CD player disappears into the panel. Right-click the applet and you have access to the basic CD player controls such as Previous, Next, Stop, Play, and so on (see Figure 18-5).
Over the years, we have all purchased a lot of music CDs or, as some of us still call them, albums. Many of those albums, unfortunately, had only two or three songs we really liked, so playing the whole album wasn’t what we wanted. As a result, we created collections of our favorite songs on tape and played the tapes, instead.
These days, with the help of our Linux systems, we can create our own collections from those albums we purchased and create CD collections of those songs we want to hear. Furthermore, if you have lots of disk space and you spend a lot of time at your computer, nothing beats a collection of songs ready to play without having to change CDs all the time. Pulling songs from a CD and saving them to your system as digital images is what is commonly referred to as ripping. The burning happens when you take a collection of songs and, well, burn them to a CD.
Before I get into the mechanics of ripping and burning songs, I’d like to spend a small amount of time discussing music formats. When you purchase a CD, the songs on that CD are in a format not generally used by your system. In fact, when we copy songs to disk from a CD, we always encode it into another, usually more compact format. The format we transfer to is identified by a three-letter extension on the filename. The most common format extensions are .wav, .mp3, and (more recently) .ogg.
The WAV format is one originally created by Microsoft. It is extremely common but not the most efficient in terms of compression. On the other hand, the MP3 format (from the Motion Pictures Experts Group, a.k.a. MPEG) owes its popularity to the high compression ratio it uses—about 12:1. The newcomer on the block is the OGG (or Ogg Vorbis) format. Like MP3, it boasts a high compression rate, but unlike MP3, it is completely unencumbered by patents.
To give you an idea of the compression values, I ripped a 3-minute, 46-second song to WAV format. It came in at 39,866,444 bytes, whereas the same song in OGG format required only 3,438,407 bytes. If you do the math, that is a ratio of 11.6:1. Pretty impressive reasons for not using WAV format files.
Every time you put in a new audio CD, every song is selected, either for play or for extraction by Sound Juicer. Earlier, I had you play the songs, but clicking the Extract button is pretty much all you need to do to get those songs onto your hard drive. Alternatively, you can select individual songs by clicking the check boxes to the left of each song.
When the process starts, the Play button is grayed out and the Extract button changes to a Stop button in case you want to cancel the process. At the bottom of the Sound Juicer window, on the left side, is a graphical progress bar. Directly to the right of that, the estimated time is indicated along with the speed at which the process is taking place (see Figure 18-6).

The resulting songs are saved in your home folder using the following format:
/home/username/artist_name/album_name/track_title.ogg
When it’s all over, you get a message telling you that your tracks were successfully copied. You can either close the dialog or click the Eject button to pop the CD out.
Now that you have all the basics of ripping songs with the Sound Juicer, let’s take a moment to revisit this whole notion of audio formats. Click Edit on the Sound Juicer menu bar and select Preferences. When the Preferences dialog appears (see Figure 18-7), look at the bottom of the dialog. There’s a drop-down box labeled Output Format with several formats available. They include two CD quality formats (lossless FLAC and lossy Ogg Vorbis) as well as two voice quality formats (lossless WAV and lossy Ogg Vorbis).

If the music is going to stay on your home computer and you like the idea of patent-free compression format, choose Ogg Vorbis or FLAC. If you own a portable MP3 player and you want to take your music with you, you may still be okay with Ogg Vorbis because it is supported by a number of popular players.
![]() Important Legal Tip Regarding MP3 Files Some of you may wonder where the MP3 format is in this list. Because of patent issues (a problem in some jurisdictions, most notably the United States), Ubuntu does not automatically install an MP3 encoder. This is also true of playing MP3s using players such as Rhythmbox, which I will cover shortly. Because this book is distributed worldwide, it may be perfectly legal for you to download and install these encoders and plugins. Consult with your local authorities to find out if playing these formats in your country or state is legal.
Important Legal Tip Regarding MP3 Files Some of you may wonder where the MP3 format is in this list. Because of patent issues (a problem in some jurisdictions, most notably the United States), Ubuntu does not automatically install an MP3 encoder. This is also true of playing MP3s using players such as Rhythmbox, which I will cover shortly. Because this book is distributed worldwide, it may be perfectly legal for you to download and install these encoders and plugins. Consult with your local authorities to find out if playing these formats in your country or state is legal.
To get MP3 functionality (along with several other formats), you need to install the following packages: gstreamer0.10-plugins-ugly and lame. You can do this with Synaptic as described in Chapter 8. Note that you need to have the Universe and Multiverse repositories activated. These only cover MP3 files but there are a handful of other formats that may be considered non-free—again, depending on where you live. To learn about these and how to install the right packages, make sure you visit the following URL:
https://wiki.ubuntu.com/RestrictedFormats
Another, very easy way to add MP3 support (as well as support for many other audio and video formats) is to visit EasyUbuntu at http://easyubuntu.freecontrib.org. Just follow the instructions on the site and you are on your way.
Now, look at your Sound Juicer Preferences window again and click Edit Profiles next to the output format drop-down list. You see the current four formats listed. Now click the New button to the right and enter a name for the new profiles (for example, CD Quality, Lossy, MP3). You now have five profiles listed. Click your new MP3 profile and then click the Edit button. A dialog like the one in Figure 18-8 appears.
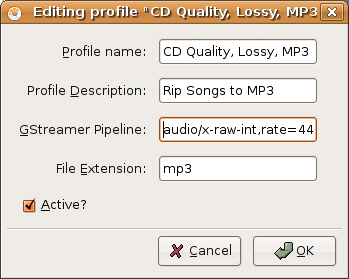
It’s time to make a few changes. The Profile Name can be left alone, and you can pretty much enter whatever you like as a Profile Description (for example, Rip songs to MP3). Under File Extension, enter mp3. Because the GStreamer Pipeline information is a little long, I’m going to show it to you on a separate line:
audio/x-raw-int,rate=44100,channels=2 ! lame name=enc
Click the Active check box, and then click OK to close the dialog. At this point, I would tell you to select your new MP3 encoder from the Output Format list, but on my system, I found that I had to shut down Sound Juicer first and restart it before I could make the change. After that, I was able to rip MP3s without fuss.
This is the easy part. Start up Nautilus and navigate to a folder where your songs are located. If you are looking for a specific song, do a search on it (as described in Chapter 4). In Figure 18-9, you can see that I’ve done a search on songs with the word Woman, ending with an .mp3 extension.

If you pause over the music file with your mouse cursor, the file starts to play and continues playing as long as your cursor sits there. Not very practical for listening but a great way to make sure this is indeed the song you are looking for. To play it and get back to work at the same time, double-click the song file. The Totem media player appears and your music plays (see Figure 18-10).
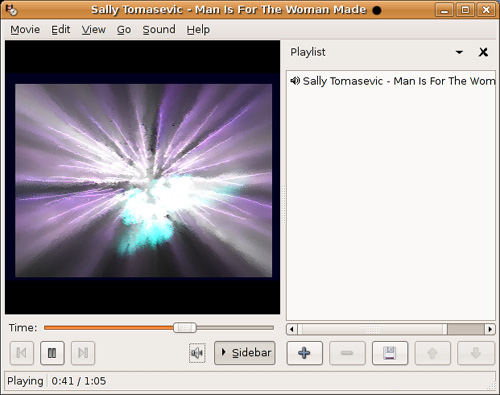
Aside from the fact that you can now listen to your track of choice, you have also been introduced to the all-purpose Totem media player. You might also have noticed that while you were listening, Totem was running a pretty cool little light show over in the left pane. It’s kind of hard to visualize from the image in Figure 18-10, but it can be rather hypnotic. Press the <F> key (the letter f) and your view switches to full screen. Just sit back, watch the show, and listen. To leave full screen mode, press <F> again or slide your mouse cursor to the top of the screen (a Leave Fullscreen button appears).
At the bottom of the window, you find controls for playing/pausing, previous, and next. There’s also a volume control and a slider to position you at any point in the track being played. Notice that your single song selection is listed in the right pane, the one titled Playlist. One song constitutes a fairly small playlist, but you can easily add more songs to the mix. Just click the plus sign at the bottom of the window and the standard GNOME file selector appears. Select the songs you want and they appear in your playlist. If you like the collection you’ve created, click the diskette icon at the bottom of the playlist, and you can load it up at a later time.
I still find it interesting to consider the terms that have entered the language when referring to creating CDs. We rip, and then we burn. Considering the violent-sounding nature of the process, anything that simplifies the process and makes things a little friendlier is certainly welcome. For this part of the chapter, I’m going to assume that you have already ripped a number of songs and now you want to create a custom collection of your music to listen to in the car or on your living room stereo. I’m also going to tell you how you can use essentially the same process to back up your data.
Try this one. Make sure you have closed the Sound Juicer program and taken your music CDs out of the drive. Take a blank CD-R and pop it in your CD or DVD burner. Your Ubuntu system should recognize this event with a pop-up message asking your intentions for this blank CD (see Figure 18-11).

Do you want to ignore this event, create a music CD, or create a data CD? Hmm . . . doesn’t that last choice sound interesting? We’ll cover making an audio CD shortly. For now, let’s click the Make Data CD button. When you do, something interesting appears. A special Nautilus window appears (see Figure 18-12).

![]() Tip You can bring up the CD/DVD Creator view of Nautilus from any Nautilus window. Click <Ctrl+L> and enter
Tip You can bring up the CD/DVD Creator view of Nautilus from any Nautilus window. Click <Ctrl+L> and enter burn:/// in the location bar or click Go on the menu bar and select CD/DVD Creator from the menu.
If you are looking to save some files and folders to a CD (or create a backup), the easiest thing to do here is to open another instance of Nautilus from which you can make your selections. Click the files and folders you want and drag them into the Nautilus CD/DVD Creator window. You can also create special folders in this window into which you organize the information you want to burn to a CD. As you add files, the window looks somewhat more populated (see Figure 18-13).

Repeat this process until you have everything you want, and then click the Write to Disc button in the top right of the Nautilus window. The Write to Disc dialog appears (see Figure 18-14). Before we move on, I should mention that everything I’ve mentioned up to this point is based on the idea that you started with a blank CD in the drive. If you haven’t yet put in a blank CD (that is, you started the CD/DVD Creator manually), this is the time to pop it into the drive.
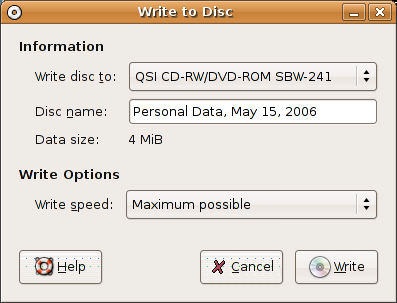
If you have more than one CD burner (perhaps a CD and DVD burner), you can select from the drop-down list at the top. Directly below that, enter the name of the project you are creating. You can also choose to accept the default of Personal Data followed by the date. The only other thing you might to modify here is the Write Speed. I don’t generally find this to be a problem, but sometimes, if I find myself creating more coasters than usual (bad CDs), I turn the burn speed down. This can be caused by CD media that can’t handle high write speeds. When you are happy with all your choices, click the Write button. A progress window appears with details of the current burn (see Figure 18-15).
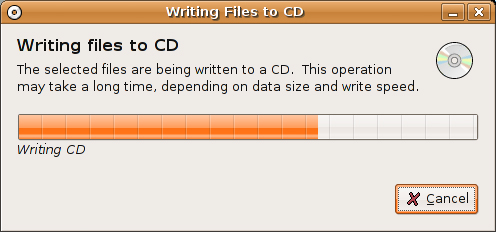
After the CD is complete, another dialog box appears, giving you the opportunity to make another copy or eject the drive.
By now you must be thinking, “Hey, if I can copy data directories to my CD, surely this is the perfect way to do backups.” It certainly sounds good. CDs allow you to back up roughly 700MB of data, and DVDs a whopping 4GB. Use CD-RWs, and you can create a rotating set of discs for backup purposes. So what’s the catch?
Well, for starters, the default Nautilus view does not show hidden files. If you want a complete backup, you need to make sure you get everything. When navigating Nautilus, make sure you click View on the menu bar, and then select Show Hidden Files.
The second problem has to do with permissions. If you are going to use this system to later restore your data, you need an intermediate step. You need to create an archive of those files. Let’s say you had selected a whole collection of configuration files, or email, or anything else for that matter. Right-click the selected files, then select Create Archive. The Create Archive dialog appears (see Figure 18-16).
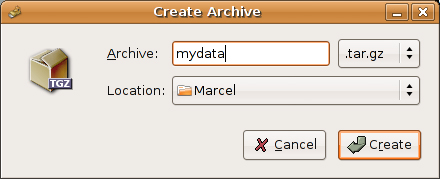
The Archive field is where you enter the filename in which you want all this information stored. To the right of the name is a drop-down box with .tar.gz selected. This is the default storage format, but several others are also available including .tar.bz2, .zip, and more. The Location is a folder where this archive file will be written. Click Create and a process dialog appears as files are added and compressed.
When the archive is done, drag that into the CD/DVD Creator window instead of the individual files.
That’s it. With your data safely backed up, you can sleep soundly at night.
Data is fine, of course, but I started this chapter talking about music. So let’s make ourselves a music CD, shall we? We can start this in two different ways. The first is to pop in a blank CD, wait for the “What would you like to do with this?” message (refer to Figure 18-11), and then select Make Audio CD. This fires up the Serpentine Audio-CD Creator (see Figure 18-17). The second method is to click Applications on the top panel, then select Serpentine from the Sound & Video submenu. Both methods take you to the same place.
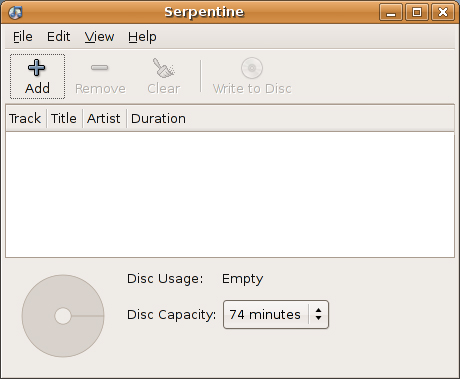
This is a standard interface with a menu bar along the top and an icon bar below. In the large central areas, tracks are listed along with their duration. As you can see, there are no tracks at this time. In the bottom part of the window, the disc usage is reported as empty with a total capacity listed based on the type of CD Serpentine identified. Notice the CD icon to the left. This a graphical progress bar of sorts, showing you how much of your disc is currently full. To add tracks to your CD, click the Add button. The standard GNOME file selector dialog appears from which you can make your selection (see Figure 18-18).
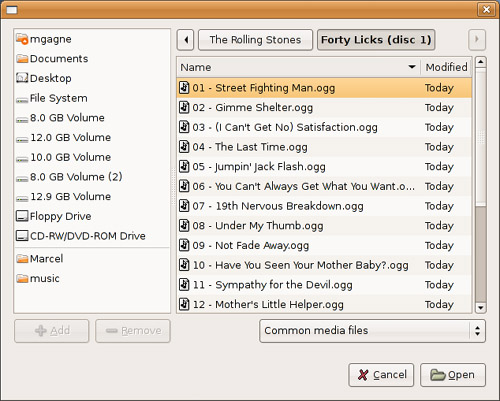
Remember, press <Ctrl> and click with the left mouse button to specify which songs you want. When you have what you want, click the Open button. Don’t worry about the order in which the songs appear on the list. When you have your selection complete, Serpentine displays the songs and works out the Artist and Title information from the filename (see Figure 18-19). Then, you can simply click on the songs in the middle pane, and move them up or down at will. If the song in position six would make a better opener, drag it up to position one. It is that easy.

Notice the disc icon in the lower left. It now shows my CD as being just slightly better than three-quarters full. Feel free to add more songs and rearrange them further. To remove a track, click it then click the Remove button in the icon bar. When you are done, click the Write to Disc icon at the top. A pop-up message appears asking you to confirm that you truly want to burn this music CD. Click the Write to Disc button on the confirmation dialog to begin the process.
As the window appears, you might notice that it looks a little different than the data burn window. For starters, a message appears telling you that the media files are being prepared. That’s because your OGG or MP3 files need to be converted back to CD audio first. After the conversion has finished, the same window displays the write progress (see Figure 18-20).

Ripping songs from your CDs and storing them on your PC so you can listen while you work (or play) is fantastic. Double-click Start up Totem, pull in a few songs into your playlist, and enjoy the music. Life couldn’t be any better. Except . . .
You see, all this collecting of music—ripping songs, building huge libraries of MP3s or OGGs on your computer’s hard disk—is eventually going to become a nightmare to administer. Sure, all those CDs in jewel cases have disappeared into that virtual space that is your hard disk, but now you have all these songs in a number of large folders with little or no organization. If you want to play something, you have to go searching. What you need is a jukebox.
In a much earlier part of my life, I used to make extra money babysitting some of my parents’ friends’ children. One of their friends repaired jukeboxes for a living. Consequently, a real honest-to-goodness jukebox was always in the house, full of 45 RPM singles. From time to time, the model and type of machine would change, but with the coin mechanism disabled, I had all the music I wanted available. Now, that’s entertainment! As luck would have it, your Ubuntu Linux system comes with a very fine jukebox program called Rhythmbox and you won’t have to babysit anybody’s kids to use it.
You’ll find Rhythmbox (command name, rhythmbox) by clicking Applications on the top panel, then selecting Rhythmbox Music Player from the Sound & Video submenu. This program integrates nicely into the GNOME desktop, with a notification area icon to drop the application out of sight quickly. It includes support for your MP3 and Ogg Vorbis files, collection and playlist management, tag editing, and much more.
On first start, a Rhythmbox configuration assistant appears to take you through some basic configuration steps. The first of these screens is an introduction, so just click Forward and Rhythmbox asks for folders where music is kept (see Figure 18-21). Enter this information manually or click the Browse button to bring up the GNOME file selector, from which you can choose the locations of music on your system. In my case, I have a separate partition called /mnt/music where I keep all my music.

As the assistant indicates, you can Skip This Step and enter the information at a later time. Click Forward and you are done. On the next screen, click Apply and Rhythmbox starts. The program is smart enough to scan all of your subdirectories for songs so there’s no need to list each and every directory where you keep music. You don’t want to just scan the entire system, however, because you won’t have permissions for many directories. You can add as many folders or file systems as you want.
Rhythmbox starts scanning those folders and builds a base collection. It reads the information tags on each song to try to determine the title, year, and so on of each song. After the process ends, you wind up with a collection list similar to the one in Figure 18-22.
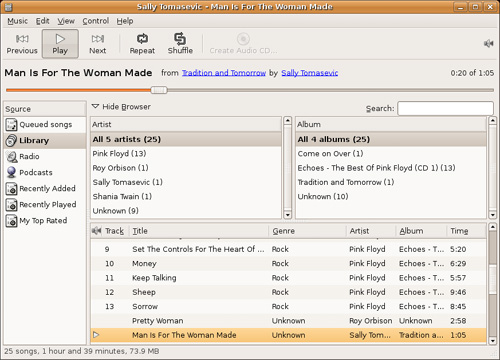
To the left of the interface, there’s a vertical pane labeled Source. Several choices are already filled in for you with your dynamically created selection of songs under Library. As the names in that list imply, Rhythmbox is also a way to listen to Internet radio stations, download and enjoy podcasts, and much more. For the moment, let’s concentrate on our local music. Most of the action with Rhythmbox happens on the left side with a two-panel music browser in the top half (Artist and Album).
Below is your list of tracks based on the results of your selections in the above browser. By default, all of your songs appear here in the default collection list. Because organization is key, you can create additional playlists by right-clicking the left column, and then selecting New Playlist. The new playlist appears in the Source sidebar without a name; click (or right-click) it and rename it to something more appropriate. To populate a new playlist, make sure you have your default playlist selected, then drag and drop song titles into your playlist folder of choice. The titles appear in your new playlist but remain in the master collection as well.
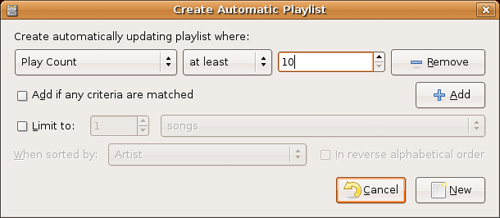
When you added that playlist, you no doubt noticed that there was also an option to add a New Automatic Playlist. This is cool because you can have Rhythmbox create playlists based on criteria you select. Let’s pretend that I want a playlist where every song is a song I have played at least 10 times. I might create a playlist called 10 or More that is automatically added to every time I play a particular song more than 10 times (see Figure 18-23). That selection criterion can be anything from artist to words in a title (all songs containing the word love) to play count, rating, and so on.
As anyone with a collection of songs on their computer knows, the information contained in the information tags isn’t always perfect. To deal with this problem, we have Rhythmbox’s tag editor. Right-click a title and select Properties. A two-tabbed window appears (see Figure 18-24), from which you can change basic information about the current track as well as details such as your rating (0 to 5 stars) for the song.

EasyUbuntu
http://easyubuntu.freecontrib.org
Lame Encoder
Ogg Vorbis
Rhythmbox
http://www.gnome.org/projects/rhythmbox
Ubuntu Wiki on Restricted Formats