
Chapter 6 Printers and Other Hardware
Ah, hardware . . . “I hate hardware!”
Part of the personal computer experience seems destined to be an eternal battle in getting your current system to talk to the latest and greatest devices. There’s always a new, hyper-fantastic, 3D video card; mind-blowing stereo sound system; or hair-trigger game controller out there. Then there are everyday devices, such as modems, scanners, and printers. Getting all these devices to work with your system is something that has caused us all grief over time, regardless of what operating system we were running.
We are used to assuming that anything works with Windows, but even that isn’t true. From time to time, even Windows users must visit hardware vendors’ Web sites to download a driver. One of the things that sets Ubuntu Linux apart is its intelligent and accurate hardware detection and support. Most things will be automatically configured without a fuss. In this chapter, I’m going to give you the tools you need to deal with common issues and give you some tips on avoiding problems in the first place.
Device support under Linux is excellent. The sheer number of things that will work “out of the box” without you having to search for and install drivers is impressive and, quite frankly, beats your old OS. That doesn’t mean all is rosy, however. Let me be brutally honest here. Some devices have been written to work with Windows and only Windows . . . or so it seems. One of the great things about this open source world is that developers are constantly working to write drivers to make it possible to run that faster-than-light communications card.
If you haven’t already bought that new gadget, there are a couple of things that you should do. For starters, if you are in the store looking at that new printer, pull the salesperson aside and ask whether it runs with Linux. If the person doesn’t know (which is sometimes a problem, but less so as time goes on), take a few minutes to check out the excellent Hardware HOWTO document. You can always find the latest version by surfing on over to the LDP’s Linux Hardware Compatibility HOWTO page:
http://www.tldp.org/HOWTO/Hardware-HOWTO/index.html
If you don’t find what you are looking for there, check out the hardware compatibility guide on your Linux vendor’s site. In the case of Ubuntu Linux, that means paying a visit to the Ubuntu Wiki and checking out the hardware support pages:
https://wiki.ubuntu.com/HardwareSupport
![]() Quick Tip Red Hat’s hardware catalog is also worth the visit, regardless of what version of Linux you are running. The URL follows. However, keep in mind that URLs do change on Web sites. If you don’t find it there, just go to the main Red Hat site at http://www.redhat.com and look for hardware.
Quick Tip Red Hat’s hardware catalog is also worth the visit, regardless of what version of Linux you are running. The URL follows. However, keep in mind that URLs do change on Web sites. If you don’t find it there, just go to the main Red Hat site at http://www.redhat.com and look for hardware.
Although Ubuntu Linux is Linux, different releases of different vendors’ products may be at different levels of development. Consequently, at one time or another, Red Hat may have slightly more extensive support for hardware than the others, and a month later SUSE may have the widest range of support.
As Linux gains in popularity, you’ll find that hardware vendors are increasingly interested in tapping into this ever-growing market. I’ve had the experience of being on site, adding hardware to a customer’s system (Ethernet cards come immediately to mind), and finding that the system did not have the drivers. I quickly visited the Ethernet card manufacturer’s Web site and found precompiled drivers ready and waiting for me.
For the most part, adding a device to your Ubuntu Linux system is simply a matter of plugging it in. If the device doesn’t just appear and you don’t want to configure it manually, a reboot forces hardware detection, and the device should be recognized by the system and configured. Universal Serial Bus (USB) devices tend to be even easier because of their hot-plug nature. In other words, you don’t need to reboot the system in order to have a USB device recognized, and you can unplug it while the system is running. For instance, plug in a USB key or USB pen drive and it simply appears in your Places menu (see Figure 6-1).

Getting a device recognized is only part of it, though. Just because your system knows about the device doesn’t necessarily mean that it is configured for your applications. Although you generally don’t have to find and install drivers, it does happen, just as it does in the Windows world. It wouldn’t be fair to you if I simply ignored this little tidbit, so I won’t.
Let’s take a look at the most popular, and sometimes the most frustrating, piece of hardware computer users are faced with. That’s right, I’m talking about printers.
This might seem like a silly thing to mention, particularly if your printer was automatically detected, configured, and tested at boot time. Nevertheless, there are things that you might want to do with your printer, and we should probably cover some of these now. Furthermore, printing is one of the most important functions a personal computer can perform. It’s good to get it right. On that note, I’m going to spend a little bit of time talking about printers and printing. Trust me, it’s going to be lots of fun.
Printing under Linux works on the basis of print queues. At its simplest, this means that whenever you send something to the printer, it is queued in a directory where it awaits its turn at the printer. This de-queuing is known as spooling. Consequently, the process that sends the print jobs from the queue to the printer is called the spooler. That spooler can be one of a small handful of programs, all of which are transparent to you when you print from applications. Here’s a quick roundup of the more popular spoolers.
CUPS, the Common UNIX Printing System, is designed to be a platform-independent printing system that works across a great number of UNIX flavors, including Linux. CUPS uses the Internet Printing Protocol (IPP), a next-generation printing system designed to allow the printing of any job to any printer, anywhere. At this point, CUPS certainly looks like the spooler of the future. Most modern Linux distributions include CUPS, and Ubuntu uses it transparently.
The second most likely spooler you run into is LPD, the classic UNIX spooler. LPD has been around for a long, long time and continues to be distributed with pretty much every Linux out there. I mention it mostly for historical reasons. It’s there, but you won’t likely be using it.
Whether it is CUPS or LPD, GNOME handles printing beautifully. Adding, configuring, or removing a printer is done through the system printing manager. Click System on the top panel, then select Printing from the Administration submenu. A window labeled Printers appears with an icon labeled New Printer (see Figure 6-2).

![]() Tip If you are on a network with shared printers, click Global Settings on the menu bar and select Detect LAN Printers.
Tip If you are on a network with shared printers, click Global Settings on the menu bar and select Detect LAN Printers.
Notice that in my case, there is already a printer listed (laser). That’s because I already have a network accessible printer available on my network. In all likelihood, you will only see the New Printer icon, and that’s a great place to start. To add a printer, start by making sure your printer is plugged in and online. Next, click Printer on the menu bar and select Add Printer. You can also just double-click the New Printer icon. Assuming you have a supported printer and that it is connected and online, Ubuntu should autodetect your printer (see Figure 6-3).

In my example, the system handily noticed my HP printer and all was well from the start. Click Forward and we get to the driver selection screen. Because the printer in this case was properly identified, the system also offers a driver for that printer (see Figure 6-4).
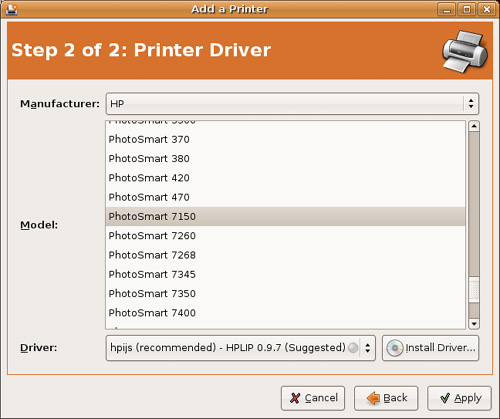
If you don’t think this is the right driver or the system hasn’t properly autodetected your printer, you can select a different manufacturer and model on this screen. Both options provide a drop-down list with a number of choices. With most printers, there is one recommended driver and it is listed next to the Driver label. You can see that the driver listed here is actually the first item in a drop-down box, which means there can be more than one printer. Generally speaking, the selected driver is the recommended driver and is identified as such.
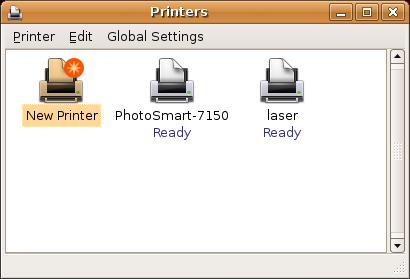
Notice the button labeled Install Driver. On many printers, you can find PPD (printer definition) files either on the printer manufacturer’s Web site or via the Linux printing site (linuxprinting.org), even if that driver isn’t included with your Ubuntu Linux system. If you have such a printer file downloaded, and your printer’s driver is not in the list, click this button and the standard GNOME file selector appears. Navigate to the driver’s location and install it. When you are happy with your choice, click Apply to have your changes take effect. The new printer appears in the Printers dialog (see Figure 6-5).
![]() Note I’ve mentioned how some companies aren’t very forthcoming with drivers for Linux systems. This is changing, however, and some printer manufacturers offer excellent support for Linux. These include HP and Brother, among others.
Note I’ve mentioned how some companies aren’t very forthcoming with drivers for Linux systems. This is changing, however, and some printer manufacturers offer excellent support for Linux. These include HP and Brother, among others.
Now that there are two printers configured, take a look at the laser printer, the one that was automagically detected on the network. Notice the check mark icon on its top left. That indicates that this is the system’s default printer. To change the default output to another printer, right-click the printer and select Make Default from the pop-up menu.
The example I gave you is for a locally connected printer, one that was autodetected by your system. What if the printer make and model isn’t detected or you need to use a network-based printer, perhaps one hanging off a Windows network? Let’s look at a more complex installation. Once again, double-click New Printer to bring up the Add a Printer dialog.
The radio button for Local Printer is selected by default. Click the radio button for Network Printer for a network connected printer. To the right, there is a drop-down box with options for a CUPS printer (IPP), a Windows printer (SMB), a UNIX printer (LPD), and an HP JetDirect network adapter. For this example, I choose a Windows printer because this is be a common scenario for home users. As soon as you select SMB, your Ubuntu system scans your local network for Windows machines and Windows workgroups. If it finds one, an Authentication Required dialog appears (see Figure 6-6).

Enter the information and click Connect. The Add a Printer dialog you saw earlier changes to display options specific to the type of network printer you are trying to configure (see Figure 6-7). In the case of a Windows network printer, there are fields for the Host name of the Windows machines on your network and for the shared printer.

![]() Tip It’s not unusual for Samba (Windows file sharing on Linux) servers to be part of a modern network. Printers shared on these machines look identical to the way they do on any other Windows system on the network. As such, Samba servers and their printers are listed as well.
Tip It’s not unusual for Samba (Windows file sharing on Linux) servers to be part of a modern network. Printers shared on these machines look identical to the way they do on any other Windows system on the network. As such, Samba servers and their printers are listed as well.
Select a Windows host, then select a printer from the list below it. If you had multiple machines on your network, it is possible that the Username and Password filled in here doesn’t match those you entered earlier. Confirm that the information is correct, then click Forward. Once again, you’ll find yourself at the printer driver selection screen (see Figure 6-8).

Click Apply and your printer is added.
![]() Tip For more information on printing from different machines and different operating systems, check out the following URLs:
Tip For more information on printing from different machines and different operating systems, check out the following URLs:
https://wiki.ubuntu.com/NetworkPrintingFromWin2000
When you send something to the printer, you generally expect action quickly. Something better start coming out of that printer soon. If there is something wrong with the printer or you are sharing that printer with others, you may find yourself waiting, at least a little while, before your precious printout appears. The easiest way to find out how many jobs are in the queue is to open the Printers dialog. Remember, you do that by clicking System on the top panel and selecting Printers.
Directly under the icon representing your printer, you see a message telling you that it is printing and how many jobs it is printing (for example, Printing 2 jobs). For more details, double-click the printer icon to open up the printer’s job queue (see Figure 6-9). The plus side of doing this is it also gives you the opportunity to pause printing, print test pages, and resume jobs.
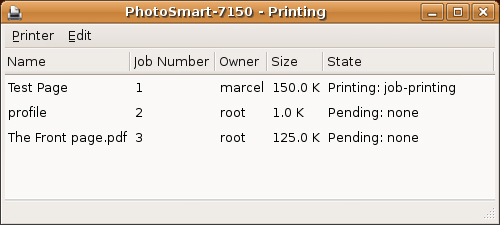
Let’s face it. From time to time, we all end up sending something to the printer we wished we hadn’t. “No, I only meant to print the first 5 pages, not 500!” Luckily, you can also cancel a job. Just click the line to highlight it, and then click Edit on the menu bar, followed by Cancel Jobs.
See, printers aren’t so scary after all.
Meeting new people isn’t always easy. Sociologists tell us that there is a complex interplay that takes place whenever we meet someone new, much of it subconscious. Although it is possible to meet someone and instantly like him or her, it is more likely that you become comfortable enough to develop a friendship only after having been around a person for some time—in other words, after you’ve gotten to know a person better.
Now, what the heck does this have to do with hardware and your Linux system?
Well, it’s like this . . . . For most, the computer we use is a black (or beige) box with a few things plugged into it and some magic happening inside that makes it possible to surf the Internet. Anything that falls outside the small subset of applications we use makes us uneasy. That’s why the notion of trying something new may be intimidating. The best way to get over that is to become comfortable with what you have.
Ubuntu’s Device Manager is a great place to start for getting to know what makes up your system (see Figure 6-10). You can find it by clicking the System menu on the top panel and selecting Device Manager from the Administration submenu. Or, you can bring it up by pressing <Alt+F2> and typing in hal-device-manager, its program name.

As soon as the Hal Device Manager loads up, you’ll notice that the program window is broken into two main panes. The left side lists all the various device classes and subclasses that make up your system. Beside each major item, there’s a small arrow that collapses or expands that particular device or device class’ components. Click any item and details about that item are displayed in the right pane.
Why don’t we take a few minutes to explore this hardware landscape? Let’s start with PCI devices.
Adding a PCI device definitely requires a reboot because we are talking about internal devices, though your system likely has PCI devices already installed. These are cards that fit into the slots inside your computer. When you reboot the machine, Linux should be able to scan for these cards and identify them without any problem. When you click a PCI device, you’ll see that a third tab appears in the right pane. Click the tab to get more vendor-specific information on the device (see Figure 6-11). This is particularly useful if there is a configuration issue and you need to identify your device’s make and model number.

![]() Shell Out You can also run the command
Shell Out You can also run the command /sbin/lspci for a more succinct list of all PCI devices on the system. The following is a partial list from my notebook computer:
0000:00:00.0 Host bridge: ATI Technologies Inc
RS200/RS200M AGP Bridge [IGP 340M] (rev 02)
0000:00:01.0 PCI bridge: ATI Technologies Inc PCI
Bridge [IGP 340M]
0000:00:06.0 Multimedia audio controller: ALi
Corporation M5451 PCI AC-Link Controller Audio Device
(rev 02)
0000:00:07.0 ISA bridge: ALi Corporation M1533 PCI
to ISA Bridge [Aladdin IV]
0000:00:08.0 Modem: ALi Corporation M5457 AC'97
Modem Controller
0000:00:09.0 Network controller: Intersil
Corporation Prism 2.5 Wavelan chipset (rev 01)
0000:00:0a.0 CardBus bridge: O2 Micro, Inc. OZ601/
6912/711E0 CardBus/SmartCardBus Controller
If the Linux kernel has the appropriate device drivers available as modules, they are automatically loaded, and nothing else needs to be done to make the device available. The reason that this information is useful has to do with those times when you do not have a driver handy or directly available. Being able to get the details on the troublesome device in this way is the first step toward getting it working.
A classic example of this is the Winmodem, so called because it was designed to work specifically with Windows. If you have one of these modems and it was not automatically configured by the system, never fear. I’ll talk about Winmodems in more detail later in the chapter. For the moment, let’s talk USB.
The whole idea behind USB was eventually to replace all those different connectors on the back of a computer. That includes serial ports, parallel ports, and mouse and keyboard connectors. The acronym stands for Universal Serial Bus. On any USB system, there is at least one USB hub and whatever devices are attached. If you look at Figure 6-12, you can see information displayed on two USB controllers (one is a USB 2.0 port, the other USB 1.1), a Labtec webcam, a mini USB wheel mouse, and my Palm Zire 72 (selected), all connected to my system.

Notice that in the case of a USB device, like my Palm Zire 72, a third tab appears on the right pane. It is labeled USB and clicking it displays additional information specific to the USB device currently selected.
![]() Trivia Time I casually mentioned that my notebook computer had both USB and USB 2.0 ports. It’s worth noting because not all systems have both and there is a difference between the two. The new USB 2.0 uses an identical connector to the original USB 1 port but the hardware supports a much faster rate of information exchange. This is particularly useful for devices that must transmit a large amount of information, such as a digital video camera. USB 1 has a speed of 12Mb per second, whereas the new USB 2.0 can transmit data at 480Mb per second.
Trivia Time I casually mentioned that my notebook computer had both USB and USB 2.0 ports. It’s worth noting because not all systems have both and there is a difference between the two. The new USB 2.0 uses an identical connector to the original USB 1 port but the hardware supports a much faster rate of information exchange. This is particularly useful for devices that must transmit a large amount of information, such as a digital video camera. USB 1 has a speed of 12Mb per second, whereas the new USB 2.0 can transmit data at 480Mb per second.
![]() Shell Out To get a list of USB devices, try the command
Shell Out To get a list of USB devices, try the command lsusb. The following output is from my notebook:
$ lsusb
Bus 003 Device 001: ID 0000:0000
Bus 001 Device 004: ID 0830:0061 Palm, Inc.
Bus 001 Device 003: ID 0c45:6029 Microdia
Triplex i-mini PC Camera
Bus 001 Device 002: ID 0451:2046 Texas Instruments,
Inc. TUSB2046 Hub
Bus 001 Device 001: ID 0000:0000
Bus 002 Device 002: ID 04fc:0013 Sunplus Technology
Co., Ltd
Bus 002 Device 001: ID 0000:0000
The sheer number of USB devices available is phenomenal, to say the least, and the list is growing. Many of these devices use a standard set of drivers, which means that a number of things can literally be plugged in and used—no need to mess with loading drivers because it is all being done for you.
You noticed the word many in that last sentence, right? Keeping track of what works (and what doesn’t) and providing access to drivers that aren’t included in current distributions is the raison d’être of the Linux USB Device Overview Web site. If you find yourself looking at a new webcam, and you aren’t sure whether it is supported under Linux, look there first:
http://www.qbik.ch/usb/devices/
The site is organized into sections, depending on the device type (audio, video, mass storage, and so on). Each device is assigned a status identifying just how well a device is supported, from works perfectly to works somewhat to don’t bother.
Well, here’s something scary....
Way back when, in the introductory chapter, I mentioned Winmodems as one of the few minuses of running Linux. You’ll recall that a Winmodem is a modem designed to work only with Windows. They are sometimes referred to as software or controllerless modems and tend to be less expensive than controller-based modems.
If you are running a Winmodem, all is not lost. The Linux community is nothing if not resourceful. Even when manufacturers are slow to notice Linux users, the same isn’t true the other way around. As more and more people run Linux, this becomes less and less of a problem. In time, hardware manufacturers may be building for Linux first and Windows second. In the meantime, check out the Linmodems.Org Web site at http://www.linmodems.org and you should be up and running shortly.
So just how do you transform a Winmodem into a Linmodem? Well, let me give you an example.
Among the more common Winmodems out there are those based on the Conexant chipset; these are starting to be very well supported. For the latest driver, just head on over to Linuxant’s Web site (not related to Conexant) at http://www.linuxant.com. Not only can you get source drivers, but precompiled packages are available for a number of popular Linux distributions.
Identifying the Winmodem is your first step. You can use the GNOME device manager to browser through your PCI hardware, where you will get a lot of detail. You can also shell out and use the lspci command for a quick list of all the PCI devices found on your system. Here’s what it looks like:
$ lspci
00:00.0 Host bridge: VIA Technologies, Inc. VT8367 [KT266]
00:01.0 PCI bridge: VIA Technologies, Inc. VT8367 [KT266 AGP]
00:06.0 Communication controller: Conexant HSF 56k Data/Fax/
Voice/Spkp (w/Handset) Modem (WorldW SmartDAA) (rev 01)
00:08.0 Ethernet controller: Realtek Semiconductor Co., Ltd.
RTL-8139/8139C (rev 10)
00:11.0 ISA bridge: VIA Technologies, Inc. VT8233 PCI to ISA
Bridge
00:11.1 IDE interface: VIA Technologies, Inc. Bus Master IDE
(rev 06)
00:11.2 USB Controller: VIA Technologies, Inc. USB (rev 18)
00:11.5 Multimedia audio controller: VIA Technologies, Inc.
VT8233 AC97 Audio Controller (rev 10)
01:00.0 VGA compatible controller: nVidia Corporation NV11
[GeForce2 MX DDR] (rev b2)
In some cases, you will find precompiled driver packages. Some are specific to your release, and others are generic. In the case of my Conexant-based Winmodem, the site provides a generic installer that should detect your system and install itself accordingly.
As per the instructions that followed the install, I typed the following command:
/usr/sbin/hsfconfig
A short dialog followed, asking me for the country (Canada, in my case), after which the program compiled and installed my driver for me. It even linked the newly created device, /dev/ttySHSF0, to /dev/modem. I was ready to use my modem without a care.
![]() Shell Out From the shell prompt, I can verify the location of my modem with this command:
Shell Out From the shell prompt, I can verify the location of my modem with this command:
$ ls -l /dev/modem
The system then responds with this information:
lr-xr-xr-x 1 root root 8 Sep 9 11:23
/dev/modem -> /dev/ttySHSF0
The preceding listing is all one unbroken line.
Clearly, none of this whole Winmodem problem applies if you are using an external modem or happen to be among the lucky ones using a cable modem connection or high-speed DSL access from your local phone company. For others out there, it can be a bit more complicated. I’ve already given you the address of the Conexant Web site, and I will give you more right here.
Remember, many of these modems can be made into useful and productive members of Linux society with a visit to the right Web site. On that note, here’s my roundup:
We’ve covered a lot of ground here, but we are by no means finished. Those things we attach to our PCs aren’t much good if we don’t put them in context with the tools and applications we use them with. Those tools tend to require a somewhat more in-depth examination. For instance, burning CDs isn’t just about creating collections of your favorite songs. People use them for backups, as well, or to make collections of digital photos for sharing with the family. I’ll tell you all about CD burning in Chapter 18. Most CD and DVD burners are automatically recognized under Linux.
The same is true of scanners. These gizmos are incredibly handy devices for the home or office. Aside from converting nondigital pictures to place on your Web site, you can use your scanner as a photocopier and as a way to send faxes when the pages require your signature (you can fax from a word processor, after all). For the most part, your scanning application autodetects your scanner and configures it for you (see Figure 6-13). You’ll find XSane under your Graphics submenu.

By the way, XSane is also a great program for sending images in an email, faxing documents, or making photocopies.
To help you in choosing a scanner that is well supported under Linux, check out the SANE (Scanner Access Now Easy) page of supported devices.
http://www.sane-project.org/sane-supported-devices.html
There’s also a scanner search engine on that page to make locating your devices that much easier.
Linux Hardware Compatibility HOWTO
http://www.tldp.org/HOWTO/Hardware-HOWTO/index.html
Hardware Catalog at Red Hat
http://bugzilla.redhat.com/hwcert
Linmodems.org (Winmodems under Linux)
LinuxPrinting.org (Linux Printer Database)
Linux USB Device Overview
http://www.qbik.ch/usb/devices/
SANE Project, Supported Devices
http://www.sane-project.org/sane-supported-devices.html
Ubuntu Hardware Support Wiki