Chapter 7 Connecting to the Internet
I’m going to start this chapter with a little Networking 101. It will be fun—really. For those of you who already know everything about TCP/IP and how IP networks operate, you can skip ahead a few paragraphs.
Communication over the Internet takes place using something called the TCP/IP protocol suite. TCP/IP actually stands for Transmission Control Protocol/Internet Protocol, and it is the basic underlying means by which all this magic communication takes place. Everything you do on the Net, whether it is surfing your favorite sites, sending and receiving emails, chatting via some instant messaging client, or listening to an audio broadcast—all these things ride on TCP/IP’s virtual back.
TCP/IP is often referred to as a protocol suite, a collection of protocols that speak the same language. Essentially, this comes down to the transmission and reception of IP packets. Those packets have to get from place to place, and that means they need to know how to get there. IP packets do this in exactly the same way that you get from your house to someone else’s house. They have a home address from which they go to a remote address.
Each and every computer connected to the Internet has a unique address called an IP address, four sets of numbers separated by dots (for example, 192.168.22.55). Some systems that are always online (banks, Web sites, companies, and so on) have a static address. Dial-up connections for home users tend to be shared—when you aren’t connected, someone else may be using the same address—which is referred to as a dynamic IP address.
You may be wondering how a symbolic Web site address such as www.marcelgagne.com translates to the dotted foursome I mentioned previously, and that would be an excellent question.
Think of the real world again. We don’t think of our friends as 136 Mulberry Tree Lane or 1575 Natika Court; we think of them by their names. To find out where our friends live, we check the phone book (or ask them). The same holds true in the digital world, but that phone book is called a domain name server (DNS). When I type a symbolic (that is, human readable) address into my Web browser, it contacts a DNS (assigned by my Internet service provider (ISP)) and asks for the IP address. With that IP address, my packets almost know how to get to their destinations.
Almost?
To reach an address in the real world, you get out of your driveway and enter some road to which all other roads are connected. If you drive long enough, presumably you get to Rome (having often been told that all roads lead to Rome). Before you can get to Rome, you enter your default route, namely, the street in front of your house. The same principle exists in the virtual world. For your IP packages (an email to your mother, for instance) to get to its destination, it must take a particular route, called a default route. This will be the IP address of a device that knows all the other routes. Your ISP provides that route.
That concludes Networking 101. Not particularly complicated, is it?
Connecting to the Internet is one if those things you set up once, then forget about. Still, you need to get some information from your ISP up front. The basics are as follows:
• Your username and password
• The phone number your modem will be dialing to connect (if using a dial-up modem connection)
• The IP address of the DNS (name servers, described earlier)
• The IP or symbolic address of your SMTP and POP3 email hosts
• The IP or symbolic address of your news server (optional)
All of this information likely came with your contract when you first signed up with your ISP. Armed with this information, you are ready to begin.
As I write this, there are three very popular methods of connecting to the Internet, notwithstanding your own connection at the office. These are cable modem, DSL service from the phone company, or good old-fashioned dial-up modem. The first two are usually referred to as high-speed or broadband connections, and dial-up access is usually made fun of because it feels very slow when compared to the higher speed methods.
With all the press and hype about high-speed service, you would think that this is all people run. Think again. As I write this, the vast majority of people in North America, and indeed the world, is still connecting through a dial-up connection. Make no mistake—as Mark Twain might have remarked, the rumors of dial-up access’s demise are greatly exaggerated. You may be among the majority who are still using dial-up; I’ll cover that in detail.
If you are ready, let’s begin.
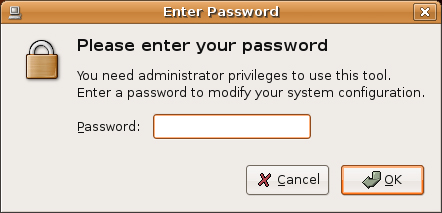
Most ISPs provide dial-up access through the Point-to-Point Protocol, or PPP. To set up a network connection or pretty much any type, just run the Network Settings program. Click System on the top panel, then Administration, and finally, Networking. You can also use your <Alt+F2> Run Application shortcut and type in network-admin in the dialog box. If you are starting to like the feel of the command line, enter "network-admin &" in a terminal window. Since this is an administration function, you’ll be asked for your password (see Figure 7-1).
![]() Tip You may have noticed in the preceding paragraph that I added an ampersand (
Tip You may have noticed in the preceding paragraph that I added an ampersand (&) to the end of the network-admin command. When you start a command from a shell prompt, it normally runs in the foreground. This means you can’t start another process at the shell until the current one finishes (you could, of course, open up another shell). The ampersand tells the shell to put the process in the background so that you can run other commands.
When the Network Settings tool comes up for the first time, it lists, at minimum, a modem connection that is currently not configured (see Figure 7-2). Even if you don’t have a modem built in to your machine, an option for configuring one is still available. In your list of connections, you may also see an Ethernet connection. Most modern machines usually have an Ethernet card built in, so this is likely. We’ll use my test machine as an example, which, as you can see, has both a network card and a dial-up modem attached.

Before you jump in and configure your modem connection, look at the drop-down box labeled Location near the top of this window. The idea here is that you can have multiple dial-up (or network) accounts. Most people probably use just one, but you can also use it to set up multiple profiles of the same account. If you happen to be a road warrior or globe trotter with a notebook, you can create location profiles for the various cities you visit.
By default, there are no locations defined. If you go ahead and configure a network connection without creating a location, those settings are your default. To add a new location, click the drop-down box (it is empty at this point) and click Create Location. A small dialog appears (see Figure 7-3), in which you enter the name of this location (for example, London office). When you have entered the name, click OK.

Because you are probably doing this to deal with traveling profiles, you may want to add at least two entries here, one for home and one for away.
A dial-up connection generally implies a PPP, or Point-to-Point, connection. Click Modem Connection to highlight that selection, then click the Properties tab. The Interface Properties dialog appears. It consists of three tabbed windows labeled General, Modem, and Options. If the General tab isn’t selected by default, click it now. Look for and check the box labeled Enable This Connection. You’ll find it on the General tab under the Connection heading for device ppp0 (see Figure 7-4). The additional fields in this window should no longer be grayed out.

Enter your ISP’s dial-up phone number and, if need be, a dialing prefix. Below that, enter the username and password that was supplied to you when you set up the account. Now, click the Modem tab.
I covered devices in the previous chapter, specifically the issue of modems, and it is particularly relevant here. If you click the Modems tab, you’ll notice that the modem port is not set. Click the drop-down list and you’ll see several possibilities including /dev/modem, which is a symbolic link to the actual port for the modem. That might be /dev/ttyS0, but it could be many other things, as well. You have the option of specifying the modem port yourself, but the easiest way to discover the modem is to click the Autodetect button (see Figure 7-5).

The Dial Type setting lets you choose between tone and pulse dialing. I can’t personally remember encountering a pulse service for many years now, but if yours still uses it, click the drop-down box and select Pulses instead of Tones. Finally, there’s a Volume setting (Off, Low, Medium, and Loud) so you can listen to your modem dial out and make that cool screeching noise.
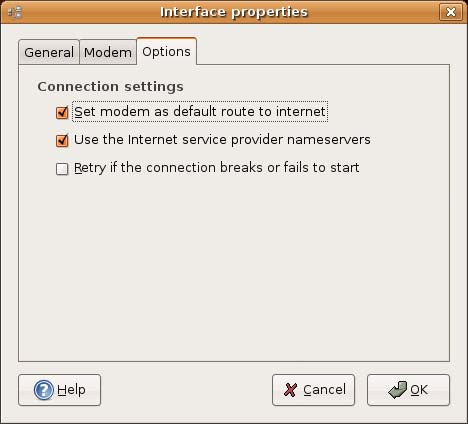
The third and final tab is labeled Options (see Figure 7-6). You’ll find Set Modem as Default Route to the Internet and Use the Internet Service Provider Nameservers check boxes selected. Unless you have good reason to change these settings (that is, as instructed by your ISP), leave them alone. You may, however, select the last check box, Retry If the Connection Breaks or Fails to Start to automatically reconnect should anything interrupt your Internet connection.
Click OK and you return to the main Network Settings screen with Modem Connection still selected (refer to Figure 7-2). The difference here is that the Activate button is no longer grayed out. Click the button to dial out to the Internet.
For the most part, if you installed your Linux system with the cable modem connected, this is probably already working, and you have nothing left to do. If, however, you are already up and running and you are just now getting a cable modem, it is probably time for a few pointers. Quite frankly, these days (with a modern Linux distribution), there isn’t much to it.
To begin with, cable modems aren’t modems in the classic sense. The so-called modem is connected to your cable TV service on one side and to an Ethernet card inside your PC on the other. High-speed access through your phone company’s DSL service is similar in that they provide you with an external, modem-like device (in many cases, it is really a router) that also connects to an Ethernet card.
The Ethernet card (which should be automatically detected by your system) gets an IP address from the cable modem via the Dynamic Host Configuration Protocol (DHCP). Although this address may appear permanent in that it rarely (if ever) changes, it is nevertheless dynamic, because your actual Ethernet card gets its address whenever it connects.
The process of getting your system configured varies a bit from distribution to distribution, but only cosmetically. When you install your new Ethernet card (for access through the cable modem), it should be autodetected by the system on reboot. As part of that process, the system asks you whether you want to configure the card. The answer is yes, of course. Next, the system asks whether you want to supply an IP address or have it autoconfigure via DHCP. With a cable modem, as with DSL, autoconfiguring is what you want.
Now that I’ve told you how incredibly easy it is to do this, I’m going to mention that there are many different providers of high-speed cable and DSL access. This means that if your system doesn’t autorecognize and configure your connection, you may need to do one of these things. For cable modems, the answers vary, but start by checking out the Cable Modem HOWTO at http://www.tldp.org for details on your particular geographic location.
If you are on a phone company DSL service, you want to use the pppoeconf package (already installed as part of your Ubuntu setup). Open a shell (Terminal) and run the command with administrator permissions. Do this by typing this command:
sudo pppoeconf
This is a text-only utility and basically a fill-in-the-blanks session. The first screen checks for your Ethernet card and asks you to confirm its location. Because most people only have one Ethernet card, this is usually a fairly simple choice to make. You want to make sure that your DSL modem is plugged in and turned on because the next screen scans for the existence of your DSL modem to continue with setup. Then, you are asked for the username and password provided by your Internet service provider for this connection.
The last step in this configuration dialog is a question about whether you want the connection to come up automatically. This is generally a good idea. After you have completed this setup, you likely don’t need to run this utility again (unless you switch ISPs, of course).
Notebook computers used to be the exception rather than the rule, but falling prices have made these little portable powerhouses increasingly attainable. Sit in any airport waiting room and it seems as though every other person is sitting, typing at a notebook. Furthermore, they are running wireless. The open notebook isn’t an unusual sight at coffee shops either. In fact, these days, wireless networks are everywhere, quite possibly in your home. Now all you need to do is get connected.
Linux has excellent hardware support and that includes wireless support. Unfortunately, there are still drivers that are written for Windows only or in the case of my own notebook, the Linux driver may lack functionality. My own notebook’s wireless card works fine on my home network, but it only works so well. For instance, the standard Linux driver that supports the card doesn’t allow for things like scanning.
As sometimes happens, manufacturers aren’t 100 percent forthcoming with information or specifications to make full Linux support easy. I truly admire the incredible talent and energy of Linux developers who provide Linux with excellent drivers while working in a vendor black hole. Nevertheless, this lack of information was the impetus for the NdisWrapper project, which makes it possible to use Windows NDIS drivers via a loadable Linux kernel module. Luckily, your Ubuntu Linux system makes this extremely easy and I’ll show you how.
Click System on the top panel and navigate to the Administration submenu. There, click the Windows Wireless Drivers menu option (command name ndisgtk). Because this is an administrative function, you are asked for your password to confirm. After you enter it, the Wireless Network Drivers dialog appears (see Figure 7-7).
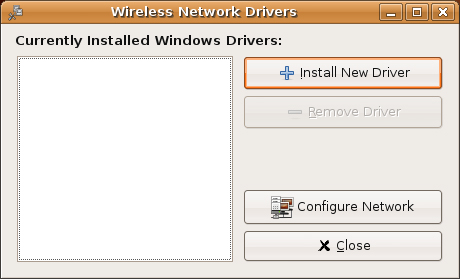
To install a Windows NDIS driver, click the Install New Driver button. A small dialog appears asking you to select an INF file. Below that is a button labeled Location. Click the button to bring up the GNOME file manager and navigate to the location of the Windows INF file that corresponds to your particular wireless card. When you have chosen your driver and returned to the dialog, click the Install button to install the driver. If you have chosen the right driver and everything has gone well, you should be back at the main window; but it now shows an installed driver and lists the hardware as present (see Figure 7-8).

Now that your driver is installed and your hardware is recognized, you can go ahead and configure your network settings by clicking the Configure Network button. The Network Settings dialog you used earlier appears (refer to Figure 7-2).
See, it was easy, wasn’t it?
Good question. For starters, you have everything the Internet has to offer. You can surf the Web (which I cover in Chapter 10), send email (Chapter 11), download and install software, and find and download music and videos. The Internet is a vast cornucopia of news, information, conversation, sights, sounds, and a thousand other things. When looking at all of its offerings, it is easy to forget that it really all comes down one thing—communication.
The Internet was born on communication; email specifically was the tool that drove its development into the globe-spanning network that it is today. That means electronic mail, Web browsing, and the increasingly popular instant message.
I’ll tell you all about instant messaging with Ubuntu shortly, but first, it’s time to discuss software. Not the software you have installed, but the amazing, free software that is still out there, waiting for you, on the Internet. In the next chapter, you will learn how easy it is to install software packages and keep your system up-to-date with Ubuntu.
Ubuntu Information on Wifi and Ndiswrapper
https://wiki.ubuntu.com/WifiDocs
Ubuntu Wiki Page on pppoeconf