Chapter 8 Installing New Applications
Your Ubuntu Linux system arrived with a collection of great software, with packages to handle everything from word processing to email, surfing the Web, instant messaging, even games to help you unwind. As you take the time to experiment and learn about your system and everything it has to offer, eventually you’ll want more than what you have. That’s why I’m going to show you how to install that software, easily and without fuss. I will also tell you about updates and how to make sure that your system is patched and secure. You’ll be amazed at how easy it is to search for the software you need and how fast you can have it up and running.
Before we get into finding and installing software, I’d like to address a little myth. You have no doubt heard that installing software on Linux is difficult and that it is inferior to what you are used to in the Windows world. Nothing could be further from the truth. In fact, software installation under Linux is actually superior to what you are leaving behind in your old OS.
![]() Security Note When you install software and software packages, you must often do so as an administrative user, also known as root. As root, you are all powerful. Linux tends to be more secure and much safer than your old OS, but that doesn’t mean disasters can’t strike. Know where your software comes from and take the time to understand what it does. That’s why sticking with the Ubuntu repositories, which give you access to several thousand packages through Synaptic, is the best approach. Synaptic? Don’t worry. I’ll explain.
Security Note When you install software and software packages, you must often do so as an administrative user, also known as root. As root, you are all powerful. Linux tends to be more secure and much safer than your old OS, but that doesn’t mean disasters can’t strike. Know where your software comes from and take the time to understand what it does. That’s why sticking with the Ubuntu repositories, which give you access to several thousand packages through Synaptic, is the best approach. Synaptic? Don’t worry. I’ll explain.
When it comes to installing software, security is something we should talk about. I’ve already said that you should know where your software is coming from, but that is only part of the consideration. That’s why I’m going to clear up some bad press Linux gets when it comes to installing software.
In the Windows world, it is frighteningly easy to infect your PC with a virus or a worm. All you have to do is click on an email attachment, and you could be in trouble. With some email packages under Windows, it “helps” you by automatically opening your email attachments, or connecting you to Internet links, which can cause trouble. You won’t find many Linux packages provided as simple executables (.EXE files and so on). Security is the reason. To install most packages, you also need root privileges. Again, for security reasons, Linux demands that you be conscious of the fact that you might be doing something that could hurt your system. If an email attachment wants to install itself into the system, it must consult the root user first.
Package managers, such as rpm (the RPM Package Manager) or Ubuntu and Debian’s dpkg/apt-get, perform checks to make sure that certain dependencies are met or that software doesn’t accidentally overwrite other software. Those dependency checks take many things into consideration, such as what software already exists and how the new package will coexist. Many of you are probably familiar with what has been called DLL hell, where one piece of software just goes ahead and overwrites some other piece of code. It may even have happened to you. Blindly installing without these checks can be disastrous. At best, the result can be an unstable machine—at worst, it can be unusable.
Installing software under Linux may take a step or two, but it is for your own good.
Most major Linux distributions have in common the concept of a package—a prebuilt bundle of software ready to be installed on your system. Despite the numerous distributions out there, most use the same package management systems. They often have different ways of dealing with them, but the packaging system remains pretty consistent. Most distributions these days use either the RPM format of packages or DEB. Because it is based on Debian, Ubuntu Linux uses DEB format packages.
Assume that I am talking about a hypothetical package called ftl_transport. If I were looking for this package to install on my Ubuntu system, I would find it in this type of format:
ftl-transport_2.1-1_i386.deb
The first part is the package name itself. The numbers just after the underscore (and just before the hyphen) indicate the software version number. The number following the hyphen is the package release number. Following that is the architecture for which the package was compiled (i386, in this case). The final prefix, .deb, is a dead giveaway that this is a Debian package, sometimes referred to as a DEB.
In the next section, I’m going to show you a detailed way to find, install, update, and maintain software for your Ubuntu Linux system. Before I do that, however, I want to show you a simple, easy-to-use tool for installing packages on your system. You’ve no doubt seen this entry in the menu several times as you have worked through the various chapters of this book. It’s time to look at the Add Applications program.
To get started, click Applications on the top panel and select Add/Remove. It’s the last item on the list. Installing software requires system privileges, so you are asked for the password first. Enter it and a few seconds later, the Add/Remove Applications dialog appears (see Figure 8-1). There is a short delay as the program reads the database of available and installed applications. The command name for this program is gnome-app-install.

To the left, in a vertical sidebar, is a list of categories into which all of the available applications are sorted. These categories include Games, Graphics, Office, System Tools, and others. Click on a category and the list of applications that exist in that category appear in the top right window. Below the top right-hand pane is another window. This is the description window. Click on an application above and a description appears below.
Let’s just jump right in and see how easy this is to use. Then, we’ll investigate it in a bit more detail. At the top right of the screen, you’ll see a little box with a Search label to the right of it. Type game in the text box. In seconds, the install program locates every package it knows of that that has the word game somewhere in either the title or the description. The results appear in the left pane (see Figure 8-2).

Select a game from the list and read its accompanying description. If this sounds like a good choice, click the check box next to the program’s name, then click the Apply button at the bottom of the main window. Before things get rolling, you are asked to confirm your list of packages. If you are happy with the choices, click Apply. A dialog appears informing you of the installer’s progress as it downloads, unpacks, and installs the packages you have selected (see Figure 8-3).
![]() Note The Ubuntu DVD included with this book includes all of the supported Ubuntu packages, whether installed or not. What this means is that for many packages, you don’t need to download from the Internet if you installed Ubuntu from the DVD. Just have the disk ready when the system asks you for it. This is a boon for those of you who may not have access to a broadband connection.
Note The Ubuntu DVD included with this book includes all of the supported Ubuntu packages, whether installed or not. What this means is that for many packages, you don’t need to download from the Internet if you installed Ubuntu from the DVD. Just have the disk ready when the system asks you for it. This is a boon for those of you who may not have access to a broadband connection.
When the installation is complete, you get a nice message alerting you to that fact along with a list of the major packages you have selected. Then, the package and dependency list are rebuilt and you are ready to start again.
Should you decide that you want to remove a package—not a bad idea if you aren’t using the software—go back to the Add/Remove Applications dialog and search for the package. That’s the quickest way to find it. You could also browse down the applications list to find it. To actually remove the package in question, uncheck the box next to the program name and click Apply. A confirmation dialog appears asking you to confirm that you do indeed want to remove this package. If this all sounds familiar, that’s because it is essentially the reverse of installing software.
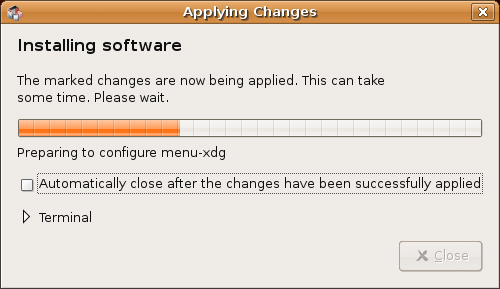
Before we move on, let me direct your attention to those two check boxes below the list of applications (see Figure 8-4). If you pause your mouse cursor over the “Show unsupported applications” or “Show proprietary applications” check boxes, you’ll find literally hundreds of applications that aren’t part of the official Ubuntu release.
Occasionally, packages rely on other packages and removing packages becomes a somewhat more complex issue. A message appears suggesting that you use Advanced mode. This Advanced mode is the Synaptic package manager and despite the word Advanced, it is still very easy to use. Let me tell you about it.
Before we get started, I want to tell you about package repositories, sites where Ubuntu Linux packages are stored and available for download. By default, Ubuntu comes preconfigured with standard and security update repositories. To get access to certain packages, like the MP3 software I tell you about in Chapter 18, you will want to enable the extra Universe and Multiverse package repositories. It’s easy. Really.
Let’s start by firing up Synaptic. Click System on the top panel and select Synaptic Package Manager from the Administration submenu. Because installing software requires administrator privileges, you are asked to enter your password for confirmation. A few seconds later, you are looking at the Synaptic window (see Figure 8-5).

The Synaptic window is broken up into three major areas, or panes. The left-hand bar lets you identify software based on its category. Below the category listing are four buttons labeled Sections, Status, Search, and Custom. The main portion of the window is divided horizontally on the right. To the top, packages are listed. Clicking one of these packages shows a description of the software in the lower pane. Along the top, you’ll find the classic menu bar, and directly below, an icon bar with buttons that provide access to some of the most common functions.
Because I made such a big deal of it, let’s start by adding those other repositories. From the Synaptic main window, click Settings on the menu bar, and then select Repositories. A Software Preferences dialog appears (see Figure 8-6). You’ll see three tabs, one labeled Installation Media, another labeled Internet Updates, and the other, Authentication. By default, the Installation Media tab should be selected.

We’ll get to those repositories in just a second, but first click on the Internet Updates tab. Look for a check box labeled “Check for updates automatically.” It should be checked on by default. There’s a combo box next to the label with Daily selected. A little later in this chapter, I will cover the subject of system updates. This is how you define whether and how often the system checks for updates. I find that daily is an ideal choice for me, but you can change that to every two days, weekly, or every two weeks.
Now, on to those extra repositories: Click back to the Installation Media tab. If you scroll down the list of Sources in that Installation Media window, you see the repositories that your system already knows about and uses. Some things are listed as officially supported; some possibly with restricted copyright. The Universe and Multiverse repositories don’t fit neatly into these categories, partly because they aren’t officially supported. Click the Add button to show and select these other options. The Add Repository dialog appears (see Figure 8-7).

Click the check boxes next to Community Maintained (Universe) and Non-free (Multiverse) to add these repositories. All four check boxes should now be selected. Click Add to close the dialog. If you scroll down the list of Sources under the Installation Media tab, you’ll notice that these binary repositories have been added under a Ubuntu 6.04 “Dapper Drake” (Binary) header. Click the Close button on the main Software Preferences dialog.
A dialog appears telling you that the repositories have changed and that you should click the Reload button on the main Synaptic window. Click Close to dismiss the information window and that takes you back to the main Synaptic window. It’s time to click the Reload button and let Synaptic find out about all those new packages you told it about.
Using Synaptic to install an application isn’t all that different from what I showed you earlier, but Synaptic is quite a bit more flexible and more powerful than the basic GNOME package installer.
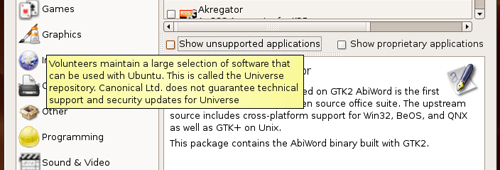
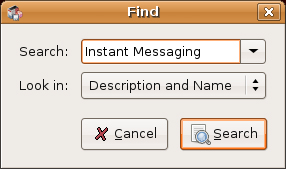
To search for a package, click the Search button on the icon bar. A small Find window appears with an empty field, into which you can enter your search terms (see Figure 8-8). Below the Search field is a combo box that lets you define where the search takes place. The default is to look in the package name and the description for the package. For most, this will satisfy 99 percent of the time. You can, however, also search for a particular version number, the package maintainer’s name, dependencies, and provided packages. Let’s enter instant messaging in the search field, and click the Search button.
The result is a list of packages that have the words instant messaging somewhere in their description. Click each package individually to get a description of that package. Should you decide you want to install a particular package, right-click the package name and select Mark for Installation (see Figure 8-9).

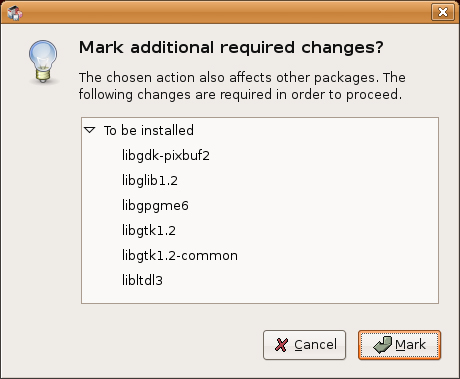
Part of what makes Synaptic such a joy is that it takes all the work out of having to know what other packages might be needed when you choose to install something. If the software you want needs three additional packages, Synaptic knows and lets you know as well (see Figure 8-10). In my example, there are six additional packages required. Synaptic wants to know if I want to have them automagically marked for installation as well. If you accept—and generally speaking, you always do—click the Mark button to continue.
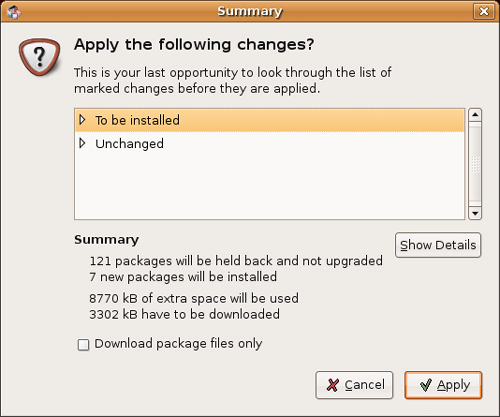
At this point, you can go ahead and search for additional packages if you want. Synaptic remembers the packages you have chosen until you choose to install them or quit the program. When you are ready to install what you have selected, click Apply on the Synaptic icon bar. You get a final window telling you about all the packages that will be installed, how much space will be used, and how big the download itself will be (see Figure 8-11).
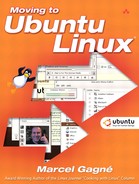
The install begins, first with the packages being downloaded over the Internet. This is followed by the system preparing the packages for upgrade and ends with the installation of the packages themselves. Throughout the process, a dialog alerts you to the various steps and provides a status bar (see Figure 8-12) so you have some idea of how long the whole thing will take.
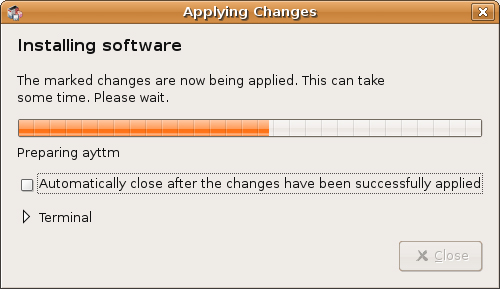
Depending on the speed of your machine or the number of packages, this could take from several seconds to several minutes or more. The process bar gives you some clues as to how much time this will all take. When the process is done, you get a final dialog letting you know that all changes (installations, upgrades, package replacements) are done. Click Close and you go back at the main Synaptic window.
If your system is connected to an always up, Internet connection, Ubuntu regularly scans its update repositories for general patches and security fixes. When something becomes available, you see a message pop up at the top of your screen (see Figure 8-13). These updates may be anything from patches and fixes to security updates. The latter is a particularly good reason to stay on top of the latest updates.

It is possible that you do not see the preceding pop-up. Depending on whether you’ve already seen the message, banished it earlier, or whether you’ve been busy installing packages, the red icon itself is a giveaway. If you pause your mouse cursor over it, you see a tooltip alerting you to the number of updates available (see Figure 8-14).

There are a couple of things you can do here. The first is to just click the icon. This starts the update manager. Right-click the icon and a pop-up menu appears with a number of options. You can choose to view the available updates, update the package list now, or go ahead and install the updates. There’s also an option here to change the update manager preferences.
Regardless of whether an update icon is present in the top panel, you can also start the update manager by clicking System on the top panel and selecting Update Manager from the Administration submenu. Remember that the system only checks for updates according to the schedule you selected earlier in the chapter. It is possible that there are updates you need to check on before the scheduled time (for example, you’ve heard about a security update and you want to check on it now). Either way, because this is an administrative function, you are asked for your password before continuing. Enter it and the Software Updates window appears (see Figure 8-15).
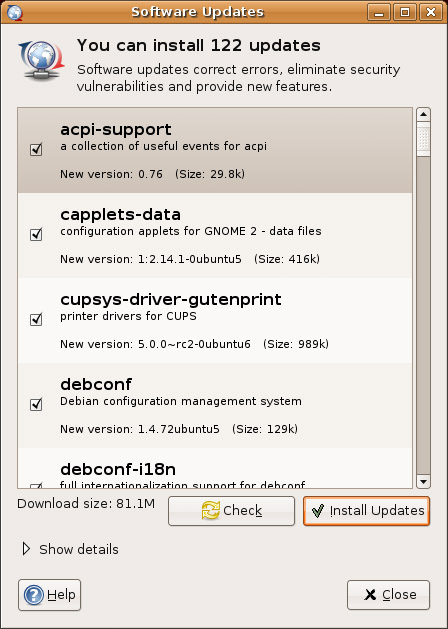
At the bottom of this window, there’s a Show Details label with a small arrow to the side. If you want to find out what a particular update does or what changes come with an update, click the arrow. The window splits into a top and bottom pane with an information pane at the bottom. Click a package name up top and the description of changes appears below.
Unless you have good reason not to, you can usually accept the changes. Click the Install Updates button and the packages start to download. If you have followed along up to this point, what happens next will be familiar to you. The installation of those packages follows the same approach you saw with Synaptic and the basic GNOME package installer.
For most, using Synaptic, or the simple package installer I told you about earlier, is definitely the way to go. However, as with many things, there is another way to do it and this way involves working down at the shell. If you are interested in finding out what goes on beneath Synaptic’s slick exterior, take a look at this short introduction to package administration using the Linux shell.
In the Debian world, of which Ubuntu is a part, there are two useful commands for dealing with packages at the command line: dpkg and apt-get. The most basic method of installing a package is with this format of the dpkg command:
sudo dpkg --install ftl-transport_2.1-1ubuntu1.deb
dpkg is the basic package installation tool for Debian and Debian-based systems such as Ubuntu. The previous command installs the package. This one removes it:
sudo dpkg --remove ftl-transport
![]() Note If it looks like I am saving keystrokes here, there is a reason. I only indicate the package release number and subsequent extensions at installation time. To remove a package, you only need the package name itself.
Note If it looks like I am saving keystrokes here, there is a reason. I only indicate the package release number and subsequent extensions at installation time. To remove a package, you only need the package name itself.
You should be aware that there is another step to consider when removing a package. Although the program is now gone from your system, its configuration files remain (which can be a good idea). To get rid of those as well, you need to purge the package:
sudo dpkg --purge ftl-transport
Now that I have had you do it the long way, you could start with a purge to both remove the package and purge the configuration files in one step.
Sure thing. If you want to get a list of every package on your system, use the --list option to dpkg. You might want to pipe that output to the more command:
dpkg --list | more
If something in that list should prove interesting and you would like to know more about the package, try the --print-avail flag. In this example, I try to discover something about the mysterious mtools package:
dpkg --print-avail mtools
Package: mtools
Priority: standard
Section: otherosfs
Installed-Size: 468
Maintainer: Luis Bustamante <[email protected]>
Architecture: i386
Version: 3.9.9-2.1ubuntu1
Depends: libc6 (>= 2.3.2.ds1-4)
Suggests: floppyd
Size: 195994
Description: Tools for manipulating MSDOS files
The preceding information only prints information about an installed package. As with many things in the Linux world (and life in general), there is more than one way to do this. You could also use the other indispensable command-line tool, apt-get—to be specific, apt-cache, one of apt-get’s related utilities:
apt-cache show mtools
The results of this command are identical to those of the preceding dpkg example.
To find out the version of a package that is already installed on your system, use the –l flag. In the following example, I query the system to find out what version of bash (the Bourne Again Shell) I am working with:
dpkg -l bash
Desired=Unknown/Install/Remove/Purge/Hold
| Status=Not/Installed/Config-files/Unpacked/Failed-config/
Half-installed
|/ Err?=(none)/Hold/Reinst-required/X=both-problems
(Status,Err: uppercase=bad)
||/ Name Version Description
+++-==============-==============-============================================
ii bash 3.1-2ubuntu6 The GNU Bourne Again SHell
Let’s say that you are wondering what some file is doing on your system. For instance, there is something called pinwrapper in my /usr/bin directory and I don’t remember installing it. Furthermore, if I try to look it up in the man pages, I am told that there is no information on this file. Using the -S flag, I can have dpkg identify what package this file was a part of:
dpkg -S /usr/bin/pinwrapper
bluez-utils: /usr/bin/pinwrapper
Even though I don’t remember installing this bluez-utils software, I can now use apt-cache show bluez-utils to tell me what this package is for. As it turns out, they are tools for using Bluetooth devices.
People who use Debian distributions on a regular basis sometimes point to this wonderful little program as the reason why Debian is so great. Well, I certainly won’t be the one to deny that apt-get is wonderful.
If you want to install a package called tuxtype (a great typing tutor for kids, by the way), this is how to do it:
sudo apt-get install tuxtype
Reading package lists... Done
Building dependency tree... Done
The following extra packages will be installed:
libsdl-image1.2 libsdl-mixer1.2
The following NEW packages will be installed
libsdl-image1.2 libsdl-mixer1.2 tuxtype
0 upgraded, 3 newly installed, 0 to remove and 1 not
upgraded.
Need to get 4341kB of archives.
After unpacking 6038kB of additional disk space will be
used.
Do you want to continue [Y/n]?
The great thing here is that you do not have to go to a variety of sites to hunt down and identify appropriate software. You call apt-get with the install parameter and off you go. Notice as well that apt-get automatically picks up dependencies for a given package and installs them when needed. If you want to update to the latest version of tuxtype, substitute the install parameter with upgrade.
I don’t want to confuse things here but speaking of updates, one of the most important things an administrator must do is keep packages up-to-date. You can install upgrades to all installed packages with this version of the apt-get:
sudo apt-get upgrade
Perhaps the most famous example of Debian’s prowess is symbolized by the following command:
sudo apt-get dist-upgrade
This is, by no means, something that is used on a regular basis. It is used to upgrade from one major release of a distribution to another (say Breezy to Dapper).
That is the question, or at least one of them. I routinely work with the command line and with the graphical desktop. Despite my comfort at the command line, I still use Synaptic and find it an invaluable tool.
What should you use? Synaptic is certainly easier for a new user, but the point of showing you these things is two-fold. First, I’d like you to realize that there is more than one way to do it. That applies to graphical tools (as you saw earlier in this chapter) and command-line tools. Second, I want you to see that the shell isn’t that scary, even for dealing with things like software installation. In Chapter 21, the final chapter of this book, I’ll give you a great introduction to working with the Linux shell.