In this chapter
From the start, the Internet has been touted as a means for enhancing human communications, and among the many communication tools available in the online world, few have had the impact of electronic mail (email).
To fully understand the nature of email, you should keep in mind that, at its most basic level, it is simply a way for users to send messages to each other over a network. This network could be a local area network (LAN) run by your company using MS Exchange Server software. In this situation, the network server manages all message traffic. The server can also act as a gateway to other servers, allowing you to send mail beyond the local network. If you have an email account with an Internet service provider (ISP) or other Internet-based service, the provider's server acts as your gateway to other mail servers across the Internet.
Email has been criticized by some as diminishing the art of written communication by making letter writing into a less formal exchange. You may or may not agree, but if your daily work requires you to use a computer, chances are you are also expected to use email for much of your business communication.
Given that email is here to stay, you must decide which email client you plan to use for reading, composing, and sending messages. You have a number of options available to you, and which one you ultimately choose will depend not only on your personal preferences but also professional needs.
Windows XP includes an excellent email client called Outlook Express 6 (OE6), which is actually a companion program to Internet Explorer 6 (IE6). It is a multifeatured program designed to appeal to a variety of email users, but it isn't for everyone. OE6 can also function as a newsgroup client, making it a “one-stop” program if you routinely communicate via email and use newsgroups.
Note
→ To learn more about using Outlook Express to read newsgroups, see Chapter 11, “Reading Newsgroups with Outlook Express.”
Outlook Express is relatively compact as Windows applications go. If you want an efficient program that can handle your email needs without a lot of extra fluff, OE6 is a pretty good choice. However, it does lack a few features that you might want or need, so read the next couple of sections to find out if you should be using a different client.
NOTE
This discussion assumes you have a choice in email clients. If you're using Windows XP in an office environment, check with your company's Information Systems (IS) manager to find out whether you must use one specific client.
If you use Microsoft's Office suite, you're probably familiar with Outlook. Outlook is the primary communications tool included in the Office package, and many professional PC users like it. However, don't be misled by the name similarity between Outlook and Outlook Express. OE6 is not a “lite” version of Outlook; these two applications are actually quite different. Aside from the name and a few basic interface similarities, the only thing they have in common is the capability to handle email.
Outlook includes many features that Outlook Express does not, such as the following:
A personal calendar
An electronic journal
Fax capability
Compatibility with Microsoft Exchange Server
In addition, Outlook's system of managing personal contacts is far more advanced than that of Outlook Express. If the ability to integrate a heavy email load with your personal scheduler on a daily basis is important to you, Outlook is the clear choice.
If you are already using Outlook and like the Calendar and Journal, stick with it. Furthermore, if your company's network or workgroup uses Exchange Server for mail services, Outlook is the only fully compatible upgrade to that system. Outlook is also Messaging Application Programming Interface (MAPI) capable, which means it can share mail with other MAPI-capable programs on your system. Outlook Express is not MAPI-capable. Because Outlook is bigger than OE, it requires more disk space, more RAM, and slightly more patience on the part of the user. If you find that you don't use Outlook for anything but email, you might be better served by Outlook Express.
Microsoft isn't the only company producing high-quality email clients. One of the most popular alternatives is Eudora Pro from Qualcomm (www.eudora.com). Eudora offers an excellent package of mail management and filtering features, as well as compatibility with the latest Internet mail standards. Like Outlook Express, it is considerably more compact than Outlook, but it does not incorporate a newsgroup reader. Some unique Eudora features include the following:
Voice messaging capability
Integrated McAfee VirusScan protection for viruses propagated in mail attachments
Built-in compression agent to shorten download times on slow dial-up connections
A free version of Eudora called Eudora Light is available, but it lacks so many of the features available in the identically priced Outlook Express that, at this point, it isn't worth your consideration.
Another popular email client is Netscape Messenger, which comes as part of the Netscape Communicator package and is available as freeware. Messenger is comparable to Outlook Express in terms of mail management and newsgroup capability, and its interface is clean and uncluttered.
Numerous other email clients exist. A simple search on the Web or of www.download.com will flush them out.
Because covering the many different email clients that are available would be beyond the scope of this book, we will assume that you have chosen Outlook Express 6. It comes free with Windows XP and will meet many of your electronic mail needs.
Outlook Express is installed during a clean installation of Windows XP, so it should be ready to open. You can launch it by clicking the Outlook Express icon near the top of the Start menu, labeled “E-mail.”
NOTE
In Windows, there is something called your “default email program.” This is the program used to generate email from other programs. For example, it will be used if you click a link in IE to send an email to someone. As installed, Windows XP assumes that OE is your default email program. If you upgraded your previous version of Windows to XP, and had been using another email program such as Outlook or Eudora for email, that program will be your default email program instead. Still, this does not mean it will necessarily appear at the top of the Start menu next to “E-mail.” This setting should automatically show your default email client. If not, you can simply change it by right-clicking the Start button, choosing Properties, clicking Start menu, then the Customize button, and then changing the E-mail drop-down list to the program of your choice. If you don't see the program you expected, then it's not installed into XP.
Note
→ If you have not yet set up an Internet connection, you will need to do so. The New Connection Wizard will pop up to guide you through the process. Refer to Chapter 8, “Internet and TCP/IP Connection Options,” for more information.
If you are online, and you already have an email account set up, OE automatically checks for new mail when you open the program. If you don't yet have an account set up, when you open OE for the first time the (poorly-named) Internet Connection Wizard opens to help you set up a mail account. For now, click Cancel to close this screen and take a look at Outlook Express. I'll talk about setting up your account(s) in the next section, “Setting Up an Email Account.” The OE window will appear as in Figure 10.1.
Figure 10.1. The opening view of Outlook Express is not very useful. You can configure the program to open directly to the Inbox instead.
Note
→ If you haven't yet set up an account, see “Setting Up an Email Account,” p. 364.
If this is the first time you've opened OE6, notice that you have one unread mail message. Click the link to go to your Inbox and read the message, which is actually just a welcome letter from Microsoft.
TIP
You'll probably find that you spend more time in the Inbox than in any other place in Outlook Express. For that reason, on the default OE startup screen, place a check mark next to When Outlook Express Starts, Go Directly to My Inbox.
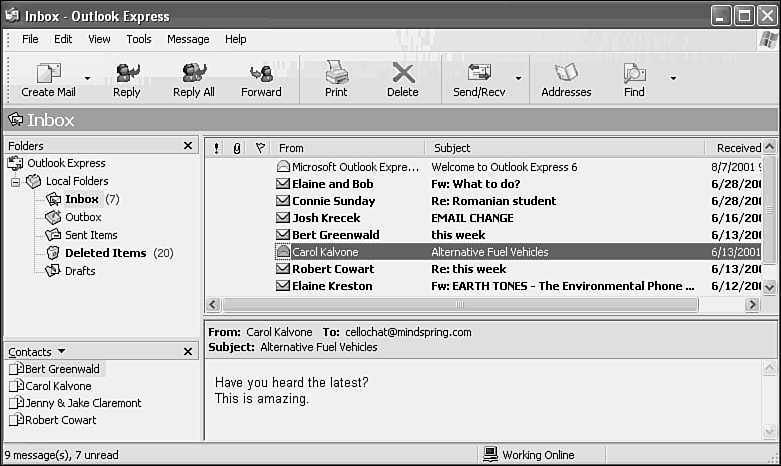
When the Inbox opens, as shown in Figure 10.2, you'll see that the right side of the window is divided. The upper half is a list of messages in your Inbox, with unread messages shown in boldface. The lower half is the Preview Pane, which shows a preview of whichever message is selected above. You can use the scrollbar to read more of the message.
Figure 10.2. The Inbox includes a list of new messages and a Preview pane that you can use to read them. The Folders list can serve as a directory to virtually all Outlook Express resources.
The Preview pane is useful, but some people don't like it because it crowds the message headers a bit. Before SP2, the Preview pane came with some security risks, potentially alerting spammers that you were reading their mail, or even running malicious code. If you haven't upgraded to SP2 and you use OE, this is an excellent reason to upgrade. To open a message in a separate window, double-click it. If you always prefer to read mail in this manner, you can hide the Preview Pane to make more room to view the list of Inbox messages. To hide that pane or make a variety of other adjustments to the Outlook Express interface, try these steps:
Choose View, Layout.
In the Window Layout Properties dialog, select or deselect the screen elements you want to show or hide. We suggest you deselect the Folder Bar (duplicated with more clarity in the Folder List), as well as the Preview Pane if you don't plan to use it. You may also want to deselect the Contacts pane, since OE can be set to auto-complete an address that is in your Address Book.
Experiment with the settings, and click OK when you have OE6 looking the way you want it.
Take a look at the other screen elements. The Folders list shown in Figure 10.2 is handy because you can use it to quickly jump to any part of Outlook Express, including newsgroups if you have an account set up.
Before you can send or receive electronic mail, you need to have an email account. There is a good possibility that your account has already been configured by your company's IS department or that some software from your ISP took care of it for you. Otherwise, you'll have to set it up yourself.
You can set up an account directly from Outlook Express by following the instructions listed here. These steps also work for setting up a second or third account or mail identity on the same machine.
In Outlook Express, choose Tools, Accounts.
In the Internet Accounts dialog (see Figure 10.3), click the Mail tab to bring it to the front.
Click Add, Mail.
The Internet Connection Wizard opens to a dialog asking for your display name. This is the name that other people will see when you send them mail, so choose carefully. Click Next after you've entered a name.
The next wizard box asks for your email account address, which should have been provided by your company or ISP. Click Next after you've entered the address.
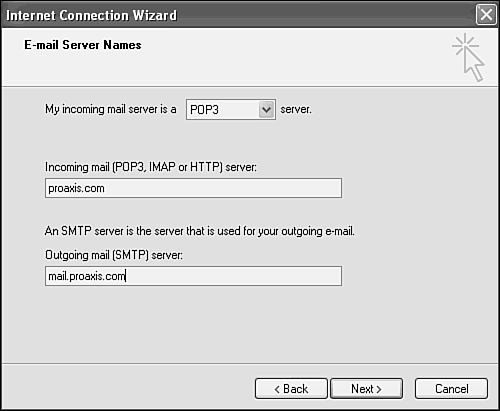
You must enter the types and names of your email servers in the next dialog, which is shown in Figure 10.4. Again, this information is provided by your company or ISP. See the next section for an explanation of the different server types.
The next dialog asks for your login name and password. Do not check the option Remember Password if other people have access to your computer. Check the SPA (Secure Password Authentication) option if required by your email provider; then click Next. Click Finish in the final dialog. Your new account should now be listed in the Internet Accounts dialog.
NOTE
Secure Password Authentication (SPA) is used by some email services to prevent unauthorized users from getting or sending your email. When you attempt to receive your mail in OE, a screen will pop up asking for you to enter a username and password. Both Outlook Express and MS Outlook have this feature. Most email (POP) servers do not use this feature, so you should probably leave it turned off.
The only other piece of information that Outlook Express needs is which network or dial-up connection it should use when sending and receiving mail. You probably don't need to select this connection because OE6 automatically assigns your default connection to all mail accounts.
Note
→ If you don't have a connection set up, see “Configuring Your Internet Connection,” p. 291.
You've probably noticed the veritable alphabet soup of acronyms that exist for the many different kinds of email servers. Unlike so many other cryptic terms thrown around in the PC world, these acronyms are actually worth remembering.
First, a basic understanding of how email flows across networks (including the Internet) is important. Usually, when you send a message, Outlook Express transfers it to a Simple Mail Transfer Protocol (SMTP) server. An SMTP server is controlled by the sender, meaning that it waits for you to push mail through it. After you send the message to your SMTP server using OE6's Send/Recv or Send All command, no other interaction is required to deliver the message to its final destination.
NOTE
The Send command must be used in the main program, not just in an individual email. Otherwise, the mail you've written will simply pile up in your Outbox. You can click on the Outbox in the Folder list to see if there are messages waiting to be sent. If so, click the Send/Recv button on the toolbar.
Mail sent to your computer doesn't just go from the sender to your PC. Since your PC is likely not always online, and certainly not always ready to receive email, messages must go to an interim server (usually maintained through your Internet service provider). To receive mail, you probably use either a Post Office Protocol (POP) or Internet Message Access Protocol (IMAP) server. POP and IMAP differ in that POP servers forward all messages directly to your local machine, whereas IMAP servers maintain the messages on the server until you delete them. When you check for mail on an IMAP server, a list of message headers is downloaded, but the actual message bodies stay on the server (like newsgroup messages, as explained in the next chapter). An IMAP server comes in handy if you travel a lot and want to be able to check messages on the road with your laptop or PDA, but don't want to remove them from the server until you can download the mail to a more permanent location on your home desktop.
Another type of email server is a Hypertext Transfer Protocol (HTTP) server, such as those offered by Yahoo!, Hotmail, and others. An HTTP mail account is useful for those who wish to travel light because it is not necessary to take a computer or software with you. You can access your HTTP account using a Web browser on any computer with access to the Internet, and generally the only information you will need to provide is your login name and password. Outlook Express can also be used to read and send mail using an HTTP account.
HTTP mail accounts have their advantages. They are free, and it is possible to access these accounts on the road from any computer with Internet access. These accounts historically have limits to the server space they'll allow you to use for free. There's a space war going on at this point (100MB on Yahoo!, 250MB on Hotmail). In any case, it's worth remembering that your HTTP email address may eventually top out when receiving large quantities of mail or big file attachments. Monitoring your remaining capacity and deleting old mail regularly is a good idea. It is possible to purchase more server space from these companies, but they still limit the size of attachments allowed. When your mailbox fills up, messages will be bounced back to the sender.
There are many free email providers. Two of the most popular are at www.yahoo.com and www.hotmail.com. To find others, do an online search for “free email,” and you'll see a seemingly limitless list. Alternatively, go to this site that lists the top five free email providers:
http://www.iopus.com/guides/bestpopsmtp.htm
Be prepared to provide information such as your name and geographic location. You will also be asked for your age, but testing has shown that you can pretty much enter anything you want into that field.
When your new account is configured, you can use it directly from the Web or add it to OE as described previously, in the section, “Setting Up an Email Account.” You enter the HTTP server address in the same location where you would otherwise enter the POP or IMAP server address. In terms of downloading and deleting messages, HTTP mail accounts work in a similar manner to IMAP accounts.
TIP
You can always check your HTTP account from another computer by visiting its Web site and entering your username and password. If you are checking mail when you are not at your own computer, it is a good idea to leave the messages you receive on the server so that they will still be available for download later using OE6.
One point to keep in mind about most free HTTP mail accounts is that although they can be helpful when you're traveling, you must use your account periodically to keep it active. For example, you need to log on to your Hotmail account at least once during the first 30 days of membership and once every 90 days beyond that.
After you have an account set up, you are ready to begin downloading and reading mail. To get started, open Outlook Express, and go to the Inbox. By default, Outlook Express automatically checks for new mail when it first opens. If your installation is configured otherwise, click the Send/Recv button on the toolbar. As your mail is coming in, a dialog box appears indicating which account is being checked, and shows the progress of the sending and receiving. It will also tell you how many messages are being transferred. New messages will then appear in your inbox, as shown in Figure 10.5.
TIP
If you receive a message from someone you plan to communicate with regularly, right-click his or her name in the message header, and choose Add Sender to Address Book. By doing so, you add the person to your contacts list so that sending him or her mail in the future will be easier.
When you reply to a message, you need to be wary of a few things. First, note that if the incoming message was sent to a group of people, clicking the Reply button will send your message to the single person who sent it to you; clicking Reply All will send your message to the entire list of people who received the original message. Although this can be a helpful tool when communicating with a group of people, it could get you in trouble if you think you are writing to a specific person and accidentally click the Reply All button. Before you send any message, make sure the correct person or persons are listed in the To: and Cc: fields. Anyone listed in those two fields will receive a copy of the message as well as a list of the other recipients and their email addresses, so make sure you aren't airing your dirty laundry any more publicly than you intended. The section “Creating and Sending New Mail” discusses addressing messages more thoroughly.
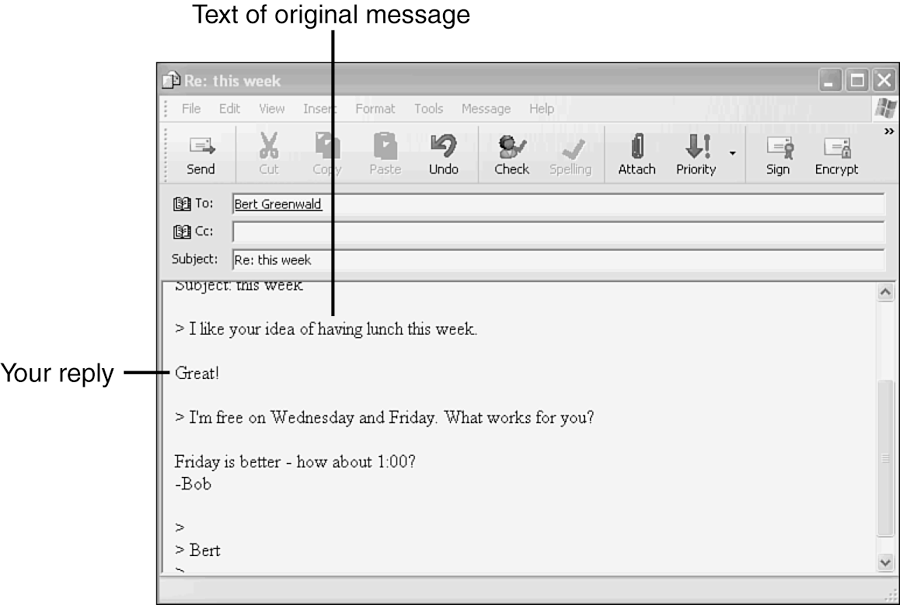
The rest of the reply process is fairly straightforward. You just type in your own text and click Send on the toolbar when you are ready to deliver the message. By default, Outlook Express automatically places the text of the original message in the reply.
When you're composing your reply, you should keep in mind these important points:
Consider editing the quoted text in the reply by cutting it down to the text you actually intend to respond to. Most people don't appreciate reading four pages of quoted text followed at long last by “Me too.”
Include enough of the original text to help the recipient understand exactly what you are replying to. If the recipient doesn't read your reply for several days, he or she might not remember what his or her original statements were.
Breaking up quoted text with your own inserted comments is usually acceptable, but make sure it is obvious which words are yours. Figure 10.6 illustrates this reply technique.
How and when messages are deleted depends on what kind of mail server you use. If you receive mail from a POP server, deleted messages remain in the OE6 Deleted Items folder indefinitely, similar to “deleted” files in the Windows Recycle Bin.
You can permanently delete them by right-clicking the Deleted Items folder and choosing Empty 'Deleted Items' Folder from the shortcut menu that appears. If you have an IMAP mail server, the Deleted Items folder is emptied automatically when you log off the mail server.
You can change the way Outlook Express handles items in the Deleted Items folder. To do so, choose Tools, Options, and select the Maintenance tab to customize when and how mail messages are deleted.
The process of creating and sending new mail is almost as easy as receiving it. To open a New Message composition window, click the Create Mail button on the OE6 toolbar.
TIP
You might find it helpful to have OE spell-check your email before sending it. OE does have a spelling checker, but it is only available if you also have Microsoft Word, Excel, or PowerPoint installed on your computer. Once enabled, you can click the Spelling icon in the message window when composing a message. Adjust your spelling options by going to Tools, Accounts, and clicking on the Spelling tab.
Addressing messages properly is extremely important. A single misplaced character, or an extra one, in an email address can send the message to the wrong person or to no one at all. A typical email address looks like this:
TIP
Some mail servers are case sensitive. If you're not sure, just type the whole address in lowercase letters.
Notice that OE6 has two address fields that appear by default, To: and Cc:. Cc: is short for Carbon Copy or, these days when that messy blue paper is nearly extinct, Courtesy Copy. The address field is the only required field when sending email; all the others, including the subject and even the message body, can be blank. The To: field usually contains the email address of the primary recipient, although it can contain more than one address, as shown in Figure 10.7. You separate multiple addresses with a semicolon (;).
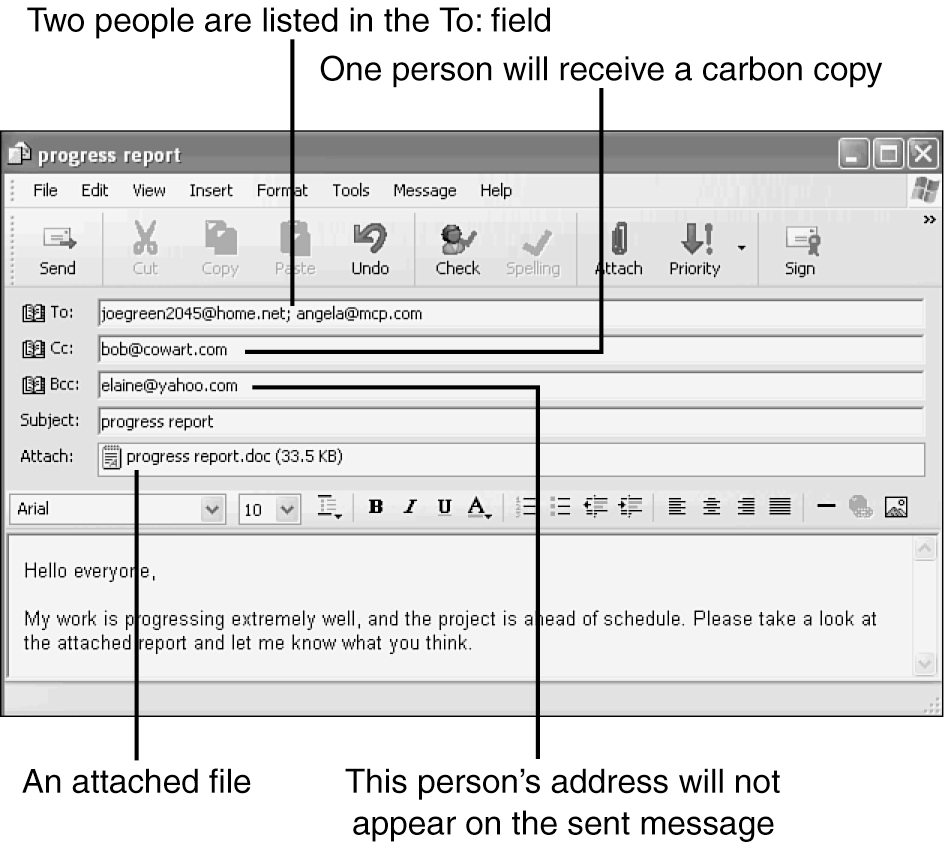
To send email to several people without allowing its recipients to see the names or email addresses of others who also received it, enter addresses in the Bcc: field (Blind Carbon/Courtesy Copy). In an email window, choose View and select Show All Headers. The Bcc: field will now appear in the email window.
When you are finished composing the message, just click Send on the toolbar. If you do not want your message sent right away, choose File, Send Later. The message is then sent to the Outbox folder and will be sent to your mail server the next time the Send command is given.
Of the many features that make email a versatile method for communication, perhaps the most useful is the capability to send files along with an email message. You can attach any electronic file stored on disk to an email message in Outlook Express and then send it to someone else.
NOTE
Some email accounts do not allow you to send or receive file attachments with messages. Others, particularly HTTP accounts, limit the number and size of attachments allowed. Check with your account provider to find out whether you have this capability. Also, make sure that the recipient has the capability to receive attachments.
Attaching a file to an outgoing message is easy. In the message composition window, click the Attach button on the toolbar, and locate the file you want to send in the Insert Attachment dialog. After you have selected the file, click Attach. The file attachment should appear in the header information, as shown earlier in Figure 10.7.
Before you send any attached files, consider the bandwidth it will require. Even if you have a very fast network or Internet connection, if the recipient connects to the Internet via a dial-up modem, downloading the attachment could take a long time. In general, you should avoid sending any attachments that are larger than one or two megabytes unless you are sure the recipient can handle them or knows in advance that they're about to receive some rather large files. It's best to ask your recipient first. Many mail servers (especially Web-based accounts) limit the total amount of space a person can use, and many also set a limit to the size of attachments allowed (often capping the attachment size at 1MB).
One more thing: If you or the recipient uses a 56Kbps or slower Internet connection, it is usually a good idea to compress large attachments before you send them. Simply right-click on the document(s) you wish to send, choose Send To, and then Compressed (zipped) Folder. Attach the compressed version to your email.
To open an attachment in a message you receive, right-click the attachment (listed in the header) and choose Save As to save it to disk, or simply open it. If the attachment is a picture file, it often appears in the body of the message as well.
Computer viruses often propagate themselves through email attachments. Hackers seem to get their jollies out of slowing down the Internet or bringing corporate business to a crawl. One way to do this seems to be targeting the most popular email programs, such as Outlook and Outlook Express. As a result, the bulk of email-borne contagion exists in the form of attachments whose payloads sneak through weaknesses in those two programs. Personally, I think that both these programs are excellent email clients, so I don't suggest changing your email program just to avoid the onslaughts of malicious Internet hackers.
As you might suspect, Microsoft doesn't want to lose customers either, so it makes a point of looking for viruses and posting critical updates to its site for easy download. A good approach is to run a Windows System Update regularly. As of SP2, Automatic Updates are turned on for just this reason.
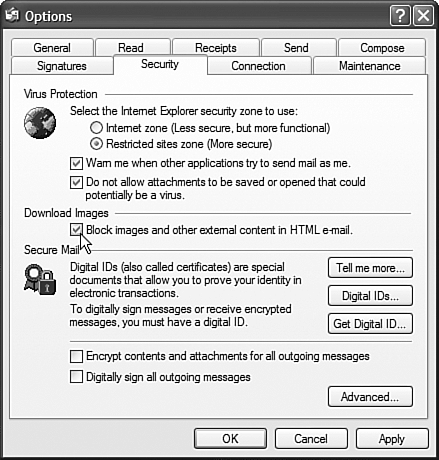
In addition, security has been improved in OE6 to specifically combat this problem. By going to Tools, Options and clicking the Security tab, you'll notice the addition of Virus Protection since the previous version of OE. By default, OE6 will warn you if another program attempts to send a message to contacts in your Address Book. As you may be aware, this is a common way for viruses to spread. I recommend that you keep this option selected.
There is also an option that deals with potential threats from incoming email attachments. If you click the box next to Do Not Allow Attachments to Be Saved or Opened That Could Potentially Be a Virus, you'll be more protected, but your ability to access any attachment to email in OE will be quite limited. If you're diligent about it, a better way of dealing with the possibility of attachment-borne viruses is to carefully look over your incoming email before opening any attachment by following the tips below. I've found that when enabling the automatic feature in OE6, even the most innocuous attachments are prevented from opening. (You can regain access to these attachments simply by returning to the Security dialog box and deselecting this option.)
Yet another option is to download and use one of many available anti-virus programs. http://www.mcafee.com is a reliable source, and its Web site is another good place to check for the latest discovered viruses and how to protect your computer from them.
Contrary to popular belief, simply downloading an infected attachment virtually never harms your computer. With few exceptions, it is only if you open an attached executable file that there could be dire consequences. If possible, save the file attachment on a separate disk, and then scan it with antivirus software.
Be especially wary of
Attachments you weren't expecting (even from people you know). If in doubt, write back to the sender and ask if they intended to send you the attachment. Their computer may have a virus they are unaware of. Ask if the attachment is safe, and if they've run it on their computer.
Executable attachments (filenames ending in .exe, .vbs, or .js). Be aware that sometimes filenames are misleading on purpose. For example, you might see an attachment such as party.jpg.vbs. This is not a picture. The final extension is the one that counts.
Emails with cryptic or odd subjects and messages, such as “I Luv U,” “Here's that document you requested,” or “CHECK THIS OUT!!!”
Anything that comes from a source you are unfamiliar with.
NOTE
See the section “Additional Security Features in Post-SP2 Outlook Express” later in this chapter for further discussion of this important topic.
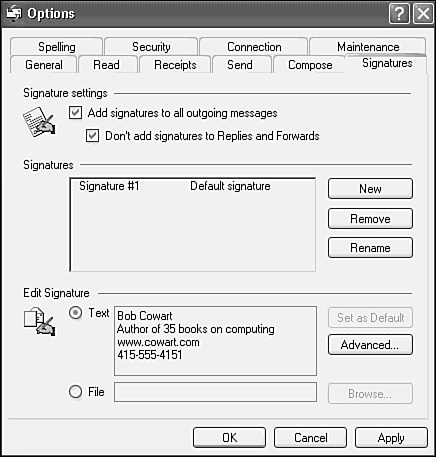
If you use email for much of your personal and business communication, you may like to “sign” outgoing messages with an electronic signature file. These signatures frequently include additional information about you, such as an address, title, phone number, company name, Web URL, or a witty quote. Outlook Express makes it easy to set up a standard signature that will be included in every message you compose. You can configure your own signature by following these steps:
Choose Tools, Options. Click the Signatures tab to bring it to the front.
Click New to begin typing a new signature. Type your signature information as shown in Figure 10.8.
If you have multiple email accounts, click Advanced and select the account or accounts you want this signature to be used with.
Place a check mark next to Add Signatures to All Outgoing Messages to enable this feature. Notice that, by default, your signatures will not be added to replies and forwards. Click OK when you're finished.
It is possible for OE to send a request along with email you send, asking the recipient to simply click a box to notify you that your email message has been read. This is called a “read receipt.” When typing a message, go to Tools, Request Read Receipt. If there is not already a check mark next to it, click on Request Read Receipt.
Note that this is a request only: The recipient has the option of refusing to send the receipt. Still, it is a helpful tool: If you don't get a receipt, you can follow-up with another email or a phone call.
If you intend to request a read receipt every time you send email, you can change your settings to make it simple. In OE, go to Tools, Options, and click on the Receipts tab. Click the box at the top of the window that says “Request a read receipt for all sent messages.” Consider this carefully; your Inbox could get filled quickly with read receipts, and the significance of receipts could be diluted (and recipients irritated) if a request is attached even to the messages of minor importance that you send. In addition, this window allows you to select your preference for returning read receipts. If you find the pop-up windows to be annoying, choose an option to “never” or “always” send a receipt when requested.
A simple way to enrich email is to apply message formatting using HTML code, the same type of code used to construct Web pages. HTML is the default format for new messages you create in OE6, although replies are typically formatted in whatever manner they were originally sent to you.
Applying special formatting to HTML messages is easy. Outlook Express provides a formatting toolbar similar to what you would see in a word processing program, where you can choose such formatting options as bold, italic, and so on. You also can give HTML messages graphic backgrounds by choosing one of several varieties of “stationery” provided by OE6. To do this, choose Format, Apply Stationery. You can even generate email that looks much like a Web page, complete with pictures (and, heaven forbid, banner ads), as well as links.
Note
→ See the “Tips from the Windows Pros” section at the end of this chapter for details on how to create Web-page–like HTML email.
CAUTION
Although you don't have to worry about accidentally generating malicious HTML-formatted email, you might want to know that HTML email can carry scripts that might damage your system, or invade your privacy. Some viruses (such as the infamous bubbleboy virus) have used HTML mail to propagate. Also, HTML emails can be used to track how people view their email. For example, some emails have links to pictures in them that automatically download from the Internet when you click on the message. These links can be used by advertisers (if they care to notice) to track when you've opened an email. They can also track how often you read that email. Some people consider this a breach of privacy. As of SP2, this feature can be turned off, protecting your privacy. See the section "Additional Security Features in Post SP-2 Outlook Express," p. 382.
One problem with HTML messages is that not all modern email clients can view them properly. Messages formatted in this manner may appear with a huge quantity of gibberish at the end of the message if the recipient doesn't have an HTML-compatible client. Likewise, mailing lists usually cannot handle HTML formatting in messages that are sent to them.
There are two types of plain text message formatting available. Until a few years ago, all email was formatted as simple text, with no special characters or fancy formatting. These early emails utilized a message format called uuencode, short for Unix-to-Unix encode. You don't need to be running UNIX to read uuencoded messages, though; virtually any email client you are likely to encounter—including OE6—can read and send messages in this format.
To address the shortcomings of ASCII-based uuencode email, the Multipurpose Internet Mail Extensions (MIME) specification was developed. MIME, which is supported by most modern email clients, allows the use of graphics, file attachments, and some special non-ASCII characters in email messages.
Most mailing lists and users in general can handle MIME messages. To change the default sending formats for outgoing messages, open the Options dialog in OE6. On the Send tab, choose HTML or Plain Text. If you choose Plain Text, your default message format will actually be MIME. If you want to change to uuencode, click the Plain Text Settings button, and choose the appropriate options in the dialog that appears.
Email has fast become an essential method of communication, but for some uses, it might not be secure enough. Hiding or falsifying one's identity on the Internet is easy enough that some unscrupulous person could be masquerading as you or one of your associates. To combat this problem, several companies offer digital IDs that help verify the identity of the sender.
Another threat to the privacy of email is the possibility that messages will be intercepted and read by others (think digital wiretapping). Sending encrypted email will prevent your mail from being read by anyone on the way to your intended recipient.
A digital ID is made up of a private key, a public key, and a digital signature. When you digitally sign a message, two of these three things are added to your email: a public key and your digital signature. This is called a certificate. The private key stays with you.
When you send secure mail, recipients use your digital signature to verify your identity. They use your public key to send encrypted email to you. When you receive the encrypted email, you use your private key to decrypt the message.
The mechanics of how this works are elaborate and a topic that can entertain the most advanced cryptologists and software engineers. What's important is that in order to send or receive secure mail, you will need to have a digital ID. To encrypt messages you send, your Address Book must contain a digital ID for each recipient.
You can obtain a digital ID for yourself by following these steps:
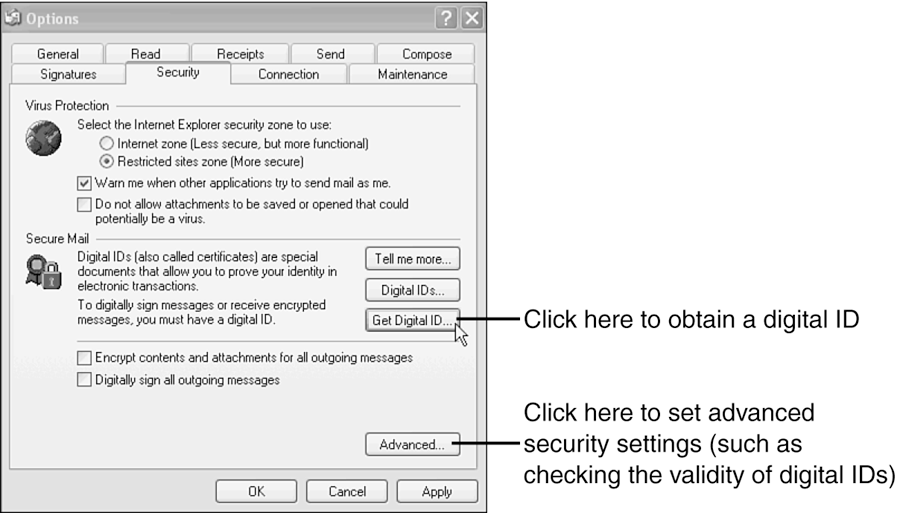
In OE, choose Tools, Options.
On the Security tab, click Get Digital ID, as shown in Figure 10.9. Choosing this option will launch your browser and automatically go to a Microsoft Web page that contains links to various certification authorities. Among those listed are VeriSign, GlobalSign, and Thawte Certification.
Select one of these companies and go to its Web site. Follow the instructions provided there to obtain and install a digital ID.
When you have a digital ID, it is simple to add it to a message. To do so
Open OE and click Create Mail.
In the new mail window, go to Tools and click Digitally Sign.
Compose and send your message.
Outlook Express will automatically add your digital ID to your email account when you send your first digitally signed message, by searching your computer for a valid digital ID which matches the email address from which you are sending. If more than one valid digital ID is found, you must choose which ID to add to that email account. Also note that if you have more than one email account, you will need to have a different digital ID for each account from which you want to send secure email.
NOTE
When sending secure email, your reply address must match the account from which you send digitally signed email. If you have set up a different reply address (on the General tab of your account properties dialog box), message recipients won't be able to use your ID to reply with encrypted email.
When others send digitally signed email to you, messages are marked with a red seal in the message header. Outlook Express shows you an explanatory message about digital signatures before displaying the message. If you are online, you can check the validity of the digital ID of the sending party. To do this, choose Tools, Options, Security tab, Advanced, Check for Revoked Digital IDs, Only when Online.
You don't have to communicate via email for very long before you mistype someone's address. Suddenly, spelling has become more important than ever before. Your local mail carrier can direct your parcel to you when the label is misspelled, tattered, and torn, but email with a misspelled address just gets bounced back to you. Email addresses can also be cryptic and long, and some are even case sensitive. The Address Book feature in Outlook Express is a big help with all of this.
Before going through the inner workings of the Address Book, keep in mind that this single feature goes by two different names within OE6. Sometimes it is called the Address Book, and other times it is called the Contacts list.
You can open the Address Book in its own window by choosing Tools, Address Book, or by clicking the Address Book icon in the toolbar.
By default, OE adds an entry to your address book whenever you reply to an email you've received. This is an easy way to fatten up your address book quickly. Before your Address Book grows to an unmanageable size, you may want to turn off that feature (see the Troubleshooting notes at the end of this chapter). If you do this, you'll need to know how to add contacts in other ways. A fool-proof way to add someone to your Address Book is by doing the following:
Open a message sent to you by someone you want to add to the Address Book.
Right-click the individual's name or email address in the message header, and choose Add to Address Book.
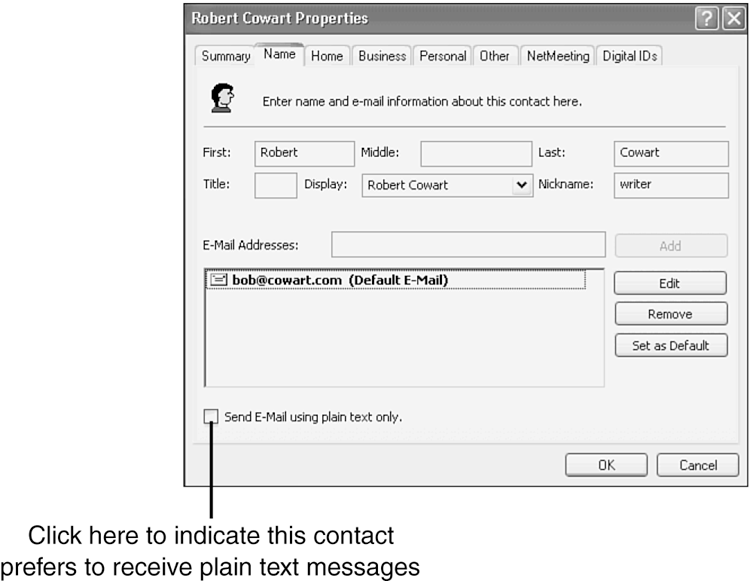
A Properties sheet opens for the entry, but don't close it yet. Click the Name tab to bring it to the front, as shown in Figure 10.10. If the person uses a nickname, you might need to edit the name entries on this tab so that they are displayed correctly in your Contacts list. Pay special attention to the Display field.
Review all the other tabs in the Properties sheet, and enter any other information about this person you feel appropriate. Click OK when you're finished.
You also can add someone to your address book the old-fashioned way—that is, manually from a business card or other source. In Outlook Express, click on the Addresses icon. This will open up the Address Book. Click on the New icon, and select New Contact. The Properties window, described previously, will open for you to enter information.
To edit a contact later, click on the Addresses icon to open the Address Book. Select the contact that you wish to edit by double-clicking that person's name. The Properties window will now open with a summary of that person's contact information. To change or add information, you need to click on one of the other tabs along the top of the window—the information can not be changed on the Summary tab.
You might find duplicate listings or unwanted contacts in your Address Book. Deleting a contact is simple: Just highlight the entry and click Delete. Be certain you've selected the correct contact, since this action can not be undone.
Sending a single email message to several people is not unusual. However, entering multiple addresses can get tiresome, especially if you frequently send messages to the same group of people.
To simplify this task, you can create distribution lists in the OE6 Address Book. You can group many people into a single list, and when you want to send a message to the group, you simply choose the distribution listing from your Address Book. Distribution lists can be created for co-workers, customers, friends and family, or any other group you communicate with. To create a list, just follow these steps:
Open the Address Book.
Click New, and select New Group from the menu that appears.
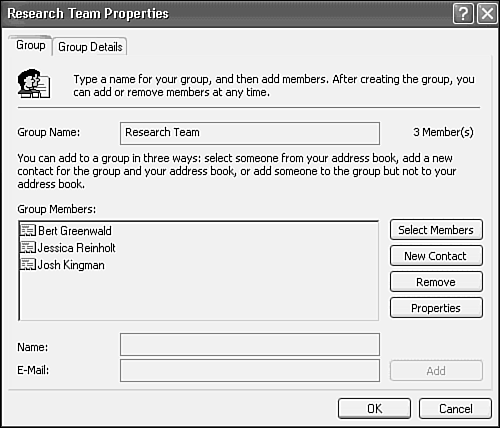
On the Group tab of the Properties dialog that opens, type a descriptive name. For example, consider using the name of your department at work.
Click Select Members. In the Select Group Members dialog, pick a name from your Address Book, and click Select. Repeat until you have selected all the names you want in the distribution list.
Click OK when you are finished selecting names from the Address Book. As you can see in Figure 10.11, each member is listed under Group Members. Check the Group Details tab to see whether you should enter any information there, and click OK when you're finished.
A listing for the group then appears in your Address Book. When you are composing email for the group, simply select the group name from your Address Book to automatically send the message to all group members. To delete a group, highlight the group name and click Delete. Note that this deletes the group, but not the group's members, from your Address Book.
A number of people-search directories exist on the Internet to help you locate individuals. Outlook Express does a good job of integrating these search engines into the program, making it easy for you to search for people and add them to your Contacts list.
TIP
No matter how obscure a name may seem, you would be amazed at how many other people in the world share it. When you locate someone in an online directory, first send that person an email inquiry to confirm that he or she is indeed the person you are seeking before you share any sensitive information with him or her. Unfortunately, you'll also find that the information given by some online directories is frustratingly out of date. (So much for the speed of the Internet.) If you suspect the information is not current, try a different search engine.
To find people who aren't in your Address Book, follow these steps:
Open the Address Book. Click Find People on the Address Book toolbar.
In the Find People dialog, click the drop-down arrow next to Look In, and select a directory service. No single directory is ideal, so you might need to try searching through several directories before you find the person you are looking for.
Click Find Now. A search of the directory service you selected in step 2 is conducted, and results are displayed. If the person is not found, a dialog tells you so. Try another directory or a different spelling for the name.
After you have located the person you are looking for, select his or her listing, and click Add to Address Book. Click Close when you are finished searching.
Outlook Express 6 has features that go well beyond the most common email-related tasks of reading and composing mail, addressing and sending messages, or using the Address Book. For example, you may have more than one email account. You can set preferences for these accounts, choose to keep them separate, or to bring them all into the same OE Inbox. You'll also learn ways to organize and filter your mail, check your mail while traveling, and how to make an alternate backup location for the mail you want to save and protect. In this section, we'll describe these more advanced situations and capabilities. Even if you don't intend to use these features, skim through the sections just so you know what features are available. Once you know what features are built in, you might want to come back and try them out later.
After setting up an email account or two, you may find that you'd like to change a few things, such as the server name, password, connection preference, and more. To do this, go to Tools, Accounts, click the mail tab, and click Properties. Poke around in here to see all the characteristics that you can change.
Under the General tab, you can change how your name will appear on outgoing mail. Whatever you enter in the Name box will be what the recipient sees. Think about whether you'd like your email to be listed in recipients' inboxes in a casual or formal way, or even with your business name instead. (In other words, enter “Bob Cowart” or “Mr. Robert Cowart” or “Bob's Car Care.”)
You might want to send mail from one email address, but have replies go to a different email address (when recipients click Reply.) To do this, enter the outgoing email address in the Email address box, and the alternate email address in the Reply address box.
Some email accounts (University accounts, for example) require you to connect to the Internet using a specific connection in order to access your email. If you need to change the connection used for an account, open the Internet Accounts dialog and follow these steps:
Click the Mail tab to bring it to the front, and select the account you want to change. Click the Properties button on the right side of the dialog.
Click the Connection tab. If you need to use a specific connection, place a check mark next to Always Connect to This Account Using, and select a connection from the drop-down menu.
As of Service Pack 2, Outlook Express included a couple security features worth knowing about. Click Help, About Outlook Express, and check the revision number. If your Outlook Express revision is later than 6.00.2900 then you have the updated version. The post SP2 version deals with two essential problems: Spam and unsafe email attachments.
Of course, one way around most viruses and other intrusive malware (uninvited programs that do harm to your computer) is to switch to the Mac and Linux operating system and/or hardware. The degree to which hackers are interested in writing malicious code for a platform is directly proportional to the size of the installed base of a platform, and Windows wins that competition by a long shot. However, if, like us, you really enjoy the broad base of applications and utilities available for the Windows platform, switching to a Mac or Linux system simply to avoid viruses seems self defeating. Better to understand how to protect yourself from malware's ravages by taking reasonable security measures. Spam is another issue, one that affects most anyone who uses email.
Some estimate that spam (unsolicited email) constitutes as much as 60% of all Internet traffic. This is an unbelievable waste of bandwidth that could be better used. Then again, look at how much paper “spam” we get in our physical mailboxes every week, and that consumes trees. Don't get me started!
Spammers are very clever about distinguishing between live addresses and dead ones. Spammers often use programs that generate thousands of potentially accurate email addresses, based on known domain names (such as AOL.com, Mindspring.com, or other domains in the publicly viewable domain registries). As explained earlier, one way of “mining” a real address is to send out an email that has image links in it. You may not know that email images can be sent in two different ways: Stored in the email itself, or pointed to by placeholders in the email that direct the email reading program (in this case, Outlook Express) to download the images from a server on the Internet. The former is a good way of ensuring that recipients can see the images even if they are not online at the time they read the email. However, this approach slows down the transmission of the emails because the images increase the file size of the emails. Pumping out spam in this way takes too much time, so spammers use the second method, with an additional benefit. When the recipient views an email (assuming they are online), the links download the images from the spammer's Web server. At that point, the spammer's server notes who is downloading the images and then updates its spam database, marking that address as live.
One way around this problem is to use a less popular email “client” (program), such as Eudora, Pegasus, or a Web-based client such as Yahoo! mail or Hotmail. But I have found that there are incompatibilities of various kinds that I prefer not to deal with. Again, I'd prefer to buttress my defenses and continue to use the industry standard Outlook or Outlook Express. Outlook 2003 already had a defense against this image downloading issue, and it has migrated into Outlook Express. Here's how to use it:
In Outlook Express, open Tools, Options. Click on the Security tab.
Notice the checkbox called Block Images and Other External Content in HTML E-mail (see Figure 10.12). Make sure this option is on.
When you receive an email with images in it, the images will be blank and will indicate that you can right-click on the image and choose Download images once you have determined that you can trust the sender of the email. The images are downloaded and stored with the email on your computer and can later be viewed.
Another advantage of this arrangement pertains to folks using dial-up connections to the Net. In previous Outlook Express versions, viewing an HTML email with external images (that download from a server) would cause the computer to begin a dial-up session. This was annoying.
See more spam-battling techniques at the end of this chapter.
Email programs that can read and execute HTML-formatted email are potential targets for virus authors because HTML email can include scripts. These scripts are little programs that can run when the email is viewed. Microsoft attempts to thwart such vulnerabilities in Internet Explorer and Outlook Express via security patches and system updates disseminated via the Windows Update site, but people don't check it as often as they could, and there is often a delay between the outbreak of a virus across the Net and the availability of a fix. However, a more failsafe approach is to turn off Outlook Express's ability to execute HTML email altogether.
As of SP2, Outlook Express can do this via a setting that causes emails to be read using a “rich text” editor instead of the HTML editor. This turns off the part of Outlook Express that would execute malicious HTML code (typically code stored in the HTML header). You won't see images or stuff like font styles, sizes, and color, but you can still read the text just fine.
Here's how to turn off the HTML editor/viewer:
Choose Tools, Options. Then click the Read tab.
Select the Read All Messages in Plain Text check box.
Now whenever you read emails, they will not have HTML formatting displayed, but potential malicious HTML header won't be executed, either.
Sometimes you'll want to display HTML effects, however, because it can be easier to read the message when it's all prettified and whatnot. No biggie. Just do this:
Increasingly, individuals have more than one email account. Outlook Express can be configured to handle multiple email accounts, even if they are on separate servers. For example, I have four email accounts, one from each of my Internet service providers. I can pull all my email into one inbox by setting up the various accounts under a single user identity. When I click on Send/Receive Mail on the OE toolbar, OE goes out and pulls in all the new mail from all four accounts automatically. It's just that simple. How do you set up your system so it can do this? Read on.
Each email account needs to be set up and configured in Outlook Express as explained earlier in this chapter. Simply set up an account for each email address and server you have, using the information provided by each ISP (or email account, if a single ISP has given you multiple email accounts).
Normally, OE6 checks all accounts when looking for new mail, even if they use different servers. Sending and receiving email from different accounts will normally happen automatically and without impediments. You connect to the Internet (whether by dialup service or over your LAN or cable/DSL modem), click Send/Receive, and OE will try to access each server one after another, using the currently active Internet connection. However, there are a couple instances where this gets more complicated:
If you have specified that an account must use a specific connection, you will see a dialog box when you try to use that account on another connection. Here, you must decide whether you want to switch connections or try to locate the server on the current connection.
Some services require that you be actually dialed in to their Internet connection service before you can send email through their SMTP (mail sending) service. This is to prevent “spoofing” or “spamming” by non-paying users who jam up SMTP servers sending their unwelcome advertisements. It's sort of like hijacking the U.S. Postal Service to send free bulk mail. Such services check to see that you are connected to the Internet through them, and logged in. Once you are, you can send mail through that account. Sometimes such services will let you receive mail regardless of how you are connected to the Net, because that doesn't infringe on their services. It is typically only the sending that is restricted. If a unique connection is needed for a given email account, then you must specify this in the account's properties dialogs. Click on the Connection tab and choose the Always Connect to This Account Using option. Then, choose which connection the account in question should use.
You can set up an unlimited number of email accounts in OE6. You can even set up multiple accounts using the same email address and server information. Each account can serve as a separate identity for you.
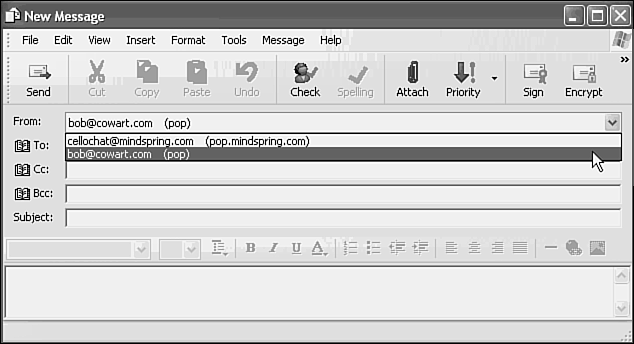
When you compose a new mail message, it is automatically addressed for your default mail account. The default account can be set in the Internet Accounts dialog. You can change the account used for an individual message manually, as follows:
Click Create Mail in Outlook Express to begin composing a new message.
In the New Message window, select an identity from the drop-down menu next to From: in the header, as shown in Figure 10.13. The identity used here appears on your outgoing mail and also determines the Reply to: address used if the recipient replies.
You don't have to receive very much mail to realize that your Inbox can get cluttered in a hurry. The best way to save important mail and stay organized is to organize your mail into folders, just like files are organized on your hard drive.
The process of creating folders and storing messages in them is quite simple:
Right-click the Inbox in the OE6 Folder list, and choose New Folder. The Create Folder dialog opens.
Type a descriptive name for your folder under Folder Name. Look at the folder list in the lower half of the dialog to make sure that the correct parent folder is selected.
Click OK to create the folder.
The new folder appears in the OE6 Folder list under the parent folder. You can simply drag and drop messages from the message list to the designated storage or project folder.
CAUTION
Compacting messages in the background automatically can be dangerous, so we choose to turn off this option. To do so, go to Tools, Options, and click the Maintenance tab. Uncheck Compact Messages in the Background. The reason this can be dangerous is because if the computer crashes or the phone connection is interrupted when message compaction is in progress, it can kill the crucial folders.dbx file or corrupt the entire message store. In addition, you may notice a significant drop in the computer's performance each time background compacting begins.
It is important to compact folders regularly, however. By choosing a time to clean them up manually, you can minimize the risk of corruption while compacting. Go to File, Folder, and select Compact All Folders. Compacting folders can take several minutes. It is best not to use your computer during this time. If an error occurs, such as “cannot compact, folder in use,” close OE, wait a moment, reopen OE, and restart the process.
Many email users—especially those who subscribe to mailing lists—receive dozens or even hundreds of messages per day. Wading through all this mail for the really important stuff can be challenging (to say the least), so OE6 includes a mail filtering feature similar to Outlook's Inbox Rules that helps you direct certain kinds of mail to specific locations. For example, you might want to direct all mail from a list you are subscribed to into a special folder where it can be read later.
You can even use mail filters to delete mail you don't want to see at all. Mail can be filtered by content, subject, or sender information. If you are frequently being bothered by someone, you can simply set up OE6 to send all messages from that person to the Deleted Items folder.
To set up a filter:
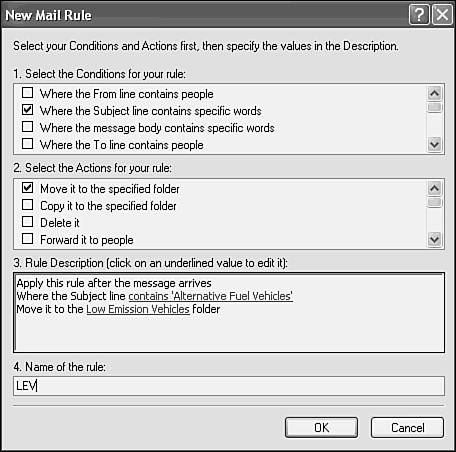
In Outlook Express, choose Tools and select Message Rules, Mail. You will see the window shown in Figure 10.14. If there are already one or more Mail Rules set up, the Message Rules dialog opens first. In that case, click New to get to the New Mail Rule window, or Modify to change an existing rule.
Select a condition from box 1 of the New Mail Rule dialog. Place a check mark next to the condition or conditions you want to apply.
Select an action in box 2. This action will happen if the condition specified in box 1 is met.
Follow the instructions in box 3. They will be specific to the conditions and actions you set in boxes 1 and 2. As you can see in Figure 10.14, we have set up a rule that automatically files certain incoming messages in a specific folder. The reply states that we are away from the office until a certain date.
Check the description in box 3 to make sure the correct action will take place. Name the rule in box 4, and click OK when you are finished.
The rule then appears in the Message Rules dialog with a check mark next to it. You can open this dialog at any time to edit, disable (by clearing the check box), or remove any rules.
TIP
An “out of office” auto reply rule can be created in mail rules to automatically respond to all incoming messages, stating that we are away from the office until a certain date. Although this can be useful, do not enable such a rule if you are subscribed to any mailing lists. (For more on mailing lists, see “What About Mailing Lists?” in Chapter 11.)
To block mail from a specific sender, you can use the Blocked Senders tab of the Message Rules dialog. You can open this tab directly by choosing Tools, Message Rules, Blocked Senders List in Outlook Express. Click Add in the dialog, and type the person's email address in the Add Sender dialog. After you add the address, that person's name appears in your Blocked Senders list. Notice that you can opt to block newsgroup messages from that person as well.
Before leaving on a trip, consider setting up a message rule in Outlook Express to forward all incoming messages to your HTTP mail account (such as Hotmail or Yahoo!). That way, you can read all of your mail on the road, regardless of which of your addresses to which the messages are sent. Of course, in order for this method to work, your computer must remain on while you are away, and OE must be set to check for new messages regularly. This is not the best idea, environmentally speaking, but there are conditions where it will work with no wasted energy, such as if your office computer will be in use by others in your absence.
A better way to check email while away from your computer is to set up POP mail in your HTTP mail account. At your HTTP account online, go to options (or something similar) to enter your POP server settings. Some servers let you differentiate between different mail accounts with color coding of messages. Once this is set up, simply click on the online Inbox or, in some cases, Check Other Mail.
If you're like me, though, you'll want to keep all your mail in the same computer, not scattered around in places like Hotmail, Yahoo! Mail, and Google Mail as well as in your laptop or desktop in Outlook or Outlook Express. I have two “ultimate” solutions to this, depending on how you work.
If all your work is on a laptop and that is your primary computer, then all you have to do when traveling is to make sure you have an email account that lets you send out mail from the road, using the various connections you'll find along the way (typically WiFi connections in airports, hotels, and cafes). Although WiFi hotspots are becoming ubiquitous, the gotcha is when you try to send out mail on your usual email account and you find out (usually much to your chagrin), that it won't go. Why is this? It's because many ISPs, in an attempt to thwart spammers, won't let just anyone use their SMTP (outgoing mail) server. You have to be connected directly to their server to do so.
For example, I have cable at home, using Comcast. Until recently, I couldn't send email out through Comcast unless I was actually communicating through the cable connection. This was a bummer because I like to work in cafes. But cafes usually don't have SMTP servers available. Why? Because spammers would sit in cafes and deluge the cafe's SMTP server with outgoing spam. Sad but true. When on the road, I have two options. I checked with Comcast and found that they now have an “authenticated SMTP” server. I went into the account settings for my email (Tools, Accounts, Mail tab, Servers) and made the appropriate settings, turning on authenticated SMTP. This allows me to send outgoing mail through their server even when I'm connected to the Net through another ISP such as a WiFi hotspot. You may want to ask your ISP or your SMTP administrator whether they support authenticated SMTP for dealing with such circumstances.
My backup solution, when authenticated SMTP isn't available, is to maintain a dial-up connection I can use from hotels and friends' houses. The trick here is that I must have a separate OE email account for that server. In my case, it's Earthlink. So, using the techniques explained earlier in this chapter (in “Handling Multiple Email Accounts for the Same User”), I created an Earthlink account. When I write an email, it's automatically set to be sent by the default mail account, which is usually Comcast for me. I have to make a point of either changing the default email account or manually choosing the account I'm going to send each new email with. (If you have multiple email accounts, you'll have a drop-down list on the From field in your new emails. Click open the list and choose the email account that has the SMTP server that corresponds to your current Internet connection at the time of sending the message(s).
My other and newer solution is this. I have so much work on my desktop computer that I decided to leave it all there and not worry about taking some email folders with me on the road. I'm doing video editing and have all my MP3s and photos on my desktop. It's too much to carry with me. Transferring stuff onto my laptop prior to a trip was always a last-minute hassle. What's more, I'm running beta operating systems on the desktop using Virtual PC and don't want that to potentially confuse things on my laptop. So here's what I do (and no, I'm not getting paid for this shameless advertising):
I subscribed to GoToMyPC.com. It's about $20 a month; no biggie for the convenience it affords me.
I leave my desktop at home on and running. I make sure it's not going to power down (check the Control Panel's Power Options). (The desktop computer has to be connected to the Net with a cable or DSL connection for this to work reasonably fast enough, by the way.)
When I'm on the road, I get online (preferably on a high-speed connection such as in a cafe) and then go to www.gotomypc.com and log in. In a few seconds, my desktop computer screen comes up on my laptop, and I'm working as though I'm at home, only a tad slower. The speed degradation is not too bad if both computers have DSL, cable, T1, and so on. It's livable.
Of course, you can achieve similar results using Remote Desktop (see “Remote Desktop,” in Chapter 18, “Windows Unplugged: Remote and Mobile Networking”) but with a little more elbow grease to get it working. Notably, routers get in the way and have to be set up carefully to allow the signal to pass through. But once set up, it's free. Remote Desktop will also connect the COM ports, printer ports, disk drives, and sound cards of the host computer to the remote computer. However, for a simple, easy-to-connect solution to remote email needs we're addressing here, my vote is for GoToMyPC, partly because virtually any Web browser-enabled computer will function as the remote machine. Caught without your laptop but need to check your mail? I have logged onto my desktop PC from both Macs and PCs in libraries, for example.
One of the unique aspects of electronic mail is that it can serve as a permanent record of your communications. Mail that seems insignificant now may be invaluable in the future, and many people back up all their correspondence on a regular basis to ensure that a record is kept for all time. You can save copies of individual messages by choosing Save As from the File menu in the message window. Choosing this option opens a standard Windows Save dialog, where you can choose a location and name for the file. It is saved with the .EML extension.
In addition, you might want to use a backup procedure regularly to store messages elsewhere and remove them from OE. If you receive and send thousands of messages a year, removing them and storing them elsewhere (yearly or quarterly) will help keep Outlook Express running efficiently and will free up space on your hard drive.
The easiest and perhaps safest way to back up your mail is to make a backup copy of your entire Outlook Express email message files. (It's complicated to backup and restore just individual folders.) To begin, make a backup copy of all of your OE messages.
In OE, go to Tools, Options, and click the Maintenance tab.
Click the Store Folder button.
Copy the folder location that appears in the box (highlight the entire line and then press Ctrl+C).
Click Cancel twice to close the dialog boxes.
From the Start menu, click Run, press Ctrl+V (to paste the folder location into the Run dialog box), and click OK. This opens the mail folder in a new window.
On that window, open the Edit menu, and click Select All.
Open the Edit menu and click Copy.
Close the window.
Create a new folder on your hard drive or alternate backup drive, and name it (Bob's Email Backup, for example).
Open the new folder, choose Edit, Paste. All the mail files will be copied into the new folder, leaving the originals in place.
The next thing you'll want to back up is your all-important Address Book. If you have any significant number of addresses, and especially mailing-list groups, losing your address book do to a reinstallation of Windows or a hard disk crash, you'll be glad you did. There are two ways you can do this. Firstly, you can sleuth out the location of the single .WAB (Windows Address Book) file that is used by OE6 for each user that logs onto on an XP system, and then back up the file somewhere safe. This takes a little digging, though. Also not that this technique backs up the address books belonging to other “identities” that you have created in your OE, too.
As an alternative, there is a menu command in OE that lets you back up (or, more accurately, export) any identity's address book. When you export, though, it's not in the native .WAB format, so pulling the data back into a system you're restoring is as simple as just copying in the .WAB file. You export in comma separated value (CSV) format, typically.
Let's look at the first technique. The individual data for each logged-in user on the XP system is stored in a unique .WAB file. As mentioned above, this .WAB file contains all the address book data for all of that user's email Identities.
The path for this file will look something like this:
D:Documents and SettingsOwnerApplication DataMicrosoftAddress BookOwner.wab
To find the place where your address book is stored in your computer, you'll have to be crafty, because the location normally is hidden by XP. Here's one way to do that:
Go to the Start menu and choose Search.
Click All Files and Folders.
Enter
*.wabin the first text box.Click More Advanced Options at the bottom of the Search Companion window.
Place a check mark in the box next to Search Hidden Files and Folders by clicking the box, because Application Data is hidden by default.
Click Search.
You will see a file for each XP system user. Make a backup copy of your address book, preferably on a separate drive or CD-R. By saving it in this way, it will be easier to load the data back into OE in the same format.
To restore the data, you have two options. First, simply copy and paste your saved address book to the location you found by the method above. Or, choose File, Import, Address Book, and specify the file location.
Here's the second approach to backing up address book data that I described above. If it is important to you to segregate the Address Book data of individual OE identities, or if you want to pull your address book data into another program, such as Excel, ACT, and so on, you will need to export Address Book data while logged in to a specific Identity. When the .WAB file becomes disassociated from the user identities, the data can be exported only as a single file—not folder by folder. It gets a bit messy, because this process converts the file to a comma-separated values file and chooses which fields to export and import. (You also have the option of exporting to Microsoft Exchange Personal Address Book format, if you intend to use another program that reads that format.)
To export your OE address book in this way, go to the File menu and click Export, Address Book. Choose Text File (Comma-Separated Values), and click Export. Browse to the folder you created for mail backup, enter something like Bob's address book backup, and click Save. Click Next, and mark the boxes for each field you want to export. (If in doubt, select all fields.) Click Finish, and then click OK, and Close.
To copy your Outlook Express mail accounts, go to Tools in OE, and click Accounts. Go to the Mail or Newsgroup tab, select the account that you want to back up, and click Export. In the Save In box, find the mail backup folder that you created and click Save. Repeat for each account you want to save, and close the window when you're finished.
Before restoring data, you might need to re-create identities. After the identities are established, repeat each step for each identity.
To import your OE email messages from your backup folder, follow these steps:
Open OE, go to the File menu, click Import, and then click Messages.
In the box that appears, select an email program from which to import, and click Next.
Click Import Mail from a Store Directory, and click OK.
Browse to your mail backup folder and click OK, and Next.
Choose All Folders, click Next, and click Finish.
Importing other data is done in a similar way. To import the Address Book as saved in a CSV file:
Go to the OE file menu, click Import, and click Other Address Book.
Click Text File (Comma Separated Values), and then click Import.
Browse to your mail backup folder, choose the address book *.csv file, and click Open.
Click Next, Finish, OK, and then Close.
Mail and News Accounts can be imported in this way:
Go to Tools, Accounts.
Click the Mail or News tab, and click Import.
In the Look In box, find the backup folder.
Click the account that you wish to import, and click Open.
Repeat for each account, and then click Close.
TIP
There are several methods of backing up and restoring data. For other options, go to these Web sites, current at the time of this writing. If no longer available, perform a search by entering OE backup restore in the window of a search engine such as www.hotbot.com.
Answers to dozens of questions about OE:
How to back up and restore mail folders:
Advanced backup instructions here. Caution: Some of these tips advise you to modify the system Registry. Always back up your Registry files before modifying them. If you don't know how to do this, read about it first in Chapter 32, “The Registry.”
To make the process easier, there is software available that will back up files for you with a single click (after you've set up your preferences). An added perk is its capability to synchronize OE message folders on multiple computers. The program even includes a system that will remind you to back up files regularly.
One of these programs, Express Assist, is available for downloading here:
A hot topic in email circles today is the subject of commercial advertisements mass-delivered via electronic mail. This type of unsolicited mail is generally referred to as Spam, a name attributed in Internet lore to a Monty Python musical skit pertaining to the pink meat product of the same name. This type of mail is so offensive to some people that a few states have even enacted laws against it.
Some groups are also working with the U.S. Federal Government to ban unsolicited electronic mail and place identification requirements on people and organizations who send advertisements via email. Countless anti-Spam organizations exist, with one of the foremost being CAUCE, the Coalition Against Unsolicited Commercial Email (www.cauce.org).
The real problem with Spam is that scam operations are rampant and difficult to detect. Spam also has an impact on Internet traffic, requiring a considerable amount of bandwidth that many people feel would be better used for other purposes.
If you have been online for very long, you've almost certainly received some Spam yourself. You can protect yourself from receiving a lot of Spam by taking some basic precautionary measures:
Avoid giving out your email address whenever possible. Some Web sites funnel you through pointless registration procedures that do little else than collect email addresses.
If you post to newsgroups periodically, alter your Reply to: email address for your news account in such a way that “spam bots” searching newsgroups for email addresses will not be able to send you mail correctly. Many people put “Nospam” or other phrase in front of their address ([email protected]), a modification that will be easy for humans to correct when sending you a valid reply.
Don't register with too many online directories. Some directories can be used as email address archives for spammers. The trade-off is that someone looking for you will have a harder time.
Get an email spam filter. There are many available that will work with Outlook Express. I use a very effective one called MailShell Antispam (www.mailshell.com).
Alas, no matter how careful you are, some spam will get through. Many spams contain instructions for getting yourself removed from their lists. Beware that following their instructions may result in even more spam, because some unscrupulous spammers use this trick to find active addresses. To avoid this, simply delete the messages.
You can also check with your local, state, or federal laws from time to time to find out whether there are regulations against spam that apply to your account. If so, you may have legal recourse against spammers. The CAUCE organization mentioned earlier is a good starting point to search online for information about laws in your area.
NOTE
If you're concerned about email viruses and spam spreading throughout your office network, wreaking havoc and slowing down the system, you'll want to consider antivirus and content-filtering software designed for businesses. These software packages can be costly, but well worth it to companies that have been spared a nasty virus or have seen productivity increase when there is less spam to deal with.
Antivirus software offers an additional level of protection beyond the virus protection provided with XP, and it can often repair infected files in addition to identifying and blocking viruses in attached files. Content filters go further, by scanning email for specific words, attachment names, and scripting commands. A content filter can be set to block or track messages with specified characteristics.
Consider using one of these products:
eSafe Mail (www.ealaddin.com/esafe)
ScanMail 3 for Microsoft Exchange and ScanMail eManager (http://www.trendmicro.com/download/)
Tumbleweed Messaging Management System (www.tumbleweed.com)
Norton Mail Security for Microsoft Exchange (http://nct.symantecstore.com/0060/627780_smsmse40.html)
McAfee Active Virus Defense SMB Edition (http://www.shopmcafee.com/dr/v2/ec_MAIN.Entry10?V1=636645&PN=1)
For a good free antivirus program for home (or paid subscription for office), check out a program called Avast! Antivirus. http://www.avast.com/
The server will not accept my password.
Many email servers are case sensitive. If the Caps Lock key on your keyboard is on, it could cause the password to be entered in the wrong case. Sometimes an inadvertent space can be the culprit as well. This is true even if you have configured Outlook Express to remember your email address so that you don't have to type it in every time you check mail.
I don't like the name Outlook Express is using to identify me in outgoing messages.
The name Outlook Express uses could be indicative of several things. First, if you have multiple accounts or identities configured in Outlook Express, make sure that you are selecting the desired one in the From: field when you send the messages. You can also open the Internet Accounts dialog and check the Properties sheet for your email address(es). The Name field under User Information on the General tab is the name used to identify you on outgoing mail.
I have several mail accounts, but OE6 doesn't check all of them when I click Send/Recv.
Open the Properties sheet for each of your mail accounts in the Internet Accounts dialog. On the General tab is an option labeled Include This Account When Receiving Mail or Synchronizing. Make sure a check mark appears next to this option for each of your mail accounts.
Several people in my Contacts List shouldn't be there, including spammers.
By default, OE6 adds an entry to the Address Book for every source to which you reply. You can disable this feature by opening the Options dialog in the Tools menu. On the Send tab, disable the option labeled Automatically Put People I Reply to in My Address Book. Then, to remove unwanted entries from your Address Book, highlight the contact and click Delete.
People on my mailing list are sending me hate mail because of machine characters or strange attachments that accompany each of my posts.
HTML messages are not compatible with most electronic mailing lists. Change your default mail-sending format to Plain Text on the Send tab of the OE6 Options dialog.
Alternatively, you can have OE remind you of specific people in your address book that request Plain Text messages. Open the Address Book and click on the name of a person who requests Plain Text mail. Click on the Name tab, and put a check mark in the box next to Send E-Mail Using Plain Text Only. When you try to send HTML email to this person, a reminder window will pop up asking if you'd like OE to reformat the email to Plain Text.
When I try to go online and check mail, an error occurs stating that the server could not be found.
Assuming that the server information for your account is correct, you probably have a problem with your connection. OE6 should automatically dial a connection if one is not present, but if it doesn't, open the Internet Properties icon in the Windows Control Panel. On the Connection tab, select the option Dial Whenever a Network Connection Is Not Present, and click OK to close the dialog.
I want/don't want Outlook Express to automatically check for mail periodically.
Go to the General tab of the Options dialog. If the option Check for New Messages Every XX Minutes is checked, OE6 automatically checks for new mail at the specified interval. Just below that option, you can also specify whether you want OE6 to automatically dial a connection at this time.
My Outlook Express folders seem to have disappeared.
They might be still on disk, just not in Outlook Express anymore. Use these steps:
In OE, choose Tools, Options, Maintenance, and click Store Folder to locate the location of the store folder. Select the whole path of the store location and press Ctrl+C to copy it.
Click Start, Run, and then press Ctrl+V to paste in the name of the store file location. This opens a window with all your message store files in it.
Rename the folders.dbx file to folders.xxx. (You might need system administrator privileges to do this.)
Restart OE. Your folders should reappear, but all folders will now be on the same level instead of appearing as subfolders. Reorganize the folder structure by dragging and dropping. Check your message rules for any rules that move messages into folders to be certain that the destination folder is correct. Also, check other settings such as your Identities, Signatures, and Newsgroup Synchronization.
So you know a lot about email. What about the fancy-looking messages you get in your Inbox—the ones that look like Web pages? This type of email is created with HTML formatting.
And how do you create fancy HTML email messages, anyway? In its simplest form, HTML mail lets you format the font and other goodies like color and background. Well, we already talked about stationery. So you know that this is HTML mail. You can also use the Insert Picture button on the OE toolbar to insert an image. But your ability to design a document with much control is still quite limited.
If you want to create more elaborate email, with tables, text that wraps around pictures, and lots of links in it, you'll probably want to use a Web-design program such as FrontPage or Dreamweaver. After you've designed a page there
Start a new email in OE.
Select and copy the new page you designed in your Web design program and paste into the new email you're constructing. As you paste in the text and images, they should appear in your email.
Adjust as necessary.
Test the look of the email you created by sending the sample mail to yourself; see how it looks when you open it. Make sure to test it by sending it to another computer, too. That way you can determine if there are any missing images. Your test can be deceptive if you send and receive from the same computer, since the images you use are already on the source computer. If the images are missing from the email, they are still likely to show up if you use the source computer for testing it, simply because they are being called up from your local hard drive.
To keep your email easy to read, keep the page fairly narrow. Also, don't expect your message to display with as much predictably as it does in a Web browser since HTML-capable email programs just aren't as polished in their ability to render HTML. It's a good idea to check your mail in various email clients first to get an idea of how it will look to a variety of readers.
Much spam HTML email only downloads the HTML code and the text portion into OE. The rest of the images are not loaded in until you look at the mail (assuming you are online at the time). When you click on the mail to read it, the images stream in because the HTML code in the message “points” to the image sources, which are out on Web servers somewhere across the Internet. This is an acceptable way to construct your HTML mail, but it assumes your readers are online. If you want to be sure people can read your mail offline, then you should include the images in the email itself. However, this does make the file larger, and can slow down the transfer time. Make sure to keep your images relatively small and compressed (as a rule, your images shouldn't exceed about 25KB). Use a program such as Fireworks, FrontPage, or Photoshop to optimize photos and other images for transmission over the Web.
TIP
There are some folks whose programs cannot read HTML mail. In the subject line of HTML mail, I like to include the words “HTML version” so people will know not to bother reading it if their email program isn't HTML-savvy. Then I send another message that is plain text, with subject line that includes the words “Plain text version.”