In this chapter
For many users and system administrators, intelligent hard disk management really forms the core of efficient system management. Until a new technology evolves to replace the hard disk, we're stuck with the problems and limitations created by what is, in a sense, a crude system of motors, spinning platters, and very delicate parts, such as read/write heads floating just microns above a flying surface that can be easily ruined by particles as small as those found in a puff of cigarette smoke. Perhaps some day hard disks will be relics of the past, bookends, like the 5MB drives I have on my bookshelf. (They make good doorstops, too.) Until that time, though, we're stuck with the peculiar vagaries of hard disks. The good news is that high-capacity drives are cheap and plentiful these days.
No doubt, the majority of Windows XP users will never set up RAID arrays, multiple-booting arrangements, or dynamic disks; use encryption; or need to do any remote disk administration. Perhaps they will perform occasional disk cleanups and defragmenting as well as learn to share folders over the network. These tasks are enough to get by with. Yet, with a bit more knowledge gleaned by reading through this chapter, you will learn how extensive Windows XP's hard disk configuration capabilities are.
NOTE
RAID is short for redundant array of independent (or inexpensive) disks. In this hard disk scheme, two or more drives are connected together in combination for higher fault tolerance and performance. RAID arrangements are used frequently on servers but aren't generally necessary for personal or client computers.
This chapter describes the following:
Using Windows XP's disk management tools
Learning organizational strategies for arranging files and partitions on your hard disk
Working with the supplied Disk Management utility
Managing removable storage
Cleaning up your drives
Defragmenting and repairing your drives
Converting to NTFS
Compressing files
Encrypting files
Freeing up space
Backing up your data
Zipping files
Using third-party file system tools
Troubleshooting hard disk problems
The following sections describe this new dynamic storage model, its benefits, and its drawbacks. You'll also learn about the features and advantages of NTFS v.5.
Windows XP uses a new concept in storage models (introduced by Windows 2000), which Microsoft terms dynamic storage. Although Windows XP still supports the old, familiar models of partitions and drives, upgrading your hard disk to this new storage type brings with it a new way of thinking about partitions and how they are organized.
CAUTION
Converting a hard disk to dynamic storage is a one-way process. To change a dynamic disk back to a basic disk, all volumes must be deleted before converting the drive back to basic storage. Also, note that dynamic disks can be read by Windows XP Pro, Windows Server 2003, and all version of Windows 2000. Windows XP Home, Windows NT, Windows 98/SE/Me, and all earlier versions of Windows cannot access dynamic storage volumes. When you change the boot disk to dynamic, you can no longer multiboot into another operating system because the familiar boot loader screen disappears for good.
One last point of concern when dealing with Dynamic Disks is that they absolutely cannot be used on a multi-booting computer system. Only one installation of Windows can own a set of Dynamic Disks, so if you are planning on using Dynamic Disks as your RAID solution on a multi-boot computer, think about investing in a hardware-based (SCSI) RAID solution.
I can best explain dynamic storage by comparing it to previous methods of structuring a hard disk.
The traditional storage model of disk structure used partition tables. Each hard drive could hold up to four primary partitions or up to three primary partitions and one extended (secondary) partition. Within this extended partition, you created logical drives. The total number of primary partitions and logical drives cannot exceed 32 per hard drive. This disk structure is understood and can be accessed by MS-DOS, Windows, and all versions of Windows NT up to release 4.0. The annoyances and limitations of this partition table methodology are artifacts of Microsoft operating systems, incidentally, not something imposed by hard disks themselves or their manufacturers. Some other operating systems don't suffer the same peculiarities.
NOTE
Storage types are separate from the file systems they contain. Both basic and dynamic disks can contain any combination of FAT16, FAT32, NTFS v4, or NTFS v5 partitions or volumes. All drives are either basic or dynamic.
With dynamic storage, the restraints of primary and extended partitions are gone. Under this storage model, free space on a hard drive is divided into volumes instead of partitions, and these volumes can be noncontiguous and span one or more disks. In addition, volumes on a dynamic disk can be configured as simple, spanned, mirrored, striped, or RAID-5. Basic storage partitions can only be configured as simple partitions unless they are remnants from a previous OS retained during an upgrade.
A simple volume uses free space available on a single disk. This space can be a single contiguous region or multiple concatenated regions. Under the basic storage model, each partition or logical drive is assigned a separate and distinct drive letter and functions as a distinct region of disk space. Dynamic storage can be configured to see multiple regions of a disk as a single volume, accessed with a single assigned drive letter.
A spanned volume takes the concept of a simple volume and extends it across multiple disks (up to a maximum of 32). All joined regions on these disks are seen as a single volume to programs accessing them. However, if a single unit in a spanned volume fails, the entire set is lost.
A mirrored volume is a volume in which data from one disk is mirrored or duplicated on a second disk. This process provides for data redundancy, often called fault tolerance. If one disk fails, the data can be accessed from the second disk. A mirrored volume cannot be spanned; each volume must be contained on a single disk. Programs see only one volume, and Windows ensures that both disks are kept in sync. Mirroring is also known as RAID-1.
A striped volume is a volume in which data is stored across two or more physical disks. When data is written to a striped volume space, it is allocated alternately and evenly to each of the physical disks. A striped volume cannot be mirrored or spanned via Windows XP (it is possible on hardware-based RAID). Striping, often termed RAID-0, is used to increase storage system throughput. If a single unit in a striped volume fails, the entire set is lost.
A RAID-5 volume is a fault-tolerant version of a striped volume. When data is written to a RAID-5 volume, it is striped across an array of three or more disks, and a parity value is added. If a hard disk belonging to a RAID-5 volume fails, the data can be re-created by the remaining drives using this parity value. Note the difference here between a mirrored volume and a RAID-5 volume.
NOTE
A mirrored volume contains two disks; if either one fails, the operating system goes to the other for data access.
A RAID-5 volume contains three or more disks, any of which can fail without the system halting. The operating system then reconstructs the missing data from the information contained on the remaining disks.
So, what are the advantages of dynamic storage?
First and foremost, noncontiguous regions of multiple disks can be linked so that they appear as one large region of disk space to any program. By linking them, you can increase the size of a disk volume on-the-fly, without reformatting or having to cope with multiple drive letters.
Second, and perhaps more important from an administrator's point of view, is that disk and volume management can be performed without restarting the operating system.
The catch to all this is that on a multiboot system, non-Windows 2000, non-Windows XP Pro, or non-.NET Server systems cannot even see dynamic storage drives. Unlike NTFS which only applies to the formatted partition, dynamic storage affects the entire hard drive. Only Windows XP Pro, Windows Server 2003, and Windows 2000 can see drives configured as dynamic storage. So, if you plan on using dynamic storage, plan ahead and keep other OSes on different hard drives. Plus, you must ensure the boot drive is a basic storage drive as well so the boot menu will function.
Although the disk systems described in the preceding section are interesting, especially to power users and system administrators who have multiple drives available, most Windows XP users will end up setting up their systems with standard partitions (that is, basic storage) and the NTFS file format. But what about other file systems? How should you organize multiple disks? What about preparing your disks, and what kinds of strategies should you consider?
If you're not going to stick with the straight and narrow of running only NTFS on your hard disk, consider these alternative strategies and rules to follow:
Whenever possible, create a separate partition for your data files. This tip has particular relevance to users who test new software or operating systems. If you store your data on a separate partition, reinstalling an operating system is a simple matter of formatting your system partition and starting from scratch. Although you still have to reinstall your programs, using a separate data partition eliminates the need to fuss and ensures you didn't miss a data file somewhere along the line. It also makes backups simple and straightforward. You can do one backup of your system partition; you then need to update this backup only when you add a new device or software program. Data backups can be run on a daily or weekly basis (as determined by how often your data changes) and set to run on your data partition.
TIP
When you have a data partition in place, right-click the My Documents icon on your desktop, select Properties, and reset the target folder location to your data partition. Resetting it ensures that all your favorites, application settings, and history files are also kept separate from the system partition. (Windows domain network users with roaming user profiles have less to worry about on this score, as their My Documents files are copied to the domain server as well as their local computer.)
Buy a disk image program (such programs are discussed toward the end of this chapter). You can purchase one for less than $75, and it is worth its weight in gold if you like to “tinker” with your system and program configurations. After you have your operating system set up, your principal applications installed, and everything tweaked and configured to perfection, you can create an image of your system on a separate drive or partition. If you need to reinstall your operating system for whatever reason, the complete process—from beginning to end—should take no more than 20 minutes. Couple this program with the separate data partition discussed in the preceding bullet, and you have a system that you can rebuild from scratch with minimal effort or time loss.
When you add, delete, or reconfigure a program, or make changes to the hardware configuration of your disk subsystem, be sure to update your disk image.
Some clients I know have gone so far as to buy and install a separate hard drive just for image storage. At $100 or less for a 150GB drive, a hard drive is probably one of the best investments in crash protection you can buy. As a matter of fact, I'm considering making dedicated image drives a standard system configuration for all computers I maintain.
If you have more than two IDE hard drives, put both drives on your primary IDE controller and your CD-ROM on the secondary controller. Configuring a system this way puts all the strain on one IDE bus when copying data from drive to drive, but mixing a CD-ROM drive and a hard disk on the same channel is worse. CD-ROM drives transfer data at a much slower rate than hard disks. Mixing fast and slow devices on the same controller forces the controller to run at the slower of the two rates. If you really want good performance with complex drive scenarios (multiple hard disks and CD-R or CD-RW), I suggest that you look into SCSI controllers, serial-ATA setups, or fast ATA controllers.
If you want to install Windows XP in a dual-boot configuration with other OSes, please jump over to Chapter 31, “Multibooting Windows XP with Other Operating Systems.” There, all the ins and outs of multibooting are discussed along with all the necessary steps.
Windows XP comes equipped with a handful of disk management tools, ranging from very powerful ones that can create hard disk stripe sets, create mirror disks, and/or beat a disk into submission, to a couple that are simply convenience items.
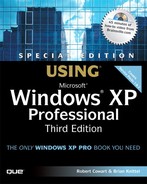
The most often-used tools are available right off the Tools tab of a drive's Properties sheet. To reach the Properties sheet, right-click a drive in Explorer. Figure 29.1 shows the Properties tabs for both a FAT drive and an NTFS drive. Notice the difference in the number of tabs. NTFS has more options because of its support for security and quota management.
The following sections explain the use of the bulk of hard disk management tools included in Windows XP.
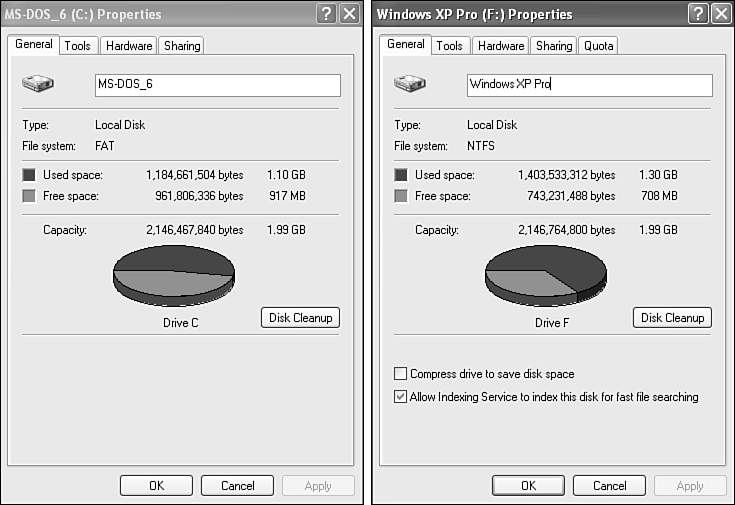
The Disk Management utility (see Figure 29.2) is responsible for the creation, deletion, alteration, and maintenance of storage volumes in a system. This tool is located within the Computer Management interface of Administrative Tools (accessed through Start, Control Panel, Administrative Tools, Computer Management, Disk Management). Another means is by right-clicking My Computer and choosing Manage. Using the Disk Management utility, you also can assign the drive letters used by your CD and hard disk drives.
TIP
If the Administrative Tools menu selection is not displayed on the Start menu, right-click over the Start menu and select Properties, click Customize, click the Advanced tab, scroll down to the System Administrative Tools items, and then select the appropriate radio button.
If you enable the Control Panel to act as a menu, Administrative Tools can be accessed through it off the Start menu as well.
As discussed in Chapter 27, “System Utilities,” this single interface lets you manage both local and remote computers using the various administration utilities shown in the left pane. Using this interface, I will show you how to perform different procedures on your existing and new hard disks. The process is quite simple for most of the operations because you will be presented with a wizard to complete them.
Most operations on disks can be performed by right-clicking the disk or volume you want to affect. As usual, you are presented with a context-sensitive menu from which you can perform any actions relating to the volume or disk you clicked. You can also see, from the graphical layout in the Disk Management, just what is going on with your disks at any given time. As always, you can select the Help option from within any menu to get an explanation of the operations available to you.
TIP
You can change the way specific types of volumes are displayed in Disk Management. To do this, click the Settings button at the end of the button bar. From there, you can select the color you would like to use to represent any of the various disk states that will be shown by the Disk Management. By selecting the Scaling tab from the Settings dialog box, you can also change the way in which the Disk Management shows the scaling of each disk. This capability is particularly useful if you would like the scale display to be more representative of the actual physical sizes of your disks.
Windows automatically assigns letters to the drives. However, this assignment might not suit your system; for example, you might have mapped a network drive to the same letter that Windows assigns to a new drive.
Using the Disk Management, you can easily assign logical drive letters to your hard disks and removable drives such as CD-ROMs. You can't change the drive letter of your boot drive (usually the C: drive), but you can change any of the others.
CAUTION
Note that many MS-DOS-based and Windows-based programs make references to a specific drive letter (for example, environment variables). If you modify the drive letter of a drive with these programs installed, they may not function correctly.
To change the letter, right-click the disk volume or drive in the bottom-right pane of the Disk Management, and select Change Drive Letter and Paths. A dialog box appears, listing the current drive letter assignment. Click Change. Under Assign a Drive Letter, choose the desired new letter. Click OK and confirm that you really do want to make the change.
In addition to or instead of assigning a drive letter to a disk drive or partition, you can “graft” the disk volume onto another. Windows lets you specify a folder that will become the mount point for the new drive. For example, I might create a folder named C:TEMP. Because I want lots of space for it, I can install a new hard drive and, instead of assigning it a drive letter, tell Windows to access it through C:TEMP. My C:TEMP files and subfolders are then stored on the alternate drive.
TIP
By using a mount point, you can add space to the folders under the mount point folder using an available drive. This is a good way to add space in a controlled fashion for a specific purpose, such as storing scratch files or Web page images.
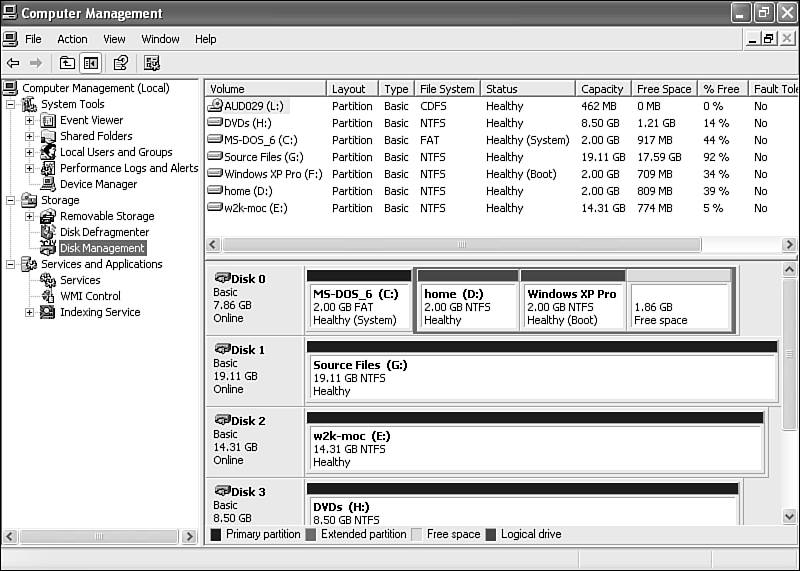
Assigning mount points is different from what happens when you aggregate dynamic disks into one large volume. Although dynamic disks and regular disks (simple disks) both support the use of mount points, dynamic disks can create one large, apparently contiguous disk space. Mount points graft subsequently added drives at a folder, sort of like grafting two trees by tying together a branch from each tree. Figures 29.3 and 29.4 illustrate the differences between the two approaches. In Figure 29.4, I've grated my music files from drive G:MUSIC into the mount point on drive H:MP3.
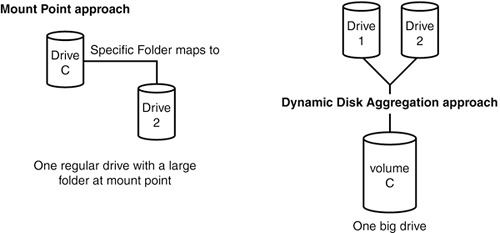
Figure 29.3. You can join drives two different ways. Using mount points is one way, and using dynamic disk aggregation is another.
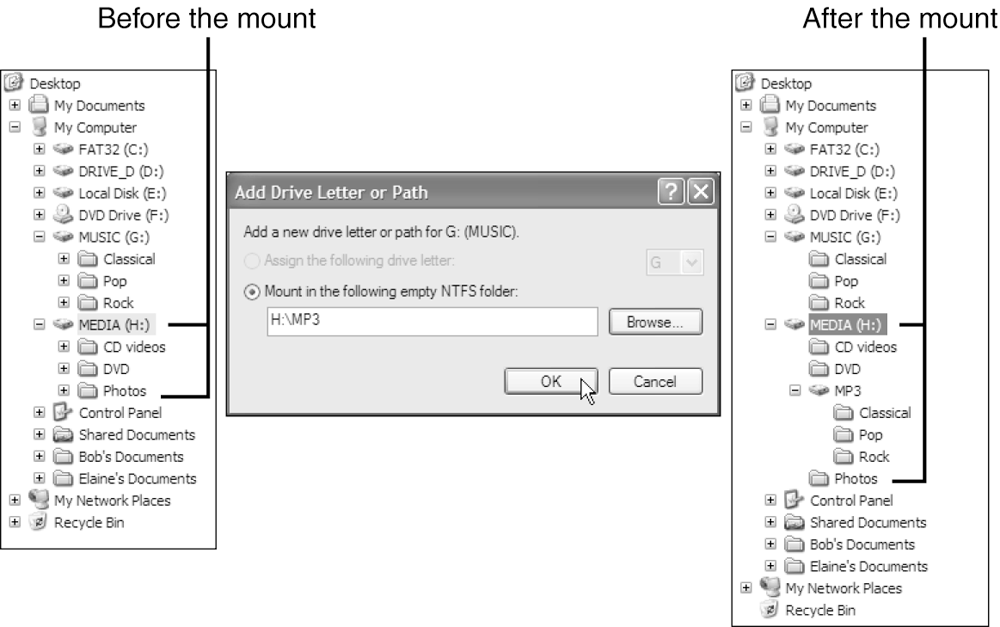
Figure 29.4. Assigning a partition or volume to a folder rather than a drive letter joins the volume to an existing volume. The contents of the added volume appear as subdirectories of the mount point folder.
NOTE
You can graft new volumes or disks onto a folder only on an NTFS-formatted drive. The new volume can have any format, however.
NOTE
If the folder you specify as the mount point already contains files, they are inaccessible as long as the drive-to-path mapping exists because that folder is now remapped into the new location. The original files reappear if you delete the drive path. Therefore, it's usually a good idea to create a new folder as a mount point or delete all of the contents of an existing folder before establishing the mount point.
Even if you have several hard drives and CD-ROM drives, you can graft them all together onto your C: drive, making it look like one big file system. It's a great management concept: You can add space to your file system by attaching new disk volumes right into the original folder structure. (Unix users are probably smirking at this point because the Unix operating system has worked this way since it was written in the 1970s.)
If you mount a drive and assign it a drive letter, you can gain access to it through both pathways.
To graft a disk volume to an existing file system, follow these steps:
Create the folder that is to serve as the mount point for the new drive or volume.
Highlight the new drive or volume in Disk Management.
Right-click, select Change Drive Letter and Paths, and click Add.
Select Mount in the Following Empty NTFS Folder.
Enter the folder's pathname, or click Browse to locate it.
TIP
When Explorer shows you free disk space on the original drive, it measures only the space on the physical drive, not space on any grafted drives. You'll actually have more space than you think because files on the grafted folders are stored on another volume. If you want, you can also assign a drive letter to the added volume so that you can view and monitor its free space directly.
Alternatively, you can use the command prompt, change to the folder in the grafted volume, and use the DIR command. The DIR command lists free space on the actual current volume.
You can assign a given drive or volume to at most one drive letter, but an arbitrary number of paths. (It's a little bit strange to see the same files appear in several different places, so I recommend that you not go nuts with this feature.)
TIP
If you're running out of room on your C: drive, see whether it makes sense in your situation to add lots of space to just one folder (for example, My Documents). If it does, install and format a new hard drive, and assign it a letter. Copy the original folder to the new drive. Then add a path to the new hard drive using the name of the original folder. This way, you can preserve your original data and have lots of room for growth.
By the way, this “grafting” technique works with both basic and dynamic NTFS disks. Only Windows dynamic disks can be “grown” by changing their partition size on-the-fly. If you use a basic-formatted disk, as most users do, the grafting trick is a good one to know.
TIP
Another really good time to use this feature is when you've backed up application data onto a CD-R or CD-RW. If you want to use the backed-up data in an emergency, you can add a path for your CD-ROM drive to make its files appear in the original data location expected by your application. That way, you can use the data off the CD-R without restoring it to disk or reconfiguring your application. Later, you can delete the path to regain access to the “real” folder.
If you are using only Windows XP on a system, upgrading your storage devices to dynamic disks is usually the best way to go because of the many advantages of the new dynamic disk storage system. Remember, though, that you can't boot into or read your dynamic disks from any other operating system after you upgrade them. You can upgrade a disk through Disk Management, right-clicking the drive's icon in the bottom pane (click the part of the graphical display that reads “Disk 0,” “Disk 1,” and so on, not on the volume), and choosing Upgrade to Dynamic Disk. Then choose the disk and click OK. Next, just follow the wizard, and you'll be set.
CAUTION
Don't upgrade to dynamic disks until you read all the material here on the topic and review the Help system's coverage of it in Disk Management. As you learned earlier in this chapter, dynamic disks cannot be changed back to basic disks without completely destroying any partitions and reformatting the disk. If you have to do that, right-click the volume and select Delete Volume. From there, you can just re-create your simple volume by right-clicking a disk and going through the applicable wizard. Also, remember that other operating systems such as Windows XP Home, Windows 9x, and DOS can't use dynamic disks, so if you intend to multiboot your machine, you should not upgrade the drive. Whether a drive is basic or dynamic has no bearing on network client access to shared folders.
If you don't seem to have the option of upgrading to dynamic disks, one of two possible reasons might be the cause. First, the disks may have already been upgraded to dynamic disks. Second, the disk is not a hard drive but rather a CD device or removable media device.
NOTE
You cannot install Windows XP onto a dynamic disk volume that you've added to a dynamic disk from another instance of Windows XP or Windows 2000. This is a limitation of the Windows XP Setup program in that it needs to see a partition table in order to install onto the disk. Disk partitions created from a dynamic disk do not contain partition tables and as such cannot be utilized by Setup. The only types of disks that contain partition tables are simple disks and dynamic disks that were upgraded from simple disks. However, you can convert the boot drive to a dynamic volume after installation has completed.
One of the really cool options available in the Disk Management is the option to extend a volume on a dynamic storage drive. Extending is really just another way of “stretching” a simple volume to a specified size when unallocated space is present on the disk. Sometimes you might want to rearrange the way you've set up your disks, so this option can come in very handy.
To perform the actual extend operation on a disk, you need to have an area of the disk that is unallocated. From there, you simply right-click an existing partition and select Extend Volume to bring up the Extend Volume Wizard. The wizard allows you to specify the size that you would like to extend the volume to. Finishing the operation leaves you with a disk that is now larger than before. This operation is not limited to volumes that are mounted as drive letters. You can also perform this task on volumes that are mounted into directories.
When Disk Management extends a disk, it is really just creating a new partition and mapping it to the same drive letter as the partition to be extended. It is, in effect, a spanned volume. Although this approach is a bit different from the traditional method performed by disk utilities such as Partition Magic, the upside of the Disk Management approach is that you can extend your disk without having to wait for the volume to be resized and data to be shuffled around. The Disk Management approach happens very quickly without even rebooting your system.
A spanned volume is a volume in which the disk space spans across multiple partitions and/or disks. Using a spanned volume is a very handy way of taking a couple of small disks and turning them into one large disk, mounted under one drive letter or folder. Simple volumes can also be extended using spanned volumes, as shown in the previous section. Spanned volumes can be created only on dynamic disks. A spanned volume basically is the same as an extended volume, except the former adds drive space from other hard drives while the latter adds drive space from the same drive.
Creating a spanned volume is just a matter of right-clicking an empty partition and selecting New Volume, which opens the New Volume Wizard. This wizard enables you to select the spanned volume option. Next, you are given the option to select which disks to include in your spanned volume. At this point, you also can select the amount of space to use for each disk. The total size of your spanned volume is the cumulative total of the space you select on each disk.
Finally, you are prompted for the mount point and the format for your new spanned volume.
One of the procedures you can perform with Disk Management is creating a striped volume. Creating such a volume is often desirable simply because of the ease of administration as well as the substantial gain in speed. Creating a striped volume is really practical only if you're using more than one disk. In fact, you must have more than one disk. For the definition of a striped volume, see “Dynamic Storage” earlier in this chapter.
NOTE
Unfortunately for users, Microsoft decided to leave out the option to create RAID sets from Windows XP. This option, as well as mirroring, is included only in the Server and Advanced Server versions of what Microsoft is calling Windows Server 2003. You are not precluded from using a hardware-based RAID controller with Windows XP Professional and Home, however. In devices such as these, the BIOS is used to set up the RAID options, thereby bypassing the operating system.
When you're creating a striped volume, you are creating partitions of the same size across two or more disks. Bear this point in mind as you plan your implementation because you need to have the same amount of space available on each disk that you want to use for your set.
To create a striped volume, just follow these steps:
Right-click one of the disks to be used in the striped volume set, and select New Volume. The New Volume Wizard then opens.
Select Striped. Then select Next.
Select the disks you want to include as part of a striped volume. The New Volume Wizard automatically selects the first free disk as the first in the striped volume. The remaining two disks can be selected from the left column and added to the right column for the set. When you are done adding disks, click Next.
You then are prompted for the mount point of your new striped set. The three options here bear further explanation:
Assign the Following Drive Letter—. This option assigns your set one drive letter like any normal drive. Selecting this option is the most common method of mounting a striped set, and it will suffice for most purposes.
Mount in the Following Empty NTFS Folder—. This option is a bit different from anything previously offered in Windows. By mounting a striped set to a folder, you are effectively creating a mount point within another disk. The mount point isn't actually on another disk in the physical sense. The folder you use just has the amount of storage equal to the size of your striped set. This approach is more closely related to the UNIX approach, where the actual drive letter is not used but the folder is referred to as the mount point. (Mount points were discussed earlier in this chapter.)
Do Not Assign a Drive Letter or Drive Path—. Selecting this option creates the striped set and leaves it for you to allocate at a later time using either of the two methods mentioned previously.
When you are presented with a summary of the actions to be performed by the wizard, choose the Finish button so that your new striped volume will be created and mounted under the path you chose in step 4.
Removable Storage is another tool within Computer Management. Its job is to track and catalog the data stored on removable storage devices. These devices can take the form of tape backup drives, MO drives, JAZ drives, or the changers that control many removable storage devices. The Removable Storage Manager works by allowing you to create media pools—collections of media to which the same management properties (such as security permissions or backup routines) apply.
Removable Storage is another of those “buried” Windows XP features that you're not likely to know about unless you know where to look. Open the Control Panel, click Administrative Tools, and then click Computer Management. In the right pane, expand Storage and click Removable Storage. From here, you can create and manage media pools and also get information about the physical locations for media.
NOTE
If you're not certain whether a given removable device is compatible with Windows XP, check the Hardware Compatibility List (HCL) and/or catalog at the Microsoft Web site: http://www.microsoft.com/windows/catalog/.
As implemented, Removable Storage is limited to the small scope of hardware supported under it. But like many other Windows XP features (the Indexing Service, for example), it has tremendous potential when third-party vendors develop hooks to its functions and interface. At the moment, it stands as a useful tool to catalog backup media, such as tapes and optical cartridges, but little else.
See “Backup,” later in this chapter, for more details about using removable storage management features as an adjunct to your backup strategies.
When an operating system stores data on a hard disk, it places that information in the first available “hole” it can find that isn't already occupied by another file. If the disk already contains several other files, however, that location might not be large enough for the complete file. When this happens, the operating system places as much of the file as it can in the space available and then searches for another open hole for the balance of the file. This process continues until the entire file has been written to disk. Any files not written to a contiguous disk location are considered “fragmented.”
The problem with fragmentation is that it slows down the rate at which your hard disk can retrieve information and supply it to the requesting program. Hard disks remain largely mechanical devices and are governed by the laws of physics. To access files stored on a disk, the drive must physically move a small arm to the correct location on a spinning platter. These movements are measured in milliseconds, but milliseconds add up, especially when a file is spread over a hundred unique locations.
Fragmentation is not always a bad thing. If an operating system had to find a contiguous section of disk space for each and every file it stored, as your drive filled, your system would slow. Eventually, your system would reach a point where the disk still had ample free space, but none of this space would be in contiguous blocks big enough to hold a file.
Disk Defragmenter addresses this fragmentation problem by reorganizing all the files on your hard disk so that they are stored as complete units on a single area of the disk. To do so, it identifies any remaining free areas, moves small files there to open up more space, and uses this newly opened space to consolidate larger files. This shuffling process repeats until all the files are shuffled around in this manner and the entire disk is defragmented.
NTFS contains, at its core, a file called the master file table (MFT). It is similar to the file allocation table in the FAT system. At least one entry exists in the MFT for every file on an NTFS volume, including the MFT itself. The MFT also contains extended information about each file, such as its size, time and date stamps, permissions, data content, and so forth.
As you add more files to an NTFS volume, the number of entries to the MFT grows. When files are deleted from an NTFS volume, their MFT entries are marked as free and may be reused, but the MFT does not shrink. Thus, space used by these entries is not reclaimed from the disk.
NTFS preallocates a specific amount of the volume for storage of the MFT and, in an effort to ensure high performance, tries not to fragment it. NTFS also does its best to allocate free space on the disk intelligently. If you are running low on disk space, it relinquishes reserved and unused MFT areas for your files. If the MFT is running low, it grabs space from the file area for more entries. As you would expect, if you have a large number of files, the MFT becomes larger. If you have a small number of files, the MFT is smaller.
Here's the rub: If you try to pack a zillion files onto an NTFS volume (I can't give you an exact number because it will vary based on volume and file size), and you run out of disk space, you could exhaust the MFT, which can result in a major bummer when the directory table for the volume blows up. You get no warning. If you intend to store a huge number of small files on an NTFS partition, and you think you might unexpectedly run out of room on the volume, you should consider a Registry hack that preallocates more room for the MFT by adding a value to the Registry.
Caution: This procedure modifies the Registry. Do I have to remind you to back up the Registry first? If you aren't a Registry whiz already, be sure to read Chapter 32, “The Registry,” before trying this operation.
To add this value, perform the following steps:
Run the Registry Editor (Regedt32.exe), and go to the following subkey: HKEY_LOCAL_MACHINESystemCurrentControlSetControlFileSystem
From the Edit menu, choose New, DWORD value.
Type the name of the new value entry as
NtfsMftZoneReservation.Double-click on this new value entry to open the Edit DWORD Value dialog box. Provide value data for this new value entry.
NtfsMftZoneReservationis a REG_DWORD value that can take on a value between 1 and 4, where 1 corresponds to the minimum MFT zone size and 4 corresponds to the maximum. The sizes are not absolute. You might have to experiment with the sizing to determine what is best for you. Microsoft supplies no specific details about the number of file entries available under each size.Close the Registry Editor, and restart your computer.
Keep in mind that this is a runtime parameter and it does not affect the format of a volume. Rather, it affects the way NTFS allocates space on all volumes on a given system. Therefore, to be completely effective, the parameter must be in effect from the time a volume is formatted throughout the life of the volume.
For more information, check the following URL:
http://support.microsoft.com/support/kb/articles/Q174/6/19.ASP
Or, search the Microsoft Knowledgebase for article 174619.
TIP
Defragmenting a large drive with many files on it can take a lot of time. Let the Task Scheduler handle it because it can run at night when you're not around and don't need access to your hard disk drive. However, the defragmenter included with Windows XP cannot be automated. You'll need to purchase a full-blown commercial defragmenter to take advantage of automated scheduling. I've had great success with Symantec's Norton Speed Disk, which is a part of SystemWorks (www.symantec.com) and Executive Software's Disk Keeper (www.execsoft.com). By the way, the native Windows XP defragmenter is a limited version of Disk Keeper.
When should you defragment your drive? In reality, because today's drives are so fast, you're not likely to notice slowdowns unless you're using very large data files, or you use the same files and/or applications regularly, which can fragment them. For typical users who are hopping around between programs, creating new files, and deleting files on a regular basis, the average access times they experience with a drive will be acceptable, even when fragmented.
If you start to notice a general hard disk access slowdown, the first thing to suspect is a RAM shortage, or that you have too many files open and your drive's pagefile is being hit too much (that is, swapping is going on). After ruling that out, however, take a trip down defrag lane. Run the program, and it will tell you whether your drive is fragmented enough to make it worth your time to defragment.
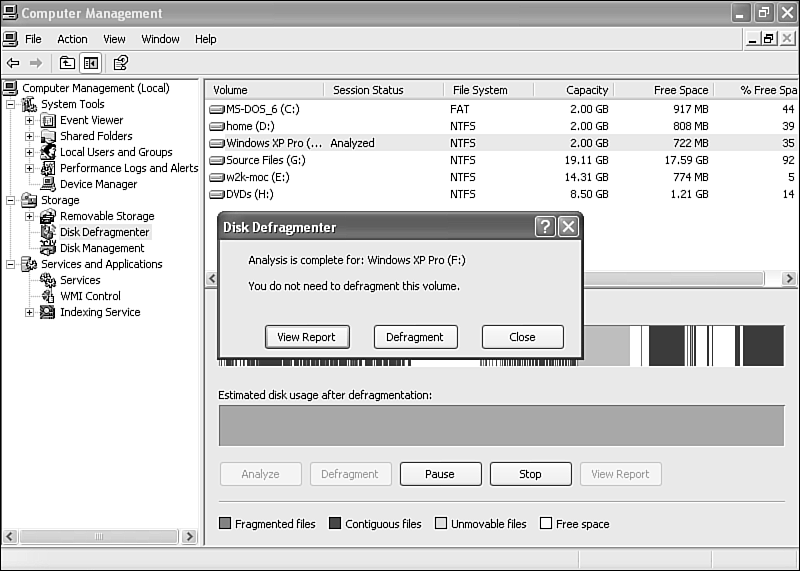
To run Disk Defragmenter, follow these steps:
Select Disk Defragmenter from the Storage section of Computer Management.
Click to select a drive in the list of volumes.
Click the Analyze button. In a few minutes, the result of the analysis will appear. You'll see a screen like the one shown in Figure 29.5.
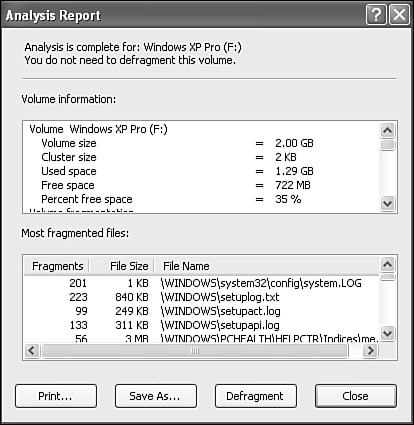
Click the View Report button if you're the curious type. You can really get into the numbers here, viewing statistics about the drive, and checking to see where the maximum fragmentation is occurring, the number of fragments, the file sizes, and so on. Figure 29.6 shows an example from my hard disk. You can save the report or print it, if you like.
If you decide to go ahead and defragment, click the Defragment button and get ready to wait. As the defragmenting progresses, you'll see the progress reported across the bottom graph in the window. The graphic display slowly becomes primarily blue, indicating that most files are now contiguous. You will see some areas of green, indicating system files (possibly a large area if a pagefile is on the drive). You might have some small areas of fragmentation left over as well. The leftover fragmentation is due to this being a free defragmentation tool, which does not include high-level defragmentation techniques, or due to the files being open and locked, thus unable to be moved by the tool.
NTFS was introduced and billed as a “robust and self-healing” file system, as opposed to FAT, which is not. All in all, I would have to agree with Microsoft on this one. I have yet to have an NTFS partition go “sour” on me in any way, shape, or form. I've had NTFS partitions that would not boot and key system files that would not run, but for the most part, these errors were self-inflicted and usually brought on by playing with fire.
Some other versions of Windows have the ScanDisk program whose job it is to detect and repair the file allocation table (FAT) when you shut down improperly. You also can run it manually from time to time. This program hearkens back to DOS days. From within the Windows XP GUI, the replacement program for ScanDisk is called Error Checking.
TIP
If you dig a little deeper, you'll find command-line hard disk volume checkers in the %SystemRoot%System32 directory. They are not called ScanDisk, as they were in some previous versions of Windows. Look for chkntfs.exe (for NTFS partitions) and chkdsk.exe (for FAT/FAT32 partitions). For a description of how each works, just add the normal /? switch, or see Windows online help. The available commands enable you to turn on or off automatic checking and repair a “dirty” (improperly shut down) drive at bootup.
Error Checking checks the file system for errors and the drive for bad sectors (bad spots). To run the program, do the following:
In My Computer or the Explorer, right-click the drive you want to check.
On the context menu, choose Properties.
Click the Tools tab.
In the Error-Checking section, click Check Now. A dialog box appears, as shown in Figure 29.7.
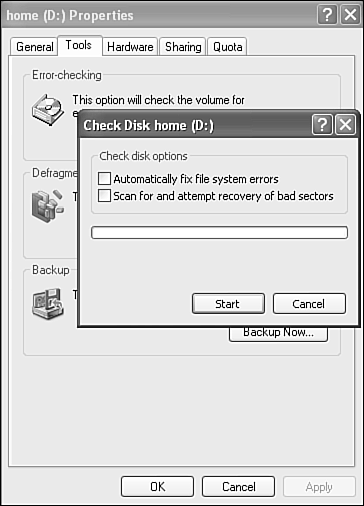
You can run the error check with neither of the option boxes turned on. You are not required to close all open files and programs. However, if you check either of the boxes, you are told that all files must be closed for this process to run. You are given the option of deferring the check until the time you restart your system, however.
The meaning of the options is as follows:
Automatically Fix File System Errors—. If file directory errors (for example, lost clusters, files without end-of-file markers, and so on) are found, this option specifies whether the program should fix them.
Scan for and Attempt Recovery of Bad Sectors—. This option specifies whether the program should attempt to locate bad sectors, mark them as bad, and recover data from them, writing it in a known good area of the disk. If you select this option, you do not need to select Automatically Fix File System Errors; Windows fixes any errors on the disk.
Convert is a command-line program that converts an existing FAT16 or FAT32 partition to NTFS.
CAUTION
This conversion process is a one-way street. The only way to revert an NTFS partition back to a FAT partition with the native tools is to reformat the drive. To revert and not lose your data, you have to use a program such as PartitionMagic (from Symantec).
The command-line syntax for the Convert program is as follows:
CONVERT volume /FS:NTFS [/V]
The arguments are as follows:
| Specifies the drive letter (followed by a colon), mount point, or volume name |
| Specifies that the volume be converted to NTFS |
| Specifies that Convert should be run in Verbose mode |
Considering the work the Convert program has to do, it's surprisingly fast, even on a well-populated disk.
NOTE
If the Recovery Console was installed on the disk partition you're converting to NTFS, you'll have to reinstall the Recovery Console after the conversion has completed. For more information about the Recovery Console, see “Recovery Console,” page 1279.
The Encrypting File System (EFS) provides the core file encryption technology used to store encrypted files on NTFS volumes. When a file is encrypted, the data stored on the hard disk is scrambled in a very secure way. Encryption is transparent to the user who encrypted the file; you do not have to “decrypt” an encrypted file before you can use it. You can work with an encrypted file just as you would any other file; you can open and change the file as necessary. However, any other user or an intruder who tries to access your encrypted files is prevented from doing so. Only the original owner and the computer's designated recovery agent can get into encrypted files. Anyone else receives an Access Denied message when trying to open or copy your encrypted file.
Folders can be marked as encrypted, too. What this means is that any file created in or copied to an encrypted folder is automatically encrypted. The folder itself isn't encrypted, though. Anyone with the proper file access permissions can see the names of the files in it.
Note
→ To learn more details about recovery agents and how to recover and decrypt files when the username and password of the encryptor have been lost, see “Protecting and Recovering Encrypted Files,” p. 1132.
NOTE
EFS encryption only protects the files while they reside on the NTFS volume. Once they are accessed for use by an application, they are decrypted by the file system drivers. This means that files that are encrypted on the drive are not encrypted in memory while being used by an application. This also means that transferring files over the network is done without encryption. Any file action that performs a copy (which includes moves across partitions or volumes) will inherit the settings of its new container. In other words, if the new container is not encrypted, the new file will not be encrypted either, even if it was encrypted in its previous location. If you back up EFS-protected files, they are stored on the backup media in their normal form, not encrypted. EFS only protects files on the hard drive, nowhere else. Use EFS only when expressly needed. EFS will cause significant performance reduction if a significant number of commonly accessed files are encrypted, due to the CPU processing required to decrypt them for use.
You encrypt or decrypt a folder or file by setting the encryption property for the folder or file just as you set any other attribute, such as read-only, compressed, or hidden (see Figure 29.8).
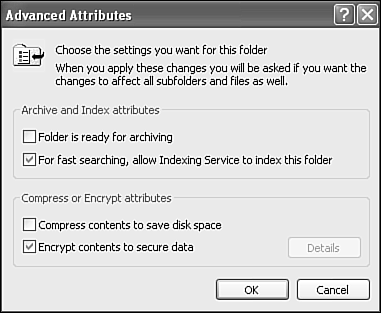
After you set the option to encrypt a folder and click OK on a folder's Properties dialog, you are prompted to confirm the attribute change. From this dialog, you can set the option to encrypt all the subfolders and files within the folder you are encrypting.
It is recommended that you encrypt at the folder level rather than mark individual files so that new files added to the folder will also be encrypted. This point is crucial because most editing programs write a new copy of the file each time you save changes and then delete the original. If the folder containing an encrypted file isn't marked for encryption, too, editing an encrypted file would result in your saving an unencrypted version.
You can use EFS to keep your documents safe from intruders who might gain unauthorized physical access to your sensitive stored data (by stealing your laptop, for example).
You also can encrypt or decrypt a file or folder using the command line and the following syntax (the following is not an exhaustive list of the cipher syntax; execute cipher /? at a command prompt for the complete list of parameters and syntax):
CIPHER [/E | /D] [/S:dir] [/I] [/F] [/Q] [dirname [...]]
The arguments are as follows:
| Encrypts the specified directories. Directories are marked so that files added afterward will be encrypted. |
| Decrypts the folder and halts any further encryption on that folder until reactivated. |
| Forces the |
| By default, the |
| Forces the encryption operation on all specified directories, even those already encrypted. Already-encrypted directories are skipped by default. |
| Reports only the most essential information about a file or folder's encrypted status. |
| Specifies a pattern or directory. |
Used without parameters, CIPHER displays the encryption state of the current directory and any files it contains. You can use multiple directory names and wildcards, but you must place spaces between parameters.
When you work with encrypted files and folders, keep in mind the following points:
Only files and folders on NTFS volumes can be encrypted.
You cannot encrypt files or folders that are compressed. Compression and encryption are mutually exclusive file attributes. If you want to encrypt a compressed file or folder, you must decompress it first.
Only the user who encrypted the file and the designated recovery agent(s) can open it. (You'll learn more about recovery agents shortly.)
If you encrypt a file in a shared directory, it is inaccessible to others. Windows XP will display encrypted files in green, just like compressed files are displayed in blue.
Encrypted files become decrypted if you copy or move the file to a volume or partition that is not formatted with NTFS.
You should use Cut and Paste to move files into an encrypted folder. If you use the drag-and-drop method to move files, they are not automatically encrypted in the new folder.
Encrypting folders or files does not protect them against being deleted, moved, or renamed. Anyone with the appropriate permission level can manipulate encrypted folders or files. (These users just can't open them.)
Temporary files, which are created by some programs when documents are edited, are also encrypted as long as all the files are on an NTFS volume and in an encrypted folder. I recommend that you encrypt the Temp folder on your hard disk for this reason. Encrypting your original files keeps them safe from prying eyes, but programs often leave temp files behind—usually in the Temp folder—and these files remain vulnerable.
NOTE
The paging file is also a problem in this regard and unfortunately cannot be protected directly, as far as I know. However, you can configure the Local Security Policy to clear the pagefile when you shutdown the system. Just enable the “Shutdown: Clear virtual memory pagefile” policy under the Local Policies, Security Option section.
On a domain network, you can encrypt or decrypt files and folders located on a remote computer that has been enabled for remote encryption. Check with your system administrator to see whether your company's servers support this capability. Keep in mind, however, that opening an encrypted file over a network still exposes the contents of that file while it is being transmitted. A network administrator should implement a security protocol such as IPSec to safeguard data during transmission.
You should encrypt folders instead of individual files so that if a program creates temporary files and/or saves new copies during editing, they will be encrypted as well.
Encrypted files, like compressed folders, perform more slowly than unencrypted ones. If you want maximum performance when folders or files in the folders are being used extensively (for example, by database programs), think twice before encrypting them.
I recommend that you encrypt the following folders:
Encrypt the My Documents folder if you save most of your documents there. Encrypting this folder ensures that any personal documents saved there are automatically encrypted. However, a better alternative would be to create a subfolder under My Document for personal files and encrypt just this folder. This approach relieves you from having to track which files are encrypted and which are not.
Encrypt your Temp folder so that any temporary files created by programs are automatically encrypted.
CAUTION
If someone steals your laptop computer or gains physical access to your desktop computer, it's possible that even with all of Windows XP's file access security and file encryption, that person can gain access to your files. How? There is a trick that allows this to happen, and you should guard against it. Here's how it works: By reinstalling the operating system from a CD-ROM, a thief can set up himself or herself as the system administrator. If the default file recovery certificate is still on the computer at this point, the intruder can view encrypted files. To guard against this situation, you should export the file recovery certificate to a floppy disk and remove it from the computer. I'll show you how in the next section.
Encrypted files are supposed to be very secure; only the user who creates an encrypted file can unscramble it. But this security hangs on your own personal file encryption key, which is stored in the Windows Certificate database (see the sidebar “How File Encryption Works” earlier in this chapter). Where would you be if you accidentally deleted your file encryption certificate, or if your user account was deleted from the system? Could the secret recipe for Aunt Dottie's Zucchini Fritters be lost forever this way? Probably not. The Encrypted File System has a “back door” that lets designated recovery agents open any encrypted file.
The availability of this back door is both good news and bad news. The good news is that encrypted files can be recovered when necessary. The bad news is that this capability opens up a potential security risk, and you need to be sure you take measures to protect yourself against it.
Your ability to recover encrypted files hinges on two factors:
Being listed by the Windows Local or Group Security Policy as a designated recovery agent
Possessing the file recovery certificate that holds the recovery key data
With a few dirty tricks, it's possible for someone who steals your computer to get himself or herself in as administrator and pose as the recovery agent. So, if you really want to ensure the privacy of your files with the Encrypted File System, you have to save the file recovery certificate on a floppy disk or other removable medium and remove the certificate from your computer.
To back up and remove the recovery certificate, do the following:
Be sure that at least one file on your computer has been marked Encrypted by any user.
Log in as the local administrator (
XXXXAdministrator, whereXXXXis the name of your computer).Start the Microsoft Management Console by choosing Start, Run. Then type
mmcand press Enter.Choose File, Add/Remove Snap-In. Then select Add. Next, highlight the Certificates snap-in and click Add. Select My User Account and click Finish. Finally, click Close and then click OK.
In the left pane, expand the Certificates node, Current User, Personal, Certificates.
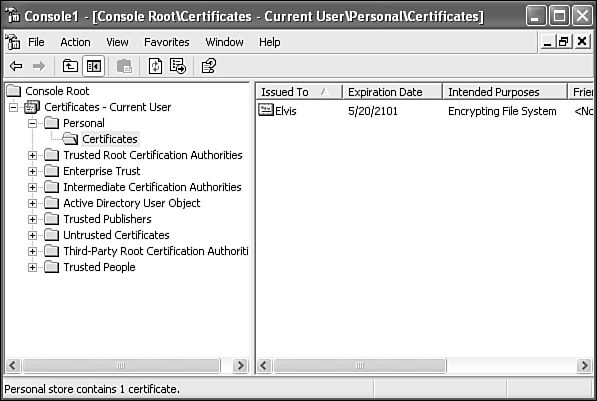
In the right pane, you should see a certificate listed with its Intended Purposes shown as
Encrypting File System, as shown in Figure 29.9. If this certificate is not present, and you're on a domain network, your domain administrator has done this job for you, and you don't need to proceed any further.Right-click the EFS certificate entry, and select All Tasks, Export to launch the Certificate Export Wizard.
Click Next, and then select Yes, Export the Private Key, and click Next. Select Personal Information Exchange, uncheck Enable Strong Protection, and uncheck Delete the Private Key if Export Is Successful. Then click Next.
Enter a password twice to protect this key. (You must remember this password!) Then click Next.
Specify a path and filename to be used to save the key. Insert a blank, formatted floppy disk, and type the path and filename, such as
A:RECOVERY.PFX(not case sensitive). Click Next and then Finish. A dialog box appears stating the export was successful; click OK.Right-click the certificate entry again, and select Delete.
Label the floppy disk clearly “EFS Recovery Key for XXX”, where XXX is the name of your computer. Store this diskette in a safe place away from your computer.
Restart your computer. After it's restarted, log on as Administrator again, and confirm that you can't view the file you encrypted as another user.
If your user account is lost, or if you accidentally delete your own file encryption certificate some day, you might lose access to your own files. The recovery agent could still help out, but you can protect yourself by exporting your own personal EFS certificate. Basically, follow the same procedure as for the local administrator while logged in as a user. Just be sure to have at least one encrypted file before starting the process. Once complete, label the disk “EFS for UUU on XXX,” where UUU is your user account name and XXX is your computer name. Store it in a safe place.
If your user accountis deleted, or you end up reinstalling Windows from scratch, you'll lose access to your encrypted files because the Encryption database will be lost. You can log on as Administrator and reinstall the encrypted file recovery certificate, or you can log on as yourself and reinstall your file encryption certificate to get the files back with the following procedure:
Choose Console, Add/Remove Snap-In, and then select Add. Next, highlight the Certificates snap-in and click Add. Select My User Account and click Finish. Finally, click Close, and then click OK.
In the left pane, expand the Certificates node, Current User, Personal, Certificates.
In the right pane, right-click and select All Tasks, Import to start the Certificate Import Wizard.
Click Next. Enter the name of the certificate file—for example,
a:
ecovery.pfx
—and click Next.Enter the password for the certificate, and check Mark the Private Key as Exportable. Click Next twice, and then click Finish.
You should now be able to access the encrypted files. I suggest that you remove the Encrypted check mark from these files. Log on again as the Normal user of these files and re-encrypt them if you want.
Windows XP ships with built-in provisions for file compression that is implemented via NTFS. It's not strictly true that only NTFS files and folders can be compressed, because a command-line program called compress can compress FAT-based files and folders. However, you must, in turn, use the expand command to decompress the resulting files and folders before you can use them. This procedure is awkward. So, for practical purposes, compression is implemented seamlessly into the operating system only on NTFS-formatted volumes.
File compression works by encoding data to take up less storage space. Digital data is compressed by finding repeatable patterns of binary 0s and 1s. The more patterns found, the more the data can be compressed. Text can generally be compressed to about 40 percent of its original size and graphics files from 20 to 90 percent. Some files (namely .EXE files) compress very little because of the lack of repeating data patterns within the program. The amount of compression depends entirely on the type of file and compression algorithm used.
Compressing a file or folder in Windows is a simple and straightforward process:
Open Windows Explorer, and select the file or folder you want.
Right-click, and select Properties from the context menu.
Select the Advanced button at the bottom of the Properties dialog.
In the Advanced Attributes dialog that appears, put a check mark in front of the Compress Contents to Save Disk Space option (refer to Figure 29.8).
When you click OK, you are prompted to choose whether you want to compress files and folders, if you're compressing a folder, recursively. Doing so is generally desirable and a safe bet.
Two caveats are in order with compression:
A file or folder can be compressed or encrypted, but not both. These options are mutually exclusive.
By default, compressed files are shown in blue, while encrypted files are shown in green. If you choose Control Panel, Folder Options and select the View tab, you can find an option to display compressed and encrypted files or folders in an alternate color.
CAUTION
You should keep in mind some disk space requirements when using compression. If you try to compress a volume that's running extremely low on free space, you might see this error message:
Compression Error
File Manager/Explorer cannot change compress attributes for:
"pathfilename"
These error messages indicate that the system needs additional free space to perform compression. The system is not designed to manipulate the data in place on the disk. Additional space is needed to buffer the user data and to possibly hold additional file system metadata. The amount of additional free space required depends on the cluster size, file size, and available space.
Use compression only when expressly needed. Compression will cause significant performance reduction if a significant number of commonly accessed files are compressed, due to the CPU processing required to decompress them for use.
Windows XP comes with a text-search system called the Indexing Service. This system scans files and folders on your hard disk and builds a database of the words it finds in them. This database helps speed up the Search for Files and Directories option when you're looking for words within files or keywords in file descriptions and helps the Internet Information Services Web server perform Web site searches. You can also query the index directly.
NOTE
Right off the bat, I should reassure you that the Indexing Service pays attention to file privileges when it displays results of searches. It never reports a match for a file the person searching doesn't have permission to view.
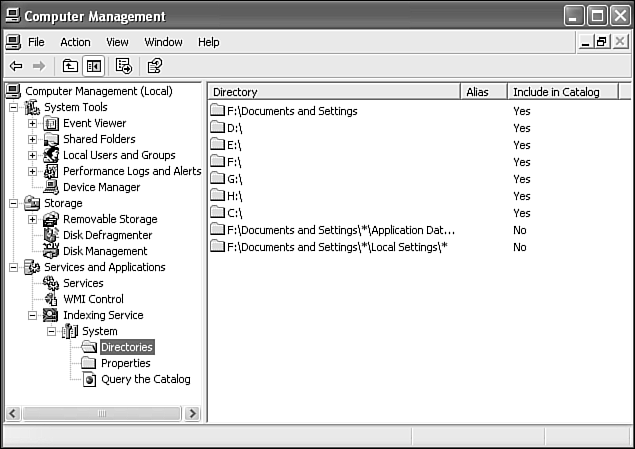
To view the Indexing Service Manager, open Computer Management from Administration Tools, expand Services and Applications, and then select Indexing Service (as shown in Figure 29.10). Under Indexing Service, the manager displays any catalogs defined on your system. A catalog is a self-contained index for a folder or group of folders. By default, a System catalog is defined for use by Search for Files and Folders. If you've installed Internet Information Services, you also have a Web index, which can be used by scripts to let visitors to your Web site search its pages.
If you want to use the Indexing Service, select Indexing Service in the left pane, and choose Action, Start from the menu. Answer Yes to Do You Want the Indexing Service to Start Whenever You Boot Your Computer?
Choosing Yes starts the service, which immediately begins its job of cataloguing files on your hard drive. It does its job of scanning files periodically from now on, as long as the computer is turned on.
You can right-click the Indexing Service entry in Computer Management to adjust the service's global properties. The Generation tab has some useful settings, as shown in Table 29.1.
Table 29.1. Generation Tab Options
By default, the Indexing Service Properties settings apply to each catalog managed by the Indexing Service. However, you can select the Properties sheet for each individual catalog by right-clicking the catalog name in the left pane and selecting Properties (in Figure 29.10, the catalog is named “System”). Then you can uncheck Inherit Above Settings from Service on the Generation tab and customize them on a catalog-by-catalog basis.
A good use of this capability would be to enable abstracts for the Web index if you have installed Internet Information Services and use searching on your Web site.
You can control which directories (drives and folders) are included in and excluded from a catalog by using the Directories folder. Under any catalog name in the left pane, select the Directories entry, and view the cataloged folders in the right pane.
Here, you can add any additional drives to include in your index and add any folders you want to exclude from the index. To add an Include or Exclude entry, right-click in the right pane, and select New, Directory.
In the resulting dialog, enter the full path to the folder to be indexed, or use X:to add the entire drive X:. Check Yes or No under Include in Index. If you want to add a directory on a remote computer, enter its full UNC network name—for example, \machinesharenamefolder—and a username and password to be used to access the shared folder.
You can also remove files or folders from all catalogs by using the files' or folders' Properties sheets.
To exclude a file from any catalogs, right-click the file or folder, and select Properties, Advanced. Under Archive and Index attributes on the resulting dialog, you can uncheck For Fast Searching, Allow Indexing Service to Index This File or Folder. Unchecking this box prevents the Indexing Service from ever scanning the file. However, just checking the box is not enough to put the file into an index; the folder must be listed in the catalog's Directories list or in a subfolder of a listed folder.
The System catalog is used automatically by the All Files and Folders search option accessed through the Search item on the Start menu, and it's especially handy when you're searching for a keyword or specific file type. The index is used to hasten the search of any cataloged folder.
The Web folder is used by scripts or FrontPage extensions on the Internet Information Server, which is described in Chapter 13, “Hosting Web Pages with Internet Information Services.”
You also can search any catalog directly from the Indexing Service Manager. Select Query the Catalog in the left pane, and a search form appears in the right. Enter any desired keywords, and click Search to begin a query. I was surprised to find that my system's temporary Internet files are included in the catalog, as test queries returned matches based on words in Web pages I had recently visited.
In the course of daily use, Windows XP generates thousands of temporary files to aid in system operation. These files are critical to the operation of the programs that use them when the programs are being used. As most people are well aware, though, temporary files have a habit of being much more persistent than their name implies. And over the course of time, these files add up in a hurry and consume large amounts of valuable disk space. The Disk Cleanup utility provides you with a safe and reliable way to delete these temporary files from all their various hiding spots and thus free up disk space on your hard drive.
To access this utility, do the following:
Choose Start, All Programs, Accessories, System Tools, Disk Cleanup. In the resulting dialog, choose the drive to analyze. Alternatively, you can right-click a drive in the Explorer, and then choose Properties, General, Disk Cleanup.
The program then searches this drive for files that can be safely deleted or compressed. The details of this analysis are then displayed in a dialog similar to the one shown in Figure 29.11.
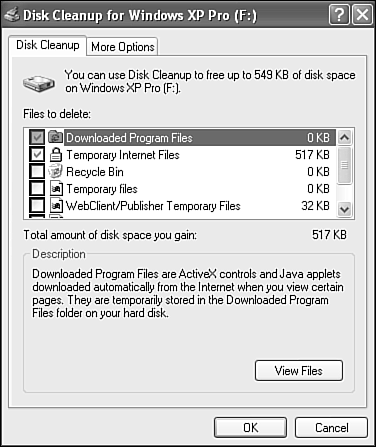
Near the top of the dialog box is the total amount of disk space you can free on this drive by accepting the selected recommendations listed below. You can exclude or include file groups from the cleanup process by placing a check mark in front of the types listed. When you select an entry, you see a description of which files that group contains and what their purpose is. By selecting a group and then the View Files button, you can see exactly which files are slated for death in the resulting folder window. Use this option if you have any doubts about a group of files, where they reside, or what they do.
The following file groupings might be listed:
Downloaded Program Files—. These files are ActiveX controls and Java applets used by Web pages you have visited. If you delete them, they will simply be reloaded the next time you visit the pages.
Temporary Internet Files—. This one is a biggie. Every time you access a Web page, your browser stores or caches the various elements of that page on the hard disk. When you revisit a page, any elements that have not changed since your last visit are reloaded from the hard disk, rather than the site itself, to speed the rendering process. Deleting these temporary Internet files frees the largest amount of disk space of any of the group lists. If you use a modem to access the Internet, however, you will notice longer rendering times the next time you return to one of your favorite sites.
NOTE
Agreeing to delete temporary Internet files does not delete your cookies (personalized settings for Web sites), so don't worry about having to reenter user ID information or other such information for sites you visit a lot. Cookies are stored in x:Documents and Settings<username>Cookies. Temporary Internet files are stored by default in x:Documents and Settings<username>Local SettingsTemporary Internet Files (where x: is the volume the system is installed on).
Recycle Bin—. Clearing this folder is the same as manually clearing your Recycle Bin. It is a good idea to have a quick look at the files stored there before choosing this option. Select this option, and click the View Files button under the group description; a folder window then opens, listing the contents.
Temporary Offline Files—. Similar to cached Web pages, when you connect to a network location and access a read-only file, a temporary copy is sometimes stored on your hard drive. Clearing these temporary copies does not erase the files you explicitly marked as available for offline use, so this is a safe choice.
Offline Files—. If you use the Synchronization features of Windows XP (see Chapter 18, “Windows Unplugged: Remote and Mobile Networking”), selected files and folders from a network connection are stored locally for access while you are disconnected. Do not delete these files unless you're sure you can work without the local copies. You'll lose any changes you made to offline files if you delete them here, so don't make this choice without synchronizing first.
Compress Old Files—. Windows can compress files not accessed within a specified period. To configure this period, select this group and click the More Options button.
Catalog File for the Content Indexer—. The Windows Indexing Service (see the description earlier in this chapter) speeds file searches by building and maintaining indexes on your hard disk. Selecting this option removes any old index files not in use but does not delete any current indexes.
On the Disk Cleanup dialog, also notice the second tab marked More Options. The Windows Components option provides a quick access shortcut to the Windows Components Wizard. From this wizard, you can select major system components (such as IIS and Indexing Services) to add or remove. Also on this tab is a shortcut to Add/Remove Programs under the section labeled Installed Programs. The System Restore Clean up button is used to delete all but the most recent restore points. This may free up a significant amount of drive space, but it will eliminate your ability to rollback to previous states of the system. (See Chapter 33, “Troubleshooting and Repairing Windows XP,” for information in System Restore.)
TIP
Running Disk Cleanup weekly does wonders to improve a system's performance. The first time you run it, the program might take quite awhile to run, but with regular exercise, this program speeds up because the disk stays cleaner. Once a month—after you check the contents of the individual folder groups carefully—you should empty all folders of all temporary files. Then follow up by running a defragmentation utility.
If you would prefer not to use the Disk Cleanup utility, you can choose a second option for clearing out those disk-hogging cached Internet files.
To access it, open the Control Panel, and select the Internet Options icon. On the Internet Properties dialog, you will find a section titled Temporary Internet Files. The Delete Files button works exactly as advertised. The Settings button allows you to configure options for how often cached files are checked against their original counterparts, how much disk space these cached files are allowed to take up, and in which folder they are stored.
When the disk space setting is exceeded, files are removed on a “First In, First Out” basis; that is, the oldest files are deleted to create space for newer ones.
The Move Folder option lets you specify a location where these temporary files will be stored. I think it's a great idea to change this path to a temporary folder or a drive with lots of free space. I usually redirect Internet Explorer to deposit its temporary Internet files into a emp folder I've created on one of my drives. If you do a lot of Web surfing, you'll want to map this temp location to a fast volume that is not on the same hard drive as your main Windows partition.
TIP
Changing the location for the storage of temporary Internet files is especially a good idea if the system is a client on a domain network and roaming profiles are in use. By storing the temporary files outside of your profile, it will take less time to log in and log out, plus your profile will consume less space on the network server.
Nobody plans to lose or corrupt an important file. But then again, no one I know gets up in the morning and plans to crash his car either. Things happen, though, and for all the same reasons you buy car insurance, you should also be taking all the necessary steps to safeguard all those bits and bytes that reside on your system's hard drive.
Windows is installed with a backup utility that should meet the needs of most individual users. With it, you can back up folders or files—both local and remote—to a Windows recognized tape device, to a removable storage device (JAZ drive, MO drive, Zip drive, and so on), or to a file on a local or remote drive. If Windows XP can read the file (FAT16, FAT32, or NTFS natively), then it can be backed up.
NOTE
Windows XP's Backup program is acceptable for an individual user's computer, but it's not really adequate for LAN or server backups because it can't fully back up remote computers. If you're setting up a LAN, you might look into more sophisticated programs, such as the server versions of ARCserve or BackupExec. If your computer is on a LAN, your system administrator might have a more sophisticated centralized backup system available to you.
NOTE
Windows XP offers versatile removable storage services used to manage groups of removable media (a.k.a. media pools). Windows keeps track of what media can be overwritten, which can be deleted, and which media need to be retired. However, in many situations, especially for individual users, managing media pools is too much work for too little benefit. For the most part, you can more than adequately manage your own media manually through proper labeling.
An easy to follow scheme for tape management (or any medium for that matter) is to have 5 or 6 tapes. Rotate each tape after each full backup (in many cases this occurs once a week). Keep track of the uses of each tape. For example, label the tapes “My Stuff 1/5”, “…2/5”, and so on. Then each time you insert the next tape, write the date on the label. Keep in mind that tape media usually are designed for 6 to 10 uses before they need to be replaced. You can use them dozens of times, but as the use numbers add up, the reliability of the recorded data, as well as the physical integrity of the tape itself, degrades. Once you've reached the reliable use lifetime (6 to 10) of a medium, replace it. By this process (one week full backup rotation with 5 tapes for 6 uses), you'll need to buy new tapes about every seven months.
If you'd like to learn more about media management, there is plenty of coverage in the Help and Support of Windows XP as well as in the Windows XP Resource Kit.
The first time backup is launched (Start, All Programs, Accessories, System Tools, Backup), the Backup or Restore Wizard is launched. The first page of this wizard has a check box which controls whether the wizard is launched every time. The wizard can be used to backup or restore files. These wizards offer few options; they mainly ask whether you want to back up or restore, what types of documents to manage (My Documents and settings only, everyone's documents and settings, or all data), and where to put the backup. If that's all you need, then you don't need me.
However, there is a lot more to explore in the Backup utility if you switch to Advanced Mode. You can do so by clicking on the link. Plus, you can choose to always open Backup in Advanced Mode by de-selecting the Always Start in Wizard Mode check box.
When you reach Advanced Mode, you'll actually be seeing the Backup utility proper (see Figure 29.12). I think it's humorous that Microsoft labeled using the utility directly “advanced.” From the Welcome tab of the Backup utility, you can launch more advanced wizards which offer a broader range of activities and settings. There is a wizard for backing up, restoring, and Automated System Recovery (ASR).
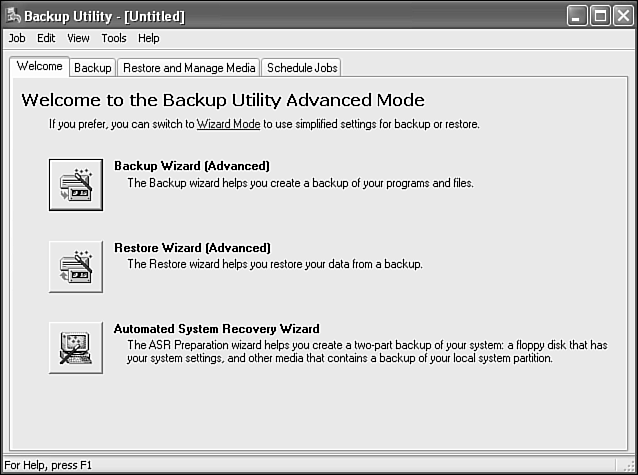
ASR is a two-part backup solution which creates a backup set that can be used to fully restore your system. It creates a boot floppy and a media set. The ASR backup can restore your system even if you can no longer boot into Windows XP or you replace your hard drive. Just boot with the floppy and follow the prompts to restore your entire system from the backup media.
NOTE
Emergency Repair Disks are a thing of the past. Windows XP does not offer a facility to create and ERD. In fact, the recovery and restoration tools included with Windows XP don't need an ERD. Instead, Windows XP uses other mechanisms to protect its Registry, SAM, and configuration settings. First, the Registry actively maintains its own backup copies. Second, the native backup utility can save System State. This includes the Registry and all essential system configuration settings. If your system is just damaged, the repair capabilities of Disaster Recovery are able to rebuild the system. In the case of a complete system loss, a full backup can restore your system. In either case, the ERD is no longer required.
In addition to the Welcome tab's wizards, there are three other tabs of control. The Backup tab is used to manually configure a backup operation. The Restore and Manage Media tab is used to manually configure a restore operation and perform basic media management tasks. The Schedule Jobs tab is used to view and alter scheduled backup jobs.
If you are completely new to backing up, use either default wizard or the advanced wizard to walk you through the process. You'll get the hang of it very quickly. If you are a backup veteran, I don't even need to tell you how to perform a backup.
The Backup tab's interface is very straightforward. Just mark the check box beside each item you want to include in the backup. Keep in mind that marking a parent box will automatically include all sub-folders and file contents. And don't forget to mark the System State check box to protect your Registry and system configuration.
Backups can be stored to tapes or files. The tape option is only available if you have a tape device installed locally. Otherwise, all other storage locations are accessible through the File option. Through the File option, you can define the destination path to a file on a local hard drive, on a Zip disk, on floppies, or even across the network to a network share.
TIP
Selecting the option to back up to a file is actually a blessing in disguise. Because many people don't have traditional backup devices such as DAT tapes or DLT drives, backing up to a file facilitates backup to other common removable media such as CD-Rs. Backing up your data in this manner is preferable to simply writing files to a CD-R. Normally, if you simply back up files and directories to your CD-R drive, you lose your permissions as well as make all the files read-only by virtue of the fact that they are backed up to read-only media. By backing up to a single file from Backup, you retain these settings and can restore with all of them intact. You can even compress this file before you write it to your CD-R by using your favorite zip program.
After you made your file selections and defined the destination, click the Start Backup button. This reveals the Backup Job Information dialog box (see Figure 29.13). From this dialog box, the following items can be configured:
Description
Append or overwrite/replace media
Allow only the owner and administrator access to the backup
Schedule the backup (via Schedule button)
Set Advanced options (via Advanced button)
Cancel backup (via Cancel button)
Start backup (via Start Backup button)
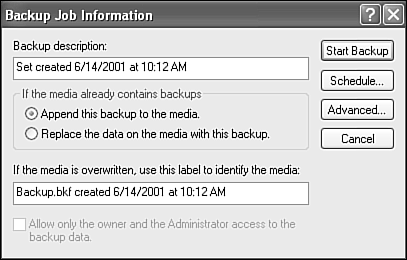
Scheduling a backup is not difficult; just follow the prompts. You'll need to save your backup selections, and then provide the username and password under which you want the backup job to execute. Once you are presented with the Scheduled Job Options dialog box, be sure to click the Properties button to define the schedule you need. A thorough discussion of the scheduling options is included later in this chapter.
The Advanced options include
Backup data in Remote Storage
NOTE
Remote Storage is an optimization mechanism where unused or infrequently accessed files are moved off to a remote storage location, such as a network share or a tape device. If the user requests a migrated file, it is automatically retrieved and returned to its original location, invisible to the user. Remote Storage is supported by Windows XP via NTFS. However, no details are included in Windows XP's Help system on how to configure it so you'll need to consult the Windows XP Resource Kit for details.
Verify data after backup
Compress data to save space
Include system protected files with System State
Set backup type
There are five types of backup supported by Windows XP's Backup utility. It is a good idea to consider the different types of backups available before initiating your backup. As you probably know, the operating system provides a means for keeping track of which files have been changed since the last backup—the archive bit. Based on whether a file's archive bit is turned on or off, the backup program either backs it up or skips over it. Your job is to set the correct options so the Backup program is relative to this bit. You can find these options through the Advanced button as discussed or by opening the Tools, Options dialog and selecting the Backup Type tab. Here, you can set how your files are backed up to your media, with the following options:
Normal—. The Normal backup does a backup of every file you've selected while also clearing, or turning off, the archive bit on each file. This type of backup sets each file's attribute to signify that it does not need to be backed up again until it has changed.
Copy—. The Copy type of backup simply copies the files to your backup media and leaves the archive bit alone. Using this option, you can have several backups happening on the same files without each of them stepping on each other's toes. In other words, if you use the Copy backup option, using the Normal option still backs up every file because the archive bit is still set on them.
Differential—. This option backs up only the files that have been changed since the last normal or incremental backup, while leaving the archive bit set for each file. With this option, any file backed up looks as though it has not been backed up.
Incremental—. The Incremental option is the same as the Differential option, with the exception that it does, in fact, clear the archive bit on files that it backs up.
Daily—. The Daily option backs up all files that have been modified only on the day that the backup is performed. Be careful with this one because you could end up not backing up everything you want if you do not run nightly backups.
All the backup options have their places in certain situations. I personally leave the backup type at Normal so that all my files are always backed up, no matter what. You might find that another option suits you better, so feel free to experiment with all these options to find the best one for you.
“The best laid plans of mice and men oft gang a'glay,” as the saying goes. When you've lost data and had enough foresight to have backed it up, you're in luck. Or you hope you are, at least. Backing up is the first half of recovering your data. With any luck, you'll be able to get it back the way it was before whatever bolt of lightning hit your PC. The Restore tab of the Backup dialog comes in at this point. Restoring from a backup is a very simple process, which you can execute in three essential steps:
Run the Backup program (by choosing Start, All Programs, Accessories, System Tools, Backup).
Use the Restore Wizard from the Welcome tab if you want a walkthrough. Alternatively, select the Restore and Manage Media tab, and adjust a few simple parameters.
Begin the restore, and insert media if and when prompted.
Of course, you might want to understand a few option and parameter details, for better control of your restorations. The following sections discuss the options. You should probably read along before doing your first couple of data recoveries. After you have the theories under your belt, then you can proceed.
Notice the left pane of the Restore tab. Here, you can view all the available Backup media pools. You can expand these nodes to display all possible source media and pools. They're displayed in a familiar tree view of the directories and files backed up to each related medium. As with the process of Backup, you simply select the files or folders you want to restore. And, of course, by selecting a top node of the tree, you include everything beneath it.
Next, it's a good idea to look at the settings on the Restore tab of the Options dialog box (Tools menu, Options). Here, you can choose from options that dictate how files will be handled if you are restoring one that already exists in your restore destination. The safest bet here is to not replace any file with a restored version. This is generally the best bet unless you have a specific reason to do so. Reasons for overwriting existing files do crop up, though. For example, if know that you somehow trashed, misedited, or otherwise mangled the file you currently have on disk, you can revert to the last-backed-up one. In that case, you need to enable replacement.
Other than the general restore options, the only real option for the restore portion of the Backup program is the option to specify the location in which you want to restore the files. You choose this option from the drop-down list at the bottom of the Restore tab. Three options are available:
Original Location—. This option restores the files to the exact place from which they were backed up. Be careful with this one; it could cause you problems with files that are open. You should make sure you're not trying to restore over a file that may be in use by another application or the system.
Alternate Location—. This option gives you the opportunity to restore the files to a destination of your choosing. If this option is selected, you are prompted for the location to which you want to restore via an entry box beneath the location options. From there, you can use the Browse button to find your restore destination. If you use this option, the directory structure of your backed-up files will be retained in the new destination.
Single Folder—. Selecting this option dumps all the files from your backup to a single folder. Be aware that using this option does not preserve the directory structure of your backed-up data. It simply ignores the structure and restores all the files to the directory you choose.
After you've selected your restore destination, you can click the Start Restore button to begin. If you selected Alternate Location or Single Folder, you're given the option to configure Restore options via the Advanced button on the Confirm Restore dialog box. The options in the Advanced Restore Options dialog are as follows:
Restore Security—. This option enables you to restore the same permissions for the files and folders you're restoring to their original settings. In most cases, choosing this option is best because you don't want to have to set them one-by-one after the restore has finished.
Restore Junction Points, and Restore File and Folder Data Under Junction Points to the Original Location—. Turn on this check box if you've created junction points using the
linkdcommand, and you're trying to restore the junction points and the data that the junction points point to. If you don't, only the pointers are restored, not the data. You also should turn on this box if you are restoring a mounted drive's data.When Restoring Replicated Data Sets, Mark the Restored Data as the Primary Data for All Replicas—. This option is relevant only to Windows Server 2003 and should be grayed out on any machine running Windows XP Professional or Home.
Restore the Cluster Registry to the quorum disk and all other nodes—. This option is relevant only to Windows Server 2003 and should be grayed out on any machine running Windows XP Professional or Home.
Preserve Existing Volume Mount Points—. This option most often applies when you're restoring the data for an entire drive, such as when you're replacing a drive. Typically, you put in a formatted drive, re-create the mount points, and then restore the data. You don't want to overwrite the mount points, so you turn on this option. If you have not re-created the mount points, and you want to restore the entire data and mount points as stored in the backup set, then uncheck this box.
Finally, by selecting the OK button, you can then select OK on the Confirm Restore dialog to start the restore.
Finally, we come to my personal favorite, the Schedule Jobs tab of the Backup dialog. This feature is a great addition to an already very capable backup program. There should really be no reason for most people not to have a reasonably current backup of their system at any given time if they use this tool.
Strategies for scheduling backups vary from person to person or machine to machine. Some people, myself included, are extremely paranoid and go for the “back up every single night” method. As you can guess, backing up this frequently saves a great deal of heartache in the event of a total system meltdown. I can't tell you how many times backing up has saved my neck. On the other hand, say you have a machine at your home or business that rarely gets used or is just acting as a proxy server. This kind of machine really only needs backups at much longer intervals than your personal workstation. In this case, it's usually safe to back up a system like this only every week or so. In the end, it's up to you how you feel you need to schedule your backups. Just remember, your system will probably go down at some point. Being prepared is the best insurance around for this nasty inevitability.
To use the scheduling features of backup, you simply double-click any date using the provided calendar or click the Add Job button. This gives you a chance to use the Backup Wizard. The options for it are very straightforward. In fact, if you read the previous section on backing up, you should have no problem whatsoever using this wizard.
NOTE
You will be prompted to set the account information for the backup because it may end up running when another logged-in user doesn't have the rights to initiate the backup. When you're prompted, you can specify a “Run As” user and password.
NOTE
The Schedule Job dialog is actually the same one used when scheduling any common task via Scheduled Tasks, a system tool covered in Chapter 27. You might want to refer to that chapter for some more details on the options.
The Settings tab on the Schedule Job dialog offers somewhat lower-priority options. You should take a gander at them, though, if you're intending to get serious about automated backups. Among the settings are those that affect idle time and power management. You should consider power settings if you're doing a backup from a laptop running on batteries. The Idle Time options could be useful if there is a possibility that someone will be using the computer when backup begins. If good computer responsiveness is important, you can ensure the backup process stops if someone sits down to the keyboard and begins work. Check the Stop the Task If the Computer Ceases to Be Idle check box.
The following sections provide a few alternative ideas for doing your backups. You can choose from many other possible ideas because of the proliferation of device types and offsite backup services (for example, CD-R, CD-RW, DVD, Internet-based services, LAN-based backups, and so on). However, you might find one of these ideas interesting and potentially very helpful in your work setting.
Windows XP has a little-known feature called Offline Files and Folders. The implementation of this tool is aimed at notebook users who connect to the corporate network, update files, and then journey off with their laptops on another adventure.
Here's how it works: The user logs on to the server and marks a network folder as available while offline. This folder and its contents are then replicated to the user's system. While on the road, the user adds new files to the folder and modifies or deletes existing ones. When the user returns and logs back on the network, Windows XP automatically synchronizes all changed files—in both directions. For example, if the user deleted a file from the offline folder on his or her notebook, the synchronization process notes the discrepancy and asks whether this file should also be deleted from the server. A similar process takes place for new or modified files.
Note
→ Offline folders are also discussed in the chapter on mobile network users. To learn more about these folders, see “Offline Folders,” p. 697.
“This is all well and good for mobile users,” you say. “But why is this topic described under backup strategies?” Because the synchronization process does not give a nit whether you physically disconnect your machine from the network; it can automatically update changed files every time you log off or on. In addition, you can easily force synchronization at any time by using a simple menu command.
TIP
Let me describe precisely how I ensure I have a recent backup of my working files throughout the course of a day. Both my main working system and my notebook have network cards, connected by a $2–7 twisted-pair crossover cable. The notebook has a shortcut to the folders containing all my critical data (book chapters, contact files, business correspondence, and so on), and these folders are enabled for offline access. Whenever I need a break or a distraction arises, I manually force a synchronization between the notebook and my working system. This way, if disaster strikes, I can quickly restore a damaged file by forcing another synchronization. The notebook detects whether something is amiss and offers to right the error.
The backup strategy described here, at first glance, looks a bit convoluted, but if you apply a little thought and creativity, you will be amazed at the range of possibilities that unfold from it.
Every power user has at least one device in his or her computer stable that won't play nice with another. In my case, it happens to be my USB Zip drive. The device works flawlessly on my IBM ThinkPad, but the USB port on my main working machine will not work under Windows XP until Epox comes out with a BIOS update.
This minor irritation would have remained minor had I not developed such a high regard for my trusty little Zip drive. It is fast, convenient, and flexible. It addition, it is a perfect place to copy chapter versions and backups as they evolve. In short, I wanted the same backup flexibility I had on my notebook available to me on my main machine. And being the doggedly persistent person I am, I finally found a way.
Do you remember that crossover cable I talked about earlier? If you have more than one computer in your house, or if you work on computers for a living, go buy one. It has to be the handiest item in my arsenal, and it costs only $2–7. A crossover cable lets you connect the LAN cards of two computers together into a mini-network without hubs or any other hardware.
As I noted previously, my notebook and my main system “talk” to each other via network cards and my crossover cable. Janus (my working system) can see Penelope (my notebook). Penelope can see and utilize the Zip; Janus cannot. But if A can see B, and B can utilize C, then why don't I give A access to C?
Here's how to make it so:
Computer A can talk to B.
Computer B has a device attached that A cannot use directly, for whatever reason.
On computer B, select the device from Windows Explorer and share it (select the device, right-click, and select Share from the pop-up menu displayed). Give it a share name to reflect its function or purpose.
Now go back to computer A and map a drive to that device (via Windows Explorer, Tools, Map Network Drive). In the folder box, you have to specify both the computer name and the device's share name. In my case, it is \penelopezip.
I created a shortcut on my desktop for this drive mapping and added it to my Send To menu. Now I can quickly back up a file from Windows Explorer with a single right-click.
Windows XP stores your user profile in the folder Documents and Settings<yourusername>. The subfolders contained here contain all the tweaks, configurations, and data files that make up what you see and access while working under Windows XP. Guard this folder tree with your life! With a little manipulation, this information can be copied to a safe haven and slipped back into place should the unforeseen occur, and you have to reinstall your operating system.
NOTE
If your computer is a member of a Windows domain network, and you're set up with a Roaming User Profile, your profile folder is automatically copied from the domain server to your computer when you log in and back again when you log out. It is an automatic backup, of sorts, so you can be a little more relaxed about it.
If you need to restore a profile copy in this environment, you should contact your network administrator because this task is fairly tricky.
The following are some of the invaluable goodies contained on the profile tree:
Your Favorites folder
Your History folder
All the configuration settings and program templates for MS Office
Your Desktop settings
The default folder for data files (My Documents)
Your most recently accessed files list
The folder your cookies are stored in
Your SendTo folder
Your Start menu configuration
Your section of the Windows Registry
A bevy of application settings, temp files, and IE history files, in a folder called Local Settings
As you can see, all this stuff is very good, and it's tailored specifically to your computing experience under Windows XP.
The root folder of your profile (in my case, C:Documents and SettingsBob) contains two key files: NTUSER.DAT and a backup of this file, NTUSER. They are your user Registry settings and are locked by the operating system in such a way as to forbid any other program from accessing them directly. Therefore, you cannot copy either of these files while logged on as yourusername (even if you have administrative rights under yourusername). An attempted copy operation will fail. The problem is that the rest of the tree structure is useless without these key files because they tell the operating system (and indirectly, the programs that use them) which files can be found where.
Ah, grasshopper, but this problem is not insurmountable. The following steps illustrate how you can wrestle a copy of your profile away from the arms of Windows XP.
NOTE
The following example uses a network drive as a copy point for simplicity. Realistically, the place you copy your profile is dependent on the resources at hand. The key here is to get it off your system volume and somewhere safe. This location can be a Zip drive (if it will fit), a CD-R drive, or at the very least, a separate partition. Personally, I keep my profile backed up to both another partition on my main system and a backup partition on my notebook. I tend to be a bit protective of my data, and for good reason, as you will read shortly.
Log off from yourusername and log on as Administrator. This is a key step; as noted previously, you cannot properly copy your profile tree while logged on as yourself.
In Windows Explorer, create a folder on a network drive you have access to, and name it—for example,
Profile Backup.Go to your user profile (in my case, C:Documents and SettingsBob), select the highest folder in your profile tree (Bob), and drop it on the network folder you just created (Profile Backup). Go have a cup of coffee; this process could take awhile if you have several data files stored here.
Last but not least, make sure you keep this backup profile updated on a routine basis. Most users can generally afford to lose a day or so of work; losing some work is unpleasant, but it is tolerable. But if you're like me, by the end of a busy week, you've probably added 10 or more “gems” to your Favorites list, messed with your NORMAL.DOT template three or four times, and shuffled your Start menu at least once.
The preceding routine is not about protecting your data; that is a separate routine which should be done on a level that reflects the value you place on the data you create every day. What it is about is protecting the configuration settings that represent your daily working environment under Windows XP.
So, you follow this sage advice and dutifully copy your profile somewhere safe on a routine basis. How is this effort going to reward you? Well, should you need to reinstall your operating system, your efforts are going to reward you by allowing you to re-create your desktop, its shortcuts, and most of your program configurations quickly and painlessly.
If you've been on the Internet for any length of time, you've run into zipped files (a.k.a. filename.zip). Zipping files is a way to combine multiple files and even a directory structure into one single file that is compressed. Zipped files make the transfer of data files and programs not just simpler, but faster, too. PKZip 2.04g was a command-line utility which was used to create zip files. As zipping became popular, many third-parties created utilities to perform zipping operations through GUI interfaces. My favorite utility of these is WinZip. But with Windows XP, I may never use it again.
Windows XP includes built-in zipping capabilities—viewing, creating, and extracting. Viewing zip files is easy. Windows XP treats .zip files as a compressed folder, no matter what utility was used to create them. They appear as folders with a zipper. You can view and access the contents just as if they were stored in any typical folder on the file system.
Zip files are created by issuing the New, Compressed (zipped) Folder command from either the File menu or the right-click menu in Windows Explorer or My Computer. After naming the folder (be sure to retain the .zip extension), you can drag and drop files or folder structures into it. Once your files are inside the “compressed folder,” the .zip file can be manipulated like any other file, including attaching to emails or uploaded via FTP.
Extracting files from a .zip file via Windows XP is no different than moving or copying files from normal folders; just drag and drop. Or, while viewing the contents of a .zip file, issue the Extract command. This launches the Compressed (zipped) Folders Extraction Wizard, which walks you through the process of locating a destination for the contents and initiating the extraction.
It has taken a bit of getting used to. I'm so in the habit of viewing and extracting the contents of zip files through WinZip that I can't seem to remember that Windows XP will perform the tasks for me. I've had to uninstall WinZip, but now that it's gone I don't miss it.
Table 29.2 provides a list of tools that you should not be without if you are serious about hard disk tweaking, backup, and recovery. By searching on the Web, you can find any of these programs easily because they are so popular.
Table 29.2. Third-Party Tools
Type of Program | Vendor | Product Name |
|---|---|---|
Defragmentation | Executive Software | Diskeeper |
Programs | Symantec | Norton Speed Disk |
Undelete Programs | Executive Software | Undelete |
Symantec | Norton Utilities (part of SystemWorks) | |
Disk Management | Symantec | Drive Image |
Tools | Symantec | PartitionMagic |
V Communications | System Commander | |
Symantec | Norton Ghost | |
Compression | PowerArchiver | Conexware |
Programs | Nico Mak Computing | WinZip |
PKWare | PKZip | |
Pacific Gold Coast Corp. | TurboZIP | |
Info-Zip | Info-Zip | |
Rarsoft |
These sections are not meant to be comprehensive. Full books have been written on solving hardware problems, and thousands of individual chapters on hard drives and the multitude of problems they can exhibit. What these sections will do, however, is give you some tried-and-true directions to head in if your hard drive starts to give you grief.
Hard drive problems range from file system structures that have been twisted out of shape to catastrophic, dead-in-the-water hard drive failures. And as any seasoned administrator will tell you, the catastrophic failures are the easy ones to diagnose and fix. More often than not, the inconsistent “what the heck?” problems are the real “head-scratchers.”
To keep it simple, let's begin with the most important factor in troubleshooting problems of all shapes and sizes—be it a car that will not start or a computer that will not boot. And that is…
I come from a long line of tradesmen who made a living getting their hands dirty and solving mechanical problems. As a writer and computer consultant, I rarely get my hands dirty anymore, but I have discovered that the principles of problem-solving I learned when I was young are the same across all fields. You need to be methodical, and if you are going to make assumptions, they had better be good ones; otherwise, you just might steer yourself down the wrong garden path.
The very first step to take when you have a disk access problem is to stop, sit down, and think. Although this advice might seem obvious, it is seldom realized in practice. People experience what they conclude is a hard drive problem, open their case, and start ripping out components when, in fact, they have a file system problem that could have been easily resolved by running Error Checking on their drive. Similarly, others start reinstalling operating systems when the problem is not software at all, but a failing CMOS battery that is causing the motherboard to lose sight of the hard drive.
None of this exposition is meant to imply that I'm smarter or better at diagnosing problems than the next guy, and in the end, I might come to the same conclusion as the person who leapt in and started ripping his or her case apart. What separates us, in my humble opinion, is that the steps I use to solve a problem today will apply equally well to a completely different problem I encounter a week from now.
So, when you have a hard drive problem—or what you think is a hard drive problem—before you pick up a CD-ROM or a screwdriver, get yourself a cup of coffee, and take a few minutes to get a clear picture of the nature of the problem in front of you. The following are some questions you might want to ask yourself:
When did the problem start?
What was I doing when I first noticed the problem?
Is the problem consistent? If so, how? If not, what is missing from the puzzle?
This last point bears some elaboration. Computers, as a whole, are extraordinarily consistent devices. Input goes in here; output comes out over there. In the case of hard drives, you lay out structures on them, and the operating system uses these structures to tell programs where their data is located. When you have inconsistencies, one of two forces is at work:
You're not seeing or you're overlooking something.
You could have more than one problem on your hands.
The key of this forced reflection is to have a “plan” before you react. And the cornerstone of that plan must be to do no further harm and to figure out what the problem is without complicating matters further.
So, the next highly recommended tools to pick up, after you've pondered and had a cup of coffee, are a notepad and a pencil. Begin by jotting down some notes on what happened, what you think the problem is, and what might be a good course of action to solve that problem. Use your notepad to reason out the problem; more often than not, eliminating a piece of flawed logic with an eraser is easier than restoring all the programs to your hard drive.
Hard drive problems fall into two general categories:
Hardware
File structure
Hardware-related problems involve the hard drive itself, cabling, power, connections, and the motherboard.
File structure problems involve the tracks and partitions on the hard disk, the boot records, and the files the operating system uses to initialize itself.
If you power up your computer, and the BIOS cannot find the attached hard drive, chances are you have a hardware problem. On the other hand, if the BIOS finds and recognizes your hard drive but fails to boot, you likely have a file structure problem. Note the chances are and likely qualifiers. As you read through the following scenarios, bear in mind the complications that can be brought on by compounded problems. In other words, file structure problems and hardware problems can, at times, overlap. For example, a damaged master boot record (MBR) may be the result of a failing hard drive; repairing the MBR might fix a consequence of the problem but not the problem itself.
If the computer fires up (the BIOS information appears and the floppy drive is accessed but nothing more), you have some sleuthing to do. Just follow these steps:
Turn off the computer, open it, and check the cables. Are the power and data cables attached to the drive? Is the wide, flat data cable flipped over backward on end? Check to see that pin #1 on the motherboard connects to pin #1 on the drive.
Check the settings on the drive to make sure they are correct. If you have a SCSI drive, check the ID number and termination as per the instruction manual for the drive. If you have an IDE drive, check the master/slave settings and channel assignment. If you have two devices on the same IDE channel, both set to master or both set to slave, there will be a conflict. You can have only one master and one slave per IDE channel. You typically change the setting by using a little jumper on the back of the hard drive next to the data and power connectors (ditto for IDE-based CD-ROM drives).
Check the BIOS settings by pressing the appropriate key during POST (Power-On Self Test) and having the computer autodetect the drive type. Make sure the drive is listed and/or recognized.
Windows XP offers several features that allow you to repair a system that will not start or will not load Windows XP. These features are useful if some of your system files become corrupted or are accidentally erased, or if you have installed software or device drivers that cause your system to not work properly. However, these features are used more to restore a system with a damaged Registry or destroyed system files rather than hard drive–specific problems. If you've already tried the actions listed in this section to no avail, flip over to Chapter 33, for details on numerous other recovery techniques that may be of benefit to you. Be sure to check out Safe Mode, Recovery Console, and parallel installations.
Hard drives vary in the noise output they produce. Sometimes the stepper motors are annoyingly loud. Other drives have loud spindle motors. When a drive is coupled to the body of the computer housing, motor noises can be effectively amplified, increasing the aggravation you experience using a system. If your computer sounds like a garbage disposal from time to time, chances are good that the stepper is not a quiet one, and as the head dances around on the platters, the drive shakes just enough to get the computer chassis rattling a bit, too. It's a bit like the relationship between the strings and the body of a violin.
Spindle motors (the motor that turns the platters at high speed) often start out life quietly, only to get noisy over time as the bearings wear in (or out). This noise is particularly annoying in laptop computers if you happen to use them in a quiet place, such as a library or in a home office. I actually replaced my 8GB IBM 3.5-inch drive once this year (Dell laptop, free of charge thanks to Dell), only to find that within a few months it developed the same annoying whine again, so I gave up and accepted it.
Some environments, such as recording studios, require that a computer be seen and not heard. For desktop systems, there are a couple solutions. One is to get some long wires for the keyboard monitor, pointing device, and so on, and relegate the computer to a closet. A more practical approach is to buy an after-market kit that quiets your PC's power supply and hard disk. Check the Web for information about such kits, such as at www.quietpc.com.
The bottom line here is to check out the specs on drive noise, if you care about that. Or you can listen for a quiet computer, find out what kind of drive it has, and then order that brand and model the next time you're shopping.
In the case of serious noise (you turn on the computer, and it really does sound like a garbage disposal), well, you're in trouble. This noise is a sign of your hard disk after crashing (the heads are actually rubbing on the surface of the platters) or in the process of crashing. Get out while the getting is good. Back up your data and/or whole drive, and replace it as soon as possible. Then restore the data.
In some cases, the noise you hear is not from your hard drive, but from the fans on the case or the power supply. These plastic fan blades collect dust. The dustier your environment and the higher your average humidity, the faster these fans become caked with crud. In many cases you can use a can of compressed air to clean off the fans. But when that doesn't work, you can attempt to remove the fan's protective screen and wipe the blades clean with a slightly moist paper towel. DON'T spray or drip any liquids into the system.
If you find that you are cleaning off your fan every month or so, you should consider getting a room filter to clean your air or attach part of an A/C filter over the air intake holes on your system. Just be sure that the airflow is not restricted or you'll end up overheating the system. Keep in mind your CPU and hard drives are air cooled; that's why there are fans in the case. If you restrict the airflow too much, the heat will build up and cause problems. If you hear a beeping sound much like that of European police cars, that's the warning sign that the CPU is too hot.