CHAPTER 8
Lighting Specifications
In this chapter, you will learn about
• The characteristics of light that impact human perception
• Selecting luminaires for an AV system based on a room’s application
• Creating zoning plans for a room’s lighting based on application
• Determining lighting-level presets for each zone in an AV space
• Addressing factors specific to maintaining lighting quality for videoconferencing
• Safety expectations in your design
An AV designer must specify lighting requirements for the space in which an AV system will be installed and operated. The goal of this chapter isn’t to turn you into a lighting engineer. It’s to make you aware of lighting specifications that can improve the quality of your AV design. Ultimately, you will likely coordinate with a lighting consultant to execute your design.
Light can come from many sources, such as natural light from windows or artificial light from lamps and AV equipment (in other words, projectors and displays). All light sources, whether natural or artificial, must be included in an AV design so they meet the client’s needs and allow end users to operate an AV system effectively.
Keep in mind, users need enough ambient light to move safely around a space, view collateral materials (objects, printed pages), and see the presenter well enough to comprehend the intended message. Such ambient light, while necessary, can impact the effectiveness of display systems and will affect the design. Users also need enough light coming from the AV equipment to perceive displayed images as faithful reproductions. Moreover, in situations where video cameras are required, you need to specify lighting that illuminates participants and the space so that they can be seen clearly (and in a flattering light), whether the video will be transmitted across a distance, as in a videoconference, or recorded and watched later.
Basics of Lighting
When considering lighting for an AV design, it is important to understand human perception. How humans perceive brightness, contrast, and color will help determine whether your design serves its intended purpose, as identified during the needs analysis, and will help users communicate effectively.
Visual perception in an AV space requires a light source (the luminaire), receptor (the human eye), and analyzer (the brain). It’s up to the designer to control the light within a room so that users can accurately perceive, receive, and analyze information.
The human eye is stimulated by light that comes directly from a source, as well as light that reflects off surfaces before entering the eye. The brain interprets the various light waves it receives through the eye, causing people to see color, contrast, and shape. Everything humans see is the product of light absorbed by, transmitted through, and reflected back from the surfaces of objects. Two important characteristics of light, which designers must consider, are brightness and color temperature.
Brightness
For the eye to recognize color and contrast, there needs to be enough light directed toward and reflecting off surfaces in a room. The brightness, or luminance, perceived by humans depends on the amount of light coming from a source to a surface and on the amount of light reflected back to the eyes from that surface. Luminance is light emitted from or reflected by an object. It is measured in candelas per square meter (cd/m2, also referred to as a nit) or footlamberts (fL). One nit (cd/m2) = 0.292 fL.
NOTE Illuminance is light falling on a surface, measured in lux (lx) or footcandles (fc). One lux = 0.09 fc. It is not visible to the human eye except in the form of reflected luminance.
Both direct (luminance) and reflected (illuminance) light can be measured using special instruments.
• Incident light meters measure the direct light coming from a source, such as a lightbulb, projector, or monitor.
• Reflected light meters, also known as spot meters, measure the light that bounces off an object, such as a projection screen or work surface.
For more information about light measurement, see the section about display environments in Chapter 5.
Color Temperature
The lamps you choose for an AV space will be a determining factor in what wavelengths of light will reach users’ eyes. An important element of those light sources is color temperature. Color temperature is the quantification of the color of “white” light, as rated on a numerical scale. Low color temperature light (about 2000 kelvin [K]) has a warm (reddish) appearance, while light with a high color temperature (about 6000 K) has a colder (blueish) appearance.
All white light consists of varying amounts of color wavelengths from the visible light spectrum. Depending on how much of each color is present, the human eye will perceive the warmth or coolness of that light.
The lamps you choose will have a perceived color. If you have outdoor light coming into your room, you need lamps that match the outdoor color temperature. If you have no windows, you can choose a warmer, yellow light that is more pleasing to the human eye indoors.
Characteristics of color temperature can be expressed in a couple ways, by correlated color temperature and by color rendering index.
Correlated Color Temperature
Correlated color temperature (CCT) measures the light color that a lamp emits as a single number and indicates the “warmth” or “coolness” of the light. The curved line in the middle of Figure 8-1, known as the Planckian locus, indicates the color of a theoretical black body as it’s heated to the temperature indicated in kelvin. In physics, a black body is an ideal physical object that absorbs all incident radiation. Think of a piece of steel in a blacksmith’s shop. As the metal heats, it starts to glow. It gets redder and redder until it is orange and then finally blue in color. The blue numbers indicate the monochrome wavelength values of the image.

Figure 8-1 A chromaticity diagram
Typically, most commercial light sources range from 2700 to 6500 K, with lamp CCTs appearing “warm” below 3200 K and “cool” above 4000 K. For example, the CCT of LED lamps can span from warm white (2700 K) to cool white (greater than 4000 K) to daylight (5600 K). Which you choose may depend on the space, such as a ballroom in which you want the light to appear either harsh or soft depending on the event.
Table 8-1 shows CCTs for various light sources.

Table 8-1 Correlated Color Temperature
Color Rendering Index
While CCT measures the color that a light source emits, the color rendering index (CRI) measures how accurately a light source replicates a desired set of parameters. It is the effect a light source has on the perceived color of objects relative to an incandescent source of the same CCT. In lighting, a lamp is tested for its ability to render faithfully several test colors, and then those measurements are averaged to produce one CRI number.
CRI values range from negative numbers to 100. The most accurate replication of colors is indicated by 100. Typically, incandescent lights are the best color replicators, followed by LEDs, which are somewhere in the 90s range. This information is important in the AV industry. If your AV system is displaying a company logo, critical information on a projection screen, or a live video feed of a chief executive officer (CEO) leading a meeting through a videoconference, it needs to produce the right colors.
CRI values are often expressed by their equivalent CIE Ra value, which is an international standard. When you see Ra listed for a commercial lighting product, think CRI. The Ra is the average test color value, or CRI, of each lamp (see Figure 8-2). Using an LED lamp with a higher CRI (Ra) would change the look of whatever object it’s illuminating.
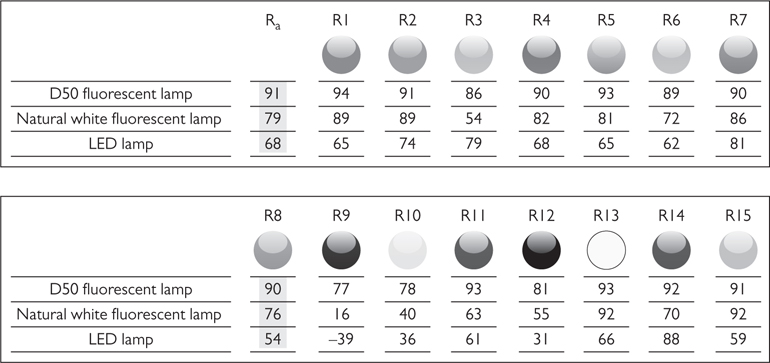
Figure 8-2 Average test color values (Ra)

TIP It’s important that you understand the link between the correlated color temperature and the color rendering index. If you’re given a light-emitting diode (LED) blend with a perceived kelvin reading of 6500 K, you might think that it’s perfect for your application. However, if it has a CRI in the 20s, it may be worthless.
Energy Consumption
Another factor you’ll have to consider is a lamp’s energy consumption. Just as a car’s performance can be measured in miles per gallon, a lamp’s performance can be measured in lumens per watt. The number of lumens you get per watt is known as efficacy. You arrive at this number by dividing the initial lumens by the nominal lamp watts.
Sustainability efforts, along with local and national regulations, have sought to limit the waste of energy coming from lamps, so many manufacturers have been investing in light designs with better efficacy. Figure 8-3 shows the range of efficacies for various lamps.

Figure 8-3 Lamp efficacy ranges
Keep in mind, however, that the highest-efficacy lamp may not always be the right one for your AV design, regardless of sustainability efforts. Efficacy is only one measure among many that you need to consider when determining the proper lighting. You must also take into account intensity, color, lamp life, and control capabilities.
Lighting the Space
Planning for the various lamps, luminaires, and other lighting-related equipment in your AV design requires information gathered during the needs analysis. In that analysis, you and the client, along with your fellow allied trade representatives, should have discussed the different tasks that users will perform in a space. Given room applications, you can start thinking about task lighting, shades and blackout drapes, and lamps and luminaires.
TIP It is important to know the difference between a lamp and a luminaire. A lamp describes the light source and light-producing components (bulb, filament, fuse, and so on). A luminaire is the light source plus the structures attached to it that control and distribute light (the lamp plus sockets, housing, and so on). Often you’ll hear lighting fixture and luminaire used interchangeably in the AV industry, but luminaire is preferred when communicating with the lighting trade.
Task Lighting
The Illuminating Engineering Society (IES) Lighting Handbook recommends task light levels in AV areas to be from 200 to 500 lux or from 20 to 50 fc.
Task lighting concerns the amount of light you want to direct toward people for things such as note-taking, reading manuals, and operating equipment. It will need to be balanced against the amount of light you want to direct away from things such as a front-projection screen or videoconferencing camera.
Ultimately, in planning for luminaires, you want to specify the following in your design:
• Light you want
• Light you don’t want
• Light you need to control
For more information about task lighting, see the section about task light levels in Chapter 5.
Shades and Blackout Drapes
Not all the light in a room comes from lamps. Nor is all light desirable at every location of the room. Because there is usually ambient light—or general light filling a space—you will need to consider how to control it so that it doesn’t negatively impact your design. Ambient light may strike the screen or the walls in the room and reflect into the viewing area, competing with the displayed image by reducing contrast and washing out the picture.
Consider the ANSI/INFOCOMM 3M-2011 standard, Projected Image System Contrast Ratio, which sets a minimum contrast ratio of 15:1 for basic decision-making applications, including information displays, presentations containing detailed images, classrooms, boardrooms, multipurpose rooms, and product illustrations. Achieving compliance with the standard starts with limiting the amount of ambient light falling on a screen. AV designers should specify the ambient light limits for these locations. A great starting point is the Illuminating Engineering Society DG-17-05 standard, Fundamentals of Lighting for Videoconferencing, which recommends the following:
• Less than 50 lux (5 fc) at front-projection screens
• Less than 150 lux (15 fc) at rear-projection screens
• Less than 200 lux (20 fc) at direct displays
One way to control the ambient light at a display is to specify shades and blackout drapes for rooms with windows that allow excessive natural light. Yes, natural light can help set a mood or meet energy-savings requirements. But the amount and color of natural light isn’t always consistent. Color temperatures can range from a warm 1000 to 1800 K at sunrise to a cool 5000 K at noon. And natural light can vary in spectra and distribution depending on whether the skies outside are blue or cloudy. That’s why if an AV space includes windows, it is important to block out natural light, especially for videoconferencing or displaying critical images.
Choosing Lamps
Once you’ve specified your task light levels and your ambient light limits, you can consider the types of lamps and luminaires you’ll want in the room. Lamps can be broken into three main groups.
• Incandescent
• Fluorescent
• LED
Incandescent lamps work by heating a filament with electricity, which causes the tungsten wire to glow. The advantages of incandescent lamps are low initial cost and high CRI, while the disadvantages are low efficacy and high heat output.
Fluorescent lights work by heating both an inert gas and mercury to the point of producing visible light by the phosphor coating on the bulb. The advantages of fluorescent lights are higher efficacy and cooler operation, while the disadvantages are higher initial cost and sensitivity to external temperatures.
LED lights work by converting electrical energy directly into photons through semiconductor materials. The advantages of LED lights are long lamp life, high efficacy, good performance in cold weather, and longer durability. The disadvantages are high initial cost and heat sensitivity.
TIP Many LED lamps on the market offer extremely poor performance. The United States requires LED makers to include “Lighting Facts” on their cut sheets, which helps to make an informed purchase decision.
Because incandescent lights become hot when illuminated, designers must account for the heat they generate. Heat and AV equipment don’t usually mix well, so make sure the heating, ventilation, and air conditioning (HVAC) engineer provides adequate air-conditioning capacity for the AV space. Of course, in a few years, it might not matter because incandescent lamps are being phased out completely in many parts of the world.
Choosing Luminaires
Luminaires include not only the light source but also the physical features that control and distribute light. A luminaire is a complete lighting unit consisting of a lamp (or lamps) and ballast (or ballasts), when applicable, together with the parts designed to distribute light, position and protect the lamps, and connect the lamps to the power supply.
Luminaires are intended to utilize absorption, reflection, transmission, and other physical properties of light to control it in a way that complements human perception in a room. From various plastic blends that cover the lamp to shaped reflectors that direct light, luminaires come in a range of designs for different lighting needs.
Luminaires can be grouped based on several characteristics, but the following are the most common:
• By the type of light source, determined by the type of lamp they employ, such as incandescent, fluorescent, LED, and so on
• By mounting style, such as surface-mounted, recessed, semi-recessed, track, or suspended
• By light distribution, classified by the IES as direct, indirect, semi-direct, semi-indirect, direct-indirect, and general diffuse. Such descriptions are based on the percentage of light output above and below a horizontal plane.

NOTE When you add a ballast and housing unit to a lamp, its efficacy can change. The term that describes the difference in percentage between the lumen output of a lamp alone and the lumen output of the lamp within a luminaire is efficiency.
Lighting Coverage
When choosing luminaires, it is important to assess available photometric data. This will help you design for lighting coverage. Photometric data is collected on luminaires to gauge the light intensity and includes many measurements to help you choose a luminaire suitable for your room application. Three important reports to consider are candlepower distribution curves, spacing criterion, and lamp and ballast data.
Candlepower distribution curves are usually graphed as polar plots that look similar to microphone and loudspeaker plots (see Figures 8-4 to 8-7). These graphs show the distribution of light from the vertical field and help give you a sense of the direction that light will be spread in an area of a room. This is helpful to an AV design because, for example, there are places in a space where you don’t want light to be directed, such as at a front-projection screen. Although a luminaire that distributes generally diffuse light might be applicable in an audience setting, it would not be acceptable near the projection screen.

Figure 8-4 A candlepower distribution curve

Figure 8-5 The center of the plot shows where the light source is emanating from.

Figure 8-6 The intensity of the light is measured in candelas.

Figure 8-7 The direction of the intended light path is indicated by the 0° mark.
Spacing criterion data will provide you with the recommended ratio between each light’s center and the distance above the task area. This is to ensure an even distribution of light and can help you properly coordinate with your loudspeaker layout in a reflected ceiling plan or keep an even wall wash for videoconferencing lighting.
Lamp and ballast data includes lamp type, CCT information, and CRI information. It also includes ballast descriptions, such as electronic, dimmable, and energy efficient. These specifications will affect everything from the color temperature of the room to the way the ballast utilizes light energy.
Documenting Luminaires
Having studied luminaires, you should now be able to specify their type and location. You want to sketch out lighting positions across the space and specify type in detail (for example, direct-reflected fluorescents for the front of the room with less than 50 lux falling on the front-projector screen, plus general diffuse fluorescents with task light of at least 200 to 500 lux).
Although documenting luminaires for an AV design might seem straightforward, it’s often a process that’s better accomplished using computer-modeling software. Such software can produce artful and scientifically calculated models, based on your lighting design information. More importantly, by using software, the luminaires you specify for your design can be imported into the lighting designer’s modeling software, putting the AV needs front and center.
Your lighting documentation also needs to take into other possible systems, such as HVAC and sprinklers, which compete for space in the ceiling. Furthermore, you will have to consider your own loudspeaker coverage pattern, if applicable, and your sightline study. This is where you will want to review reflected-ceiling plans (see Figure 8-8). You cannot put a luminaire where a loudspeaker is, and you cannot suspend luminaires that impede sightlines.

Figure 8-8 Reflected ceiling plan
The bottom line is, be thoughtful and specific. Your fellow trades people cannot meet your AV design needs if you do not communicate them through documentation.
NOTE While you document luminaires, know that some energy codes will impact the type and quantity of luminaires in the room. Some energy codes that may affect your design are the International Energy Conservation Code (IECC) from the International Code Council (ICC) and Energy Standard for Buildings Except Low-Rise Residential Buildings 90.1 from the American Society of Heating, Refrigerating, and Air-Conditioning Engineers (ASHRAE).
Creating a Zoning Plan
Different tasks require different lighting, so your design specifications will need to include a way to alter luminaires throughout the space. During a video presentation, when note-taking is required, your system should utilize different groups of lights than it does during a videoconference to achieve proper contrast ratios.
Lights are often grouped together in zones. A zone is a grouping of luminaires (lighting fixtures) that are controlled together.
Lighting zones are usually grouped by the luminaire’s intended function, which may or may not determine their position in a room. A zone can be as simple as a single row of lights near a display wall or as complex as individually addressable luminaires.
Figure 8-9 shows a room’s lighting zones organized by luminaire function and labeled with letters.

Figure 8-9 Lighting zones organized by letter
Determining Zones
Determining which luminaires go in which zone depends on the needs analysis. Keeping in mind how the space should function will help you determine the complexity of the zoning plan.
If you have a room that will be used only for PowerPoint presentations and general meetings, you might create two separate zones: the lighting above the meeting space and the lighting closest to the projection screen. Such a simple zoning plan would allow users to adjust the lights manually based on the room’s function. Notice in Figure 8-10 that groups of lights are zoned together so they can be manipulated to meet the needs of various tasks in the room.

Figure 8-10 Lighting zones based on tasks
If you are designing for a space that will host videoconferences, the IES publication this should be a space Fundamentals of Lighting for Videoconferencing recommends the following zones:
• Ambient, or general illumination
• Videoconference task lighting
• Lighting of vertical and perimeter surfaces
• Image-display lighting or luminaires located in front of the projection screen or monitor
• Additional zones for task lighting on the table, accent, and display lighting
The more complex the AV space, the more complex the zoning required to meet various needs.
As with luminaires, you should document your lighting zones to show which lights will be working together. As you document the zoning plan, be logical. You can color code them, if that helps, or you can label them using symbols and a key.
Lighting Control
After zoning your lights, you will then need to consider how the end user will interact with them. This means determining how lights will be controlled, setting up preset levels, and incorporating control interfaces.
On/Off vs. Dimmable
The simplest way of adjusting lighting levels is a switch. Switches give you the option of two conditions: on and off. They can control a single light or an entire zone.
The most basic lighting design for an AV room would be two zones of switched lights. Typically, the lights in front of the projection screen can be turned off separately from the rest of the room. Switches are rated by the amount of current they can safely pass. When a number of luminaires are grouped onto one zone, it is common to control them using a higher current-capable controller.
Another, more complex way of controlling a lighting system is through dimmers, which give users greater flexibility to set light levels based on the task at hand. Dimmers are controls that can reduce the percent of lumens coming from a light source by varying the voltage (or current) to the luminaires. They can be simple, such as a switch/dimmer on the wall for manual control, or complex, such as a computer controller.
Dimmers are rated according to their power-handling capability and, therefore, are different for incandescent and fluorescent lamps.
It is common practice to use only 80 percent of a dimmer’s capacity for incandescent loads. For example, if a dimmer is rated at 2400 W, the designed load should not exceed 1920 W (80 percent of 2400).
Fluorescent loads have an inherent surge, and dimmers that control them are commonly derated by 30 to 50 percent. Fluorescents can’t be dimmed unless fitted with appropriate dimmable ballasts.
Lighting Scenes
A scene or preset is a recallable configuration of lighting levels for one or more zones. If your design specifies dimmable lighting, then it can be controlled through scenes or presets that dictate the lighting levels in every zone, regardless of method. These should be specified based on the task.
Thinking back to the needs analysis for the room, you should be able to specify the number of lux or footcandles you need from each zone and preset to create the proper scene. You can reference the IES Lighting Handbook to find the various categories necessary for your particular tasks. If you specify dimmable lighting, you can calculate these zones more precisely.
For any given scene, every zone is working together to produce the correct lighting for a particular task. In a scene/preset for “Presentations,” Zone 1 is turned off to keep light away from the projection screen, Zone 2 is dimmed to 75 percent for task lighting, and Zone 3 is on to direct light at the person speaking. When a user presses the “Presentations” button, the lighting in all three zones is automatically adjusted to support that task.
Figure 8-11 shows a lighting control panel with seven scenes, an off switch, and dimming options. Each scene will recalibrate the lighting in the room for different tasks. As you consider the usability of this panel, would you be able to walk into the room and instantly set the scene for a videoconference? Probably not, because the numbers don’t tell you much about what each preset is meant to do. As a designer, you should be thinking about how your users will interact with your AV system. In this case, specifying a panel that labels scenes by task would better meet the needs of the client.

Figure 8-11 A panel with seven scenes
Keep in mind, not every wall panel works with every dimming control system. Specifying a scene panel with dimmers and other features is beneficial only if the dimming system interface can yield the intended results. You don’t want a scene selection/dimming unit that doesn’t interface with the dimming control system.
TIP Be sure to specify control-override features and keep window treatments and lights independently addressable. Override features allow end users to operate the lights when daylight-saving timers alter a room, for example. Keeping shades separate from lighting presets allows people to adjust the window treatments without having to cycle through lighting scenes.
Lighting a Videoconference
Videoconferencing requires a particular set of design criteria to address both the viewers in a space and the camera that is capturing images. Although people in a room are capable of capturing and processing images using both their eyes and their brains, a video camera simply captures images. Humans have the ability to adjust to a far greater range of image contrasts, movement speeds, and luminance variations than a camera.
With this in mind, when designing a room to support videoconferencing, you must think of the people in the room and the camera. Your lighting requirements need to strike the right balance between the two, as described in Table 8-2.

Table 8-2 Lighting Needs in Videoconferencing Spaces
Glare
Chances are, you’ve experienced bright light in your eyes or seen a TV screen partially washed out by light from the sun. Any excessive bright light that causes discomfort or a reduction in visibility is called glare, and it negatively impacts your AV design.
Glare is the sensation produced by luminance within the visual field that is sufficiently greater than the luminance to which the eyes are adapted and causes annoyance, discomfort, or loss in visual performance or visibility. There are two types of glare.
• Direct glare, or any excessive bright light coming directly into the eyes or camera
• Indirect glare, or any excessive bright light reflecting off a surface before coming into the eyes or camera
When it comes to videoconferencing, your goal is to avoid direct glare from light sources entering the camera, as well as indirect glare, called veiling reflections, from reflecting light off nonmatte surfaces and washing out critical text and details. Some ways of addressing glare include the following:
• Specifying the location of the camera
• Specifying the luminaire distribution
• Specifying the wall and furniture finishes
Light Balance
Videoconferencing systems require proper light balance to produce high-quality images. In general, three-point lighting of a presenter will create suitable lighting in many AV designs, but it’s especially true of videoconferencing. A fourth light can be aimed at the rear wall to help with the camera’s auto-iris setting (see Figure 8-12). Four layers of light are often considered in videoconference rooms.

Figure 8-12 Four layers of light
• Key light
• Fill light
• Back light
• Wall wash
Here is what the letters mean in Figure 8-12:
• A is the key light, the brightest light on the subject.
• B is the fill light, filling in the dark spot created by the key light.
• C is the back light. It shines on the subject’s shoulders and hair. This creates an outline around the subject and separates the subject from the wall behind.
• D is the wall wash that lights the background. It helps to produce a pleasing image when using an auto-iris camera.
Lighting for video can be a challenge because the contrast of the image must not exceed the contrast ratio of the camera’s pickup device. If the contrast ratio of the device is exceeded, then clipping can occur. Clipping may cause the person’s face to appear too white on camera. If the lighting is too dark, noise can enter the image because of automatic gain settings in the camera. When flat, low-contrast lighting is used, images can look washed out and dull. Proper lighting will create images that look good and are interesting to watch.
This is why specifying dimmable lighting is essential in videoconference scenes.
NOTE In many cases, back lighting and wall washing are optional. The key and fill lights may produce enough light on the wall to make them unnecessary. It is also important to note that fill light can come from a lamp that is providing key light on an adjacent area.
Color Temperature
Some video cameras have a manual setting for color temperature; it should be set to the color temperature of the lamps used. If the camera uses auto white balance, then it will adjust automatically. It is important that wall colors do not “fool” a camera into thinking the wall is white. This will make for incorrect white settings that affect skin tones, which, in turn, may create images that are tinted green or pink.
Correlated color temperature is important when lighting videoconferences. Here are two examples of how you will see CCT applied:
• Video cameras are not as forgiving of variations in CCT as the human eye. Therefore, electronic adjustments are often made for what “white” should be.
• A monitor or projector may have a CCT selection feature. This allows you to alter the “whiteness” of the image for the lighting conditions in the environment. You can make the “white” of the displayed images match the “white” of a piece of paper under the room’s lighting conditions.
IES’s Fundamentals of Lighting for Videoconferencing recommends that fluorescent sources have a CCT of 3000 to 3500 K, with a minimum CRI of 80; halogen sources should have a CCT of 2800 K or greater. Other types of light sources are not recommended.
NOTE Projected-image or direct-display devices often have a different CCT than the videoconference room lighting. The room lighting is often in the 3000 to 3500 K range, while the display might be 5000 K or greater. This is an issue only if the light from images are seen on the users’ faces.
Wall and Table Finishes
When designing a space to support videoconferencing, remember that the materials, colors, and reflections within the camera’s field of view can significantly impact the camera’s ability to capture the intended images. There are many surfaces that affect a camera, from the materials on the walls, ceiling, floor, tables, chairs, and furniture to the colors and properties of surfaces. When light encounters such materials, the characteristics of light will change depending on their properties. Here are some examples:
• Polished material, such as marble or mirror, creates specular (mirrorlike) reflections, similar to the sky on the horizon of a body of water.
• Irregular material, such as etched metal, creates spread reflections similar to specular but with a more cone-shaped reflection.
• Matte materials, such as plaster and matte paint, create diffuse reflections that reflect light without direction and achieve a wide distribution of light.
As you coordinate with allied trades, you will want to specify the reflectance values of various surfaces throughout the space to achieve a good distribution of light. See Table 8-3 for guidance.

Table 8-3 Reflectance Values of Various Surfaces
NOTE During the design process, you need to make sure multiple stakeholders take the time to talk to each other. Getting the lighting designer and the interior designer or architect together on a conference call helps to ensure that everyone is taking room and furniture finishes into account with lighting. For example, a glass table will affect lighting levels. A conference call may draw attention to the issue.
Emergency Lighting
AV spaces may need to include emergency lights that are not attractive but are necessary for the building. As you’re designing, remember to ask yourself where these signs will be located within your space. Will they cause problems? How can you design around them? Ultimately, these light sources cannot be turned off and cannot be covered up.
For example, you can’t place a ceiling-mounted loudspeaker or luminaire near an exit sign. You probably don’t want to design your projection screen near an emergency light that stays on in a darkened room either. If you do either of these without realizing the ramification, you may have to restart your design, which could cost time and money.
TIP Check your local codes for other safety considerations that may affect your lighting design.
Chapter Review
In this chapter, you learned about important lighting specifications you will need to consider as you design the lights within your space. You will use this information when communicating with the lighting consultant and architect about your design, and ultimately you will hand these specifications over to your integrator as a way for them to verify the work.
Review Questions
The following questions are based on the content covered in this chapter and are intended to help reinforce the knowledge you have assimilated. These questions are not extracted from the CTS-D exam nor are they necessarily CTS-D practice exam questions. For an official CTS-D practice exam, download the Total Tester as described in Appendix D.
1. For light coming directly from a source such as a lightbulb, what measure and instrument should be used?
A. Foot lambert with an STL
B. Candela with an incident meter
C. Lux with an incident meter
D. Footcandle with a light impedance meter
2. Considering a 2400 W lighting dimmer is available, the design load for the system should not exceed:
A. 1300 watt
B. 1750 watt
C. 1920 watt
D. 2400 watt
3. What is the highest recommended ambient lighting level illuminating a front-projection screen within a videoconferencing space?
A. 5 footcandles (50 lux)
B. 30 footcandles (108 lux)
C. 45 footcandles (161 lux)
D. 25 footcandles (215 lux)
4. What other type of light, besides light coming directly from a source, must be measured?
A. Refracted
B. Distorted
C. Fluorescent
D. Ambient
5. When lighting a room for videoconferencing, the Illuminating Engineering Society recommends that fluorescent light sources have a correlated color temperature of __________.
A. 2000 to 2500 K
B. 3000 to 3500 K
C. 4000 to 4500 K
D. 5000 to 5500 K
Answers
1. B. Use candelas and an incident meter to measure light coming directly from a source.
2. C. With a 2400 W lighting dimmer, the design load for the system should not exceed 1920 W (80 percent of capacity).
3. A. The highest recommended ambient lighting level illuminating a front-projection screen in a videoconferencing space is 5 footcandles (50 lux).
4. D. When considering lighting for an AV design, you should measure ambient light as well as light coming directly from a source.
5. B. When lighting a room for videoconferencing, the Illuminating Engineering Society recommends that fluorescent light sources have a correlated color temperature of 3000 to 3500 K.