
11. Setting Up Payroll
Sign Up for a Payroll Service
Complete the Payroll Setup
Pay Employees
Pay Liabilities
When your business hires employees, one of your most important tasks is making sure your QuickBooks data is set up correctly to handle this responsibility. This chapter details for you the proper way to set up your payroll. In Chapter 12, “Managing Payroll,” you learn how to efficiently review your payroll data and handle some of those unique payroll transactions.
Getting Started
For the new business owner, here is a common definition of an employee: “a person in the service of another under any contract of hire, express or implied, oral or written. The employer also has the power or right to control and direct the employee in the material details of how the work is to be performed.” If your company hires individuals who meet this criteria, your company is responsible for paying wages, collecting and paying certain federal and state payroll taxes, and filing quarterly and annual forms.
Your company becomes an agent of the federal and state governments because the company must collect certain payroll-related taxes and pay these on predetermined payment schedules.
Payroll Process Overview
QuickBooks is designed to help you set up and manage your company’s payroll. Payroll tasks are easily completed using the Employee Center and Payroll Center. Scheduling your payrolls and related liability payments practically eliminates the chance of making errors.
The recommended payroll workflow detailed here, when combined with the frequent review of reports, can help you manage your company’s payroll efficiently and accurately:
1. Sign up for an Intuit QuickBooks payroll subscription.
2. Set Payroll and Employee preferences for your company.
3. Complete (if your data is new) the Payroll Setup process or use the Run Payroll Checkup diagnostic tool included with your QuickBooks software.
Note
Are you already using QuickBooks for your payroll processing? Start with the QuickBooks Run Payroll Checkup on p. xxx.
4. Set up scheduled payrolls to pay your employees.
5. Pay your scheduled payroll liabilities.
6. Reconcile your bank account each month, verifying that the paychecks distributed were cleared for the proper amounts.
7. Review and compare your business financials and payroll reports.
8. Prepare your quarterly and annual state and federal payroll forms directly in QuickBooks (depending on which payroll subscription you have purchased).
When managing payroll in QuickBooks, you use these transactions:
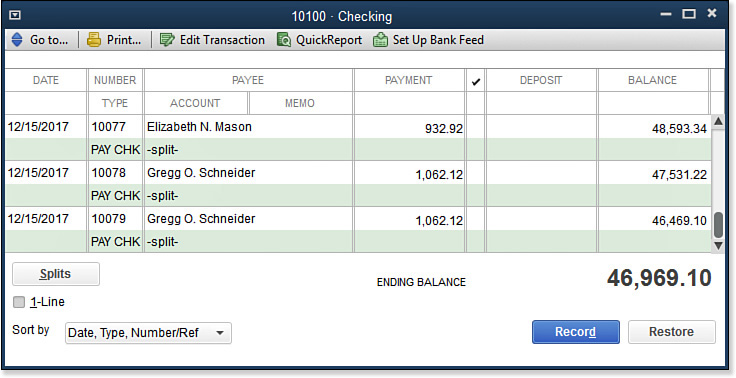
• Paycheck—Record payment to an employee and automatically calculate all additions and deductions. You can identify these in your bank register as the transactions with a PAY CHK transaction type, as in Figure 11.1.
Figure 11.1. Properly created employee paychecks have PAY CHK as the transaction type.
• Pay Liabilities—Record the payment of the accrued payroll taxes to the state and federal government.
• Liability Adjustment—Modify the payroll liability amounts computed from actual paychecks. You can identify these transactions in your bank register as transactions with a LIAB CHK transaction type.
• Refund Deposit for Taxes and Liabilities—Record any refund received from overpaying your payroll liabilities. You learn more about this transaction type in Chapter 12.
You can access each of these transactions from the Payroll Center or by selecting submenus from Employees on the menu bar.
When you use the proper payroll transactions, QuickBooks includes the amounts in preparing payments of payroll liabilities due or when preparing state and federal payroll reports in QuickBooks.
Selecting and Activating a Payroll Service Subscription
For QuickBooks to automatically calculate your payroll, you need to purchase a payroll service subscription from Intuit (in addition to purchasing your QuickBooks financial software).
QuickBooks financial software partnered with an Intuit-provided payroll service makes setting up payroll, collecting taxes, remitting timely payments of the collected taxes, and filing the required payroll reports trouble free.
Tip
The payroll offerings are detailed in this chapter, or you can visit http://payroll.intuit.com/compare/compare-quickbooks-payroll.jsp for a graphical comparison.
Purchase your payroll service subscription at www.payroll.com, or click the Turn On Payroll icon on the Home page and select a plan that works for your company. You can choose from several payroll subscriptions that start at these levels:
• Do My Own Payroll—Stay in control with just a few steps.
• Intuit Provided Payroll Services—Opt for worry-free payroll; you enter the hours and Intuit does the rest.
As of this writing, Intuit offers four payroll service options, one of which is sure to meet the needs of your company.
Note
You can enable manual payroll in QuickBooks without purchasing a subscription. With manual payroll, QuickBooks does not calculate the payroll taxes or prepare the payroll forms. I do not recommend this method unless you have only a few payroll checks that are always the same amounts each pay period.
From the menu bar, select Help, QuickBooks Help. In the search box, type process payroll manually and select the link with the same name. Read the information and follow the provided instructions.
Preparing and Printing Paychecks Only
On the Home page, select Turn On Payroll. Choose the I Want My Accountant option. Click See My Plan. This option is the Intuit Basic Payroll subscription and includes the following:
• The capability to enter employee hours and let QuickBooks automatically calculate payroll taxes, additions, and other deductions
• The option to print checks, or you can use free direct deposit of earnings into your employees’ bank accounts
• Expert help via online knowledgebase or live assistance during business hours
• A variety of reports your accountant can use to complete payroll tax forms
Preparing and Printing Paychecks and Filing Tax Forms
On the Home page, select Turn On Payroll. Choose the I Want To Pay & File option and click See My Plan. This service is the Intuit Enhanced Payroll subscription and includes the following:
• Capability to enter employee hours and let QuickBooks automatically calculate payroll taxes, additions, and other deductions
• Option to print checks, or you can use free direct deposit of earnings into your employees’ bank accounts
• Automatic completion of federal and most state tax forms for you to E-pay, print, or E-file
If you are an accounting professional, you can select the Intuit Enhanced Payroll for Accountant’s subscription. With this subscription, you can do all the preceding tasks named plus the following:
• Create after-the-fact payroll
• Calculate net-to-gross paychecks
• Support up to 50 Federal Employer Identification Numbers (FEINs) with your paid payroll subscription
• Prepare Client Ready Payroll Reports (using Excel)
For more details about the ProAdvisor program, visit http://proadvisor.intuit.com.
Note
If you currently use an outsourced payroll solution that does not integrate with QuickBooks, consider the Full Service payroll subscription. Entering payroll into QuickBooks can save time and improve accuracy.
Allowing Intuit Payroll Experts to Prepare Your Payroll
On the Home page, select Turn On Payroll. Choose the I Want Intuit Payroll Experts option. Click See My Plan. This is the Assisted Payroll, and it gives you capabilities to do the following:
• Participate in one-on-one guidance with Intuit payroll experts to set up or transfer all your employee data.
• Enter hours into QuickBooks to create paychecks. Intuit reviews the payroll for accuracy. All your taxes, additions, and deductions are calculated automatically.
• Print checks or offer direct deposit into your employees’ bank accounts.
• Allow Intuit to process tax payments and forms for you, guaranteed to be accurate and on time.
Using Intuit Online Payroll
With an Intuit Online Payroll subscription, you can prepare payroll anytime, anywhere, as long as you have an Internet connection. To learn more about this payroll offering, visit http://payroll.intuit.com/payroll_services/online_payroll.jsp
With Intuit Online Payroll, you can do the following:
• Enter employee hours online and make paycheck additions—deductions automatically calculate.
• Receive email reminders when it’s payday or for tax filing deadlines.
Note
Are you an accounting professional? Would you like to share responsibility with your client for payroll processing?
With an Intuit Online Payroll for Accounting Professionals subscription, your client can enter the payroll hours and leave the responsibility for tax filings to you. Visit http://accountants.intuit.com/payroll-payments/.
• Print paychecks or direct-deposit employees’ paychecks into their bank accounts.
• Process electronic payments and tax filings.
• Allow employees to view their pay stub information online.
• Process payroll using your mobile device.
• Prepare many detailed payroll reports.
• Process an unlimited number of payrolls each month.
• Import the transactions into QuickBooks (as a Write Checks transaction).
Updating Payroll Tax Tables
Your purchase of an Intuit payroll subscription includes periodic tax table updates. When the federal or state government makes changes to payroll taxes or forms, you will be notified that a new tax table is available.
To update your tax tables, make sure you are connected to the Internet and have a current payroll subscription. To update payroll tax tables, follow these steps:
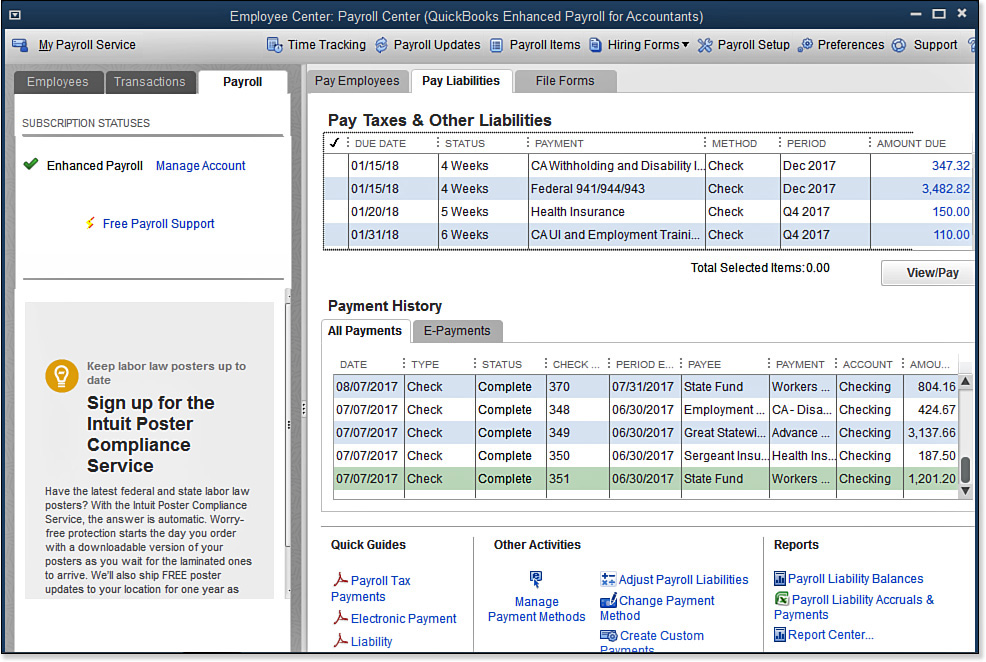
1. From the menu bar, select Employees, Payroll Center. Your payroll subscription status is detailed to the left. See Figure 11.2.
Figure 11.2. Check the status and manage your payroll subscription from the Payroll Center.
2. From the menu bar, select Employees, Get Payroll Updates.
3. (Optional) Click the Payroll Update Info button for details about the currently installed tax table version.
4. (Optional) Click the Account Info button. You need to sign into your account to view the QuickBooks Payroll Account Maintenance information about your subscription, including type of service, payroll company FEIN information, billing details, and direct deposit details. Click the X in the top-right corner to close the QuickBooks Payroll Account Maintenance dialog box.
5. Select the option to download only changes and additions to the installed payroll files, or download the entire payroll update. Click the Update button.
6. Click OK to close the Payroll Update message that tells you a new tax table or updates were installed. Click Troubleshooting Payroll Updates if the update does not install successfully.
7. QuickBooks opens the Payroll Update News dialog box. Click through the tabs of information to learn more about changes made with the installed update. Press the Esc key on your keyboard to close.
Tip
Because payroll requirements are changing all the time, make sure you have an accounting professional who can review your payroll setup or who can file the returns for you.
8. From the menu bar, select Employees, Payroll Center.
9. On the left side of the Payroll Center, view information about your payroll subscription status.
Employer Resources
Getting started with payroll can seem like a daunting task. This section discusses the many resources that can help you successfully get started with payroll.
Classifying Workers as Employees
Your business might hire employees and independent contractors (see Chapter 7, “Setting Up Vendors,” for more). Use these IRS guidelines when classifying a worker as an employee:
• Behavioral—Does the company control or have the right to control what the worker does and how the worker does his or her job?
• Financial—Are the business aspects of the worker’s job controlled by the payer? (These include factors such as how the worker is paid, whether expenses are reimbursed, and whether the business owner provides tools and supplies.)
• Type of Relationship—Are written contracts or employee-type benefits (pension plan, insurance, vacation pay, and so on) in use? Will the relationship continue, and is the work performed a key aspect of the business?
The IRS provides additional comments on this topic on its website, www.irs.gov. Type contractor or employee into the help search box, and click the links provided for more details.
Federal and State Required Identification
Your business likely has identification numbers assigned by federal, state, and local governments. The identification numbers detailed here represent the basic identification numbers you need to properly report and pay payroll liabilities.
As mentioned earlier, your company becomes an agent of the state and federal government when it collects from employees certain taxes that governments require you to report and pay to the respective legal entity. Your company needs the following identification numbers for properly reporting and remitting your payroll taxes:
Tip
The reporting regulations for federal and state governments can be time consuming to learn about. Hiring legal and accounting professionals to guide you through the process can save you time and allow you to concentrate on building your business.
• Federal Employer Identification Number—Commonly referred to as FEIN. You can obtain this number from the Internal Revenue Service. Visit www.irs.gov for instructions.
• State Withholding Tax ID—Issued by the states you do business in. You use this ID to file and pay state income tax you withhold from your employees’ paychecks. Some jurisdictions also require IDs by city, county, or both. Call your state tax department or search your state’s website for more details.
• State Unemployment ID—Issued by the states you do business in. You use this ID to pay and file state unemployment reports. Call your state tax department or search your state’s website for more details.
• Other identification numbers—Possibly required by the state, county, or city jurisdictions you do business in.
You might process your first payrolls before you have your assigned identification numbers. Check with your state taxing authority for instructions on paying these liabilities while you wait for your proper identification number to be assigned.
IRS and Other Forms
Your business is required to have on file for each employee a Form W-4: Employee’s Withholding Allowance Certificate. You can access this form and other useful forms for your business in the Your Taxes section of the http://payroll.intuit.com/support/forms website. If the forms this site provides are not the most current, you can also go to www.irs.gov.
Tip
Business owners face many other requirements when paying employees, including displaying the most current federal and state labor law posters at the place of business. Find more information at www.freeposteraudit.com.
State Reporting
Each state where you have employees working has specific filing requirements. You are even required to report new hires and, in some states, independent contractors. Your state might also require city and county reporting. You can access information from each state’s website, or Intuit provides useful information on the following websites:
• http://payroll.intuit.com/support/compliance
• http://payroll.intuit.com/support/PTS/statelocaltax.jsp
Properly tracking and reporting your payroll activity to the state helps you avoid costly penalties for not filing timely.
Creating Payroll Accounts in the Chart of Accounts
Proper payroll tracking includes having the necessary payroll liability and expense accounts in the chart of accounts.
Review your data to make sure you have these accounts, or create them as needed. Adding subaccounts (see Figure 11.3) to the default accounts QuickBooks creates can help you track the financial details of payroll more efficiently.
Figure 11.3. Create subaccounts for payroll liability and expenses for more detailed reporting.
→ See “Chart of Accounts,” p. xxx, for more information on creating these subaccounts.
Typical accounts to create for recording payroll transactions include the following:
Tip
Have you been recording QuickBooks payroll transactions without using these recommended subaccounts? Create the desired subaccounts and then edit the payroll items, assigning the newly created subaccount.
QuickBooks reassigns all previous transactions to the newly created subaccounts. Always make a backup of your data before you attempt a procedure such as this.
• Bank Account—QuickBooks does not require that you have a separate bank account for payroll transactions. Companies with large amounts of funds from operations might choose to have another bank account for payroll transactions. Having a separate bank account for payroll can limit the business’s financial exposure from fraud.
• Payroll Liabilities—Other Current Liability. QuickBooks uses this account type to track the amount owed to federal or state governments, health insurance providers, and the like. QuickBooks creates this account for you automatically. Include the following as subaccounts to this account, and add other subaccounts as needed:
• FICA/Medicare Payable (also referred to as 941 taxes). For simplicity, I recommend using a single account that combines the employee deductions and employer contributions.
• State Unemployment Payable (also referred to as SUTA).
• Federal Unemployment Payable (also referred to as FUTA).
• Health Insurance Payable.
• Wage Garnishments.
• Job Costs—Cost of Goods Sold. Many industries track the costs associated with providing a service or product to their customers or jobs. To track these properly on your Income Statement, use the Cost of Goods Sold account category. Do not overuse this category by adding too many to the chart of accounts; instead, use QuickBooks items for greater detail.
→ For more information, see “Understanding Items,” p. xxx.
• Overhead Costs—Expense. When you create a company-paid payroll item, you assign an account for the expense. Payroll items are used on paycheck transactions and have account(s) assigned to them. QuickBooks automatically creates a Payroll Expenses account. Typically, you want to add the following as subaccounts:
Caution
Do you have employees who work in the office doing administrative tasks and other employees who perform work related to customers and jobs? If you do, properly recording payroll costs assigns the costs of administrative payroll to an overhead expense account and assigns customer or job payroll expenses to a Cost of Goods Sold account.
However, QuickBooks has a limitation with this process. Company-paid payroll tax items allow only a single-expense account. As a result, each specific company-paid payroll tax expense is reported to a single account. Keep this in mind when you are reviewing your financials.
• Salaries & Wages—Assign these to payroll compensation items.
• Payroll Taxes—Assign these to the employer Social Security and Medicare payroll items.
• State Unemployment—Assign this to your state(s) unemployment payroll item.
• Federal Unemployment—Assign this to the Federal Unemployment payroll item.
• Employee Benefits—Assign these to company-paid benefits, including health, dental, life insurance, and other types of benefits.
A comprehensive chart of accounts that includes subaccounts for liabilities and expenses makes it easy for you to review your payroll and fix any errors.
Setting Up Payroll Tax Vendors
You can improve tracking, paying, and reporting payroll liabilities balances if you identify the vendors by the tax or benefit being paid. This is important for states or other agencies that have the same payee name for multiple state tax liabilities.
Creating separate vendor records is recommended. When processing the payroll liability payments from the Payroll Center, QuickBooks prepares a separate liability check for each:
• Unique liability payroll item assigned to a specific payee. For example, 941 payroll taxes will be paid together, but not on the same check with 940 payroll taxes.
• Liability payments with different due dates.
When preparing the Federal 941/944 and Federal 940 payments, QuickBooks creates a separate check for each type of liability or for same payroll item types but with different due dates. See the Pay Scheduled Liabilities section in Figure 11.4. This is necessary so that the reporting and payment for these liabilities follow strict due date guidelines dictated by the state, federal government, or other entity being paid.
Figure 11.4. QuickBooks prepares individual checks for the different payroll items and for the same payroll items but with different due dates.
→ To learn more about creating your vendor records, see “Adding or Modifying Vendors,” p. xxx.
The following is a list of some of the more common payroll vendors you should create when you are managing payroll:
• United States Treasury—941
• United States Treasury—940
• State income tax department
• State unemployment tax department
• Health insurance vendor
Payroll Preferences
After you sign up for one of the Intuit Payroll Service subscriptions, you need to enable payroll and set some payroll- and employee-specific preferences. QuickBooks offers two types of preferences:
• My Preferences—Settings that are unique to the user logged in to the data file and that other users do not share.
• Company Preferences—Settings that are common for all users. When a preference is modified on the Company Preferences tab, the change affects all users.
For this section, reference is made only to preferences on the Company Preferences tab. The My Preferences settings do not directly affect the payroll process. Log in to the file as the Admin or External Accountant user in single-user mode to set the following preferences.
Payroll and Employee Preferences—Company Preferences
These specific preferences are set for all users. To set up payroll and employee preferences, follow these steps:
1. From the menu bar, select Edit, Preferences to open the Preferences dialog box. Select the Payroll & Employees—Company Preferences tab (see Figure 11.5).
Figure 11.5. Setting defaults improves accuracy and efficiency when working with payroll activities.
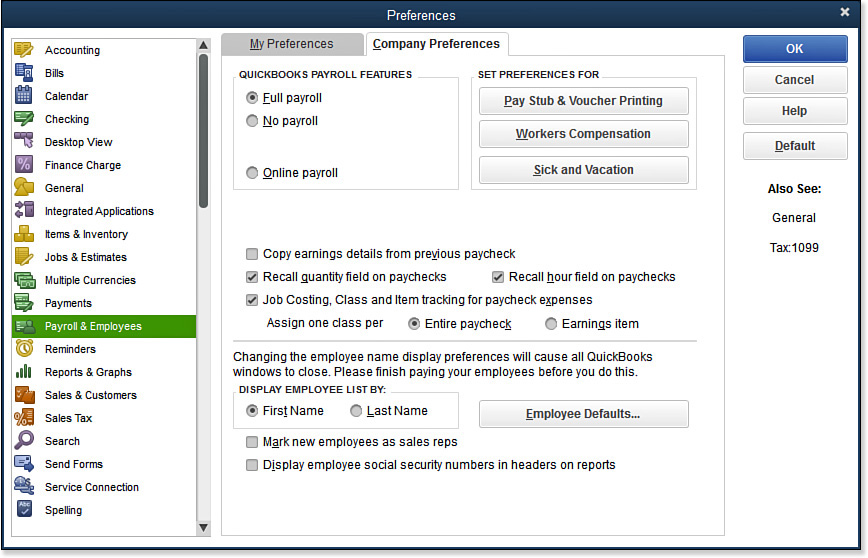
2. Select the Full Payroll option in the QuickBooks Payroll Features box. This enables the remaining features in the Preferences dialog box.
3. Select the checkbox next to the features that are appropriate to your business:
• Enable ViewMyPaycheck—Gives your employees online access to their pay stubs, W-2s, and other payroll info—free with your QuickBooks Payroll subscription. For more information, see section “ViewMyPaycheck,” later in this chapter.
• Copy Earnings Details from Previous Check—Copies hours, rates, and Customer:Job from the previous paycheck.
• Recall Quantity Field on Paychecks—Recalls line 1 of a previous paycheck, payroll item, and rate only; no Customer:Job is recalled.
• Recall Hour Field on Paychecks—Recalls total hours only and places the total number of hours on a single line even if the previous paycheck had several lines.
• Job Costing, Class, and Item Tracking for Paycheck Expenses—Enables QuickBooks to add the cost of company-paid taxes to the burdened cost for time that is assigned to a Customer:Job. QuickBooks also offers the Class Tracking by Paycheck or Earnings Item option if you have the Class Tracking preference enabled.
4. Choose the default for displaying employee names on reports, either First Name or Last Name.
5. Select the Mark New Employees as Sales Reps checkbox if you want new employees automatically added to the sales rep list. An employee who is also a sales rep can be listed on a customer invoice transaction so you can report on sales by rep.
6. Select the Display Employee Social Security Numbers in Headers on Reports checkbox if you want to display this sensitive information on reports.
7. Click the Employee Defaults button to set the following defaults for new employees:
Tip
Setting these payroll defaults ensures consistency and saves time when setting up employees in QuickBooks.
• Earnings items and rate
• Time data to create paychecks
• Additions, deductions, or company contributions payroll items
• Employee coverage by qualified pension plan
• Payroll schedule or pay frequency
• Class (if the QuickBooks Class preference is enabled)
• Taxes for federal and state tax settings
• Sick days and vacation settings
8. Click OK to close the Employee Defaults dialog box.
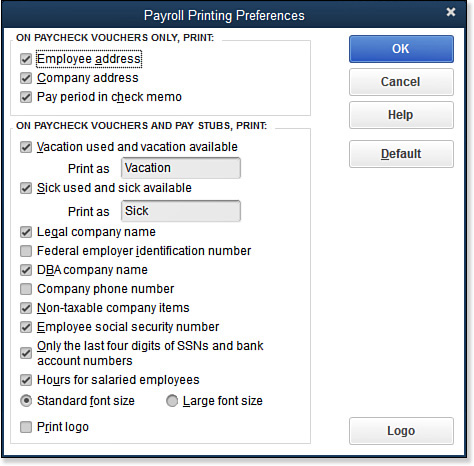
9. Click the Set Preferences for Pay Stub and Voucher Printing button to open the Payroll Printing Preferences dialog box in Figure 11.6. In this dialog box, you can customize what detail prints on employees’ paycheck stubs.
Figure 11.6. Customize the information that prints on the employee’s paychecks or paystubs.
10. Click the Workers Compensation button to set the preference to track worker’s comp, to be warned when worker’s comp code is not assigned, and to exclude overtime hours from worker’s compensation calculations. Workers Compensation tracking is not included with the Basic payroll subscription.
11. Click the Sick and Vacation button to set the default accrual period, hours accrued, and maximum number of hours, and to specify whether the hours should be reset each new year.
Checking—Company Preferences
The Checking-specific preferences are set for all users. From the menu bar, select Edit, Preferences to open the Preferences dialog box. Select the Checking preference from the left side, and click the Company Preferences tab.
In the Select Default Accounts to Use box, select the Open the Create Paychecks checkbox or the Open Pay Payroll Liabilities checkbox, and specify a bank account from the drop-down list.
Time and Expense—Company Preferences
The Time and Expense preferences are set for all users. To set up time and expense preferences, follow these steps:
1. From the menu bar, select Edit, Preferences to open the Preferences dialog box, and select the Time & Expenses—Company Preferences tab.
2. Select Yes in the Time Tracking box if you plan to use timesheets to record employee work hours.
3. If necessary, change the First Day of Work Week from the drop-down list.
4. Placing a checkmark in the Mark All Time Entries as Billable is helpful if you create invoices for your customers that include the employees’ time on the invoice. This type of billing is often referred to as Cost Plus or Time and Expense billing.
Note
Do you invoice customers for time, expense, and a markup percentage? If yes, the Invoicing Options can help you with this task. For more information, see “Time and Expense Invoicing,” p. xxx.
Using the Payroll Setup Interview
The Payroll Setup Interview is helpful for new and existing QuickBooks payroll users. New users will appreciate how it walks you through setting up your first payroll.
For existing QuickBooks payroll users, the Payroll Setup feature helps you by identifying missing information necessary for properly preparing, reporting, and paying payroll. If you do not have all the information needed at the time of setup, select Finish Later to exit the Payroll Setup. You can return later to update the information.
Information Needed to Set Up Payroll
Before you begin to set up your payroll, you should collect the following information, where possible:
• Compensation types—Compile a list of the types of pay you offer, such as hourly, salary, overtime, vacation, and so on. You will establish a QuickBooks payroll item for each of these.
• Other additions or deductions to payroll—Some examples are dental insurance, uniforms, and union dues.
• Employee names, addresses, and Social Security numbers—Included in the employee provided Form W-4: Employees Withholding Allowance Certificate.
• Payroll tax payment schedules and rates—This refers to the frequency with which your business is required to pay payroll taxes, including the rate you pay for your state unemployment tax and other taxes.
• A year-to-date payroll register from your previous payroll system—If you’re transferring your payroll process to QuickBooks at any other time than the first of a calendar year, request a year-to-date payroll register and filed forms from your previous payroll system.
Note
If you have been using QuickBooks to prepare payroll, consider using the Run Payroll Checkup diagnostics. From the menu bar, select Employees, My Payroll Services, Run Payroll Checkup. To learn more about working with this feature, see “Using the Run Payroll Checkup Diagnostic Tool,” p. xxx.
→ For more information, see “Midyear Payroll Setup,” p. xxx.
• Any year-to-date payroll tax and other liability payments made before using QuickBooks—These help you prepare your startup payroll records in QuickBooks.
With this information collected, you are ready to begin using the Payroll Setup Interview. This handy tool uses a question-and-answer format to walk you through customizing your payroll settings. When it’s completed, you can begin preparing payroll checks for your employees.
Introduction
The Payroll Setup Interview guides you through adding the necessary payroll items so you can begin processing payroll.
After purchasing a payroll service subscription, launch Payroll Setup (see Figure 11.7) by selecting Employees, Payroll Setup from the menu bar. Optionally, click the link Payroll Item Checklist (not shown in Figure 11.7). Click Continue.
Figure 11.7. Selecting the right option for setting up payroll affects the menus provided in the QuickBooks Payroll Setup dialog box.

Choose one of the following that best describes your business payroll setup needs:
• The Company Has Never Issued Paychecks—You have not done so manually or through an accountant, or using another payroll service.
• The Company Is Changing to QuickBooks Payroll. Select this option if you have been using another method for preparing payroll during the current year.
The following instructions assume that no paychecks have ever been issued. Your menu options will differ if you selected Company Is Changing to QuickBooks Payroll.
Company Setup
The Company Setup introduction provides two methods for creating pay types and benefits:
• Typical New Employer Setup—QuickBooks automatically creates common payroll items, and then you can later add items. I recommend selecting this option.
• Custom Setup—Selecting this option enables you to create custom payroll items. If you are familiar with setting up payroll, you can use this method. You can make changes to your setup later in your QuickBooks file, if needed.
→ To learn more about adding custom payroll items, see “Adding or Editing Payroll Items,” p. xxx.
The following instructions assume that you selected Typical New Employer Setup. Click Continue to begin setting up your employees (see Figure 11.8).
Figure 11.8. Be sure to have your employees’ information ready when you run the Payroll Setup Interview so you can complete each of the required fields.
Employee Setup
You can work most efficiently with entering your employees if you have all the required information listed here. Complete the following information:
Tip
After completing some of the information, you have the option of Finish Later (lower left). When you choose Finish Later, QuickBooks retains the information you have entered, and you can return later to the Payroll Setup Interview to complete the missing information.
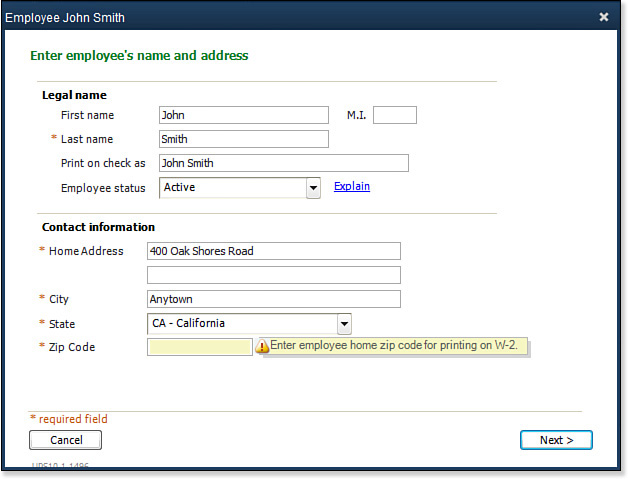
• Legal name.
• Contact information.
• Employee type—Regular, Officer, Statutory, or Owner—and other hiring information.
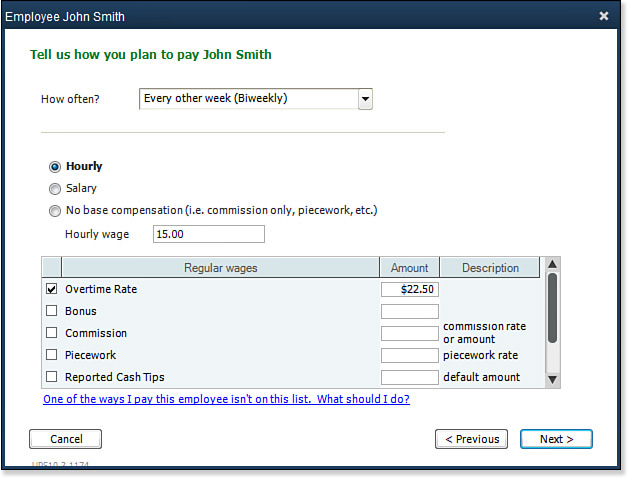
• Payroll schedule, pay type, and rate (see Figure 11.9).
Figure 11.9. Assign the pay frequency and rate to improve the accuracy of the prepared paycheck.
• Additions or deductions to employees’ payroll.
• Method of payment to use for the payroll—check, direct deposit to an Intuit Pay Card, bank account, or multiple direct-deposit bank accounts that split the amount.
• The employee’s state where worked and state subject to withholding taxes.
• Federal tax information from the employee’s Form W-4 and the proper withholdings and credits. Most employees’ wages are subject to Medicare, Social Security, and Federal Unemployment.
• State tax information and whether the employee is subject to any special local taxes.
Information required differs from state to state.
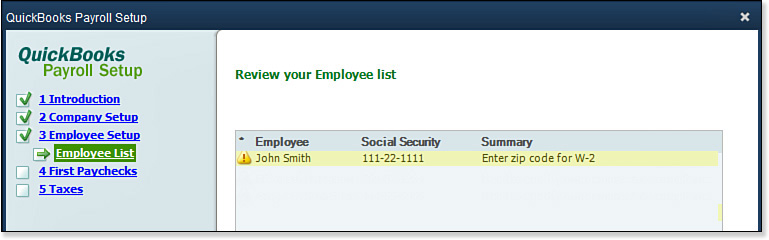
Click Finish (not shown in Figure 11.9) to complete the setup for employees. If you have not completed all the information, you might get a Missing Information error message, as in Figure 11.10. Read the information, and click OK to close the message or Cancel to return to the setup. Choose Add New to continue with the next employee setup, or select an employee from the list and click Edit, Delete, or Summary.
Figure 11.10. The QuickBooks Payroll Setup detects any setup errors or missing information.
First Paychecks
With the few steps you have completed, you can immediately create paychecks. If you are in a hurry to prepare paychecks, click First Paychecks, step 4 on the QuickBooks Payroll Setup dialog box. You have the following choices; however, I recommend completing the setup by selecting the second option listed next:
• Click the Create Paychecks button to return to the Payroll Center, where you can immediately pay your employees.
• Click the Continue button to Continue to Tax Setup, providing agency information (recommended).
Taxes
Continuing with the payroll setup, select the Taxes menu item in the Payroll Setup, review the tax items created automatically for you, and enter the rates your business pays for federal and state taxes:
• 941/944 Form—Identify which tax form you file.
• Federal Taxes—Review the federal payroll tax items created for you (you will add to or edit them later).
• State Tax—Click Add New to create a specific local/custom tax and define the state you are creating a payroll tax item for. Click Finish. Click Add New, Edit, or Delete. Click Continue when you have finished setting up state tax payroll items.
• Schedule Payments—Assign the tax item deposit method of check or E-pay, the payee, and the payment frequency. If you are uncertain what payment schedule your business should follow, contact your tax accountant; you also can click How Often Should I Pay These Taxes? for additional resources.
Caution
When a Fix This Error Now icon displays during Payroll Setup, heed the warning. If you don’t, your payroll transactions or reporting might be incorrect. See Figure 11.10 earlier.
Caution
If you are creating midyear payroll records, you need to complete each of the following: paychecks, tax payments, and nontax payments. Failure to complete each of these can result in misleading information in the QuickBooks payroll module.
Midyear Payroll Setup
In the accounting community, the term midyear refers to setting up payroll at any time other than at the beginning of the current calendar year.
This method is needed only for companies converting to QuickBooks payroll in a calendar year that had prior payroll produced using software or through a payroll service provider.
When you make the decision to begin using QuickBooks payroll in a year in which you already had payroll transactions, you can do the following:
• Manually re-create in detail all your previous payroll transactions. You do not need to follow the steps in this section.
• Record year-to-date totals for previously issued payroll checks and liability payments, following the steps in this section.
Note
The Enter Paychecks by Employee option will not create any accounting entries (it has no effect on the Balance Sheet or Profit & Loss). However, the entries will affect payroll reports and forms you file for your state and the federal government. The transactions entered here are used to enter year-to-date totals so that certain taxes on future paychecks calculate correctly and for completing quarterly and annual payroll forms using QuickBooks.
You will separately record the payroll liability balances for the Balance Sheet and payroll expenses for the Profit & Loss reports with a beginning trial balance entry provided by the company accountant.
Before you begin this process, make sure you have accurate records of the prior-period payrolls, preferably subtotaled by calendar quarter. To set up midyear payroll totals using Payroll Setup, follow these steps:
1. On step 1 of Payroll Setup (select Employees, Payroll Setup from the menu bar), select The Company Is Changing to QuickBooks Payroll. QuickBooks adds menus to the Payroll Setup that are necessary for completing YTD entries.
2. Complete steps 2–4, entering the required information for Company, Employee, and Taxes setup as detailed previously.
3. On step 5 (Year-to-Date Payrolls), select Determine if Needed.
4. Click Yes to answer the question Has Your Company Issued Paychecks This Year?
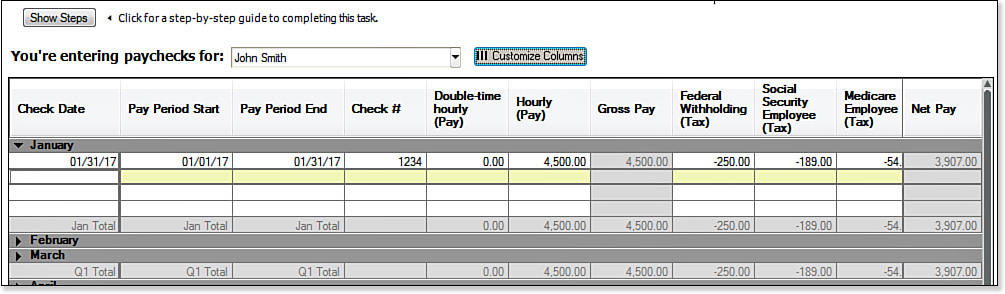
5. Click Continue. QuickBooks opens the Enter Paychecks by Employee dialog box, shown in Figure 11.11. This dialog box, with functionality similar to Microsoft Excel, streamlines the task of entering year-to-date payroll totals for your employees.
Figure 11.11. Use this worksheet in QuickBooks Payroll Setup to record prior-period paychecks from the same year.
Note
If you previously started using the Payroll Setup, step 5 instead displays the Payroll Summary. Click Edit next to the desired information you need to complete, including paychecks, tax payments, or nontax payments.
6. Click the Show Steps button to have QuickBooks provide a pop-up dialog box of the steps for entering the information to be typed in each cell.
7. Click the Customize Columns button to arrange the columns of data to match the reports from your prior software or payroll provider, which simplifies the data entry process.
8. To begin entering data for your employees, click the drop-down list for You’re Entering Paychecks For and select the employee name.
Caution
The Enter Paychecks by Employee dialog box allows you to enter only payroll check dates in the current calendar year (determined by the year on your computer).
9. Right-click to conveniently copy, paste, delete, or insert rows. This functionality is especially useful when entering repeating information, such as for salaried employees.
10. Conveniently check your monthly and annual totals as you type directly from the Enter Paychecks by Employee dialog box, to make sure your data entered agrees with your earlier payroll records.
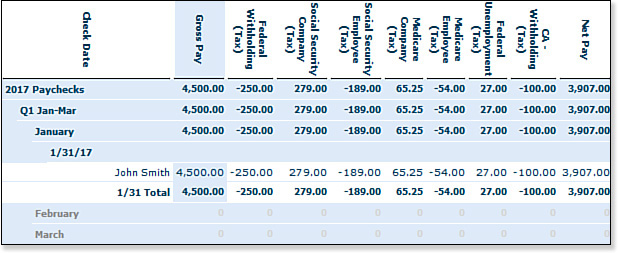
11. Click View Reports. QuickBooks includes the following two reports to help report on the accuracy of the setup details:
• Historical Paycheck Report—Basic—The report details the gross pay and any deductions or company expenses. Carefully review this report to make sure the totals match your earlier payroll records.
Note
After you click View Reports, if your computer has Internet security settings enabled, you might see a yellow bar near the top of your Internet browser. Click the yellow bar, select Allow Blocked Content, and click Yes if prompted.
• Historical Paycheck Report—Advanced—Click Switch to Advanced Report. The Advanced report compares the combination of historical paycheck detail with any employee or company payroll liability adjustments. If you correctly entered your historical payroll and adjustments (if needed), QuickBooks-Calculated amount column should equal your totals for those payroll tax items as reported to your federal and state governments.
After the reports display, you can print the report, export the report to Excel, or compress the report to fit on the printed page. See Figure 11.12.
Figure 11.12. The Historical Paycheck Report—Basic is useful to review and compare to the payroll records you have before using QuickBooks.
12. Click the X in the top-right corner to return to the Enter Paychecks by Employee dialog box.
13. Click the Done Entering Paychecks button to return to the QuickBooks Payroll Setup dialog box. As you enter each paycheck, tax payment, and nontax payment, the boxes will be shaded green progressively until each task is complete, making it easy to return where you left off.
Congratulations! You have completed the tasks necessary to set up your year-to-date payroll; you can now process new payroll transactions. This is a good time to complete the Run Payroll Checkup diagnostics the next section discusses.
Using the Run Payroll Checkup Diagnostic Tool
After you complete the payroll setup and you have created payroll checks or year-to-date entries in QuickBooks, you are ready to review your data using the Run Payroll Checkup diagnostic tool. This feature is similar to the previously listed Payroll Setup feature. In fact, when you open the Run Payroll Checkup diagnostic tool, it also opens the Payroll Setup feature, but some of the menu choices are different.
What makes the Run Payroll Checkup tool different from the Payroll Setup tool? After you have set up your payroll, you will most likely use the Run Payroll Checkup tool to diagnose errors with setup and transactions.
The QuickBooks Run Payroll Checkup gives you an option called Finish Later so you can return where you left off. Before you begin the Run Payroll Checkup dialog box, make sure you have the following information available, in case any of it is missing or incorrect:
• Employees’ names, addresses, and Social Security numbers.
• Compensation, benefits, and other additions or deductions your company offers.
• Missing or incomplete information when you originally set up the employees. Figure 11.10, earlier, showed an example.
• Compensation items, other additions, and deductions for missing or incomplete information.
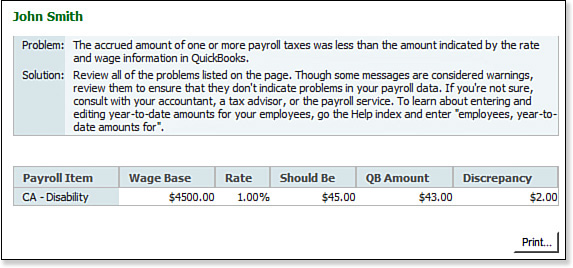
For existing data, review of actual wage and tax amounts provides an alert if any discrepancy arises. See Figure 11.13.
Figure 11.13. QuickBooks Payroll Setup detects certain payroll tax computation errors.
To have the payroll diagnostic tool in QuickBooks review your payroll setup for missing information and paycheck data discrepancies, do the following:
1. From the menu bar, select Employees, My Payroll Service, Run Payroll Checkup. Follow each of the dialog boxes, clicking Continue through each step.
2. In the Data Review dialog box, click Yes. QuickBooks reviews the wages and taxes in the payroll records.
3. If errors are detected, click the View Errors button. QuickBooks opens the error detail, as in Figure 11.13.
4. Click the Print button in the Payroll Item Discrepancies dialog box.
Tip
The Run Payroll Checkup diagnostic tool is optional for Intuit’s Basic or Enhanced Payroll subscribers. However, I recommend that you process the Run Payroll Checkup regardless of the payroll subscription you select. Using the tool as often as once a quarter before you prepare quarterly payroll tax returns can help ensure that your data is correct.
Be prepared to take the time to fix the errors detected. The QuickBooks Run Payroll Checkup diagnostic tool allows you to ignore warnings, but doing so might result in additional payroll calculation errors.
5. If you click the Continue button, you will need to fix some errors before you can proceed.
6. Click the Finish Later button to close the Run Payroll Checkup diagnostic tool so you can create correcting entries.
Using the errors displayed earlier in Figure 11.13 as an example, the following are the typical steps for correcting them. (Your errors will be different and might require adjustments to other types of payroll items than the ones detailed here.)
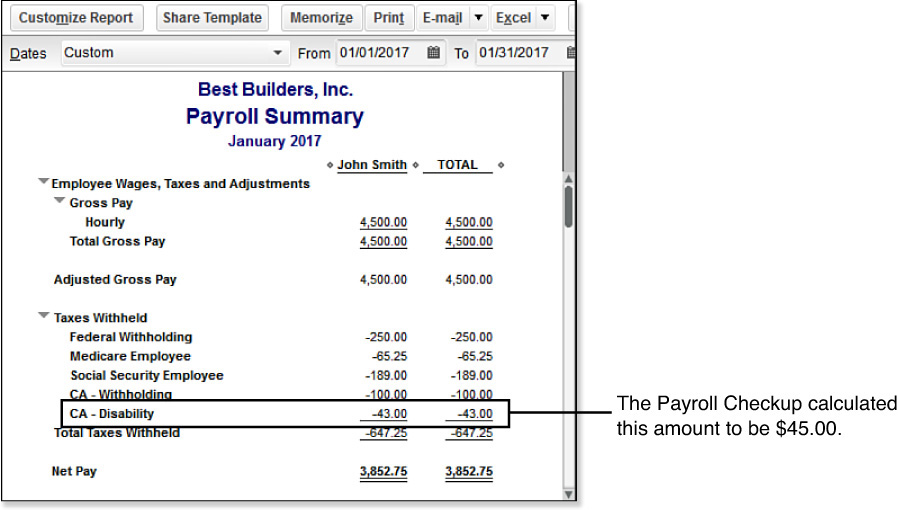
1. From the menu bar, select Reports, Employees & Payroll, Payroll Summary. Review this report for either earlier or current payroll quarters (depending on where the error was detected). In Figure 11.14, compare the Payroll Summary report to the Payroll Item Discrepancies report shown earlier in Figure 11.13. The Should Be amount should equal what your Payroll Summary report shows when prepared today.
Figure 11.14. The amounts included in the Payroll Summary report should match the Should Be amounts in the Payroll Item Discrepancies report.
Caution
Carefully consider the adjustments that need to be made if they affect an earlier calendar quarter you have already filed with the state or federal government.
Be prepared to promptly file a correcting return with the appropriate agency when you adjust your QuickBooks payroll data from what you previously reported.
Correcting earlier quarters can often be the best choice, especially if your data is ever audited.
2. From the menu bar, select Employees, Payroll Taxes and Liabilities, Adjust Payroll Liabilities, as in Figure 11.15.
Figure 11.15. Create a liability adjustment to correct any errors found in the Payroll Item Discrepancies report.
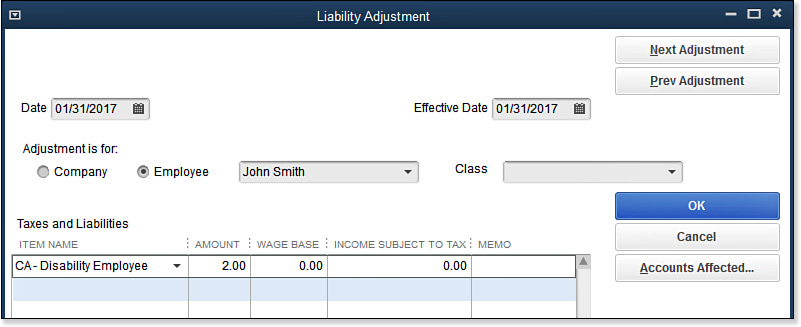
3. Enter the Date and Effective Date. Both should be dated in the quarter for which you want to make the change.
4. Select either Company or Employee for the adjustment. Company indicates it is a company-paid adjustment. Employee indicates an employee-paid adjustment and affects W-2 reported amounts.
5. (Optional) Assign a class if your business tracks different profit centers.
6. Click Accounts Affected only if you do not want the adjustment to affect liability and expense account balances. This would be necessary if your Balance Sheet is correct but the Pay Scheduled Liabilities balances in the Payroll Center are incorrect. Click OK to close the Accounts Affected dialog box (if displayed).
7. Click OK to save the transaction.
8. Return to the Run Payroll Checkup menu to review your payroll data again after the correction. If your adjustments were successful, QuickBooks displays a Congratulations message showing that all adjustments have corrected the discrepancies.
Setting Up Employees
If you are a new QuickBooks payroll user, I recommended using the Payroll Setup for adding payroll items and employees. You can return to the Payroll Setup to add employees or use the following instructions to add or edit employee information.
Using the Employee Center
QuickBooks makes adding, modifying, and researching employee activity easy from the Employee Center (see Figure 11.16).
Figure 11.16. The Employee Center provides one place to access common employee tasks and reports.
On the Home page, click the Employees button to open the Employee Center. Alternatively, you can click the Employees icon on the icon bar.
From the Employee Center, you can view contact details for your employees and access many payroll-related tasks to do the following:
• Add a new employee or edit an existing employee’s information
• Manage employee sales rep information and new employee defaults
• Print paychecks, paystubs, and other useful list information
• Enter time for employees
• Export to Excel employee lists and transactions
• Export to Excel Client-Ready Payroll Reports (requires a payroll service subscription for accounting professionals)
• Prepare employee letters and customize vendor letter templates using Word
• Filter the list of employees to include All Employees, Active Vendors, or Released Employees
• Attach documents to the employee record
• Access a map and driving directions to the employee’s address
• Add and edit employee notes and to-do reminders
• New for QuickBooks 2014! Track emails sent
• View and filter the list of transactions by employee or by transaction type
• Schedule To Do’s reminding you of important employee-related tasks
• Record miscellaneous Notes in the employee’s record
• Prepare a QuickReport, Payroll Summary, Paid Time Off report, or Payroll Transaction Detail report for the selected employee
Use the Employee Center to access many of the common employee transactions and reports you learn about in this chapter.
Caution
Is this your first time setting up employees in QuickBooks? You might want to start by using Payroll Setup. For more information, see “Using the Payroll Setup Interview,” p. xxx.
Adding or Editing Employee Information
Have you completed the steps outlined in the Payroll Setup? You can now easily add a new employee or modify the information for an existing employee in the Employee Center.
To practice adding a new employee record, open the sample data file as instructed in Chapter 1, “Getting Started with QuickBooks.” If you are working in your own file, follow these instructions to add a new employee:
1. From the menu bar, select Employees, Employee Center. Click New Employee.
2. Complete the fields in the Personal, Address and Contact, and Additional Info tabs. For this exercise, enter fictitious information into each of the fields. On the Additional Info tab, your QuickBooks version might offer a Billing Rate Level field. For more information, see “Billing Rate Levels,” p. xxx.
3. Select the Payroll Info tab. Select Biweekly for the payroll schedule, as in Figure 11.17. In your own file, click Add New to create a payroll schedule. Payroll schedules help you keep track of the next payroll processing date. Payroll schedules also facilitate grouping employees into different pay frequencies. For example, you might pay your field labor every week and your administrative staff biweekly. This is an example of setting up two different payroll schedules.
Figure 11.17. The Payroll Info tab should include each pay period’s earnings and deduction items.
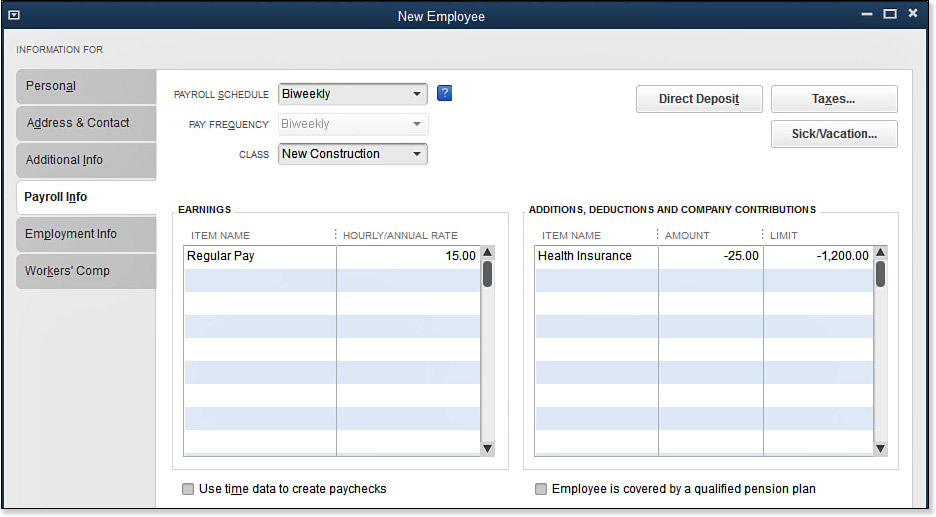
4. In the Class field, select New Construction. The option to assign a single class (department) to the entire paycheck or assign multiple classes to a single paycheck is defined in the Payroll & Employee preferences section. From the menu bar, select Edit, Preferences, Payroll & Employees, Company Preferences.
5. The Regular Pay wage item defaults in the Item Name column of the Earnings box. Type 15.00 into the Hourly/Annual column. To view other compensation items, click the down arrow next to Regular Pay.
6. For this exercise, do not select either of these options: Use Time and Expense Data to Create Paychecks, or Employee Is Covered by a Qualified Pension Plan.
7. Record other Additions, Deductions, and Company Contributions for this employee. In the Item Name drop-down list for this exercise, select Health Insurance. Type 25.00 into the amount column and accept the defaulted Limit—QuickBooks deducts this amount from each paycheck. The Limit allows you to set an upper limit and specify whether the limit is reset annually. You can define the Limit amount globally for all employees when setting up the deduction, or you can make the Limit a specific amount for each employee.
8. The Direct Deposit button is inactive in the sample data for this exercise. If this button is enabled in your own file, clicking it displays a QuickBooks dialog box to verify your company information, enter bank information, and select check security limits.
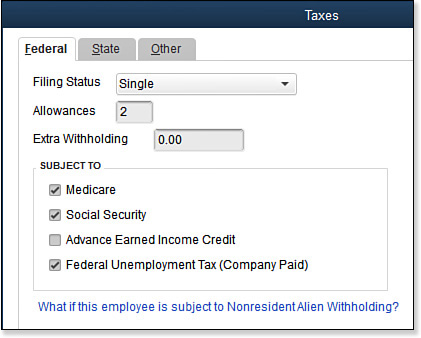
9. Click the Taxes button to see the information in Figure 11.18. The information selected in the fields on the Federal, State, and Other tabs determines how the respective taxes are calculated. Use the information on the employee’s completed Form W-4 when selecting Filing Status, Allowances, and Extra Withholding settings. Click OK to close. If you did not select a State Worked, you might be prompted to complete the setup.
Figure 11.18. Assign the employee’s federal, state, and other tax status.
10. Click the Sick/Vacation button. Use these settings to accrue and track employees’ sick and vacation time. Click OK to close.
11. (Optional) Click the Employment Info tab to record Employment Dates and Employment Details.
12. (Optional) Click the Worker’s Comp tab to assign the Worker’s Comp Code available with selected Intuit payroll subscriptions.
13. Click OK to close the New Employee dialog box.
Tip
Working in your own file, if you select Use Time and Expense Data to Create Paychecks, QuickBooks uses that time data from time cards to prefill the hours on a paycheck. This can save you time, making your payroll processing more efficient.
To learn more about using the QuickBooks Timer, see p. xxx.
Managing your employees’ information from the Employee Center is easy. To edit an employee’s information, select an employee on the left side of the dialog box and click the Edit Employee icon above and to the right of the employee’s contact information.
Finding Payroll Transactions
The Employee Center provides a central location for maintaining employee records and reviewing payroll transactions in QuickBooks.
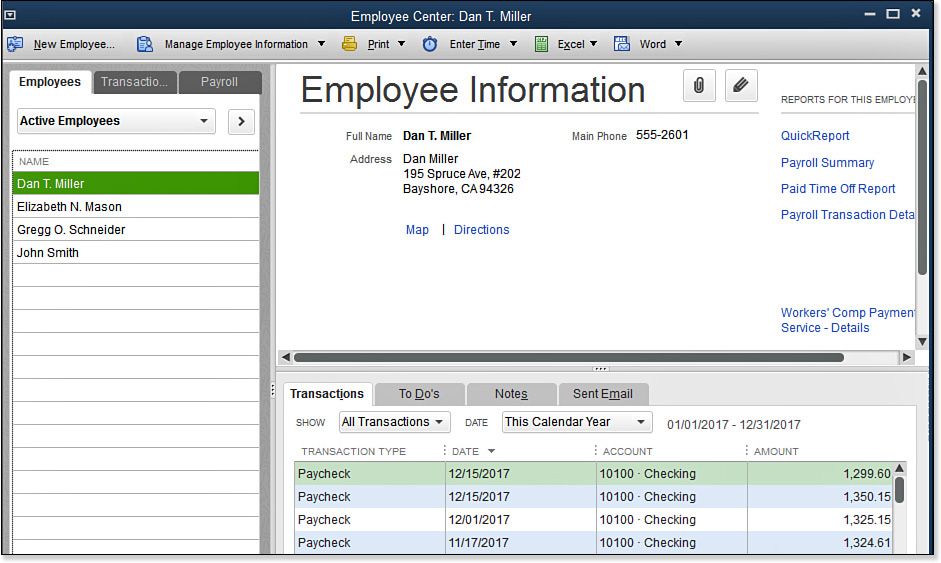
On the Home page, click the Employees button to open the Employee Center. Select an employee on the left side of the dialog box to display individual transactions assigned to that employee on the right. For example, with the employee Dan T. Miller selected in the Employee Center, QuickBooks displays individual transactions for that employee. See Figure 11.19.
Figure 11.19. Filter for specific transaction types and dates for the selected employee.
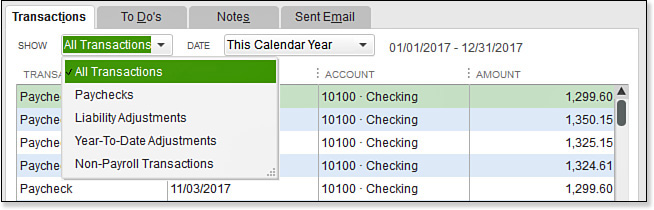
Another useful feature of working with the Payroll Center is on the Transactions tab. From the Transactions tab in the Employee Center, you can easily locate payroll and nonpayroll transactions for all employees. When reviewing payroll, it can be helpful to see what payments, if any, were paid to the employees using payroll transactions or payments made with other transaction types. Payments made to an employee not through a payroll transaction type are not included in state and federal payroll reporting.
You are now proficient in adding or editing an employee’s information. In the next section, you learn about managing your payroll items.
To practice finding employee transactions by type, open the sample data file as instructed in Chapter 1. If you are working in your own file, use these instructions to locate your own employee’s transactions.
1. From the Employee Center, click the Transactions tab.
2. Select the Liability Checks type, as in Figure 11.20.
Figure 11.20. Use the Transactions tab of the Employee Center to research by transaction type.
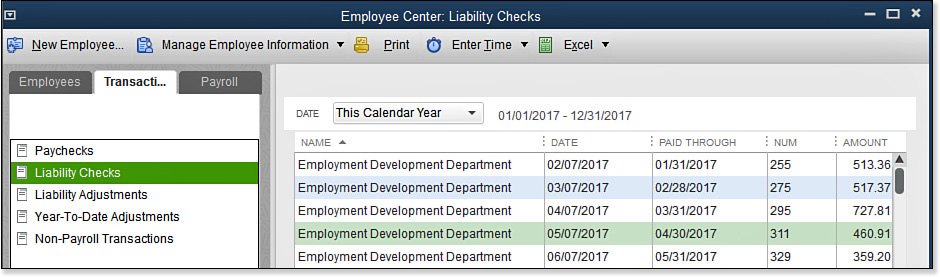
3. From the Date drop-down list, select This Calendar Quarter. (If you are using the QuickBooks-supplied sample data, the date selected might be sometime in the future.)
4. Click any column header to sort the data by that column.
5. Double-click any transaction to open it. Click Save & Close to return to the Transactions tab details.
6. Click the Print button to print the listed transactions.
7. Click the Enter Time drop-down list to enter a Weekly Timesheet or Time/Enter Single Activity.
8. Click the Excel drop-down list to choose from the following:
• Export Transactions—Exports the displayed transactions to an Excel worksheet.
• Client-Ready Payroll Reports—Available if you are using QuickBooks Accountant 2014 or QuickBooks Enterprise Accountant 14.0. A robust set of payroll reports is created for you using Excel.
• Summarize Payroll Data in Excel—A collection of useful payroll reports.
→ For more details, see “Excel Reports,” p. xxx.
Tip
To customize the information displayed, right-click in the column area of the transaction display and select Customize Columns. You can then choose to add or remove available columns of data and change the order in which the information is displayed.
Setting Up Payroll Items
QuickBooks uses payroll items to calculate and track compensation, additions, deductions, and company expenses that result from paying employees. You need to set up your payroll items only once, which makes processing payroll as easy as reporting the time an employee works.
Adding or Editing Payroll Items
If you are new to QuickBooks payroll, I recommend that you begin by using the Payroll Setup. During the Payroll Setup, you were provided with two options for creating your list of payroll items:
• Typical New Employer Setup—QuickBooks adds the most common payroll items for you.
• Custom Setup—Select this option if you need to set up sick time, vacation time, or insurance benefits.
If you have been using QuickBooks for payroll, you will no longer see these two options. The fields required to be completed will differ depending on the type of payroll item.
To add or edit a deduction payroll item, follow these steps:
1. From the menu bar, select Lists, Payroll Item List.
2. Select New from the Payroll Item menu (or use the Ctrl+N keyboard shortcut). You can also right-click a payroll item and choose Edit Payroll Item if you need to make changes.
3. Select one of the following methods:
• EZ Setup—Opens the Payroll Setup using standard settings, recommended for most users. To learn more about using this option, see “Using the Payroll Setup Interview,” p. xxx.
• Custom Setup—Offers a more traditional approach to setting up payroll items, recommended for expert users.
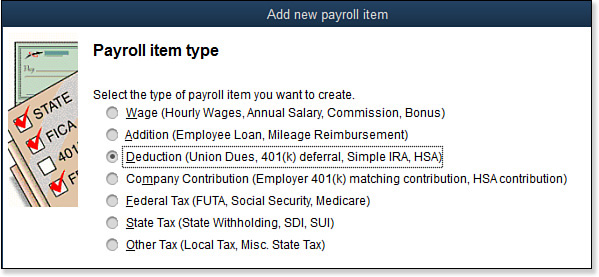
4. If you selected Custom Setup in step 3, the Add New Payroll Item dialog box displays.
5. Select a payroll item type, such as Deduction (see Figure 11.21), and then click Next.
Figure 11.21. Select the appropriate payroll item type to create.
6. Type a name for the payroll item. This name will display on paychecks and in reports. Selecting Track Expenses by Job might be suitable for most company contribution and addition items and would include costs to this payroll item in Job Profitability reports. Click Next.
7. On the Agency for Employee-Paid Liability screen, enter the following:
• From your vendor list, select the agency or vendor to which you pay the liability. If necessary, click Add New to create a new vendor record. Skip this field if the deduction is not being paid to anyone. For instance, Figure 11.22 shows how to establish a cell phone reimbursement item.
Figure 11.22. Payroll deductions can recover a portion of a business-paid expense.
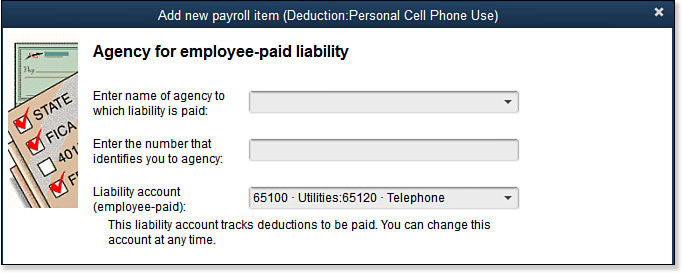
• If your liability vendor assigns an account number to your business, enter it into the account number field.
• Make a selection from your chart of accounts. In this example, the Telephone Expense account is selected. If the deduction payroll item is used to recover a business-paid expense from employees, select the corresponding expense account. Normally, you accept the default account of Payroll Liabilities. If you followed the previously recommended process for creating detailed payroll accounts on your chart of accounts, select the appropriate subaccount. Click Next.
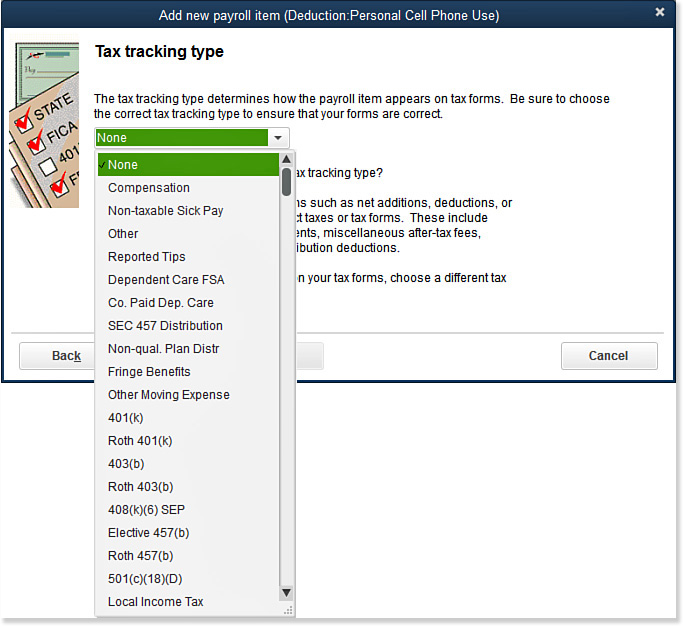
8. Select the appropriate Tax Tracking Type, or select None if none of the types applies, as in Figure 11.23. This choice is important to properly set up your payroll items. If you are unsure, ask your accountant for advice. Click Next.
Figure 11.23. Carefully reviewing the Tax Tracking Types can help with accurately setting up payroll.
9. The Taxes screen displays. In most cases, you do not need to modify the settings in this screen. Click Default to return to the original settings. Click Next.
10. The Calculate Based on Quantity screen offers the following choices:
Note
You can always edit the settings for a specific payroll item. However, some changes affect only future payroll checks, not those recorded before you make the change.
• Calculate This Item Based on Quantity
• Calculate This Item Based on Hours
• Neither
11. After making a selection, click Next.
12. Select an option for calculating the deduction: either Gross Pay or Net Pay. If you are unsure, ask your accountant; the correct selection depends on the item being set up. Click Next.
13. Enter a Default Rate and an optional Default Upper Limit, and specify whether the limit is annually reset, is monthly reset, or is a one-time limit. If the rate or upper limit differs for each employee, do not enter amounts here; you can add the rate and limit individually to each employee’s record. Click Finish.
14. Click OK after reading the Schedule Payments message. For more information, see “Creating or Editing a Payroll Schedule,” p. xxx.
Now that you have properly set up your payroll items, let’s learn about reporting on them. In the early stages of your payroll use, you should carefully inspect your setup to avoid any mistakes with payroll payments.
Reporting About Payroll Items
Reviewing your Payroll Item List after adding to or modifying it is prudent to make sure the changes are correct. Follow these steps for reviewing the payroll item list:
1. From the menu bar, select Lists, Payroll Item List (see Figure 11.24). QuickBooks displays the Payroll Item List dialog box.
Figure 11.24. View the Payroll Item List for information about the setup and accounts assigned to the payroll items.
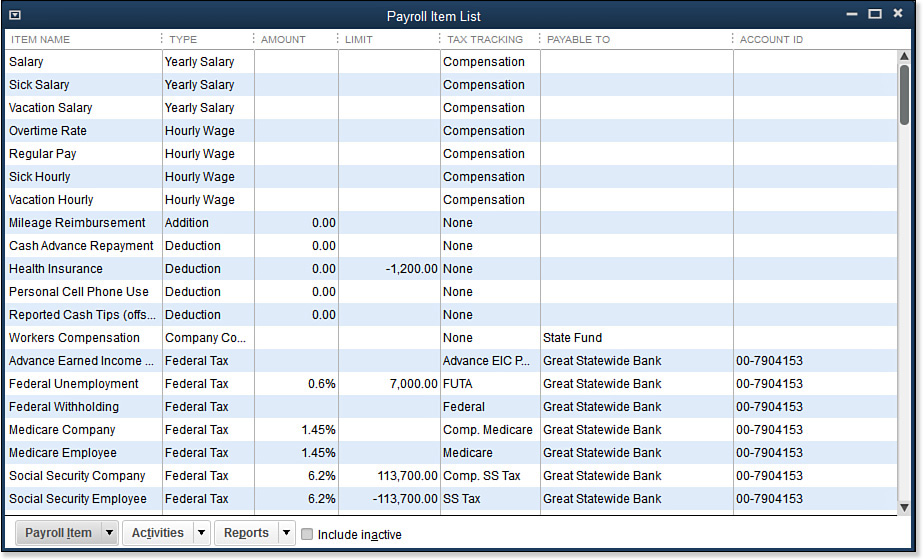
2. To expand the report for better viewing, double-click the words Payroll Item List in the title bar of the dialog box.
3. To add or remove columns, right-click and select Customize Columns.
The following information displays by default when viewing the Payroll Item List:
• Item Name—This name appears on paychecks and reports.
• Type—This comes from a predefined list in QuickBooks. The types are more wide ranging than that because they describe pay types and tax types, as well as additions and deductions.
• Amount—This figure is often determined by the QuickBooks-provided payroll tax tables, with the exception of addition and deduction calculations, which include amounts that the user can set as well.
• Annual Limit—This figure is often determined by the QuickBooks-provided tax tables, and the user cannot modify it. Incorrect limits for standard tax calculations could be the result of a payroll tax table that is not current.
• Tax Tracking—When you create a new payroll item and select a payroll item type, QuickBooks provides a predetermined list of tax tracking types associated with that item type. Tax tracking determines how QuickBooks treats the item on payroll returns and on the W-2 year-end employee tax form.
• Payable To—Checks are payable to the named entity.
• Account ID—This is the identification number your tax payment agency or payroll item vendor has assigned to your company.
• Expense Account—If the payroll item type is considered an expense, users can define the default expense account from the chart of accounts list in the payroll setup. QuickBooks defaults this account to a generic Payroll Expense account, which is created automatically by QuickBooks when payroll is enabled.
• Liability Account—This account is used for payroll items that are accrued with payroll and paid to the state or federal government. QuickBooks defaults these items to a generic liability account created when payroll is enabled. You can define what liability account is assigned. If you are creating a new account, it should be a subaccount of the one QuickBooks provides if you want to see certain warnings when you try to create a transaction incorrectly.
Tip
On the displayed Payroll Item List, to add or remove specific columns of data, right-click and select Customize Columns.
Additionally, from this screen view of the payroll item list, you can access the following:
• Payroll Item—Add, edit, delete, make an item inactive, find an item in transactions, and print a list.
• Activities—Access Payroll Setup and other common payroll item tasks.
• Reports—Access a summary or detail reports of payroll item transactions.
Congratulations! You have the needed items set up for preparing payroll for your employees. In the next section, you learn how to prepare and process your payroll. Take your time with the details; accuracy is everything when it comes to payroll processing.
Paying Employees
Having completed your Payroll Setup and Run Payroll Checkup, you are ready to begin paying your employees. If you previously paid your employees’ payroll with other software or by a payroll agency, record the year-to-date payroll totals for each employee.
→ For more information, see “Midyear Payroll Setup,” p. xxx.
The next sections provide details on preparing payroll for your employees.
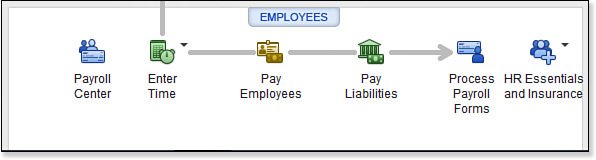
Payroll Home Page Workflow
With a paid payroll subscription, you might have all or some of the following icons on your Home page, providing easy access to the typical payroll workflow. Your icons might differ from Figure 11.25, depending on the payroll subscription purchased and the preferences you have set in QuickBooks.
Figure 11.25. The Home page provides access to the proper payroll workflow.
Entering Employee Time
QuickBooks includes weekly or single-activity timekeeping you can use to record employee work time and create paychecks. You can access timesheets by clicking the Enter Time icon on the Home page.
Note
Time tracking is enabled in the Preferences dialog box. From the menu bar, select Edit, Preferences to open this dialog box and then select the Time & Expenses—Company Preferences tab.
Timesheet entries can help you efficiently create payroll records each pay period. On the Payroll Info tab for each employee (refer to Figure 11.17), select the Use Time Data to Create Paychecks checkbox.
Using timesheets simplifies the process of creating payroll records if you track employees’ time by customers, jobs, or service items. Timesheets are not necessary if your employees are paid a fixed amount (salary) or work the same hours each pay period. Features of using timesheets in QuickBooks include the following:
• Using a stopwatch to time an activity as it is performed.
• Entering the time manually using a weekly timesheet or individually by the activity (see Figures 11.26 and 11.27).
Figure 11.26. Weekly timesheets can help you create payroll transactions.
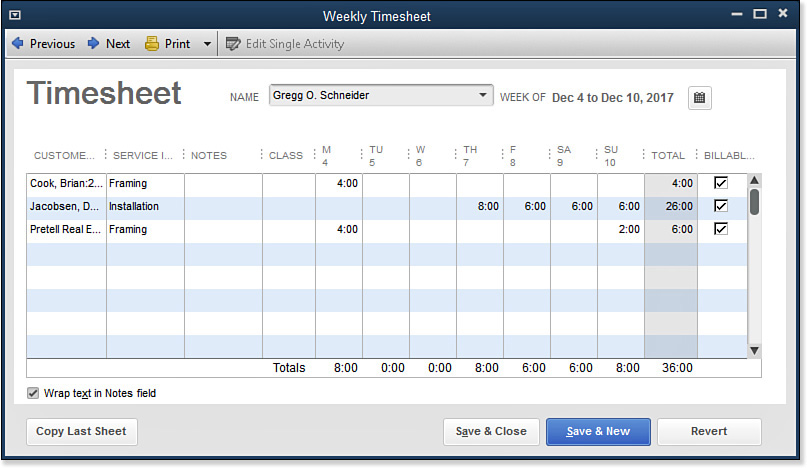
Figure 11.27. The Time/Enter Single Activity dialog box includes a stopwatch.
• Adding the time to a customer’s invoice. For more information, see “Time and Expense Invoicing,” p. xxx.
To record payroll timesheet activity, follow these steps:
1. On the Home page, click the drop-down arrow next to the Enter Time icon and select Use Weekly Timesheet or Time/Enter Single Activity. The following instructions presume you selected the Weekly Timesheet.
2. From the Name drop-down list, select the employee whose time you want to enter. If you want to enter multiple names, select Multiple Names (Payroll) from the top of the list. Adding multiple names to a timesheet can be useful if you have crew labor that works the same hours, on the same service items for the same customers or jobs.
Tip
Do you want to have employees track their own time on jobs at their computer, even if they do not have access to the QuickBooks file? Enter QuickBooks Timer in the search box in the upper-right corner of the menu bar, select Help from the drop-down list, and click the Search icon to the right. Follow the links for installing and working with the QuickBooks Timer.
→ For more detailed information and instructions, see “Using the QuickBooks Timer,” p. xxx.
3. Click Copy Last Sheet if you would like to repeat the detail from a previously recorded timesheet.
4. Enter data as needed (the user might not have time for each day, for instance) in each of the columns. Your columns might differ, depending on your purchased payroll subscription and the payroll preferences you enabled.
5. (Optional) Click the Print button to print the current timesheet with a signature line. If you want to print a blank timesheet, click the down arrow to the right of the Print button and select Print Blank Timesheet.
6. Click Save & Close when completed with the timesheet entry.
Using timesheets can help you enter payroll more efficiently, and you can print them for the employees to sign, approving the hours they will be paid.
Preparing Employee Paychecks
You are now ready to create paychecks for your employees. Following the instructions provided in this chapter can help make this process efficient and accurate.
Creating or Editing a Payroll Schedule
A payroll schedule defines the payroll frequency, the pay period end date, and the date that should print on the employee’s paycheck. If you create at least one payroll schedule, the Payroll Center displays the next scheduled payroll. Another use for payroll schedules is to separate your employees into different groups. If your business pays the administrative staff biweekly but your operations employees weekly, you would set up two payroll schedules.
To create or edit a payroll schedule, from the menu bar, select Employees, Add or Edit Payroll Schedules. Complete the information required and click OK to save the schedule. Press the Esc key on your keyboard to close the Payroll Schedule List.
Next, assign your employees to the newly created scheduled payroll.
→ For more information, see “Adding or Editing Employee Information,” p. xxx.
Paying Employees
To prepare your QuickBooks payroll paychecks, follow these steps. To help you along, when you prepare your first payroll, QuickBooks displays a “Welcome to Your First Payroll” message. After you review the details, click OK, I’m Ready!
1. On the Home page, click the Pay Employees icon. The Payroll Center opens (refer to Figure 11.2).
2. Select a Payroll Schedule and click Start Scheduled Payroll.
3. From the Enter Payroll Information dialog box, do the following:
• Accept the default Pay Period Ends and Check Date selections, or change as necessary.
• Place a checkmark next to each employee you want to pay. Optionally, click the Check All or Uncheck All button, in Figure 11.28.
Figure 11.28. The payroll information defaults from the scheduled payroll setup and employee’s salary or time sheet details.
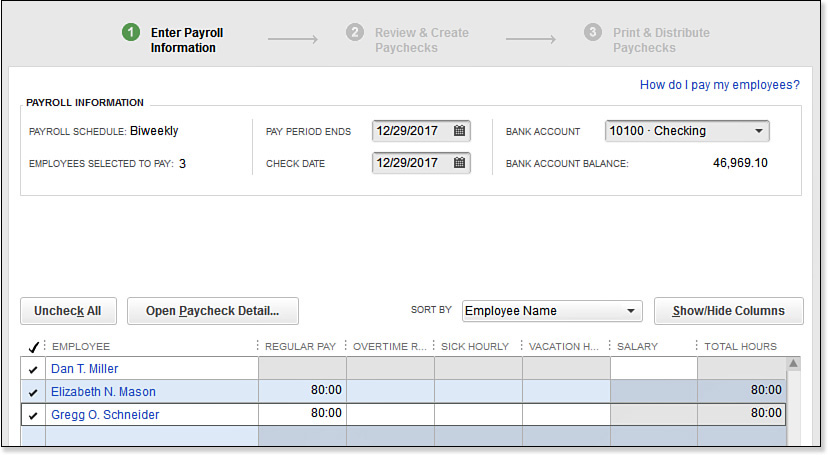
• Optionally, use Sort By and Show/Hide Columns to customize how the information displays.
• If time entered on a QuickBooks timesheet doesn’t appear for a given employee, verify that the employee record has the Use Time Data to Create Paychecks option selected (refer to Figure 11.17).
• Optionally, enter your employee’s hours in the Enter Payroll Information dialog box.
• Optionally, click the Open Paycheck Detail, to review or edit information not displayed on the Enter Payroll Information dialog box. Click Save & Next or Save & Close to return to the Enter Payroll Information dialog box.
4. Click Continue. The Review and Create Paychecks dialog box displays (see Figure 11.29).
Figure 11.29. Select paycheck printing options and review paycheck details.
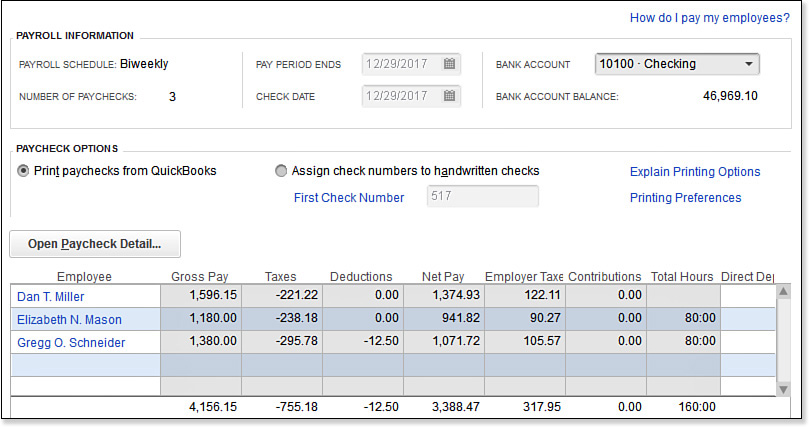
5. Change the Bank Account selection, if necessary.
6. Choose either Print Paychecks from QuickBooks or Assign Check Numbers to Handwritten Checks.
7. Click Create Paychecks.
The following section details printing of paychecks or paystubs.
Printing Paychecks or Paystubs
The last step in preparing payroll for your employees is printing the checks. You have two options:
• Print Paychecks—Prints on check stock for employees to deposit or cash.
• Print Paystubs—Creates a nonnegotiable document detailing the employee’s earnings. Use this dialog box when an employee is paid by direct deposit.
When you click Create Paychecks, the Confirmation and Next Steps dialog box displays (see Figure 11.30).
Figure 11.30. You can print paychecks now or print later by selecting File, Print Forms, Print Paychecks, or Print Paystubs from the menu bar.
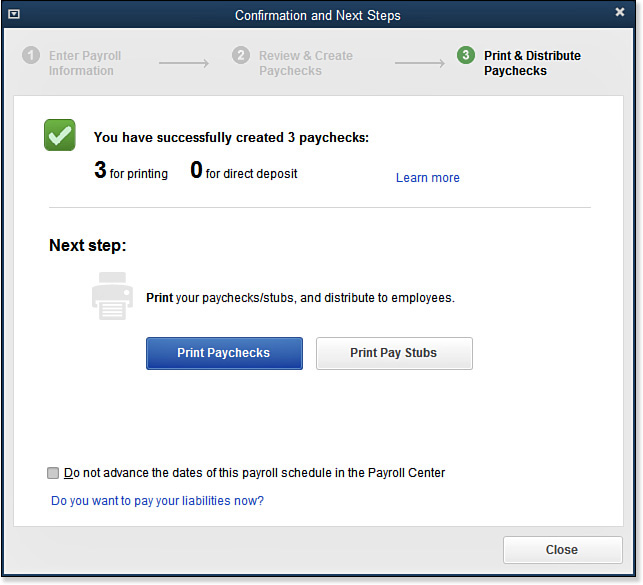
After successfully printing your employees’ paychecks, you should promptly pay the payroll liabilities, to avoid costly penalties and late fees.
→ To learn more about printer settings in QuickBooks, see “Setting Form Defaults and Making Printing Adjustments,” p. xxx.
Do your employees ask for information about previously paid payroll? Check out the next section for details on using the free service ViewMyPaycheck.
ViewMyPaycheck
With ViewMyPaycheck, a free service included with your QuickBooks payroll subscription, you can give your employees online access to their pay stubs, W-2s, and other payroll info. Access the information from any Internet connection or on your mobile device.
How does the ViewMyPaycheck service work? Following are the steps:
1. After subscribing to one of the QuickBooks integrated payroll subscriptions, from the menu bar, select Employees, Send To ViewMyPaycheck.com. This is a free service for companies that have a paid QuickBooks payroll subscription.
2. The ViewMyPaycheck dialog box displays. Click Connect.
3. The Intuit App Center displays. Here you create an Intuit Account or sign in to an existing account. Complete the fields as required.
4. You might get an If You’re Almost Ready message, indicating you have more than one Intuit Account and need to associate this service with the correct account. Click Continue.
5. A message displays with details about how the application ViewMyPaycheck will access your Intuit company data. Click Authorize.
6. A message displays that you are securely connected to ViewMyPaycheck. Click Return to ViewMyPaycheck.
7. If this is your first time signing up for this service, you will see a ViewMyPaycheck message. Select Send to send the latest paystubs to the service so employees can view and print them.
8. If prompted, click the Invite My Employees button or the I’ll Do This Later button. The ViewMyPaycheck dialog box displays in the administrator view (see Figure 11.31).
Figure 11.31. Invite employees to access their payroll information using the free ViewMyPaycheck service on the Internet or mobile device.

Logging in to ViewMyPaycheck as the Administrator (the original user who signed up for the service), you can access the following:
• Paychecks tab
• Choose either Print Pay Stub or Download/Save PDF.
• Filter paychecks listed for a specific date range.
• View paystub information, including Used and Available Paid Time Off.
• Taxes tab
• Enables W-2 Access. If you are an employee of the company as well as the ViewMyPaycheck administrator, you need to set yourself up as an employee and sign into the service.
• Provides a link for sending your QuickBooks W-2 data to ViewMyPaycheck.
• Manage Employees tab
• Manage administrators by adding new administrators or removing access.
• Enter employees’ email addresses and send invitations to set up access to view their own payroll information.
• Preferences tab
• Offers the option to send email notification to employees when pay stubs are uploaded.
• Shows all paychecks dated through today’s date or the latest paycheck date.
If you would like more information about this service, go to http://viewmypaycheck.intuit.com/.
Preparing Payroll Liability Payments
When your business pays employees, you also become responsible for paying the liabilities associated with the payroll to governmental and other entities.
Paying Scheduled Liabilities
To pay scheduled payroll liabilities, follow these steps:
1. On the Home page, click the Pay Liabilities icon. QuickBooks opens the Pay Liabilities tab in the Payroll Center. The Pay Scheduled Liabilities lists each payroll liability (amount you owe), with the Due Date, Status, Payment Description, Method, Period, and Amount fields (refer to Figure 11.4).
2. To process a payment, place a checkmark next to the payroll item you want to pay. (Optional) Double-click Amount to view a listing of the transactions that are included in the amount due.
3. Click View/Pay. QuickBooks prepares a Liability Payment for your review (see Figure 11.32).
Figure 11.32. QuickBooks payroll calculates the tax payments automatically.
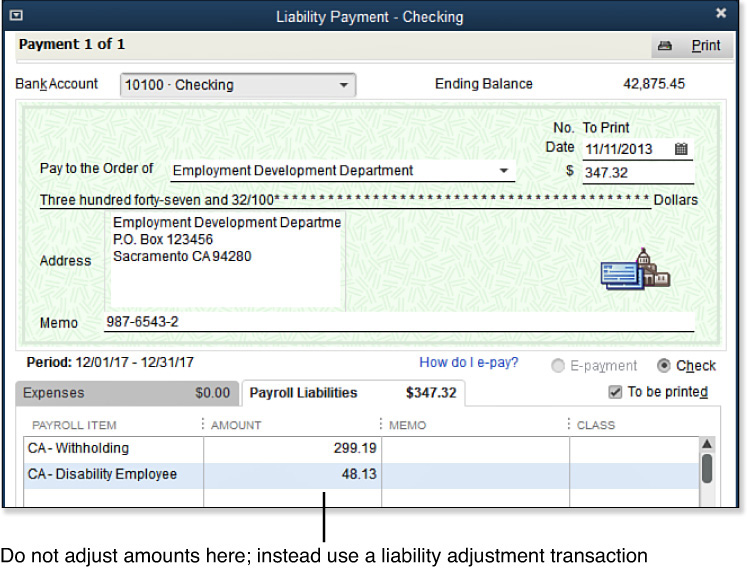
4. Change the Bank Account, if needed. The payroll items and amount included on the liability payment are calculated from payroll transactions. Check E-Payment to process your payment electronically, or for more information, click the How Do I E-Pay link.
5. Print the checks from the top-right Print icon, or print later by selecting File, Print Forms, Print Checks from the menu bar.
6. Click Save & Close when you are finished. The Payroll Liability Summary window displays. Click Print Checks, Print Summary, or Close.
7. Click the X in the top-right corner to return to the Payroll Center.
Caution
If you do not see all the payroll liabilities you accrue each pay period, you might not have the correct payroll liability due date assigned. From the Payroll Center, click Manage Payment Methods in the Other Activities at the bottom of the Pay Liabilities tab of the Payroll Center.
QuickBooks Payroll Setup displays. You can review and edit the Schedule Tax Payments and Benefits & Other Payment lists.
Adjusting Payroll Liabilities
QuickBooks automatically calculates payroll liabilities as you process paychecks. If you determine that an amount is not calculating correctly, review the settings for that payroll item.
Your accounting professional might choose to create a journal entry to correct the business financials. However, this type of transaction will not affect the amounts included in Pay Scheduled Liabilities in the Payroll Center or the payroll reporting forms. Instead, use the Liability Adjustment dialog box for changes to the amounts that are reported as liabilities and to affect federal and state reporting forms.
After reviewing your payroll reports detailed in Chapter 12, you can adjust payroll liabilities. To do so, follow these steps:
1. From the menu bar, select Employees, Payroll Taxes and Liabilities, Adjust Payroll Liabilities (refer to Figure 11.15).
2. Select the Date and Effective Date. These dates might affect your payroll reporting forms, so specify the date carefully.
3. Select Company if the adjustment is for a company-only payroll item, such as a company-paid health insurance benefit.
4. Select Employee if the adjustment is for an employee-reported liability or if you need to change the employee’s W2 amounts. Select Class if you are using this feature in QuickBooks.
5. From the Item Name drop-down list, select the payroll item or items to be adjusted.
6. Enter an Amount (positive or negative).
7. Enter the Wage Base (positive or negative) if the payroll item being adjusted is subject to a wage threshold similar to federal or state unemployment.
8. Enter the Income Subject to Tax (positive or negative) to adjust the amount reported on tax forms.
9. (Optional) Enter a Memo.
10. (Optional) Click Accounts Affected. The default is to affect liability and expense accounts. If your financials are correct but the payroll reporting and liabilities are incorrect, select Do Not Affect Accounts. Click OK to close the message.
11. Click Next Adjustment to add a record, or click OK to close the Adjust Payroll Liabilities dialog box.
It’s a good practice to review your payroll reports again after making the adjustments, to be certain they display the expected results.
This chapter has prepared you well for working with payroll processes. Join me in the next chapter for details on managing your payroll, including what reports to review and how to verify that your payroll data is correct.