Creating an Eyeball
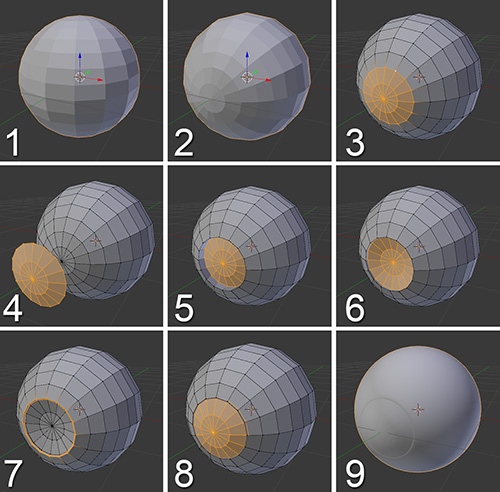
Jim’s eyes are drawn in kind of an animation/manga style (not completely round). The eyes are basically spherical, but to make them a little more realistic, you can create the cornea with the pupil beneath it. Figure 7.4 shows the process step by step and an explanation of what happens in each step follows.
1. In Object Mode, create a UV Sphere and, in the Operator panel, set it to have 16 segments and 16 rings.
2. Rotate the sphere 90 degrees on the X-axis so the poles are positioned at the front and back. This way, you’ll be able to use the circular edge loops on the front pole to build the pupil.
3. Enter Edit Mode by pressing Tab. Select the two edge loops of the front pole and the pole vertex. A quick way to do this is to select the vertex in the pole and then press Ctrl + NumPad + to increase the selection twice.
4. Press Shift + D to duplicate the geometry you selected in the previous step and move the new geometry out a little or, for now, hide it by pressing H. Later, this geometry will become the eye’s cornea.
5. Select the same geometry you selected in step 3 from the sphere and extrude it into the eye by pressing E on your keyboard.
6. Scale the selected geometry to invert its curvature by pressing S, then pressing Y to scale on the Y-axis, and then typing -1. Press Enter to confirm. Then, adjust the position of this geometry on the Y-axis so it fits into the eye in case the geometry moved out of alignment when you inverted it.
7. Select the outer edge loop of that inverted circular area and bevel it (Ctrl + B) so it will have a little more detail when you add the Subdivision Surface modifier later.
8. Press Alt + H to unhide everything and see the cornea you previously detached. Move it back to its place and even scale it up a little bit if it’s needed to cover the gaps that you made when beveling the borders.
9. Apply a Subdivision Surface modifier with two divisions. Go to Object Mode and, in the Tools Region, click the Smooth option so the eyeball doesn’t show the edges of all the flat faces.
Note
For this exercise, the lamp and the camera are in a different layer. Press M, select one of the squares, and then on the 3D View header you can turn those squares (layers) on and off. You’ll learn more about layers in future chapters. Alternatively, you can delete the lamp and the camera to get them out of the way until you need them in the final stages of the project. If you do this, though, you’ll need to create them later when you need them again.

