Building the Basic Hand Shape
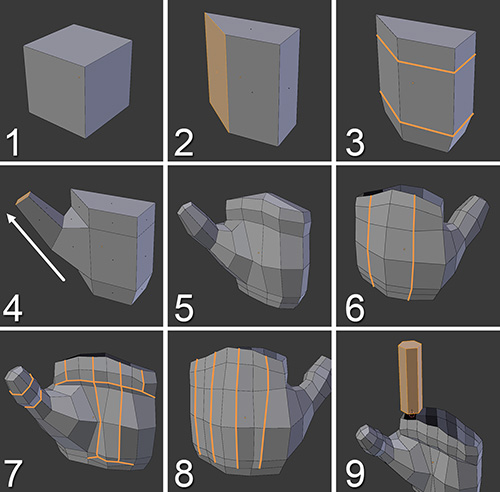
Figure 7.21 shows the modeling process for a hand. You can model it wherever you want and move and scale it later according to the rest of the model.
1. Start by creating a cube.
2. Make it narrower and move one of the edges to the middle of what will be the palm of the hand. The diagonal face left there will serve as the base for the thumb.
3. Add two loop cuts, one near the wrist, another one near the fingers. The fingers will be in the upper part of the shape.
Tip
Remember to keep adjusting the vertices as you add them; the sooner you make adjustments, the easier the modeling process will be later when you keep adding new vertices.
4. Select the base face and extrude it to create the preliminary shape for the thumb.
5. Select everything and, in the Specials menu (W), use the Subdivide Smooth tool to add geometry to work with. Notice how the vertices have been distributed in a way that forms the four finger bases at the top of the palm.
Caution
There are two major errors people commit when modeling hands at this stage: they model so the thumb grows from the side of the hand instead of partly from the front, and they make the other four fingers all the same height. Both of these errors can make your hand look very unnatural.
6. Delete the top faces (the base for the fingers) and, on the back of the hand, add two cuts to end up with the same four bases for the fingers.
7. Make some cuts as shown in the image. The purpose of these cuts is to create two edges on each side of the hand to prepare the geometry for connecting the fingers later. You can see how the outer cuts are made in such a way that they stay at the top of the hand, while the central cuts go almost to the wrist to help define the shapes of the palm. Also, add a couple of loops to the thumb to give it some detail.
8. Make some similar cuts on the back of the hand that will help define the tendons and knuckles. Look at how the cuts end before reaching the wrist. This allows you to extrude the flap of the glove with fewer edges later on and then arrange the topology with the Knife tool.
9. On top of the hand, create a cylinder with six vertices (and fill the top with an n-gon). This will serve as a preliminary shape for the fingers. You’ll model one of the fingers and then duplicate and modify those duplicates to create the other fingers.

