Blender User Interface
As mentioned before, Blender’s UI is different from the UI in other software. The main thing you’ll notice once you start using Blender’s interface is that it is made up of what are called areas (also known as frames). You can split and join areas to create your own workspace, depending on what you feel more comfortable with or what task you need to accomplish. If you need further help with the interface, you can find a video tutorial included on the book’s companion website (www.informit.com/title/9780133886177) with downloadable files that explain the basics of this chapter.
Each area can show different tool sets and views, called editors. Each part of Blender, or each task you can perform with it, is developed in a specific editor; for example, 3D View, Outliner, Timeline, Node Editor, and UV/Image Editor are some of the various types of editors you will encounter.
At any time, you can split an area and decide which editor you want to use in it, a feature that provides you with great flexibility as you work. You can also save different workspaces so that you can load the one you need very quickly without the need to set it up again.
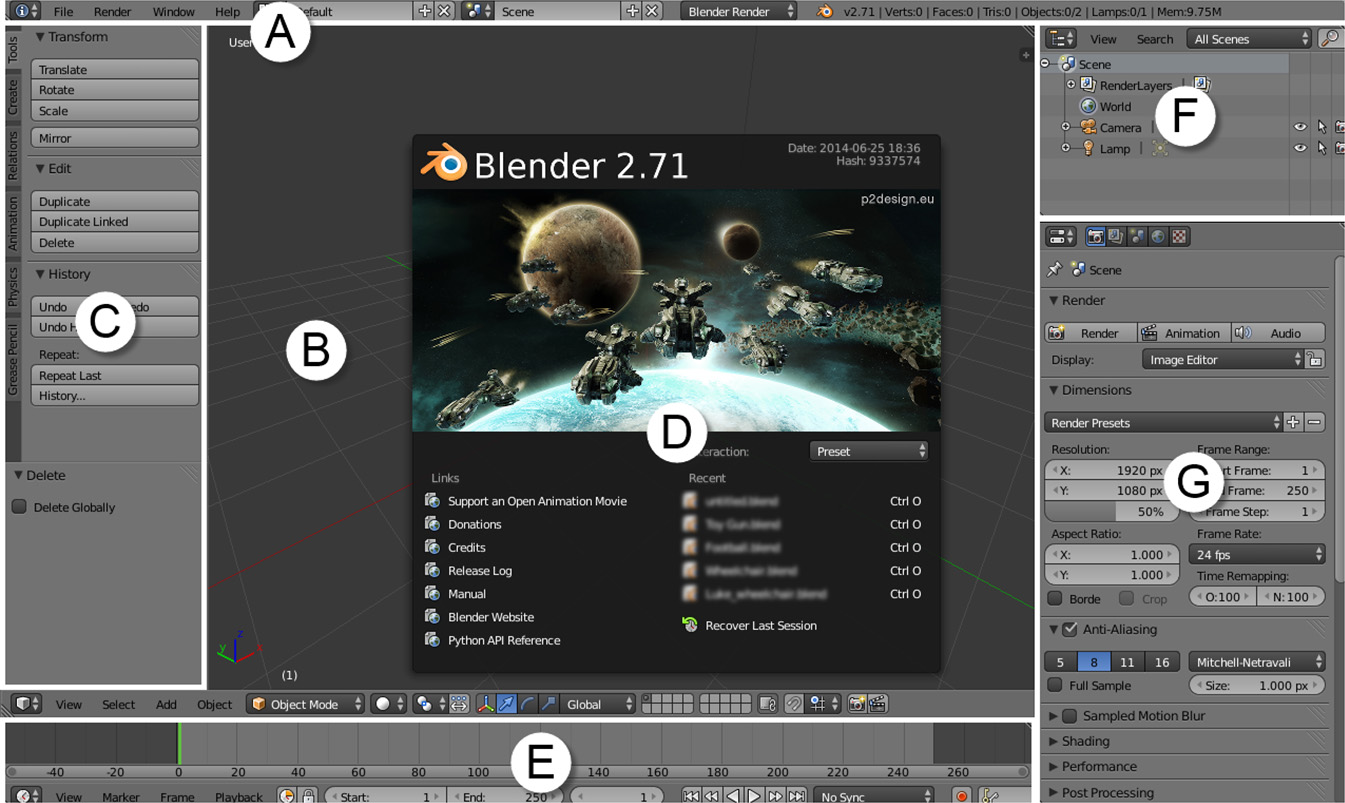
The following list describes what you will encounter the first time you use Blender (see Figure 2.1):
Info Bar (A): This is the main menu where you will find typical options like Save, Load, and Help. Also, there are two drop-down menus (Workspace is covered later in this chapter, and Scene lets you switch between different 3D scenes you can store in the same file), the Render Engine selector, and information about the current scene with which you’re working.
3D View (B): Here is where the magic happens, where you can create your objects, model and animate them, and add lights, for example. By default, you can see a grid that shows the colored axes (X is red, Y is green), a light, a cube, and a camera (all you need to launch a render to turn your 3D scene into an image).
Tools Region (C): Some editors, such as the 3D View shown in Figure 1.1, have their own regions where you can see certain options relevant to that specific editor. There are usually two types of regions: Tools and Properties. The one you see by default on the 3D View’s left side is the Tools Region, where you have access to common tools and actions.
Splash Screen (D): This screen appears as you launch Blender and it shows the version you’re using, interesting links about Blender, and options such as Help and Recent Files. If you just want to start using Blender, close the Splash Screen by clicking somewhere in the interface away from the Splash Screen.
Timeline (E): This section represents the time dimension in your scene (by default, in frames) and allows you to watch the animation, see where you have set animation keys or time markers, and locate the start and end of the animation.
Outliner (F): This area contains a schematic representation of the current scene, similar to a tree that you can collapse and expand. Here, you can check a list of every object in the scene and its relationships with other objects, or you can quickly select and find the particular object you’re looking for.
Properties Editor (G): This editor is probably one of the most important features of Blender. Here, you’ll find all the options you need for rendering. You’ll create materials, change the parameters of the selection, add modifiers, and much more.

