Using the 3D Cursor
Something you might not understand when you first open Blender is why there is always a circle in the middle of the view. What is its function? It’s the 3D cursor and it’s a special feature in Blender. While it can initially be a little disturbing, it becomes really useful once you’ve learned about it.
Here are the main functions of the 3D cursor:
![]() You can use it to set the location where new objects will be created.
You can use it to set the location where new objects will be created.
![]() You can use it to align objects.
You can use it to align objects.
![]() You can also use it as a pivot point to rotate or scale objects.
You can also use it as a pivot point to rotate or scale objects.
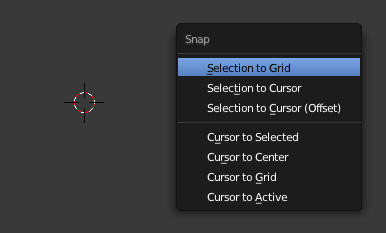
Press Shift + S to reveal the Snap menu (see Figure 2.10). It includes various options that are primarily used with the 3D cursor. It’s also divided into two sections: the first one transforms the selection and the second one places the 3D cursor. (At this point, you may not understand some of these Blender terms, such as transforms, vertices, or skeletons, or how to access them, but don’t worry; you’ll learn about them in the next chapters!)
For example, if you want to align an object to a specific place on the surface of another object, you can select a vertex of that object, then press Shift + S, and select Cursor to Selected. Select the other object, press Shift + S, and select Selection to Cursor.
By pressing , (comma) or . (period) on your keyboard, you can switch between using the Box Center Pivot and using the 3D Cursor Pivot. Sometimes, placing the 3D cursor and using it as a pivot to rotate or scale objects comes in very handy! For example, let’s say you want to pose a character. Thanks to the 3D cursor, you don’t need a skeleton for simple posing; you can select the vertices of the leg, place the 3D cursor in the articulation, and rotate those vertices using the cursor as a pivot point.
Tip
In the Blender User Preferences (Ctrl + Alt + U or in the File menu), on the Interface tab, you can find the Cursor Depth option. If you turn it on, when you click LMB over a surface, the 3D cursor will be placed on that surface, making it easier to align objects to the surface.

