
Chapter 6. Creating a Comic Book Page
Chapter Objectives
Chapter Learning Objectives
![]() Create custom page sizes.
Create custom page sizes.
![]() Add a grid of frames.
Add a grid of frames.
![]() Space content with the Gap tool.
Space content with the Gap tool.
![]() Place multiple images.
Place multiple images.
![]() Reuse and link content.
Reuse and link content.
![]() Check document spelling.
Check document spelling.
![]() Search and replace text.
Search and replace text.
![]() Use object and Creative Cloud libraries.
Use object and Creative Cloud libraries.
![]() Draw shapes with the Pencil tool.
Draw shapes with the Pencil tool.
![]() Create freeform shapes with the Pen tool.
Create freeform shapes with the Pen tool.
![]() Add type to a path.
Add type to a path.
![]() Create hyperlinks.
Create hyperlinks.
![]() Export for the web.
Export for the web.
Chapter ACA Objectives
For full descriptions of objectives, download the printable chart from your account on peachpit.com. See pages xi–xii.
DOMAIN 2.0
UNDERSTANDING PRINT AND DIGITAL MEDIA PUBLICATIONS
2.5
DOMAIN 3.0
UNDERSTANDING ADOBE INDESIGN CC
3.1, 3.2
DOMAIN 4.0
CREATING PRINT AND DIGITAL MEDIA PUBLICATIONS USING ADOBE INDESIGN
4.1, 4.2, 4.3, 4.4, 4.5, 4.6
DOMAIN 5.0
PUBLISH, EXPORT, AND ARCHIVE PAGE LAYOUTS USING ADOBE INDESIGN
5.1
The comic book project allows you to practice a lot of skills you learned in previous projects and try out some new techniques and features. For example, you’ll learn a quick-and-easy method for creating a grid of images that involves setting up automatic resize options for graphic placeholder frames. You will also learn a range of different techniques for reusing design elements, colors, and styles among documents, including working with the Content Collector tool as well as libraries. To ensure no spelling errors are left behind, you will perform a spelling check as well as find and replace text in the document. You’ll learn to use two new drawing tools, the Pencil and Pen tool, so you can create freeform shapes. In addition, you’ll find out how to place text on a path. Finally, you’ll create text- and object-based hyperlinks, and export the comic page for viewing on the web (Figure 6.1).

Creating Grid-Based Designs
Whether you work with photographic images, such as for this project, or cartoon drawings, you’ll start designing a comic book by creating a story idea and sketching up storyboards. Storyboards are rough sketches that outline what each panel in the comic book contains—images, captions, speech bubbles, and sound effects. There are different tools to use when creating storyboards. You can use pen and paper, or you can work in one of Adobe’s touch apps, such as Adobe Sketch or Adobe Illustrator Draw. These applications integrate with Adobe Photoshop and Illustrator. Whichever method you choose, invest a little time at the start to outline your ideas before jumping into creating your pages and adding placeholder frames for the comic panels.
Note
This chapter supports the project created in video lesson 6. Go to the Project 6 page in the book’s Web Edition to watch the entire lesson from beginning to end.
![]() ACA Objective 4.1
ACA Objective 4.1
Adding Reusable Page Sizes
The comic book project uses a nonstandard page size of 6.625 x 10.25 inches. If you frequently work on projects with nonstandard page sizes, consider adding a reusable custom page size to the Page Size menu in the New Document dialog box. Once you add a custom page size to InDesign, you can select it from the Page Size menu rather than entering the width and height values each time you create a new document.
To create a reusable custom page size (Figure 6.2):
1. Choose File > New > Document.
2. From the Page Size menu, select Custom.
3. In the Custom Page Size dialog box, enter a descriptive name for the page size in the Name field.
4. Enter your desired dimensions in the Width and Height Fields, and click OK.

Figure 6.2 When you add a custom page size, you can select it from the Page Size menu in the New Document dialog box, Control panel, and Pages panel.
The newly created page size appears at the top of the Page Size menu in the New Document dialog box. Each time you create a new document, you can now select the custom page size.
Note
You can also select the page size from the Edit Page Size menu at the bottom of the Pages panel, as well as the Page Size menu in the Control panel that appears when you select the Page tool (![]() ).
).
![]() ACA Objective 4.2
ACA Objective 4.2
Creating Frame Grids
To create the grid for the panels that make up the comic book page, you could start by adding ruler guides to the page (Layout > Create Guides) and manually adding graphic frames with the Rectangle tool. But why work that hard? Instead, you can work smarter by quickly creating an entire grid of frames.
To create a rectangular frame grid (Figure 6.3):
1. Select the Rectangle Frame tool (![]() ).
).
![]() Video 6.1
Video 6.1
![]() Video 6.2
Video 6.2
2. Start dragging a rectangle on the page, but do not release the mouse button.
3. As you drag, tap the Up Arrow key to increase the number of rows you are creating and tap the Right Arrow key to increase number of columns.
If you accidentally create too many rows, tap the Down Arrow key to decrease number of rows. To decrease number of columns, tap the Left Arrow key.
4. To increase or decrease the space (gutter) between the rows and columns, press Ctrl-tap (Windows) or Command-tap (Mac OS) the appropriate arrow keys.
5. Release the mouse button when you’re finished creating the grid.

Figure 6.3 Creating a grid of graphic frames by dragging to create a shape and pressing the arrow keys
A grid of frames appears on the page.
Tip
To set the gutter amount before dragging a grid of frames, choose Layout > Margins And Columns and enter a value in the Gutter field. Keep in mind that if you are working with a multicolumn document, changing the gutter amount also changes it on the active page.
Pressing the arrow keys to create multiple, evenly spaced objects works for any type of frame you create—ellipses, polygons, rectangles, even text frames. InDesign even automatically threads the text frames. You can also create a grid of images when pressing the arrow keys, as you drag with a loaded graphics icon that has multiple images loaded in it.
![]() ACA Objective 4.2
ACA Objective 4.2
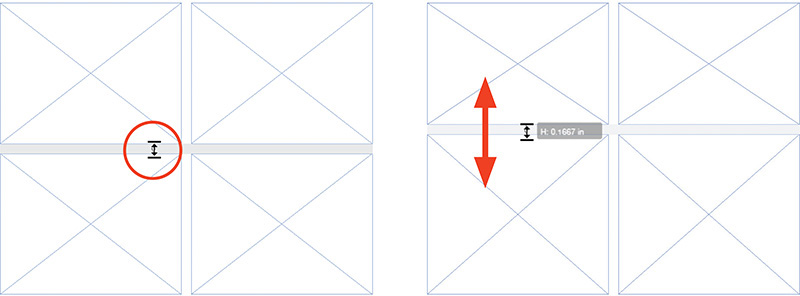
Using the Gap Tool
InDesign provides a tool that is ideal for editing grid-based layouts. The Gap tool (![]() ) lets you move and resize multiple objects that align. It snaps to objects that have their edges aligned, and it snaps to gaps between aligned objects. When you drag with the Gap tool, objects that are attached to the gap move with it.
) lets you move and resize multiple objects that align. It snaps to objects that have their edges aligned, and it snaps to gaps between aligned objects. When you drag with the Gap tool, objects that are attached to the gap move with it.
![]() Video 6.2
Video 6.2
To change a gap position (Figure 6.4):
1. Position the Gap tool between objects whose edges are aligned.
2. Drag the gap in the direction the arrows are pointing.
When working with the Gap tool:
![]() To reposition the gap for objects closest to the dragging point, Shift-drag in the direction the arrows are pointing.
To reposition the gap for objects closest to the dragging point, Shift-drag in the direction the arrows are pointing.
![]() To change the distance between objects, Ctrl-drag (Windows) or Command-drag (Mac OS) in the direction the arrows are pointing.
To change the distance between objects, Ctrl-drag (Windows) or Command-drag (Mac OS) in the direction the arrows are pointing.
![]() To move objects that snap to the gap, Alt-drag (Windows) or Option-drag (Mac OS) in the direction the arrows are pointing.
To move objects that snap to the gap, Alt-drag (Windows) or Option-drag (Mac OS) in the direction the arrows are pointing.
To have some real grid and gap fun, try working with combinations of the shortcut keys listed. For example, Ctrl+Shift-drag (Windows) or Command+Shift-drag (Mac OS), would change the distance for objects closest to the dragging point.
Consider the following to make the Gap tool work more efficiently:
![]() For images, enable the Auto-Fit option in the Object > Fitting > Frame Fitting Options dialog box.
For images, enable the Auto-Fit option in the Object > Fitting > Frame Fitting Options dialog box.
![]() For text frames, enable auto-sizing (Object > Text Frame Options).
For text frames, enable auto-sizing (Object > Text Frame Options).
![]() ACA Objective 4.4
ACA Objective 4.4
Fitting Content to Frames
You can apply frame-fitting controls to an empty placeholder frame before placing an image. This speeds up the placement process, especially when multiple placeholder frames are on a single page. After placing the image, using the Selection tool, click the Content Grabber in the center of the image. Drag the image inside the frame to adjust the crop, or Shift-drag the bounding box handles on the image to resize it within its frame.
![]() Video 6.3
Video 6.3
To specify a fitting option for a placeholder frame (Figure 6.5 and Figure 6.6):
1. Using the Selection tool (![]() ), select an empty graphics frame.
), select an empty graphics frame.
2. Choose Object > Fitting > Frame Fitting Options to display the Frame Fitting Options dialog box.
3. Select the preferred option from the Fitting menu.
4. In the Align From area, click one of the small squares to set the reference point.
The reference point controls the original placement position of the image in the frame before it is resized. With the center point active, the image is centered in the frame.
5. Click OK.

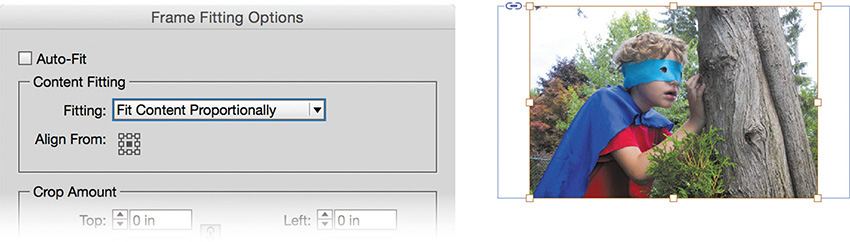
When you place photos, the Fill Frame Proportionally setting ensures the photo completely fills the frame and is not distorted. If the reference point is set to the center, the photo crops vertically or horizontally. With the Selection tool, click the Content Grabber in the frame to change the position of the image if necessary, or select one of the image’s bounding box handles and Shift-drag to resize the image and change the crop.
In most cases, logos, diagrams, and illustrations should not be cropped or distorted as they will lose their meaning. Imagine seeing only half of a logo on a page! For these types of graphics, use Fit Content Proportionally as the frame-fitting option. The graphic is sized so that it fits in the frame completely. The frame may be wider or narrower than the placed graphic. To adjust the size of the frame so it matches the size of the placed graphic, choose Object > Fitting > Fit Frame To Content.
![]() ACA Objective 4.4
ACA Objective 4.4
Placing Multiple Images
Until now you have placed images into your designs one at a time using the File > Place command. To speed up the placement of images, InDesign enables you to load multiple image files in the loaded graphics icon.
![]() Video 6.3
Video 6.3
With the loaded graphic icon, you can place an image into an empty placeholder frame, create a graphic frame as you click (to place the image at 100%), or create a graphic frame as you drag (to place the image at any size). Once you place one image, the loaded graphic icon is ready to place the next image.
Tip
You can even load images, graphics, text, and other supported files all at once, then place them throughout the document.
To place multiple images into empty placeholder frames (Figure 6.7):
1. Choose Edit > Deselect All before placing content into InDesign.
2. Choose File > Place.
3. Deselect Show Import Options.
4. Navigate to the images to place, and select the images to import.
To select a contiguous range of images click the first image, then Shift-click the last image. To select multiple, noncontiguous images, Ctrl-click (Windows) or Command-click (Mac OS) the images.
5. Click Open.
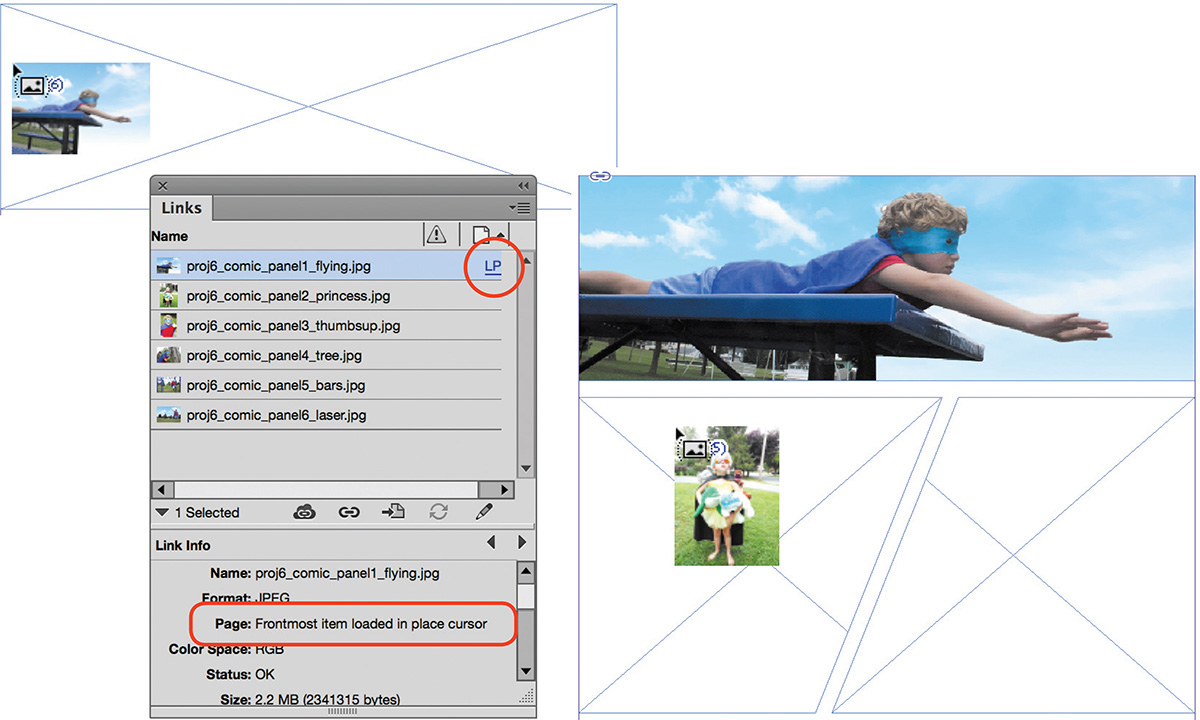
The number next to the loaded graphics icon (![]() ) shows how many objects are loaded. The preview provides a visual of the currently loaded object.
) shows how many objects are loaded. The preview provides a visual of the currently loaded object.
Tip
To see the names of the images in the loaded graphics icon, show the Links panel (Window > Links). The Page column in the Links panel shows LP for the image you’ll place next.
6. Press the arrow keys to toggle through the loaded images until the one you want to place is loaded.
Tip
To remove an image from the group of images loaded into the loaded graphic icon, make sure it is the top image and press Esc.
7. Position the loaded graphic icon over an empty graphic frame and click.
8. Repeat steps 6 and 7 until all images are placed.
With the images inserted into the frames, you can resize, transform, and position them further as needed.
Tip
The Control panel enables you to resize and transform images and objects, including adjusting the width, height, scaling, and rotation. When you do this, the Reference Point locator (![]() ) defines the point around which the resizing or transforming takes place. Click any of the nine boxes to change the reference point.
) defines the point around which the resizing or transforming takes place. Click any of the nine boxes to change the reference point.
Placing and Linking Content
When you are working on a project, you may want to reuse design elements from one part of a publication somewhere else. InDesign not only lets you do so easily, it also enables you to link the elements so a change to the original element quickly changes them all.
![]() Video 6.4
Video 6.4
Back in Chapter 3, you learned how creating an alternate layout retained links to parent objects from the original layout. Remember that this allowed you to make text and formatting changes in the parent layout, and use the Links panel to update the modified page objects in the child layout. Placing and linking individual page elements in InDesign uses the same parent-child analogy. True, you could easily choose Edit > Copy and Edit > Paste to duplicate page elements. If you wanted to make changes to all those duplicated page elements, however, you would need to edit each object manually. Using the placing and linking tools saves you all that extra effort. By creating a parent-child relationship between the original object and the copies you place in your document, you can make changes to the parent and quickly update all of its children.
Using the Content Collector and Placer Tools
Let’s look at the following example. The comic book for this project is called: The Adventures of Captain Toothless. Suppose you have created more comic book pages in the same document. On the other pages, the panels, text, and images are different but the heading remains the same.
Instead of copying and pasting the heading across the different pages, you can use the Content Collector tool (![]() ) and Content Placer (
) and Content Placer (![]() ) tool to place linked elements. The tools work in conjunction with the Content Conveyor, a panel that stores collected objects until they are used or removed.
) tool to place linked elements. The tools work in conjunction with the Content Conveyor, a panel that stores collected objects until they are used or removed.
With the Content Collector tool, you select page elements and load them into the Content Conveyor. Then, with the Content Placer tool, you can place objects from the Content Conveyor onto your pages.
Tip
Instead of adding page elements one by one, you can drag around a number of elements with the Content Collector tool and add a set. Sets retain the positional relationship between objects.
To load content into the Content Conveyor (Figure 6.8):
1. Select the Content Collector tool in the Tools panel. The Content Conveyor panel displays as soon as you select this tool.
2. With the Content Collector tool, click on page elements to add to the Content Conveyor.
3. With each page object you click on, the number next to the Content Collector icon increases, indicating the number of objects in the Conveyor.
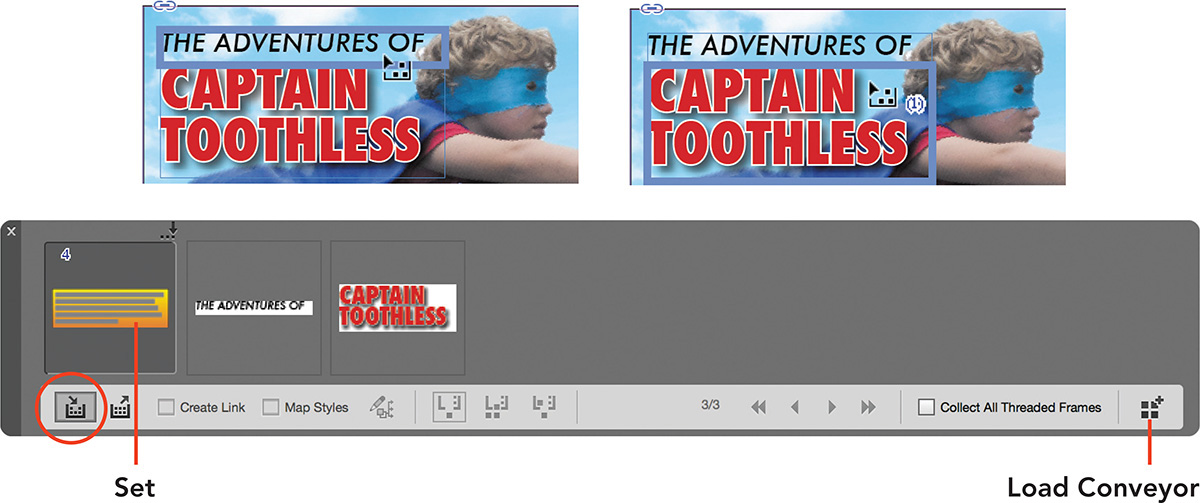
Figure 6.8 Page elements added to the Content Conveyor by selecting them with the Content Collector tool
You can also load content from the Content Conveyor. Select the Content Collector tool to show the Content Conveyor, then click the Load Conveyor and select an option from the Load Conveyor dialog box.
![]() Selection loads all selected objects on the page.
Selection loads all selected objects on the page.
![]() Pages loads content from one or more pages.
Pages loads content from one or more pages.
![]() All Pages Including Pasteboard Objects loads every page object.
All Pages Including Pasteboard Objects loads every page object.
![]() Create A Single Set loads all the page objects collected into a set.
Create A Single Set loads all the page objects collected into a set.
Tip
You can toggle between the Content Collector and Placer tools by clicking the tool icons at the bottom of the Content Conveyor.
With the Content Conveyor loaded with page objects, you can start placing them into your document.
To place and link content from the Content Conveyor (Figure 6.9):
1. Select the Content Placer tool (![]() ). It is hidden below the Content Collector tool.
). It is hidden below the Content Collector tool.
2. Select Create Link in the Content Conveyor.
3. The number next to the loaded cursor shows how many objects are loaded from the Content Conveyor, similar to when you place multiple images.
4. Press the arrow keys to toggle through the objects to load the object you want to place.
5. Navigate to the placement location, such as another page.
Tip
To remove any page objects from the Content Conveyor, press Esc when the Content Placer tool is selected.
6. Click to place the content on the page.
7. Repeat steps 4 to 6 to continue placing additional objects.
8. Click the close box on the Content Conveyor when you are finished placing objects.

By default, objects placed from the Content Conveyor are removed after placement. There are three different placement options to select in the Content Conveyor before placing content:
![]() Place Remove From Conveyor And Load Next lets you place an object once, and removes the object from the Content Conveyor after placement.
Place Remove From Conveyor And Load Next lets you place an object once, and removes the object from the Content Conveyor after placement.
![]() Place Multiple And Keep In Conveyor lets you place an object multiple times.
Place Multiple And Keep In Conveyor lets you place an object multiple times.
![]() Place And Keep In Conveyor And Load Next doesn’t remove the object from the Content Conveyor after placement, and loads the next object into the cursor.
Place And Keep In Conveyor And Load Next doesn’t remove the object from the Content Conveyor after placement, and loads the next object into the cursor.
![]() ACA Objective 4.5
ACA Objective 4.5
![]() ACA Objective 5.1
ACA Objective 5.1
Updating Links
When you use the Create Link setting in the Content Conveyor, placed objects link to their parent. With the Screen Mode set to Normal and View > Extras > Show Link Badge enabled, a link icon appears on the top right of the placed object.
If you make changes to the parent object, the Link Badge on the child objects change to a modified link (![]() ). Additionally, the Links panel also shows modified links (Figure 6.10).
). Additionally, the Links panel also shows modified links (Figure 6.10).

Figure 6.10 Updating the header, and updating the linked content on the next comic book page that uses the same header
To update the modified links:
![]() Click the Link Badge, or choose Update All Links from the Links panel menu.
Click the Link Badge, or choose Update All Links from the Links panel menu.
![]() ACA Objective 4.5
ACA Objective 4.5
Using Place and Link
Separate from the Content Collector and Placer tools, InDesign has a Place and Link command that automatically loads a selected object into the Content Conveyor. The feature then loads the object into the Content Placer tool for easy placement, and selects the Create Link option in the Content Conveyor.
Tip
To place the same object multiple times, select Place Multiple And Keep In Conveyor in the Content Conveyor before placing, and press Esc when you’re finished.
This is a great shortcut to use when you want to quickly place and link a single object elsewhere in the document or on the page.
To use the Place And Link command (Figure 6.11):
1. Using the Selection tool, click a page object to select it.
2. Choose Edit > Place And Link.
3. With the loaded cursor, click on any page to place the object.

Figure 6.11 Using Place And Link to quickly place multiple instances of a caption text frame on the comic book page
Preserving Changes
When you update a modified child link, the appearance of the object, including its content, updates according to the parent object. In the previous Place And Link example, additional caption text frames were added. After adding the linked text frames for the captions (the child objects), the text inside the frames was changed, and their size and shape was altered. Making a change to the appearance of the parent caption would result in all of the captions resetting to the exact appearance and content that the parent contains.
That would not be a good thing, as it would require retyping the caption text plus making the size and shape changes once more. Thankfully, there is a way to control which changes (local edits) that you make to a child object are preserved when updating the links.
To preserve certain changes applied to child objects (Figure 6.12):
1. Select the objects on the page or in the Links panel.
2. From the Links panel menu, select Link Options.
3. In the Link Options dialog box, select any of the following settings to preserve changes made to them:
![]() Appearance: Keeps fill color, stroke color and weight, corner options, and effects changes.
Appearance: Keeps fill color, stroke color and weight, corner options, and effects changes.
![]() Size And Shape: Keeps changes made to width, height, transformations (such as rotation), and other object shape changes, like moving an anchor point to a different position with the Direct Selection tool.
Size And Shape: Keeps changes made to width, height, transformations (such as rotation), and other object shape changes, like moving an anchor point to a different position with the Direct Selection tool.
![]() Interactivity: Keeps buttons and forms settings, animation, timing, and object states (you will learn more about these in the next chapter).
Interactivity: Keeps buttons and forms settings, animation, timing, and object states (you will learn more about these in the next chapter).
![]() Frame Content: Retains edited content within the frame, such as images, text, or video.
Frame Content: Retains edited content within the frame, such as images, text, or video.
![]() Others: Leaves changes to a number of other edits, such as Text Frame Options, text wrap, and hyperlinks intact.
Others: Leaves changes to a number of other edits, such as Text Frame Options, text wrap, and hyperlinks intact.
4. Select Warn If Link Update Will Overwrite Local Edits to display a warning dialog box if any local edits will be changed when updating modified links.
5. Click OK.
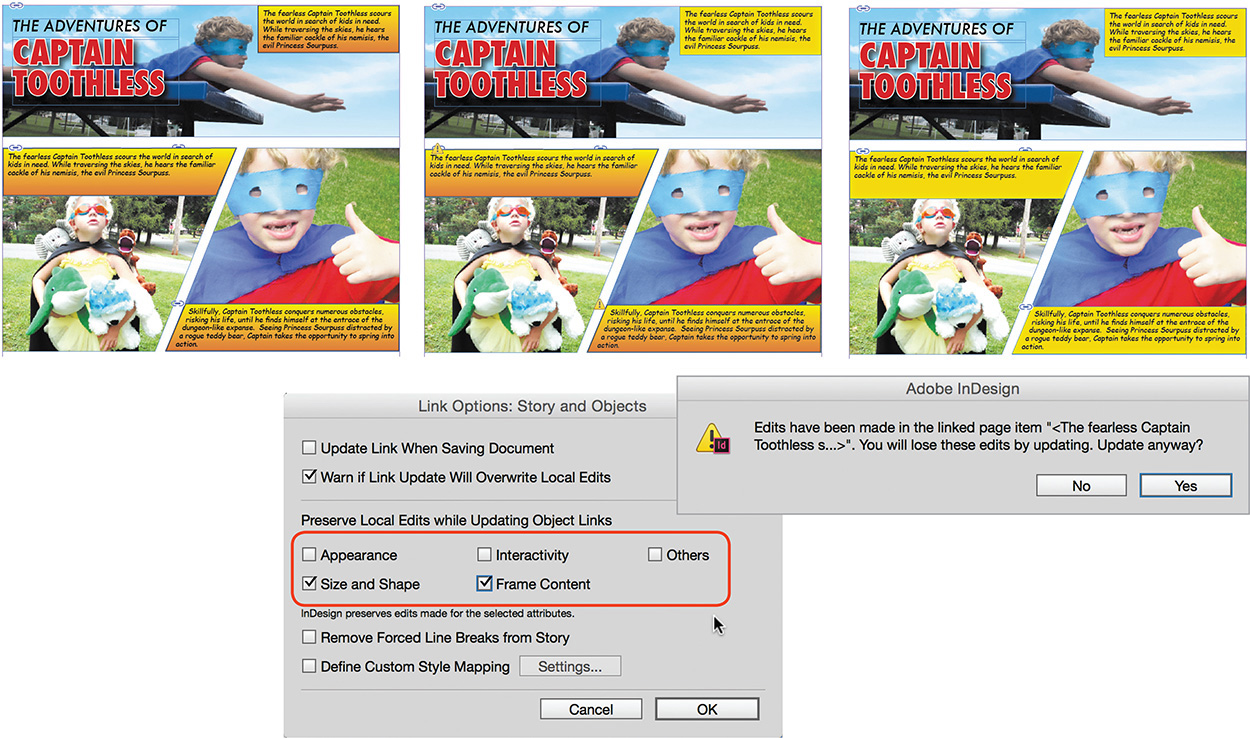
Figure 6.12 Controlling which design attributes are preserved when updating modified links for child objects
With the Link Options set for the child objects, you can now update the links.
Making Text Changes
Text submitted by clients is often prepared in word-processing applications, such as Microsoft Word. Although these applications have built-in tools for checking spelling and finding and replacing text, you will likely need to edit text after completing a layout. To help you, InDesign has its own spelling checker and find-and-replace features.
![]() Video 6.5
Video 6.5
![]() ACA Objective 4.3
ACA Objective 4.3
Checking Spelling
InDesign’s check spelling feature looks through the text of a document and detects incorrectly spelled words, capitalization errors (such as a lowercase letter at the start of a sentence), and repeated words (such as “and and”).
Text is checked against a dictionary for the language that is applied to the text. You can change the language by selecting text, and selecting a language from the Language menu in the Control panel (character formatting controls) or the Character panel. Changing the language for selected words can be handy when French words appear in English documents for example. A language can also be applied through character and paragraph styles (Figure 6.13).

To check spelling for a document (Figure 6.14):
1. Choose Edit > Spelling > Check Spelling.
Tip
To control what text in the document is checked, select an option from the Search menu in the Check Spelling dialog box. You can check selected text (Selection), the text in a series of threaded text frames (Story), all text in the document (Document), or all open documents (All Documents).
The Check Spelling dialog box opens, and the first suspect word in the text is highlighted.
2. Select the correctly spelled version of the highlighted word from the Suggested Corrections, or enter the correct spelling in the Change To field.
3. Click Change to update just this occurrence of the error, or click Change All to fix all occurrences of this error. The next suspect word is highlighted.
To ignore a spelling error, because it might be a company name or special term that does not appear in the dictionary, click Ignore or Ignore All. Alternatively, you can click Add to include the word in the User Dictionary, so that future occurrences will not be flagged as an error.
4. Repeat steps 2 and 3 until the spelling check is complete, and click Done.

Performing Find/Change
InDesign’s Find/Change command is a powerhouse that lets you search for content and replace it with something else in the document. This speeds up the process of making text changes throughout your project.
In addition to performing simple text changes throughout a document, such as replacing the word “captain” with “colonel,” you can also use Find/Change to:
![]() Search for advanced pattern-based text strings with GREP, a language that codes the finding of patterns in text, for example, any text in brackets, and make changes.
Search for advanced pattern-based text strings with GREP, a language that codes the finding of patterns in text, for example, any text in brackets, and make changes.
![]() Search for Glyphs, and replace them. Glyphs are special characters you can insert into text with the Type > Glyphs panel. Double-clicking a character in the panel inserts it at the text insertion point.
Search for Glyphs, and replace them. Glyphs are special characters you can insert into text with the Type > Glyphs panel. Double-clicking a character in the panel inserts it at the text insertion point.
![]() Search for object formatting, such as stroke or fill colors, and change the settings.
Search for object formatting, such as stroke or fill colors, and change the settings.
![]() Search for text formatting, such as font and size, and replace the settings.
Search for text formatting, such as font and size, and replace the settings.
To search and replace text (Figure 6.15):
1. Choose Edit > Find/Change.
2. Click the Text tab in the Find/Change dialog box.
3. Enter the text to search for in the Find What field.
4. Enter the replacement text in the Change To field.
5. Under Direction, select Forward to search from the current page through to the following pages.
6. Click Find Next to find the first occurrence of the search word.
7. Click one of the change options:
![]() Change: Replaces only the found text.
Change: Replaces only the found text.
![]() Change All: Replaces all occurrences of the found text.
Change All: Replaces all occurrences of the found text.
![]() Change/Find: Replaces the found text, and immediately moves forward to the next occurrence.
Change/Find: Replaces the found text, and immediately moves forward to the next occurrence.

Tip
For common document cleanups, such as removing double paragraph returns, or spaces, select one of the preset searches from the Query menu at the very top of the Find/Change dialog box.
Working with Libraries
As you work on design projects, you’ll find that you reuse design elements, such as caption boxes, speech bubbles, images, text, colors, and styles. This occurs not just within the same project, but across projects. Libraries can make those frequently needed elements available to you at any time.
InDesign offers two types of libraries, both of which appear as a panel.
![]() Object libraries: These libraries are files that you create; they are stored on your local computer. They can only contain objects, such as text frames, image frames, and groups of objects; these objects may or may not have contents (Figure 6.16). While you can share your library files with other designers, you can’t provide live updates to the objects in them. You simply each have your own copy of the library.
Object libraries: These libraries are files that you create; they are stored on your local computer. They can only contain objects, such as text frames, image frames, and groups of objects; these objects may or may not have contents (Figure 6.16). While you can share your library files with other designers, you can’t provide live updates to the objects in them. You simply each have your own copy of the library.

![]() Creative Cloud libraries: These libraries are part of the Adobe Creative Cloud, and are used to store objects similar to object libraries, as well as color themes, colors, paragraph and character styles, and Adobe Stock images. The same libraries and assets appear across Adobe applications (such as Photoshop and Illustrator) and Adobe mobile apps (such as Adobe Capture CC). You can share CC Libraries among users, which makes them a great tool for working collaboratively with other designers (Figure 6.17).
Creative Cloud libraries: These libraries are part of the Adobe Creative Cloud, and are used to store objects similar to object libraries, as well as color themes, colors, paragraph and character styles, and Adobe Stock images. The same libraries and assets appear across Adobe applications (such as Photoshop and Illustrator) and Adobe mobile apps (such as Adobe Capture CC). You can share CC Libraries among users, which makes them a great tool for working collaboratively with other designers (Figure 6.17).

Note
Collaborators to CC Libraries must be Creative Cloud members.
![]() ACA Objective 4.5
ACA Objective 4.5
Working with Object Libraries
Object libraries work well when you work on a project alone and only want to store InDesign objects. First, you need to create a library file, and then you can add objects to it.
![]() Video 6.6
Video 6.6
Creating a Library
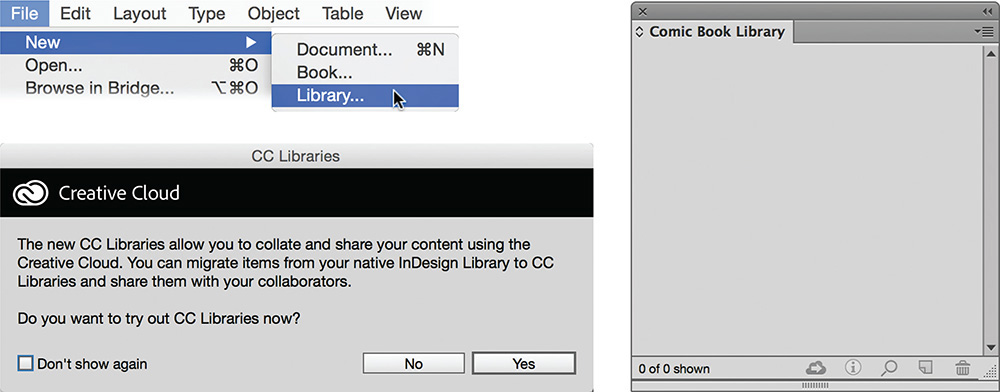
To create a new library (Figure 6.18):
1. Choose File > New > Library.
2. Click No in the CC Libraries dialog box.
3. Specify a name and location for the library, such as Comic Book Library, in the File Name (Windows) or Save As (Mac OS) dialog box.
4. Click Save.
Tip
To close a library, click the close box at the top of the panel. To open a library, choose File > Open and navigate to the INDL file on your system and double-click the file.
The library panel opens as a blank panel, and you can start adding library items to it.
Adding Items to a Library
To add items to the library (Figure 6.19):
1. Select an object on the page.
2. Select Add Item from the library panel menu.

Tip
You can also select an object and drag it to the library panel or click the New Library Item button at the bottom of the library panel.
Adding Information to Library Items
To help you find items in a library later, you can give each library item a name, type, and description.
To add item information (Figure 6.20):
1. Select the item in the library.
2. Select Item Information from the library panel menu, or click the Library Item Information button at the bottom of the panel.
3. Enter the name in the Item Name field.
4. Select an option from the Object Type menu.
5. Enter a short description in the Description field. Click OK.

Figure 6.20 Adding Library Item Information to items in a library makes later finding of the items easier.
You can use the item names and descriptions as criteria for finding a specific item or displaying a subset of items.
To show a subset (Figure 6.21):
1. Select Show Subset from the library panel menu.
2. Select the parameter type, for example, Description from the Parameters menu.
3. Enter the text for the description. Click OK.

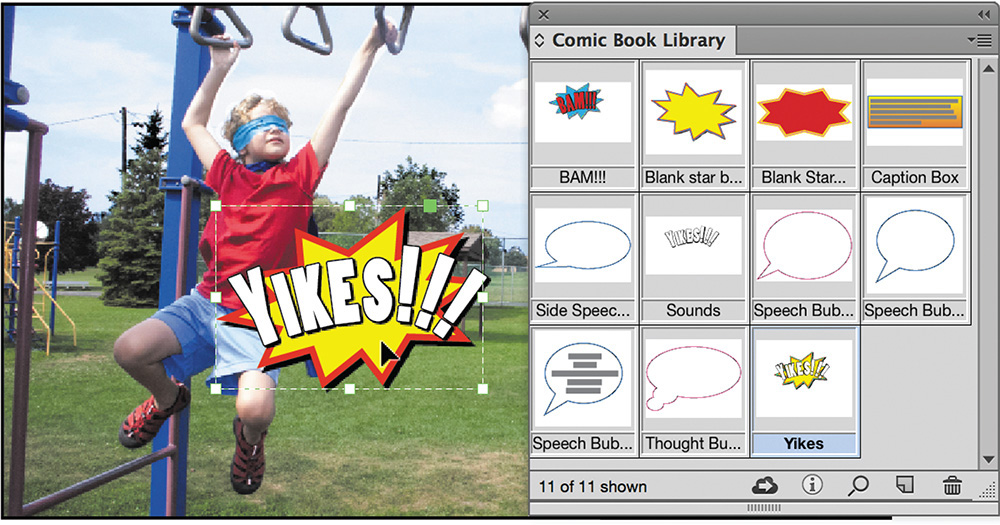
Using Library Items on Document Pages
Now that you know how to add and find library items, you are ready to start using the library items in your project. All the sound effects are added, ready to use in the comic book project. To add objects from library items you must first open the library (File > Open).
To place a library item on the page, you can either (Figure 6.22):
![]() Drag the item from the library panel onto the page.
Drag the item from the library panel onto the page.
![]() Select the item, and select Place Item(s) from the library panel menu.
Select the item, and select Place Item(s) from the library panel menu.
Note
Page objects and library items maintain no link or relationship. So if you change an object on the document page, its source item in the library does not change. Likewise, if you update a library item, the changes are not reflected in the objects already on the page. (To update a library item in a library, select a related object on the page, then click the item in the library and select Update Library Item from the library panel menu.)
Working with the Creative Cloud Library
CC libraries differ from object libraries in that multiple designers can open the same library at once and use assets in their designs. Additionally, CC libraries can contain more than page objects; for example, they can also contain colors and paragraph styles. When you add new items to the library, or update items, other designers can see these changes almost immediately. That is because Creative Cloud libraries synchronize over the Internet. Additionally, you can place non-InDesign artwork into the libraries. For example, the sound effects could also be created in Adobe Illustrator.
Creating a Library
To create a new library (Figure 6.23):
1. Choose Window > CC Libraries to show the CC Libraries panel.
2. Click the libraries menu at the top of the panel, and select Create New Library.
3. Enter the name for the library and click Create.
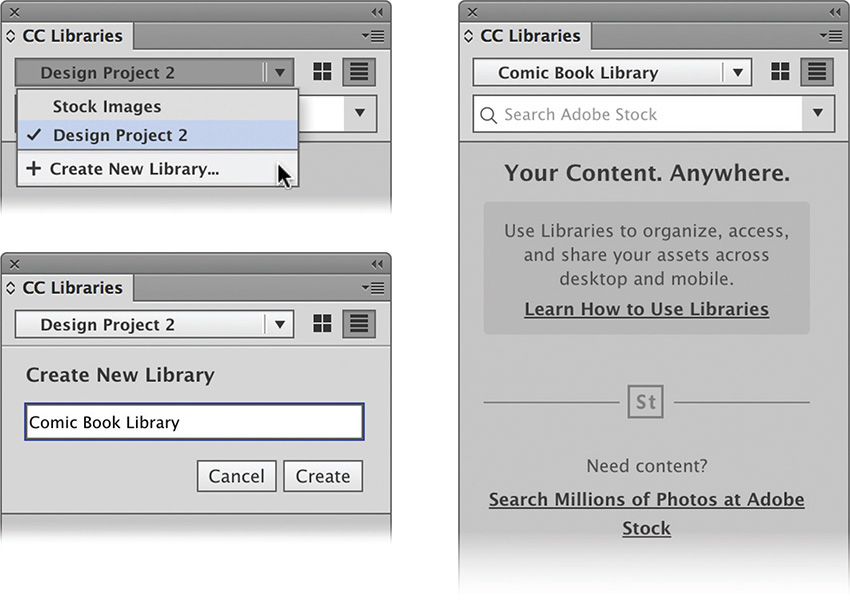
An empty library is created, and you can start adding InDesign page elements, colors, color themes, and more. You can even search across Adobe Stock, an online resource that has millions of beautiful images, photos, and videos that you can use in your designs.
Adding Page Elements to a Library
To add InDesign page elements to a library (Figure 6.24):
1. Select the destination library from the library menu in the CC Libraries panel.
2. Drag the artwork from an InDesign page into the CC Libraries panel, or click the Add Graphic button at the bottom of the panel.

Depending on what you have selected on the InDesign page, you will also be able to add character styles, paragraph styles, fill color, or stroke color. For example, if you have a shape selected with a red fill, clicking the Add Fill Color button at the bottom of the CC Libraries panel adds the color below the Colors heading in the CC Libraries panel. If you have text selected that has a paragraph style applied to it, clicking Add Paragraph Style adds the style to the panel.
The library item is added to the library under the Graphics heading, and automatically named. When items are displayed in the list view, a badge on the right indicates this graphic’s artwork is created in InDesign. A graphic’s artwork can also be added from other applications. For example, artwork added from Adobe Illustrator will display an Ai badge.
Note
When you are not connected to the Internet, you can still add items to and update items in CC Libraries. Synchronizing will happen once you’re back online.
You can also add colors, color themes, paragraph styles, or character styles directly from the various panels. To add these to a library (Figure 6.25):
1. First, select the library at the top of the CC Libraries panel.
2. Show the panel from which you want to add an item.
3. Select the item, and click the Add To Library button at the bottom of its panel.

Items from object libraries can also be moved to CC Libraries.
Renaming a Library Item
To rename library items (Figure 6.26):
1. Right-click (Windows) or Control-click (Mac OS) the added artwork, and select Rename.
2. Type the new name, and press Enter (Windows) or Return (Mac OS).

Using Library Items in Documents
With colors, color themes, styles, and graphics loaded in CC Libraries, you can now use them for your design projects.
To add a graphic to the page (Figure 6.27):
1. From the library menu at the top of the CC Libraries panel, select a library.
2. Drag the graphic from the library to the page.

You can also right-click (Windows) or Control-click (Mac OS) a graphic and select Place Copy or Place Linked. Place Copy detaches the placed graphic from the item in the library. Place Link maintains a link to the parent object in the library. When a linked item, such as a sound effect graphic created in Illustrator, is placed, a modified or missing link warning might appear in the Links panel (this happens when the item has been edited or removed from the library). You update these links just like any other link in InDesign: Select the object and select Update Link from the Links panel menu.
To work with other library items, such as styles, select text on the page, and click the style name in the library in the CC Libraries panel. Styles are automatically added to the paragraph or character styles panel for the document you are working on. The same applies when using colors from a CC library. The colors are added to the Swatches panel.
Library items that are graphics can be edited in their native applications, for example, to edit an item with an Id badge.
To edit an InDesign graphic in the library (Figure 6.28):
1. Double-click the item in the library. It will open in InDesign, as a randomly named file.
2. Make the changes, for example, changing the fill color.
3. Choose File > Save, then File > Close.
The item in the library is updated, and any designers you’ve shared the library with will see the updated item in their libraries, once the Creative Cloud has synchronized the files.

Figure 6.28 Double-click an item in the library to edit it. Save the changes, and close the edited file to update the item in the library.
Creating Freeform Shapes and Lines
You have learned how to add different shapes and frames, such as ellipses, circles, rectangles, and polygons to your designs, and used the Pathfinder panel to create new shapes by combining shapes. In Chapter 3, you learned that shapes are paths. What are the different components that paths are made up of?
![]() Anchor points.
Anchor points.
![]() Line segments that connect two anchor points.
Line segments that connect two anchor points.
![]() Direction lines that attach to anchor points and control the curvature of line segments.
Direction lines that attach to anchor points and control the curvature of line segments.
Two InDesign tools let you create freeform paths:
![]() The Pencil tool (
The Pencil tool (![]() ) follows the movements of your mouse (or pen, if you happen to work with a drawing tablet). It automatically adds anchor points and joins those with line segments. For smooth corners that are attached to curved lines, it even adds the direction lines.
) follows the movements of your mouse (or pen, if you happen to work with a drawing tablet). It automatically adds anchor points and joins those with line segments. For smooth corners that are attached to curved lines, it even adds the direction lines.
![]() Video 6.8
Video 6.8
![]() The Pen tool (
The Pen tool (![]() ) is a more technical drawing tool. You add each anchor point and construct the path as you work with it, joining anchor points with line segments and adding direction lines where a path requires a curve.
) is a more technical drawing tool. You add each anchor point and construct the path as you work with it, joining anchor points with line segments and adding direction lines where a path requires a curve.
![]() Video 6.9
Video 6.9
![]() ACA Objective 3.2
ACA Objective 3.2
Drawing Shapes with the Pencil Tool
The easier tool to work with when creating freeform shapes is the Pencil tool. You start by drawing a path with the Pencil tool. Then, you continue to smooth the path using the Smooth tool (![]() ), and you can delete sections using the Eraser tool (
), and you can delete sections using the Eraser tool (![]() ). The Smooth tool and Eraser tool are grouped with the Pencil tool.
). The Smooth tool and Eraser tool are grouped with the Pencil tool.
To draw the path (Figure 6.29):
1. Select the Pencil tool.
2. Start dragging across the page while pressing the mouse (or start dragging with a pen). A dotted line appears.
3. Release the mouse or pen when you are finished drawing.

After you create a path, you can select it with the Selection tool and apply stroke settings, such as color, weight, and stroke type to the path.
To create a closed shape that can have a fill color when drawing with the Pencil tool, move the Pencil tool close to the start point, and press Alt (Windows) or Option (Mac OS). When a small circle icon appears next to the Pencil tool icon on the page, release the mouse button (Figure 6.30).

Which tool could you use to edit a path and reposition anchor points?
Yes, the Direct Selection tool (![]() ). When you click on the edge of an unselected path, all the anchor points are visible. If you look at a path drawn with the Pencil tool, you’ll likely spot some unintended wobbles along it. Although you could use the Direct Selection tool to select anchor points, redirect direction lines, or reposition lines and edit them, that quickly becomes a tedious task for paths with lots of anchor points. A more efficient alternative is the Smooth tool. As its name suggests, you can use it to smooth the paths you have drawn.
). When you click on the edge of an unselected path, all the anchor points are visible. If you look at a path drawn with the Pencil tool, you’ll likely spot some unintended wobbles along it. Although you could use the Direct Selection tool to select anchor points, redirect direction lines, or reposition lines and edit them, that quickly becomes a tedious task for paths with lots of anchor points. A more efficient alternative is the Smooth tool. As its name suggests, you can use it to smooth the paths you have drawn.
To smooth a path (Figure 6.31):
1. Select the path.
2. Select the Smooth tool. All the anchor points on the path are now visible.
3. Drag over the path while pressing the mouse button.
4. If needed, repeat multiple times to get a smoother result.

Tip
To edit the default Pencil tool preferences, double-click the tool in the Tools panel.
To erase part of a path (Figure 6.32):
1. Select the path, then select the Eraser tool.
2. Drag over the section of the path to erase it.
3. Release the mouse button.

![]() ACA Objective 3.2
ACA Objective 3.2
Using the Pen Tool
With the Pen tool you can create straight and curved shapes (paths). Each time you click with the tool, a new anchor point is created. The anchor point that is added last is then joined to the previously added anchor point with a line segment.
If you click and drag instead of clicking, you create an anchor point with a direction line. This allows you to create curved line segments.
Straight Line Segments
To draw a simple zigzag line (Figure 6.33):
1. Select the Pen tool.
Tip
To place anchor points that are horizontally or vertically aligned with the previous anchor point, Shift-click with the Pen tool. The Shift key constrains the position to 45° and 90° angles.
2. Click at the starting point for the line.
3. Position the pointer at the next point on the zigzag line and click.
4. Continue to click until the zigzag line is finished.
5. Using the Selection tool, click the path and adjust its stroke settings.

To create a closed path (Figure 6.34):
1. As you are drawing the path with the Pen tool, position the pointer over the start point. A small circle indicates you are about to close the path.
2. Click to close the path.

Adding Curves
The Pen tool can also be used to draw paths with smooth corners and curved line segments. Instead of clicking to place anchor points, you’ll click and drag to create anchor points with direction lines.
A few tips for adding direction lines:
![]() Drag in the direction that you are drawing.
Drag in the direction that you are drawing.
![]() The longer the direction line is, the longer the line segment will be.
The longer the direction line is, the longer the line segment will be.
![]() Consider making the direction lines about 30% of the length of the line segment between the two anchor points.
Consider making the direction lines about 30% of the length of the line segment between the two anchor points.
Let’s take a look at drawing a wavy line as an example (Figure 6.35):
1. Select the Pen tool.
2. Click and hold the mouse, and drag up to create the first anchor point with a direction line.
3. Release the mouse button, and move the pointer to the position for the next anchor point.
4. Click and hold the mouse button, and drag down to create another anchor point with a direction line.
5. Repeat steps 3 and 4 until you’ve finished creating the path.
6. Using the Selection tool, click the path and adjust its stroke settings.

Editing Paths
You can continue to edit any paths you draw using the Direct Selection tool as you have learned in earlier chapters. Additionally, you can use the Add Anchor Point tool (![]() ) and Delete Anchor Point tool (
) and Delete Anchor Point tool (![]() ), which are hidden under the Pen tool. Click a line segment to add more points, or click an anchor point to delete it.
), which are hidden under the Pen tool. Click a line segment to add more points, or click an anchor point to delete it.
For more advanced information on using the Pen tool, please refer to InDesign Help.
![]() ACA Objective 3.2
ACA Objective 3.2
Flowing Type on a Path
Until this point, text has been added to text frames—mostly rectangular text frames—and tables. Text can be inserted into frames that are freeform shapes or any other shape. To do so, click inside the shape with the Type tool to convert the path to a text frame and add text (Figure 6.36). Then, edit the text-frame appearance and text as you’ve learned in earlier chapters.

![]() Video 6.8
Video 6.8
InDesign’s Type On A Path tool (![]() ) allows you to set text on the path itself instead of inside the shape. This is a great way to work creatively with text. For example, in poster designs or, as in the comic book project, to change the way the sound effects appear on the page.
) allows you to set text on the path itself instead of inside the shape. This is a great way to work creatively with text. For example, in poster designs or, as in the comic book project, to change the way the sound effects appear on the page.
Adding Text to the Path
Before you can set type on a path, you must first create a path to work with. This can be a curved line, as you have just learned to create, but it can also be a closed shape, such as a circle or ellipse.
Note
To make it easier to see the path in the screenshots, the path has a 1-pt black stroke. If you don’t want to see the stroke in the end, change the stroke color for the path to [None].
To add type on a path (Figure 6.37):
1. Position the Type On A Path tool over the path.
2. Click the path when a small plus sign appears (![]() ).
).
3. Type the text you want to add to the path.
4. Format the text, changing the font, size, and color as required for your design.
5. If needed, select the path and change the stroke and/or fill settings as well.

The text flows with the path shape. Its start position will vary depending on the text alignment you selected when formatting the text. For example, if you center align the text, it will position itself in the center of the path, or if you left align text, it will be placed at the leftmost point of the path.
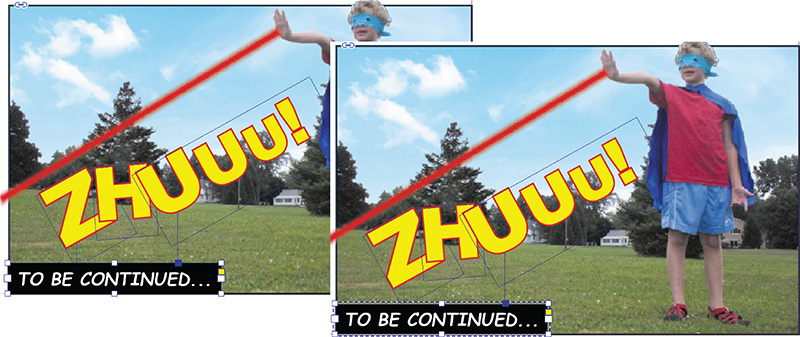
Moving Text Along Its Path
As you add text to a path, three brackets help you position the text. To see the brackets, select the path with the Selection tool. You can use these brackets to control where the text is positioned on the path.
Note
If you reposition the Left and Right brackets, you also define the start and end positions for the text, a bit like setting a Left Indent or Right Indent on paragraph text in a text frame.
For text that is placed on a line, use the bracket that is positioned on the alignment side of the text. For example, to move left-aligned text along the path, select the left bracket.
To move the text along the path (Figure 6.38):
1. Select the path with the Selection tool.
2. Position the pointer over the left bracket until you see the cursor change.
3. Drag the bracket along the path to a new position.

Figure 6.38 Moving left-aligned text along the path by dragging the left bracket with the Selection tool
When you release the mouse button, the text is placed at its new position.
For text that is placed on a closed path, you can use any of the brackets to position the text along the path.
Setting Type Path Options
A number of additional controls allow you to adjust type on a path. You can change the vertical position of text, adjust the spacing, and the appearance.
To edit the type on a path settings (Figure 6.39):
1. With the Selection tool, select the type on a path.
2. Choose Type > Type On A Path > Options.
3. In the Type On A Path Options dialog box, select Preview so you can see the changes you make.

Note
You can even flip the orientation of text on your path, which comes in handy when setting type on a circle. When you create a logo in the Project 7 videos, you’ll get to try this out.
4. From the Effects menu, select one of the effects that controls the way the text appears on the path.
5. From the Align menu, select an option to control the vertical position of the text in relationship to the path itself (To Path).
6. To add more space between the text characters along the path, decrease the spacing amount (yes, that sounds backwards, but it works). Note that you can apply additional kerning or tracking amounts to text as part of text formatting as well.
7. Click OK.
As you can see, type on a path is a fun feature. It can draw the attention to a word or phrase on the page and make text stand out.
Working with Hyperlinks
Hyperlinks are interactive links that take you from a source point you click (or tap) to a destination somewhere else. A familiar type of hyperlink is a link to a web page. However, InDesign also lets you link to an email address, a file, or another page.
InDesign provides a number of different ways to add hyperlinks:
![]() You create a hyperlink for selected text.
You create a hyperlink for selected text.
![]() You can select an entire object and convert it to a hyperlink.
You can select an entire object and convert it to a hyperlink.
![]() You can convert an object to a button and set a button action that takes you to a web page. You will learn how to do this in the next project.
You can convert an object to a button and set a button action that takes you to a web page. You will learn how to do this in the next project.
In this section, we’ll focus on working with the Hyperlinks panel (Window > Interactive > Hyperlinks).
![]() Video 6.10
Video 6.10
![]() ACA Objective 4.6
ACA Objective 4.6
Creating a Text Hyperlink
A text hyperlink is some text within a paragraph that becomes a clickable link. To create a text hyperlink to a web page (Figure 6.40):
1. Open a web browser and navigate to the web page you want to link to.
2. Select the text in the web address field in the web browser, and press Ctrl+C (Windows) or Command+C (Mac OS) to copy the address.
3. Choose Window > Interactive > Hyperlinks to show the Hyperlinks panel.
4. Select the text that will become the hyperlink source (the clickable link).
5. Choose New Hyperlink from the Hyperlinks panel menu, or click the Create New Hyperlink button at the bottom of the Hyperlinks panel.
6. Select URL from the Link To menu.
7. Click inside the URL field under Destination, and press Ctrl+V (Windows) or Command+V (Mac OS) to paste the copied web address into the field.

Tip
You can also paste the copied web address into the URL field in the Hyperlinks panel to create a hyperlink to a web page.
InDesign automatically applies a character style called Hyperlink to the text. It applies a blue color and underline to the text, which makes the link more noticeable in the text.
8. Under PDF Appearance settings, select Invisible Rectangle from the Type menu to prevent the creation of a visible box around the link in an interactive PDF, and select [None] from the Highlight menu to ensure that when you click the link, the appearance does not change.
9. Click OK.
Note
To change the appearance of the Hyperlink character style, double-click it in the Character Styles panel. Alternatively, double-click the hyperlink in the Hyperlink panel, and select [None] from the Style menu in the Edit Hyperlink dialog box to not apply any character-level formatting to the hyperlink.
The Hyperlink panel shows a green traffic light symbol to the right of the hyperlink to confirm that the web address can be accessed online. For web addresses that do not work, the traffic light changes to red.
You can edit the hyperlink at any stage by double-clicking it in the Hyperlinks panel, or by clicking the link and selecting Edit Hyperlink from the Hyperlinks panel menu.
Creating an Object Hyperlink
Turning an object into a hyperlink pretty much works the same way as creating a text hyperlink. Instead of just the text, the entire object becomes a clickable link. Make sure that you have copied the web address so you can paste it into the URL field.
Note
To generate clickable hyperlinks, you need to export your InDesign document to a format that supports hyperlinks. Some of the formats that support hyperlinks are interactive PDF, EPUB, and HTML. You will learn about creating an interactive EPUB in the next chapter.
To create a hyperlink from an object (Figure 6.41):
1. Select the object, such as a text frame or image, on the page.
2. Choose New Hyperlink from the Hyperlinks panel menu.
3. Select URL from the Link To menu.
4. Click inside the URL field under Destination, and press Ctrl+V (Windows) or Command+V (Mac OS) to paste the web address into the field.
5. Click OK.
The hyperlink object now displays a dashed line around the object, when the document screen mode is set to Normal, indicating that it is now a hyperlink.
Exporting to a Web Image Format
You might be asked by a client to supply an InDesign document as an image that can be used on the Internet. For example, a magazine cover might be used on a publisher’s web page to announce that a new issue is out. Or, a comic book page might appear on a web page as a teaser of the comic book’s story.
InDesign supports two web-based image formats you can export to:
![]() JPEG: JPEG is a lossy file format that applies file compression, reducing the file to a smaller size that is more suited for use on the Internet. Because it is lossy, it reduces the quality of the image. Think of it as a format that crumbles up a piece of paper. The higher the amount of compression, the tinier the paper ball. However, also consider what would happen if you try to iron out the piece of paper again after you’ve crumbled it up. Because of this lossy quality, JPEG is not well suited for designs that contain a lot of text, as the text would appear fuzzy. Additionally, JPEG also does not support transparency; this means that InDesign pages are exported with a white background. JPEGs are best suited for designs that contain a lot of photos.
JPEG: JPEG is a lossy file format that applies file compression, reducing the file to a smaller size that is more suited for use on the Internet. Because it is lossy, it reduces the quality of the image. Think of it as a format that crumbles up a piece of paper. The higher the amount of compression, the tinier the paper ball. However, also consider what would happen if you try to iron out the piece of paper again after you’ve crumbled it up. Because of this lossy quality, JPEG is not well suited for designs that contain a lot of text, as the text would appear fuzzy. Additionally, JPEG also does not support transparency; this means that InDesign pages are exported with a white background. JPEGs are best suited for designs that contain a lot of photos.
![]() PNG: Also applies compression to reduce the file size of the document it creates, but it does so in a lossless way. Additionally, it supports transparency, which might be helpful if you design a logo in InDesign that needs to be placed on a colored or tinted background online. Without transparency support, the logo would appear on a white background. PNG is also a great format to use for text-heavy pages as the text remains much crisper. It is also a format that works well when you need to supply images for use in Microsoft Office applications, such as Word and PowerPoint.
PNG: Also applies compression to reduce the file size of the document it creates, but it does so in a lossless way. Additionally, it supports transparency, which might be helpful if you design a logo in InDesign that needs to be placed on a colored or tinted background online. Without transparency support, the logo would appear on a white background. PNG is also a great format to use for text-heavy pages as the text remains much crisper. It is also a format that works well when you need to supply images for use in Microsoft Office applications, such as Word and PowerPoint.
Exporting as PNG
Based on the differences between JPEG and PNG, the comic book page is well suited for PNG export.
![]() Video 6.10
Video 6.10
Can you think of a reason why? Because it contains text that might end up appearing fuzzy.
To export the comic book page as a PNG (Figure 6.42):
1. Choose File > Export.
Tip
To export only specific objects on a page, first select them with the Selection tool. Then, choose File > Export.
2. Enter the name for the file in the File Name (Windows) or Save As (Mac OS) field.
3. Select PNG from the Save As Type (Windows) or Format (Mac OS) menu.
4. Click Save. The Export PNG dialog box opens.
5. Under Export, select the content to export. To export a specific page, enter the page number in the Range field.
6. Under Image:
Select the preferred quality setting from the Quality menu. Maximum quality provides the best result, but could result in a larger file size.
![]() To specify the Resolution, select an option from the menu or enter a value. For PNG files used in Microsoft Office, for example, 150 ppi works well.
To specify the Resolution, select an option from the menu or enter a value. For PNG files used in Microsoft Office, for example, 150 ppi works well.
![]() From the Color Space menu, select RGB. Remember, that is the color space used for digital media and web publishing.
From the Color Space menu, select RGB. Remember, that is the color space used for digital media and web publishing.
7. Under Options:
![]() Select Transparent Background to create a PNG that supports transparency.
Select Transparent Background to create a PNG that supports transparency.
![]() Select Anti-Alias to create smoother edges.
Select Anti-Alias to create smoother edges.
![]() To restrict the exported page to the page area itself, deselect Use Document Bleed Settings.
To restrict the exported page to the page area itself, deselect Use Document Bleed Settings.
![]() Select Simulate Overprint if your page contains any transparency effects, such as drop shadows, directional feather, or different opacity levels.
Select Simulate Overprint if your page contains any transparency effects, such as drop shadows, directional feather, or different opacity levels.
8. Click Export.

The PNG file is now created.
![]() ACA Objective 2.5
ACA Objective 2.5
Exporting as JPEG
For photographic pages, or pages that have file size restrictions, you could export to JPEG, which provides a higher level of compression, and thus smaller file sizes.
To export a page to JPEG (Figure 6.43):
1. Choose File > Export.
2. Enter the name for the file in the File Name (Windows) or Save As (Mac OS) field.
3. Select JPEG from the Save As Type (Windows) or Format (Mac OS) menu.
4. Click Save. The Export JPEG dialog box opens.
5. Under Export, select the page to export.
6. Under Image, select a Quality option. Keep in mind that the lower the quality, the more lossy the resulting image will be. Leave the Format Method set to Baseline. In the early days of the Internet, Progressive download was preferred, so the image would be downloaded incrementally. With faster Internet speeds today, that is no longer required.
Note
To see the different quality variations when applying a high amount of compression for JPEG export, try exporting the same comic page with different quality settings, leaving the resolution set to 72 ppi. Open the resulting images in a web browser, and see if you can spot the differences.
7. Under Options, select Simulate Overprint if the page you export contains transparency.
8. Click Export.

Wow, well done! You have completed another project, and you are nearly at the end of the projects covered in this book. For the final project, you’ll start by revising previously learned skills to get more practice, and then learn how to add very cool interactive elements such as movies and slideshows to an InDesign project that is exported as an eBook file.