10. Organizing Your Artwork with Layers
Lesson overview
In this lesson, you’ll learn how to do the following:
Work with the Layers panel.
Create, rearrange, and lock layers and sublayers.
Move objects between layers.
Merge layers into a single layer.
Locate objects in the Layers panel.
Copy and paste objects and their layers from one file to another.
Apply an appearance attribute to objects and layers.
Make a layer clipping mask.

This lesson will take about 45 minutes to complete. To get the lesson files used in this chapter, download them from the web page for this book at adobepress.com/IllustratorCIB2022. For more information, see “Accessing the lesson files and Web Edition” in the Getting Started section at the beginning of this book.
Layers let you organize your work so that it can be edited and viewed individually or together. Every Adobe Illustrator document has at least one layer. Creating multiple layers in your artwork lets you easily control how artwork is printed, displayed, selected, and edited.
Starting the lesson
In this lesson, you’ll organize the artwork for an app design as you explore various ways to work with layers in the Layers panel.
![]() Note
Note
If you have not already downloaded the project files for this lesson to your computer from your Account page, make sure to do so now. See the “Getting Started” section at the beginning of the book.
To ensure that the tools function and the defaults are set exactly as described in this lesson, delete or deactivate (by renaming) the Adobe Illustrator preferences file. See “Restoring default preferences” in the “Getting Started” section at the beginning of the book.
Start Adobe Illustrator.

Choose File > Open, and open the L10_end.ai file in the Lessons > Lesson10 folder, located on your hard disk.
Choose View > Fit All In Window.
Choose Window > Workspace > Reset Essentials.
 Note
NoteIf you don’t see Reset Essentials in the Workspace menu, choose Window > Workspace > Essentials before choosing Window > Workspace > Reset Essentials.
Choose File > Open. In the Open dialog box, navigate to the Lessons > Lesson10 folder, and select the L10_start.ai file on your hard disk. Click Open.
The Missing Fonts dialog box may appear, indicating that fonts were used in the file that Illustrator can’t find on your machine. The file uses Adobe fonts that you most likely don’t have activated, so you will fix the missing font(s) before moving on.
 Note
NoteFor more information on activating fonts, visit helpx.adobe.com/creative-cloud/help/add-fonts.html.
In the Missing Fonts dialog box, make sure any missing fonts are selected, and click Activate Fonts. After some time, the font(s) should be activated, and you should see a success message in the Missing Fonts dialog box. Click Close.
NoteFor more information on resolving missing fonts, visit helpx.adobe.com/fonts/kb/resolvemissing-fonts.html.
If you see another dialog box asking about font auto-activation, click Skip.
Choose File > Save As. If the Cloud Document dialog box opens, click Save On Your Computer.
In the Save As dialog box, name the file TravelApp.ai, and select the Lesson10 folder. Leave Adobe Illustrator (ai) chosen from the Format menu (macOS) or Adobe Illustrator (*.AI) chosen from the Save As Type menu (Windows), and then click Save. In the Illustrator Options dialog box, leave the Illustrator options at their default settings, and then click OK.
Choose Select > Deselect (if available).
Choose View > Fit All In Window.
Understanding layers
Layers are like invisible folders that help you hold and manage all of the items that make up your artwork. If you shuffle those folders, you change the stacking order of your artwork. You learned about stacking order in Lesson 2.
The structure of layers in your document can be as straightforward or as complex as you want. When you create a new Illustrator document, all of the content you create is organized in a single layer. However, you can create new layers and sublayers (like subfolders) to manage your artwork, as you’ll learn about in this lesson.
Click the L10_end.ai tab at the top of the document window to show that document.
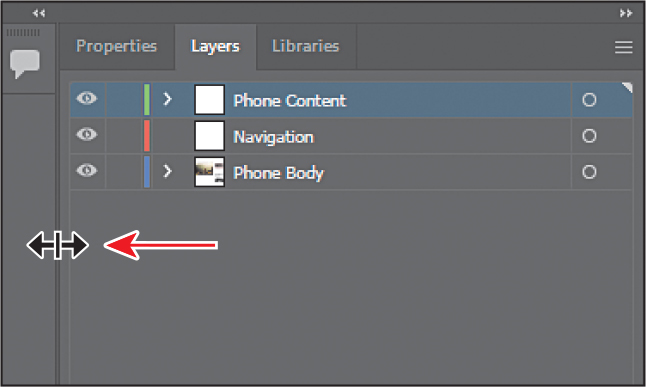
Click the Layers panel tab in the upper-right corner of the workspace, or choose Window > Layers.
NoteThe figure shows the top and bottom of the Layers panel. The Layers panel in the Essentials workspace is very tall, which is why the figure shows a split (dashed line) in the panel.
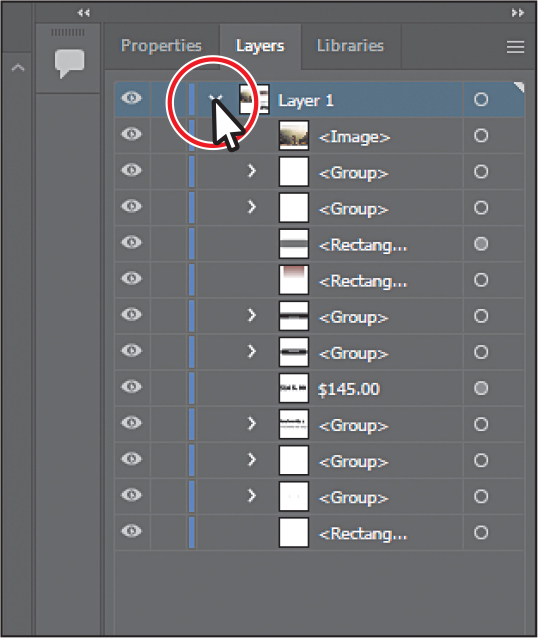
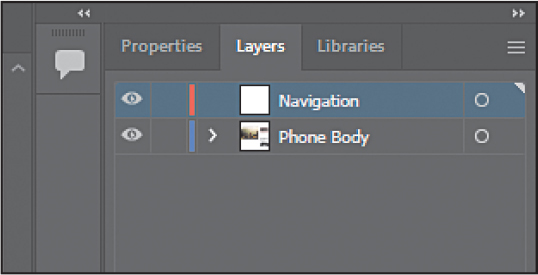
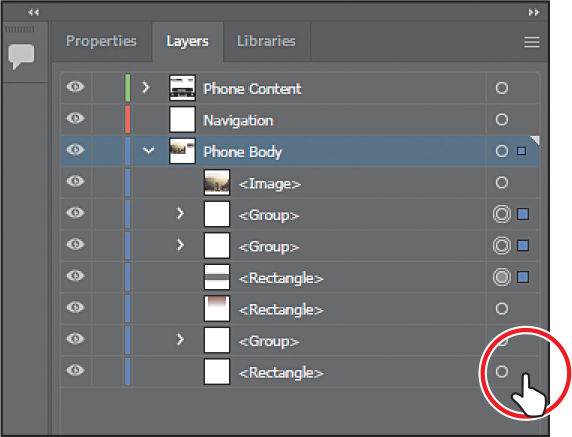
In addition to organizing content, the Layers panel gives you an easy way to select, hide, lock, and change your artwork’s appearance attributes. In the following figure, the Layers panel shows the content for the L10_end.ai file. It may not match what you see in the file. You can refer to this figure as you progress through the lesson.
After reviewing the panel, choose File > Close to close the L10_end.ai file.
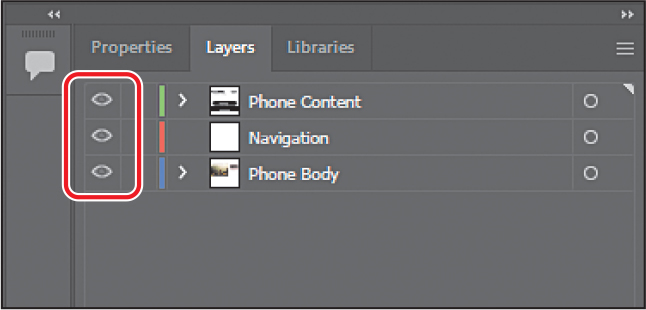
A. Layer color
B. Visibility column (eye icon)
C. Template Layer icon
D. Edit column (lock/unlock)
E. Disclosure triangle (expand/collapse)
F. Collect For Export
G. Locate Object
H. Make/Release Clipping Mask
I. Create New Sublayer
J. Create New Layer
K. Delete Selection
L. Current layer indicator (the triangle)
M. Target column (the circle)
N. Selection column (blank space to right of circle)
Creating layers and sublayers
By default, every document starts with a single layer, named “Layer 1.” As you create artwork, you can rename and add layers and sublayers at any time. Placing objects on separate layers lets you more easily select and organize them because you can temporarily hide the content for a layer, lock it on a layer, and more.
For example, by placing type on a separate layer, you could lock the rest of the artwork in the document so you can focus on the type without affecting the rest of the artwork, or you could have several versions of an icon—one is showing while the rest are hidden.
Creating new layers
You’ll start by renaming the default layer name and then create new layers using different methods. The idea for this project is to organize the artwork so you can more easily work with it later. Ideally, when you’re working in Illustrator, you’ll set up layers before you begin creating or editing the artwork. In this lesson, you’ll organize artwork with layers after the artwork is created, which can be a bit more challenging. Instead of keeping all the content on a single layer, you’ll create several layers and sublayers to organize the content better and make it easier to select later.
![]() Tip
Tip
Know that there is no “wrong” layer structure, but as you gain more experience with layers, you’ll see what makes sense for you.
With the TravelApp.ai document showing, if the Layers panel isn’t visible, click the Layers panel tab on the right side of the workspace, or choose Window > Layers.
In the Layers panel, Layer 1 is highlighted, indicating that it is active. Anything you create or add to the document will go on the active layer.
Click the disclosure triangle (
 ) to the left of the Layer 1 thumbnail to show the content on the layer.
Each object you create is listed under that layer. By default, Illustrator shows groups as <Groups>, paths as <Paths>, images as <Images>, and so on. That makes it easier to glance at the content and see what is there.
Click the disclosure triangle (
 ) to the left of the Layer 1 thumbnail to hide the content on that layer.
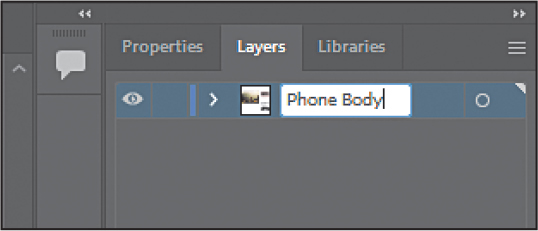
In the Layers panel, double-click directly on the layer name “Layer 1” to edit it inline. Type Phone Body and then press Enter or Return.
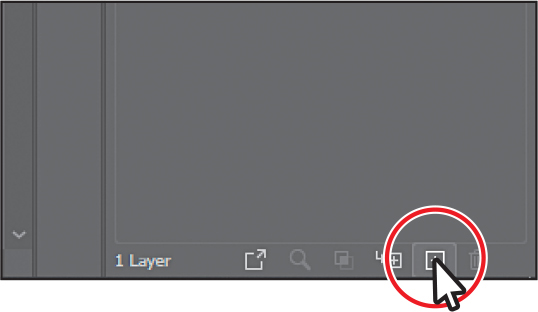
Click the Create New Layer button (
 ) at the bottom of the Layers panel.
Layers and sublayers that aren’t named are numbered in sequence. For example, the new layer is named “Layer 2.” When a layer or sublayer in the Layers panel contains other items, a disclosure triangle (
 ) appears to the left of the layer or sublayer name. You can click the disclosure triangle to show or hide the contents. If no triangle appears, the layer has no content on it. Note
The Layer Options dialog box has a lot of the options you’ve already worked with, including naming layers, setting Preview or Outline mode, locking layers, and showing and hiding layers. You can also deselect the Print option in the Layer Options dialog box, and any content on that layer will not print.
Double-click the white layer thumbnail to the left of the layer name “Layer 2” or to the right of the name in the Layers panel to open the Layer Options dialog box. Change the name to Navigation, and notice all the other options available. Click OK.
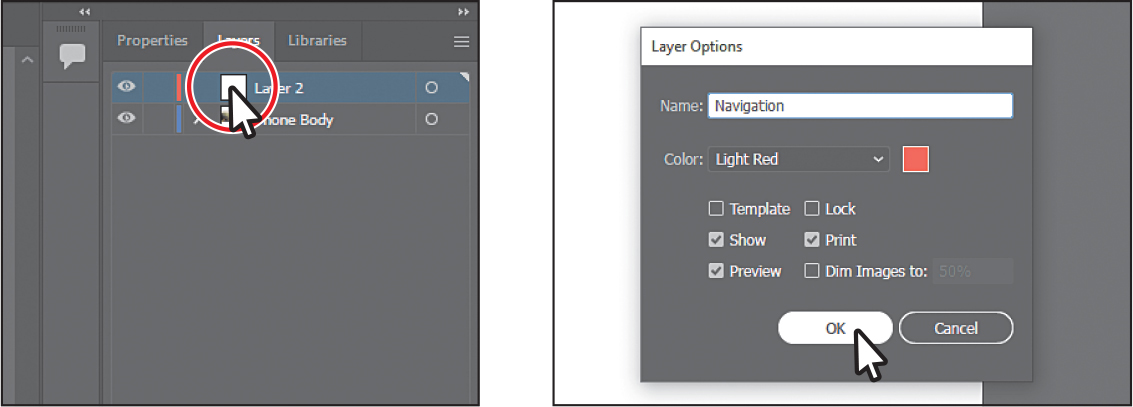
By default, the new layer is added above the currently selected layer in the Layers panel (Phone Body, in this case) and becomes active. Notice that the new layer has a different layer color (a light red) to the left of the layer name. This will become more important later, as you select content.
Next you’ll create a new layer and name it in one step, using a modifier key.
Option-click (macOS) or Alt-click (Windows) the Create New Layer button (
 ) at the bottom of the Layers panel (circled in the following figure). In the Layer Options dialog box, change the name to Phone Content and then click OK.
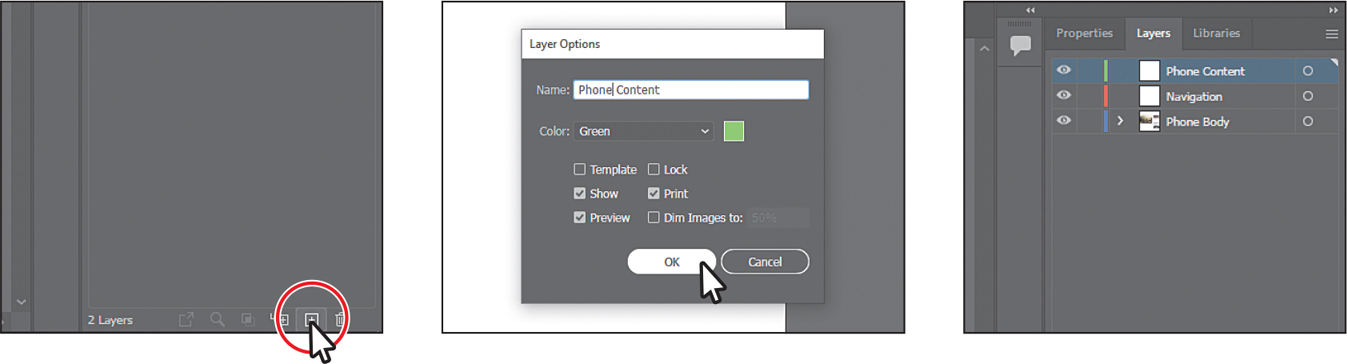
Creating a sublayer
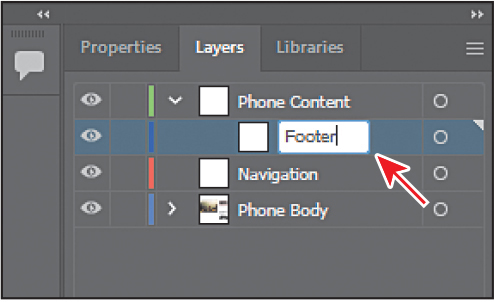
Think of sublayers as subfolders within a layer—essentially they are a layer nested within a layer. Sublayers can be useful for organizing content within a layer without grouping or ungrouping content. Next you’ll create a sublayer to put the footer content in so you can keep it together.
Click the layer named “Phone Content” to select it, if it isn’t already, and then click the Create New Sublayer button (
 ) at the bottom of the Layers panel.
 Tip
TipTo create a new sublayer and name it in one step, Option-click (macOS) or Alt-click (Windows) the Create New Sublayer button or choose New Sublayer from the Layers panel menu to open the Layer Options dialog box.

A new sublayer is created on the Phone Content layer and is selected. You can think of this new sublayer as a “child” of the “parent” layer named Phone Content.
Double-click the new sublayer name (Layer 4, in my case), change the name to Footer, and then press Enter or Return.
Creating a new sublayer opens the selected layer to show existing sublayers and content.
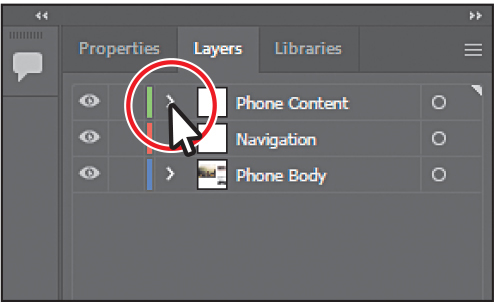
Click the disclosure triangle (
 ) to the left of the Phone Content layer to hide the content of the layer.
In a few sections, you’ll add content to the Footer sublayer.
Editing layers and objects
By rearranging the layers in the Layers panel, you can change the stacking order of objects in your artwork. On an artboard, things higher in the list in the Layers panel are in front of objects located on layers lower in the list. Within each layer, there is also a stacking order applied to the objects on that layer. Layers are helpful for various reasons, including the ability to move objects between layers and sublayers to organize and more easily select your artwork.
Finding content in the Layers panel
When working on artwork, there may be times when you select content on the artboard and then want to locate that content in the Layers panel. This can help you determine how content is organized.
Drag the left edge of the Layers panel to the left to make it wider.
When the names of layers and objects are long enough or objects become further nested one in another, the names can become truncated—in other words, you can’t see all of them.
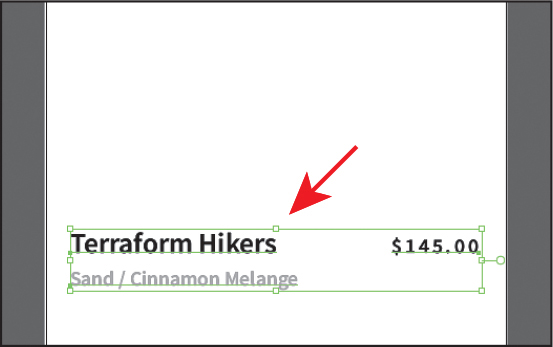
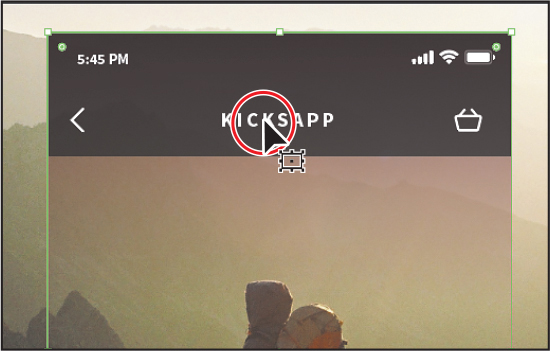
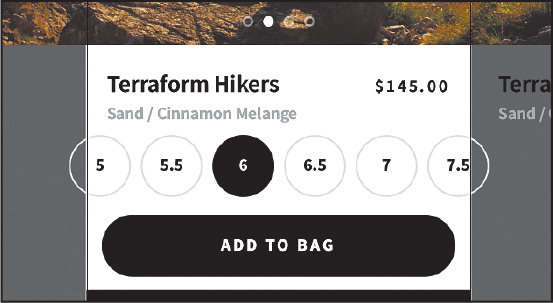
With the Selection tool (
 ), click the “Terraform Hikers” text on the artboard.
Click the Locate Object button (
 ) at the bottom of the Layers panel to reveal the selected content (a text group) within the Layers panel.
Clicking the Locate Object button will reveal the content for the layer that the selected text is on in the Layers panel. You’ll see a selection indicator (
 ) to the far right of the layer that the selected content is on (Phone Body), as well as a <Group> object and the individual text objects. You can see that the selected text is in a group on a layer.
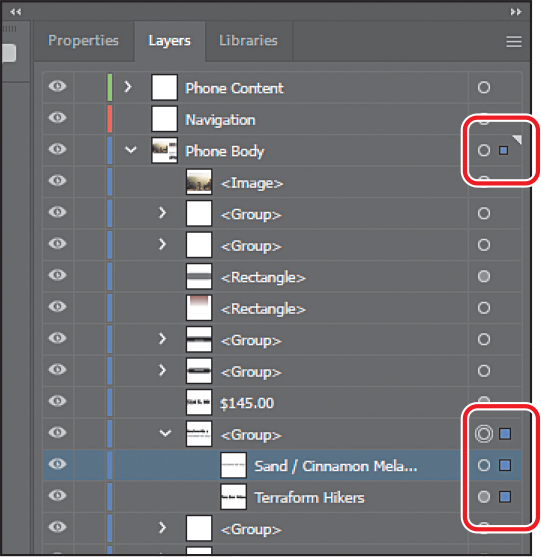
On the artboard, Shift-click the “$145.00” text to select it as well.
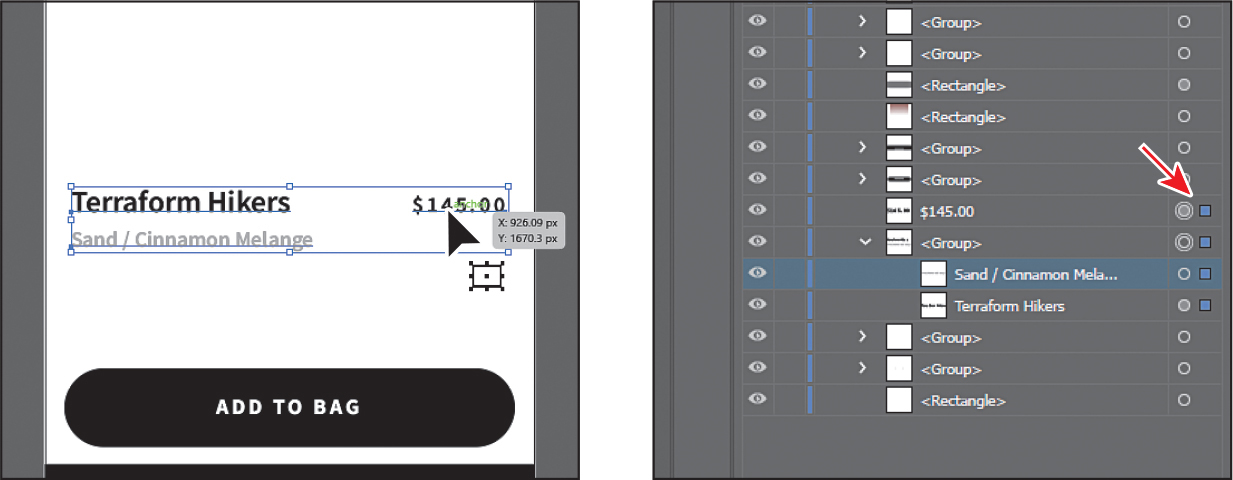
In the Layers panel, you should also see a selection indicator (
) to the far right of the $145.00 text object.To group the selected text, press Command+G (macOS) or Ctrl+G (Windows).
When content is grouped, a group object (<Group>) is created that contains the grouped content.
Click the disclosure triangle (
) to the left of the selected <Group> to show the original group and the $145.00 text object that is now grouped with it.You can rename a <Group> by double-clicking the name in the Layers panel. Renaming a group doesn’t ungroup it, but it can make it easier to recognize what is in the group in the Layers panel.

Double-click the main <Group> name and type Description. Press Return or Enter to accept the name.
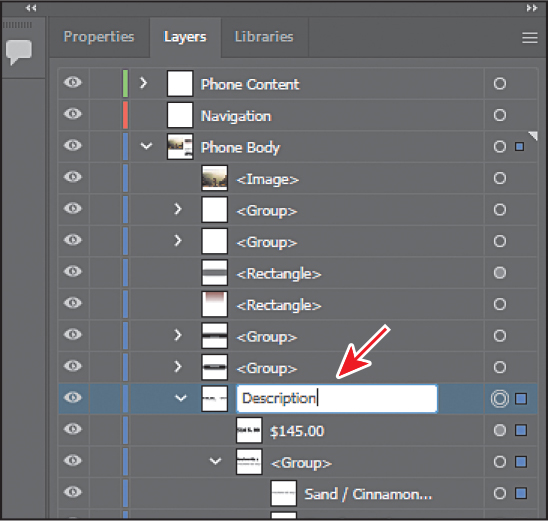
To collapse the group again so you hide the content, click the disclosure triangle (
) to the left of Description.Click the disclosure triangle (
) to the left of the Phone Body layer thumbnail to collapse the layer and hide the contents of the entire layer.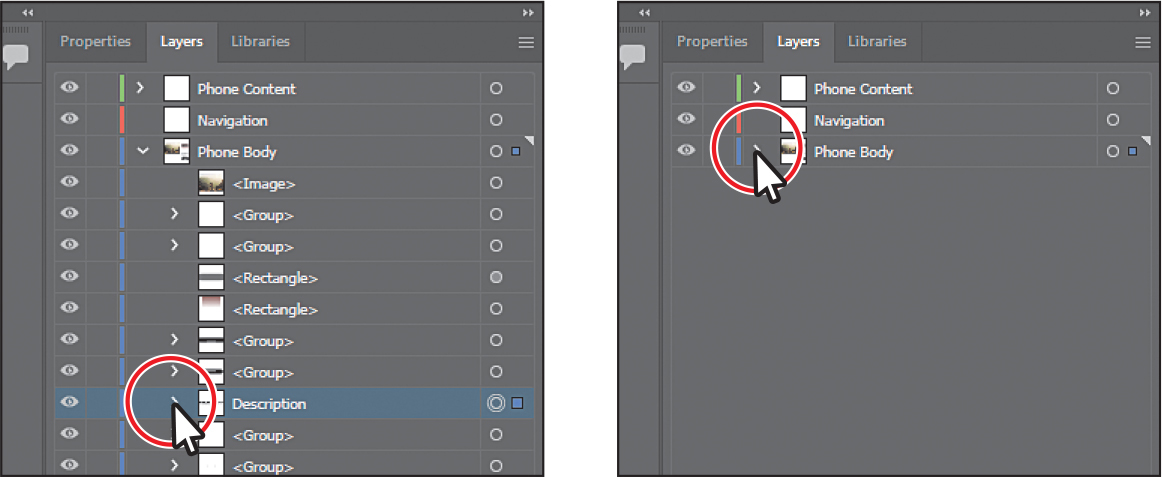
Keeping layers, sublayers, and groups collapsed is a great way to make the Layers panel less visually cluttered. The Phone Content layer and Phone Body layer are the only layers with a disclosure triangle because they’re the only layers with content on them.
Choose Select > Deselect.
Moving content between layers
Next you’ll move the artwork to the different layers to take advantage of the layers and sublayers you’ve created.
In the artwork, using the Selection tool (
), click the text “Terraform Hikers” to select that group of content.In the Layers panel, notice that the Phone Body layer name has the selected-art indicator (the color square); it’s circled in the figure.
TipThis selection square is smaller than the selected squares you’ve seen up until now. A smaller selection square indicates that it’s not the entire layer that’s selected—just certain objects on the layer.
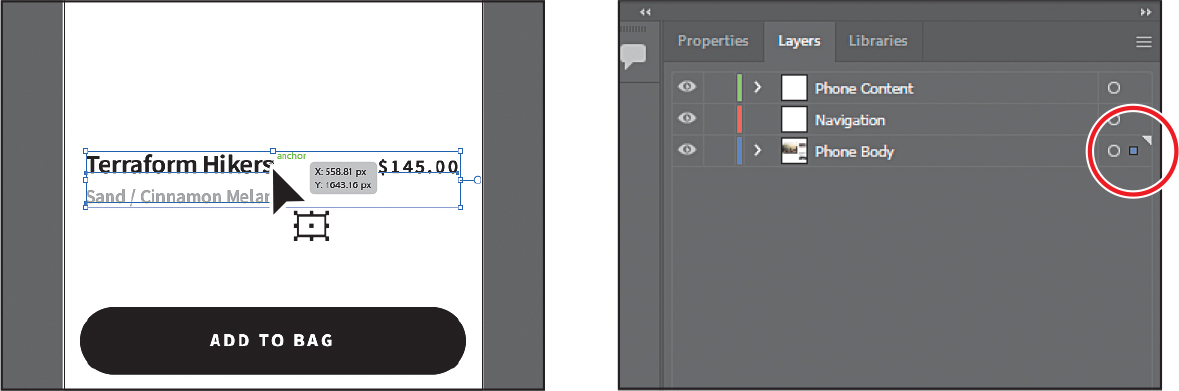
Also notice that the color of the bounding box, paths, and anchor points of the selected artwork matches the color of the layer (the small color strip [
 ] you see to the left of the layer name in the Layers panel).
If you want to move selected artwork from one layer to another, you can drag the selected-art indicator for either a sublayer or layer. That’s what you’ll do next.
Drag the selected-art indicator (the little blue box) for the Phone Body layer straight up to the right of the target icon (
 ) on the Phone Content layer.
 Tip
TipYou can also press Option (macOS) or Alt (Windows) and drag the selected-art indicator to another layer to duplicate the content. Remember to release the mouse button first and then the key.
This action moves all of the selected artwork to the Phone Content layer. The color of the bounding box, paths, and anchor points in the artwork changes to the color of the Phone Content layer, which is green (in my case).
Choose Select > Deselect.
Click the disclosure triangle (
) for the Phone Body and the Phone Content layers to show the content for each layer.With the Selection tool (
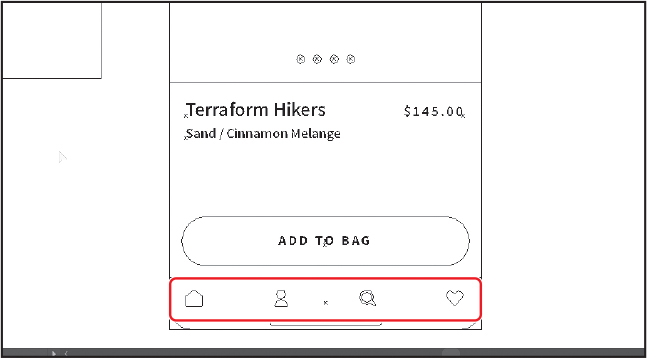
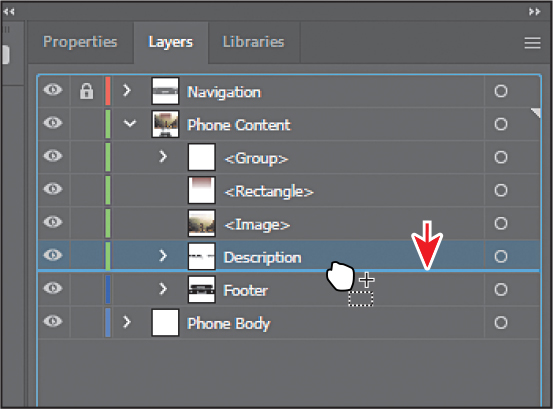
) selected, move the pointer above the ADD TO BAG button. Drag across the “ADD TO BAG” text and black rectangle at the bottom of the artboard to select a series of objects, making sure not to select the small white rectangle on the bottom edge of the artboard.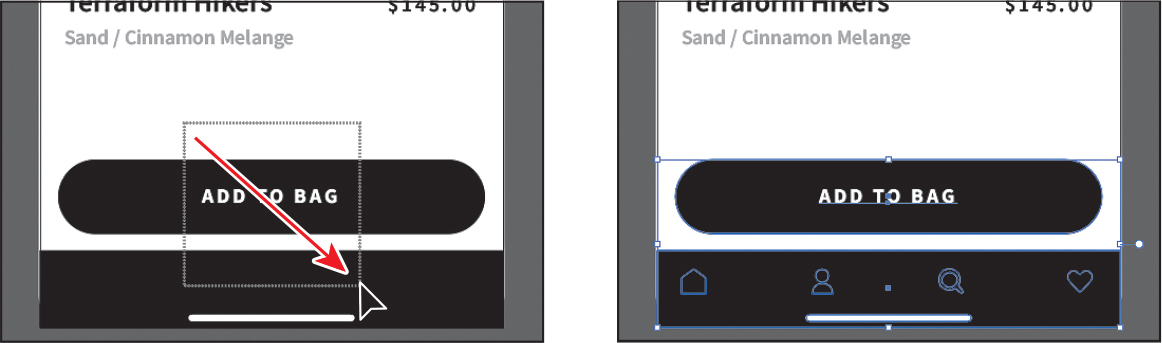
You should see the blue selection indicators to the right of that content in the Layers panel. Also, notice the icons that are selected but can’t be seen on the artboard because they are behind the black rectangle at the bottom. In the next section you’ll arrange those icons so they are in front. Next you’ll select those objects in the Layers panel and move them to another layer.
In the Layers panel, click one of the <Group> objects that has the selection indicator to the right of the name. To select the other two groups, Command-click (macOS) or Ctrl-click (Windows) the other two <Group> objects where you see the selected indicator to the right of the name.
NoteYou didn’t need to select the artwork on the artboard to drag content from one layer to another, but it made it easier to find in the Layers panel.
Drag any of the selected objects to the Footer sublayer in the Phone Content layer above it. When the Footer sublayer shows a highlight, release the mouse button.
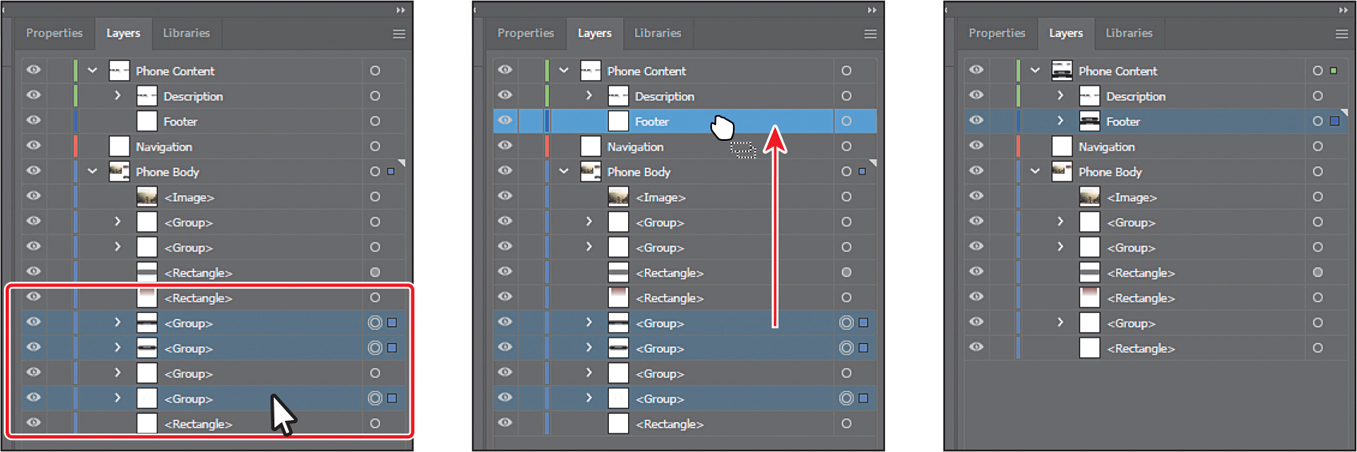
This is another way to move artwork between layers. Any content that is dragged to another layer or sublayer is automatically at the top of the layer or sublayer ordering. The color of the bounding box, paths, and anchor points of the selected artwork now matches the color of the Footer sublayer.
Click the disclosure triangle (
) to the left of the Phone Body and Phone Content layers to hide the layer contents.Choose Select > Deselect, and then choose File > Save.
Viewing layer content differently
In the Layers panel, you can display layers or objects individually in either Preview or Outline mode. In this section, you’ll learn how to view layers in Outline mode, which can make artwork easier to select.
Choose View > Outline. This displays the artwork so that only its outlines (or paths) are visible.
You should be able to see the menu icons that are hidden beneath the black shape. They are circled in the figure.
Notice the eye icons (
 ) in the Layers panel now. They indicate that the content on that layer is in outline mode.
Choose View > Preview (or GPU Preview) to see the painted artwork.
Sometimes you may want to view part of the artwork in Outline mode while retaining the strokes and fills for the rest of the artwork. This can be useful if you need to see all artwork in a given layer, sublayer, or group.
In the Layers panel, click the disclosure triangle (
) for the Phone Content layer to reveal the layer content.Command-click (macOS) or Ctrl-click (Windows) the eye icon (
 ) to the left of the Phone Content layer name to show the content for only that layer in Outline mode.
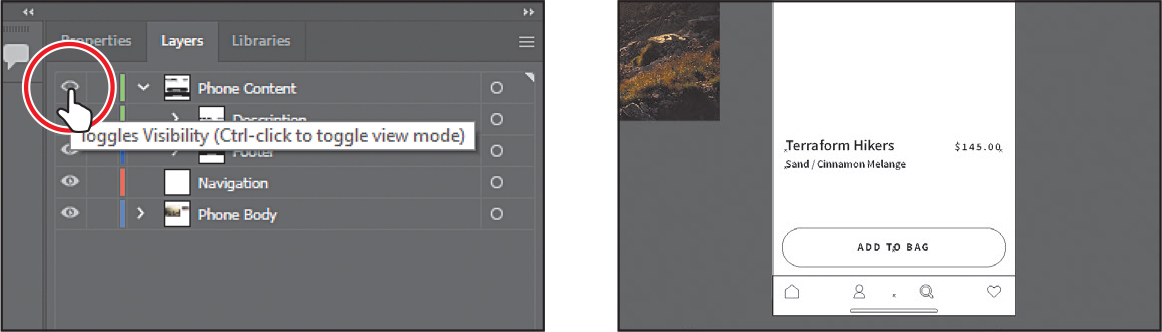
You should be able to see the icons near the bottom of the artboard again. Displaying a layer in Outline mode is also useful for selecting the anchor points or center points of objects.
With the Selection tool (
) selected, click one of the mobile icons to select the group of icons.Click the disclosure triangle (
 ) to the left of the Footer sublayer to show the content on the sublayer.
You should be able to find the group of icons in the Footer sublayer.
Choose Object > Arrange > Bring To Front.

The Arrange commands move the content up or down in the layer stack on an individual layer. The Bring To Front command only brought the icons group to the top of the Footer sublayer. If you decide to create layers and organize your content and later need to move content in front of other content, it can be a bit more challenging to use the Arrange commands if that content is not on the same layer. Sometimes you wind up moving content from one layer to another or reordering layers altogether so some content can be in front of other content.
Click the disclosure triangle (
 ) to the left of the Phone Content layer to hide the layer content.
Command-click (macOS) or Ctrl-click (Windows) the eye icon (
 ) to the left of the Phone Content layer name to show the content for that layer in Preview mode again. You should now see the icons.
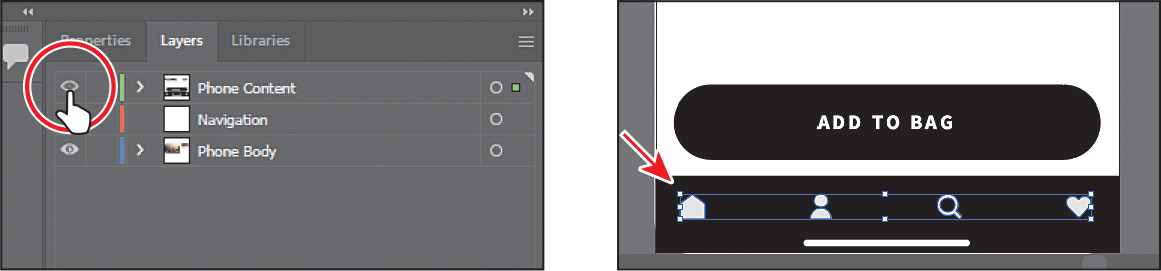
Choose Select > Deselect and then File > Save.
Reordering layers and content
In earlier lessons, you learned that objects have a stacking order, depending on when and how they were created. That stacking order applies to each of the layers in the Layers panel. By creating multiple layers in your artwork, you can control how overlapping objects are displayed. Next, you’ll reorder content to change the stacking order.
With the Selection tool (
) selected, on the artboard, drag across the content at the top of the artboard to select the header content.After attempting to select just the header content, you’ll see that the selection appears to capture other content. You can tell because the bounding box surrounding the selection covers the artboard.
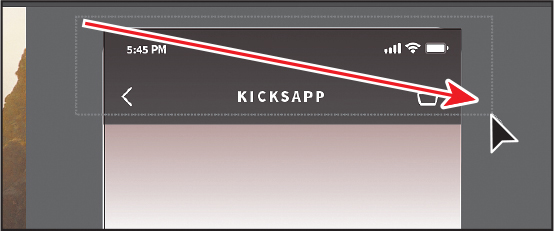
Click the disclosure triangle (
 ) to the left of the Phone Body layer name to show the content.
You should see the content that is selected. You need to remove a few items from the selection. There is a gradient-filled rectangle and something else.
To remove the rectangle with the gradient fill from the selection, Shift-click the rectangle on the artboard. See the figure.
There is still a shape that is the size of the artboard that is selected and needs to be deselected.
In the Layers panel, Shift-click the selection indicator to the right of the bottom <Rectangle> object to remove it from the selection.
That happened to be the right thing to deselect, in this case. If it weren’t, you could have Shift-clicked the selection indicator column again to reselect it and tried another object. Just as in the document, you can use the Shift key to add or remove items from a selection in the Layers panel. As I’m sure you’ve figured out by now, selecting the name of a layer or object in the Layers panel does not select it in the document. That’s why you Shift-clicked the selection indicator and not the name of the rectangle.
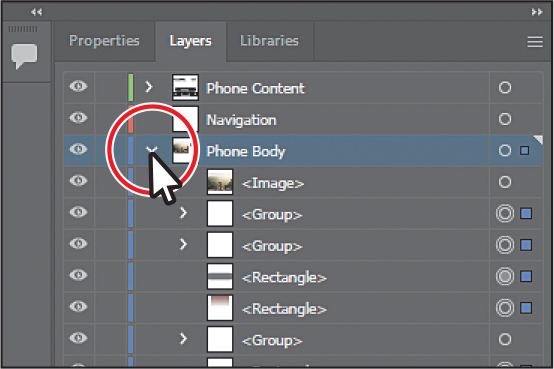
Click the disclosure triangle (
 ) to the left of the Phone Body layer to hide the content. To move the selected content to the Navigation layer, where it belongs, drag the selection indicator to the right of the Phone Body layer up to the Navigation layer and release.
The selection indicator to the right of a layer means that there is selected content on that layer. It doesn’t tell you what or how much is selected, but dragging it to another layer moves only the currently selected content.
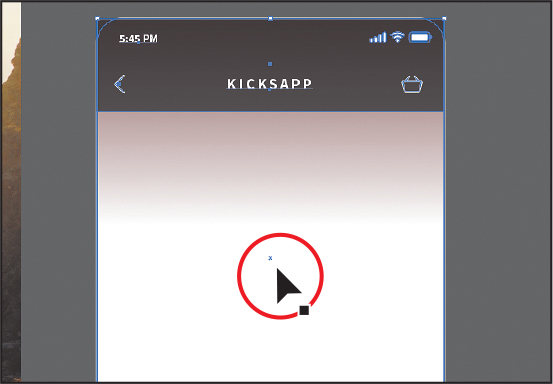
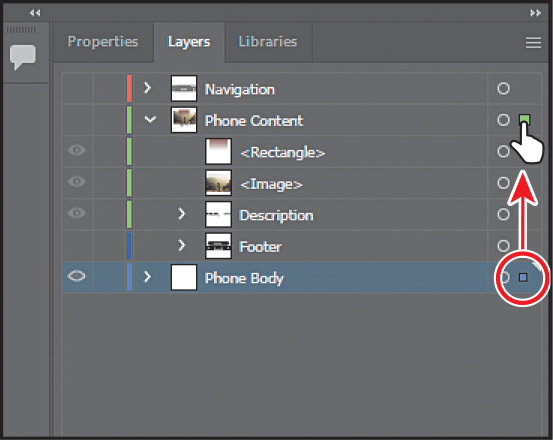
With the Selection tool (
 ) selected, click in a blank area, away from artwork, to deselect, if necessary. Shift-drag the image from off the left edge of the artboard into the approximate center of the artboard. Release the mouse button and then the Shift key.
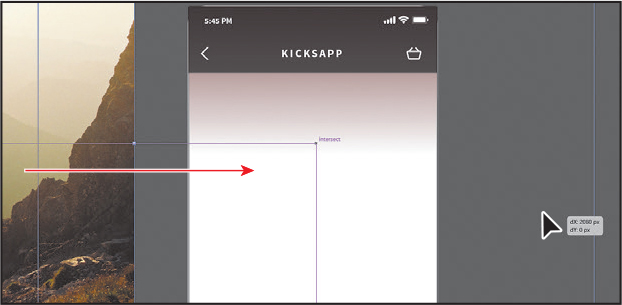
The image needs to be on the Phone Content layer, so with it selected, drag the selection indicator in the Layers panel up to the Phone Content layer.

Unfortunately, the image now covers the content on the Navigation layer. Next you’ll reorder the layers so you can once again see the navigation content.
Drag the Phone Content layer down below the Navigation layer. When you see a blue line below the Navigation layer, release the mouse button to move the Phone Content layer below the Navigation layer. You should now see the navigation content since it’s above the Phone Content layer content.

Choose Select > Deselect.
Choose File > Save.
Locking and hiding layers
In Lesson 2, you learned about locking and hiding content. When you lock and hide content using menu commands or keyboard shortcuts, lock, unlock, hide, and show are set in the Layers panel. The Layers panel lets you hide layers, sublayers, or individual objects from view. When a layer is hidden, the content on the layer is also locked and cannot be selected or printed. In this section, you’ll lock some content and hide other content to make it easier to select things.
Click the image of the hiker on the artboard. Click the Locate Object button (
 ) at the bottom of the Layers panel to find it in the layers. Notice the eye icon () to the far left of the <Image> name.
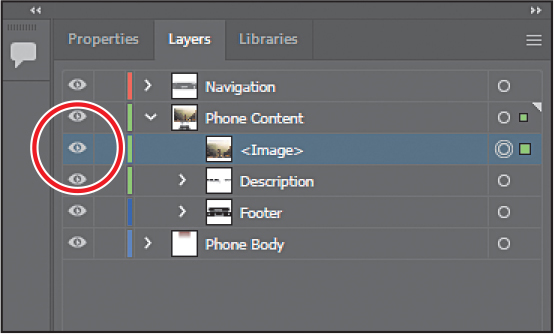
Choose Object > Hide > Selection.
The image is hidden, and the eye for the <Image> object is gone in the Layers panel.
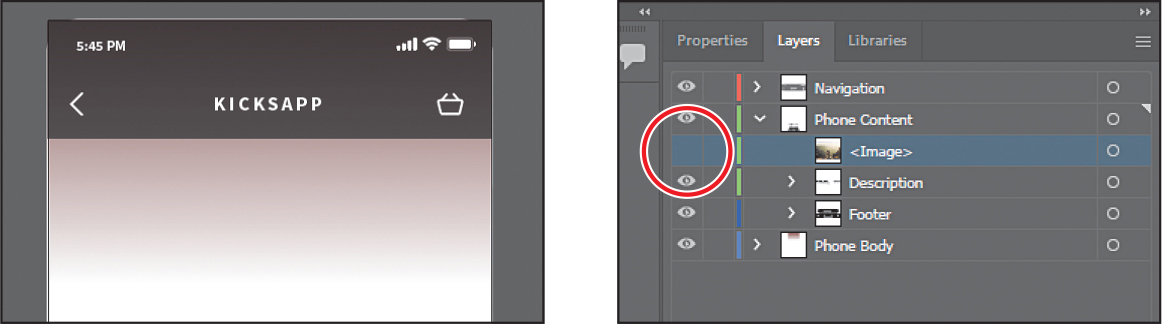
Click where the eye icon (
 ) was, to the far left of the <Image> name in the Layers panel, to show the image again.
That is the same as choosing Object > Show All. But in the Layers panel, you don’t have to show everything that you hide, like the command does. You can show or hide layers, sublayers, individual objects, or a combination.

Option-click (macOS) or Alt-click (Windows) the eye icon (
) to the left of the Phone Body layer to hide the other layers.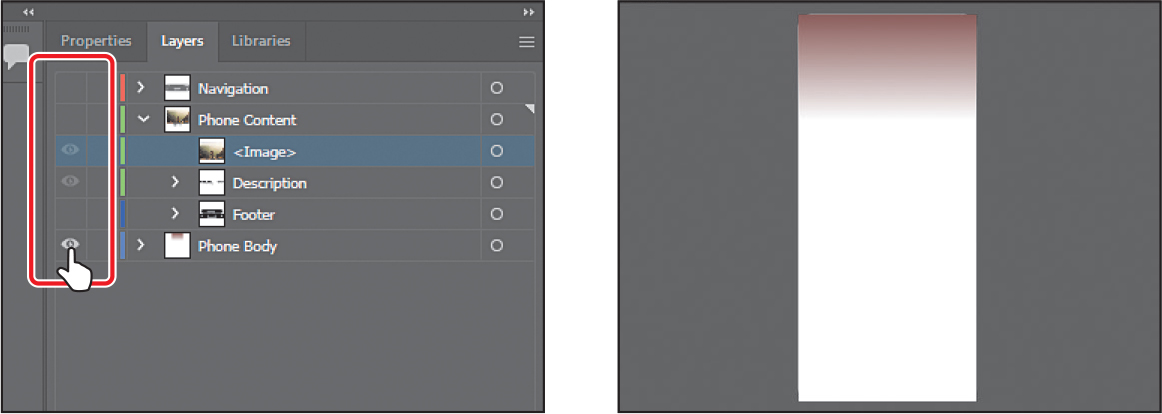
Hiding all layers except those that you want to work with can make it easier to focus on the content at hand.
Click the gradient-filled rectangle in the top part of the artboard. In the Layers panel, drag the selection indicator up to the Phone Content layer and release.
The rectangle will disappear since it is now on a layer that is hidden.

To view the artwork in Outline mode, press Command+Y (macOS) or Ctrl+Y (Windows). You should see four small circles near the center of the artboard that are meant to show navigation for an image slideshow in the app. Click to select them.
Drag the selection indicator in the Layers panel up to the Phone Content layer and release. The circles disappear since they are now on a layer that is hidden.
Press Command+Y (macOS) or Ctrl+Y (Windows) to exit Outline mode.
Choose Show All Layers from the Layers panel menu (
 ), or Option-click (macOS) or Alt-click (Windows) the eye icon () to the left of the Phone Body layer, to show all layers again.
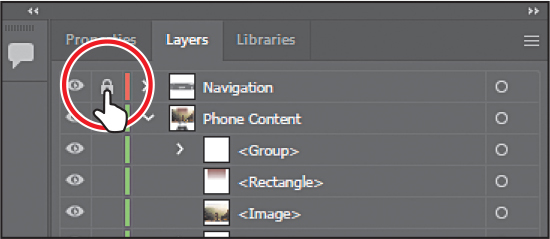
Click the empty Lock column to the left of the Navigation layer to lock all of the content on that layer.
Try clicking the “KICKSAPP” text at the top of the artboard, and you’ll wind up selecting the gradient-filled rectangle on the layer beneath.
Locking a layer makes it so you can’t even select the content on that layer. Locking content can be helpful if you don’t want to move content, for instance, accidentally. You can also click in the Lock column for an object on a layer to lock or unlock objects on a layer.
Choose Select > Deselect and then choose File > Save.
Duplicating layer content
You can also use the Layers panel as another method for duplicating layers and content. Next you’ll duplicate content on a layer and duplicate a layer.
With the Phone Content layer content showing in the Layers panel, click the name “Description” to select that group sublayer in the Layers panel. Pressing Option (macOS) or Alt (Windows), drag it down until you see a line appear just below the original. Release the mouse button and then the key to duplicate it.
Dragging with the modifier key copies the content. This is the same as selecting the content on the artboard, choosing Edit > Copy, and then choosing Edit > Paste In Place.
 Tip
TipYou can also Option-drag (macOS) or Alt-drag (Windows) the selected-art indicator to duplicate content. You can also select the <Description> row in the Layers panel and choose Duplicate “<Description>” from the Layers panel menu to create a copy of the same content.
NoteThe original Description group was selected because if you had selected the copy and then attempted to drag it on the artboard, you would have instead dragged the original Description group that was above it in the layer stack. It really didn’t matter which you dragged off the artboard, since they are the same.
Option-click (macOS) or Alt-click (Windows) the original group name “Description” to select the text on the artboard.

Drag the selected text off the artboard to the right.

You’ll keep a copy of the original text in case you convert the text on the artboard to outlines. Next you’ll make a copy of the Navigation layer and drag the content for the copy off the artboard. This can be a way to make a design version of the navigation off to the side.
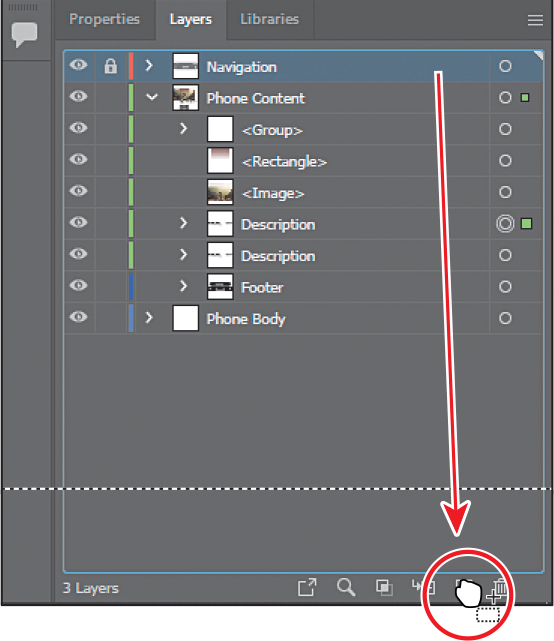
Click the Navigation layer name and drag it down to the Create New Layer button (
 ) at the bottom of the Layers panel.
This duplicates the layer, and the content is pasted in place, on top of the original Navigation layer content. Notice that the copied layer, named “Navigation Copy” is also locked.
Click the lock icon (
 ) to the left of the Navigation Copy layer name in the panel to unlock it.
To select the copied content so you can move it off the artboard, click the selection indicator column to the far right of the Navigation Copy name, to select all of the layer content.
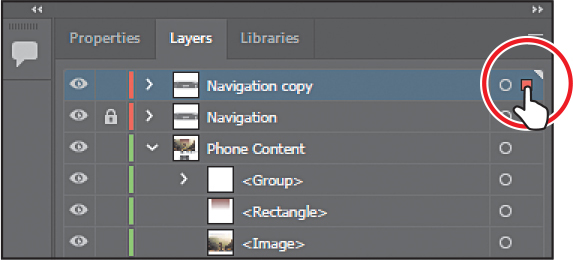
On the artboard, drag the selected navigation content off the artboard to the right.

Pasting layers
To complete the app design, you’ll copy and paste the remaining pieces of artwork from another file. You can paste a layered file into another file and even keep the layers intact. In this section, you’ll also learn a few new things, including applying appearance attributes to layers and reordering layers.
Choose Window > Workspace > Reset Essentials.
Choose File > Open. Open the Sizes.ai file in the Lessons > Lesson10 folder on your hard disk.
Choose View > Fit Artboard In Window.
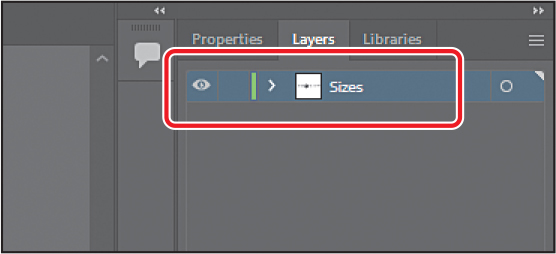
Click the Layers panel tab to show the panel and see the layer named “Sizes” that the content is on.
Choose Select > All and then choose Edit > Copy to select and copy the content to the clipboard.
Choose File > Close to close the Sizes.ai file without saving any changes. If a warning dialog box appears, click Don’t Save (macOS) or No (Windows).
In the TravelApp.ai file, choose Paste Remembers Layers from the Layers panel menu (
). A checkmark next to the option indicates that it’s selected.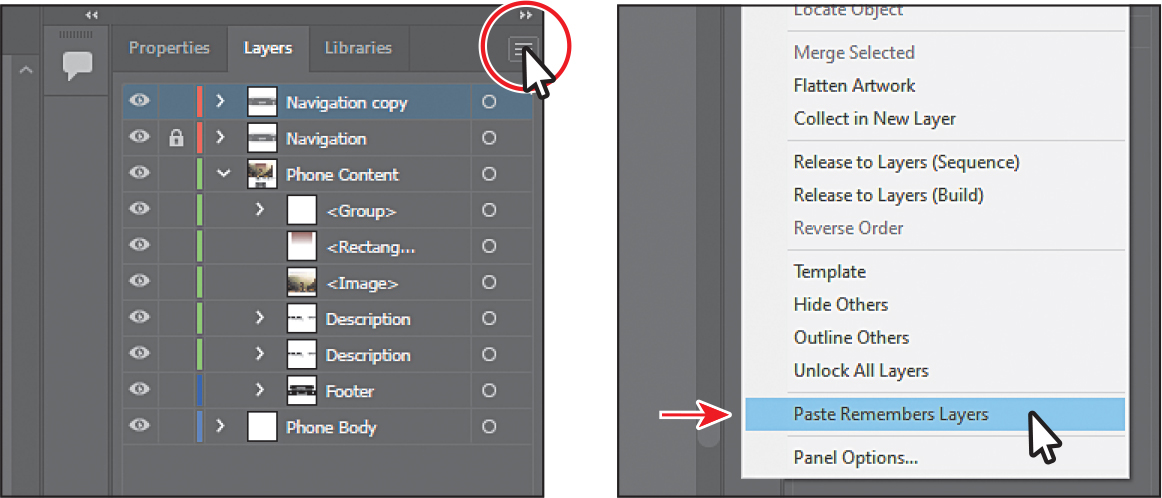
When Paste Remembers Layers is selected, artwork is pasted into the layer(s) from which it was copied, regardless of which layer is active in the Layers panel. If the option is not selected, all objects are pasted into the active layer, and the layers from the original file are not pasted in.
Choose Edit > Paste to paste the content into the center of the Document window.
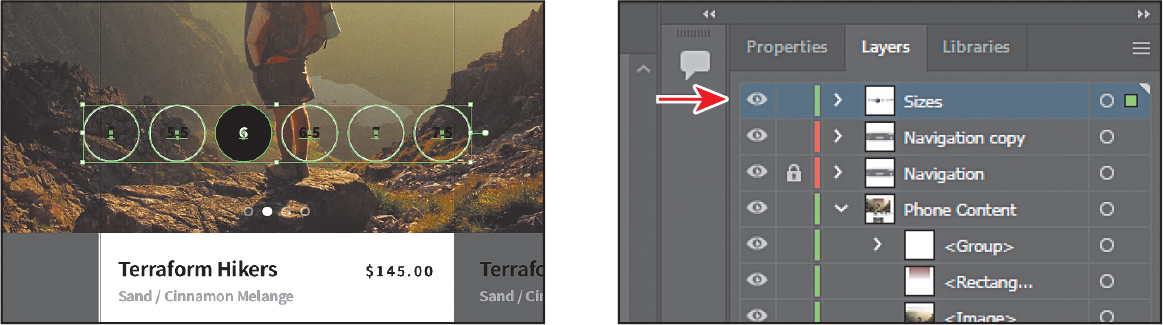
The Paste Remembers Layers option causes the Sizes.ai layer to be pasted as a layer at the top of the Layers panel. Now you’ll move the newly pasted layer into the Phone Content layer.
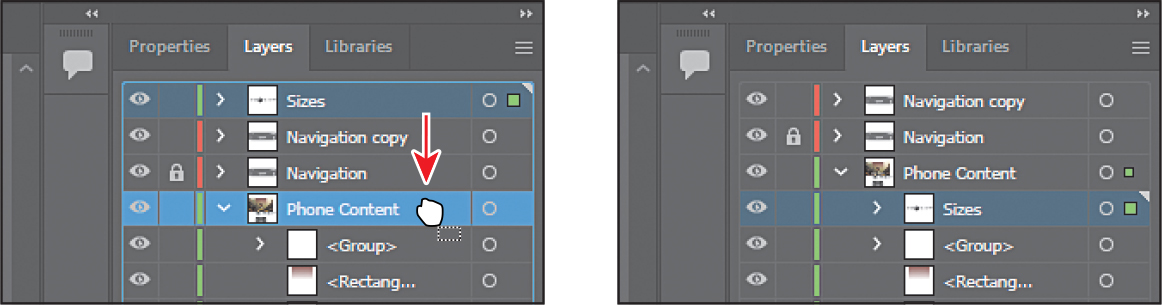
Drag the Sizes layer down on top of the Phone Content layer to move the content to the new layer. The pasted layer becomes a sublayer of the Phone Content layer.
Drag the selected artwork on the artboard down into position.
Choose Select > Deselect.
Applying appearance attributes to a layer
You can use the Layers panel to apply appearance attributes, such as styles, effects, and transparency to layers, groups, and objects. When an appearance attribute is applied to a layer, any object on that layer takes on that attribute. If an appearance attribute is applied only to a specific object on a layer, it affects only that object, not the entire layer. Next, you’ll apply an effect to all of the artwork on one layer.
![]() Note
Note
To learn more about working with appearance attributes, see Lesson 13.
![]() Note
Note
Clicking the target icon also selects the object(s) on the artboard. You could simply select the content on the artboard to apply an effect.
Click the target icon (
) to the right of the Navigation Copy layer in the target column.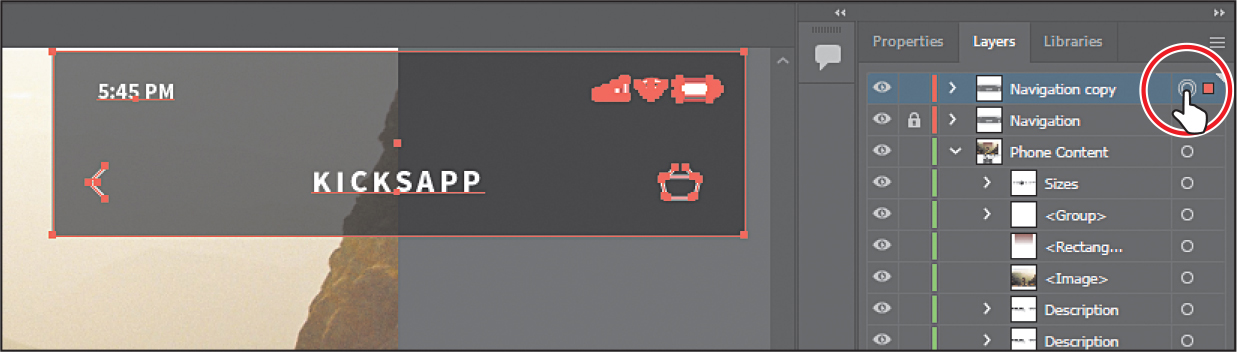
Clicking the target icon indicates that you want to apply an effect, style, or transparency change to that layer, sublayer, group, or object. In other words, the layer, sublayer, group, or object is targeted. The content is also selected in the Document window. When the target button appears as a double-ring icon (either
 or
or  ), the item is targeted; a single-ring icon indicates that the item is not targeted.
To apply an effect, choose Effect > (Illustrator Effects) Stylize > Drop Shadow.
In the Drop Shadow dialog box, select Preview and change the following options:
Mode: Multiply (default)
Opacity: 50%
X Offset: 0 px
Y Offset: 10 px
Blur: 3 px
Color: Selected
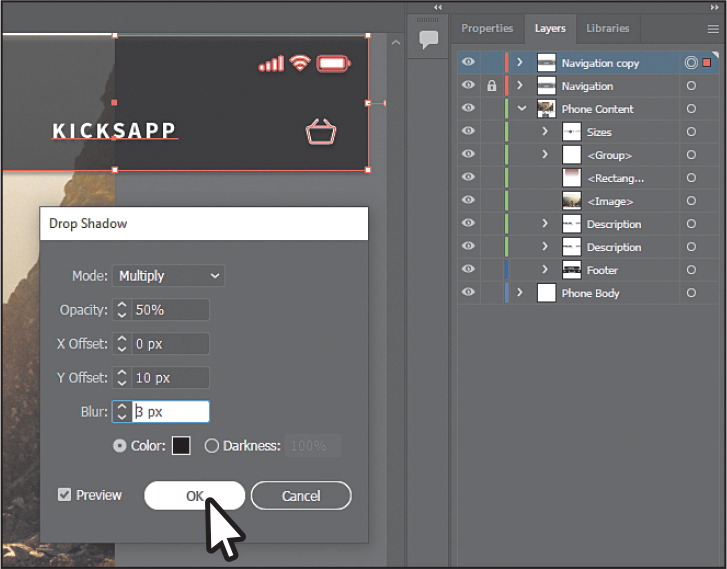
Click OK.
If you look in the Layers panel, the target icon (
 ) for the Navigation Copy layer is now shaded, indicating that the layer has at least one appearance attribute (the drop shadow added) applied to it. All content on the layer has the drop shadow applied.
Choose Select > Deselect.
Creating a clipping mask
The Layers panel lets you create clipping masks to control whether artwork on a layer (or in a group) is hidden or revealed. A clipping mask is an object or group of objects (with its shape) that masks artwork below it in the same layer or sublayer so that only artwork within the shape is visible. In Lesson 15, you’ll learn about creating clipping masks that are independent of the Layers panel. Now you’ll create a clipping mask from layer content.
Click the disclosure triangle (
) to the left of the Phone Body layer to show its contents, and click the disclosure triangle ( ) to the left of the Phone Content layer to hide its contents.
The <Rectangle> object on the Phone Body layer will be used as the mask. In the Layers panel, a masking object must be above the objects it masks. In the case of a layer mask, the masking object must be the topmost object on a layer. You can create a clipping mask for an entire layer, a sublayer, or a group of objects. You want to mask all of the content in the Phone Content and Navigation layers, so the clipping object needs to be at the top of a single layer that contains the Phone Content and Navigation content.
Click the lock icon (
) to the left of the Navigation layer name in the Layers panel to unlock it.Click the Phone Content layer and Shift-click the Navigation layer name in the Layers panel. See the first part of the following figure.
Choose Collect In New Layer from the Layers panel menu to create a new layer, and put the Phone Content and Navigation layers in it as sublayers.
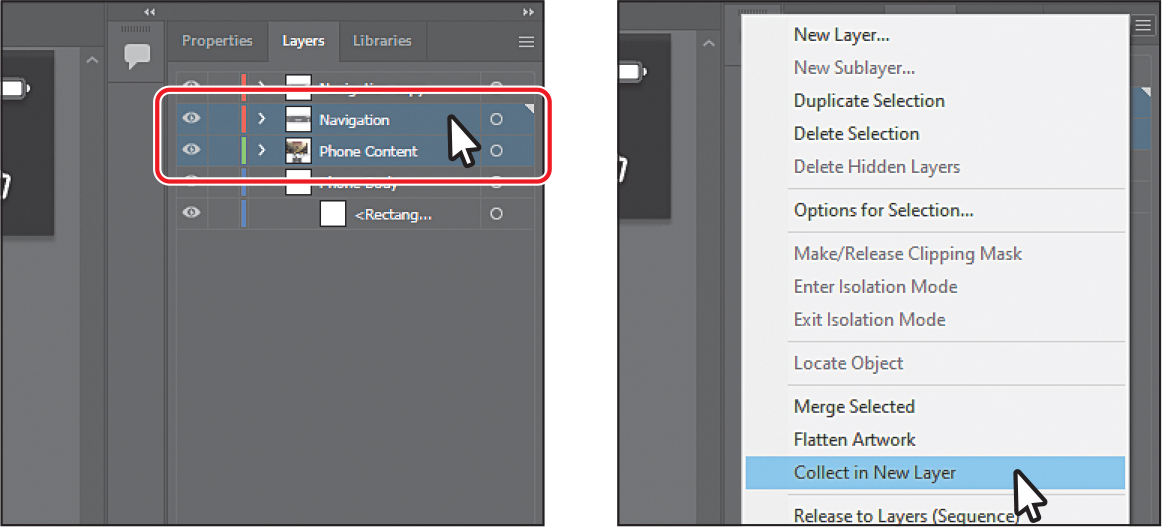
You probably noticed these other options in the Layers panel menu: Merge Selected and Flatten Artwork. Merge Selected would have merged the content of the two layers into the top layer (Navigation). Flatten Artwork would have collected all of the artwork into a single layer that it chooses.
Double-click the new layer name directly (I see “Layer 7”), and name it Phone. Press Return or Enter to accept the change.
Drag the object named <Rectangle> from the Phone Body layer onto the new Phone layer to move it to that layer.
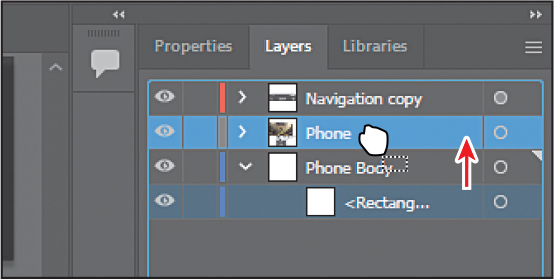
This path will be used as the clipping mask for all of the content on the layer.
Click the disclosure triangle (
) to the left of the Phone layer to show the layer content.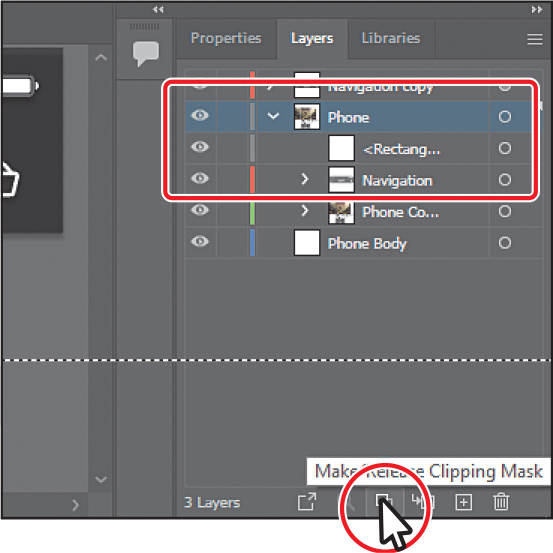 Tip
TipTo release the clipping mask, you can select the Phone layer again and click the Make/Release Clipping Mask button (
 ).
).Click the Phone layer to highlight it in the Layers panel. Click the Make/Release Clipping Mask button (
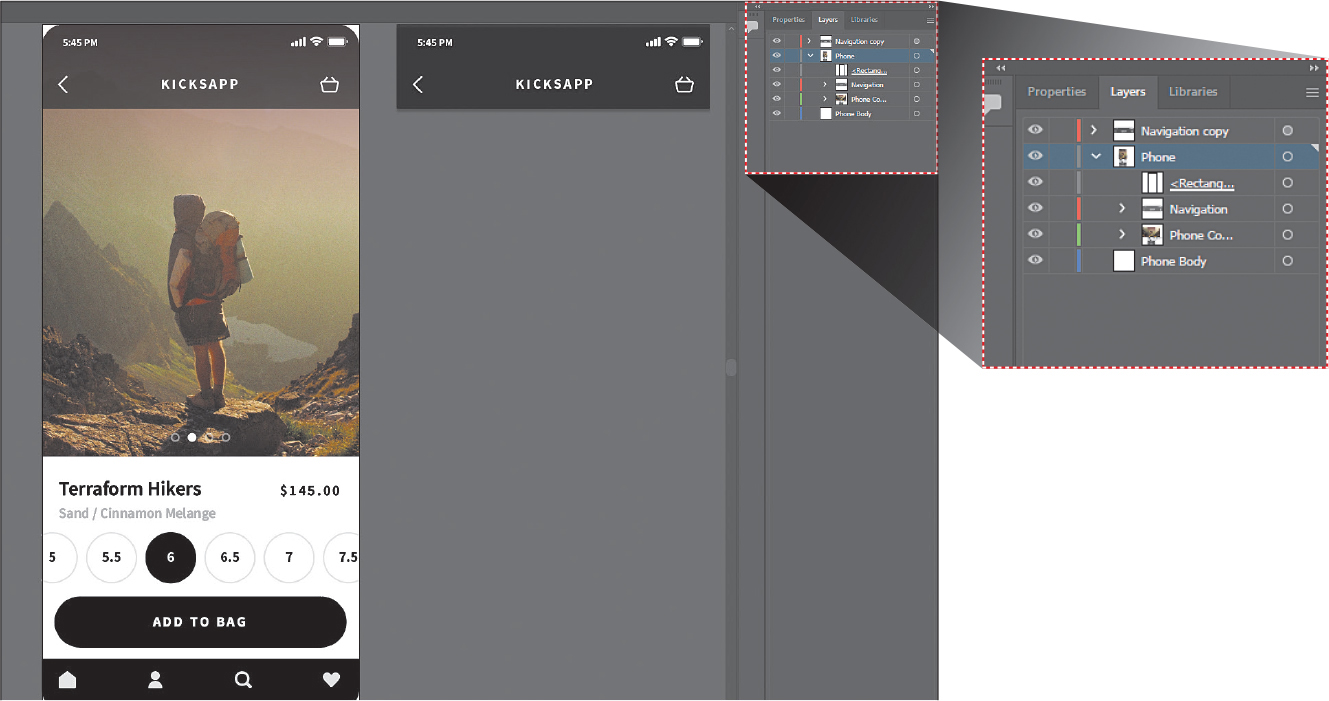
 ) at the bottom of the Layers panel. The figure shows just before clicking.
The name of the <Rectangle> content is underlined to indicate that it is the masking shape. On the artboard, the <Rectangle> content has hidden the parts of the phone content that extended outside of the shape.
Now that the artwork is complete, you may want to combine all the layers into a single layer and delete the empty layers. This is called flattening artwork. Delivering finished artwork in a single-layer file can prevent accidents, such as hiding layers or omitting parts of the artwork during printing. To flatten specific layers without deleting hidden layers, you can select the layers you want to flatten and choose Merge Selected from the Layers panel menu (
). In this case, make sure to select the layer with the mask (Phone) last, so the layer mask is intact. NoteFor a complete list of shortcuts that you can use with the Layers panel, see “Keyboard shortcuts” in Illustrator Help (Help > Illustrator Help).
Choose File > Save and then choose File > Close.
Review questions
1 Name at least two benefits of using layers when creating artwork.
2 Describe how to reorder layers in a file.
3 What is the purpose of changing the color for a layer?
4 What happens if you paste a layered file into another file? Why is the Paste Remembers Layers option useful?
5 How do you create a layer clipping mask?
Review answers
1 The benefits of using layers when creating artwork include organizing content, selecting content more easily, protecting artwork that you don’t want to change, hiding artwork that you aren’t working with so that it’s not distracting, controlling what prints, and applying effects to all of the content on a layer.
2 You reorder layers by selecting a layer name or its selected-art indicator in the Layers panel and dragging the layer to its new location. The order of layers in the Layers panel controls the document’s layer order—topmost in the panel is frontmost in the artwork.
3 The color for a layer controls how selected anchor points and direction lines are displayed on a layer and helps you identify which layer an object resides on in your document.
4 The paste commands paste layered files or objects copied from different layers into the active layer by default. The Paste Remembers Layers option keeps the original layers intact when the objects are pasted.
5 Create a clipping mask on a layer by selecting the layer and clicking the Make/Release Clipping Mask button (![]() ) in the Layers panel. The topmost object in the layer becomes the clipping mask.
) in the Layers panel. The topmost object in the layer becomes the clipping mask.