In CRM-speak, a suspect is a person or a company with whom you may do business someday. In all likelihood, your suspect hasn't yet heard of you. A prospect is the next level up. Your prospect has heard of you and may have even expressed some interest in doing business with you. Microsoft CRM refers to both suspects and prospects as leads.
An opportunity is a lead that has matured enough to deserve serious attention. But before you can begin to turn leads into opportunities, you need to enter your lead data (such as contact information, the source of the lead, and what the prospect is interested in) into CRM.
Note
Actually, you can promote a lead to an account record, a contact record, or an opportunity record, or to any combination of these three. The subtle benefit of promoting a lead to an opportunity is that you can forecast a sale associated with an opportunity. You can also link each opportunity to a price list, which helps determine the pricing in a quote.
You need to create an opportunity record before you close your opportunity (whether by winning or losing the deal). You create opportunity records manually by just typing them in, by importing them from outside files (such as Excel), or by converting them from leads. Importing data from Excel is discussed in Appendix A.
Workflow rules enable almost complete automation of your selling process, moving opportunities from one sales stage to the next. Workflow is part of the process of handling opportunities and is discussed in some detail in Chapter 9.
In Chapter 16, we discuss what happens when you close an opportunity and turn it into the real deal. In this chapter, we talk about entering leads and moving them through your sales process with the intention of turning them into full-fledged opportunities.
Leads may come to you from many sources. Some of the most common sources are referrals from existing customers, mailing lists you've rented or purchased, inquiries from your Web site, and responses to marketing campaigns.
Leads get into CRM in essentially two ways. You can enter them manually or you can import them, typically from an Excel file. If your CRM system is integrated with your Web site, you can automate the entry of leads from the Web. It's likely, though, that you'll want some expert help for that. Chapter 21 deals with Web integration and Chapter 28 discusses when and how to access some expert help. You're probably going to enter leads manually if you have only a few sporadic leads or if you don't have them available in a convenient electronic format. In this section, we discuss getting leads manually into your CRM system and what to do with them after they're there.
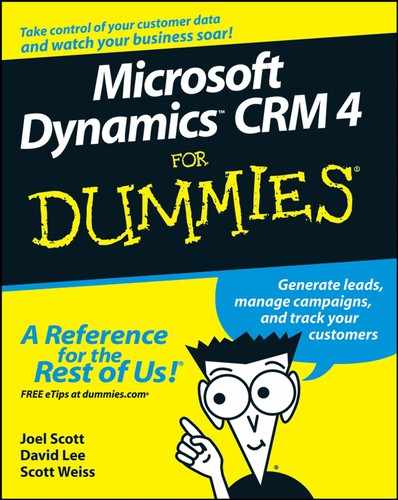
You can access everything about leads and opportunities from the Sales module. And everything about leads starts at the Leads window, which is shown in Figure 12-1. To get to that window, click the Sales button near the bottom of the navigation pane. Then, at the top of the pane, select Leads. That's it.
Note
As you go through the standard Lead windows, you can see about 20 data fields. As with most data entry windows throughout CRM, many more fields than that are available. Those fields have been hard-coded into the database structure but remain invisible unless your system design people make them available. In the case of lead records, for example, 95 fields are available, should you need to track more information about your leads. Your administrator or dealer can add fields, if needed.
Your marketing department's efforts are supposed to create leads. Microsoft CRM thinks of a lead as a potential customer that may or may not have expressed interest in your company's products. For example, the marketing department might purchase a list of potential users. Or various types of advertising might generate inquiries. In any case, the resulting contact information has to get into the CRM database.
Unless you have an electronic list or your CRM system is hooked to your Web site, you're probably going to be entering leads the old-fashioned way — by typing. In this section, we discuss the easiest way to manually enter those hard-won leads. Just follow these steps:
On the Leads window toolbar, click the New button.
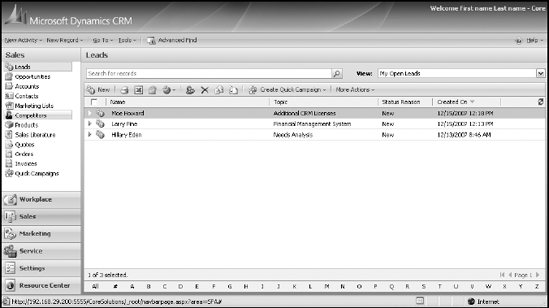
The Lead: New window appears, as shown in Figure 12-2, with four tabs: General, Details, Administration, and Notes.
Fill in at least the required fields, which are highlighted with red asterisks.
If the General tab isn't already selected, click it. For the Topic field, enter the product or service that the prospect is interested in.
Tip
The Company Name field is a required field, so you must enter a company name even if your lead is an individual. When we encounter that situation, we simply enter X as the default company name. If you have the name of an individual or any other relevant contact information, enter that as well.
Tip
Although the E-Mail and Lead source fields aren't system-required, they should be at least business-recommended fields (in blue). The e-mail address field is on the General tab, and the Lead source field is on the Details tab. Make sure you enter as much information as you can in the General, Details, and Administration tabs.
When you're finished, click the Save and Close button at the top of the screen.
The system returns to the Leads window, where you can create another lead, access a lead, or move on to another function.
Aside from the obvious contact information, such as company name, contact person, and phone number, you should focus on collecting data that will enable you to follow up both immediately and over the long term. E-mail addresses and specific product interests are key ingredients to properly following up on leads, and they're critical for campaign management and electronic marketing.
You can modify a lead by navigating to the Leads window, clicking the lead, and then making the necessary changes in the various tabs of the lead's record. Remember to click Save and Close before leaving the record.
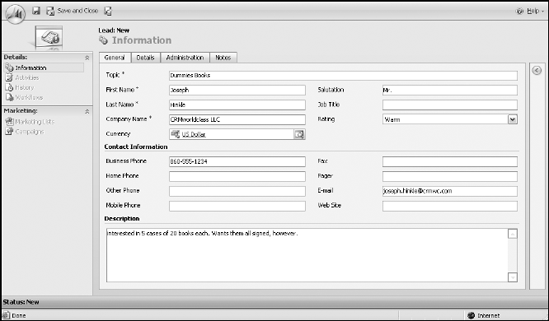
If the lead you're interested in isn't displayed in the list, check the View menu in the upper-right corner. This menu contains several options in its drop-down list that expand or contract the number of listings displayed, as shown in Figure 12-3. For example, if you're looking for a lead that hasn't been assigned to you, try selecting Open Leads from the View drop-down list. Depending on your access rights, you may be able to see additional leads this way.
If you don't find your lead in any view, it may have been converted to an account, a contact, or an opportunity. That's good news, but it means you may have to look under those other record types for your data. We discuss accounts and contacts in Chapter 13 and opportunities later in this chapter. If your lead has been disqualified, which is just another way of saying, "forget about it," refer to the upcoming "Resurrecting a lead" section.
When you've decided that you have no hope of generating anything worthwhile from a lead, you can disqualify it. You do this as follows:
In the Leads window (refer to Figure 12-1), double-click the specific lead you intend to give up on.
The General tab for that lead appears.
Click the Convert Lead button near the top of the window.
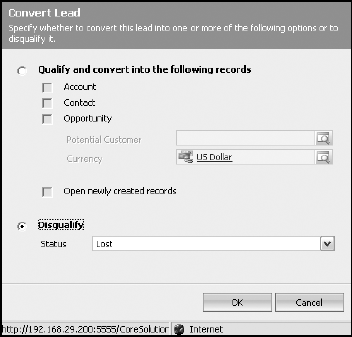
The Convert Lead dialog box appears as shown in Figure 12-4.
To disqualify the lead, select the Disqualify option.
All the choices above the option become dimmed.
Select a reason for the disqualification from the Status drop-down menu and then click OK.
The lead now shows up only in the Closed Leads view in the Leads window.
Warning
Deleting a lead is possible but not recommended. Deletions are permanent, and deleting a lead also deletes any attachments or notes associated with the lead. A far better approach is to disqualify the lead. That way, an audit trail (using that term loosely) remains if needed. And disqualifying allows you to resurrect the lead later if the situation changes.
Occasionally you get lucky and a lead that you thought had died comes back to life. If you disqualified the lead, you can bring it back without re-entering all the old information. If you didn't heed our advice — see the preceding Warning — and instead deleted the lead, you're out of luck.
To resurrect a lead, perform the following steps:
In the upper-right corner of the Leads window, change the View selection to Closed Leads.
The lead you previously disqualified appears somewhere in the list.
In the list, select the lead in question by double-clicking it.
The record for that lead appears.
On the menu bar at the top of the screen, choose Actions
Reactivate Lead.
The Confirm Lead Activation dialog box appears.
Click OK.
The original record appears. The data that had appeared dimmed while the lead was disqualified is again available for editing and general use.
Click the Save and Close button, and you're back in business.
The record is updated and the window closes.
Review the list in the Leads window to make sure that your lead is successfully brought back to life. Make sure to change the Status to "Open Leads" or to "My Open Leads" to actually see your newly resurrected lead.
Your goal is to turn all leads into opportunities. When you reach that goal, it's time to turn your lead record into an opportunity record. Navigate to the record for that lead and then click the Convert Lead button at the top of the screen. The screen shown in Figure 12-5 appears.
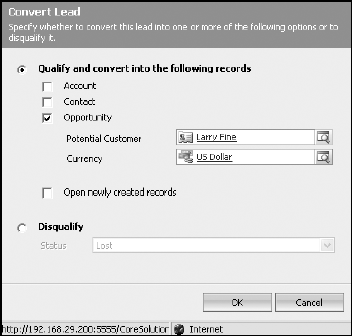
The first three conversion choices in Figure 12-5 aren't mutually exclusive. If you initially created a lead without establishing any related accounts or contacts, you can do all three conversions in one smooth step now. We discuss accounts and contacts in Chapter 13.
If this potential sale is directly related to a consumer (a person), select the Contact option. If you're trying to sell something to a company, choose the Account option. If you're dealing with a company, you can select the Contact in addition to selecting Account, in which case the system creates an account and a related contact record.
Note
An account is a company. A contact is a person. A customer might be either one.
The third option, Opportunity, converts your lead to an opportunity. If you also elect to create an account record, that opportunity will be related to it. If you don't create an account but do create a contact, the opportunity will be related to the contact. If you have the system create both an account and a contact, the opportunity (and the contact) relates to the account.
An opportunity is always associated with a customer! That's why the Customer field is a required field.
A fine line exists between a lead and an opportunity. Generally, you've crossed the line when you're able to forecast a sale with associated revenue, a potential close date, and a probability for the sale happening. When those conditions are met, you graduate a lead to an opportunity, although your organization may define the transition differently. If you've already written a quotation, you're definitely over the line.
We cover converting a lead to an opportunity in the preceding section. You can also skip entering the lead record entirely and go directly to an opportunity record. We like to do this when an existing client calls and asks for something — even if we aren't ready to forecast a sale yet.
To create a new opportunity, follow these steps:
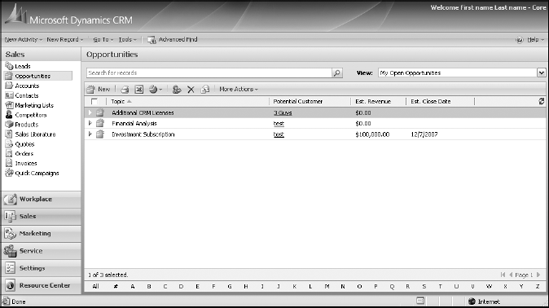
Near the bottom of the navigation pane, click the Sales button. Then, near the top of the pane, select Opportunities.
The Opportunities window appears, as shown in Figure 12-6.
On the Opportunities window's toolbar, click the New button.
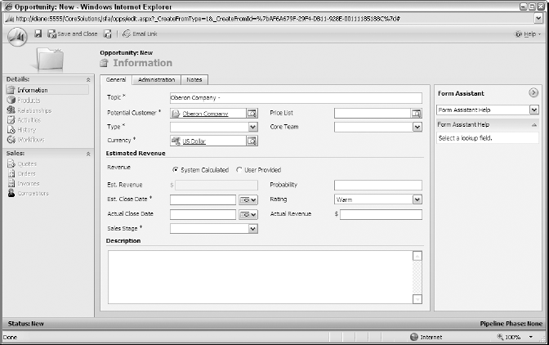
The Opportunity: New window appears, as shown in Figure 12-7.
Enter a topic.
Topic, which is a system-required field, is just a description of what you expect to sell — for example, Consulting, Term Insurance, or Transporter System.
Select a Potential Customer (the second required field) to which this opportunity relates.
Remember, a customer is either an account (a company) or a contact (a person). If you click the magnifying glass to the right of the Potential Customer field, another screen appears that allows you to browse to and select either an account record or a contact record.
If you have a price list set up, select the appropriate one.
We discuss price lists in Chapter 7.
For the Revenue field, if your price lists have been set up, select System Calculated; otherwise, select User Provided.
By the way, you are the user, so be prepared to enter a forecasted amount if you select the User Provided option.
Enter information in the following fields:
In the Est. Revenue field, enter your best guess for the actual revenue you'll receive when you close the deal.
In the Probability field, enter a whole number between 1 and 99.
Although 0 and 100 are allowed, a 0 probability sale doesn't deserve to be an opportunity, and at 100 the deal must already be closed and turned into an order.
In the Est. Close Date field, enter the date when you expect to close the deal.
In the Rating field, enter a rating.
You can select Cold, Warm, or Hot to describe the rating, although the Probability field already does a good job of rating.
Although none of these are system-required fields, you don't have much of an opportunity if you don't have these estimates.
Click the Save and Close button to save the opportunity record.
From the Opportunities window, you can update an existing opportunity record by double-clicking the particular record, editing the information in any of the three tabbed areas (General, Administration, and Notes), and then saving the record.
Tip
As your opportunity progresses through the sales cycle, you'll want to update it often to maintain the current status of your real pipeline.
You can assign an opportunity to yourself or to another user. You can share opportunities with other users or teams. For large or more complex opportunities, this is often a necessity.
Note
When you assign an opportunity to someone else, you change the record ownership to that user. Sharing enables other users to see the opportunity in their My Opportunities view just as if it were their own, but it doesn't change the record's ownership.
To assign an opportunity to another user, follow these steps:
On the menu bar (at the top of the screen), choose Actions
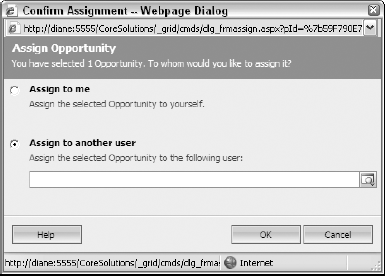
Assign.The Assign Opportunity dialog box (available from the Opportunity record itself, not from the Opportunity grid) appears, as shown in Figure 12-8. Although you can assign one or more opportunities to yourself or to another user, you can't assign an opportunity to multiple users or to a team.
Select the second option, Assign to Another User. You can also assign records to yourself, but your organization may have some rules regarding this.
Click the magnifying glass to the right of the Assign to Another User text field.
A Look Up Records dialog box appears.
Select the user to whom you want to assign this opportunity.
The Assign to User text field shown in Figure 12-8 is automatically filled in with that user's name.
Click OK.
The system returns to the General tab of that record, even though the opportunity is no longer yours.
You share opportunities as follows:
In the Opportunities window, click the More Actions button.
A short list of options appears.
Choose Sharing.
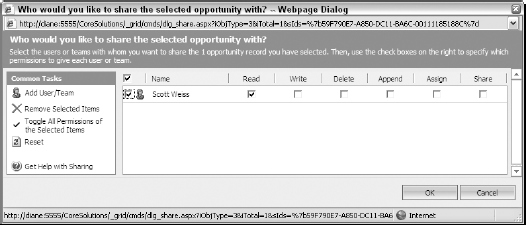
The window shown in Figure 12-9 appears.
Select which users or teams you want to share this opportunity with and which rights you want to give them.
Unlike assigning, sharing allows you to choose multiple users and even teams of users. For each user or team, you can decide how much authority to give. For example, you might decide to allow everyone to see the opportunity but not make changes to it. Or, if you're going away on vacation, you might share the opportunity with another user and give him or her complete rights to make changes (Write) and to share the opportunity with yet another user. Those choices and selections are shown in Figure 12-9. Chapter 8 has further details on security and rights.
Click OK after you've chosen the people or teams and their rights.
The system returns to the Opportunities window.
Opportunity records are often associated with many other types of records. Opportunities can be, and should be, related to accounts, or contacts, or both. (We discuss how to associate an account or contact to an opportunity in the preceding section, "Creating and sharing opportunities.") This makes sense because you're planning to sell something to either a company or a person. You may also want to relate activities (such as phone calls and appointments), quotes, orders, invoices, notes, or attachments to an opportunity.
While working on an opportunity, chances are you're generating one or more quotes, making notes, and saving documents or data files that are associated with the opportunity. For example, in our business, CRM consulting, we often need to save sample data files so we can analyze how best to convert a legacy system's data into Microsoft CRM files. All these various files can be linked to the opportunity record.
Here are the steps to link activities or files to an opportunity:
In the Opportunities window, click an opportunity record to see its details.
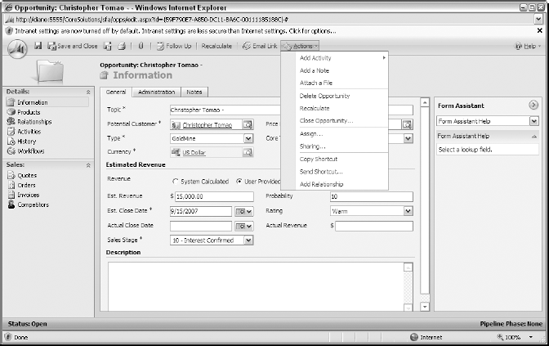
On the menu bar (at the top of the screen), choose Actions.
Select one of the choices shown in Figure 12-10.
Click the Save and Close button.
Workflow rules automate your sales process — assuming your organization has a process and the workflow rules are set up to emulate that process. Typically, a sales process has 3 to 12 stages ranging from initial contact to generating a quote, negotiating with the customer, and closing the deal. Every company has a different process with different stages. In fact, a single company may have a different process for every type of product or service it sells.
Setting up your processes is usually the domain of your sales management team, an outside consultant, or a combination of the two.
From the Actions menu, you can advance an opportunity through your predefined sequence of sales steps. We highly recommend this approach, but an intelligently designed workflow is key. Workflow rules are discussed in Chapters 9 and 18.
The Relationships function enables you to link various accounts and contacts. This is often important, particularly in more complex deals. For example, you may have a pending deal with a prospect, and both an outside consultant and a leasing company are involved. Because the consultant and the leasing company are each separate records in your database, you use the Relationship function to link them. From the Opportunities window, you select the appropriate opportunity, select Relationships from the navigation pane on the left, and add new customers to the opportunity.
Eventually, whether you win or lose the deal, you need to close the opportunity. This is easy enough to do. To close an opportunity properly, follow these steps directly from the Opportunity form (not the grid view):
On the menu bar (at the top of the screen), choose Actions
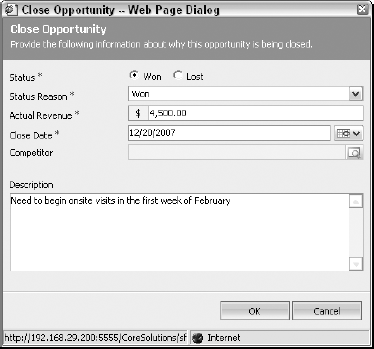
Close Opportunity.The Close Opportunity window appears.
Under Status, click the appropriate option to indicate whether you won or lost the opportunity.
In the Status Reason field, select one of the drop-down choices.
Microsoft CRM provides two reasons for losing a deal: The order was canceled or you were outsold. We've never seen a salesperson select that second choice. Many other reasons exist for losing a deal, and your system administrator or dealer should help expand this list.
Do one of the following:
If you won, modify the Actual Revenue field to reflect the agreed-upon price and then enter the Close Date.
If you lost the opportunity, enter the competitor to whom you lost, if you know that information.
In the Description field, enter a sentence or two with your final comments.
An example is shown in Figure 12-11.
Click OK to close the opportunity.
The system returns to the General tab of the opportunity.
A previously closed opportunity may resurface and need to be reopened. If so, follow these steps:
In the Opportunities window, make sure the View menu displays Closed Opportunities.
In the window's list, select the appropriate opportunity.
The opportunity's record appears.
On the menu bar (at the top of the screen), choose Actions
Reopen Opportunity.The Opportunity's status changes immediately, and you can edit it just as you would any other active or open opportunity record.
You can also delete an opportunity. This may seem like a good idea, particularly if you're upset that you lost a deal. In the long run, however, it's a bad idea because you never know when a deal may come back to life or you may need to refer to your notes on it. Don't do it. Instead, close it and attach a note if need be.