Microsoft CRM 4 comes with a basic activity management system that enables you to schedule or log activities associated with the various records in the database, such as opportunities, leads, contacts, accounts, or cases.
Your calendar is a subset of your activities and displays only appointments. Your activities show a wider assortment of things that take up your time, such as phone calls and miscellaneous tasks such as meeting with your boss or coordinating the company golf outing. In addition, only the appointments on your calendar are coordinated with Outlook. Phone calls and tasks never show up in the main area of Outlook.
Aside from the obvious practice of entering all your activities in the system to ensure that they're properly documented and that you don't forget to do them, workflow rules can also have an important role with activities in your business processes. Workflow rules can look for overdue activities and alert you to them. They can look for activities that should be scheduled (such as following up on a quote that you sent out a week ago or an annual maintenance contract that's due next month) and send a series of alerts to the right team members. This is a powerful use of scheduling, but it works well only if everyone on the team is consistently logging his or her activities. (We discuss workflow in detail in Chapter 9.)
The ingredients essential to activity management include viewing existing activities, entering new activities, delegating activities, the inevitable rescheduling of activities, and completing activities. In the next few pages, you'll find out how to manage your activities and, to the extent possible, the activities of others as well.
Microsoft designed its CRM product assuming that most users also use Outlook. In this chapter, we discuss how to use Microsoft CRM's activity management system assuming that you aren't using Outlook. This is a big assumption, but it helps simplify the discussion of calendar usage.
If you aren't using Outlook, you'll want to look at the Service Scheduling calendar as a way to keep you and your team members on the same page. You won't get any alarms about appointments or due dates. (Maybe you view this as a good thing!)
Chapter 2 covers using Outlook with Microsoft CRM. If you're an Outlook user, consider reviewing Chapter 2 next. Doing so will fill in the holes created in this chapter.
Warning
If you're coming to Microsoft CRM with experience using another CRM system, you may wonder where some of the more advanced teamwork functionality is hiding. So, before you start looking around, here are some of the program's shortcomings:
To look at everyone else's activities, you have to go to the Service Scheduling area from the Navigation pane. Using Outlook via Exchange provides some assistance here, though, in that it allows for shared calendars.
You can schedule other users to do something, but no convenient, automatic way exists to notify them that you did the scheduling. And because you can't see their calendar easily, you may end up scheduling them into a conflict. Outlook's Meeting Request is the answer to this situation. (And you can link Outlook Meeting Requests to CRM, so this is a viable workaround.)
You can't set an alarm on any kind of activity to alert you to an upcoming event. Therefore, Microsoft also doesn't have a snooze button in CRM.
The system doesn't automatically roll over activities from one day to the next if you don't complete something when you're supposed to. However, activities do remain on your calendar as past-due activities and show up on your activity list as long as you fail to complete them.
Some of these oversights are resolved if you're using the Outlook client. More on that in Chapter 2.
Having now finished our complaints, we must say, in all fairness, that Microsoft CRM enables you to schedule and track all the important activities associated with customers. If you use this feature consistently, you'll always be organized. You'll never forget to do the important things. You'll make more money, live longer, and prosper. But we do still need to easily see and share our staff's calendars. And, we've got to say it one more time: Use the Outlook client if you really want the system to work well for you.
To display your calendar, click the Workplace button near the bottom of the navigation pane. Then, near the top of the pane, click Calendar, which appears under My Work. (If nothing appears under My Work, click the plus sign next to it to display the list.) The Calendar window appears on the right, as shown in Figure 14-1.
The service calendar displays the weekly view of appointments and service activities. Note that service activities are activities associated with the Service module that have not only a user but also company resources. The information is available also in the Service Scheduling window, which allows users to see other user's calendars and activities.
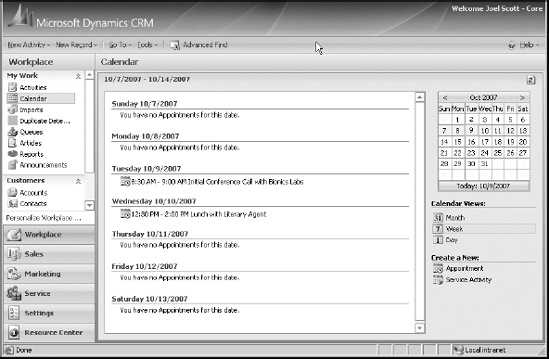
The area on the far right of the screen contains a calendar you can use to change the date or date range of the calendar display. You also can select from three display modes — month, week, and day.
If you really want to know what's on your agenda, the Activities window is the place to go to look at your open activities. To get there, select Activities under My Work at the top of the navigation pane. You can also set this as the default screen that shows up every time you start up CRM. This is discussed in Chapter 4. Figure 14-2 shows a typical Activities window. This is probably where your day should begin and where you should spend much of your professional life.
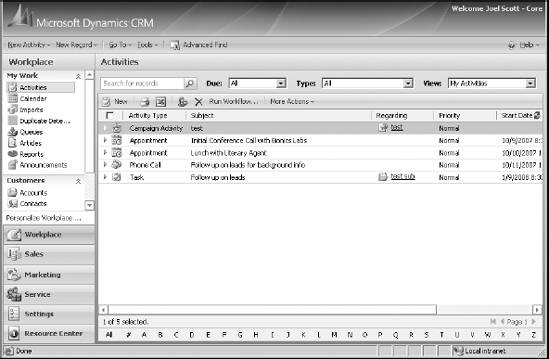
Figure 14-2 shows the Activities window for appointments, but remember you can manage eight types of activities in Microsoft CRM:
Tasks
Fax
Phone call
E-Mail
Letter
Appointment
Service Activity
Campaign Response
Tip
Clicking the column title re-sorts your activities by that column, from ascending to descending order. Activities are sorted within each day's display. If you want to adjust the width of a column, drag the border between the column titles. You can change the columns displayed by saving your own Advanced Find searches, or your system administrator or implementation partner can create customized views.
At the top of the window, the Look For field allows you to locate scheduled activities based on the subject. Although you can use the alphabetical listing bar at the bottom of the window to locate Subjects beginning with a particular letter, the Look For field is more flexible. For example, you can enter consecutive characters, such as flor, to find activity subjects starting with, say, Florida. You can also use the wildcard character * to match any sequence of characters.
Tip
If you're trying to find all of your activities, enter * in the Look For field and then click the Find button. This displays both open and closed activities. You might think by just choosing My Activities in the View drop-down list, all your activities would be displayed. But you'd be missing the closed activities with that method of searching.
You can use the View menu (in the upper-right corner of the Activities window) to select from one of several views. Your selection of a view works with your Search for Records selection. These views are
All Activities: This comprehensive list displays open and completed activities no matter whose they are.
Closed Activities: These are all the completed activities the system contains — yours and everyone else's.
My Activities: These are the activities on your schedule. This is probably the most important view and the one we use most often.
My Closed Activities: These are all your completed activities that the system contains.
Open Activities: These are all open activities, whether they belong to someone else or to you. Unfortunately, the default view doesn't show to whom they belong.
Scheduled Activities: These are all your scheduled appointments.
Of course, there are no activities to view if you don't enter some in the first place. Creating these activities in CRM is the subject of the next section.
You can create an appointment for yourself directly from the Workplace, which Microsoft online help suggests. This method is quick, but you can easily cause yourself problems by flippantly agreeing to some appointment without first checking your calendar — or better yet, your activity list.
Note
An appointment is just a special kind of activity, and that's why we sometimes seem to refer to those two things (appointments and activities) almost interchangeably. The calendar shows only appointments, not tasks or phone calls. If you want to avoid scheduling two conference calls at the same time, for example, use the Activities window instead of the calendar.
You're always better off checking before you schedule appointments. For that reason, we recommend another approach to scheduling your appointments when working online in Microsoft CRM:
Near the bottom of the navigation pane, click the Workplace button. At the top of the pane, select Activities (under My Work).
Review your schedule here before committing to another appointment or activity.
On the Activities window's toolbar, click the New button.
Select an activity (such as Appointment) and then click OK.
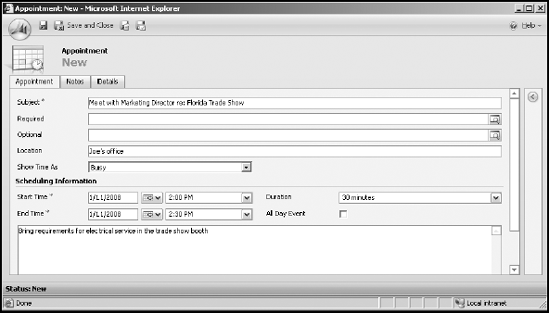
Figure 14-3 shows a typical window for entering appointment details. We describe this screen in detail in a moment.
Fill in the details.
When you're finished, click the Save and Close button.
You return to the Activities window.
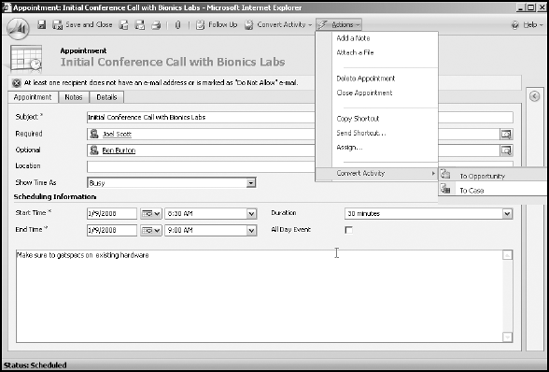
The Appointment window is divided into three tabs: Appointment, Notes, and Details. The following fields deserve clarification or further elaboration:
Appointment tab: the Appointment tab contains the information that will be transferred to your calendar display.
Subject: The text you enter in the Subject field appears in the Activities window and the Calendar window. In the weekly view of the calendar, the text wraps so you can see it all. In the daily view, if the text is too long, it's cut off.
Required and Optional: When you click the magnifying glass to the right of each of these fields, CRM presents a window allowing you to specify one or more people involved in the meeting. The first field, Required, is for those people for whom attendance is mandatory. The Optional field is for people not quite so important.
Regarding: This field enables you to attach an activity to one or more records, such as contacts, accounts, or leads. By associating the activity with more than one record, you can then see the activity from any of those records.
Start Time and End Time: If you don't enter a start and end time, particularly for appointments, the times aren't displayed on your calendar.
All Day Event: By default, an event is a day-long activity. When you select an All Day Event, you no longer have the option of selecting specific times. However, you can specify the dates; if the end date is different from the beginning date, you create an activity that spans multiple days. Vacations are a good example of an appropriate use of All Day Event.
Details tab: The Details tab houses the information on the meeting owner and the organizer — possibly two separate people.
Tip
The organizer is the person coordinating the activity and isn't necessarily one of the attendees. This is the person you blame when the meeting is messed up.
Notes tab: The Notes section is an unlabeled free-form text area that appears on the lines just below the time span and subject on the calendar.
That's what it takes to schedule something for yourself. One of the more powerful features of CRM systems is the ability to schedule activities for other people — that is, to delegate. That's what we discuss next.
How you use Outlook determines how you can best schedule activities for others on your team. Specifically, if calendar sharing is enabled in Outlook, scheduling is easy. Even if sharing isn't enabled, you can use Outlook's meeting request functionality to assist in setting up activities for other people. We discuss Outlook in detail in Chapter 2. Assuming you aren't using Outlook, you still have a few options.
Because you can't actually see anyone else's complete schedule using Microsoft CRM, it would be improper to even try to put anything directly on someone else's calendar. So you're left with two options when attempting to schedule the activities of others: e-mail requests and instant messaging.
You can use Microsoft CRM's e-mail system to send an activity "suggestion" to one or more users on your team. You can attach the e-mail to the appropriate record and request that the other users schedule that phone call or appointment. Chapter 2 discusses e-mail in some detail.
The second method for coordinating your activities with other members of your team is to use one of the instant messaging systems. They're free, which makes them even more appealing. The most common ones are Microsoft's Instant Messenger, Yahoo!, AOL, Trillian, and ICQ. In addition, Microsoft CRM version 4 now has an "Integrated Office Communicator" which is really a fancy way of saying that Instant Messaging is built-in. It's your System Administrator's task to set this up if your organization thinks it's appropriate.
Note
Several compelling reasons exist for implementing such a system. You can see who's online and available at any given moment. You can coordinate with users who are widely separated geographically. We like the instant part of the equation also. In addition, some instant messaging systems keep a history of your messages. You could, when the conversation is over, cut and paste the message history into the Notes section of the appropriate record.
In a flash, you can ask another user to call a client and get a confirmation that that task is going to happen. This is an ideal way to respond to a client call requesting service or support.
When you create an activity, you can assign it directly to yourself (by default) or to another user or to a queue. Similarly, you can reassign an activity to another user or to a queue. When you do reassign an activity, the ownership of that activity doesn't change until the intended user or queue accepts the assignment. You can assign activities from anywhere in CRM, but you can accept them only from the Queues area of the Workplace.
Assigning an activity is our favorite. We love to delegate. To do so, follow these steps:
Near the bottom of the navigation pane, click the Workplace button. At the top of the pane, under My Work, click Activities.
The Activities window appears on the right. Based on your selection in the View field, you see some or all of your scheduled activities.
Select one or more activities that you want to assign to someone else.
In Figure 14-4, we've selected two activities.
Note
You can select one or more activities by highlighting those activities and using either the Shift key (for contiguous activities) or the Ctrl key (for noncontiguous activities.)
Click the Assign option from the Activities drop-down list.
The Assign to Queue or User dialog box appears, leading you through the sequence of actions to delegate all the activities you highlighted in Step 2.
Click the magnifying glass at the end of the field to see the entire list of users to whom you might assign these activities.
Select one or more users from the list. Make sure you notify the assignees either by setting an alarm, sending an Instant Message, sending an e-mail, or by yelling down the hall.
Click OK.
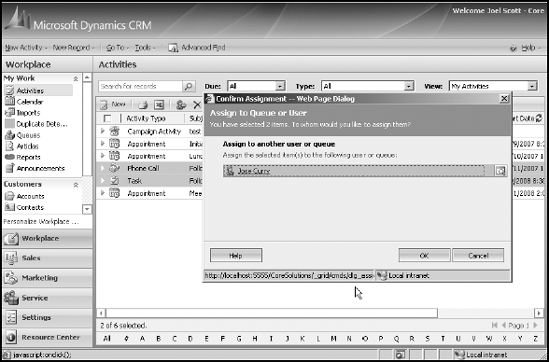
CRM returns to the Activities window.
Nothing is as satisfying as getting things off of your activity list. To complete, or close, an activity, follow these steps:
Near the bottom of the navigation pane, click the Workplace button. At the top of the pane, under My Work, click Activities.
The Activities window appears on the right.
To follow along with the example, select an appointment that you want to mark as completed.
The Appointment window appears, with three tabs: Appointment, Notes, and Details.
Click the Actions button and Add a Note to create a note that will be attached to the record. Save and close the Note.
Documenting what you do is important so that the historical trail for this record is complete.
Click the Actions button and complete the activity as shown in Figure 14-5.
We have a saying in our office: "If it's not in CRM, you didn't do it." A rough translation is that unless you enter your activities and close them when you've completed them, there's no evidence that you did anything. Later, you'll be explaining to a skeptical boss that you really did make those follow-up calls but just didn't bother completing them in CRM. Complete every activity immediately afterwards. Then there's no doubt.