The Sales Literature area is really a document management system. After you set up your subjects (formerly known as the Subject Manager) to provide the structure for your company's document library, you can file individual pieces of sales literature for future reference. (See Chapter 23 for full details about how to set up the subjects.)
Subjects create an organizational structure for your literature, documents, and brochures. Think of it as the Dewey Decimal System for your own library. The Sales Literature area allows you to stock the shelves. And the shelves, by the way, are on the server — not your local computer.
You may also want to keep track of your competitors and their sales literature. This information is particularly important when competing for projects. What you find out (even in a losing battle) may help you win the next one.
All new literature must be categorized by subject. This means your subjects must be set up with a structure to house your documents. (As mentioned, see Chapter 23 for information on subjects.)
To add a piece of literature — or any document or file — to the Sales Literature area, follow these steps:
In the lower part of the navigation pane, click the Sales button.
In the upper part of the navigation pane, select Sales Literature.
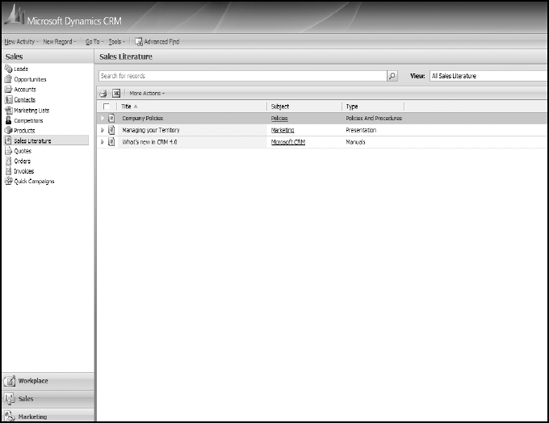
The Sales Literature window appears, as shown in Figure 17-1.
On the Sales Literature window's toolbar, click the New button.
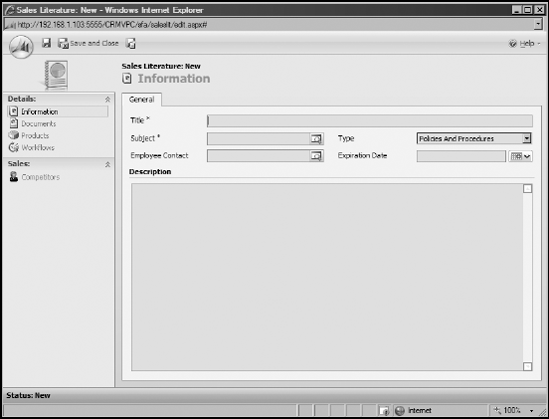
The Sales Literature: New window appears, as shown in Figure 17-2. This is the main information screen for entering and cataloging your literature.
In the Title field, enter a title for your article.
In the Subject field, select a subject as follows:
Click the magnifying glass to the right of the Subject field.
The Look Up Records window appears.
Select a subject from the list.
In the Type field, click the arrow and choose an item from the list.
This list displays likely topic descriptions for your literature.
If you want, associate a user with this literature as follows:
Click the magnifying glass to the right of the Employee Contact field.
Select an employee to associate with the literature.
This is probably the person on your staff who developed the literature or the one who is responsible for the documentation.
To the right of the Expiration Date field, click the calendar icon and select a date for your document to expire.
For example, you may have a sale advertisement or a company policy that expires on a particular date.
If you want, enter an abstract of the document in the Description field.
Click Save (the disk icon) or the Save and Close button.
If you select Save, the system saves what you've entered so far but remains on this same New Literature screen awaiting further edits. If you click Save and Close, the system returns to the Sales Literature window.
So far, you've entered only general information about the document. You still need to attach the document to the listing you just created. Follow these steps:
In the Sales Literature window, click the listing to which you want to add one or more documents.
In the window's pane on the left, select Documents (under Details).
On the window's toolbar, click the New Document button.
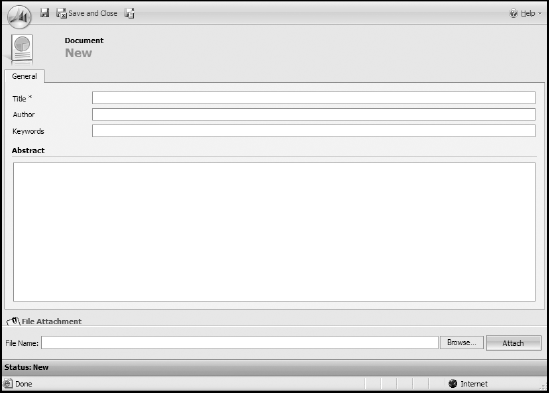
The Document window appears, as shown in Figure 17-3.
Fill in the window as follows:
Title: Enter a descriptive title of the document, possibly including a version number or a date.
Author: Enter either the author's name or the name of the person responsible for the document.
Keywords: Enter one or more keywords that anyone with access to the database can use later to locate any document with one keyword or a combination of keywords.
Abstract: This is a short summary of the document's contents.
File Name: This field connects Microsoft CRM to the stored file. You can use the Browse button to the right of the File Name field to locate the document.
Click the Attach button in the lower-right corner of the window.
Doing so attaches the document entered in the File Name field and uploads the document to the server.
Click the Save and Close button at the top of the window.
The system returns to the listing of documents associated with this particular subject.
Each title can be associated with multiple documents. When you complete step 6 above, you will be at the Sales Literature main window. To add a new document, simply repeat steps 3- 6 above. The structure of the entire title listing is similar to an organization chart, with each parent record capable of having multiple children. For example, you might have a document with pricing and terms and a separate document dealing with confidentiality associated with consulting agreements. This is done by working with subjects. Subjects are a way to organize records and to tie them together. All Sales Literature is categorized by subjects that are created in a hierarchy. We talk more about subjects in Chapter 23.
All documents are stored on the server. If you attach a document that's currently stored locally on your hard drive, Microsoft CRM makes a copy of the document on the server. This way, other users (if they have access rights) will have access to the document. When you need to retrieve the document, you have a choice of downloading it from the server or just opening it directly from the server.
Microsoft CRM copies documents to the server so that all authorized team members can use them. Therefore, at least two copies of the same document exist — one on your local computer and one on the server. Users may have their own original copy of the document on their own machine. Keep in mind that you want everyone to work from the same version of the document.
Note
Several document management systems allow multiple users to contribute to the same document, more or less simultaneously. Even Microsoft Word has a facility called Track Changes. Each contributor is automatically assigned a color, and you can easily see who has done what to the document. It's also easy to gracefully remove all signs of editing before printing the final edition.
You need one central repository for the current copies of all literature. That can be the Microsoft CRM server, or it can be another readily accessible server, as long as everyone understands where the active documents are stored. If you use CRM as a document repository, keep in mind any user of the system has access to view and download it.
Assuming that the CRM server is the central library for current documents, follow these steps to edit an existing piece of literature:
In the Sales Literature window, click the row that contains the document you want to edit.
The General tab for that subject appears. You will soon have access to the documents so that you can edit one or more of them.
In the pane on the left, select Documents.
You see a list of all the documents related to this subject.
Click the document you need to edit.
At the bottom of the window is a link to that document. This document, or attachment, is housed on the CRM server.
Click the link to the document and save it on your local drive.
You can't edit the document while it's on the CRM server.
Edit the document and save your changes on your local drive.
Upload the document to the CRM server so other users can access it.
If you simply reattach the document, it uploads automatically. Revision numbers aren't automatically associated with revised documents, so you might want to include a revision number in the file name or title of the document. In addition, you can track revisions, at least a little, by checking the Modified On date that appears in the Sales Literature window.
One of the more compelling aspects of the design of Microsoft CRM is the ability to relate one kind of record to another. Suppose you want to associate a piece of sales literature with a competitor. You collect sample brochures from each of your competitors. You then catalog them in the Sales Literature area and relate each brochure to the appropriate competitor. To do this, follow these steps:
In the lower part of the navigation pane, click the Sales button.
In the upper part of the navigation pane, select Competitors.
A list of all competitors appears in the window on the right.
Select the appropriate competitor.
The General tab for that competitor's information appears.
In the pane on the left, select Sales Literature (under Sales).
The Sales Literature window appears, showing all existing sales literature associated with the competitor you selected.
Select the piece of literature that you want to associate with this competitor by clicking the appropriate row in the list.
You can also set up a new piece of sales literature from here, as shown in the "Adding Literature" section, earlier in this chapter.
In the window's toolbar, click the Save button to save your association of sales literature with the competitor.
Whenever you're in a competitive situation, knowing as much as possible about the opposition is a good idea. You want to track their strengths so that you can anticipate the ammunition they'll use against you. You want to know their weaknesses so you can exploit them. Yes, it's a tough world out there.
It's a good idea not only to track the products they sell but also to compile as much literature about those products as possible. Your competitor's Web site is a great place to go to compile, download, and cut and paste all the information you can find. To add a new competitor to the database, follow these steps:
At the bottom of the navigation pane, click the Sales button.
At the top of the navigation pane, select Competitors.
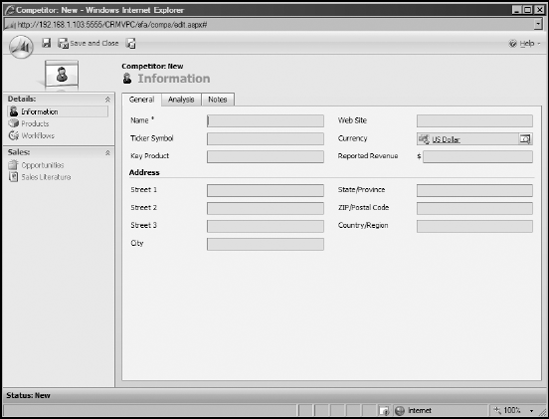
In the Competitors window's toolbar, click the New button.
The data entry window shown in Figure 17-4 appears.
Finding your competitors
You may occasionally find yourself in a competitive situation but not know exactly who your competitor is. Maybe you know the general geographic location of your competitor. The Advanced Find feature may come to your rescue. For example, if you're competing to sell computer clones against another dealer somewhere in Connecticut, you could use the Advanced Find feature to find likely contenders. Choose Tools

Enter at least the one required field, Name, and as many of the other fields as you can.
Filling in the Key Product and Address fields may come in handy.
Click the Analysis tab.
The Analysis tab has five general, text-based topics for you to fill in. If you've ever taken any Miller Heiman sales training, some of these topics may look familiar.
In these five fields, enter everything you know or suspect about the competitor.
Click the Save and Close button.
Compiling a library of your organization's literature is one of the more useful things you can do for the group. Whether it's just for internal consumption or, ultimately, for distribution to prospects and customers, having current literature organized in one place and available to everyone speeds up your sales and support efforts. Do it and then make sure you keep it all up-to-date.