In This Chapter
Understanding what SharePoint document libraries are and what they do
Customizing the settings for the default Shared Documents library
Exploring the various ways to upload files to a document library
Adding new documents and picture libraries to your SharePoint site
Filtering document libraries
Lists may form the core of SharePoint, but the SharePoint document libraries, the subject of this chapter, are surely its most used feature. No matter what else your SharePoint site does or does not contain, the site is bound to include some type of documents meant to provide essential background material to your teams — material that can be quickly updated and immediately accessed. And that's exactly where SharePoint document libraries come in, by providing you and your teams with a central location for files that are indispensable to the collaboration.
To that end, this chapter covers how to organize and create document libraries for your essential text and data files as well as create picture libraries for your important graphic files. The chapter then shows you how to upload documents to these libraries and make them available to your team members.
The chapter also covers how to connect document libraries with Outlook 2007 so that team members with the appropriate permissions can access the files in a document library right from within Outlook on their local computers (making it possible to use and work with local copies of the document even when they can't get connected to the Internet and access the document on the SharePoint site). Finally, you find out how to filter the contents of a library and use a document library's Check In/Out and Versioning features to monitor the use of documents and automatically keep your team members informed when new versions with important updates are available for their use.
On one level, document libraries represent just a specialized type of SharePoint list. (If you've read Chapter 4 on lists or are presently familiar with the basics of SharePoint lists, you already have a leg up on how they work.) Document libraries present themselves as lists expressly designed to monitor and keep track of the documents you and your team members need to use during the period of your collaboration. As such, they tend to track information such as the document name and type, the date last modified, and who did the editing.
Note
In addition to tracking the usage of essential documents and versions, however, document libraries provide another important element not associated with other standard type of lists: They provide central locations for locating the files they contain and for actually accessing their content.
As with other SharePoint lists, SharePoint automatically adds the document libraries you create to the Quick Launch area of the SharePoint site that contains them (unless you specifically prevent their links from being added there). This means that each document library you add is no more than a single click away, thus making it — and all the documents it houses — readily accessible to you and other authorized users. Moreover, given the file-oriented nature of document libraries, you can easily set them up to mimic the familiar Windows folder/subfolder hierarchy file structure that your teams work with on the company's local network.
Typically, when you first start working with a new SharePoint 2007 site created from the Team Site template, the site already contains a new document library called Shared Documents. You can then start working with this default library by customizing it and adding files to it, or you can add your own document libraries to the site to use along with this default library or in place of it.
To open the Shared Documents library, follow these simple steps:
Log on to the home page of your SharePoint site.
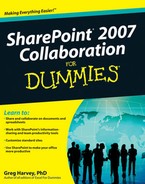
From the home page, you can open the default document library directly by clicking its Shared Documents link, or you can open it indirectly from the All Site Content page in Document Libraries view. In this example, I open the Shared Documents library indirectly from the All Site Content page.
Click the Documents link attached to the Documents category in the Quick Launch.
SharePoint opens the All Site Content page using the Document Libraries view, as shown in Figure 5-1. In this view, all of the document libraries added to the top-level SharePoint site are listed. Because a new SharePoint site has only the single Shared Documents library, this is the only one that currently appears on this page.
Click the Shared Documents link in the Name column of the list of document libraries displayed on the All Site Content page.
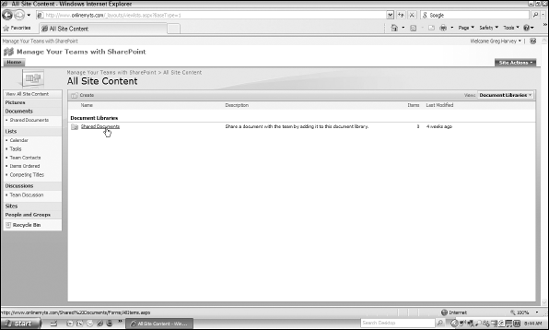
SharePoint opens the Shared Documents page shown in Figure 5-2. This Shared Documents page contains an empty list in four columns: Type, Name, Modified, and Modified By. This list also has four command buttons above its column names: New, Upload, Actions, and Settings.
After you open your Shared Documents library (or create a new document on the site), you're ready to copy the documents it needs from your local computer to the SharePoint site, as I discuss in the following section.
SharePoint gives you a choice of methods for uploading documents into any document library on your SharePoint site. When uploading documents, be aware that typically SharePoint supports a wide range of different application file types. The exceptions generally include a wide range of Windows-related computer files, most notably
EXE files: Executable program files can't be opened on a SharePoint site.
PST files: Outlook personal data files can't be opened on a SharePoint site.
Just be aware that if one of your team members attempts to open an application-type file for which he or she doesn't have the client program used to create the file or an application that supports its usage, the team member's Web browser will very nicely attempt to automatically open and display its content.
SharePoint document libraries make it easy for you to create folders for storing the various text and data files you upload to them. Creating folders for the documents that you upload to a particular document library can often make it much easier for you and your team members to peruse the library's contents and locate the file you need to work with.
To create a new folder in a library, choose New Folder from the library's New drop-down menu. SharePoint then opens a New Folder page for the selected document library where you enter a folder name and click OK. SharePoint then adds the name of the folder (indicated by the Folder icon in the initial Type column) to the list of documents in the current document library.
Note
All folders that you create in a document library are technically subfolders of the library, as evidenced by the Content Navigation Breadcrumb at the top of the library's Web page, where you see a folder you've selected in a library as just another breadcrumb in the trail. That breadcrumb trail offers you a direct way back to the library through the live link attached to its name.
After creating a folder in which to upload documents (and remember that the folders that you create in a library can have their own subfolders), you need to open the folders by clicking the link attached to their name in the library's Name column before you can access their files.
The main method for uploading documents to a library or one of its folders is to use the Upload Document or Upload Multiple Documents option on the Upload button's drop-down menu.
To upload a single document file to the current document library or the current folder within a library, follow these few steps:
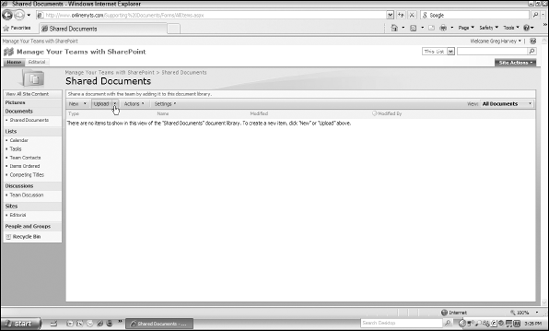
Choose Upload Document from the Upload button's drop-down menu.
SharePoint opens a Web page similar to the one shown in Figure 5-3. This Web page contains a Name text box which you can then use to designate a file on your computer's hard drive or on a network drive to which you have access.
Click the Browse button to the immediate right of the Name text box, select the document to upload in the Choose File dialog box, and then click Open.
SharePoint inserts the path and filename of the document you select in the Choose File dialog box (called Choose File to Upload if your computer is running Windows XP rather than Vista) into the Name dialog box.
Click OK on the Upload Document Web page.
SharePoint then copies the designated file into the current library or folder on your SharePoint site. After SharePoint finishes uploading the file, it returns you to the current library or folder Web page. The newly uploaded file now appears in the document list on this page (in alphabetical order by its filename) with an exclamation point and the word New in green immediately following its name.
Warning
Note that the Overwrite Existing Files check box is automatically selected on the Upload Document Web page. This means that if you're uploading a file that's already in the library, SharePoint won't stop and ask you to confirm overwriting its contents — which also means that you could conceivably replace a newer version of the document on the SharePoint site with an older, out-of-date version from your local computer. To give you an opportunity to prevent this, deselect the Overwrite Existing Files check box before you click OK to commence the uploading of the selected file. That way, if you're about to upload an older version of a file to a document library, SharePoint will alert you to this fact and give you a chance to abandon the operation.
When you have more than one file you want to copy over from a single folder on a local or network drive on your computer into the same document library on the SharePoint site and you have Microsoft Office installed on your computer, you can vary the uploading steps just a bit.
Instead of choosing Upload Document from the Upload button's drop-down menu, choose Upload Multiple Documents. SharePoint then opens a version of the Upload Document Web page similar to the one shown in Figure 5-4, which splits the main part of the page into two panes: a File pane on the left (where you select the drive and folder containing the files to copy) and a main pane on the right (which displays the files contained in the folder you've selected in the left pane).
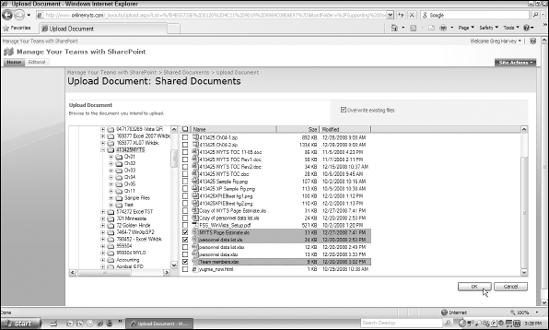
After you've selected the folder containing the files you want to upload in the pane on the left, you can then refine your selection in the main pane on the right by clicking the check boxes of just those files you want to upload.
After you've selected all the files to copy over to your current document library, simply click OK on the Upload Document page. SharePoint displays an alert dialog box asking you to confirm this operation. You must then click Yes in this dialog box to begin uploading the files to the library on your SharePoint site (indicated in the Uploading Progress dialog box that then appears).
After the selected files are all uploaded, the program returns you to the current library's or folder's Web page, where each of the files now appears in its document list (in alphabetical order by their filenames) with exclamation points and the word New in green immediately following their names.
Using the Upload button on a document library page is not the only way to get files on your local computer copied over to one of your SharePoint document libraries. Provided that your computer has Internet Explorer (version 7 or higher) installed on it, you can also do file uploading via an Explorer window, using the following steps:
Open the library or folder page to which you want to upload local documents in SharePoint.
Choose Open with Windows Explorer from the Actions drop-down menu.
SharePoint opens a Windows Explorer window that displays the contents of the current document library, including all the files and subfolders that it contains (similar to the one shown in Figure 5-5). Note that if your SharePoint site is hosted by a third-party provider, you may be required to enter your username and password in a Connect dialog box and click OK before SharePoint will open this browser window.
In the Windows Explorer window, open the folder on your computer or local network that contains the files you want to upload to your SharePoint document library.
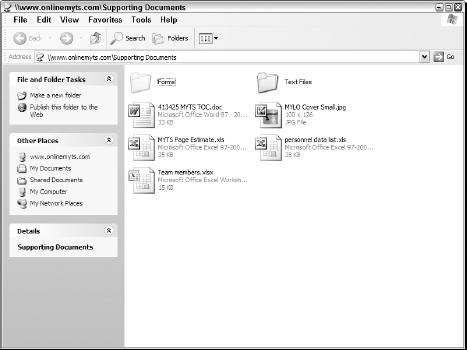
Figure 5.5. This Windows Explorer window is displaying the current contents of the Shared Documents library on my SharePoint site.
After both the Internet Explorer window with the document library and the Windows Explorer window with the files to be uploaded are open on your computer's desktop, you're ready to make the copies. You can do this either by selecting the local files in the Windows Explorer window (source) and then dragging and dropping them into the SharePoint Internet Explorer window destination, or you can copy the files from the Windows Explorer window and then paste them into the Internet Explorer window.
If you use the drag-and-drop method to upload the files, resize and position the Windows Explorer and Internet Explorer windows on the desktop so that you can see both of them side by side, so that you can easily select the file icons in the Windows Explorer window for copying, and so that you have sufficient room to drop them into place in the Internet Explorer window.
Use Figure 5-6 as a guide when sizing and positioning the Windows Explorer and Internet Explorer windows on your computer's desktop. You need to make the Windows Explorer window large enough to be able to comfortably select the files to upload and the Internet Explorer window sufficiently large to have some space on which to drop them.
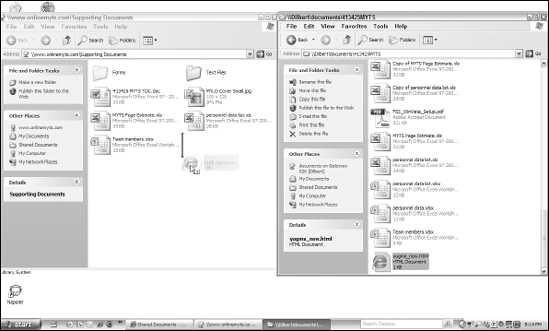
Figure 5.6. You can use the dragand- drop method to upload local files to the Shared Documents library.
Click the Windows Explorer window and then select the files to upload by selecting their file icons — you can do this by drawing an outline around them, dragging through them, or individually clicking them as you hold down the Ctrl key.
Drag the selected files to the Internet Explorer window and then, as soon as you see a plus sign on the pointer or it changes to a vertical I-beam pointer, drop the files by releasing the mouse button.
The moment you release the mouse button, SharePoint starts copying the selected files to the SharePoint library open in the Internet Explorer window. After the program finishes copying, the file icons for the copied documents appear in the Internet Explorer window.
To use the copy-and-paste method rather than drag-and-drop, you press Ctrl+C after selecting to copy the files into the Windows Clipboard.
Click the Internet Explorer window on the desktop to make it active and then press Ctrl+V to start copying the selected files into the window.
Click the Close buttons on the Windows Explorer and Internet Explorer windows you recently opened to return to the library or folder page to which you wanted to upload the local documents in the first place.
Click Internet Explorer's Refresh button or press F5.
The files that you copy via an Internet Explorer window don't show up in the SharePoint library's document list until after you refresh the Internet Explorer browser window to bring its contents up to date.
Tip
You don't have to restrict the Windows Explorer windows method outlined in the previous steps to uploading files from a local computer system to your SharePoint site. You can put it to use when you need to move or copy files from one SharePoint document library to another. However, when using drag-and-drop to copy files between two libraries open in different Windows Explorer windows, you need to hold down the Ctrl key as you drag the selected files from the source window and drop them into the destination window. Otherwise, SharePoint moves the selected files instead of copying them.
The last method for uploading files to a document library on your SharePoint site is to create a network folder that points to the SharePoint site and then copy the files (either with the drag-and-drop method or by copying and pasting) to the appropriate document library subfolder within that network folder. If your computer runs Windows XP, you do this by creating a Network Place that's accessible from Windows Explorer. If your computer runs a version of Windows Vista, you do this by mapping the SharePoint site as a network drive accessible from Windows Explorer.
If your computer is still running on that good, old, tried-and-true Windows XP, follow these steps to map your SharePoint site as a Network Place available from Windows XP's My Computer window:
Click the Start button on the Windows taskbar and then choose My Network Places from the Start menu.
Click the Add a Network Place link in the Network Tasks section of the Navigation pane.
Windows opens the Welcome dialog box in the Add a New Place Wizard.
Click the Next button.
Windows opens the Where Do You Want to Create This Network Place? dialog box in the Add a New Place Wizard. Here, the option with the long name, "Choose Another Network Location: Specify the Address of a Web Site, Network Location, or FTP Site," is selected by default.
Click the Next button.
Windows opens the What Is the Address of This Network Place? dialog box in the Add a New Place Wizard.
Type the complete URL address (including the http:// prefix) of your SharePoint site and then click Next.
Windows may display a Connect To dialog box for logging you in to your SharePoint site.
If the Connect To dialog box appears, enter your username (if it's not already displayed) in the User Name text box and enter your SharePoint site password in the Password text box. If you want Windows to be able to automatically log you in each time you open the Network Place you're creating, also select the Remember My Password check box before you click OK.
Windows logs you in to your SharePoint site and then adds a Type a Name for This Network Place text box containing the URL of your site in the What Is the Address of This Network Place dialog box in the Add a New Place Wizard.
If you want to replace the URL of your SharePoint site with a more descriptive name, type the new name for the Network Place in the Type a Name for This Network Place text box before you click Next.
Windows opens the Completing the Add Network Place dialog box in the Add a New Place Wizard. The Open This Network Place When I Click Finish check box is selected by default.
Click the Finish button.
Windows closes the Add a New Place Wizard, returning you to the My Network Places dialog box, where the Network Place folder icon with the name of your SharePoint Network Place now appears.
Double-click the Network Place folder icon representing your SharePoint site.
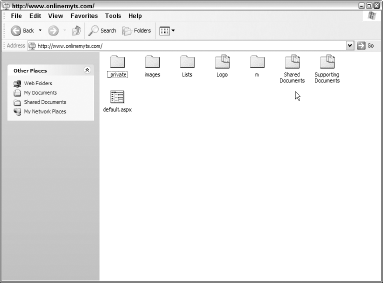
Windows opens the Network Place pointing to your SharePoint site in a Windows Explorer window, similar to the one shown in Figure 5-7. This window shows all of the site's folders (including ones for all the document libraries you've added to the site).
After adding your SharePoint site to a Network Place on your Windows XP computer, you can upload files to your document libraries by following these steps:
Click the Start button on the Windows taskbar and then choose My Network Places from the Windows XP Start menu.
Windows opens the My Network Places window.
Double-click the Network Place folder icon representing your SharePoint site.
Windows opens the Network Place window for your SharePoint site, showing all its folders.
Double-click the folder icon representing the document library into which you want to add files.
Windows opens a window for your document library showing all its files and subfolders.
Click the Start button on the Windows taskbar and then choose My Documents from the Start menu.
From the My Documents folder, open the folder on your computer's hard drive or a network drive that contains the files you need to upload.
Now, you just need to select the files to upload.
Select the icons of all the document files you want to upload in the active Explorer window.
After selecting the files, you can use either the drag-and-drop or copy-and-paste method to upload the selected files to the document library folder on your SharePoint site via the Network Place Explorer window.
To use the drag-and-drop method, drag the selected document files over to your document library's Network Place Explorer window and then drop them. To use the copy-and-paste method, press Ctrl+C to copy the selected files to the Clipboard and then click your document library's Network Place Explorer window before you press Ctrl+V.
No matter which method you use, Windows uploads copies of the selected files to your SharePoint document library. When Windows finishes uploading the selected documents, their file icons appear in the library's Network Place window on your desktop.
If your computer runs a version of the new-fangled Windows Vista, follow these steps to map your SharePoint site as a network drive that is then available from the Vista Computer Explorer window:
Click the Start button on the Vista taskbar and then choose Computer from the Start menu.
Windows opens the Computer Explorer window.
Click the Map Network Drive button at the top of the Computer window.
Windows opens the Map Network Drive dialog box, with the next available drive letter automatically assigned in the Drive drop-down list box (going from Z to A in descending order).
(Optional) To select another network drive letter from among those still available on your computer, click the Drive drop-down button and choose its letter from the drop-down menu.
In the Folder text box, type the complete URL address (including the http:// prefix) of your SharePoint site and then click Finish.
If you want Vista to connect to your SharePoint site and map it as a network drive each time you log on to your computer, be sure that you leave the Reconnect at Logon check box selected.
If the Connect To dialog box appears, enter your username (if it's not already displayed) in the User Name text box and enter your SharePoint site password in the Password text box. If you want Windows to be able to automatically log you in each time you open the Network Place you're creating, also click the Remember My Password check box before you click OK.
Windows opens an Explorer window showing the contents of your SharePoint site, including folders for all the document libraries it contains.
After mapping your SharePoint site to a network drive on your Windows Vista computer, you can upload files to your document libraries by following these steps:
Click the Start button on the Windows taskbar and then choose Computer from the Vista Start menu.
Windows opens an Explorer window showing all the physical and virtual drives on your computer.
Double-click the Network Location folder icon representing your SharePoint site.
Windows displays the contents of your SharePoint site, showing all its folders, in the same Explorer window.
Double-click the folder icon representing the document library into which you want to add files.
Windows opens a window for your document library showing all of its files and subfolders.
Click the Start button on the Windows taskbar and then choose Documents from the Start menu.
Windows opens an Explorer window showing all your local documents.
Open the folder on your computer's hard drive or on a network drive that contains the files you need to upload.
Select the icons of all the document files you want to upload in the active Explorer window.
Next, you'll want to use the drag-and-drop or copy-and-paste method to upload the selected files to the document library folder on your SharePoint site.
To use the drag-and-drop method, drag the selected document files over to your document library's Explorer window and then drop them. To copy and paste, press Ctrl+C to copy the selected files to the Clipboard and then click your document library's Explorer window before you press Ctrl+V.
Windows then uploads copies of the selected files to your SharePoint document library. When Windows finishes uploading the selected document, their file icons appear in the library's Explorer window on your desktop.
Note
If you have your document library open in a Web browser window at the time you perform this upload, don't forget to click the browser's Refresh button (F5 in the Internet Explorer) to have the newly uploaded documents displayed in the file list.
Not only can you copy your existing document and data files to a SharePoint library, but you can also create new Word documents for the library (assuming that Microsoft Word 2003 or higher is installed on your computer).
To create a new Word file using the site's word processing document template, follow these steps:
Log on to your SharePoint site and then open the Web page containing the document library to which you want to add a new Word document.
Choose New Document from the New drop-down menu.
SharePoint displays an alert dialog box warning you that you're about to open a file called
template.docthat exists on your SharePoint site.Click OK in the alert dialog box.
Windows then opens Word on your computer. If the Connect To dialog box appears, prompting you to enter your password, type your password and click OK to download the template from your SharePoint site and use it to open a new Word document.
Create your new Word document using any and all of the program's features. Then save the new document by clicking the Save button or pressing Ctrl+S.
Word opens the Save As dialog box, showing the current SharePoint document library as the place where the new document file will be saved.
Replace the default filename given to the file (using the document's initial text) with your own filename in the File Name text box and then click the Save button.
Windows saves the file in the current SharePoint library.
Press Alt+F4 to exit Word and close the new document you just saved.
Windows returns you to the open Web browser window containing your document library.
Click the Web browser's Refresh button (or press F5, if you use Internet Explorer).
SharePoint redraws the library's Web page, adding the new document you just created and saved in Word to its file list.
Note
SharePoint launches Word and opens the template.doc file in this application when you select the New Document option from the New drop-down menu because Microsoft Office Word 97–2003 Document is the default template file for the Shared Documents library (as it is for any new document library you create). Keep in mind that you can select another application template file at the time you create a new document library. (See the section "Creating a new document library" later in this chapter for details.) You can also edit this template file in its native application by opening the Document Library Advanced Settings page (by clicking the Settings button in the library and then choosing Document Library Settings from the drop-down menu and Advanced Settings on the Customize page) and then clicking the Edit Template link that appears immediately beneath the Template URL text box.
Typically, when you start working with a new SharePoint site, you have only the Shared Documents library to work with. You can, however, have as many additional document and new picture libraries as you need on your SharePoint site to house all the information that your teams need to successfully collaborate. You create document libraries for the text and data documents that your teams need access to and picture libraries for all the photos and graphic images they need.
Tip
You can create specific libraries for the various team subsites that you've created (as covered in Chapter 2) so that each team has easy access to the supporting documents they need in collaborating. You can also organize the documents in these libraries using folders and subfolders just as you do for the files on your local computer.
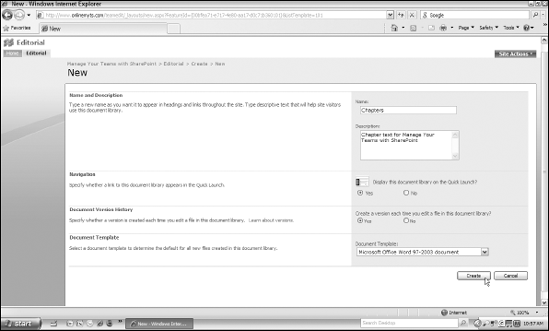
To create a new document library on your SharePoint site, follow these steps:
Log on to your SharePoint site and then open the site where you want to add the new document library.
If you want to add the document library to the top-level site, remain on the SharePoint home page after you log on to the site.
Choose Create from the Site Actions drop-down menu.
SharePoint opens the Create Web page.
Click the Document Library link in the Libraries column.
SharePoint opens a New page, similar to the one shown in Figure 5-8.
Type the name for the new document library in the Name text box and then press Tab.
SharePoint advances you to the Description text box.
Type a description of the new document library in the Description text box.
(Optional) Make any desired changes to the Navigation, Document Version History, and Document Template settings that you want.
By default, SharePoint displays a link to the new document library in the Documents section of the site's Quick Launch. Click the No radio button under the Display This Document Library on the Quick Launch heading if you don't want this link to appear (in which case, your teams must open the library from the All Site Content page for the site — not the most convenient way to do it).
SharePoint doesn't automatically track the version history for the document files you add to the new library (including when they were modified and by whom). To turn on versioning for the new document library, click the Yes radio button under the Create a Version Each Time You Edit a File in This Document Library heading (a step I strongly recommend if managing the versions in the library is at all important to you).
SharePoint automatically uses the Microsoft Office Word 97–2003 Document as the default template for any new documents you or your team members create in the new library. If the library is intended to primarily house files of another type (such as Excel workbooks or PowerPoint presentations), you may want to select a different document template (such as the Microsoft Office Excel Spreadsheet or Microsoft Office PowerPoint Presentation) for any new files created there. In which case, SharePoint will then launch Excel or PowerPoint and open a new file from the template in Excel or PowerPoint whenever you or another team member selects the New Document option from the library's New drop-down menu.
Click the Create button.
SharePoint creates the new library and then opens the Web page for the new document library. You can then use its Upload options to add the text and data files you want to make available to your teams. (See "Uploading Documents to a Documents Library" earlier in this chapter for details.)
To create a new picture library on your SharePoint site, follow these steps:
Log on to your SharePoint site and then open the site where you want to add the new picture library.
If you want to add the picture library to the top-level site, remain on the SharePoint home page after you log on to the site.
Choose Create from the Site Actions drop-down menu.
SharePoint opens the Create Web page.
Click the Picture Library link at the bottom of the Libraries column.
SharePoint opens a New Web page.
Type the name for the new picture library in the Name text box and then press Tab.
SharePoint advances you to the Description text box.
Type a description of the new picture library in the Description text box.
(Optional) Make any desired changes to the Navigation and Picture Version History settings that you want.
By default, SharePoint displays a link to the new picture library in the Pictures section of the site's Quick Launch. Select the No radio button under the Display This Picture Library on the Quick Launch heading if you don't want this link to appear (in which case, your teams must open the library from the All Site Content page for the site).
SharePoint doesn't automatically track the version history for the graphic files you add to the new picture library (including when they were modified and by whom). To turn on versioning for the new picture library, click the Yes radio button under the Create a Version Each Time You Edit a File in This Picture Library heading (a step I strongly recommend if managing the various versions of graphic files in this library is at all important to you).
Click the Create button.
SharePoint creates the new picture library and then opens the Web page for the new picture library.
After creating a new picture library, you can use its Upload Picture and Upload Multiple Picture options on the Upload drop-down menu to add images to it. The Upload Picture option works very similarly to the Upload Document option in a document library: You browse for the image file from the Add Picture page and then, after selecting its graphics, click OK to upload it. Immediately after uploading the picture, SharePoint opens an Edit Item page where you can a title, the date the image was created, a description of the image, and keywords that you can use to filter the images in a particular view of the picture library.
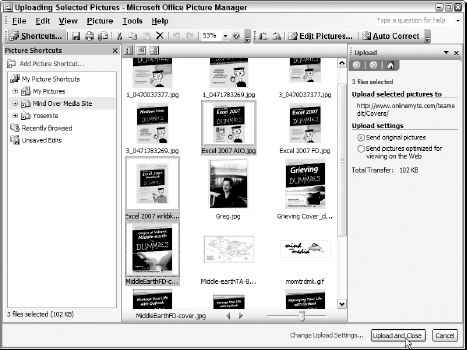
If you have more than one image to upload at a time and you have the Office Picture Manager installed, use the Upload Multiple Pictures option to add the graphic files you want to make available to your teams. Here's how it's done:
Choose Upload Multiple Pictures from the Upload drop-down menu.
SharePoint then opens the Microsoft Office Picture Manager, similar to the one shown in Figure 5-9.
Click the Add Picture Shortcut link in the Picture Shortcuts pane on the left.
Windows opens the Add Picture Shortcut dialog box.
Select the folder on your computer or local network that contains the graphic files you want to upload to the new picture library.
Windows displays thumbnails of all the graphics in the folder you've selected in the main area of the Office Picture Manager.
Ctrl+click each of the pictures you want to add and then click the Upload and Close button.
SharePoint closes the Microsoft Office Picture Manager, uploads the selected graphics files, and returns you to an Uploading Pictures page.
Click the Go Back To link followed by the name of your picture library.
SharePoint returns you to the picture library, where thumbnails appear for each of the images you added (in alphabetical order by filename).
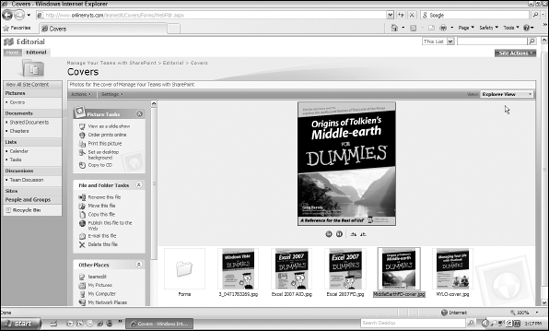
When you create a new picture library, SharePoint creates three default views that you can use to display the images in the library:
All Pictures: This default view shows thumbnails of each of the images with their filenames beneath the thumbnail and a check box in front of the filename that you can use to select individual pictures.
Explorer View: This view shows the images added to the library in a Picture Folder Explorer window using the Filmstrip viewer, which enables you to preview larger images by selecting their thumbnails (see Figure 5-10). This view also contains a pane with Picture Tasks and File and Folder Tasks areas that enable you to perform typical file tasks, such as create a new folder or rename, copy, or delete a selected folder or even e-mail its files to another team member.
Selected Pictures: This view reduces the display of the images added to the picture library down to just those thumbnails that are selected in the library at the time you choose the view.
To switch the picture library into the Explorer View or Selected Pictures view, choose the option you want from the View drop-down menu. You can also customize these views by choosing Modify This View from this drop-down menu or add to them by creating brand-new views for the picture library. To create new views, choose Create View from the same menu.
Tip
If the picture library is not in Explorer View and you need to peruse its images, choose View Slide Show from the Actions drop-down menu. SharePoint then opens an Explorer window that shows you each image in the library one at a time when you click the Play button in the image controls that appear in the upper-right corner. You can then click the Pause and Stop controls to halt the slideshow as well as the Previous and Next buttons to view the next or previous image in the library.
In addition to selecting a new view for the images in your picture library, you can also edit a library's images as follows:
To edit an image's metadata: (Metadata is information about the graphic such as its title, creation date, verbal description, and identifying keywords.) Click to select an image's thumbnail in the picture library and then, when its image page appears, click the page's Edit Item button.
To edit an image: Select the thumbnail's check box and then choose Edit from the Actions drop-down menu to open the picture in Microsoft Office Picture Manager. There, you can make such editing changes to the picture as modifying its brightness and contrast as well as cropping, rotating, flipping, resizing, and compressing the image.
To delete an image: To remove an image from the library, select the thumbnail's check box and then choose Delete from the Actions drop-down menu. You can also remove it by clicking its thumbnail and then clicking the Delete Item button on its image page.
SharePoint makes it easy to customize any of the document libraries you add to the site. To modify a library's settings, open the library's Web page and then choose Document Library Settings from the Settings drop-down menu.
SharePoint then opens a Customize Web page for the selected document library (similar to the one shown in Figure 5-11, using the default Shared Documents library). Here, you can modify the overall library settings in one of three categories (General Settings, Permissions and Management, and Communications) as well as modify the library's columns and views.
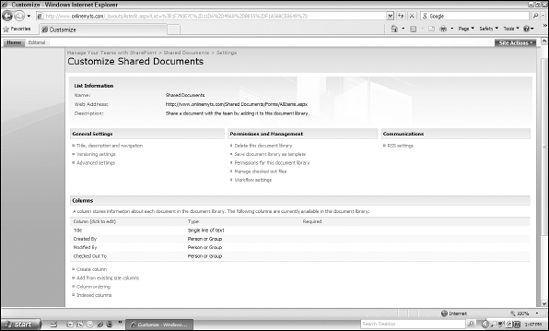
The General Settings options on a library's Customize Web page include
Title, Description and Navigation: These settings enable you to rename the library, change its description, and remove the library's link from the Quick Launch area.
Versioning Settings: These settings enable you to control whether or not content approval is in operation so that documents that other team members upload to the library remain in a draft state until you approve them. These settings also enable you to control who sees draft items waiting for approval as well as enable you to turn on and off (the default) both the Document Version History and Require Check Out settings. When you activate Document Version History, SharePoint automatically creates versions of all edits to the library documents and keeps a history of all their changes (very useful for chronicling their modifications). When you activate the Require Check Out settings, team members must individually check out the documents in a library in order to edit them (assuming they have sufficient permissions). You, as the administrator, can override a checkout and check a document back in to the library should the need arise.
Advanced Settings: These settings govern a range of more sophisticated library functions, including
Activating the management of content types (thus enabling you to specify how to manage diverse documents in the library that are related to the project at hand)
Specifying a new document template that's used as the basis for all new documents you create in the library
Specifying a custom Send To destination for copies you make of library files
Specifying whether the New Folder option appears on the New menu and determining whether documents in the library can be displayed as part of the results from searches that you and your team members perform on the site
The Permissions and Management settings on a library's Customize Web page include
Delete This Document Library: This option enables you to remove the document library from the site. Note that when you delete a library, SharePoint automatically removes all of the documents you've added to it.
Save Document Library as Template: This option enables you to save a customized document library as a template that you can then use to generate other, similar document libraries on your SharePoint site.
Permissions for this Document Library: This option enables you to customize the permissions for just that particular document library. When you modify user access to a particular library, you break the natural parent-child inheritance of permissions — meaning that changes you make to the parent site's permissions (see Chapter 3) no longer affect this library. Note that if you use this option to edit permissions for the library and then later decide that you do want the library to once again inherit permissions from its parent site, you can do this by choosing the Inherit Permissions option from the Actions drop-down menu.
Manage Checked Out Files: This option enables you (as an administrator) to manage files in the document library that have been checked out by various team members (assuming that you've selected the Require Check Out setting as part of the Versioning Settings for the document library). The Checked Out Files page indicates the checked in or out status of all document library files and allows you to take ownership of any file that a team member has checked out and check it back in so it's available to other team members. See Chapter 9 for details on checking files in and out of a document workspace (which works the same way as in a document library).
Workflow Settings: This option enables you to define a new workflow or customize the workflow assigned to the contents of the document library. Workflows can automate and regulate the processing of documents, assuming that they need to follow a set procedure. (See Chapter 10 for details on creating workflows for SharePoint document libraries.)
The Communications settings of a library's Customize Web page includes just the following two options:
Incoming E-Mail Settings: This option, when enabled, makes it possible to designate an e-mail address on the SharePoint site that your team members can use to send files to the document library as attachments to e-mail messages. See Chapter 11 for more on using Outlook with SharePoint.
RSS Settings: This option enables you to modify the RSS (or Really Simple Syndication, which is a special Web format used to publish regularly updated works) feed settings for the document library (referred to as a list, which it officially is). Note that, by default, SharePoint enables RSS updating for the list of documents in a new document library so that all library updates automatically appear in an RSS reader capable of subscribing to a protected SharePoint site. (See Chapter 8 for details on using Outlook 2007 and the Mozilla Firefox Web browser as your RSS reader for SharePoint components such as lists and blogs.)
When you start using a new document library, the All Documents default view uses a list with only a few columns of information: Type, Title, Created By, Modified By, and Checked Out To (if you enable the Require Check Out setting as part of the Versioning Settings for the library). You can use the Create Column link or the Add from Existing Site Columns link on the library's Customize page to add new columns. (The procedure for adding a new column to a library is very similar to that for adding one to a list — see Chapter 4 for details on adding columns to lists.)
Tip
Here's a place where the Add from Existing Site Columns option is really, really useful. This option enables you to reuse columns defined for any other component on the SharePoint site. The Available Site Columns list box on the Add Columns from Site Columns page contains a number of file-related fields such as Author and Contributor whose columns you can readily add to a document library you're customizing.
When you create a new document library, SharePoint creates two standard views for it:
All Documents: This default library view displays the library's documents in a standard SharePoint list with four columns: Type, Name, Modified, and Modified By. You click the hyperlink attached to the document's filename in the Name column to open the document for printing or editing with its native application. To edit the document's filename or title, choose Edit Properties from the drop-down menu that appears when you position the mouse pointer over the filename in the column. This drop-down menu also contains options for customizing the file's permissions, deleting the file, sending the file to another location (or creating a document workspace for it), checking it in and out (if the Check In/Out option is enabled), and turning on modification alerts.
Explorer View: This view displays the library's documents in a standard Windows Explorer window that shows icons for all its documents and folders and contains a task pane with links for performing common folder- and file-related tasks, such as renaming, moving, copying, and deleting. To open a file for editing, double-click its file icon (or right-click it and then choose Open from its shortcut menu). To delete a file or folder, click its icon and then click the Delete This Folder or Delete This File link in the pane.
If you want to customize the All Documents or Explorer View, choose Modify This View from the View drop-down menu when the library is displayed in that view. Note that customizing the All Documents view is very much like customizing a list (as described in Chapter 4) because it uses all the same types of categories: Name, Columns, Sort, Filter, and so on. When you customize the built-in Explorer View, however, you're limited to renaming the view, making it the default view, and deleting it altogether (something I really don't recommend).
In addition to customizing the built-in views, you can create new views for a document library by choosing Create View from the View drop-down menu. When you select this option, SharePoint opens a Create View page where you select a format for the new view using the same View Format options that are available when you customize list view — detailed in Chapter 4.
After you select the view format for the new list, SharePoint opens a Create View page where you name the view; select the audience (Personal View for your eyes only or Public View for everyone on the team); and then specify the columns, sort order, any filtering, grouping, totals, and so on — very much like you do when creating a list view. (For the details on creating a list view, see Chapter 4.)
You can sort and filter the lists of documents you add to any of your document libraries pretty much as you sort and filter any other SharePoint list. To sort or filter the documents listed in a particular library, you need to display that library in some sort of standard column view such as the default used by the All Documents view. Then, you need to display the library list as a datasheet by choosing Edit in Datasheet from the Actions drop-down menu.
After your SharePoint library is displayed as a datasheet, you can then sort and/or filter its document list. To sort the list, click the Sort Ascending or Sort Descending option at the top of the drop-down menu for the column (or columns) by which you want the list sorted.
To filter the list on a particular entry in a column, click that entry on the column's drop-down menu. To filter the list on a range of entries in a particular column, you need to choose Custom Filter from that column's drop-down menu and then set the range of values as a condition in the Custom Filter dialog box. After filtering a library, you can restore its entire document list by then choosing Show All from the drop-down menu of the column used in filtering the library — indicated by the filter cone icon that appears next to its field name in the column heading. (See Chapter 4 for more details on the sorting and filtering of SharePoint lists.)
Tip
In a document library with tons of files, you can help yourself quickly locate the document you need to access by filtering the library's list so that it displays only documents of that particular file's type. For example, if you need to refer to an Excel worksheet, you can filter out everything except Excel files in the list by selecting .xls or .xlsx (if you use Excel 2007 and save your workbook files in the new 2007 Excel file format) in the filter section of the Type column's drop-down menu.