In This Chapter
Understanding how meeting workspaces can help you plan and organize team meetings
Creating a meeting workspace for a team meeting from scratch
Creating a meeting workspace from a calendar item in your SharePoint site
Creating a meeting workspace from an Outlook 2003 or 2007 meeting request
Adding a button to your meeting workspace that launches a Yugma Web conference
You can use meeting workspaces in SharePoint 2007 to plan and manage the physical meetings and real events that take place at various times during the period of your team collaboration. Note, however, that meeting workspaces don't actually provide a place from which to launch Web conferencing applications such as Microsoft's Live Meeting, Citrix's GoToMeeting, or Yugma's Instant Web Conferencing software — the kind of applications that enable you to conduct virtual meetings over the Internet.
In this chapter, you find out what you can do with SharePoint meeting workspaces along with the various types of meeting workspaces that SharePoint supports. You also discover the different ways you can go about setting up meeting workspaces, including creating a meeting workspace from an event you place on a SharePoint calendar or from a meeting request in Outlook 2003 or 2007.
Finally, I show you how to use SharePoint's multipurpose Content Editor Web Part to add an HTML snippet to display a button on a meeting workspace page that you and your team members can then click to join a virtual meeting online using a version of the Yugma's Instant Web Conferencing program (a free Web conferencing service for meetings up to 20 attendees) directly from your SharePoint site.
Like document workspaces (discussed in Chapter 9) that are designed to facilitate the team editing of a document, meeting workspaces are special subsites designed to facilitate the planning and managing of team meetings. These meetings can be any of the various types of physical meetings and events that your teams need to participate in at different times during the period of your collaboration.
Note
Document workspaces are often temporary and exist on the site only until the editing of the document in question is completed — at which time the updated document may be moved to a document library and the document workspace deleted. Many meeting workspaces share a similar fate, in that they need to stay up on the SharePoint site only until the scheduled meeting or event takes place. However, keep in mind that some team-sponsored events (such as special social gatherings, competitions, and even product launches) are worth memorializing on the site so that you can readily share its memories with the team. In such a case, you'd not only retain the workspace on the SharePoint site after the event takes place, but you'd also enhance it by adding photos and recaps of the event to that meeting workspace.
SharePoint 2007 supports five different types of meeting workspace, each with its own elements for planning and managing an upcoming meeting or event:
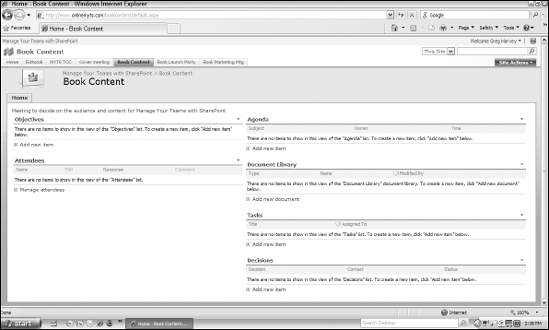
Basic Meeting Workspace: Creates a meeting workspace page (see Figure 6-1) with four empty lists: Objectives (for listing your goals for the meeting), Agenda (for listing the meeting's agenda), Attendees (for listing those team members among the site's authorized users that you want to attend the meeting), and Document Library (for listing the supporting files you've uploaded for the meeting). You can then add your content to these built-in lists or customize them by modifying or adding to their Web Parts.
Blank Meeting Workspace: Creates an empty meeting workspace page with three Web Part zones (Left, Center, and Right) to which you can add Web Parts for the elements you want to include in the workspace. (See Chapter 2 for details.)
Decision Making Meeting Workspace: Creates a meeting workspace page with the same four lists as the basic meeting space along with a Tasks list (for listing the tasks that each team member needs to accomplish as part of the decision making) and a Decisions list (for listing all the choices that must be made as part of making the overall decision). Figure 6-2 shows what a Decision Making Meeting Workspace looks like.
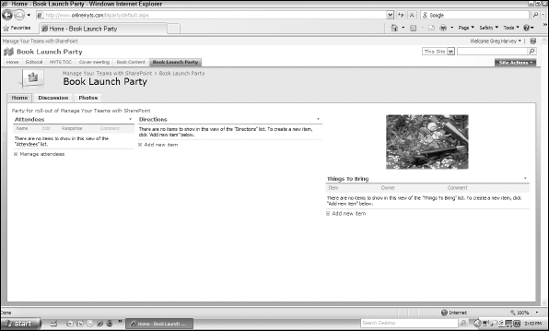
Social Meeting Workspace: Creates a meeting workspace page with three distinct pages — Home, Discussion, and Photos — as shown in Figure 6-3. The Home page of this workspace contains three empty lists: Attendees (for listing the team members invited to the event), Directions (for listing the location of the event and directions for getting there), and Things To Bring (for listing the items that each team member should bring to the event). The Discussion page contains a blank discussion board for conducting a threaded discussion on the nature of the event and/or its planning. (For more on discussion boards, see Chapter 7.) The Photos page contains a blank picture library to which you can add photos used in planning the event or taken at the event itself. This type of meeting workspace also contains a stock photo of party favors that you can, if you like, delete or replace with a photo more in keeping with the nature of your gathering.
Multipage Meeting Workspace: Creates a meeting workspace with three pages — a Home page and two blank pages (Page 1 and Page 2). The Home page contains three of the four empty lists found in the basic meeting workspace: Objectives, Agenda, and Attendees. (See Basic Meeting Workspace at the top of this list.) Pages 1 and 2 are empty pages, each with three Web Part zones (Left, Center, and Right) to which you can add Web Parts for the elements you want to include in the workspace. (See Chapter 2 for details on how to use Web Part zones.)
Just as with document workspaces, SharePoint provides more than one way to add a new meeting workspace to your site. You can create a new meeting workspace from scratch by following the same procedure you use to add a new subsite (Chapter 2) or document workspace (Chapter 9). Even more to the point, you can create a new meeting workspace on the fly right at the time that you schedule the meeting or event in question on either your SharePoint calendar or your calendar in Outlook.
To create a new meeting workspace from scratch, follow these steps:
Log on to the SharePoint site and then open the subsite in which you want to add the new meeting workspace.
If you want to create the meeting workspace at the top level of your site, open the home page.
Choose Create from the Site Actions drop-down menu.
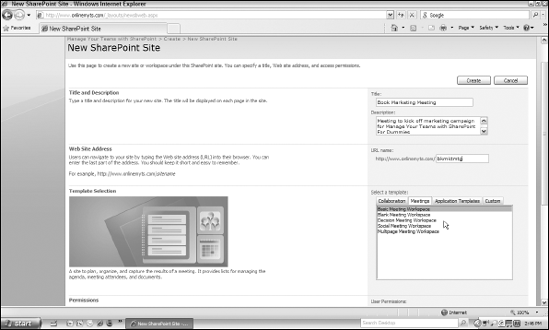
SharePoint opens a New SharePoint Site page, similar to the one shown in Figure 6-4.
Enter a name for the meeting workspace in the Title text box and then press Tab.
The workspace name you enter here appears in the Quick Launch and the tab on the Top Link bar (unless you choose not to display the workspace in these areas).
When you press Tab, SharePoint advances you to the Description text box.
Type a description for the meeting workspace in the Description text box and then press Tab.
The description you enter here appears at the top of the workspace page when you or a team member opens it.
When you press Tab, SharePoint advances you to the URL Name text box.
Type a URL address for the new meeting workspace.
Follow the same conventions in naming the new workspace as you do in naming any other subsite (no spaces and no punctuation besides hyphens and underscores).
Click the Meetings tab in the Select a Template list box and then click the name of the type of meeting workspace you want (Basic Meeting Workspace, Blank Meeting Workspace, Decision Meeting Workspace, Social Meeting Workspace, or Multipage Meeting Workspace).
Refer to the figures and meeting workspace descriptions in the previous section, "Understanding How You Can Use Meeting Workspaces," if you need help in deciding which template to select.
(Optional) Make any other changes to the Permissions, Navigation, and Navigation Inheritance options you need to for the new meeting workspace.
Select the Use Unique Permissions radio button under User Permissions if you need to set workspace site use permissions for individual team members (permissions different from the ones they have as members of a user group — see Chapter 3 for details).
Select the No button under Display This Site on the Quick Launch of the Parent Site if you don't want a link to the meeting workspace to appear in the Site section of the parent site's Quick Launch.
Select the No button under the Use the Top Link Bar from the Parent Site if you don't want the new meeting workspace to have its own tab on the SharePoint site's Top Link bar.
Click the Create button.
SharePoint creates a new workspace using the meeting workspace template you selected and then takes you to this new workspace so that you can begin customizing its elements or adding your content to them.
Note
Remember that you can also create a new meeting workspace from scratch by clicking the View All Site Content or Sites link in the site's Quick Launch and then clicking the Create button to open the Create page. When that page opens, click the Sites and Workspaces link in the Web Pages column of the Create list. Then on the New SharePoint Site page, after you specify the name, description, and URL of the new workspace, select the Meetings tab of the Select a Template list box and select your meeting template (Basic Meeting Workspace, Decision Making Workspace, and so on) before you specify Permission, Navigation, and Navigation Inheritance settings. Finally, click the Create button to create the subsite with the new meeting workspace.
If you use a Calendar page on your SharePoint site to keep track of upcoming events of interest to the team (see Chapter 1), you can create a new meeting workspace for an event at the very time you add it to the calendar.
Simply follow these steps to add the event to your SharePoint calendar and, at the same time, create a meeting workspace for it:
Open the Web page on your SharePoint site with the calendar to which you want to add the event that also needs a meeting workspace.
Remember that the calendar is a special type of list that enables you to add events to a facsimile of a daily, weekly, or monthly calendar.
Click the New button at the top of the calendar.
SharePoint opens a New Item page for the calendar, similar to the one shown in Figure 6-5. This page contains a form with various fields for adding information about the upcoming meeting or event. Note that the final option on this form is a check box that enables you to create a meeting workspace for the event you're adding.
Type a name for the meeting or event in the Title text box and then press the Tab key.
SharePoint advances you to the Location field.
Type the physical location of the meeting or event in the Location text box.
Next, you need to specify the starting and time of the meeting or event.
Use the mini-calendar and time drop-down list boxes to designate the starting and ending times in both the Start Time and End Time fields.
Click the Description text box and type a description of the upcoming meeting or event.
(Optional) If the meeting or event is an affair that spans an entire day or a range of days, select the check box labeled Make This an All-Day Activity that Doesn't Start or End at a Specific Hour.
If you select this check box, SharePoint redraws the New Item page, removing the time drop-down list boxes from the Start Time and End Time fields.
(Optional) If the meeting or event is recurring on some sort of regular basis, select the check box labeled Make This a Repeating Event. Then, after SharePoint finishes redrawing the page, specify the interval at which the event repeats using the radio button and text box options that appear beneath the check box.
You can choose between making a recurrence interval of Daily, Weekly, Monthly, or Yearly. The Pattern options that then appear depend upon the particular interval radio button you select.
Select the check box labeled Use a Meeting Workspace to Organize Attendees, Agendas, Documents, Minutes, and Other Details for This Event. Then click OK.
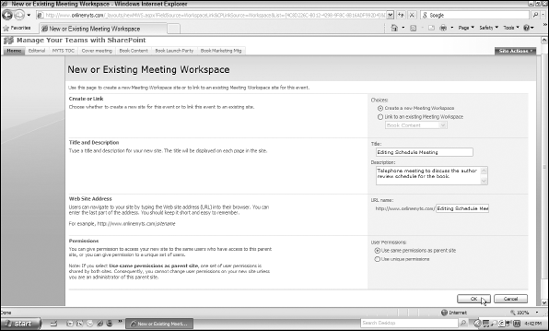
SharePoint adds the item to the calendar (which the program does not display) and then immediately takes you to the New or Existing Meeting Workspace page, similar to the one shown in Figure 6-6.
(Optional) Edit any of the options that require modification (Choices, Title, Description, URL Name, and/or User Permissions) on the New or Existing Meeting Workspace page.
If you want to link the new meeting workspace to an existing workspace, select the Link to an Existing Meeting Workspace radio button and then select the name of the meeting workspace from the drop-down list immediately beneath it.
If you want to set up individual site user permissions, select the Use Unique Permissions radio button.
Click OK.
SharePoint displays the Template Selection page.
Select the name of the meeting workspace template you want to use for the new workspace in the Template list box and then click OK.
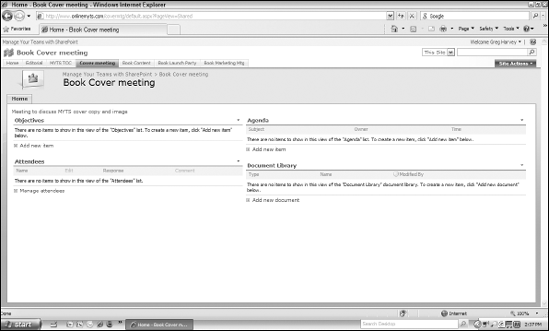
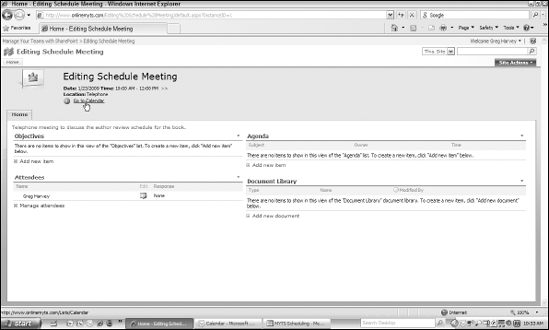
SharePoint creates the new meeting workspace using the template you selected. (Refer to "Understanding How You Can Use Meeting Workspaces," earlier in this chapter, for help with this.) The program then displays the Home page for the new meeting workspace, similar to the one shown in Figure 6-7. Note that this new workspace page not only displays the title at the top of meeting workspace, but also the meeting's date, time, and location information from the calendar item.

Tip
You can click the Go to Calendar link that appears immediately underneath the location information at the top of the meeting workspace page to jump immediately to the event on the calendar that generated the workspace.
Keep in mind that SharePoint doesn't automatically add links to the Quick Launch for meeting workspaces that you generate from events on your calendar. To access the page for this meeting workspace, click the View All Site Content link for the site containing the workspace and then click the link attached to its name in the Sites and Workspaces section of the All Site Content page.
Alternatively, you can open the calendar containing the event used in creating the workspace, click the link attached to its calendar item, and then click the link attached to the name of the meeting workspace in the Workspace field at the bottom of the item's form page.
If you want your site's Quick Launch to have a link to the meeting workspace you've created from a SharePoint calendar item, you need to manually add it. You do this by following these steps:
Click the View All Site Content link above the site's Quick Launch and then click the link attached to the name of the meeting workspace in the Sites and Workspaces section.
SharePoint opens the page for the meeting workspace you want to add to the site's Quick Launch.
Right-click the URL address in the Address bar of your Web browser and then choose Copy from the shortcut menu that appears.
You must supply this URL address to add the workspace to the Quick Launch, and copying it in this manner is the easiest way to ensure that you enter the correct address.
Click the link to the parent site in the Content Navigation Breadcrumb that appears at the top of the page and then choose Site Settings from the Site Actions drop-down menu.
SharePoint opens the Site Settings page.
Click the Quick Launch link in the Look and Feel column of this page.
SharePoint opens the Quick Launch page for the site.
On the site's Quick Launch page, click the New Link button.
SharePoint opens the New Link page.
Highlight the
http://characters automatically entered into the Type the Web Address text box and then press Ctrl+V to replace it with the complete URL address you copied in Step 2. Then press Tab.SharePoint pastes the URL address into the Type the Web Address text box and advances the insertion point to the Type the Description text box.
Type a short description of the meeting workspace in the Type the Description text box.
The description you enter here appears as the name of the workspace link in the site's Quick Launch.
Choose Sites from the Heading drop-down menu and then click OK to close the New Link page.
SharePoint returns you to the Quick Launch page, where your new link appears in the Sites section.
Click the link to the parent site in the Content Navigation Breadcrumb at the top of the Quick Launch page.
A live link to your meeting workspace now appears in the site's Quick Launch on the left of the site's page.
If you use the Calendar module in either Outlook 2003 or 2007 to schedule your meetings, you can create a meeting workspace in SharePoint for the event that you're scheduling in Outlook. To do this, follow these steps:
Open the calendar in Outlook 2003 or 2007 and then right-click the date of the event and choose New Meeting Request from the shortcut menu that appears.
Outlook opens a new Untitled – Meeting window in the Calendar (similar to the one shown in Figure 6-8 except its window carries the name of the meeting from the Subject field).
In Outlook 2007, click the Meeting Workspace button in the Attendees group on the Meeting tab of the Ribbon.
Outlook opens the Meeting Workspace pane on the right side of the window.
(In Outlook 2003, press Ctrl+Shift+Q to open an Untitled – Meeting dialog box click the Meeting Workspace button to open the Meeting Workspace pane and then click its Create button.)
Fill out the Outlook meeting request as you normally would, including filling in the To field with the e-mail addresses of those you intend to invite to the meeting and then adding the meeting's subject, location, and start and ending times, as well as any message to the recipients in their respective fields, and then click Create.
If you need help filling out the meeting request and scheduling appointments and events in Outlook, take a gander at my book Manage Your Life with Outlook For Dummies (from Wiley Publishing).
(Optional) If the settings in the Create a Workspace area of the Meeting Workspace pane are not correct — the wrong site is indicated or the wrong template is being used — click the Change Settings link in this pane.
The Meeting Workspace pane refreshes to show drop-down lists for specifying a new site location, a new template language, and a new template type, as shown in Figure 6-9.
(Optional) Click OK in the Change Settings view of the Meeting Workspace pane to return to the Home page and then click the pane's Create button.
SharePoint creates the new meeting workspace and then Outlook adds a link to that workspace in the body of the meeting request, as shown in Figure 6-10. You can then click the Send button to send out the updated meeting request to all your recipients.
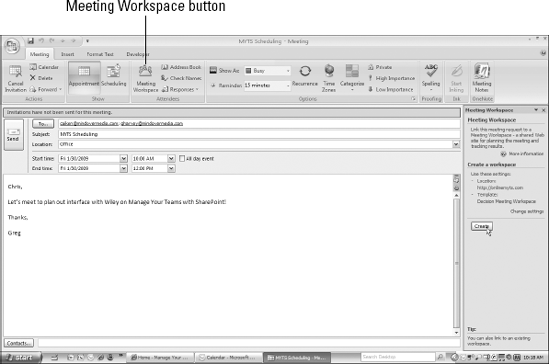
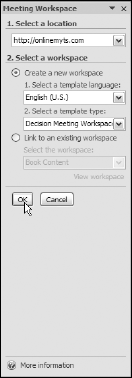
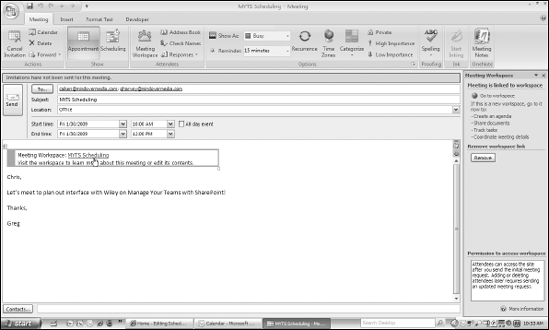
Figure 6.10. This meeting request shows the link to the new meeting workspace after creating it on the SharePoint site.
Note
Don't forget that the team members to whom you send the meeting request with the link to the new SharePoint meeting workspace may not be able to access that workspace unless they're registered as authenticated users of that site, complete with user ID, password, and permissions to browse the site. (See Chapter 3 for details on adding authenticated SharePoint site users.)
Tip
SharePoint doesn't automatically add a link to the Quick Launch for the meeting workspace you generate from an event added to your Outlook calendar. To access the page for this meeting workspace, click the View All Site Content link for the site containing the workspace and then click the link attached to its name in the Sites and Workspaces section of the All Site Content page. Or, you can add a link to the meeting workspace in the site's Quick Launch by following the steps outlined in the section "Adding a Quick Launch link to a meeting workspace created from a calendar item," earlier in this chapter.
Instead of creating a new meeting workspace for an event that you're adding to your SharePoint or Outlook (2003 or 2007) calendar, you can create a link to an existing workspace already created on the SharePoint site. This is useful, for example, when you've set up a meeting workspace for an initial meeting that contains supporting materials that pertain not only to the initial meeting but to a subsequent meeting as well (especially if the meeting or event is a recurring one that requires only a single, supporting meeting workspace).
The process for linking a SharePoint calendar event or Outlook calendar event (if you're using Outlook 2003 or 2007) to an existing meeting workspace is almost the same as the process for creating a new meeting workspace for the event — almost, but not quite. One slight change is required, and the exact nature of that change differs depending upon which of the two calendars you're using (the SharePoint Calendar or the Outlook 2003/2007 Calendar):
SharePoint Calendar: Click the Link to an Existing Meeting Workspace radio button in the Choices area at the top of the New or Existing Meeting Workspace page in SharePoint and then select the workspace you want from the drop-down list immediately beneath it.
Outlook 2003 or 2007 Calendar: Click the Change Settings link in the Meeting Workspace pane of the meeting request window (opened in Outlook 2007 by clicking the Meeting Workspace button in the Attendees group of the Meeting tab on the Ribbon[LB1], whereas in Outlook 2003 you click the Meeting Workspace button in the Untitled – Meeting dialog box). Next, select the Link to an Existing Workspace radio button in the Select a Workspace area of the Meeting Workspace pane, select the name of the meeting workspace, and then click OK.
When you click OK after designating the existing workspace to link in the SharePoint New or Existing Meeting Workspace page, SharePoint takes you to the Meeting Workspace page on the site. When you click the Link button in the Meeting Workspace pane in Outlook, the program adds a link to the existing workspace in the body of the meeting request, which you can then send to all your designated recipients by clicking the Send button. You can then click the link to the existing meeting workspace that appears in the e-mail generated from the meeting request to open the home workspace page in your Web browser.
Note
After you link a new recurring event to an existing meeting workspace, SharePoint adds a Date Selector pane on the left side of the home workspace page, and this new pane displays the dates of all the events currently connected to the workspace. You can then click the date of the particular event to display its information and calendar link on the home workspace page.
At this point in the development of SharePoint technologies, you (unfortunately) can't actually conduct an online or Web meeting from a particular meeting workspace. The best you can do if your meeting workspace is for an upcoming online meeting is to use the workspace page(s) to provide your team members with all the information they need to prepare for the Web conference. The team member attendees will then still have to launch whatever Web conferencing software you're using — perhaps Microsoft Live Meeting, Citrix GoToMeeting, or Yugma Instant Web Conferencing — from your Web browser outside of the SharePoint site.
If, however, you use Yugma Instant Web Conferencing to conduct your online meetings, you can easily add a command button to the Home page of any SharePoint meeting workspace capable of supporting an online meeting component. You and your team members can then click this button at the appointed meeting time to launch Yugma (in its own window) and join the Web conferencing session. And even if you don't use Yugma Instant Web conferencing and don't have any interest in getting it, you may still want to follow along with the steps, as doing so provides you with a good opportunity to see how easy it is to use SharePoint's Content Editor Web Part to bring readymade HTML code into your site.
To add this Yugma Now button to a meeting workspace you've created on your SharePoint site, all you have to do is download the Yugma Widget (a tiny file containing the snippet of HTML code you need to launch the Yugma program as well as the graphic used by its command button) and then add the HTML code from this snippet to a Content Editor Web Part you've added to the meeting workspace.
You can do all this by following these simple steps:
Point your browser to the Yugma home page (
www.yugma.com) and then click the Support link that appears in the column on the left side of the page.The Yugma Support page appears in your browser.
Click the Yugma Widget link and fill in the information in the online form to customize the widget. Then click the Save This HTML Snippet link.
Windows opens a dialog box asking whether you want to open or save the snippet.
Click the Save button and then designate a place on your computer to save the Yugma_now widget.
As a general principle, you should always save such files to your hard drive.
Navigate to where you saved the Yugma_now widget folder; then open the folder and click the Yugma_now HTML icon inside.
The Yugma_now HTML page appears in your browser.
Use the browser's command to open the HTML source code (View

The browser displays the HTML code for the page in a separate window.
Select all the HTML code for the Yugma snippet and then choose Edit
Windows copies the selected HTML code to the Windows Clipboard.
Now, you're ready to add the Content Editor Web Part to the appropriate page of the meeting workspace in SharePoint.
Open the page in the meeting workspace in your SharePoint site where you want the Yugma Now button to appear and then choose Edit Page from the Site Actions drop-down menu.
SharePoint places the workspace page in Edit mode, displaying the Web Part zones.
Click the Add a Web Part button at the top of the Web Part zone where you want the Yugma Now button to appear.
SharePoint opens the Add Web Parts dialog box for the Web Part zone you select.
Select the check box in front of the Content Editor Web Part in the Miscellaneous section of this dialog box and then click the Add button.
SharePoint closes the Add Web Parts dialog box and adds the Content Editor Web Part to the top of the selected zone.
Choose Modify Shared Web Part from the drop-down menu attached to the Content Editor Web Part's Edit button.
SharePoint opens a Content Editor Web Part task pane on the right side of the workspace page.
Click the Source Editor command button in the task pane.
The button appears under the heading To Type HTML Source Code, Click Source Editor.
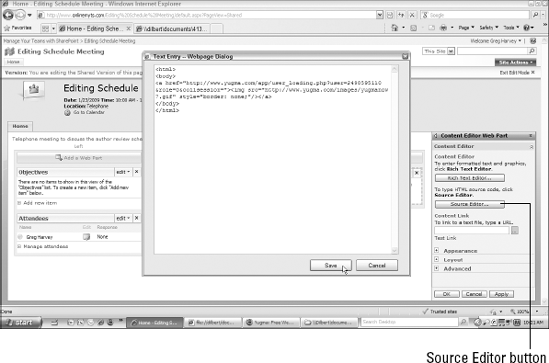
SharePoint opens a Text Entry – Webpage Dialog window.
Press Ctrl+V to insert the HTML code you copied earlier into the Text Entry – Webpage Dialog window, as shown in Figure 6-11 , and then click the Save button.
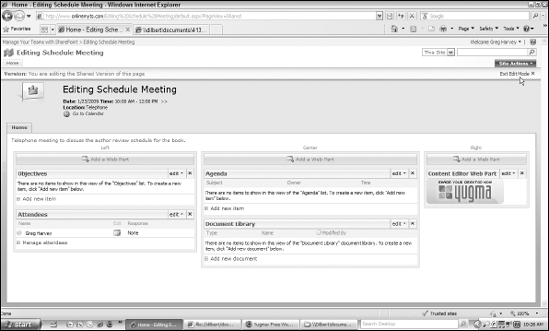
SharePoint saves the HTML code you pasted into the dialog box and then closes the dialog box. The program then redraws the current page of the meeting workspace, displaying the graphic of the Yugma Now button in the Content Editor Web Part (see Figure 6-12).
(Optional) Click the Expand button in front of Appearance in the Content Editor Web Part task pane and edit the name that appears in the Title text box to something a bit more descriptive than Content Editor Web Part.
Now, you're ready to close the task pane and exit Edit mode.
Click the OK button in the Content Editor Web Part task pane and then click the Exit Edit Mode button in the upper-right of the meeting workspace page.
SharePoint redraws the meeting workspace page with a fully functional Yugma Now button that you and your team members can use to launch Yugma Web Conferencing and start a new online meeting or join one in progress.