
In This Chapter
Understanding how SharePoint surveys work and what you can do with them
Creating a new survey to poll your teams and get their opinions
Using threaded discussions to garner ideas and get feedback from your teams
Creating new discussion boards on your SharePoint site
Connecting discussion boards to Outlook
SharePoint 2007 makes it easy to get feedback from your team members during the course of the SharePoint collaboration. To this end, SharePoint supports two special types of lists:
Surveys that team members can take to record their opinions on topics of interest to the team and/or some aspect of the collaborative project in the form of an online questionnaire
Discussion boards where team members can share their ideas and opinions on these kinds of topics following the format of a newsgroup-style threaded discussion
In this chapter, you find out how to create and use SharePoint surveys to poll your teams and record their responses to various questions. The SharePoint surveys you put together can be straightforward questionnaires that simply record a team member's responses to a series of simple questions or they can be somewhat more complex, branching out to include different series of questions based on the particular responses given to key questions.
In this chapter, you also find out how to use SharePoint discussion boards to provide forums for your team members so that they can easily share their views and opinions on various topics. You can also use discussion boards to facilitate conversations about issues that arise in the course of the collaboration and to elicit ideas for improvements that you can incorporate in future collaborations.
When you set up a new survey in SharePoint 2007, you do so by creating a series of questions meant to elicit informative responses from the team members taking your survey. These survey questions can be one of two general types:
Closed: These survey questions offer limited responses and require a definite answer such as Yes, No, or even Unsure. Closed questions are fairly easy to analyze statistically, but such questions can be a challenge to compose in such a way that they cover the full range of responses that your respondents may possibly want to give.
Open-ended: These survey questions offer no specific responses and require no particular answer from the respondents. Open-ended questions tend to call for an opinion or some sort of analysis of a topic. Questions of this type are often easier to compose than closed questions, but their responses are more of a challenge to catalogue and analyze. An open-ended question often comes on the heels of a particular response to an earlier closed question. For example, if a respondent answers in the negative to a closed Yes or No question asking whether he or she felt that a particular meeting workspace on the SharePoint site contained all the materials needed to adequately prepare for a team meeting, you can then compose an open-ended, follow-up question that asks the respondent to list specific additional resources that would have helped his or her preparation.
As with the fields in SharePoint lists, the answers to particular survey questions can be any one of many different types. As you see in Table 7-1, some of these answer types are better suited to different general types of questions.
Table 7.1. The Types of Answers Supported in SharePoint Survey Questions
Answer Type | Question Type | When to Use |
|---|---|---|
Single Line of Text | Open-ended | Used for short answers of a few words or a single sentence. You can restrict the total number of characters in this single line. |
Multiple Lines of Text | Open-ended | Used for longer answers of a few sentences or a short paragraph. You can specify three kinds of text for the multiple lines: Plain; Rich (enabling respondents to change the font, text color, and alignment); and Enhanced (enabling respondents to add pictures, tables, and hyperlinks). |
Choice (Menu to Choose From) | Closed or open-ended | Used to restrict the answer to particular selections (such as Yes, No, Maybe) in a closed question and to allow the respondent to enter his own answer in an open-ended question. You can present the choices in a drop-down list, as radio buttons, or as check boxes (which enables the respondent to select more than one answer). |
Rating Scale (a Matrix of Choices or a Likert Scale) | Closed | Used to restrict the answer to a closed question to a preference rated on a numeric scale (1 to 5 by default), where a value at one end of the scale indicates strong agreement with the question, and a value at the other end indicates strong disagreement. |
Number (1, 10, 100) | Open-ended | Used to restrict the answer in an open-ended question to a value. You can specify the number of decimal places displayed in the numeric answer as well as the highest and lowest allowable value. |
Currency ($, ¥, €) | Open-ended | Used to restrict the answer in an open-ended question to an amount of money. You can specify the currency format and number of decimal places displayed in the monetary answer as well as the highest and lowest allowable amounts. |
Date and Time | Open-ended | Used to restrict the answer in an open-ended question to a date or a date and time. |
Lookup (Information Already on This Site) | Closed | Used to restrict the answer in a closed question to a choice of entries in another list that exists on the SharePoint site. |
Yes/No (Check Box) | Closed | Used to restrict the answer in a closed question to either true (Yes) or false (No). |
Person or Group | Closed | Used to restrict the answer in a closed question to a particular authenticated SharePoint user or user group. |
Note
Keep in mind that you can specify whether any question in the survey is mandatory or optional (the default setting). You can also specify the most likely answer for a particular question as the default that's presented in the survey, which the respondent may then override with a different choice.
The ability to have a survey branch depending upon a respondent's answer to a question is a very cool new feature of SharePoint Services 3.0. Branching enables you to keep the survey simple by offering your respondents mostly multiple-choice answers, while still enabling you to get more information when a respondent gives you a particular response that requires more details.
For example, a question in your survey can be a Yes/No question that asks, "Do you need more SharePoint training in order to effectively use its technology for team collaboration?" Then, if the respondent selects the No check box, the survey simply ends, but if he answers Yes, the survey then branches to another page containing a set of Rating Scale questions that query the respondent on how strongly he feels about receiving training on particular SharePoint features (subsites, lists, document libraries, and so forth). After the respondent answers that question, the survey ends or goes on to a new line of questioning.
Tip
You and your team members can always tell when a question in a survey is branched because it will always be the last question on a particular survey page. This is because SharePoint always inserts a page break after a branching-enabled question.
Note
The only trick is that you must add the actual branching to the survey after you've finished creating the survey and entering all its questions. This requirement almost always means that you need to plan out the order of the questions and the logic of their branching in the survey before you actually start creating the survey and entering its questions in SharePoint. (To plan your survey, you can use paper, or you can use a program such as Excel or Word 2007, taking advantage of organization diagrams using SmartArt graphics.)
To create a new SharePoint survey, follow these steps:
Open the subsite where you want the survey to be available to the team members who are to take it.
If you want the survey to be available from the top-level site, open the home page.
Choose Create from the Site Actions drop-down menu.
SharePoint opens the Create page.
Click the Survey link at the bottom of the Tracking column.
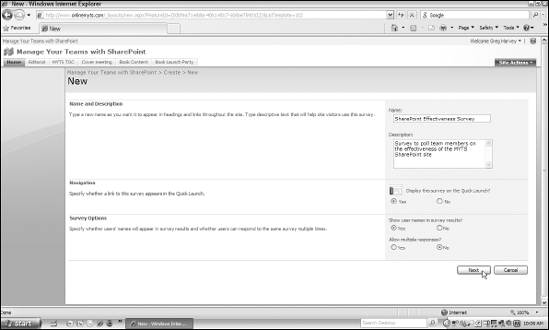
SharePoint opens a New survey page similar to the one shown in Figure 7-1.
Enter a name for the new survey in the Name text box and then press Tab.
SharePoint advances the cursor to the Description text box.
Type a description of the survey in the Description text box to let your team members know the survey's purpose and/or scope.
(Optional) Make any desired changes to the Navigation and Survey Options sections.
By default, a new survey appears in the Quick Launch, the results show the respondent's name, and SharePoint does not allow a respondent to take the survey more than once. If you need to change any of these default settings for your survey, you can do so at this point.
Click the Next button.
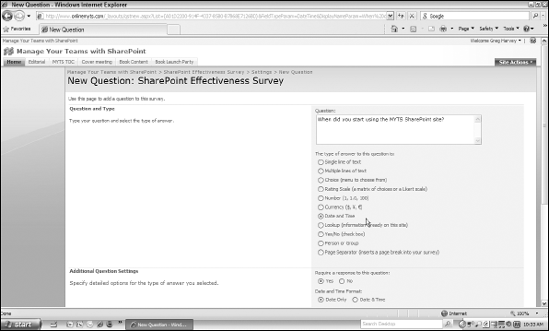
SharePoint opens a New Question page, where you compose the survey's first question. Figure 7-2 shows the top part of this New Question page, where you type the question and then select its answer type. (See Table 7-1, earlier in this chapter, for details on the various answer types.)
Type your question in the Question text box and then select the radio button of its answer type under the heading The Type of Answer to This Question Is.
By default, each new question in the survey is optional, and the other question settings — the number and types of options, for example, or the default answer — depend upon the type of answer you select in this step. Figure 7-3 shows you the Additional Question Settings that appear when you select Date and Time as the answer type.
(Optional) Make any necessary changes to the settings in the options that appear in the Additional Question Settings area of the page.
If you need to, select the Yes radio button under the Require a Response to This Question heading to make answering this question mandatory.
You now continue to compose the survey questions in the order in which you want them to appear.
Click the Next Question button at the bottom of the page and repeat the process of composing your next survey question, as outlined in Steps 8 and 9.
Repeat the process as many times as needed. After you've composed all the survey questions, you're ready to create the survey.
When you're done composing questions, click the Finish button at the bottom of the New Question page.
SharePoint compiles your survey questions and then, after creating the survey, displays the survey's Customize page — similar to the one shown in Figure 7-4 — where you can make last-minute changes to the survey and its questions, and add branching.

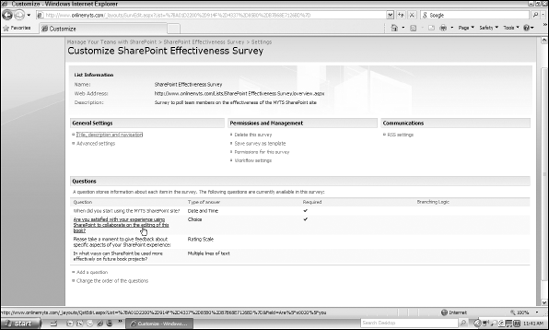
Keep in mind that, after creating a survey, you can still edit it from the survey's Customize page. To open this Customize page, click the survey's link either on the Quick Launch (assuming that the survey has such a link) or in the Surveys section of the All Site Content page and then choose Survey Settings from Settings drop-down menu.
From a survey's Customize page, you can change the survey title, its description, and whether a link to the survey appears on the Quick Launch. To access these settings, click the Title, Description, and Navigation link in the General Settings column.
You can edit individual questions (for example, changing their answer type, making them mandatory, or adding branching) by the particular question in the Question column. SharePoint then opens an Edit Question page for the selected question so that you can modify the question type and its other settings.
You can also add new questions to the survey by clicking the Add a Question link on the survey's Customize page. SharePoint opens a New Question page where you create the question. You can modify the order in which the questions appear in the survey by clicking the Change the Order of the Questions link, which opens a Change Question Order page. Here you designate the order of the questions (from top to bottom) by selecting a number that corresponds to the new question's order in the survey in the drop-down list located to the right of each question.
If you want to add branching to a survey so that the survey skips to a particular question when a respondent answers in a certain way, you need to add the branching logic to the question whose answer triggers the branching to the alternative question.
To do this, follow these steps:
Select the survey's page by clicking the survey's link either on the Quick Launch or in the Surveys section of the All Site Content page.
Choose Survey Settings from the Settings drop-down menu.
SharePoint opens the Customize page for the survey.
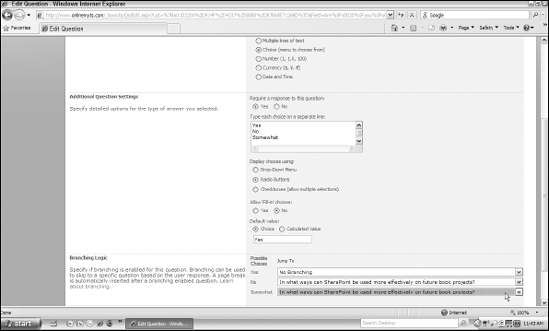
In the Question section of the survey page, click the link attached to the particular question whose answer is to trigger the branching.
SharePoint opens an Edit Question page for the particular question you select. The Branching Logic section is at the bottom of the page (see Figure 7-5) where you add a branch to a response or responses (in the case of Choice question) that indicates the question to which it jumps.
Click the drop-down button for the answer (or answers) under the Jump To heading and then select the question to which the question branches from the drop-down menu. Then click OK.
SharePoint returns you to the Customize page where, in the Questions area, a new Branching Logic column has been added. In the row of the question you just edited, a check mark appears in the Branching Logic column.
After you finish composing questions and editing the branching logic for a new survey, you can alert your team members to its existence by adding an invitation to take the survey in the home page Announcements list. You can also send out an invitation e-mail message using the survey's Alert Me option on the Actions drop-down menu.
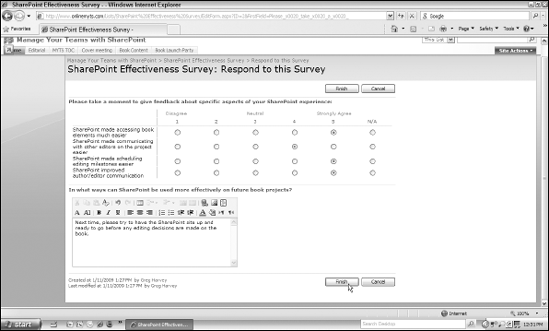
Then, team members can respond to the survey on the SharePoint site by opening its Survey page (which displays descriptive information about the survey and summarizes its results) and then clicking the Respond to This Survey button.
SharePoint opens the first page of the survey (assuming that the survey has more than a single page) where the respondent can record his answers. When the survey contains more than one page (which is always the case when a survey uses branching), he clicks a Next button when he's finished answering the questions on the current page.
When a respondent answers the final question on the survey, he can save his responses to the entire survey by clicking the Finish button at the bottom of the page, as shown in Figure 7-6. SharePoint then returns him to the main Survey page where summary information about the survey is displayed.
Note
If a respondent doesn't complete the survey and clicks the Cancel button instead of the Finish button, an alert dialog box appears, indicating that SharePoint has saved a partial survey response that can be viewed in the All Responses survey view. To delete the partial response so that the respondent can still take the survey at a later time (assuming that the survey can be taken only once), he needs to click OK in this alert dialog box rather than Cancel.
When you create a survey in SharePoint 2007, the program automatically creates three views for the survey:
Overview: This is the default view that appears on the Survey page with a list showing the survey name, description, date and time it was created, and the total number of responses to the survey.
All Responses: In this view, SharePoint displays a list of responses to the survey, showing the number of responses, the team member who completed the survey (unless you elected not to show a respondent's name in the results), the date he took it, and whether the survey was completed. To view individual answers to a question, click the link to its number in the list. To switch to this view, either click the Show All Responses link when the Survey page is in Overview or select All Responses from the View drop-down list.
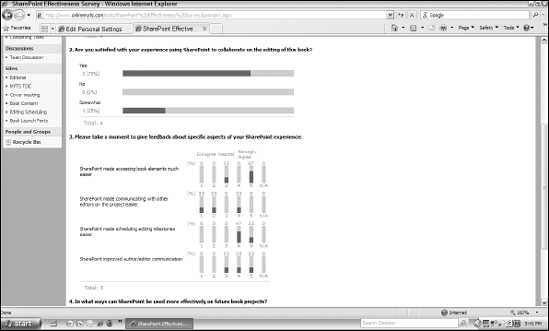
Graphical Summary: In this view, SharePoint displays statistics about the answers to each of the survey questions in bar and column chart form, as shown in Figure 7-7. To switch to this mini-graph view, either click the Show Graphical Summary of Responses link when the Survey page is in Overview or choose Graphical Summary from the View drop-down list.
Note
Unlike most of the other lists and libraries in SharePoint that enable you to customize the program's default views and create ones of your own, be aware that you can't create custom views for your surveys. The three built-in views (Overview, All Responses, and Graphical Summary) are the only ones you can use to display survey results, and these views must be used as is.
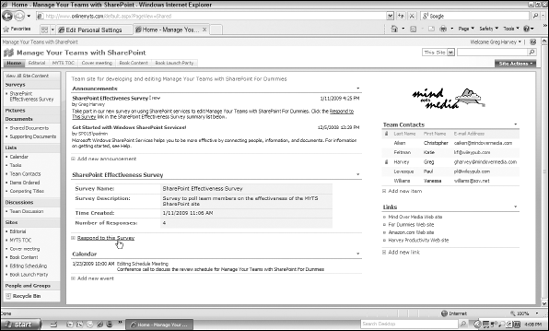
During the time that you're actively eliciting responses to a survey from your team members, you can make it easier for them to respond to the survey by adding the survey's Web Part to the home page. That way, the minute your team members log on to the SharePoint site, they'll see a summary of the survey along with a Respond to This Survey link that they can click to take the survey.
To see how this works, follow along with the steps for adding a summary list to the Left Web Part zone of my site's home page, immediately below the Announcements list:
On the home page of the SharePoint site, choose Edit Page from the Site Actions drop-down menu.
SharePoint displays the home page in Edit mode.
Click the Add a Web Part button at the top of the Left Web Part zone.
SharePoint opens the Add Web Parts to Left dialog box.
Select the check box in front of the SharePoint Effectiveness Survey Web Part in the List and Libraries section and then click the Add button.
SharePoint adds the SharePoint Effectiveness Survey in Overview to the top of the Left Web Part zone of the home page.
Drag the SharePoint Effectiveness Survey Web Part by its title bar and drop it between the Announcements and Calendar Web Part and then click the Exit Edit Mode button.
SharePoint exits Edit mode and redraws the home page with the Overview of the SharePoint Effectiveness Survey displayed between the Announcements and the Calendar lists, along with its Respond to This Survey link (see Figure 7-8).
Tip
If you want your team members to see the results of a survey you're currently conducting in graphical form, switch the Survey Web Part on the home page from the default Overview to the Graphical Summary view. While in the home page's Edit mode, click the survey's Edit button and then choose Modify Shared Web Part from the drop-down menu to display the survey's task pane on the right. When the pane is on-screen, choose Graphical Summary from the Selected View drop-down menu before you click OK.
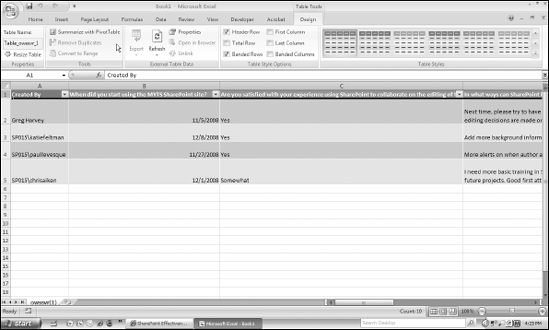
If you have Excel 2003 or 2007 installed on your computer, you can easily export your survey results to an Excel worksheet (as a Web query) and then use Excel's extensive analytical features to further evaluate the results.
To export the results of a survey to an Excel worksheet, follow these steps:
Choose Export to Spreadsheet from the survey's Actions drop-down menu.
Click the Open button in the File Download dialog box.
Windows launches Excel (if it's not already running) and then displays an Excel Security Notice alert dialog box.
Click the Enable button in the Excel Security Notice dialog box. (Supply your SharePoint User ID and password, if prompted for it.)
Excel then copies the survey results into a spreadsheet table as shown in Figure 7-9. In Excel 2007, you can then easily summarize the results in an Excel Pivot Table by clicking the Summarize with PivotTable button in the Tools group of the Table Tools: Design tab on the Ribbon. (See my book Excel 2007 All-in-One Desk Reference For Dummies, from Wiley Publishing, for loads more on analyzing summary data with Excel Pivot Tables.)
SharePoint 2007 supports the use of newsgroup-style discussions to enable you and your team members to easily exchange views on various topics of interest through the use of its discussion boards. Discussion boards enable you to create new discussion topics as well as to track all the postings and replies that you and your team members make as part of the online discussion.
When you open a discussion board, you see a list of all the discussion topics that you add to the board (using the Discussion option on the board's New drop-down menu). SharePoint displays this list using the Subject view.
The Subject view is the only ready-made view available for a new discussion board (although you can customize this view and create new views in addition to using the Modify This View and Create View options on the board's View drop-down menu). In this view, each discussion topic that you add to a discussion board is displayed in a simple list with four columns: Subject, Created By, Replies, and Last Updated.
Then, to view the particular postings and replies to a particular topic on the discussion board and to add to them, you click the link attached to the topic in the Subject column of the list itself. SharePoint then displays a page showing the posts and replies in what's called a Flat view, one of the two predefined views for a discussion that you can select from the discussion's View drop-down menu:
Flat: This is the default view afforded of a particular discussion topic that displays a straight, sequential listing of all posts and replies in the order in which they were created.
Threaded: This is an alternative view you can select for a particular discussion topic that groups replies to a particular post under that post in the order in which the replies were created.
Typically, when you start using a new SharePoint site, create a subsite from the Team Site template (Chapter 2), or create a workspace using the Document Workspace template (Chapter 9) or Social Meeting Workspace template (Chapter 6), the program automatically adds a discussion board to the subsite or workspace.
When working with a discussion board created from a Team Site or Document Workspace template, start the discussion by clicking the Team Discussion link in the Quick Launch. As for discussion boards created from a Social Meeting Workspace template, you access those by clicking the workspace's Discussion tab.
To start an online roundtable discussion about a particular topic using the Team Discussion board that comes with a new site, follow these steps:
Open the home page and then click the Team Discussion link in the site's Quick Launch.
SharePoint opens a blank Team Discussion page.
Choose Discussion from the New drop-down menu.
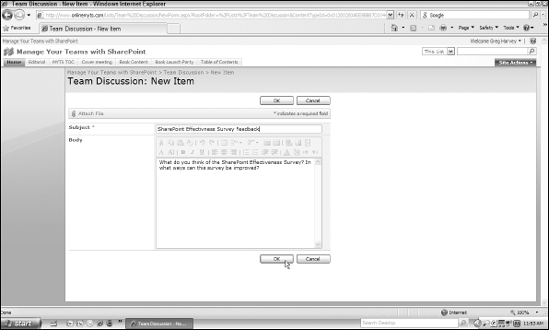
SharePoint opens a New Item page with a blank form for adding a new discussion topic, similar to the one shown in Figure 7-10.
Type a title for the new discussion topic in the Subject text box and then press Tab.
SharePoint advances the cursor to the Body text box.
Note
The title you've chosen appears in the Subject column on the discussion board, so make it as informative as possible.
Type in a description or question that indicates the nature of the new discussion topic and the type of information you want discussed.
Some topics are probably better phrased as questions for the team ("What do you think of ...?"), but others are better phrased as polite commands eliciting their feedback ("Please give me your ideas on . . .").
(Optional) To attach a supporting document file to the new discussion topic, click the Attach File link at the top and then use the Browse button to select the file in the Choose File to Upload dialog box. After selecting the file, click Open and then click OK.
SharePoint closes the Choose File to Upload dialog box and returns you to the original New Item form with the Subject text box and Body text box.
Click the OK button at the bottom of the New Item form.
SharePoint closes the New Item page and returns you to the Team Discussion page, where the new subject of the new discussion topic appears along with your name and the date and time you created it.
After adding a discussion topic as a new item on your Team Discussion board, you can post messages to it by following these steps:
Open the Team Discussion page for your site by clicking the Team Discussion link on its Quick Launch.
Click the link attached to the discussion topic in the Subject column of the discussion list on this page.
SharePoint displays a page displaying the subject and description of your new discussion topic.
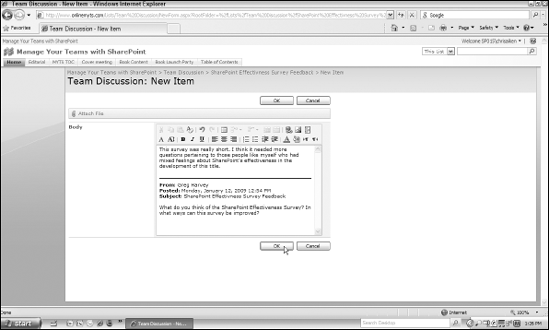
Click the Reply button on the far right of the title bar above the new discussion topic.
SharePoint displays a New Item page similar to the one shown in Figure 7-11, where you can respond to the message posed in the original discussion topic. The Body text box contains the original discussion subject and description beneath the area where you enter your response.
Type your thoughts and feelings about the discussion topic and then click OK.
SharePoint returns you to the discussion page that now shows your response immediately beneath the original post.
When someone posts a response to a comment that you make about a topic on a discussion board, you can easily post a reply directed to that person's comments. All you have to do is open the topic's discussion page and then click the Reply button that appears on the far right side of the title bar of his post. (See Figure 7-12.)
SharePoint then opens a New Item page that shows the text of the person's response immediately beneath the area where you type your reply. When you click OK on this New Item page, SharePoint returns you to the discussion page containing all the posts, where your reply now appears immediately below the person's response to your original comment.
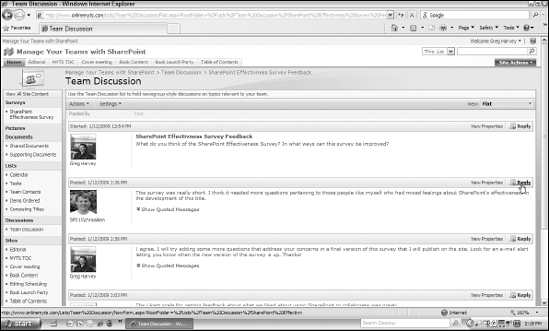
By default, SharePoint displays the messages and replies posted to a particular topic on the discussion board in a Flat view, whereby each post and reply is simply listed one after the other in the order in which they were posted (as shown in Figure 7-12).
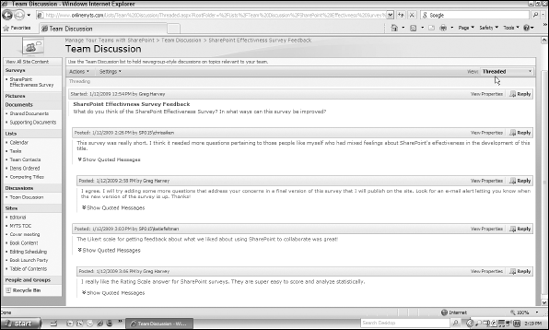
To get a better idea of the relationship between original posts and replies made specifically to them, you can switch the discussion page to the Threaded view. To do this, choose Threaded from the View drop-down menu on the discussion page that contains the threads of a particular discussion.
SharePoint then redraws the discussion page, slightly indenting replies to posts and simplifying all responses by removing the pictures assigned to the users (or the place for the person's picture even when no picture is available). Figure 7-13 gives you an idea of how the posts and replies appear in this view. Note that when you switch a discussion to the Thread view, SharePoint automatically adds a Show Quoted Messages link to each message. You can click this link to expand a particular response in the discussion so that it includes all of the previous posts and replies, thus detailing its history.
You can create discussion boards for each of the subsites that you set up on your SharePoint site (see Chapter 2) that don't automatically create them (as is the case with subsites that use the Team Site template). To create a new discussion board for a SharePoint subsite that doesn't automatically have one, follow these steps:
Open the subsite for which you want to add a new discussion board and then choose Create from the Site Actions drop-down menu.
SharePoint opens the Create page for the subsite.
Click the Discussion Board link in the Communications column.
SharePoint opens a New page, where you specify the discussion board settings.
Type the name for the new discussion board in the Name text box and then press Tab.
SharePoint advances the cursor to the Description text box.
Type a description of the new message board in the Description text box.
By default, the Leave the Share List Items Across All Meetings (Series Items) option is set to No. Provided that you don't want to share the discussion topics that you add to this new discussion board with all the other discussion boards on the SharePoint site, leave the No radio button selected under Change Items Into Series Items.
Click the Create button.
SharePoint creates the new discussion board and then displays its page on the current subsite.
You can then start adding discussion topics to the newly created discussion board following the general steps outlined in the section "Adding a new topic to a site's discussion board," which appears earlier in this chapter.
If you're using Outlook 2007, you may want to connect your SharePoint discussion board to Outlook so that you can then view the posts made to particular topics within it and make replies to them from right within Outlook itself. This is a super way to stay on top of a team discussion and to make it super easy for your team members to actively participate in the discussion.
To connect a discussion board to Outlook, open the board in SharePoint and then choose the Connect to Outlook option from the Actions drop-down menu. Doing so adds a folder for the board in the SharePoint Lists section of the Mail Folders in Outlook's Navigation pane.
When you select this discussion folder in the Navigation pane, Outlook adds an Arrange By button at the top of the pane to the right. You can click the Arrange By button to modify the way the individual posts and replies for a particular conversation (topic) are displayed there.
To reply to a post displayed in this pane, right-click the post and then choose Post Reply to Folder from the shortcut menu. Outlook opens a pre-addressed e-mail window that contains the text of the post or reply below a blank line where you can type a reply. After you finish typing your reply, click the Post button at the top of this window to post your reply to the discussion topic on your SharePoint site.