Cropping and straightening images
Working with the Divide Scanned Photos command
Using one-step auto fixes
Editing with Edit Quick
Cloning realistically
Healing wrinkles, spots, and blemishes
Fixing small flaws
One of the strongest assets of Elements is the capability to fix images quickly, painlessly, and effectively. When you work with digital imaging, you find that cropping away unwanted clutter, cloning an image with a shadow, adjusting the color or contrast of a photo, or eliminating flaws from that otherwise perfect portrait are all fixes that you can do successfully whatever your skill level. With these simple image-makeover tools, Elements makes these tasks as easy to perform as clicking a button or making a few swipes with a brush.
Even a novice photographer knows that cropping an image can make a composition stronger. Cropping cuts away background clutter or empty space in order to focus in on a certain subject.
This simple process can transform a mediocre image into an interesting and even exciting one. Take a look at our example in Figure 1-1. It doesn't take a pro photographer to figure out which image is better composed.
The most popular way to crop an image is by using the Crop tool. This simple tool is as easy and effective to use as a ruler and an X-Acto knife — without the possibility of slicing any fingers. Here's how to use this popular tool:

Specify your aspect ratio options on the Options bar.
Here are your choices:
No Restriction: Allows you to freely crop the image at any size.
Use Photo Ratio: Retains the original aspect ratio of the image when you crop.
Preset Sizes: Offers a variety of common photographic sizes. When you crop, your image assumes those specific dimensions.
Warning
When you crop an image, Elements retains the original resolution of the file. Therefore, to keep the image at the same resolution while also eliminating portions of the image, Elements must resample the file. Consequently, your image must have sufficient resolution so that the effects of the resampling aren't too noticeable. This is especially true if you're choosing a larger preset size. Be sure to see Book III, Chapter 1 for more details on resolution.
Width and Height: Enables you to specify a width and height to crop your image.
With the Crop tool, click and drag around the part of the image you want to keep and then release your mouse button.
While you drag, a marquee (a dotted outline) bounding box appears, displaying the cropping boundaries. Don't worry if your cropping marquee isn't exactly correct. You can adjust it in Step 4.
Note
The area outside the cropping marquee appears darker than the inside in order to frame your image better. Adobe calls this a shield. If you want to change the color and opacity of the shield, or if you don't want it at all, change your Crop preferences. (Choose Edit

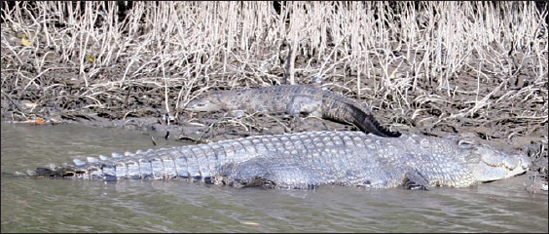
Figure 1-2 shows a great example of way too much background clutter. We dragged around the only thing we wanted to retain.
Adjust the cropping marquee by dragging the handles of the crop marquee bounding box.
The small squares on the sides and corners of the cropping marquee are called handles. When you hover your mouse pointer over any handle or over the marquee itself, your cursor changes to a double-headed arrow, indicating that you can drag.
To move the entire marquee, position your mouse pointer inside the marquee until you see a black arrowhead cursor and then drag. Adjust the marquee until you're satisfied.
You can also drag the origin point (the circle icon in the center) to change the axis of rotation.
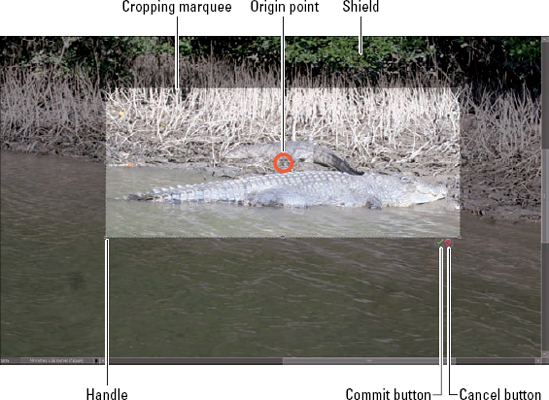
Figure 1.2. The area around your cropping marquee appears darker so that you can better frame your image.
Tip
If you move your mouse outside the marquee, the cursor changes to a curved, double-headed arrow. Dragging with this cursor rotates the marquee. This feature can be extremely useful to rotate and crop a crooked image. By using the Crop tool, you can perform both commands in one step, quickly and accurately. Just be aware that rotation, unless it's in 90-degree increments, resamples your image. If this is done repeatedly, it can damage your image. Getting the rotation right the first time is best.
Double-click inside the cropping marquee.
You can also just press Enter (Return on the Mac) or click the green Commit button next to the marquee. Elements then discards the area outside the marquee, as shown in Figure 1-3. To cancel your crop, click the red Cancel button or press the Esc key.
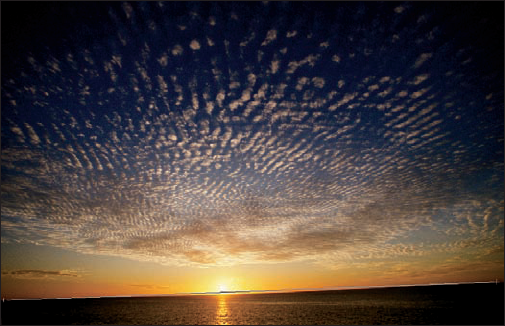
Strive to capture a straight horizon in your photo. You don't want people to feel like the water is going to pour right out of your frame in that shot of the beach or sailboat. Or, maybe when you scanned a photo, it wasn't quite centered in the middle of the scanning bed. No worries. Elements gives you several ways to straighten an image.
This tool enables you to specify a new straight edge, and it then rotates the image accordingly. Here's how to use the Straighten tool:

Specify your desired setting from the Canvas Options on the Options bar.
Here are your choices:
Grow or Shrink Canvas to Fit: Rotates the image and increases or decreases the size of the canvas to fit the image area.
Crop to Remove Background: Trims off background canvas outside the image area. This is helpful if you want to remove white areas that appear around an image when you scan it.
Crop to Original Size: Rotates your image without trimming any background canvas.
(Optional) Select Rotate All Layers.
If you have an image with layers and you want them all them rotated, select this option.
Using the Straighten tool, draw a line in your image to represent the new straight edge, as shown in Figure 1-5.
Your image is then straightened and, if you chose either of the crop options in Step 2, also cropped.
In addition to using the Straighten tool, you can straighten your images by using two commands on the Image menu, in either Edit Full or Edit Quick mode:
To automatically straighten an image without cropping: Choose Image
To automatically straighten and crop the image simultaneously: Choose Image
The Divide Scanned Photos command is fabulous if you want to save time by scanning multiple images initially into one document (and the command works on single images as well). This command is a real manual-labor timesaver, and we endorse it. Position all the photos you can on your scanning bed and get one initial scan. Just make sure that a clear separation exists between images. Then choose Image
Elements has five automatic lighting-, contrast-, and color-correction tools that can quickly improve the look of your images with a single menu command. These commands are available in either Edit Full or Edit Quick mode, and they're all on the Enhance menu.
What's great about these auto fixes is that they're very easy to use. You don't need to know a heck of a lot about color or contrast to use them. The not-so-good news is that sometimes the result of these auto fixes isn't as good as you could get via a manual color-correction method. And sometimes these fixes may even make your image look worse than before by giving you strange shifts in color. But because these correctors are quick and easy — and easily undone — they're worth a try. Usually you don't want to apply more than one of the auto fixes. If one doesn't work on your image, just remember you can undo the fix and try another. If you still don't like the result, move on to one of the manual methods that we describe in Book VIII, Chapter 2.
This all-in-one command attempts to adjust it all. It's designed to improve lighting, improve the details in shadow and highlight areas, and correct the color balance, as shown in Figure 1-7. The overexposed image on the left was improved with the Auto Smart Fix command.

Tip
For Windows users, the Auto Smart Fix command, as well as the Auto Color, Auto Levels, Auto Contrast, Auto Sharpen, and Auto Red Eye Fix, are available in the Organizer (under the Fix pane), where you can apply the commands to several selected images simultaneously.
If the Auto Smart Fix didn't quite cut it, you can ramp it up and try Adjust Smart Fix. This command is similar to Auto Smart Fix, but gives you a slider that allows you to control the amount of correction applied to the image.
The Auto Levels command adjusts the overall contrast of an image. This command works best on images that have pretty good contrast (detail in the shadow, highlight, and midtone areas) to begin with and just need a little adjustment, but it can also work wonders for seemingly unsalvageable images, as shown in Figure 1-8. Auto Levels works by mapping, or converting, the lightest and darkest pixels in your image to black and white, which makes highlights appear lighter and shadows appear darker.
Warning
Although Auto Levels can improve your contrast, it may also produce an unwanted colorcast (a slight trace of color). If this happens, undo the command and try the Auto Contrast command instead. If that still doesn't improve the contrast, try the Levels command that we describe in Book VIII, Chapter 2.
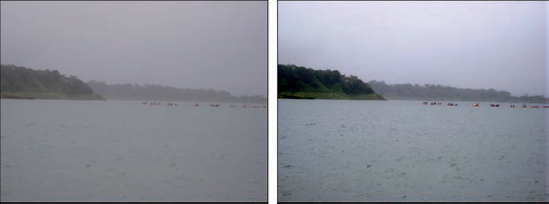
The Auto Contrast command is designed to adjust the overall contrast in an image without adjusting its color. This command may not do as good a job of improving contrast as the Auto Levels command, but it does a better job of retaining the color balance of an image. Auto Contrast usually doesn't cause the strange colorcasts that can occur when you're using Auto Levels. This command works really well on images with a haze, as shown in Figure 1-9.
The Auto Color Correction command adjusts both the color and contrast of an image, based on the shadows, midtones, and highlights it finds in the image and a default set of values. These values adjust the number of black and white pixels that Elements removes from the darkest and lightest areas of the image. You usually use this command to remove a colorcast or to balance the color in your image, as shown in Figure 1-10. Sometimes this command can be useful in correcting oversaturated or undersaturated colors.
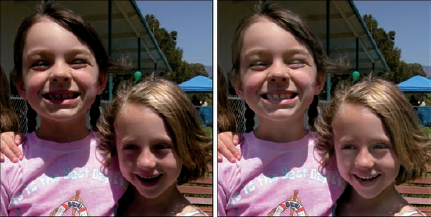
Sometimes photos taken with a digital camera or scanned on a flatbed scanner can appear soft, meaning slightly out of focus. Sharpening gives the illusion of increased focus by increasing the contrast between pixels. Auto Sharpen attempts to improve the focus, as shown in Figure 1-11, without going too far. What happens when you oversharpen? Your images go from soft to grainy and noisy. Always make sharpening the last fix after you make all other fixes and enhancements. You don't want to sharpen nasty flaws and make them even more noticeable than they already are. For more accurate sharpening methods, see the Unsharp Mask and Adjust Sharpness features discussed in Book VIII, Chapter 2.
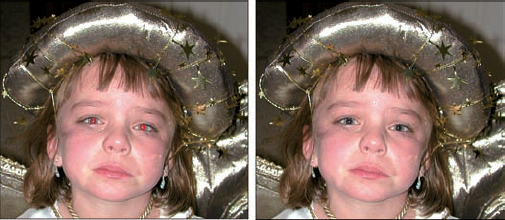
The Auto Red Eye Fix command automatically detects and eliminates red eye in an image. Red eye occurs when a person or animal (where a red eye can also be a yellow, green, or even blue eye) looks directly into the flash. Many cameras have a red-eye prevention mode, which is a pre-flash that causes the subjects' irises to contract, making their pupils smaller when the real flash goes off. Other cameras mount the flash high or to side of the lens, which also minimizes the chance of red eye. However, these preventive measures are of little solace when you have a great picture that features bright red pupils as its dominant feature.
If for some reason the Auto Red Eye Fix doesn't correct the problem, you can always try the Red Eye Removal tool on the Tools panel. Here's how to remove red eye manually:

Note that this tool is also available in Edit Quick mode.
Using the default settings, click the red portion of the eye in your image.
This one-click tool darkens the pupil while retaining the tonality and texture of the rest of the eye, as shown in Figure 1-12.
If you're unhappy with the fix, adjust one or both of these options:
Pupil Size: Use the slider to increase or decrease the size of the pupil.
Darken Pupil: Use the slider to darken or lighten the color of the pupil.
If all goes well, your image is now cured of the dreaded red eye. (Refer to the image on the right in Figure 1-12.)
It turns out that if you master the auto fixes we cover in the previous sections while working in Edit Quick mode, you probably already have all the tools you need to repair and enhance your images. This means you rarely have to visit Edit Full mode. Given the power and flexibility of Edit Quick mode, then, we're going to devote an entire section to it.
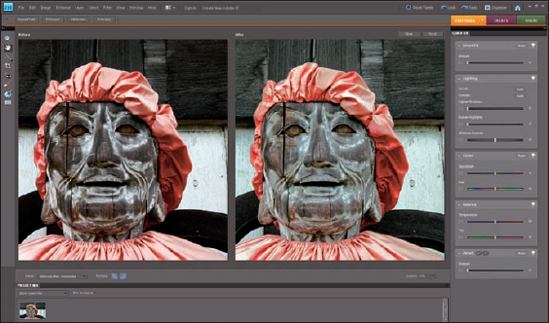
As you've probably already figured out by now, Edit Quick mode is a pared-down version of Edit Full mode that provides basic image-correcting tools and throws in a few unique features — such as a before-and-after preview of your image — for good measure. To get a general idea how Edit Quick mode works, take a look at the following step-by-step workflow, which shows you how you'd put Edit Quick mode to use to fix your photos:
Do one of the following:
In the Organizer (for Windows users), select one or more photos. Click Fix in the upper-right of the Application window and then click the Edit Quick button in the panel below.
Windows or Mac users, in Edit Full mode, select your desired image(s) from the Photo Bin. Click the Quick button in the upper-right area of the Application window.
Windows or Mac users, in Edit Full mode, open your desired images by choosing File
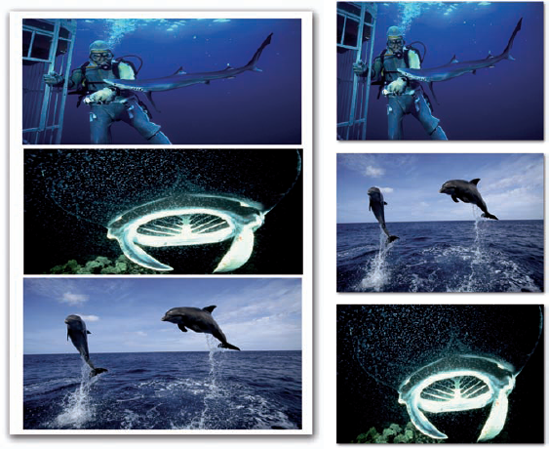
Specify your preview preference from the View pop-up menu at the bottom of the Application window.
You can choose to view just your original image (Before Only), your fixed image (After Only), or both images side by side (Before & After) in either portrait (Vertical) or landscape (Horizontal) orientation, as shown in Figure 1-13.
Use the Zoom and Hand tools to magnify and navigate around your image.
You can also specify the Zoom percentage by using the Zoom slider at the bottom of the Application window.
Crop your image by using the Crop tool on the Tools panel.
You can also use any of the methods we describe in the "Cropping an Image" section, earlier in this chapter.
To rotate the image in 90-degree increments, click the Rotate Left or Rotate Right button at the bottom of the Application window.
Use the Auto Red Eye Fix to remove the red from your subjects' eyes.
Automatically fix red eye by clicking the Auto button under Red Eye Fix in the General Fixes pane on the Edit tab in the Panel Bin on the right side of the Application window. If that doesn't work, try the Red Eye Removal tool located in the Tools panel.
Apply any necessary auto fixes, such as Auto Smart Fix, Auto Levels, Auto Contrast, and Auto Color Correction.
All these commands are under the Enhance menu or in the General Fixes, Lighting, and Color panes on the Edit tab in the Panel Bin on the right side of the Application window.
Each of these fixes is described in the section "Applying One-Step Auto Fixes," earlier in this chapter. Remember that usually one of the fixes is enough. Don't stack them on top of each other. If one doesn't work, click the Reset button in the top-right of the image preview and try another. If you're not happy, go to Step 8. If you are happy, skip to Step 9.
If the auto fixes don't quite cut it, gain more control by using the sliders available for Smart Fix, Levels, Contrast, and Color, located in the various panes on the Edit tab in the Panel Bin on the right of the Application window.
Here's a brief description of each available adjustment:
Lighten Shadows: When you drag the slider to the right, the darker areas of your image lighten without adjusting the highlights.
Darken Highlights: When you drag the slider to the right, the lighter areas of your image darken without adjusting the shadows.
Midtone Contrast: Adjusts the contrast of the middle (gray) values and leaves the highlights and shadows as they are.
Saturation: Adjusts the intensity of the colors.
Hue: Changes all colors in an image. Make a selection first to change the color of just one or more elements. Otherwise use restraint with this adjustment.
Temperature: Adjusts the colors to make them warmer (red) or cooler (blue). This adjustment can be used to correct skin tones or to correct overly cool images (such as snowy winter photos) or overly warm images (such as photos shot at sunset or sunrise).
Tint: Adjusts the tint after you adjust temperature to make the color more green or magenta.
If you still don't get the results you need, move on to one of the more manual adjustments that we describe in Book VIII, Chapter 2.
Add final fixes by using the remaining tools in the Tools panel.
Note
Note that all tools that were previously located in the Touch Up pane have been relocated to the Tools panel. The Touch Up pane is history.
Here's a quick description of each tool:
Red Eye Removal tool: If the Auto Red Eye Fix didn't work, try using this tool, described in the section "Auto Red Eye Fix," earlier in this chapter.
Whiten Teeth: This new digital fix whitens teeth at a fraction of the cost of the real analog procedure. Choose an appropriate brush size from the Brushes drop-down panel before whitening (for more on brush options, see Book V, Chapter 1). Using a brush diameter that's larger than the area of the teeth also whitens/brightens whatever else it touches — lips, chin, and so on. Click the teeth. Note that this tool makes a selection and whitens simultaneously. After your initial click, your selection option converts from New Selection to Add to Selection in the Options bar. If you pick up too much in your dental selection, click the Subtract from Selection option and click the area you want to eliminate. When you're happy with the results of your whitening session, choose Select
Make Dull Skies Blue: Click or drag over areas of your sky that need brightening. Choosing a brush size and selection option is similar to using the Whiten Teeth fix, described in the preceding bullet. When you click your sky, it's selected and brightened at the same time. When you're done, choose Select
Black and White–High Contrast: This tool converts your image into a high-contrast grayscale image. The method and options are similar to those for the Whiten Teeth and Make Dull Skies Blue options, described in the preceding bullets.
Sharpen your image either automatically (by clicking the Auto button) or manually (by dragging the slider on the Sharpen panel).
This fix should always be the last adjustment you make on your image. Sharpening increases contrast, so you want to fix the flaws first so you don't exacerbate them by making them more noticeable.
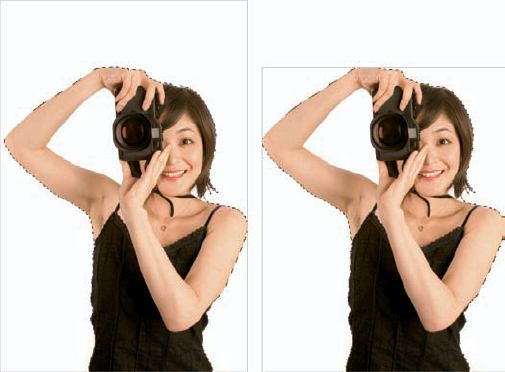
Say that you want to duplicate an element in your image. That's easy enough, right? Make a selection and copy and paste it into the new location. That works fine most of the time. But what if the element has a shadow behind it, next to it, above it, or below it? You face the dilemma of having a hard edge on the copied element because the shadow (called a cast shadow) is cut off by the selection outline. You could feather the selection, but then you have to make sure that the copied element blends realistically with the background. What a pain. The better method is to clone the element by using the Clone Stamp tool. It's quick, easy, and no one will know that only one element was there originally.
Believe it or not, you can also reach for this tool when retouching imperfections such as scratches, scars, bruises, date/time stamp imprints from cameras, and other minor flaws. In fact, that used to be one of its major functions. In some retouching instances, it does a decent job, although the arrival of the Healing Brush and Spot Healing tools has relegated the Clone Stamp tool more to the pure cloning functions and less to the hard-core retouching jobs.
The Clone Stamp tool works by taking sampled pixels from one area and cloning (or copying) them onto another area. Follow these steps to clone an element without any genetic engineering:

On the Options bar, choose a brush from the Brush Preset drop-down list, and then use the brush as is or adjust its size with the Size slider.
Select the blend mode of your choice in the Options bar.
Selecting a mode such as Difference, Multiply, or Color can produce some interesting special effects. For info on blend modes, see Book VI, Chapter 3.
To make the clone more or less opaque, use the Opacity slider or text box on the Options bar.
To make your cloned image appear ghosted, use an opacity setting of less than 100 percent.
Specify how fast the Clone Stamp tool applies the clone by adjusting the Flow Rate percentage.
Again, we left our option at 100%.
Select or deselect the Aligned option, depending on your preference.
With Aligned selected, the clone source moves when you move your cursor to a different location. If you want to clone multiple times from the same location, deselect the Aligned option.
Select or deselect the All Layers option.
This option enables you to sample pixels from all visible layers for the clone. If this option is deselected, the Clone Stamp tool clones from only the active layer. Check out Book VI for details about working with layers.
Alt-click (Option-click on the Mac) the area of your image that you want to clone to define the source of the clone.
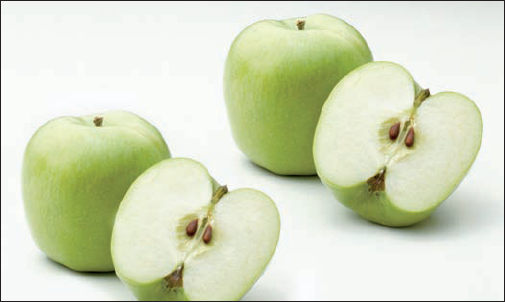
Click or drag along the area where you want the clone to appear, as shown in Figure 1-14.
While you drag, Elements displays a crosshair cursor along with your Clone Stamp cursor. The crosshair represents the source you're cloning from, and the Clone Stamp cursor shows where the clone is being applied. While you move the mouse, the crosshair moves as well. This provides a continuous reference to the area of your image that you're cloning. Keep an eye on the crosshair, or you may clone something you don't want.
When you successfully complete the cloning process, you have two identical objects. Figure 1-15 shows our identical apples.
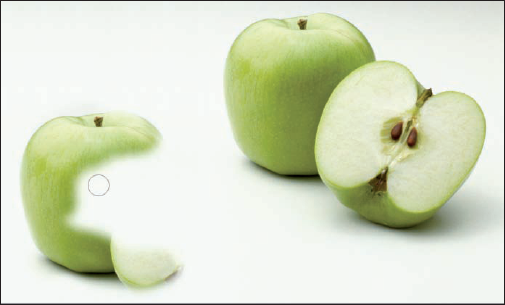
Figure 1.14. When using the Clone Stamp tool, drag along the area where you want your clone to appear.
Note
If you're cloning an element, try to clone it without lifting your mouse. Also, when you're retouching a flaw, try not to overdo it. Clicking once or twice on each flaw is usually plenty. If you're heavy-handed with the Clone Stamp, you get a blotchy effect that's a telltale sign something has been retouched.
Save the image and close it.
Here are a few additional tidbits regarding the Clone Stamp tool:
Use the Clone Stamp tool to fix simple flaws. To clean up a flaw that's pretty straight, such as a stray hair or scratch, Alt-click (Option-click on the Mac) with the tool to define the source. Then click at one end of the straight flaw and Shift-click at the other end. The cloned source pixels cover up the flaw.
Pay attention to the origin point for sampling. Depending on what you're cloning (for example, when covering up a flaw), if you keep sampling from the same point without ever varying it, the area you're cloning starts to look like ugly shag carpeting. Or, at best, it starts to appear blotchy and over-retouched.
Zoom out once in a while to check how your image looks overall. Doing so helps you avoid those funky telltale clone-stamp repetitive patterns and blotches.
The Healing Brush tool is similar to the Clone Stamp tool. Both tools let you clone pixels from one area and apply them to another area. But that's where the similarities end, and the Healing Brush leaves the Clone Stamp tool in the dust.
The problem with the Clone Stamp tool is that it doesn't take the tonality of the flawed area — the shadows, midtones, and highlights — into consideration. So, if the pixels you're sampling from aren't shaded and lit exactly like the ones you're covering, you have a mismatch in color, which makes seamless and indecipherable repairs hard to achieve.
That's where the Healing Brush tool comes in. This very intelligent tool clones by using the texture from the sampled area (the source) and then using the colors around the brush stroke when you paint over the flawed area (the destination). The highlights, midtones, and shadows remain intact, and the result of the repair is more realistic and natural — not blotchy, miscolored, and screaming "retouched" Follow these steps to heal your favorite, but imperfect, photo:
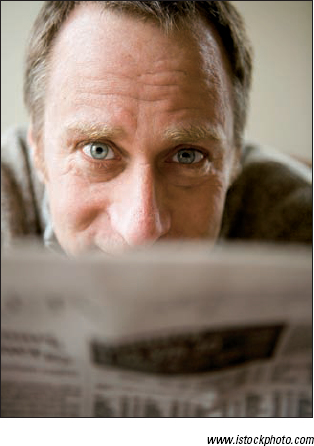
- Open an image in need of a makeover and select the Healing Brush tool from the Tools panel in the Editor in Edit Full mode.

Our guy, as shown in Figure 1-16, looks like he could stand to get some "work done," as they say in Hollywood. Note that you can also heal between two images. Just make sure that they have the same color mode — for example, both RGB (red, green, blue).
On the Options bar, click the Brush Preset Picker.
In the drop-down panel, select your desired diameter and hardness, as well as spacing, angle, and roundness if you want, for your brush tip. You'll most likely specify your brush settings several times while retouching your image. Using the appropriate brush size for the flaw you're repairing is important.
Specify a diameter and hardness for your brush tip from the Brush Picker drop-down panel on the Options bar.
You can also adjust the spacing, angle, and roundness. For details on these options, see Book V, Chapter 1. Be sure to adjust the size of your brush, as needed. Using the appropriate brush size for the flaw you're retouching is crucial for creating realism.
Choose your desired Blend mode.
You can change your Blend mode, if necessary. The Replace mode preserves textures, such as noise or film grain, around the edges of your strokes when you're using a soft brush. For most simple retouching jobs, such as this one, you can leave it at Normal.
Choose one of these Source options:
You have a choice between Sampled and Pattern:
Sampled: Uses the pixels from the image. You'll probably use this option 99.9 percent of the time.
Pattern: Uses pixels from a pattern you select from the Pattern Picker drop-down panel.
For our example, we're sticking with Sampled because we don't think our guy would look that good with a Tie-Dye pattern across his face.
Select or deselect the Aligned option on the Options bar.
For most retouching tasks, you probably should leave Aligned selected. Here are the details on each option:
With Aligned selected: When you click or drag with the Healing Brush, Elements displays a crosshair along with the Healing Brush cursor. The crosshair represents the sampling point, also known as the source. When you move the Healing Brush tool, the crosshair also moves, providing a constant reference to the area you're sampling. (We left the Aligned option selected in our example.)
With Aligned deselected: Elements applies the source pixels from your initial sampling point, no matter how many times you stop and start dragging.
Select the All Layers option to heal an image by using all visible layers.
If this option is deselected, you heal from only the active layer.
Tip
To ensure maximum editing flexibility later, select the Sample All Layers option and add a new, blank layer above the image you want to heal. When you heal the image, the pixels appear on the new layer and not on the image itself. You can then adjust opacity, Blend modes, and make other tweaks to the "healed" pixels.
Establish the sampling point by Alt-clicking (Option-clicking on the Mac).
Make sure to click the area of your image you want to clone from.
In our example, we clicked the smooth area on the chin and portions of the forehead.
Release the Alt (Option on the Mac) key and click or drag over a flawed area of your image.
Note
Pay attention to where the crosshair is located because that's the area you're healing from. We brushed over the wrinkles under and around the eyes and on the forehead. This guy never looked so good, as shown in Figure 1-17, and he experienced absolutely no recovery time.

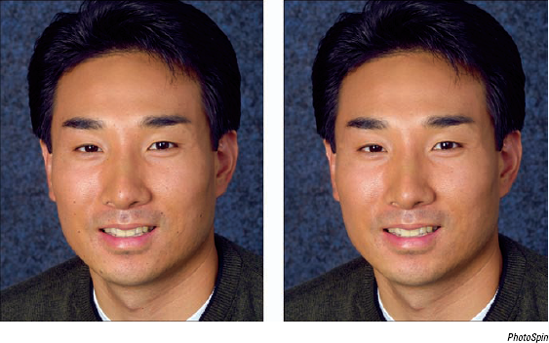
Whereas the Healing Brush is designed to fix larger flawed areas, the Spot Healing Brush is designed for smaller blemishes and little imperfections. The biggest difference between the Healing Brush and the Spot Healing Brush is that the Spot Healing Brush doesn't require you to specify a sampling source. It automatically takes a sample from around the area to be retouched. The good news is it's quick and easy. The downside is that it doesn't give you as much control over the sampling source. Consequently, reserve this tool for small and simple flaws.
Follow these steps to quickly fix little, nitpicky imperfections with the Spot Healing Brush tool:

The moles around this guy's mouth, as shown in Figure 1-18 on the left, are no match for the power of the Spot Healing Brush.
On the Options bar, click the Brush Preset Picker and select your desired diameter, hardness, and other options for your brush tip from the drop-down panel.
Try to select a brush that's a little larger than the flawed area you want to fix.
Select a blend mode from the Options bar.
Just as with the Healing Brush, you can select the Replace mode. Most likely, the Normal mode works the best.
Select a type from the Options bar:
Proximity Match: Samples the pixels around the edge of the selection to use to fix the flawed area
Create Texture: Uses all the pixels in the selection to create a texture to fix the flaw
Try Proximity Match first and, if it doesn't work, undo and try Create Texture.
Choose Sample All Layers to heal an image by using all visible layers.
If you leave this option unselected, you heal from only the active layer.
Click, or click and drag, the area you want to fix.
In Figure 1-18, we used the Spot Healing Brush for the moles and spots on the face.
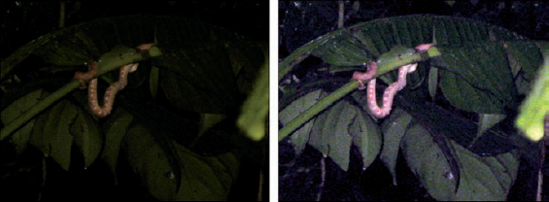
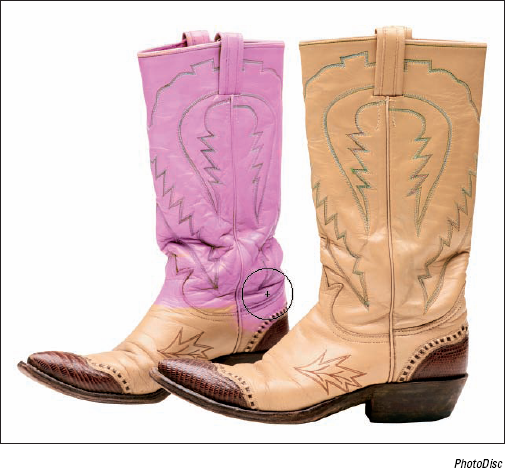
The Color Replacement tool allows you to replace the original color of an image with the foreground color. You can use this tool in a variety of ways. Create the look of a hand-painted photo by colorizing a grayscale image. Or maybe you just want to change the color of an object or two, such as a couple of flowers in a bouquet. And even though Elements has a bona fide Red Eye tool, you can also use the Color Replacement tool to eliminate red (or yellow or green) eye in people and animals.
Note
The great thing about the Color Replacement tool is that, like the other healing tools, it completely preserves the tonality of the image. The color that you apply doesn't obliterate the midtones, shadows, and highlights as it would if you were applying color with the regular Brush tool. The Color Replacement tool works by first sampling the original colors in the image and then replacing those colors with the foreground color. By specifying different sampling methods, limits, and tolerance settings, you can control the range of colors that Elements replaces.
Follow these steps to replace existing color with your foreground color:

This tool shares a flyout menu with the Brush and Pencil tools.
You can press the B key to select it (or Shift+B to cycle through the tools).
On the Options bar, specify your desired brush-tip diameter and hardness from the Brush Preset Picker drop-down panel.
In the Options bar, select your desired Blend mode:
Color: This default mode works well for most colorizing jobs. Use this mode if you're trying to get rid of red eye.
Hue: This mode is similar to color, but less intense, providing a subtler effect.
Saturation: This mode is the one to use to convert the color in your image to grayscale. Set your foreground color to Black on the Tools panel.
Luminosity: This mode is the opposite of the Color mode. Although this Blend mode can create a beautiful effect between two image layers, it doesn't tend to provide that great an effect in other circumstances.
Select your sampling method (represented by the icons) from the icons in the Options bar:
Continuous: Samples and replaces color continuously while you drag your mouse.
Once: Replaces colors in only the areas that contain the color you first sampled when you initially clicked.
Background Swatch: Replaces colors in only the areas containing your current background color.
Select your sampling limits mode.
Contiguous: The default setting replaces the color of pixels containing the sampled color that are adjacent to each other directly under the brush.
Discontiguous: Replaces the color of the pixels containing the sampled color wherever it occurs under your brush.
Specify your tolerance percentage.
Tolerance refers to a range of color. A high tolerance lets you replace a broad range of color. A low tolerance limits the replacement of color to only the areas that are very similar to the sampled color.
Choose whether you want anti-aliasing.
Remember, anti-aliasing slightly softens and smooths the edge of the sampled areas.
After you establish your settings, click or drag in your image.
Notice how the foreground color, which in our example is pink (who doesn't yearn for pink cowboy boots?), replaces the original colors of the sampled areas (see Figure 1-19). Of course, the exact effect you get depends on your settings.
Dodging and burning originated in the darkroom, where photographers would salvage negatives containing areas that were too dark or too light by adding or subtracting exposure as an enlarger made the prints.
An enlarger makes a print by projecting an image of a negative onto a piece of photosensitive paper. During the exposure, the darkroom technician can reduce the amount of light falling onto the paper by placing some object (often a disk shape of cardboard or metal impaled on a piece of wire) in the light path to dodge part of the image. The worker can burn other parts of an image by exposing only a small portion through an opening, such as the fingers in a cupped pair of hands or a piece of cardboard with a hole. The Dodge and Burn tools in Elements adopt their icons from those analog tools used in the darkroom.
However, the digital counterparts are a great deal more flexible and precise. For example, the worker in a darkroom varies the size of the dodging or burning tool by moving it up or down in the light path. Unfortunately, the closer the real-world tool gets to the paper, the sharper it appears, forcing the darkroom worker to move the tool more rapidly and frequently to blur the edges of the effects. With the Elements Dodge and Burn tools, you can specify the size of the tool and its softness by selecting one of the many brush tips available.
You can also limit the correction to a specific tonal range in your image — shadows, midtones, or highlights. You can adjust the degree of lightening and darkening applied by specifying an exposure percentage, too.
Note
The Dodge (used to lighten) and Burn (used to darken) tools can be very effective, but you can't add detail that isn't there. Keep the following in mind:
When you lighten very dark shadows that contain little detail, you end up with grayish shadows.
Darkening very light areas that are completely washed out doesn't make your image look very good, either. You'll end up with white patches.
In either case, you want to use the Dodge and Burn tools in moderation and work only with small areas. To dodge or burn a portion of an image, just follow these steps:

Press the O key to choose the tool or press Shift+O to cycle through the available tools until the one you want is active.
In the Options bar, select a brush from the Brush Preset Picker drop-down panel and also adjust the brush size, if necessary.
Larger, softer brushes spread the dodging-and-burning effect over a larger area, making blending with the surrounding area easier, creating a more realistic, unretouched appearance.
In the Options bar, under the Range drop-down list, select Shadows, Midtones, or Highlights.
Select Shadows to lighten or darken detail in the darker areas of your image. Choose Midtones to adjust the tones of average darkness. And select Highlights to make the brightest areas even lighter or darker.
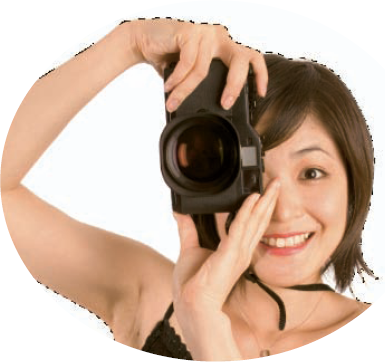
In Figure 1-20, the original image had mostly dark areas, so we dodged the shadows. Note the increased detail in the eyes, teeth, and hair. We also gave a couple swipes to the highlight areas with the Burn tool.
In the Options bar, select the amount of correction you want to apply with each stroke by using the Exposure slider or text box.
Exposure is similar to the Opacity setting that you use with the regular Brush tool. Start with a lower percentage to better control the amount of darkening or lightening. High exposure values can overcorrect and produce unnatural-looking, obviously dodged or burned areas in your images. (We used a setting of 10 percent.)
Drag or "paint" over the areas you want to lighten or darken, gradually building up the desired effect.
Note that you can make a selection prior to your dragging to make certain that the adjustment is applied only to that specific area.
If you go too far, press Ctrl+Z (

When you finish, choose File
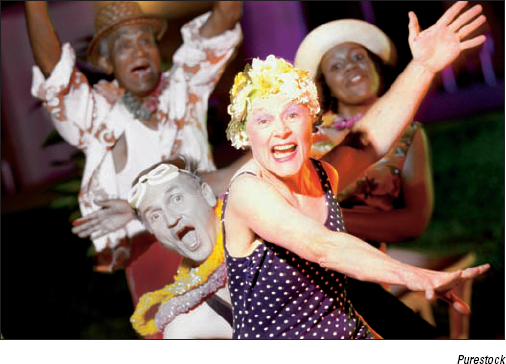
The Sponge tool soaks up or squeezes out color. It can reduce the richness or intensity (or saturation) of a color in applied areas. It can also perform the reverse, giving a specific area richer, more vibrant colors.
Surprisingly, the Sponge tool also works in grayscale mode by darkening or lightening the pixels. Unlike the Hue/Saturation command (under Enhance
You can use the Sponge tool on an image in subtle ways to reduce the saturation in selected areas for an interesting effect. For example, you may have an object that's the center of attention in your picture simply because the colors are very bright. The Sponge tool lets you reduce the color saturation of that area (and only that area) to allow the other sections of your image to become the focal point. You can also use the Sponge tool to make an artistic statement: You could reduce or increase the saturation of a single person in a group shot to give that person more attention (perhaps as being more colorful than the rest).
To use the Sponge tool, just follow these steps:

Press the O key to choose the Sponge if it's active, or press Shift+O to cycle through the tools until the Sponge tool is active.
In the Options bar, select a brush from the Brushes Presets drop-down panel.
Use large, soft brushes to saturate/desaturate a larger area.
Smaller brushes are useful mostly to change the saturation of a specific small object in an image.
In the Options bar, select either Desaturate (reduce saturation) or Saturate (increase saturation) from the Mode drop-down list.
In the Options bar, select a flow rate (that is, the speed with which the saturation/desaturation effect builds while you brush) with the Flow slider or text box.
Paint carefully over the areas you want to saturate or desaturate with color.
In Figure 1-21, we saturated the shower cap lady to make her more of a focal point and desaturated the other performers and the background.
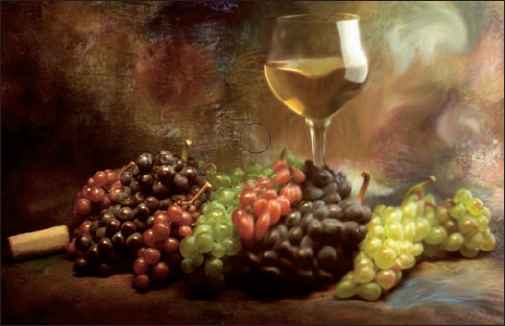
The Smudge tool performs a kind of warping effect by pushing your pixels around as if they consisted of wet paint, using the color that's under the cursor when you start to stroke. However, don't view the Smudge tool as a simple distortion tool that produces only comical effects. We use it on tiny areas of an image to soften the edges of objects in a way that often looks more natural than when we use the Blur tool. The Smudge tool can also be used to create a soft, almost-painted look, as shown in Figure 1-22. Just don't get too carried away, or you may obliterate detail that you want to preserve.
Tip
Smudged areas may be obvious because of their smooth appearance. Adding a little texture by using the Noise filter after you smudge is often a good idea if you want to blend a smudged section in with its surroundings. You can find tips on applying the Noise filter in Book VII, Chapter 1.
To apply the Smudge tool, just follow these steps:

Press Shift+R to cycle through the Smudge, Blur, and Sharpen tools.
In the Options bar, select a brush from the Brushes Presets drop-down panel.
Use a small brush for smudging tiny areas, such as edges. Larger brushes produce drastic effects, so use them with care.
In the Options bar, select a blending mode from the Mode pop-up menu.
In the Options bar, select the strength of the smudging effect with the Strength slider or text box.
Low values produce a lighter effect; high values really push your pixels around.
If your image has multiple layers, select the Sample All Layers option to make Elements use pixels from all visible layers when it produces the effect.
The smudge still appears only on the active layer, but the look is a bit different depending on the contents of the underlying layers.
Use the Finger Painting option to begin the smudge by using the foreground color.
You can get some interesting effects with this option. Rather than use the color under your cursor, this option smears your foreground color at the start of each stroke.
Paint over the areas you want to smudge.
Pay attention to your strokes because this tool can radically change your image. If you don't like the results, press Ctrl+Z (
Warning
This tool can be a little destructive. If you're looking to preserve reality, use it with restraint. If you want to get wild, go crazy.
When you finish, choose File
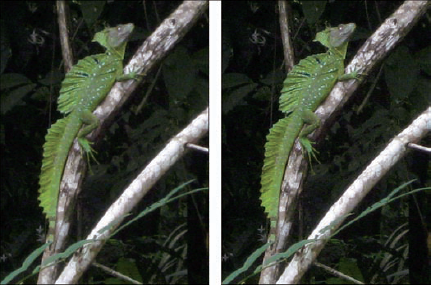
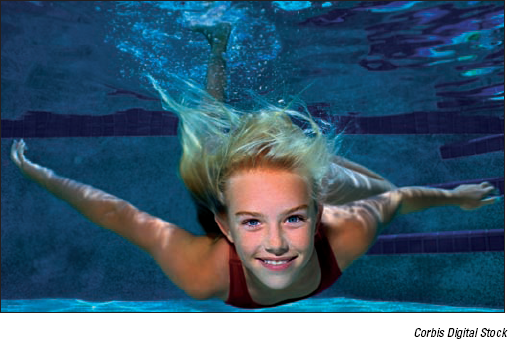
The Blur tool can be used for both repair and more creative tasks. Adding a little blur here and there can save an image with a few defects. Blurring can also be used for artistic effect — say, to add a little motion to a soccer ball frozen in time by a too-fast shutter speed. You can also blur portions of your image to emphasize and focus on a particular element, as shown in Figure 1-23, where we blurred the water and the girl's body a bit to draw attention to her face. The Blur tool makes it easy to paint your blur effects exactly where you want them. This tool works by decreasing the contrast among adjacent pixels in the painted area.
The mechanics of using the Blur tool and several of its options are similar to those of the Smudge tool. Just follow these steps:

In the Options bar, select a brush from the Brushes Presets drop-down panel.
Use a small brush for applying small areas of blur.
In the Options bar, select a blending mode from the Mode pop-up menu.
In the Options bar, select the strength of the blurring effect with the Strength slider or text box.
If your image has multiple layers, select the Sample All Layers option to make Elements use pixels from all visible layers when it produces the effect.
Selecting this option can produce a smoother blur when you merge the layers later. See Book VI for more info on layers.
Paint over the areas you want to blur.
When you finish, choose File
In theory, the Sharpen tool is nothing more than the Blur tool in reverse — instead of decreasing contrast among pixels, the Sharpen tool increases the contrast. In practice, however, use this tool with a bit more care than the Blur tool. Whereas blurred areas tend to fade from a viewer's notice (at least, in terms of how his or her eyes perceive them), sharpened areas of an image jump out at people. Even a small area that's been oversharpened can quickly lead to overly grainy and noisy images.
You can often successfully sharpen small areas with the Sharpen tool. Sometimes, the eyes in a portrait can benefit from a little sharpening, as shown in Figure 1-24. Or you might want to sharpen an area to make it stand out more distinctly against a slightly blurred background.
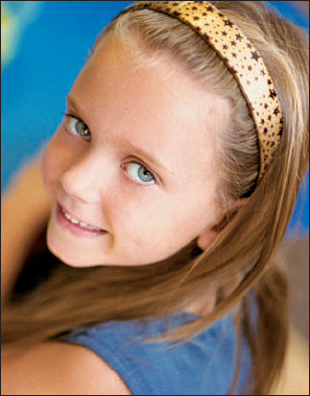
Figure 1.24. Use the Sharpen tool sparingly and in small areas, such as in the eyes of this portrait.
Follow these simple steps to use the Sharpen tool:

In the Options bar, select a brush from the Brushes Presets drop-down panel.
Use a small brush for applying small areas of sharpening.
In the Options bar, select a blending mode from the Mode pop-up menu.
In the Options bar, select the strength of the sharpening effect with the Strength slider or text box.
Tip
Using a fairly low value (say, 25 percent or less) is a good idea because you can build up sharpness slowly, being careful not to overdo it.
You know you've gone too far with the sharpness when the pixels start to look noisy and grainy.
If your image has multiple layers, select the Sample All Layers option to make Elements use pixels from all visible layers when it produces the effect.
Paint over the areas you want to sharpen.
When you finish, choose File
Tip
Sharpening increases contrast, so be careful when using the Sharpen tool if you plan to also adjust the Levels or Curves controls. Any change that increases contrast in the whole image also boosts the contrast of an area you've sharpened.
Tip
The Unsharp Mask and Smart Sharpen filters offer more options and better overall control, so unless you really need to use the sharpening effect, you're usually better off using a filter. (Book VII, Chapter 1, has more on filters in general.)
Fixing a Photo
Unless you're a highly skilled photographer, you probably have a few photos that require a number of digital fixes. Certainly, we both do. Although it may seem like fixing them is too much trouble or will take too long, you'll find how easy it is after you practice the techniques a few times. After a while, you may even get into the habit of running through your personal quick-editing workflow before you organize and archive your images in the Organizer (or Adobe Bridge on the Mac). If you have more time to burn, you can also add a few artistic touches to further enhance those shots. That way when you get the urge to share those photos, they're just an e-mail or print away.
Note that most of the details for executing these steps are described in this chapter. When they aren't, we give you the book and chapter where you can find further explanations. If these steps are too tedious for you, you can always follow the Edit Quick mode route we described earlier in the section, "Editing with Edit Quick Mode."
In the Editor, in Edit Full mode, open any image in need of repair.
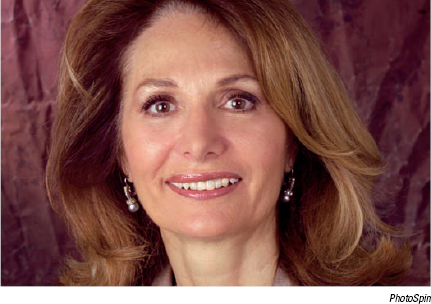
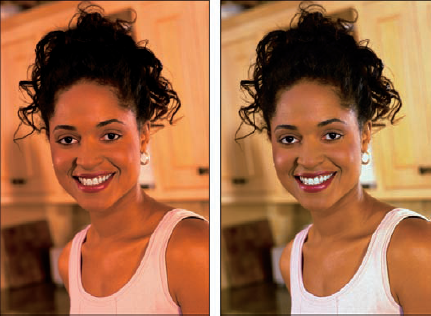
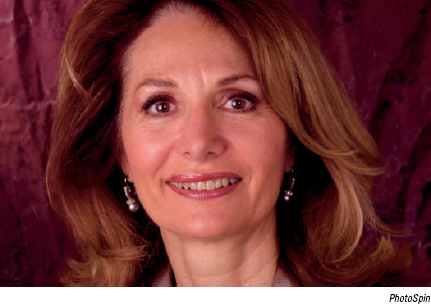
The image of our woman is in bad shape — horrible contrast, color, soft focus, scratches, and in need of some healing, as shown in the figure.
Crop your image using the Crop tool on the Tools panel.
If you need to rotate the image, choose Image
To allow for maximum flexibility in editing, convert your background to a layer by double-clicking Background in the Layers panel. Click OK in the New Layer dialog box.
For details on working with layers, see Book VI.
Adjust the contrast of your image, if needed. Try Enhance
Make sure you have good tones in the shadows (dark areas), midtones (middle-toned areas), and highlights (light areas). Also ensure that you can see details in all the tonal ranges, as shown in the figure. For details on using the Shadows and Highlights and Levels commands, see Book VIII, Chapter 2. For our woman, we broke out the big guns — Levels.
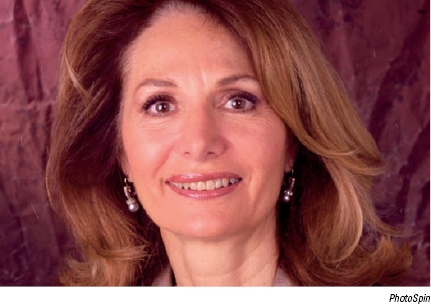
Adjust the color of your image, if needed. If you didn't use an auto fix in Step 6, you could try the Auto Color command under the Enhance submenu. Or choose Enhance
If you need to adjust the skin tones of your people, you can try the Adjust Skin Tones command. We recommend using the Adjust Color Curves command for overall color adjustment, as we did for our woman in the figure. Usually working with this curve will do the trick, no matter what your color issues are.
Note that you can fix just selected portions of your image. Make a selection first and then apply the adjustment. For details on making selections, see Book IV, Chapter 1.
If you have any people or animals with nasty red eye, use the Red Eye Removal or Color Replacement tool.
Remember to use the Zoom and Hand tools to magnify and navigate around your image, as needed.
If you need to whiten the teeth of any of your people, choose Edit Quick from the Edit tab in the top right and use the Whiten Teeth tool in the Tools panel.
We whitened the teeth of our woman.
Choose Edit Full from the Edit tab to return to Edit Full mode.

Perform any additional repair or healing tasks by using the Healing Brush, Spot Healing Brush, and Clone Stamp tools.
We fixed all the scratches in the background using the Clone Stamp tool. Then we gave our woman a "refresher" by smoothing out the wrinkles using the Healing Brush tool, as shown in the figure.
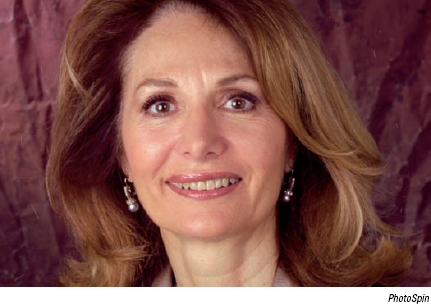
Sharpen your image. You can return to Edit Quick mode and either click the Auto button or drag the Sharpen slider under the Sharpen panel. Or, for more precise control, in Edit Full mode, choose Enhance
This fix should always be the last adjustment you make on your image. You want to make sure that all your contrast, color, and flaws are fixed before sharpening. The reason is that the sharpening process increases contrast, so you don't want to exacerbate any problems that may exist. Our "fixed" woman is shown in the final figure.