In This Chapter
One of the most important aspects of working with images in an Editor is navigation — knowing how to move around the image (as well as between images) and how to use tools and menu commands to help you.
Many tools in Elements enable you to zoom in and out of images, acquire information about your photos, and examine them in detail. In this chapter, we talk about these tools and clue you in on the best methods to use for viewing files in an Editor.
The first thing you need to know about examining an image is how to get it into the Image window. The Image window in Edit Full mode is where your photos are opened and ready for editing. To open an image in Edit Full mode, you have a few options available to you.
Like any program, Elements supports choosing File
Another method for opening photos is to use the Organizer, where you select one or more photos you want to edit. Because we cover some of the essentials of using the Organizer in Book II, Chapter 2, we take a look at opening a file from the Organizer in Edit Full mode:
You can launch Photoshop Elements and click the Organize button in the Welcome screen to open the Organizer window; or if you're in an edit mode now, click the Organizer button in the top right of the Editor window.
Click a photo thumbnail in the Organizer window.
Following this step presumes you have some photos in the default catalog, as we explain in Chapter 1 of this minibook and elaborate more on in Book II, Chapter 2.
On the Mac, open Adobe Bridge, select a photo in the Bridge window, and choose File

Open the Fix drop-down list and click Edit Photos or press Ctrl +I.
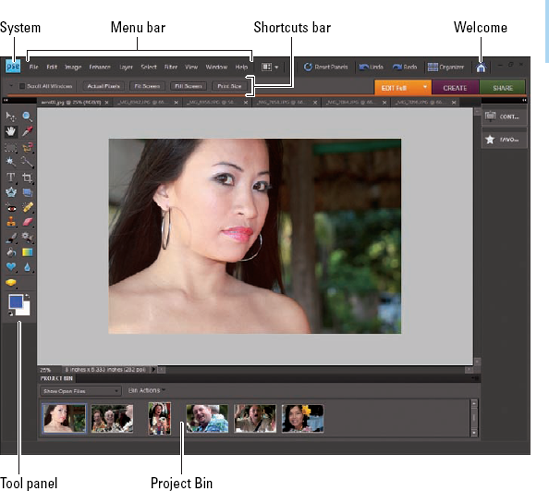
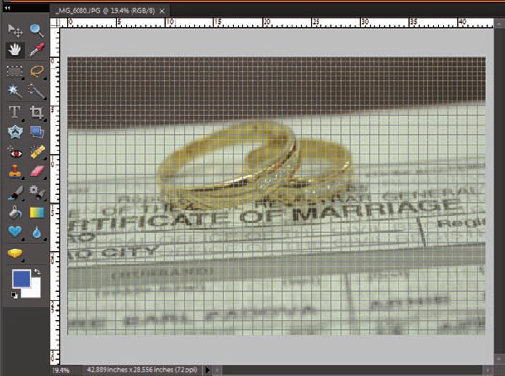
The photo opens in the Image window, as shown in Figure 3-1.
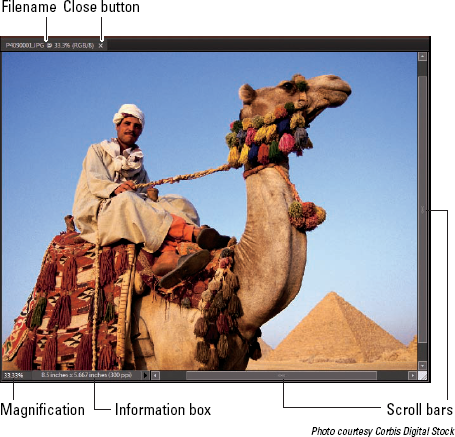
Figure 3-1 highlights several important items when you view photos in the Image window. Notice the following:
The filename appears in the top-left corner of the photo. Double-check the name to be certain the photo you want to edit is the correct image.
Scroll bars become active when you zoom in on an image. You can click the scroll arrows, move the scroll bar, or grab the Hand tool in the Tools panel and then drag within the window to move the image.
The Magnification box shows you at a glance how much you've zoomed in or out.
The Information box shows you the readout for a particular tidbit of information. You can choose what information you want to see in this area by choosing one of the options from the pop-up menu, which we discuss a bit later in this section.
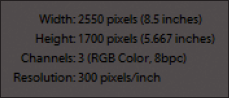
When you're working on an image in Elements, you always want to know the physical image size, the image resolution, and the color mode. (We explain these terms in more detail in Book III, Chapters 1 and 2.) Regardless of which menu option you choose from the Information box, you can get a quick glimpse at these essential stats by clicking the Information box, which displays a pop-up menu like the one shown in Figure 3-2.
The Size box enables you to resize the window. Move the cursor to the box, and a diagonal line with two opposing arrows appears. When the cursor changes, drag in or out to size the window smaller or larger, respectively.
You can also resize the window by dragging any of the other corners in or out.
You can click the Close button (it's shaped like an X) to close the active Image window and keep Elements open. Alternatively, you can use the keyboard shortcut Ctrl+W or choose File
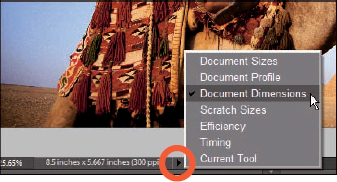
After you're familiar with the overall Image window, we want to introduce you to the Information box's pop-up menu, which enables you to choose the type of information you want to view in the Information box. Click the right-pointing arrow to open the menu, as shown in Figure 3-3.
Here's the lowdown of the options you find on the pop-up menu:
Document Sizes: Shows you the saved file size.
Document Profile: Shows you the color profile used with the file. For more on color profiles, see Book III, Chapter 2.
Document Dimensions: Shows you the physical size in your default unit of measure, such as inches. (Refer to Figure 3-3, which has the Document Dimensions option selected.)
Scratch Sizes: Displays the amount of memory on your hard drive that's consumed by all documents open in Elements. The scratch space is the extension of RAM created by a space on your hard drive. For example, 20M/200M indicates that the open documents consume 20 megabytes and that a total of 200 megabytes are available for Elements to edit your images. When you add more content to a file, such as new layers, the first figure grows while the second figure remains static.
Efficiency: Indicates how many operations you're performing in RAM as opposed to using your scratch disk. When the number is 100%, you're working in RAM. When the number drops below 100%, you're using the scratch disk. If you continually work below 100%, it's a good indication that you need to buy more RAM to increase your efficiency.
Timing: Indicates the time it took to complete the last operation.
Current Tool: Shows the name of the tool selected from the Tools panel.
Don't worry about trying to understand all these terms. The important thing to know is that you can visit the pop-up menu and change the items at will during your editing sessions.
Note
The Image window is just one small part of the user interface in Elements. To get the full picture, imagine that, when a photo opens in Edit Full mode within the Elements window, you're going to see the Image window contained within the workspace as a whole, where you have access to tools, panels, and menus to choose from a variety of edit options.
If you select multiple files in the Organizer and choose Edit Full from the Editor drop-down list, all the photos open in the Image window. Clicking the filename in the Image window brings a photo forward so you can edit it. In the workspace interface, you see something like Figure 3-4 when a photo is opened in the Image window and several other open photos appear in the Project Bin.
Precision goes a long way when making good edits on photos. When you're working carefully on image detail, zoom in on any part of a picture where you want to (carefully) apply some fine-tuning. Nothing looks worse than photos with obvious edits that were clumsily done without precision.
For some quick zooms in and out of photos, you can use keyboard shortcuts. Here are a few to keep in mind when you need to quickly change the zoom level:
Ctrl++ (
++ on the Mac): Press the Ctrl (
Ctrl− (
− on the Mac): Press the Ctrl (Ctrl+Alt++ (
+Option++ on the Mac): Press both the Ctrl (Ctrl+Alt+− (
+Option+− on the Mac): Press both the Ctrl (Ctrl+0 (
+0 on the Mac): Press the Ctrl (Ctrl+spacebar (
+spacebar on the Mac): This combination temporarily activates the Zoom In tool.Ctrl+Alt+spacebar (
+Option+spacebar on the Mac): This combination temporarily activates the Zoom Out tool.
Note
While working on an image using another tool from the Tools panel, you can temporarily access the Zoom tool without clicking it in the Tools panel. Press Ctrl+spacebar (
When you select the Zoom tool in the Tools panel, the Options bar changes to reflect choices you can make when zooming views, as shown in Figure 3-5.
Figure 3.5. Click the Zoom tool, and the Options bar changes to provide more options when using the tool to zoom views.
The tools available in the Zoom tool Options bar include
+/−: The plus and minus icons are used to zoom in and out of a photo in the Image window. Click one of the icons to zoom in or out.
Percent readout: The number appearing in the text box can be edited to zoom to a percent size. Click the down-pointing arrow to open a drop-down list where you can select from fixed zoom percentages.
Resize Window to Fit: When you click the check box, the zoom resizes the window to the size of the image or the maximum size to the window.
Zoom All Windows: If you have multiple photos open in the Image window, all photos are zoomed together when you zoom views.
Actual Pixels: The ratio is reported in this text box. When the photo is shown at 100% size, the ratio reads 1:1. The ratio changes as you change the zoom views.
Fit Screen: Click the button, and the photo zooms to the maximum view to fit the Image window.
Print Size: Click this button, and the photo zooms to the size the file will be when printed.
While working with other tools from the Tools panel, you can temporarily access the Hand tool by pressing the spacebar. Press the spacebar and drag the image; then release the spacebar and you return to the last tool selected in the Tools panel.
Note
If you're typing text on an image, you can't use the spacebar to temporarily access the Hand tool. To move the Image window when typing text, click the Hand tool in the Tools panel and move the photo. Click the Type tool in the Tools panel, click in the text block you started, and continue typing.
The Navigator panel is a handy tool to keep open when you need to zoom in and out of a photo while editing images. All zooming can be performed in this panel — and you can keep it open during your editing session!
To open the Navigator panel, choose Window
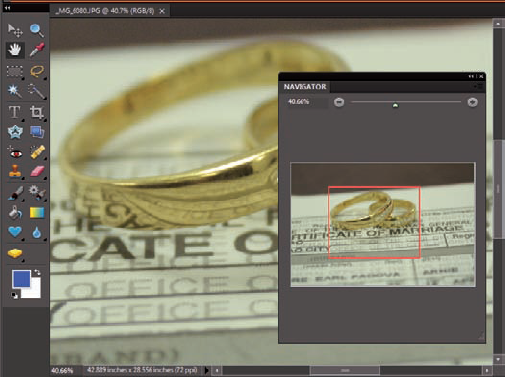
In the top-left corner, you see a readout displaying the current zoom percentage. At the top right of the panel is a slider that you can move left to zoom out of a photo and right to zoom in on a photo. In the center of the panel, you see a view displaying the entire image and a red rectangle displaying the area corresponding to the zoom view in the Image window.
The rectangle in the center of the panel can be moved around the Navigator panel just as you use the Hand tool to move around an image. The lower-right corner is dragged out or in to size the panel larger or smaller, respectively.
Click the left chevron, and the panel collapses to a button to minimize the panel size.
Note
You can quickly resize the zoom area in the Navigator panel by pressing the Ctrl key (
Grids and guides are helpful when adding text to a photo, when working with layers, and when working with selections. You can align content to guidelines for precise alignment. In addition, you can display rulers along the left and top sides of a photo.
To view the grid and guidelines, choose View
To snap layers and objects to the grid and guides, choose View
The Info panel provides some feedback related to the cursor position and color information as you move the cursor around a photo. In addition, you can quickly examine the file size and other document information in the panel.
To open the panel, choose Window
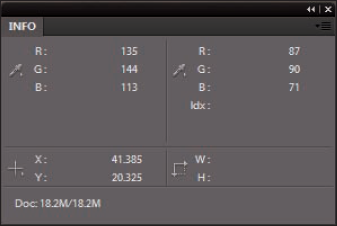
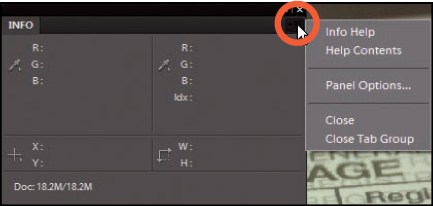
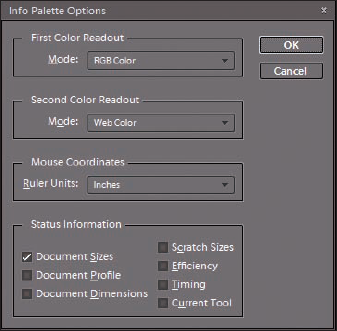
Click the down-pointing arrow in the top-right corner of the panel to open the drop-down list, as shown in Figure 3-9. Choose Panel Options from the menu, and the Info Palette Options dialog box opens, as shown in Figure 3-10. Here you can make some adjustments for the kind of information you want reported in the panel.
The options you have available in the dialog box include
First Color Readout: From the drop-down list, you can choose from Grayscale, RGB Color (the default), Web Color, and HSB (hue, saturation, and brightness) Color. The choice you make from the menu displays the values in the top-left quadrant (first readout) of the Info panel.
Second Color Readout: The same choices appear from the drop-down list as you find for the First Color Readout. These values are displayed in the top-right quadrant (second readout) of the Info panel.
Mouse Coordinates: Choose from several different units of measure from the Ruler Units drop-down list.
Status Information: Check the items you want displayed in the Info panel in the lower-left quadrant. By default, the Document Sizes readout appears. You can add all items to display them in the panel. This item mirrors the same choices you have in the Information box.
Note
Many panels have drop-down lists and several options when working with tools in the panels. Look for the down-pointing arrow in the top-right corner of a floating panel or just below the right chevron in panels contained in the Panel Bin. When you see the arrow, click it to open the drop-down list.
The Content panel provides you with a wealth of opportunity to change backgrounds on images and add photo frames, graphics, text, and shapes. You have a number of choices for the types of items you want to add to a photo (see Figure 3-11), as well as a list of categories you can apply, such as backgrounds, frames, graphics, shapes, and so on.
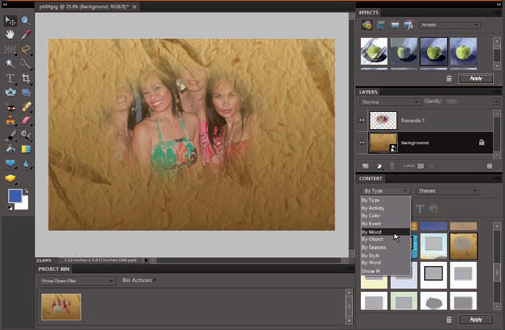
Figure 3.11. A number of different types can be applied as shapes, graphics, backgrounds, and frames.
To see how this works, assume you want to use one of the backgrounds Elements provides you in the Content panel. Follow these steps to begin an editing session:
Create a new blank document.
Open Edit Full mode and choose File
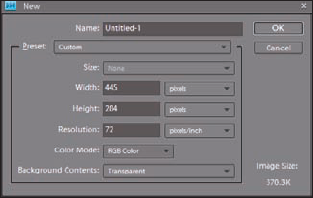
Set the file attributes.
When the New dialog box opens, as shown in Figure 3-12, choose a width and height for the file size. In our example, we use 445 × 284 pixels. Choose a resolution by typing a value in the Resolution text box. For a demonstration, we use 72 ppi (pixels per inch). Select RGB Color for the color mode and choose Transparent for the Background.
Click OK in the New dialog box.
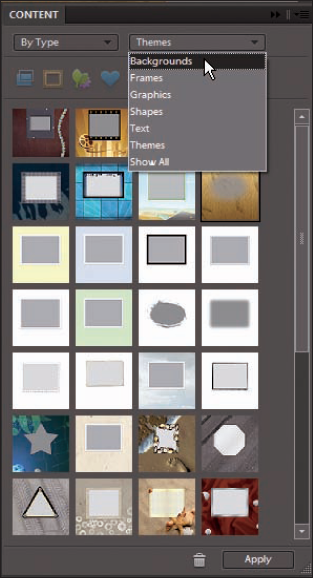
Open the Content panel.
Choose Window
From the first drop-down list in the Content panel, choose By Type. In the second drop-down list, choose Backgrounds, as shown in Figure 3-13.
Scroll through the list of thumbnail images in the Content panel and click the background you want to use.
Click the Apply button in the lower-right corner of the Content panel.
The new background image is applied to the background.
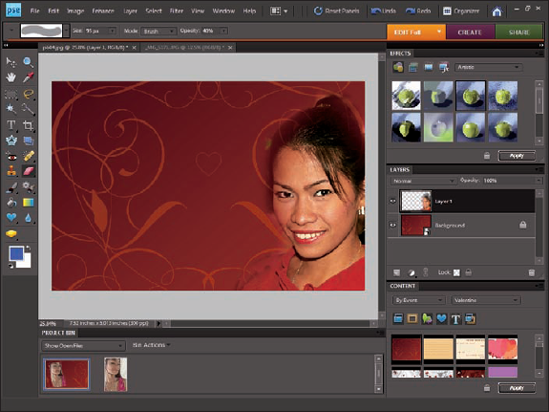
After you have a background in place, you may want to copy and paste an image into your document, add text, create multiple layers of images that you organize into a design, or perform other tasks. To effectively add images to the background, you need to know a bit about working with layers (covered in Book VI, Chapter 1) and working with selection masks (covered in Book VI, Chapter 4).
In Figure 3-14, we added a photo to a background that we selected from the backgrounds in the Content panel. For this type of look, we needed to feather a selection for the foreground image after moving it to the background document. For more on selections and feathering selections, check out Book IV, Chapters 1 and 2.