Proofing documents on your monitor
Using Acrobat for proofing and preparing files for commercial printing
Checking jobs for potential imaging problems in the CS programs
Preparing files for prepress and printing
Printing on commercial devices
As a production artist, you participate in workflows with production workers and technicians at prepress houses and print shops. Your role extends beyond the creative work you do to include proper file preparation, proofing your work, checking files for potential problems, and delivering a product that has an excellent chance for successful output. The Creative Suite applications offer you many tools for diagnosing documents and reporting potential imaging problems to you. In addition, some CS applications offer you options for creating file formats optimized for high-end prepress and printing.
This chapter begins with soft-proofing color and separations on your monitor before you send files to an imaging center, and continues with the file checking process known as preflighting. The last part of the chapter covers packaging jobs for imaging centers. Consider the contents of this chapter as the most important aspects of your production workflow when you create documents designed for commercial printing.
Soft-proofing a document is the process of viewing the file on your monitor and checking various conditions for potential printing problems. You can check issues such as overprints, proper color assignment, transparency flattening, and font problems using some of the CS applications. Illustrator, InDesign, and Acrobat Pro all provide a wealth of tools for soft proofing color.
Note
For more information on packaging documents, see the section "Packaging Documents for Commercial Printing," at the end of this chapter.
In InDesign, you can check files for transparency flattening and color separations. Open the Window menu, select Output and you see submenu menu commands for Flattener Preview and Separations Preview. Select one of the menu commands, and the respective palette opens as a floating palette.
As described in Chapter 35, transparency flattener previews show you the results of applying flattening amounts. To open the Transparency Flattener, choose Window
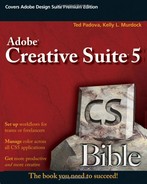
The Flattener Preview palette offers you various options for previewing the results of flattening transparency. You navigate to pages and see results on the page in the Document window as you apply settings and refresh the screen to update different settings options. The following options are available from the Highlight pull down menu in the palette:
Rasterized Complex Regions: From the drop-down list, the first choice is this option. From the Flattener Preview palette menu, which opens when you click the right-pointing arrow, you can show Transparency Flattener Presets in a dialog box. The dialog box contains buttons for creating new presets or editing presets you load or create.
Transparent Objects: When you select this option from the drop-down list, transparent objects are highlighted on the page, including alpha channels in Photoshop images, objects with blending modes, and objects with opacity attributes such as drop shadows applied in InDesign.
All Affected Objects: Next in the drop-down list is this setting, which highlights overlapping objects where at least one of the objects contains transparency. All the highlighted objects are flattened according to the amount specified in the Transparency Flattener Preset Options dialog box.
Affected Graphics: This setting highlights placed objects where transparency effects are involved.
Outlined Strokes: Following along in the drop-down list, this option highlights all strokes that have been marked for outlines.
Outlined Text: This option highlights all text converted to outlines when involved with transparency.
Raster-fill Text and Strokes: You can rasterize object fills and strokes during transparency flattening. This option previews the results of rasterizing.
All Rasterized Regions: Objects and intersections throughout the document are highlighted to show the results of rasterization. Photoshop files are also previewed for the results of rasterization, as are all effects that involve transparency, such as drop shadows and feathering.
Auto Refresh Highlight: When you select this check box, the highlighted preview refreshes as you toggle menu commands and adjust settings.
Refresh: If you want to manually refresh the preview, uncheck the Auto Refresh Highlight check box and click the Refresh button to update the preview.
Preset: InDesign is installed with three presets for transparency adjustments. You can add custom presets and the new presets are added to the drop-down list. Select from the menu the preset you want to use. When you create or edit a preset, the Transparency Flattener Preset Options dialog box opens; here, you control the amount of transparency by moving the Raster/Vector Balance slider. The slider position in the Transparency Flattener Preset Options dialog box determines the amount of rasterizing complex regions.
Ignore Spread Overrides: For individual spreads where you want to ignore spread-specific flattener presets, select the check box. If a spread has a custom flattener assigned to it via the Pages panel this checkbox overrides the custom settings and applies the flattener selected in the Flattener Preview panel.
Apply Settings to Print: When the preview results look appropriate for your output, click the Apply Settings to Print button to apply the transparency flattening settings to your document.
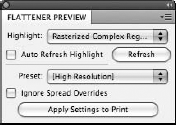
The Transparency Flattener Presets dialog box provides options for managing presets. You open the dialog box shown in Figure 36.2 by selecting Transparency Flattener Presets from the fly-out menu in the Flattener Preview palette. Options for managing presets include the following:
New: This option opens the Transparency Flattener Preset Options dialog box where you assign attributes for new presets. These new presets are saved and listed in the Presets list in the Transparency Flattener Presets dialog box. You can save presets and share them with colleagues so all designers use the same transparency flattening for all files for a given ad campaign.
Edit: You can return to a given preset and edit it in the Transparency Flattener Presets dialog box (Figure 36.3). Select the preset to edit, and click Edit. Note that you cannot edit or delete the default presets installed with InDesign.
Delete: Click a preset you want to remove, and click Delete.
Load: You load saved presets back into the Transparency Flattener Presets dialog box. Specific Flattener Presets can be part of a Printer Preset for a specific printing device and used at print time.
Save: Click Save to open the Save Transparency Flattener Presets dialog box where you can type a name for the preset and save the settings to a folder on your hard drive.
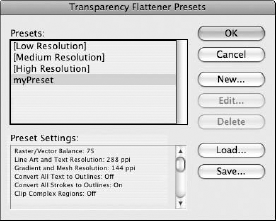
You can define options for a transparency flattener preset in the Transparency Flattener Preset Options dialog box. When you click either the New button or the Edit button, the dialog box shown in Figure 36.3 opens. Make your adjustments in this dialog box, and the collective settings are captured to the preset you create or edit.
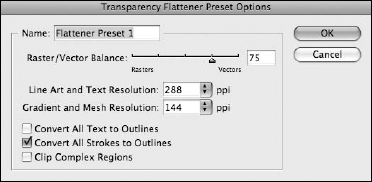
Figure 36.3. The options choices you have for defining attributes for a preset include the following:
The options choices you have for defining attributes for a preset include the following:
Name: Type a name in the field box, and the name is reflected in the Transparency Flattener Presets dialog box. Try to use descriptive names so you can easily recall a particular preset used for a given job.
Raster/Vector Balance: Move the slider to apply varying amounts of flattening. As you move the slider and target a particular amount, you can return to the Flattener Preview palette and preview the transparency settings.
Line Art and Text Resolution: You adjust resolution for rasterizing line art and text in the field box or by clicking on the up and down arrows to change the value. Line art resolutions would be set to match device resolutions—something like specifying 1200 ppi for image and platesetters.
Gradient and Mesh Resolution: A separate field box is used for rasterizing gradients and meshes. Mesh resolutions would be close to halftone frequency values such as 1.5 to two times the halftone frequency.
Convert All Text to Outlines: When checking the box, you can preview the results in the Flatten Transparency dialog box by selecting Outline Text from the drop-down list.
Convert All Strokes to Outlines: The same applies to this option as the Convert All Text to Outlines. Use the Raster-Fill and Strokes Menu command in the Flattener Preview palette to preview the flattening.
Clip Complex Regions: Once again, the same applies to this option. Use the Flattener Transparency dialog box, and choose Rasterize Complex Regions to preview the results. Clipping complex regions can be helpful when printing complex vector art.
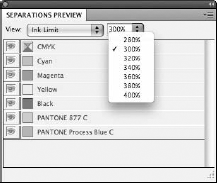
InDesign offers a method to preview separations and color modes before you send a file off to the printer. If you inadvertently specify spot colors where you intend to print a process color job, the Separations Preview palette immediately shows you all process and spot color in a document to help you avoid costly errors. To open the Separations Preview palette, shown in Figure 36.4, choose Window
Once you open the Separations panel, you still must turn Separations on. This puts the document into Overprint Preview to more accurately proof the document and uses more CPU power to show high-resolution graphics—that's why you have to turn it on.

While the Separation Preview palette is open and Separations are turned on, you can move the cursor around the document page, and ink percentages are reported in the palette for the cursor position. Select Separations from the View pull-down menu and you can toggle each color on and off by clicking on the eye icon. Clicking the ink color in the palette turns off all colors but the selected color. Single inks or combinations of inks can be displayed in the palette and reflected in the Document window.
From the View drop-down list, you have a menu command to display ink limits. Select the menu command, and the Separation Preview palette changes to the view shown in Figure 36.5. You can alter the ink coverage warning by selecting from fixed values in the drop-down list or typing values in the field box. Ink limit is designed to show where the limit has been exceeded in a document. Ink limits do not change or restrict ink output to match a press or the limit value. If the limits have been exceeded, they must be corrected in InDesign or the native editing application for a linked file.
From the palette menu, you can access the Ink Manager where you assign neutral densities that influence trapping amounts and apply spot color to process conversions. Open the palette menu by clicking the right-pointing arrow and selecting Ink Manager. The Ink Manager dialog box opens, shown in Figure 36.6.
You make settings changes in this dialog box according to recommendations from your commercial printer. You can define the neutral densities, which are established as the default values upon InDesign's installation, according to the language version you use during your installation. As you use printers from other parts of the world, you might find changes in standards for neutral densities. Neutral densities are important because the trapping engine uses the values to determine precise placement of traps. You don't want to mess around with the values, until you receive precise guidelines for adjustments from your printer.

The check box for All Spots to Process is the item in this dialog box you're likely to use often. If you specify spot-color inks during a design stage, you can convert the output of spot colors to process values with this option.
In the Separations Preview palette menu, you have a menu option for displaying spot colors as black. Select Show Single Plates in Black, and when previewing the spot colors in the file without the CMYK colors previewed, each spot color displays in the Document window as black. Note that you need to turn off all the process colors to see the spot colors appear as black. When you deselect the menu command, all spot colors display in their color values when you view plates and all plates.
Many of the transparency flattening preview options found in Illustrator are the same as the ones in InDesign. Open the Window menu and select Flattener Preview to open the Flattener Preview dialog box, as shown in Figure 36.7.
The options choices for highlighting transparency settings that differ between Illustrator and InDesign include:

From the Overprints drop-down list, you have additional options that you don't find in InDesign. The default choice is to preserve all overprints. You have other options to eliminate all overprints or to simulate overprints:
Discard: Obviously, this discards all overprints. You might use this option when you send files to print shops that perform all the trapping on your files.
Simulate: This option maintains the appearance of overprinting in composite proofs. Use this when you print to composite color printers that can display the overprints.
The Presets drop-down list offers you choices for different presets installed as defaults in Illustrator and a list of all presets you save by selecting Save Transparency Flattener Preset from the palette menu. Illustrator handles saving presets differently than InDesign. When you select the menu command, you get a dialog box prompting you to name the preset. You can return to the Presets dropdown list, and the saved preset is listed.
Editing a preset works a bit differently in Illustrator than it does in InDesign. To change options on a preset you saved, select the preset in the Presets drop-down list. Make your new options choices, open the palette menu, and select Redefine Preset. The new attributes are assigned to the saved preset.
If you need to delete a preset, you won't find an option in the Flattener Preview dialog box. Instead, you must open the Edit menu and select Transparency Flattener Presets. The transparency Flattener Presets dialog box opens. Refer to Figure 36.2 to see the dialog box with similar options choices as you have in InDesign. Notice that you can edit a preset in this dialog box as well as when redefining a preset, as mentioned earlier in the "Transparency flattening" section.
Acrobat PDF is the best form of document format for submitting files to print shops. The ability to embed graphic images and type fonts is one of the advantages you have with PDF files. In addition to being a desirable format for delivering documents for press, Acrobat Pro also offers an abundance of soft-proofing and preflighting tools.
There are two sources for accessing features related to soft-proofing and preparing files for print in Acrobat Pro. You can set up Overprint Preview in the Page Display Preferences and you can access the Print Production tools from the Advanced menu.
The other options for proofing and preparing files exist in a set of tools in the Print Production toolbar, which neatly houses the tools that creative and service professionals use to prepare files for digital prepress and printing.
Overprint previews are set in the Page Display Preferences. Press Ctrl/
Select Advanced
You often use overprints to trap colors in files intended for printing separations. Trapping a color creates a color overlap that prevents gaps from appearing between colors when paper moves on a press during the printing process. You might assign an overprint to text to avoid any trapping problems where black text prints on top of a background color. In other cases, a designer might unintentionally assign an overprint to a color during the creative process. As a measure of checking overprints for those colors that you properly assign and to review a document for potential problems, you can use Acrobat's Overprint Preview to display on your monitor all the overprints created in a file. To view overprints in a PDF document, open the Page Display Preferences and choose Always from the Use Overprint Preview pull-down menu. This preference choice offers options to view overprints from PDF/X only files, for all files, or for not viewing the overprints for all files.
Note
Overprint Preview is available in Acrobat Standard and Acrobat Pro as well as Adobe Reader 9. The remaining preflighting and soft-proofing tools are available only in Acrobat Pro and Acrobat Pro Extended.
To understand what happens with overprints and knockouts, look at Figure 36.8. The composite image is created for printing two colors. These colors are printed on separate plates for two different inks. When the file is separated, the type is knocked out of the background, leaving holes in the background, as shown in Figure 36.9. Because the two colors butt up against each other, any slight movement of the paper creates a gap where one ink color ends and the other begins. To prevent the problem, a slight bit of overprinting is added to the type. In an exaggerated view, in Figure 36.10, you can see the stroke around the type characters. The stroke is assigned an overprint so its color, which is the foreground color, prints on top of the background color without a knockout.


Designers can apply overprints in programs like Illustrator and InDesign. If a designer inadvertently makes a mistake and selects the fill color to overprint, the color of the foreground image results in a different color created by the mix of the two colors. In Figure 36.11, you view a file in Acrobat without an overprint preview. The figure shows the document as it should print. When you change the overprint preferences to show all overprints, the overprints shown in Figure 36.12 appear. As you can see, the assigned overprints in the file were a mistake. Using Acrobat's Overprint Preview preference option, you can check for any overprint errors in illustrations.

Note
Both InDesign and Illustrator provide you with overprint previews. If you use these design applications, you can check for overprint problems before converting files to PDF.


Tip
To carefully examine overprints assigned to type characters, click the Loupe tool in the Zoom toolbar. Move the cursor around the document to preview overprints on small type.
Output Preview provides options for previewing color handled in the Output Preview dialog box. Choose Advanced
Separations preview
In the Output Preview window (refer to Figure 36.13), select Separations and you preview separations like the separations preview you use in InDesign. Notice in Acrobat you need to use the checkboxes to toggle visibility of plates whereas InDesign allows you to click the plate names to toggle the visibility.
If you intend to print a file in four-color process, the Separation Preview dialog box identifies any potential problems if you have spot colors in the file. Likewise, if a spot-color job contains colors that you don't intend to print, they also appear.
You can selectively view individual colors by deselecting the check boxes adjacent to each color name, view selected colors only, and view spot colors converted to CMYK. Click Ink Manager, and you can convert spot color to process color (see Figure 36.19, later in this chapter).

You evaluate color values by moving the cursor around the document with the Separation Preview dialog box open. Notice the percentage values on the far right side of Figure 36.13. These values represent the percent of ink at the cursor position.
From the Show pull-down menu, you have several options for what you want to examine in the preview. Choose from the menu options to preview images, spot color, grays, smooth shading, and so on, and the preview dynamically shows the data you choose to view.
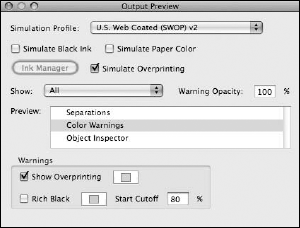
Select the Simulate Ink Black check box to see how the blacks actually print on press.
If you select the check box for Simulate Paper White in the Output Preview dialog box, the preview shows you a particular shade of gray as simulated for the paper color by the color profile you choose. You may find that the preview looks too gray or has too much black. This preview may not be the profile used, but rather the brightness adjustment on your monitor. If your monitor is calibrated properly and the profile accurately displays the paper color, the preview should show you an accurate representation of the document as it is printed on paper.
At the bottom of the dialog box, you find an option for checking Total Area Coverage. To change the threshold for where the warning is given, check this box.
Click Color Warnings in the Preview box, and the Output Preview dialog box changes, as shown in Figure 36.14. Select the check boxes for Show Overprinting and Rich Black, and the preview displays warnings for overprints and rich black printing in the colors appearing in the color swatches adjacent to the check boxes. If you want to display warnings in different colors, click a swatch and choose a preset color from the drop-down color palette or click Other Color to open your system color palette. In the system color palette, you can choose any color appearing in the palette to display the out-of-gamut color warnings.
Proofing and editing tools are accessible from the Advanced
To open the Print Production toolbar shown in Figure 36.15, open a context menu on the Toolbar Well and select Print Production from the menu commands. The toolbar opens as a floating toolbar in the Acrobat window. If you want to dock the toolbar in the Toolbar Well, open a context menu again and select Dock Toolbars or drag the toolbar to the Toolbar Well.
The Print Production tools include:
Trap Presets: You can trap PDF files for commercial printing by applying trap presets from a selection installed as defaults or from custom trap presets you create in Acrobat. Before you trap a file, you may need to fix hairline rules. Make adjustments as needed; then click the Trap Presets tool to open the Trap Presets dialog box shown in Figure 36.16.
Note
For more on fixing hairlines, see the section "Fix Hairlines," later in this chapter.

Figure 36.16. Click the Trap Presets tool in the Print Production toolbar to open the Trap Presets dialog box.
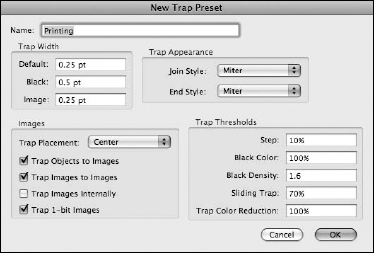
The first dialog box that opens enables you to select an existing preset or create a new one. Click Create, and the New Trap Preset dialog box opens as shown in Figure 36.17. In order to make adjustments in the dialog box, you should be familiar with trapping and the acceptable amounts to apply for trap widths, miter adjustments, and attributes assigned to images and thresholds. If you know how to trap a file, you'll know which settings to apply. If you don't know anything about trapping, it's best to leave the job to your commercial printer.
Click OK after typing a name for the new preset and making the adjustments. You are then returned to the Trap Presets dialog box where your new preset is listed in the window. Click Assign, and the trap values are applied to the document.
Output Preview: This tool opens the same Output Preview dialog box as when you choose Advanced

Preflight: You can also access preflight from the Advanced
Note
For information related to Output Preview, see the section "Output Preview," earlier in this chapter. For information related to using the Preflight dialog box, see the section "Preflighting PDF Files."
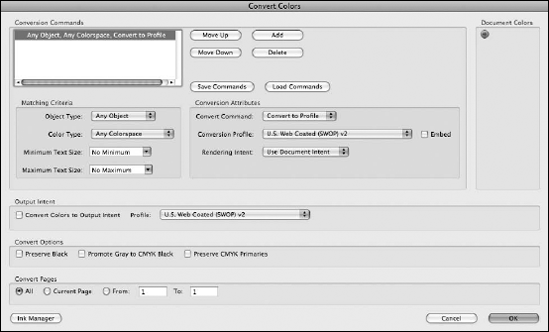
Convert Colors: The Convert Colors dialog box in Acrobat 9 has many changes compared to earlier versions of Acrobat. Click the Convert Colors tool in the Print Production toolbar, and the Convert Colors dialog box, shown in Figure 36.18, opens. In the dialog box, you can convert color for individual items such as images, text, line art, any object, and smooth shades from the current colorspace to a new target colorspace.
You also can map spot colors from one spot value to another. This is very helpful if you have two spot names such as Pantone 185 CV and Pantone 185 CVC that are intended to be printed on the same plate. At the bottom of the dialog box, you have a check box available to Preserve Black Inks. This option is helpful if you have RGB black that you want to change to K-black for print production.
Ink Manager: The Ink Manager dialog box enables you to change ink values and convert colors. Changes you apply to the options choices aren't saved with the PDF file. If you convert spot colors to CMYK, for example, and save the document, the colors are unaffected when you reopen the file. The changes applied in the Ink Manager take effect only when you print a PDF document. To open the Ink Manager, click the Ink Manager tool in the Print Production toolbar. The Ink Manager dialog box, shown in Figure 36.19, opens.
Select from the pull-down menu options for aliasing the type of color (Normal, Opaque, Transparent, and OpaqueIgnore). You change density values and the trapping sequence by editing the field box. To alias spot colors, select a spot color and alias the color to the same angle and density as a process color.
Add Printer Marks: Use this tool to add printer marks to a page.
Crop Pages: If you add printer marks to a page, you need to resize the page in order to see and print the marks. The Crop tool opens a dialog box where you can size a page large enough to view and print printer marks.
Note
For information on adding printer marks in Acrobat or for cropping pages in Acrobat, see Chapter 22.
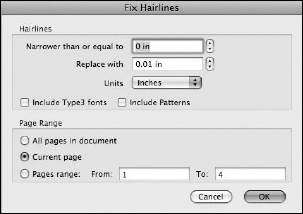
Fix Hairlines: You might see hairlines print fine on desktop printers while they appear almost invisible when printed on commercial high-resolution printing devices. If the hairlines are too small, they won't appear on the final color separation. This is particularly true if you need to trap areas around hairlines. To add larger point sizes to hairlines, click the Fix Hairlines tool in the Print Production toolbar. You can replace narrow hairlines with larger strokes, as shown in Figure 36.20.
Transparency Flattening: You have as many similar options for flattening transparency in Acrobat as you have in Adobe InDesign. Acrobat's Flattener Preview is a little more elaborate, as you can see in Figure 36.21, compared to InDesign's Flattener Preview, shown earlier in Figure 36.1.
Whereas InDesign shows you previews on the document page, Acrobat's previews are shown in the Flattener Preview dialog box. As you determine the adjustments needed to flatten transparency, click Apply. In Acrobat Pro, you can apply transparency flattening and save the results when you choose File
Some unique features you find in Acrobat's Flattener Preview dialog box not found in Illustrator and InDesign are the Preserve Overprint check box, OK, and Apply buttons. Clicking OK closes the dialog box. Clicking Apply applies the settings to the range of pages in the document you specify in the Pages range text boxes.
PDF Optimizer: Click the tool, and you open the PDF Optimizer dialog box. The same dialog box opens when you choose Advanced
Note
For a more detailed description of the choices in the Flattener Preview dialog box, see the section "Transparency flattening." For information related to using the PDF Optimizer, see Chapter 34.
JDF Job Definitions: You use a Job Definition File (JDF) in production workflows to include information necessary for a production process and information related to the PDF creation. You assign the information in a JDF file through a collection of dialog boxes that begin with your clicking the JDF Job Definitions tool at the far-right side of the Print Production toolbar. Click the tool, and the JDF Job Definitions dialog box, shown in Figure 36.22, opens.


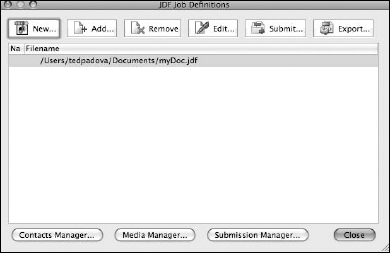
Click the New button to open the Edit JDF Job Definition dialog box, shown in Figure 36.23. You find options for adding information such as job identifying information, profile compliance, description, and printing and postprocessing information. The entire process for creating and using JDF files is extensive and beyond the scope of a thorough discussion in this chapter. For more information about JDF, see the Help document installed with Acrobat.

Preflighting is a term that creative professionals and service technicians use to describe the process of analyzing a file for suitability for printing. A preflight assessment might examine a file for the proper color mode of images, for image compression, for accessibility of embedded fonts, for accessibility of fonts to the operating system, or for any number of other conditions that might interfere with successfully printing a job.
The two applications you use for preflighting are InDesign and Acrobat. Acrobat has a much more elaborate set of preflight options, so we'll focus on using Acrobat in this chapter. If you submit native InDesign files to service centers, you can use the InDesign preflight options for checking your files and links to be certain the files will print properly at an imaging center.
To access InDesign's preflight options, choose Window

When you choose Define Profiles, the Preflight Profiles window opens, as shown in Figure 36.25. Here you can click the +/- buttons to add or delete profiles or open the pull-down menu to the right of the minus (-) icon to load and export profiles.

Figure 36.25. Open the fly-away menu in the Preflight panel and choose Define Profiles to open the Preflight Profiles dialog box.
When you create a new profile, you click the Plus (+) icon and name a profile. Then scroll the list and check the boxes for the items you want included in your profile. As a graphic designer, you might receive a profile from a print service as a file attachment or a file download from a Web site. In this case, you would open the pull-down menu adjacent to the minus (-) icon, and choose Load Profile. All the work for setting up the profile is performed by your service center, and you only have to check your file against the profile before submitting files.
Acrobat requires you to have a file open in the Document pane in order to run a preflight check. To preflight a document, be certain that a file is open and click the Preflight tool in the Print Production toolbar, or choose Advanced
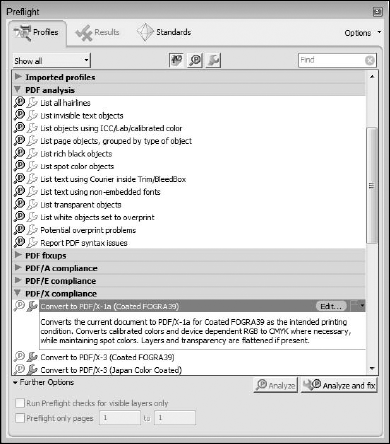
Figure 36.26. Click the Preflight tool in the Print Production toolbar, or choose Advanced
If a profile contains the conditions you want to check, select a profile and click Analyze or Analyze and fix. If a profile has been created that lets you perform just an analysis, you can click Analyze. Many profiles, however, are intended to analyze and fix a file to make it compliant with the profile conditions. When you analyze a file, a report is generated. When you choose Analyze and fix, Acrobat may take a little time to fix all the problems with the file and a Save As dialog box opens to save the fixed file. You saved the file and eventually, the Preflight window shows you a list of the fixes and an option to click a button to examine a report, as shown in Figure 36.27.

For commercial printing, you'll want to create PDF/X-compliant files. If a file is not converted to PDF/X during the PDF creation process, you can postprocess the file in Acrobat to check the file for PDF/X compliance. To produce a PDF/X file, choose a PDF/X option and click Analyze and fix. Acrobat prompts you to save the file. Choose a new file name, and click Save.
Like InDesign, Acrobat provides you options for creating new profiles. Acrobat has more than 400 conditions that you can add to a profile. To create a new profile, choose Create New Preflight Profile from the Options pull-down menu. The Preflight Edit Profile dialog box opens where new profiles are created.
Because most preflight analyses for output to commercial print shops are included in the preset profiles, you're not likely to do much custom profile editing. Refer to the Acrobat documentation if you want to look more closely at creating new profiles.
Just like the InDesign profiles, you can import profiles created by your service center to check files for given output devices. When you receive or download a preflight file, you can add the profile to your list of profiles in the Preflight window. Once added, you can create a droplet.
A droplet is like a small executable application. You can keep droplets in folders or on your desktop, and when you want to preflight a file, just drag the file on top of the droplet.
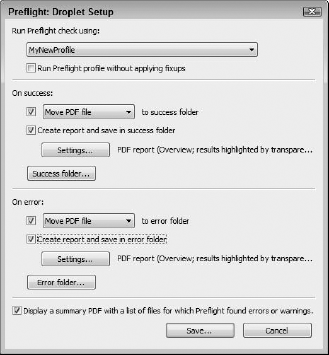
To create a droplet from an existing profile, select the profile in the Preflight window and open the Options pull-down menu. From the menu choices, select Create Preflight Droplet. The Preflight: Droplet Setup dialog box opens, as shown in Figure 36.28. You have options for where to save successful preflights and where to save files that don't meet the conditions of the profile. Make your choices, and click Save. The droplet is saved to your target location and ready to use when you're ready to check or check and fix a file.
Packaging a file for printing involves collecting all the assets required for printing and gathering them on a disk, CD-ROM, or a compressed archive you intend to e-mail or send via FTP to your service center. With Photoshop documents, you don't need to package for printing; all assets are contained within the Photoshop document. Flatten a copy of the image and send the file off to your printer. With Illustrator and InDesign, you have issues needing attention, such as font usage and links. When you package these files, you must include all links and fonts with the active file to send to your printer.
With fonts, you're faced with some potential problems related to font licensing. Many font-manufacturer licensing restrictions prevent you from legally distributing fonts to your service provider. If your provider does not have a given font, the provider must purchase the font or you need to search for a different provider.
The complex issues related to packaging native files together with legal restrictions is reason enough to search for a better solution rather than send your native files to service providers. Fortunately, the CS applications offer you a much better alternative. Quite simply, your package utility is Acrobat PDF. When you send PDF documents to your printer, you have advantages such as:
Font embedding: Not all fonts are licensed for font embedding in PDF documents. However, the more popular Adobe fonts, OpenType fonts, and many TrueType fonts carry no licensing restrictions for embedding the fonts in PDF documents. When the fonts are embedded, you don't have to worry about whether your service provider has the fonts contained in your document.
Image embedding: All images are embedded in PDF documents. You don't need to worry about missing links when sending PDF files to your printer.
Smaller file sizes: PDF documents occupy the least amount of space on your hard drive and are most often smaller than compressed native files. The results of smaller file sizes provide you with faster electronic transfer times via e-mail and FTP.
Optimized file types for printing: With PDF documents, you can create PDF/X files that are optimized for commercial printing. Developing PDF/X-compliant files provides a much more reliable format for correctly imaging your documents.
Because PDF is the best file format for sending files to prepress and commercial printing, we'll skip the packaging features for bundling native documents and focus on creating PDF documents optimized for professional printing.
If you intend to print Illustrator files rather than introduce them into an InDesign layout, you can save directly to PDF from Illustrator. Choose File

From the Standard pull-down menu, select one of the PDF/X options. Review the categories in the left pane. Add marks and bleeds, color settings, transparency flattening, and adjust the settings needed for your output.
All other choices are made for you when you select a PDF/X option. Look at the Summary item in the left pane. If you see a warning icon, click Summary and review the summary information. In some cases, you need to return to the document and fix any problems before saving as a PDF/X file. Click Save PDF. If the file meets PDF/X compliance, the file is saved to PDF.
In InDesign, you might use the preflight check built into the program before exporting to PDF. InDesign enables you to completely package the file for press via an export to PDF. After preflighting, choose File

Select a PDF/X Adobe PDF Preset, and adjust the options you need to print the file, such as printing spreads, adding marks and bleeds, and so on. As with Adobe Illustrator, be certain to check the Summary and correct any errors before exporting. Click Export, and the InDesign file is exported as PDF/X.
InDesign, Illustrator, and Acrobat provide tools for flattening transparency.
InDesign, Illustrator, and Acrobat offer you tools for preflighting documents against potential printing problems and for soft-proofing files for proper color assignment.
Acrobat offers the most sophisticated tools for preflighting and soft-proofing color. You can create or acquire preflight profiles suited to specific output equipment.
For packaging files for prepress and printing, Acrobat PDF format offers many benefits, including font embedding, image embedding, and smaller file sizes.
PDF/X is a subset of the PDF format and is the most desirable format for commercial prepress and printing..