
Chapter 10. InfoPath Integration with SharePoint Designer Workflows
Chapter at a Glance
Microsoft SharePoint Designer 2010 is a free download from Microsoft, and it is used for further customization of SharePoint. SharePoint comes with many built-in capabilities. Much of SharePoint can be customized without SharePoint Designer or custom code. However, in some situations, customizations need to be made beyond the built-in browser-based functionalities, which is when using SharePoint Designer is imperative.
Introduction to Workflows
In this chapter, you will learn about the integration points between Microsoft InfoPath 2010 and SharePoint Designer 2010. Most of the integration points that will be covered in this chapter are in workflows. Workflows are used to automate processes in lists and libraries. Some of the common functionalities of workflows are assigning approval tasks, sending emails, and setting field values. In SharePoint Designer, each workflow consists of a series of conditions and actions that execute in a certain order. Workflows can be created just for use in one specific list or library, or they can be created as reusable, which means that they can be associated with one or all content types.
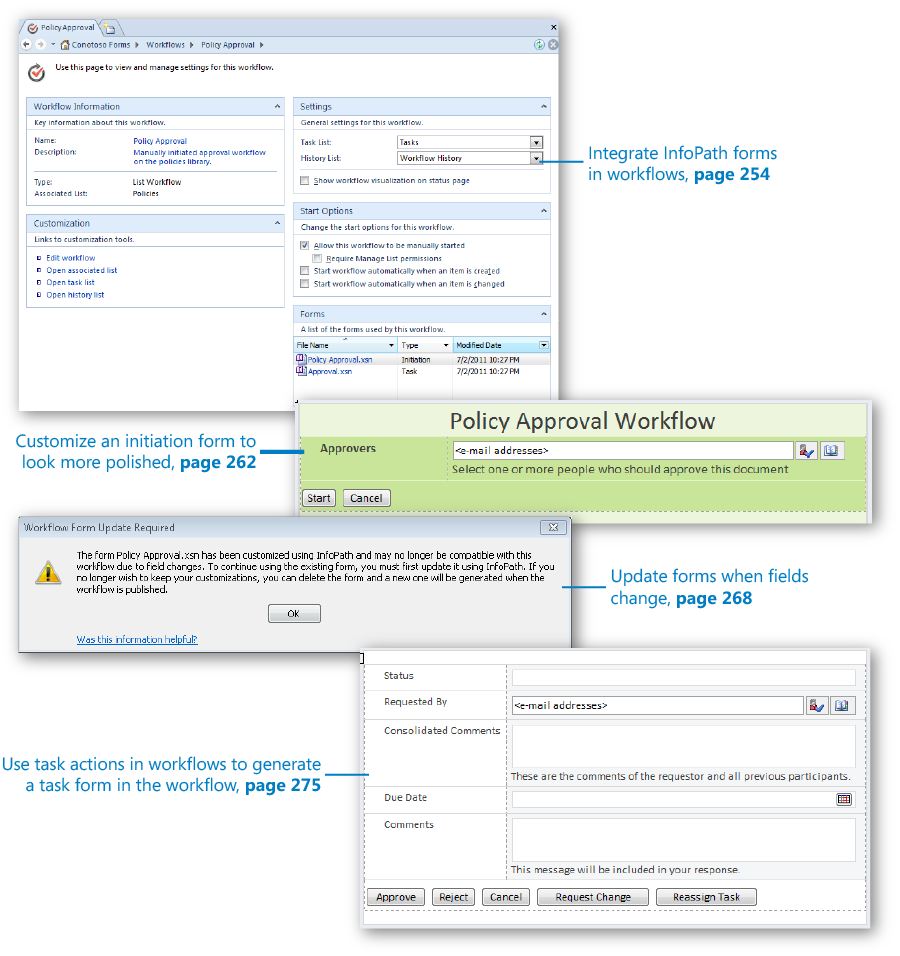
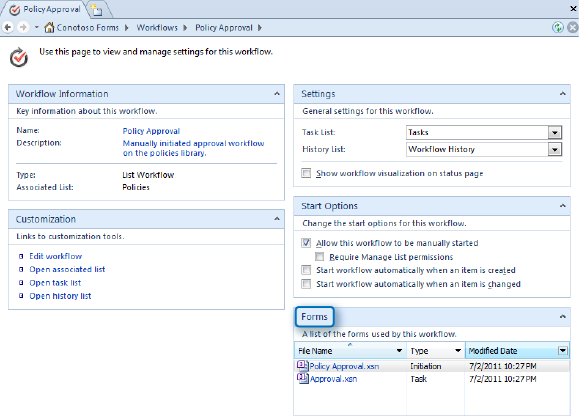
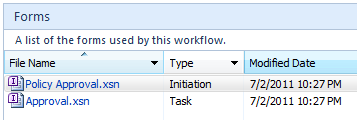
After a workflow has been published for the first time, the associated InfoPath forms are listed in the Forms section of the main workflow settings screen.
The two different types of forms that can be displayed in the Forms section are the initiation and task forms. Both will be covered in this chapter.
Workflow Initiation
When creating a workflow, one of your first considerations is deciding what will trigger the workflow.
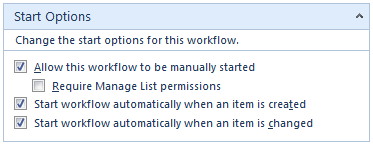
Start Options The settings in the workflow that determine how it will be triggered are called Start Options, which consist of the following:
Allow this workflow to be manually started When selected, this check box enables a user to click a button to explicitly start the workflow when desired. Associated to this is the Require Manage List permissions check box. When selected, only certain people can manually start the workflow. Manage List is a specific permission, and by default it is part of the Design and Full Control permission levels.
Start workflow automatically when an item is created When this check box is selected, the workflow automatically runs as soon as an item is created in the list or library.
Start workflow automatically when an item is changed When this check box is selected, the workflow runs every time each item in the list or library is modified.
You can select multiple start options.
The following workflow initiation concepts are important to understand:
If the workflow is to be manually started, an InfoPath form is automatically created as part of the publishing process. This form is called the initiation form because it is used upon workflow initiation. By default, the initiation form simply contains two buttons: Start and Cancel. If you want to require some information from the person starting the workflow, initiation parameters can be added.
Initiation form parameters are fields that are added to the initiation form. The types of fields available are similar to the types of columns that can be created in a SharePoint list, such as text, dates, and choices. When these parameters have been created, they automatically appear in the InfoPath initiation form.
Typically, workflows are not triggered manually; instead, they are completely automated and operate behind the scenes. SharePoint site users do not need to know that they are running nor what they are doing. Also, the users don’t need to worry about forgetting to run the workflow. Initiation forms are used only for the forms where a user is expected to start the workflow manually.
At our example company, Contoso, all of the company policies are documents stored in a single document library. A few people are in charge of editing policies, while most employees of the company can see only read-only files. When the editor of a policy has determined that edits are complete, the policy needs to go through an approval process before document changes are made available for public consumption. Policy editors have the freedom to select the approver of any given policy. For the Contoso company policies, they make use of SharePoint’s built-in content approval settings. Therefore, when a document is approved, the content approval is automatically set to Approved.
In the following exercise, you will create a simple approval workflow. Using documents as the example, it can be demonstrated that workflows are applicable to any kind of SharePoint item, whether it be a list item, document or spreadsheet in a library, or an InfoPath form that has been submitted.
Note
SET UP In the web browser, open your SharePoint site so that a new library can be created. Also, open your SharePoint site in SharePoint Designer 2010.
Create a new document library on your site, name the library Policies, and then type the description This library contains all of the company policies. Leave the rest of the settings as default, and then click Create.
Go to Library Settings. In the General Settings section, click Versioning settings. Next to Content Approval, under Require content approval for submitted items?, select Yes, and then click OK.
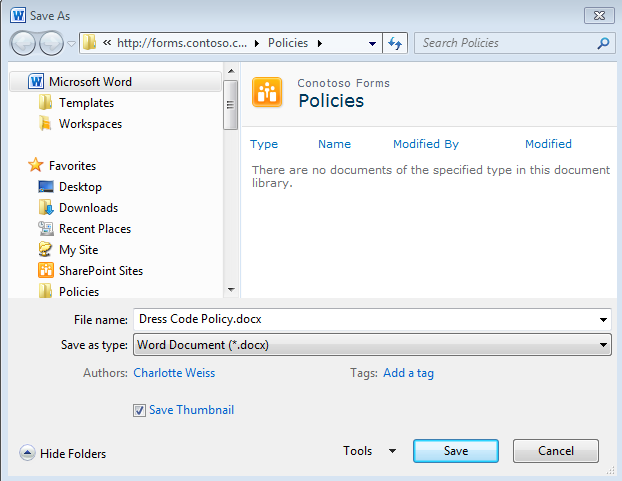
Before the workflow is created, take a look at the built-in content approval functionality. Create a new document in the library, and name it Dress Code Policy.docx. The file will be saved to the Policies library.
Notice that the Approval Status column in the library says that the document’s status is Pending.
Now it’s time to create the workflow.
In SharePoint Designer, in the Navigation pane on the left side of the screen, click Workflows.
The new workflow will be created specifically for the Policies library, so on the ribbon, click List Workflow, and then choose Policies from the drop-down menu.
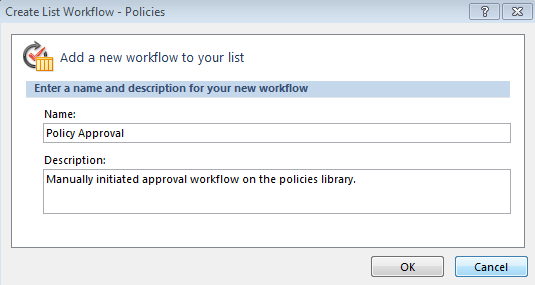
Name the workflow Policy Approval. Type the description Manually initiated approval workflow on the policies library, and then click OK.
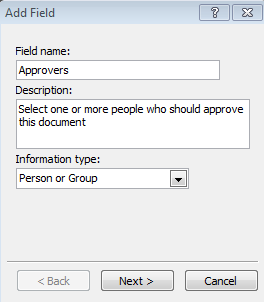
On the ribbon, click Initiation Form Parameters, and then click the Add button.
Using the people picker option, call it Approvers. Type the description Select one or more people who should approve this document. In the Information type field, select Person or Group, and then click Next.
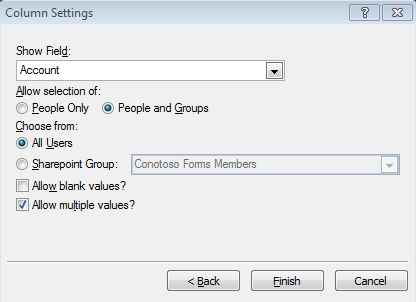
Fill in the field’s settings using the values in the following table. When complete, then click Finish, and click OK.
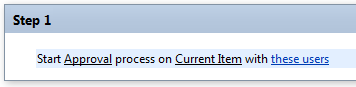
Now that the initiation parameter has been created, you need to kick off an approval process. On the ribbon, click the Action button, and then under the Task Actions section, select Start Approval Process.
This type of action is called the Task Process Designer and is an entire workflow inside of a workflow.
Click these users to select the approvers.
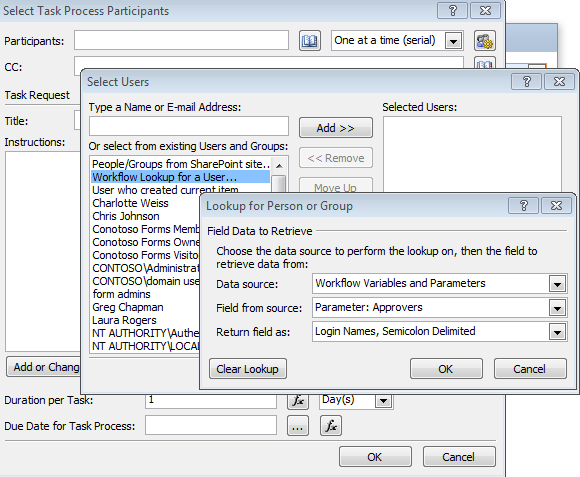
In this case, participants will be the approvers, so the initiation form parameter called Approvers will be selected as the participant. Click the Address icon next to Participants, and double-click Workflow lookup for a user.
In the Data source field, select Workflow Variables and Parameters. In the Field from source field, select Parameter: Approvers, and then in the Return Field as field, select Login Names, Semicolon Delimited. Click OK to close the Lookup for Person or Group dialog box, and then click OK in the Select Users dialog.
In the Title field, type Policy for approval, and then under Instructions, type Please take a look at this policy, and approve or reject it. In the Duration per Task field, type the number 1 (the default is days). Click OK.
On the ribbon, click the Publish button.
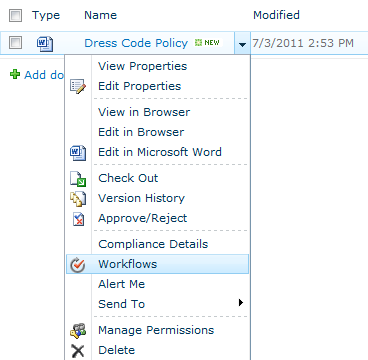
Go back to the Policies library in the browser, click the drop-down box for the Dress Code Policy document, and then click Workflows.
In the Start a new workflow section, click Policy Approval.
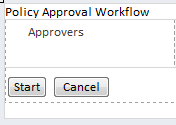
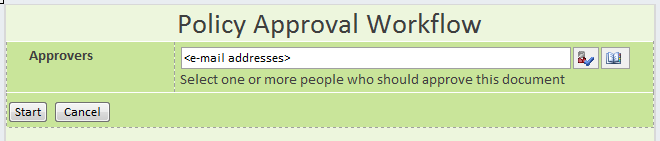
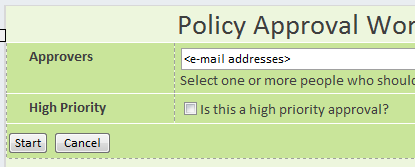
The initiation form presents a text box, in which you can fill in the names of the designated approvers.
Fill in the names of one or more people, and then click Start.


Important
If the SharePoint server’s outgoing email settings have been set up correctly by the administrator, workflow emails will automatically be sent to the approvers and to the initiator.
Note
CLEAN UP Leave SharePoint Designer and the browser open if you are continuing to the next section of this chapter. Otherwise, close SharePoint Designer, and then close the browser.
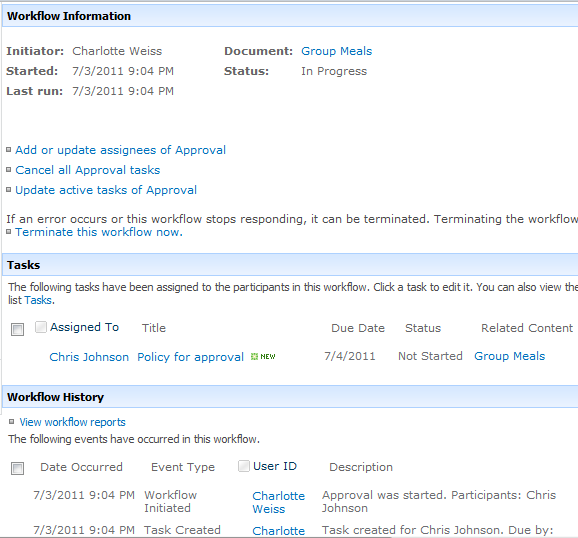
The first time a workflow is started, a new column that has the same name as the workflow is automatically added to the library. In the Policies library, notice that there is a new column called Policy Approval. The workflow has been started, so it shows as In Progress, next to the Dress Code Policy document. When you click the In Progress link, you are taken to the Workflow Status page. This shows who the current task is assigned to, as well as a workflow history that lists each activity that has happened in the workflow so far. Now that the initiation form has been created (the form that was filled out in step 17 of the preceding exercise), it can be easily customized because it is an InfoPath form.
In the following exercise, you will customize the initiation form for the policy approval workflow so that it looks a bit more polished.
Note
SET UP In the web browser, open your SharePoint site. Also, open the same SharePoint site in SharePoint Designer 2010. Open the Policy Approval workflow that was created in the previous exercise.
Go to the main workflow settings screen for the Policy Approval workflow. In the breadcrumb trail at the top of the workflow, click Policy Approval.
In the Forms section at the lower-right, click the Policy Approval.xsn form.
Put the cursor in the empty row above Approvers, and then type Policy Approval Workflow.
On the ribbon, click the Home tab, and then using the Font Styles section, change the font to Title. Center the title across the page.
Again, on the ribbon, go to the Page Design tab. In the Themes section, click to select the theme called Playground - Cay.
Now the form can be published. Click the Quick Publish button at the upper-left. InfoPath prompts you to save a backup copy of the form to your hard disk before publishing. Select a file location on the Save As screen, and then click Save.
When the template has been published successfully, click OK. Exit InfoPath.
Upload another document to the Policies library, and manually initiate the workflow by following steps 15–17 from the previous exercise. You’ll see the new, modified initiation form in place.


Note
CLEAN UP Leave SharePoint Designer and the browser open if you are continuing to the next section of this chapter. Otherwise, close SharePoint Designer and close the browser.
To build the content approval into the workflow, the goal is to automatically set content approval to Approved if a document is approved; and otherwise, set it to Rejected. This entails adding a new condition to the workflow.
In the following exercise, you add the functionality to communicate with the library’s content approval. When content approval is used on its own without a workflow, the only way to receive notification of items needing approval is to set up SharePoint alerts on that list or library. With this solution, only the specific approvers will get the email.
Note
SET UP In the web browser, open your SharePoint site. Also, open the same SharePoint site in SharePoint Designer 2010. Open the Policy Approval workflow that was created in the previous exercise.
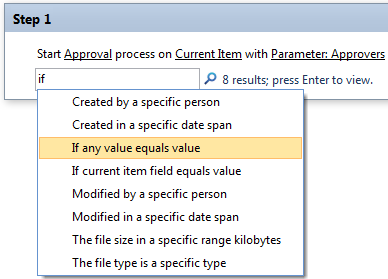
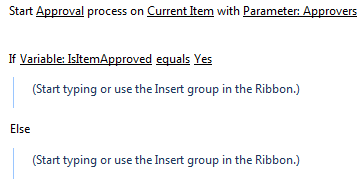
Position your cursor on the line under the Start Approval Process action, type the word If, and then press the Enter key. This will show a list of all of the optional conditions. Select If any value equals value.
The first condition that you will set is to verify that the item has been approved. The approval process that took place in the first action has a variable that you will use.
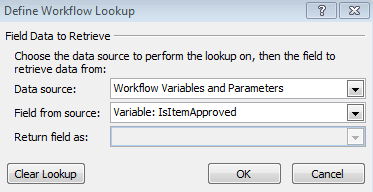
Click the name of the first blue value, and then click the function (fx) button. Select Workflow Variables and Parameters as the data source; select IsItemApproved as the field name, and then click OK.
For the second value, after is equal to, select Yes.
Select this first condition, and then on the ribbon, click the Else-if Branch button.
Now you have a structure, but actions need to be added after each condition in the statement.
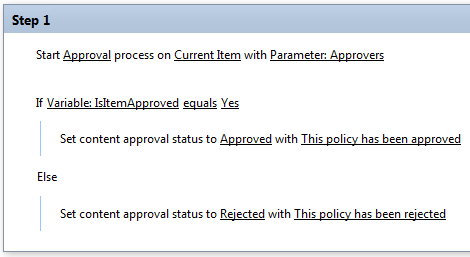
Position your cursor in the first section that says (Start typing or use the Insert group in the Ribbon). On the ribbon, click the Action button, and then choose Set Content Approval Status.
Set the content approval status to Approved, with the comment This policy has been approved.
Under the Else statement, add another action to Set Content Approval Status. Set the content approval status to Rejected, with the comment This policy has been rejected.
Add a new document to the library, and then manually trigger the workflow again. Click the drop-down box on the document in the library, and then select Workflows. Click the name of the Policy Approval workflow. Enter one approver’s name on the initiation form. In the Policies library, click In Progress in the Policy Approval column.
To open the workflow task, click the title of the assigned task—in this case, Policy for approval.
Click the Approve button on the task. Go back to the Policies library by clicking its name in the Quick Launch pane.
Note
CLEAN UP Leave SharePoint Designer and the browser open if you are continuing to the next section of this chapter. Otherwise, close SharePoint Designer, and then close the browser.
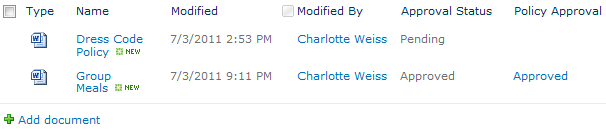
The Approval Status column has been set to approved, and the Policy Approval (workflow) column also shows as Approved. The benefit of using content approval is that each company policy can be worked on by policy editors, but the changes are not available for public consumption until the item has been approved.
This has been a fairly simple set of exercises so far, demonstrating what an initiation form is and how one is customized. However, in the real world, workflows are created, changed, published again, and then changed some more, and they go through multiple iterations. It is important to demonstrate the form publishing behavior when aspects of a workflow are modified.
In the following exercise, you will add a new initiation form parameter. When new parameters are added, the associated controls of the InfoPath initiation form are not automatically modified. You will learn how to work in the real-world scenario of having multiple changes to a workflow. A High Priority check box will be added so that the due date varies depending on the priority.
Note
SET UP In the web browser, open your SharePoint site. Also, open the same SharePoint site in SharePoint Designer 2010. Open the Policy Approval workflow that was created in the previous exercise.
In SharePoint Designer, in the Policy Approval workflow, click the Initiation Form Parameters button. Click Add to add a new parameter.
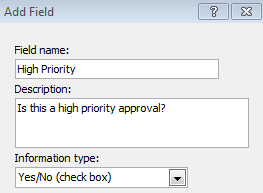
Name the field High Priority. In the Description field, type Is this a high priority approval?. In the Information type field, select Yes/No (check box), and then click Next.
Select a default value of No, click Finish, and then click OK.
If a policy is high priority, the approval task will be due in one day; otherwise, five days is the deadline.
On the ribbon, click the Local Variables button, and then click the Add button.
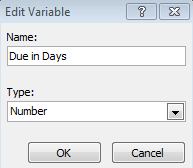
Name the new variable Due in Days. Define the Type as Number, and then click OK.
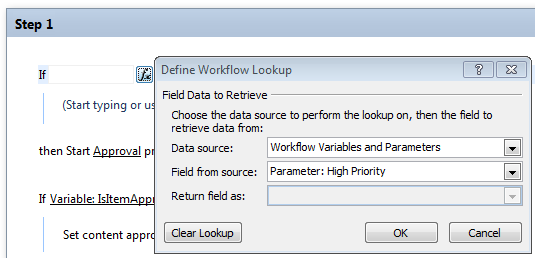
Above the action that starts the approval process in the workflow, add a new condition: If any value equals value. For the data source, choose Workflow Variables and Parameters; for the source field, choose Parameter: High Priority. Click OK.
For the value after equals, choose Yes.
On the ribbon, click the Else-If Branch button.
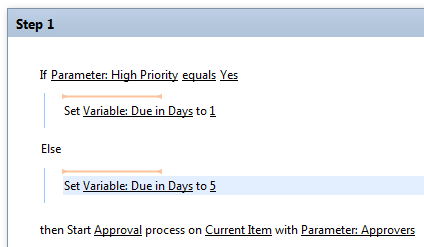
If the approval is high priority, the approver will have one day to complete the task; otherwise, the approvers get five days. Under the first part of the else-if branch, insert an action to Set Workflow Variable. For the variable, select Variable: Due in Days, and then set it to 1.
Under Else (not high priority), set the same variable to 5. In the Start Approval Process action, click the link Parameter: Approvers.
Next to the Duration per Task text box, click the function button. For the data source, select Workflow Variables and Parameters; for the field, select the variable Due in Days. Click OK.
Click OK again, and then click the Publish button.
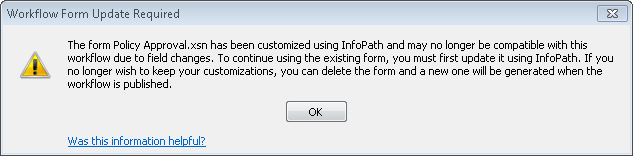
An error message displays, which is the whole point of this exercise. The error message indicates that you added the high-priority initiation form parameter, but that the new field is not on the initiation form yet. Click OK to close the message box.
You have two different ways to address the error, both of which need to be done from the workflow settings dialog box for the workflow.
On the ribbon, click the Workflow Settings button.
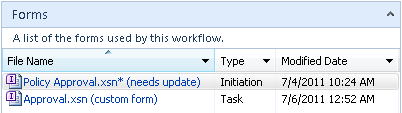
Notice in the Forms section, under File Name, that the Policy Approval.xsn (the initiation form) “needs update.”
One way to get past this would be to simply delete the form. The next time the workflow is published, it would be regenerated automatically. Another way is to open the form and manually add the new high-priority field to the form. When you get to this error, you simply need to weigh your options. How much customization has been done to the form, versus how many field changes have there been since it was last published? Is it faster to redo the customization (in this case it’s the title and colors), or is it more efficient to keep the existing form and manually add (or remove) any changed fields? Let’s go for option number two: modify the form.
Open Policy Approval.xsn by clicking its name.
The message shown in the following illustration pops up to alert you that a field has changed. Click OK.
In the form’s layout, insert a new row below the Approvers row, and then drag the high-priority field to the new row. Next to the text box, type Is this a high priority approval?.
Save the form by clicking Quick Publish, and then close InfoPath.
In SharePoint Designer, on the Workflow Settings tab, publish the workflow again. No error will occur this time.


Note
CLEAN UP Leave SharePoint Designer and the browser open if you are continuing to the next section of this chapter, but close the policy approval workflow. Otherwise, close SharePoint Designer, and then close the browser.
Now that the workflow has been improved, try it out in a couple of different ways. Add another document, and follow steps 16–18 in this chapter’s first exercise to manually start the policy approval workflow. Try starting one as high priority, and notice that the due date of the associated tasks are automatically set as one day from the date that the task is assigned. Alternately, when you start a workflow and it’s not high priority, each approver has five days from the date of assignment.
In the preceding exercise, you learned that when an InfoPath form that is associated with a workflow has been customized, it is not automatically updated when the form’s fields change. Weigh your options, and determine whether it’s more efficient to delete the InfoPath form and let SharePoint Designer automatically recreate it or to open the form and modify the layout to add or remove fields.
Custom Actions
When manually starting the workflow each time, several clicks are involved. When fine-tuning the user experience in SharePoint, you need to put yourself in the shoes of the people who will be using the site daily; thus you need to think about making things easy and obvious for them. Having to go through three clicks to start a workflow is not very easy or intuitive. Custom actions are buttons that you can create as a way to help the site users. When creating custom actions, determine where the button needs to appear in the interface and what the button will do.
The custom action button can be added in the following places:
List Item menu
Display Form ribbon
Edit Form ribbon
New Form ribbon
View ribbon
The following are the actions that can be taken when the button is clicked:
Navigate to form Open a specific form that is associated with that list or library
Initiate workflow Start a workflow that has been configured to be initiated manually
Navigate to URL Go to any specific website
At Contoso, when it is time for a policy to be approved, the user interface needs to be easy and obvious. A custom action button is the perfect solution to this requirement.
In the following exercise, you will add a custom action to the policies library that you will configure to start the policy approval workflow. A button will be added to the list item menu on each document.
Note
SET UP In the web browser, open the SharePoint site that was used in the previous exercises in this chapter. Also, open the same SharePoint site in SharePoint Designer 2010.
In SharePoint Designer, in the Navigation pane on the left, click Lists and Libraries.
In the Document Libraries section, click Policies.
On the settings page for this library, in the Custom Actions section at the bottom right, position the cursor in the white part inside of this section.
Notice that on the ribbon, at the top of the page, the Custom Actions tab is selected.
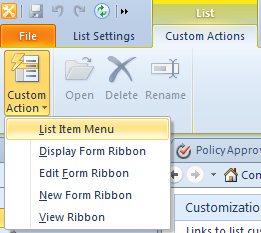
Click the Custom Action button, and then choose List Item Menu from the drop-down menu.
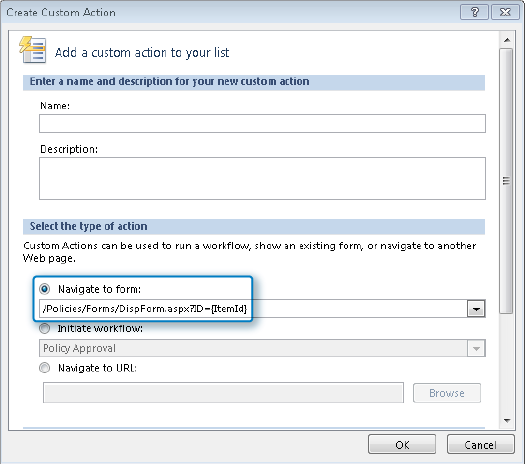
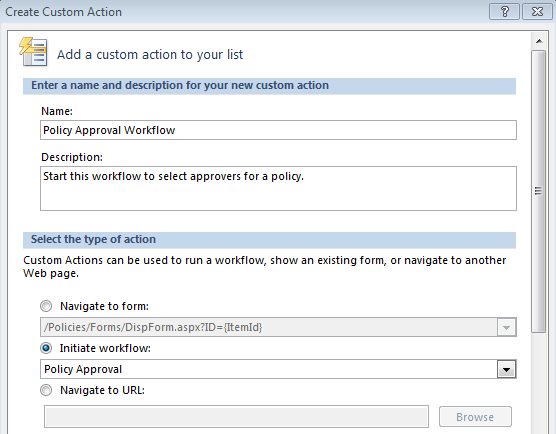
Type Policy Approval Workflow as the name; for the description, type Start this workflow to select approvers for a policy. In the Select the type of action section, select Initiate Workflow. Select Policy approval as the workflow.
Scroll down to Button Image URL, enter /_layouts/images/itgbcirc.png, and then click OK.
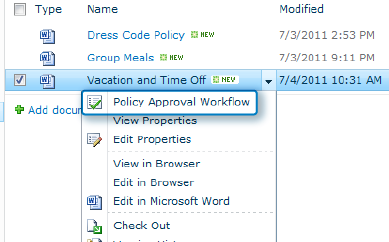
Go to the Policies library in the browser. Click the drop-down box on any policy to see the new task button called Policy Approval Workflow. The icon next to it is the PNG file that you defined in step 6. Click the Policy Approval Workflow button.
Adding this button takes you straight to the custom initiation form. Select some approvers, and then click Start.
Note
CLEAN UP Leave SharePoint Designer and the browser open if you are continuing to the next section of this chapter, and leave the policy approval workflow open. Otherwise, close SharePoint Designer, and then close the browser.
After performing all of the preceding exercises in this chapter, you now have an understanding of what an initiation form is, how a workflow can be triggered manually, and how one of these forms can be modified.
Workflow Task Forms
Another type of InfoPath form that is built into SharePoint Designer workflows is the task form. Six different task actions can be used in the Enterprise version of SharePoint, and each of these tasks comes with its own custom InfoPath form.
Assign a form to a group Assign a task to one or multiple groups and users. In this form, you can define the task title and other fields.
Assign a to-do item Assign a very simple task to one or multiple groups and users. Define the task title but no other fields.
Collect data from a user This task action returns the task ID as a variable but can be assigned only to a single person or a single group. In this form, you can define the task title and other fields.
Start approval process This type of task has built-in approve and reject buttons and is used to pass an item through an approval process.
Start feedback process This task has a button to submit feedback as well as a text box to enter comments.
Start custom task process Unlike the preceding two task process actions, this type is empty and must be fully customized.
The “task process designer” is a workflow inside of a workflow, which was introduced with SharePoint Server 2010 (Enterprise version). The latter three of the preceding six tasks have the task process designer built in. All of the workflow’s emails are built in, and these types of actions are great to use for tasks with deadlines. When a task is overdue, an email will be generated and sent to notify the appropriate people. When the whole process has ended, more notifications are sent. All of these emails can be customized in SharePoint Designer.
How does each task action have its own InfoPath form? Each time a new task action is added to a workflow, a new content type is automatically created at the site level. If multiple tasks of the same action type are added on a site, parentheses with a number are automatically added to the name of the action. Although the same task list can be used for multiple types of tasks, each of these different task actions uses a different form interface to that same list. Each form is associated with a different content type.
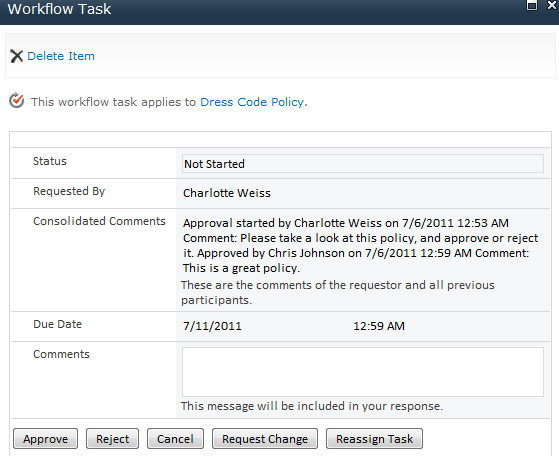
A plethora of functionality is automatically built in, especially with the task process designer. The following illustration shows an example of an approval form, with descriptions of the associated fields:
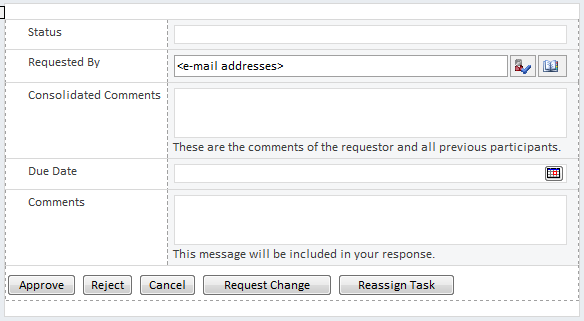
Status This is the status of the individual task. It has an initial value of Not Started. When the task is done, it will be Completed. This is read-only.
Requested By This is the name of the person who initiated the workflow. This is read-only.
Consolidated Comments This is a description that includes the initiator’s name, date, and the description of the task itself. With multiple approvers, all of their comments will also be concatenated here. This is read-only.
Due Date Use this to define a date, not the time, that the task is due. This is read-only.
Comments The task assignee can optionally type in comments before clicking one of the buttons at the bottom. These comments are stored in the workflow’s history.
Approve and Reject Buttons These are called outcomes. Within the task process, any outcomes can be created; these are just the most common. In the task process designer, these are listed under the Task Outcomes section.
Request Change This button allows the task assignee to make a change request to the initiator or to any other person of their choosing. When this is done, the current task is automatically set to Completed, and a new task is created for the person from whom the change is being requested. This setting is optional, which means that you can disallow change requests from the workflow settings.
Reassign Task Use this button to reassign the task to someone else. The existing task will be automatically completed, and a new task will be assigned to the new person. This setting is also optional.
Tip
The custom task form also has several built-in views, which the change request and task reassignment utilize.
In the following exercise, you will explore the task process designer and associated InfoPath form that was created in the last exercise.
Note
SET UP In the web browser, open the SharePoint site that has been used in the previous exercises in this chapter. Also, open the same SharePoint site in SharePoint Designer 2010, and open the policy approval workflow.
Before we delve into the task form, let’s explore the task process designer further.
In the approval process action, click Approval.
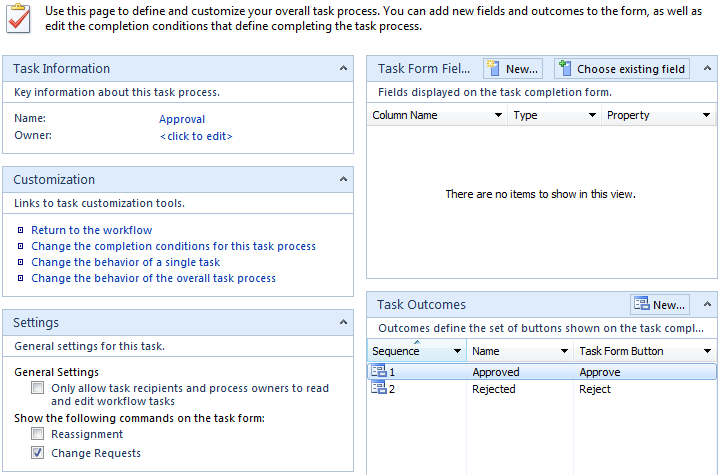
Welcome to the task process designer. The task form fields are extra fields that you would like the approvers to fill out. Task outcomes will be the buttons available to approvers. The settings section contains a security setting as well as check boxes to enable assignees to reassign or request change requests. In this exercise, you want the approvers to be able to reassign their tasks to someone else or to make change requests back to the initiator.
Select both the Reassignment and Change Requests check boxes.
The three links—Change the completion conditions for this task process, Change the behavior of a single task, and Change the behavior of the overall task process—are all more workflows. This is where all of the workflow’s emails are set up, and a lot more.
Click Return to the workflow.
Click Workflow Settings to return to the main screen for the Policy Approval workflow.
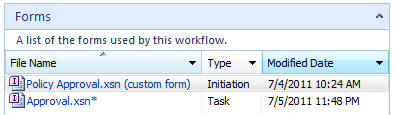
Notice that the Approval.xsn file has an asterisk next to it. This indicates that the form has a pending change. The change was made to the check boxes in step 3, so the form needs to be updated to include both buttons.
Publish the form. This process automatically regenerates a new task form.

Note
CLEAN UP Leave SharePoint Designer and the browser open if you are continuing to the next section of this chapter, and leave the policy approval workflow open. Otherwise, close SharePoint Designer, and then close the browser.
In the following exercise, you will modify the task form. A few common fields are read-only but do not appear as such. Basically, when you’re filling out a task form, it can be confusing because fields that might seem editable are not editable.
Note
SET UP In the web browser, open the SharePoint site that was used in the previous exercises in this chapter. Also, open the same SharePoint site in SharePoint Designer 2010, and open the policy approval workflow.
On the main workflow settings dialog box of the Policy Approval workflow, click Approval.xsn in the Forms section at the lower-right.
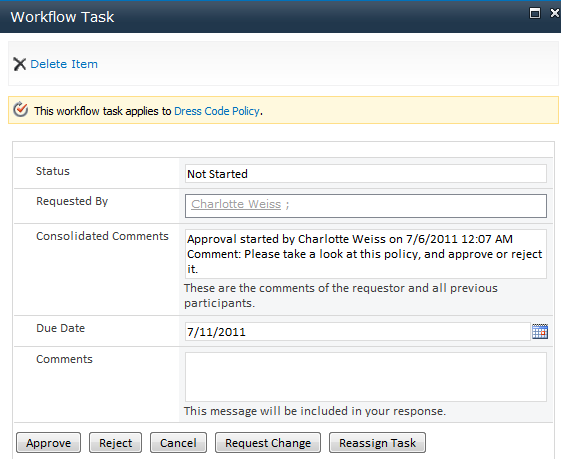
This is an example of how the task form looks when a user opens it; it is readily apparent what each field looks like.
In InfoPath, select the text box next to Status. On the ribbon, on the Layout tab, click Shading, and then choose No Fill.
Delete the Requested By people picker control.
This doesn’t need to be a people picker, because people aren’t being picked here—they’re only being displayed.
From the list of controls on the Home tab, click Calculated Value.
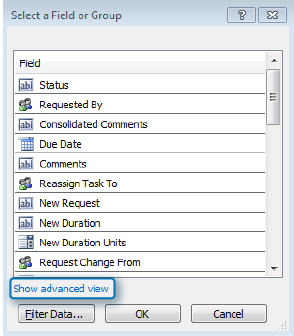
Click the function button, and then click Insert Field or Group.
Click Show Advanced View.
Select the DisplayName field under Requested By, and then click OK.
Click OK, and then click OK again on the Calculated Value Properties screen.
Right-click the text box next to Consolidated Comments. Select Change Control, and then click Calculated Value.
Right-click the date picker control next to Due Date. Change it to a calculated value. On the ribbon, on the Properties tab, change the width of this box to 165 px.
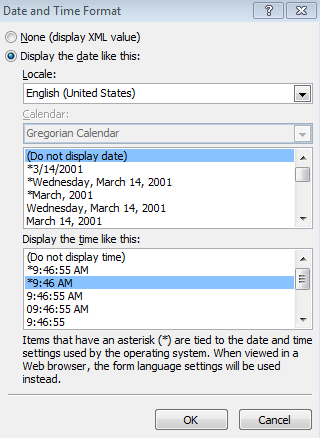
You will put two different controls on the form, one for date and one for time. Copy the Due Date field, and then paste the copy next to it.
Select the second calculated value, and then on the ribbon, on the Properties tab, click Data Format. Change it to a time format, and then click OK.
Click Quick Publish, and then close InfoPath.
Manually start the Policy Approval workflow on a document in the policies library.
Notice that the task form looks nicer, and it is more obvious that the Comments box is the only area that is editable.

Just as with initiation forms, any time the task process is modified, the form needs to be updated. When the publish button is clicked, a prompt indicates that the form must be updated.
External List Forms
Besides workflows, external list forms represent another integration point between SharePoint Designer and InfoPath. Typically, in most organizations, different systems and databases are used for different purposes. There could be an accounting database on one server and a personnel database on another one. Many times, these islands of data are not connected or integrated with one another. In SharePoint 2010, the concept of external content types was introduced. With external content types, connections can be created to many different data sources, and the data can be presented to the end user as if it were in one location.
External lists are created from external content types. When users edit the data in one of these lists, the appearance is that the data is in SharePoint, but it is not. Each time an External list is created, a prompt opens to automatically generate an associated InfoPath form for the list.
Important
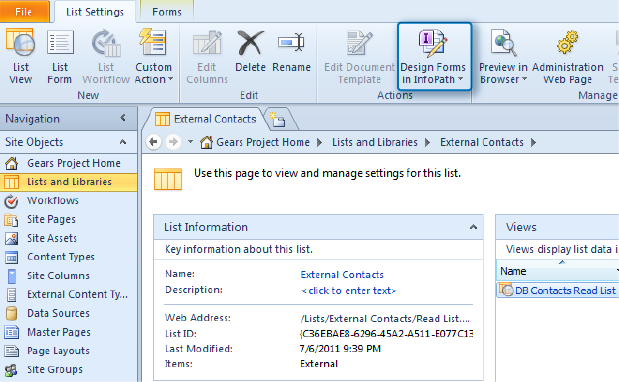
The button to modify the form with InfoPath is not available via the browser, as it is with regular list forms.
In SharePoint Designer, in the Lists And Libraries section, External lists are in their own grouped section called External Lists. When you click the name of an External list, take a look at the ribbon. Click the Design Forms In InfoPath button. The form can now be customized just like any other InfoPath form.
Key Points
There are several InfoPath integration points in the SharePoint Designer 2010 software.
SharePoint Designer 2010 is free to download and install.
There is a forms panel on the workflow settings page, where associated forms are listed.
There are three different start options for workflows; one or more can be selected.
Initiation form parameters are fields that are on the initiation form when a workflow is manually triggered.
A workflow can work in conjunction with a list or library’s content approval settings.
It can be a cumbersome process to manually trigger a workflow. Custom action buttons can be created to simply this action.
When the form fields are changed after the workflow is published, the InfoPath form must be manually modified, or the form must be deleted so that a new one will be regenerated.
Certain permissions will need to be in place for this type of approval workflow to be used efficiently and securely.