
Chapter 14. Advanced Options
Chapter at a Glance
In this book, we have tried to cover the major scenarios in which you can benefit from the use of Microsoft InfoPath with Microsoft SharePoint 2010. However, some topics either didn’t fit neatly elsewhere or might have been covered too lightly and deserve a closer look. Therefore, this chapter is designed to help advance your understanding of a number of key InfoPath topics about which our real-world experience has taught us are valuable for InfoPath forms designers to be aware. So although this chapter is a collection of topics which might seem somewhat unrelated to one another, we believe they are important enough that they needed to be included in the book.
Note
Practice Files Before you can complete the exercises in this chapter, you need to copy the book’s practice files to your computer. The practice files you’ll use to complete the exercises in this chapter are in the Chapter 14 practice file folder. A complete list of practice files is provided in Downloading the Practice Files and eBook on page xxvi.
The InfoPath Rule Inspector
In Chapter 5, you learned all about form rules. You might have deduced that when rules have been created on controls and as form load rules, forms can become a bit complex with various rules affecting different fields in the form. This is where the InfoPath Rule Inspector can help.
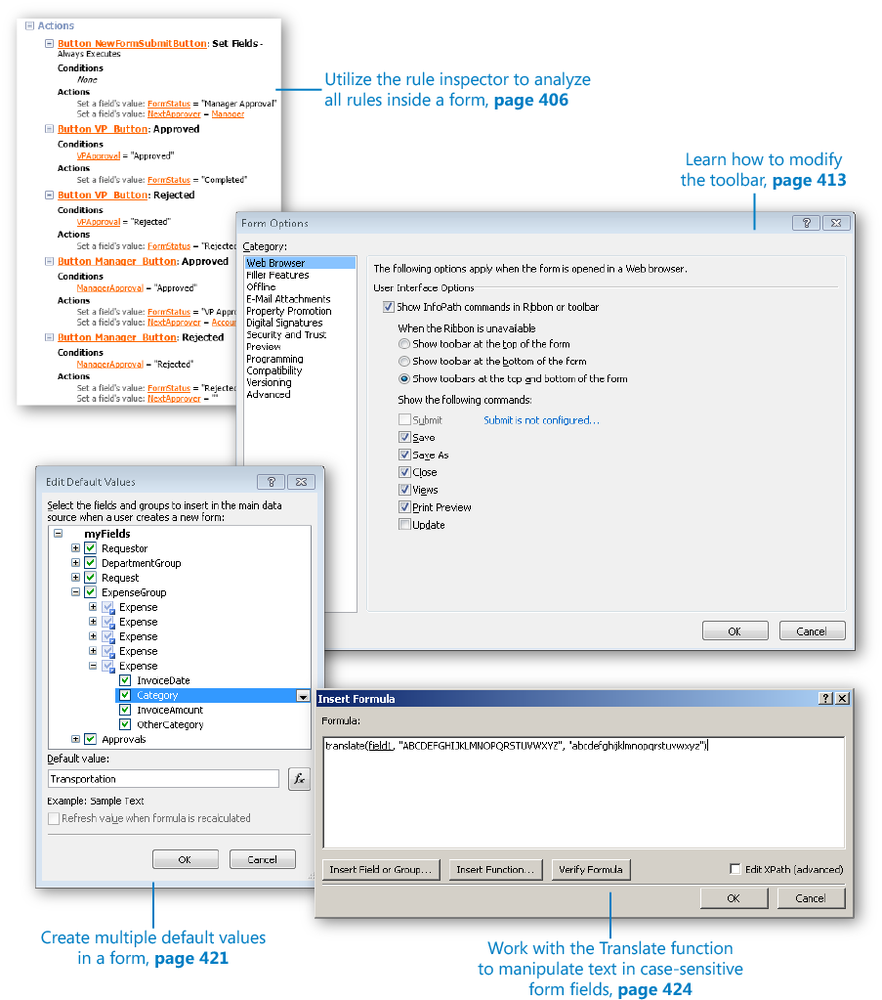
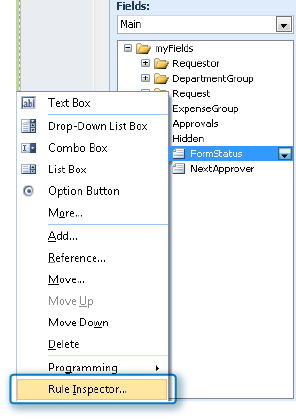
The Rule Inspector is a tool that can be used to analyze all of a form’s rules. Not only can you view the big picture, as a list of all rules in the form, but any specific field can be targeted. To access the Rule Inspector, on the ribbon, on the Data tab, simply click the Rule Inspector button. You can click any of the orange hyperlinks if you want to see more details about a given field or rule. Alternatively, in the Fields pane on the right side of the screen, right-click any field name, and then click Rule Inspector.
The Rule Inspector is a great troubleshooting tool that can also be used for documentation. The tool provides a print button, so if all of the logic behind the form needs to be saved with a project’s documentation or inspected further, you can print out a hardcopy.
Tip
Office 2010 has built-in functionality for sending a file to Microsoft OneNote instead of to an actual printer. When you click the Print button and choose Send To OneNote 2010, you are prompted to pick which notebook to save to. If you are using OneNote to take notes regarding each of your InfoPath projects, you can quickly save the rules as part of your documentation.
The Rule Inspector has four sections, with the rule information automatically categorized for you:
Validation
Calculated Default Values
Actions
Programming
The panel on the right has four sections that are specific to a selected field or group:
Rules that depend on this field or group
Rules that are triggered by a change in this field or group
Rules that may change this field or group
At Contoso, a new InfoPath form specialist has been hired and is tasked with troubleshooting an InfoPath form. Somewhere hidden in the form’s logic, its status field is being set to a value of “VP Approval”, but it is not apparent how and where that is happening.
In the following exercise, you will open an existing form and use the Rule Inspector to examine some of the logic in the form. The Contoso Reimbursement form was built in Chapter 11, and has many different logic rules built in. You will explore the Rule Inspector and then pinpoint the place in the form where the FormStatus is being set to “VP Approval”.
Note
SET UP Open ContosoReimbursementFinal.xsn in Design mode, and then switch to the New view. This is done on the Page Design tab by clicking the View drop-down box and then selecting the New (default) view.
Scroll through the list of rules to see all the rule information. Click any orange link to see more information about that item, which will appear in a new pane on the right.
In the Fields pane on the right side in InfoPath, expand the Hidden section, right-click the FormStatus field, and then click Rule Inspector.
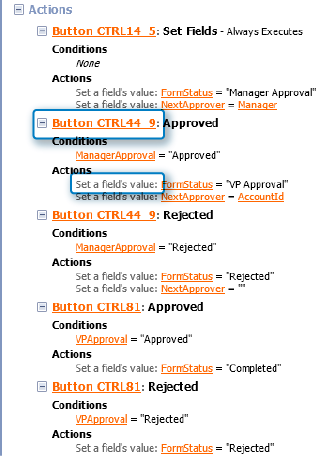
In the right pane of the Rule Inspector dialog, scroll down to the section Rules that may change this field or group.
For troubleshooting, assume that you are trying to figure out when and why the FormStatus field is being changed to “VP Approval”. You can find the action where the form status is set to this value, and you know that it happens when a button is clicked, but because the buttons do not have appropriate labels, you have no way to know which button it is. It’s time to fix the button labels so that they are more useful.
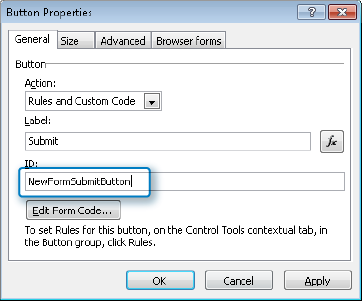
Close the Rule Inspector dialog again. In InfoPath Designer, double-click to select the Submit button.
In the ID box, type NewFormSubmitButton, and then click OK.
On the Page Design tab, use the View drop-down box to switch the current view to Approvals.
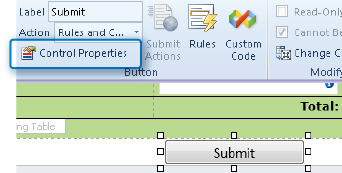
In the Manager Approval section, select the Submit button, and then press Alt+Enter to open the control’s properties.
In the ID box, type Manager_Button, and then click OK.
Repeat steps 10 and 11 for the Submit button in the VP Approval section. In the ID box, type VP_Button.
Now that all of the form’s buttons have been given more descriptive IDs, the rules in the Rule Inspector will make more sense.
Right-click the FormStatus field again, and then select Rule Inspector.
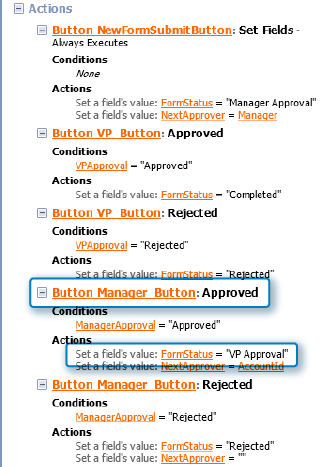
In the Rules that may change this field or group section, take a look at the Actions section again.
You are searching for the place in the form where the FormStatus is changed to “VP Approval”. The value that you are looking for can be found in the rules, and now that all of the buttons have been labeled correctly, notice that the Manager_Button is the one that is being clicked and that the rule is called Approved. The rule name is depicted in bold black text next to the name of the button.
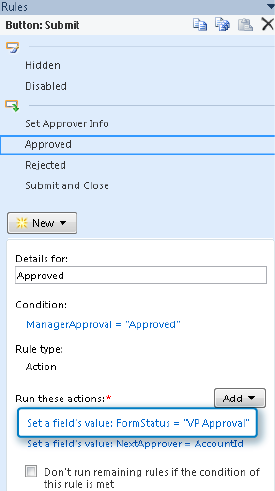
In the Manager Approval section, double-click the Submit button, and then on the ribbon, click Manage Rules.
In the Rules pane on the right, click to select the Approved rule.
Problem solved! There is the action that sets the FormStatus field to “VP Approval”.

Note
CLEAN UP Click the Save button to save the XSN file to your computer, and then close InfoPath Designer.
In the preceding exercise, you learned how to document and troubleshoot form logic. This example form is relatively simple, but you can imagine how useful this skill will be as the complexity of the form increases.
Merging Forms
Merging InfoPath forms is a way to look at several forms that have been submitted to SharePoint, merged together as a single form. This is most useful when many different items exist in a form’s repeating control, which need to be viewed in a single list.
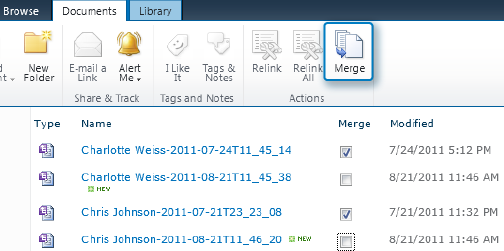
By default, each form library in SharePoint has a view called Merge Documents. This view consists of all forms in the library, with a check box next to each form name. Multiple forms can be selected, and the Merge button on the ribbon is used to merge the selected forms together. An example of this default view is displayed in the following screenshot:
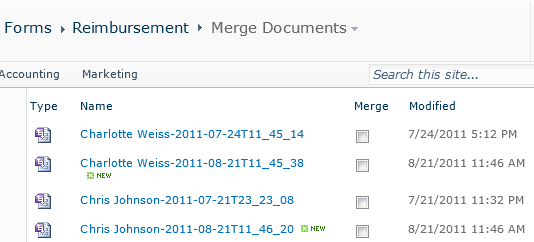
When any check boxes in the Merge column are selected, the contextual ribbon in SharePoint switches to the Documents tab. After all of the desired documents are selected, you can use the Merge button to generate a form that contains all of the forms combined together.
Important
Before you can merge forms, the InfoPath client software must be installed on your computer.
Each control in your InfoPath form has an Advanced tab that contains merge settings, which allow the value in that field to be merged when form merging is done. For example, the following illustration shows the Control Properties screen for a repeating table. The Merge Settings button is in the middle of the screen.
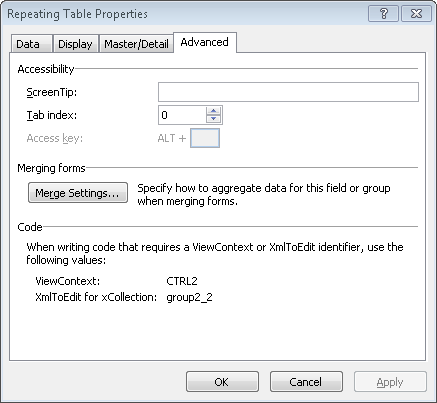
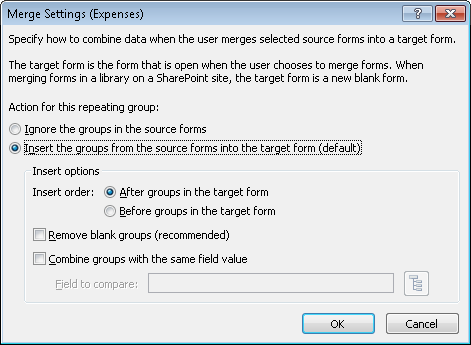
The preceding screenshot demonstrates that when the Merge Settings button is clicked, the following configuration actions can be performed:
Ignore the groups in the source forms Choose this setting to prevent a field or group from being merged. All of the other options on this screen are disabled if this is selected. The Insert the groups from the source forms into the target form option is the default and is the opposite of this setting.
Insert order By default, when multiple forms are selected to be merged, they are merged in the order in which they are seen in the Merge Documents view. With this setting, you can select the order in which the merged information is added to the form.
Remove blank groups If there are empty rows in the repeating table, you can use this option to skip them when the merge executes.
Combine groups with the same field value If multiple items in the merged forms contain the same value for the field that you select here, they will be treated as a single item when the forms are merged.
When dealing with controls that are not repeating, the default settings are a bit different. A text box has default merge settings that appear (see the following screenshot).
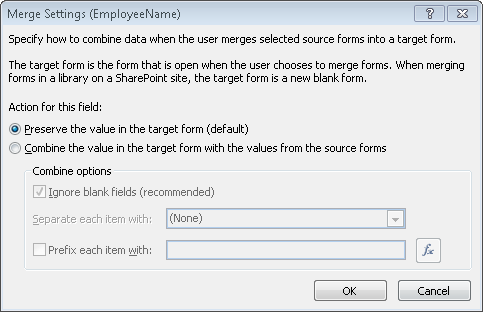
Note that text boxes are not set up to merge by default. For each control that is not a repeating one, if the value in this control needs to be merged, this setting should be changed to Combine The Value In The Target Form With The Values From The Source Forms.
The following settings can be further configured:
Ignore blank fields Choose this setting to skip data from forms that do not have a value in this field.
Separate each item with Use this drop-down box to select a separator character such as a space or a comma.
Prefix each item with Pick a field to be used as a prefix for the data that is displayed in the field when it is merged with other forms. A useful field to select might be a field that contains the name of the person who filled out the form.
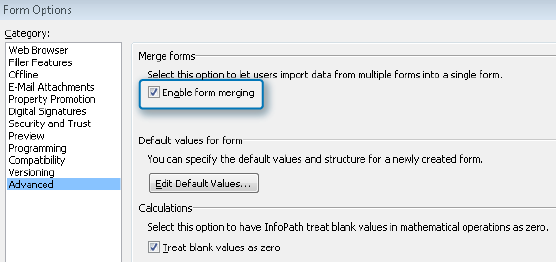
In addition to the preceding field level settings is a merge setting that applies to the form as a whole. Click File, choose Form Options, and then in the Advanced section, you can clear the Enable Form Merging check box if you would not like this to be an option for users.
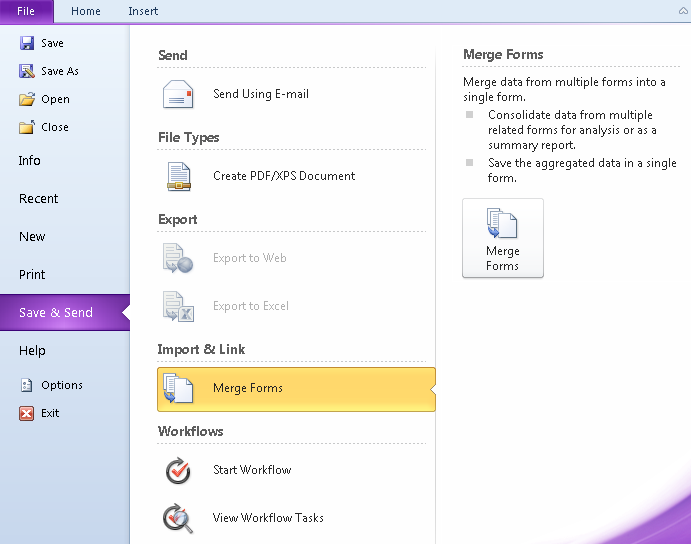
There is another way that forms can be merged; however, it requires that the InfoPath client software is being used. In the InfoPath Filler software, open any form, click File, and then click Save & Send. In the Import & Link section, click Merge Forms, and then click the Merge Forms button on the right.
You will now be prompted to select a form with which to merge the current one. This part could be a bit tricky for end users, because they need the ability to browse to the form library by using its URL. Locate the existing form (XML file) with which to merge, and then click the Merge button.
Relinking Forms
As you learned in Chapter 1, each form that has been filled out is an XML file. The form template on which the files are based is the XSN file. This XSN file is created by the form designer and published to SharePoint. Each time an existing form (XML file) is opened, there is a reference to the form’s template, which is its XSN file. When a form template has been published to a form library, all the XML forms in that library are linked to the template. An example of the location of a library template would be the following URL:
http://SiteName/FormLibraryName/Forms/template.xsn
What does it mean to relink forms, and why would you need to do it? We’ll go over how to relink forms, but first, here are two examples of situations in which forms need to be relinked:
The SharePoint site URL has changed because the site has been moved or upgraded to a new location.
The XML files have been physically moved to a new library.
If either situation occurs, the XML files are no longer linked to their XSN template and will need to be relinked to the correct XSN file location.
Follow these steps to relink forms:
Open the form library in the browser, and then on the ribbon, click the Library tab.
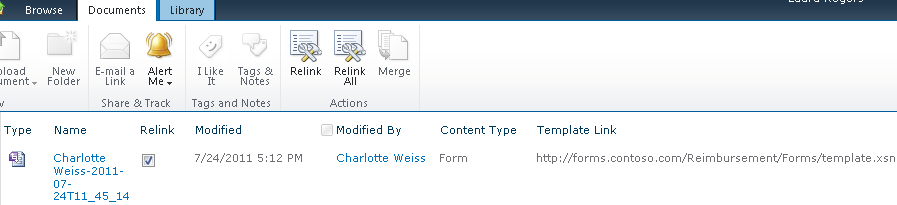
In the Current View drop-down box, select Relink Documents. Notice the descriptive text at the top of the page, which presents more information about relinking documents.
Select the Relink check box next to a document. Notice that the Documents tab on the ribbon displays two buttons: the Relink button for individual files that are selected or the Relink All button to relink all items in the library.

When the forms have been relinked to the correct XSN file, no problems or errors should occur when opening them.
Browser and Filler Buttons
A few default buttons exist in the toolbar of forms that are filled out in the filler and in the browser. You can also configure the settings in the Form Options dialog box to specify which buttons are shown or disabled.
The following illustration shows the Web Browser settings for the default screen for a new browser-based form.
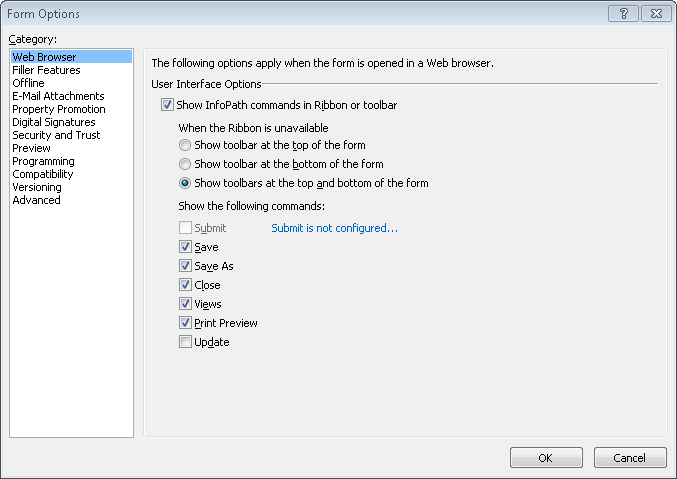
When a browser-based form is filled out, a toolbar is displayed at the top and bottom of the form. You can remove the toolbar or choose to display it only at the top or only at the bottom of the form. The form also displays a set of buttons, such as Save and Views, which can be individually added or removed. A Submit button will not exist until the first submit data connection has been created. If the form’s compatibility level is not that of a browser-based form, this section will not exist in Form Options.
The Filler Features section of the Form Options screen appears as follows.
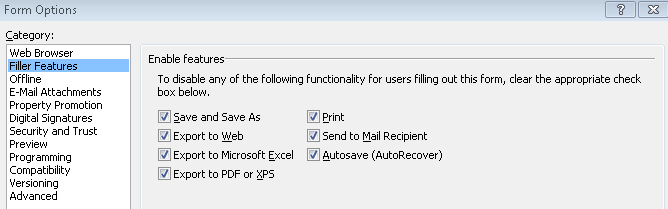
The options here are a bit different than the browser buttons. When using InfoPath Filler, the end user has several choices for exporting the form to other programs. You can disable any of these options by clearing the check box adjacent to it. If the Save and Save As option is not selected in this dialog box, the Save and Save As buttons in the Web Browser tab will be disabled.
Offline Forms
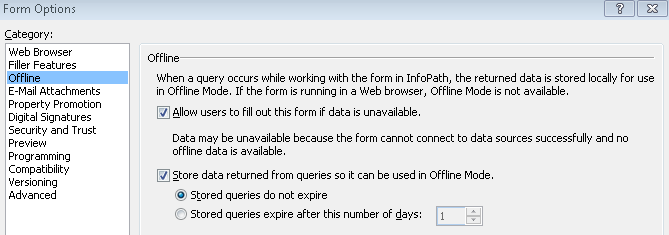
Several different methods are available in the Form Options dialog box for filling out InfoPath forms while the client computer is offline, as shown in the following screenshot. The same settings are applicable to form library and SharePoint list InfoPath forms. None of the offline settings or features apply to forms when they are filled out in the browser.
When forms are filled out while offline, they are saved to a temporary location other than SharePoint, such as a file system or even Microsoft Outlook. In Chapter 6, you learned about submitting forms and about the difference between saving and submitting. When a form needs to be filled in offline, the form does need to have the Save and Save As features enabled in the Filler Features settings.
The offline settings are as follows:
Allow users to fill out this form if data is unavailable This setting refers to data connections that receive information. If this check box is left clear, if the form has data connections that receive data, and if that data is not stored in the form offline, users will receive an error when they try to fill out the form while offline. The error states that “One or more data sources required to fill out this form cannot be reached. Should InfoPath continue trying to connect to data sources for this form?”
Store data returned from queries so that it can be used in Offline Mode This setting refers to data connections that receive data. By default, the retrieved data is stored offline in the form each time it is retrieved. When this check box is left clear, the data will not be stored in the form. When the check box is selected, you can decide how long the stored data will stay in the form before it expires. By default, stored queries do not expire, but the settings can be changed to specify a certain number of days before the data expires and must be retrieved again. With this setting, before going offline, each user would have had to fill out this form by using InfoPath Filler. This would guarantee that the data is stored in the form.
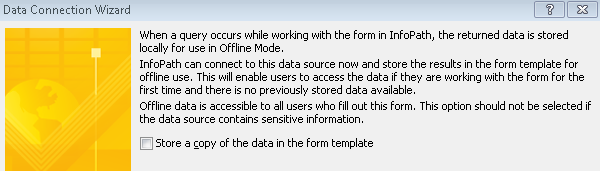
Store a copy of the data in the form template The Data Connection Wizard presents a page that asks about storing a copy of the data in the form template. If you would like the data to be stored in the form template, select this check box. The data will be available in the form, whether or not the user filling out the form has a connection to the retrieved data. This setting is different from the previous bullet point because it is not necessary for each user to have filled out the form in InfoPath Filler to retrieve the data while online. The data is already stored in the form.
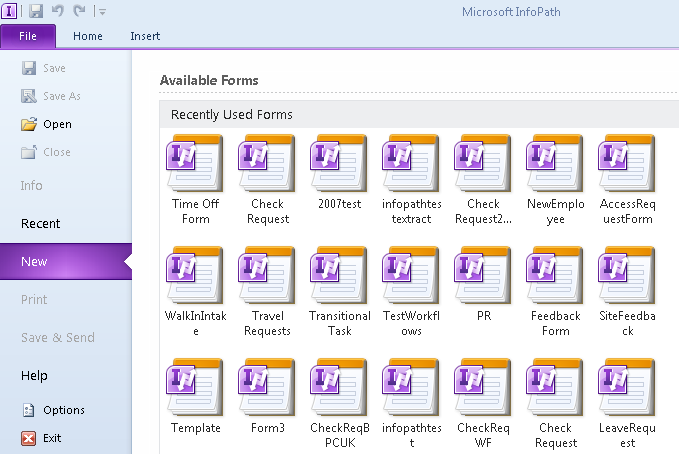
How does a user fill out a form if she can’t get to SharePoint? If an end user has previously filled out a form by using InfoPath Filler, it is easy. The next time InfoPath Filler is opened, the program will remember recently used form templates; these templates will be available under the File menu when New is selected.
After the form is filled out, it needs to be saved to the file system instead of being submitted. When the user is back on the network again, the form’s XML file can be opened and then submitted to SharePoint.
Offline Forms in Outlook
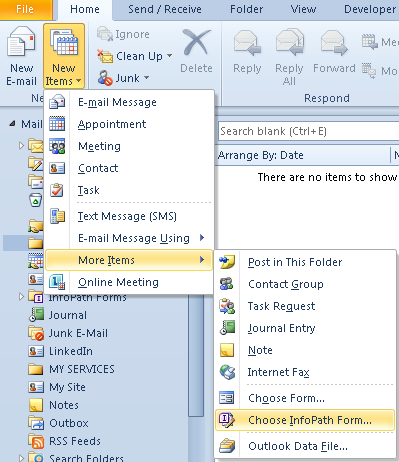
Outlook is another tool to use for filling out offline forms, and it even has some built-in InfoPath integration. InfoPath folders can be created in the Outlook client software, and Forms can be filled out from within Outlook without ever having to go to SharePoint. Be aware, however, that the InfoPath client software is required for using this functionality. From the Home tab, click the New Items button, select More Items, and then click Choose InfoPath Form.
You are then be prompted to pick from a list of the most recent forms that you have filled out on your computer using the InfoPath Filler software. When working offline, you use the form’s Save button to save a copy to Outlook. When back on the network, you need to remember to open that form and click the Submit button to submit it to SharePoint.
Offline SharePoint List Forms
When working with SharePoint lists, the offline capabilities are a bit different. To work with SharePoint list forms and data offline, SharePoint Workspace 2010 is required. This software is a part of the Microsoft Office 2010 suite of products.
Go to any SharePoint list whose form has been customized by using InfoPath. On the ribbon, on the List tab, click Sync To SharePoint Workspace.
Tip
This button will be disabled if the SharePoint Workspace software has not been installed on your computer.
When viewing a SharePoint list inside of SharePoint Workspace, you can use the New button at the upper-left to create a new item in the list, whether you are currently online or offline.
A major difference between offline items in SharePoint Workspace and any other type of offline InfoPath form is that the next time your computer is online, your new or modified forms will automatically synchronize with the server according to the sync settings. With the other offline methods, the end user must remember to open the saved local copy of the form and then click the Submit button to submit to SharePoint; this is not done automatically.
Email Attachments
You can create a type of data connection that allows an email to be sent directly to someone from within InfoPath. Depending on the form’s security settings, the form can be sent in the body of the email, and even filled out inside of the email. When working with InfoPath and SharePoint, the InfoPath email attachment functionality is inferior compared to sending an email via a SharePoint Designer workflow. The following table compares the email attachment data connection with sending an email by using a workflow.
Email Data Connection | Email Via Workflow |
Email body consists of dynamic text only. There is no ability to insert form fields. | You can use form fields inside of a completely dynamic and customizable interface. |
When the email is sent from within the form in the client software, the user is prompted with an extra dialog box that requires him to click a Send button. | As long as the workflow has been set up to run automatically when an item is created or changed, the email be sent without requiring any action on the user’s part. |
Tip
Chapter 10, and Chapter 11, provide information about how to create SharePoint Designer workflows.
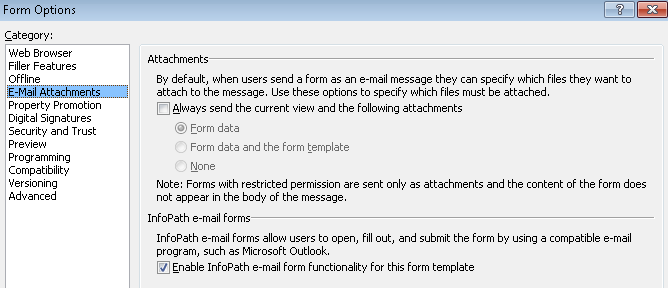
When email attachment data connections are used, there are settings in the Form Options dialog box about which you should be aware. The following are the attachment options:
Always send the current view and the following attachments Select whether an attachment should be included in the email.
Form data The XML file is attached.
Form data and the form template The XML and the XSN template are attached.
None There are no attachments. Only a snapshot of the current view will be sent in the body of the email.
Enable InfoPath e-mail form functionality for this form template With this check box selected, users can fill out forms from within Outlook, as was described in the Offline Forms section, earlier in this chapter.
Form Preview
In several of this book’s exercises, forms have been previewed to see what they look like before being published. Previewing a form is a quick way to evaluate its appearance when it is being filled out, or to test rules and logic.
The Preview button is on the Home tab, and a smaller version of it is in the Quick Access Toolbar.
There are some extra settings for previewing forms that can be especially useful when troubleshooting. Take a look at the Preview section in the Form Options dialog box.
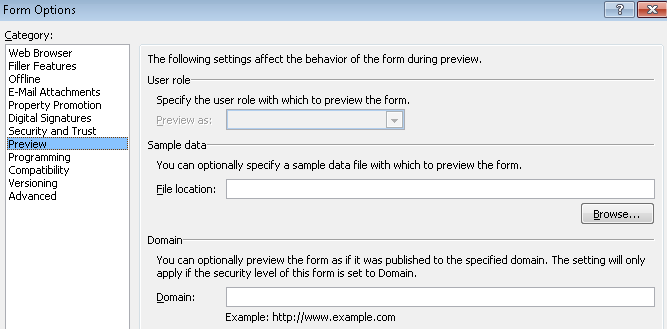
The following settings on the Form Options screen can be uniquely useful:
User Role User roles are available for non-browser-based forms only. For filler forms, when user roles have been created in the form, select the name of a role in the Preview As drop-down box. The next time you click the form’s Preview button, you will be viewing it as if you were a member of that specific role.
File location This setting is great for troubleshooting. Browse to select the URL to one specific form that has been filled out (XML file), or simply paste the URL in the box. The next time you use the Preview button, the form is displayed as that specific form. An example of a use for this setting is when a user informs you that her form is giving an error or that she doesn’t see a field that is supposed to be there. Use this feature to preview that specific form to dig deeper into the problem. As opposed to opening the form in the same way the end user would open it in the browser or filler, in InfoPath Designer you can put fields on the form or switch to different views that the end user might not have the ability to see. The syntax for the URL is http://YourSharePointSite/YourFormLibrary/OneSpecificFile.xml.
Default Values
In the following exercise, you will create default values for rows in a reimbursement request and test the functionality by previewing the form. Before getting started with the steps, click the Preview button to take a look at the list of expenses on the form. Notice that the list of expenses comprises two rows by default. More rows can be added by clicking Insert Another Expense. Close the preview. The goal of this exercise is to supply several default rows in this table, with each row having a common type of expense selected.
Note
SET UP Open ContosoReimbursementform.xsn in Design mode, and then switch to the New view. This is done on the Page Design tab by clicking the View drop-down box and then selecting the New (default) view.
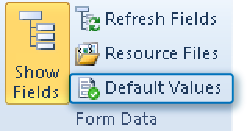
On the Data tab, in the Form Data section, click Default Values.
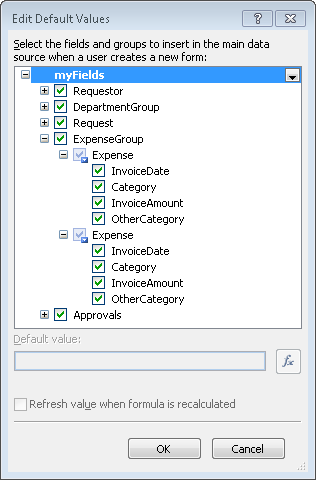
Expand the ExpenseGroup section, and then expand each Expense node. The blue icon next to each Expense section indicates that it is part of a repeating control.
In the first Expense section, click the Category. In the Default value box, type Meals.
Click the preview button in InfoPath to see the resulting behavior. The first row in the list of expenses has a default value now in the Category field.
Close the preview.
On the Data tab, click Default Values again. A row will be added for each type of expense, which will give people a bit of a head start when filling in this reimbursement form.
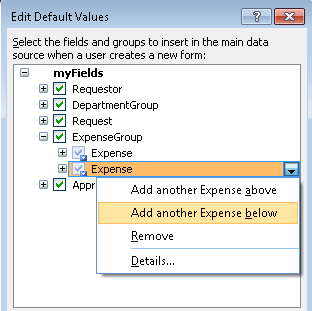
In the second Expense section, click the drop-down box, and then click Add another Expense below.
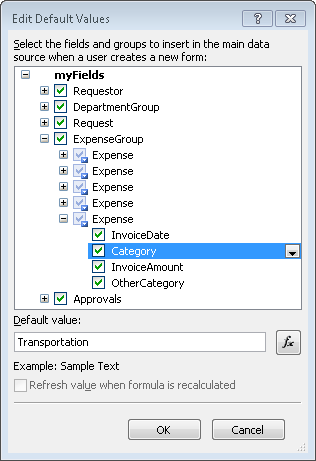
Repeat step 7 twice, adding a fourth and fifth expense section.
Use the values in the following table to fill in the categories of all five expense sections under ExpenseGroup. This is a repeat of step 2.
Expense Section
Category Default Value
1
Meals
2
Airfare
3
Lodging
4
Parking
5
Transportation
Each of the five category fields now has default values. Click OK.
Preview the form again.
The end result is that the form has five rows in the list of expenses by default, and a different category is already selected for each row. More rows can also be added by clicking Insert Another Expense.

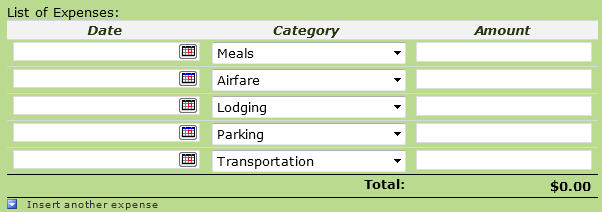
Anytime a repeating control is required to have a pre-existing number of rows, this method can be used to add more rows and optionally add default values to them.
Advanced Functions
In Chapter 5, you were introduced to InfoPath functions when we introduced the concepts of functions and then used the concat and now functions in an exercise. While most of the functions in InfoPath are self-explanatory, there is one common question that form designers have that concerns use-cases for which the requirement dictates the necessity to have an automatic conversion of some text from uppercase to lowercase or vice versa. Your forms might need this for any number of reasons—for example, to compare two fields for which case sensitivity matters. Another example is ensuring that a field that must be all uppercase or lowercase in fact is—even if the user didn’t enter it properly.
The InfoPath function that supports this requirement is called Translate. This function has three arguments that will return a converted text string. The first argument defines what the text string is, the second argument states which characters to change in the string, and the last argument specifies what to change the characters to. The characters in the second argument are converted to the characters in the third argument’s matching position. Because the characters in the second position are converted to match the third argument, Translate is also a useful function for stripping unwanted characters out of a string by providing a null value in the third argument.
The following exercise will help you to understand how to use Translate to convert the case from whatever the user entered to all lowercase.
Add two Text Box controls to the form.
Right-click the second Text Box control to open the properties dialog box.
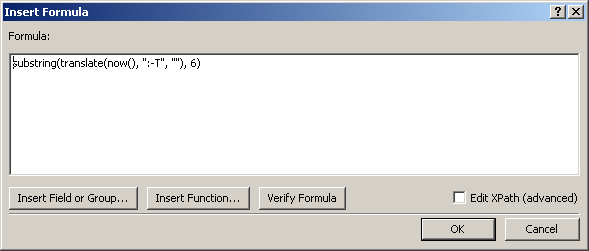
Click Default Value, and then click the Insert Formula button.
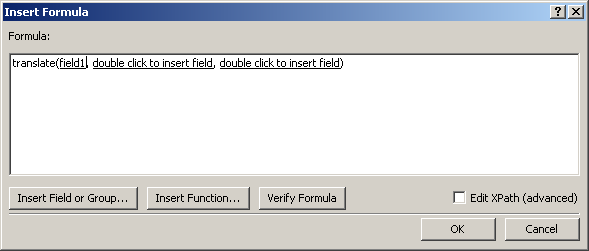
Select Insert Function, and then in the Text category, select Translate.
In the Insert Formula dialog box, double-click the first insert field link, and then select the first text box control you added to your form (probably named Field1).
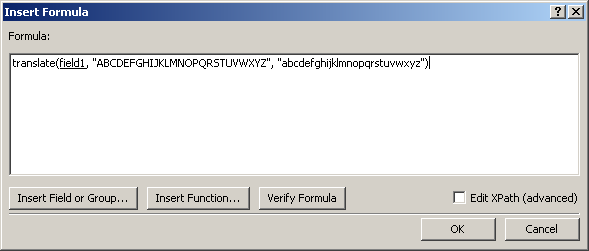
Replace the other two double click to insert field items with the following text: “ABCDEFGHIJKLMNOPQRSTUVWXYZ”, “abcdefghijklmnopqrstuvwxyz”. This must be typed exactly as shown.
Click OK twice to go back to the form, and then preview it.
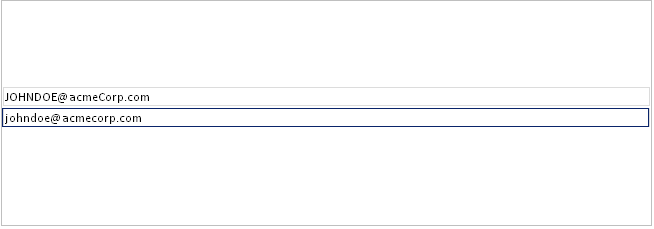
Enter some combination of uppercase and lowercase characters in the first text box, and press Tab.
You should see the characters appear in the second text field as a default value, but all have been converted to lowercase.
Note
CLEAN UP Click the Save button to save the XSN file to your computer if you want to keep it, and then close InfoPath Designer.
If you’d like to see another, more sophisticated example of how to use the handy Translate function, open the Help Desk template from Chapter 13. In this form, the Create New Request button has a submit rule on it. The first Action on the Submit rule is to set the RequestID field value.
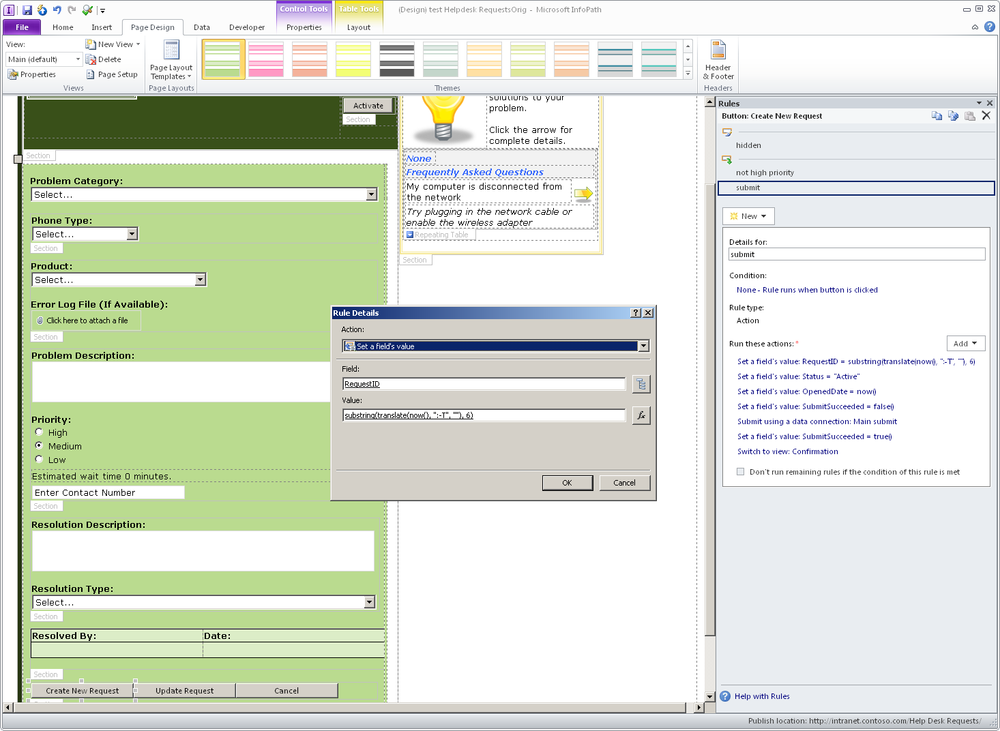
The Translate function is used here in combination with two other functions, SubString and Now.
The goal here is to create a Request ID that is generated from the Now function but to strip off several unwanted characters and start returning values at the sixth position. So the Translate function takes the Now value as its first argument. The second argument shows what text you want to be replaced. Any text that is :, or –, or T will be replaced by the third argument, which is just a null value in quotes. In other words, get rid of anything that equals :, or –, or T.
To further illustrate and clarify, in the following screenshot, the first field is a standard text control with the Now function applied with no modification. The second has the more complex version of the formula from the Help Desk form applied to it.
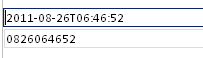
You can see that by applying the functions properly, the form is stripping out unwanted characters and leaving only the month (08), the date (26), and the numbers that represent the current hour (06), minutes (46), and seconds (52). We end up with a very effective way to use a combination of functions to deliver a unique integer value for the ID field of the form.
Key Points
The Rule Inspector can be used for troubleshooting and documentation of rules.
Forms can be merged when repeating control information needs to be displayed in one form all together, using data from multiple forms.
Relinking forms reestablishes the connection between an XML file and its lost XSN template.
You can choose the toolbar buttons that are displayed in the browser and InfoPath filler.
There are several different methods by which users can fill out forms when they are not on the network, with several different settings for the form designer to understand.
SharePoint Designer workflow emails are preferable to sending a form via the email data connection.
Specific forms can be previewed, which can be used as a troubleshooting method.
Default values can be set up for repeating controls, which is applicable when there is a set of static choices.
The Translate function is a useful and powerful mechanism for manipulating text, especially when combined with other functions.