
Chapter 9. Working with the SharePoint User Profile Web Service
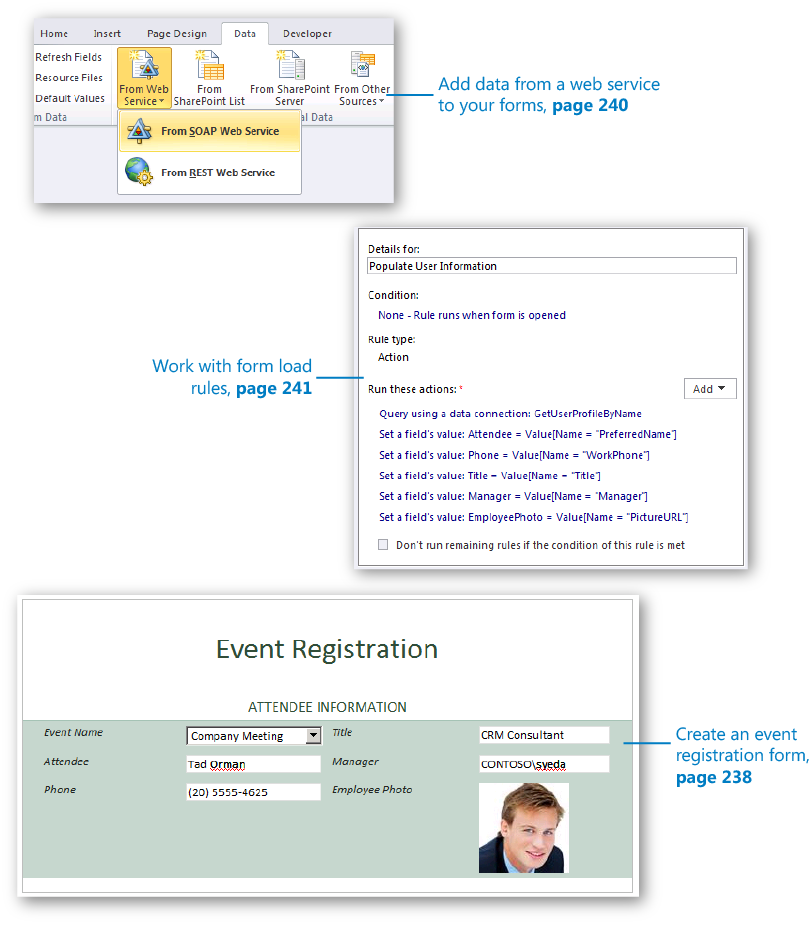
Chapter at a Glance
If you’ve never worked with XML web services before, this chapter will give you a solid introduction to understanding and learning the techniques involved in consuming data from a web service into an InfoPath form. Even if you have worked with web services in the past, you should still find this chapter useful in your work with InfoPath.
The content in this chapter focuses on specific tactics for integrating data from the SharePoint User Profile web service. The basic idea of web services is to take advantage of two very common standards (XML and HTTP) and build on top of them a technology that allows communication and interoperability between software applications. The primary technical components of a web services platform are as follows:
Web services are typically created by software developers or built in to packaged software applications so that people like you, who are doing data integration work, can easily consume data from those applications. SharePoint 2010 publishes many of its various data sources via web services in an easy-to-consume format, including the data in lists and libraries. Because so much integration is already built-in between SharePoint and InfoPath, for most forms you might not need to resort to directly implementing web services in your solution. However, for InfoPath + SharePoint scenarios, one common scenario for which you need to use web services comes up frequently: when you need to query SharePoint for specific properties about a user that are above and beyond what the people picker control provides.
The people picker control in InfoPath 2010 provides a built-in method with which your forms can easily interact with user account names from SharePoint. But what if your form requires more information? What if you need a way to populate fields with the name of a user’s manager, a user’s phone number, or their work email address? These types of data properties about a user can easily be added to your form by creating a web services data connection to SharePoint. You can use this to supply your InfoPath form with a variety of information about any user who exists in your SharePoint user database (typically, all the users in Active Directory).
The particular web service that “advertises” the user profile properties via web services is called the User Profile web service. The specific operation of this web service, which returns all of the user profile information, is the GetUserProfileByName method. You will have ample opportunity to work with the GetUserProfileByName method in this chapter’s exercises.

The User Profile database in SharePoint is the same data source that is used to populate the My Sites, so some of the user properties available to you are things that you might already be familiar with—for example, Work Phone and Job Title. The following screenshot of a SharePoint My Site page shows some of the typical SharePoint user profile properties that you might want to reuse in your forms.
Tip
You don’t need to use a SharePoint My Site to take advantage of the SharePoint User Profile web service. It is used here purely for the purpose of illustrating the user properties.

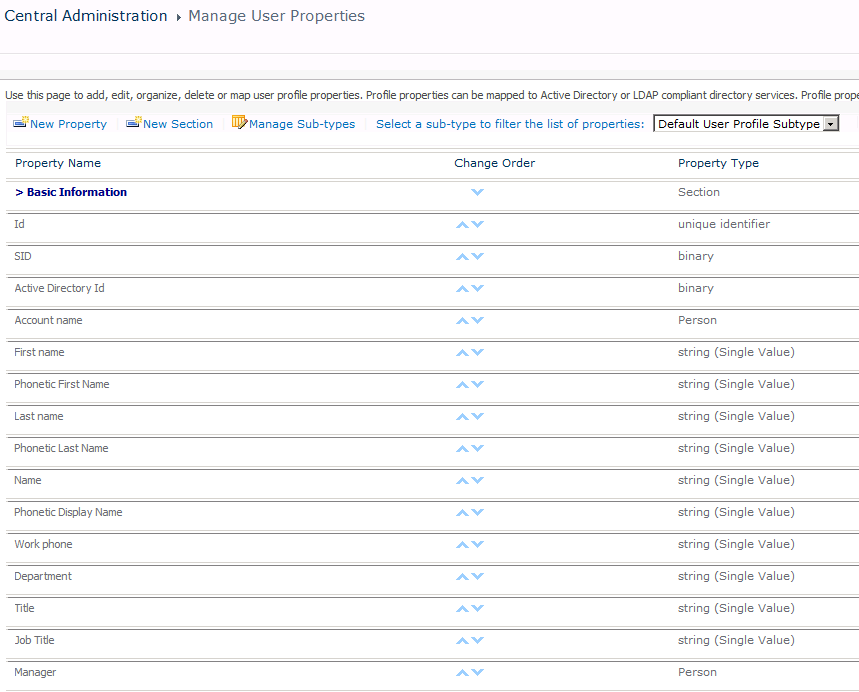
If you have access to the Central Administration console in SharePoint, you can go to the Manage User Properties page to see most of the properties that are available via the User Profile web service. The following screenshot shows some of the most common user properties from the User Profile database.
Building the Foundation of the Event Registration Form
In the following exercise, you will begin to create an event registration form that can be used in almost any business scenario for which users need to register for an event, such as training, travel, conferences, and so forth. The form will have five fields of employee data pulled from the SharePoint User Profile SOAP web service: user name, picture, phone, title, and manager. Later in the chapter, you will configure the form so that all the information is pre-populated by using Form Load rules. In the final exercise in this chapter, you will add a button and a people picker control with which the form user can populate the form with data about any user from your SharePoint environment.
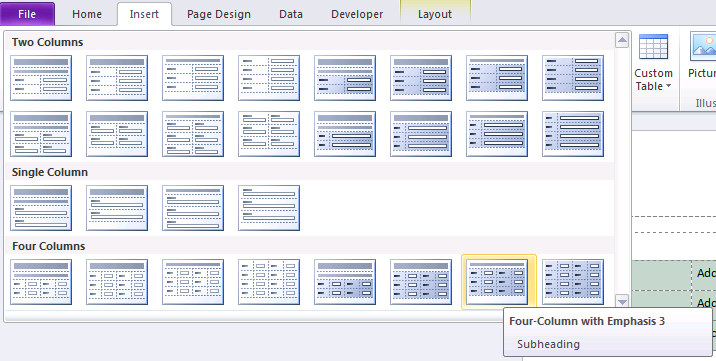
Open InfoPath Designer, and create a new blank form. Change the title to Event Registration form. With your cursor active in the bottom row of the table, on the ribbon, click the Insert tab. Insert the Four Column with Emphasis 3 – Subheading table. Change the subheading to Attendee Information.
Add labels for the six fields as follows: Event Name, Attendee, Phone, Title, Manager, and Employee Photo.
For event name, add a Drop-Down List Box control. For Attendee, Phone, Title, and Manager, add text fields. For Employee Photo, add a Picture control. When you insert the Picture control, make sure that you choose the As a link option.
Rename the fields as follows, by using either the Control Tools tab or the Fields pane:
EventName
Attendee
Phone
Title
Manager
EmployeePhoto
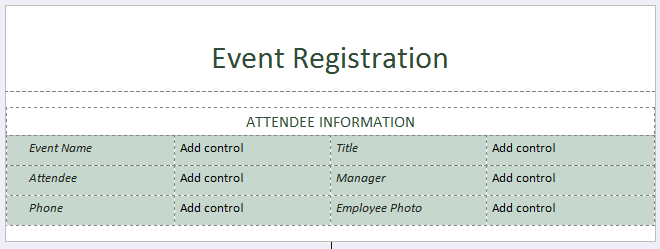
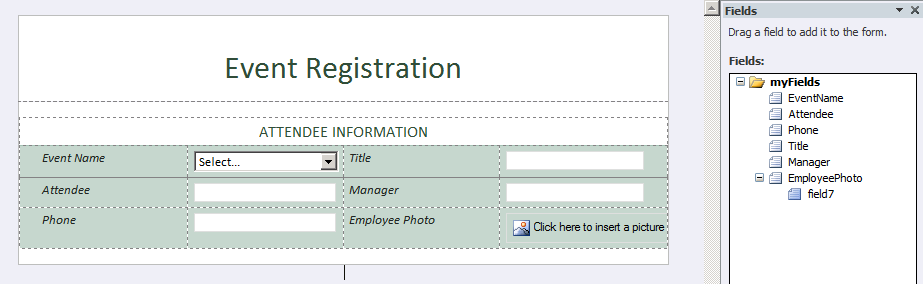
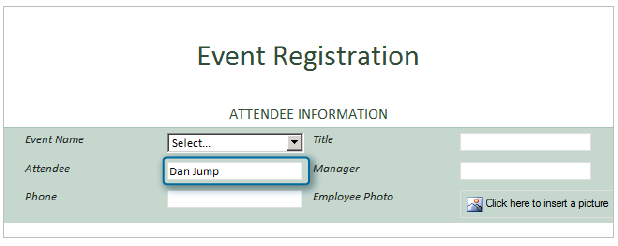
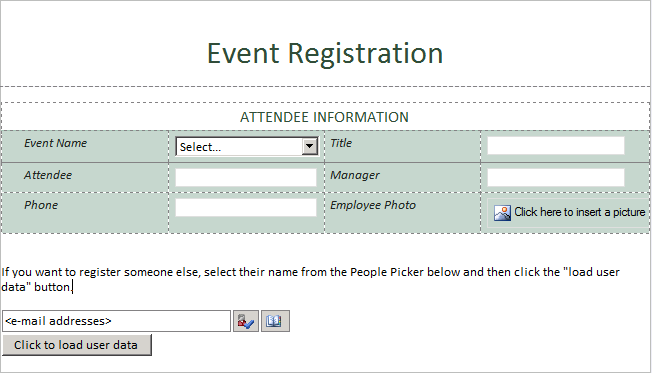
On the properties of the Event Name Drop-Down List Box control, add a few event types, such as Annual Sales Conference, Company Meeting, and Holiday Dinner Party. Your form and fields should now appear as shown in the following illustration.
Add a data connection to the User Profile web service. On the ribbon, on the Data tab, choose From SOAP Web Service.
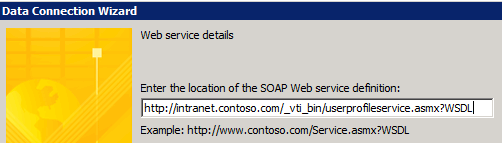
In the Data Connection Wizard, enter the URL for the SharePoint User Profile web service.
The format of the URL is as follows: http://sharepoint/_vti_bin/UserProfileService.asmx?WSDL (replace sharepoint with the URL to your SharePoint website). Click Next.
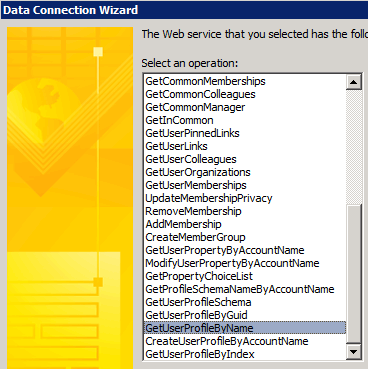
On the next page, you are presented with all the operations that the User Profile web service provides. Scroll down and select GetUserProfileByName.
This is the operation that you will use to pull the user properties from SharePoint.
Click Next three times. Do not change anything from the defaults until you get to the final page of the Data Connection Wizard.
On the final wizard page, clear the Automatically retrieve data when form is opened check box. This is done primarily for performance reasons so that the form isn’t trying to load too much data unnecessarily. Click Finish, and then close out of the Data Connections Wizard.


The form now has a connection to the SharePoint User Profile web service, although you haven’t yet actually invoked any specific data from the web service in the form. In the following exercise, you will add rules that will connect specific fields in the form to the appropriate XML data being returned by the web service. This will require some fairly extensive navigation of the data source.
Note
CLEAN UP Be sure to save your form template. You will continue building on it in the following exercises of this chapter.
Now that you have created a data connection to the User Profile web service in the previous exercise, you can connect the fields in the form to their respective counterparts in the SharePoint User Profile. You can accomplish this in a variety of ways. Because the web service is simply a secondary data connection in your form, you can populate the fields in the same manner that you can with any other receive data connection–via rules, default values, or controls that provide lookup capabilities. For the event registration form, the goal is for the form to pre-load information about the user who is currently logged on. This minimizes the amount of information that the user must input manually. The best way to achieve this is through the use of form load rules, which you will add in the next exercise.
Creating Form Load Rules on the Event Registration Form
In the following exercise, you will add form load rules that connect the four text box fields and the picture control to the User Profile web service. When using the User Profile web service, you are required to bind the controls on your design surface to the appropriate fields from the web service. This process requires navigation and filtering of the user profile schema to retrieve to the proper data. You will perform those steps in the next exercise.
When you query the User Profile web service, it returns user profile information in repeating PropertyData nodes in the form’s secondary data source. The Name field stores the name of the property. The corresponding value is contained in the Value field, located within the ValueData node. This terminology might seem confusing and abstract right now, but after you have added the connections a few times in the exercise, the picture will become more clear. Essentially, you will pass a filtered parameter to tell the web service which specific user profile property you want—for example, “Work Phone”. Each control that you want to populate with user profile data will need to make this connection to the web service; typically, rules are the most effective way to accomplish this.
Note
SET UP In InfoPath Designer, open the Event Registration form that you saved from the first exercise in this chapter. Alternatively, you can open the file Event Registration Post Exercise 1.xsn from the practice files. This exercise assumes that you have access to a SharePoint server with user profiles.
In the Rules pane, create a new Action rule called Populate User Information.
The condition should be that the Attendee field is blank. You don’t want the original attendee’s information overridden next time someone else opens the form. These fields only need to be populated when the form is being filled out for the first time.
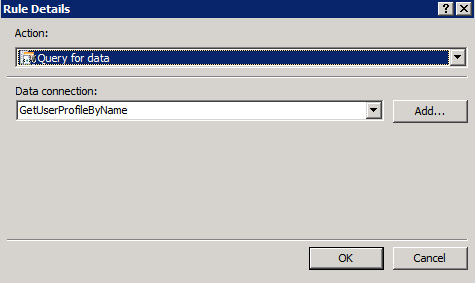
If you recall from the last exercise, you cleared the check box in the Data Connection Wizard that asked whether to automatically retrieve data every time the form was opened. Because you cleared that check box (for performance reasons), you now need to add a Query for Data action as the first action in the form load rule. This will query the GetUserProfileByName secondary data connection so that the data is readily available to be used in the form.
Select the GetUserProfileByName data connection.
Add five Set a Field’s Value action steps for the form load rule, one for each of the five user data fields that you will pull from the User Profile web service.
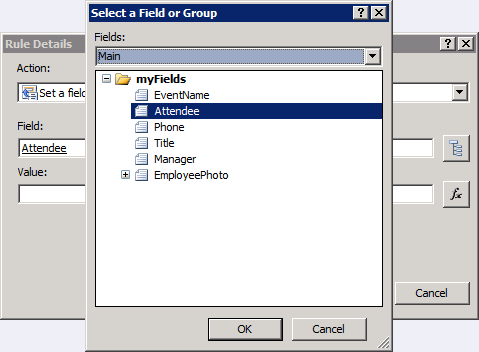
Each one of the action steps will require you to connect the respective control to the appropriate XML node from the web service. Add a Set a Field’s Value step, and then select the Attendee field from the Main data source as the one you want to work with.
Add the correct entry from the web service to the Value field of the Rule Details. Click the formula button, and then select Insert Field or Group.
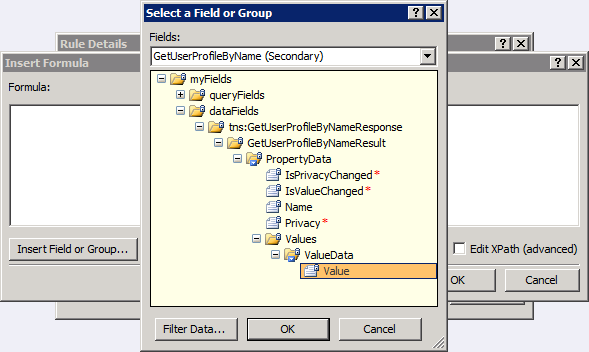
In the Select a Field or Group dialog box, change the drop-down box to the GetUserProfileByName(Secondary) data source.
In the dataFields folder, expand everything in the tree until you can access the Value field; select it, but do not click OK yet.
To get at the specific field of data that matches Attendee, the Value field requires you to pass a filtered parameter.
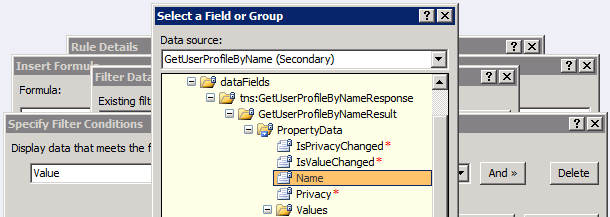
Click the Filter Data button, and then click Add. In the first drop-down, click Select Field or Group. The Name field is the one that we will filter on for all the user profile properties. Select the Name field within the PropertyData folder, and then click OK.
Leave the second drop-down set at is equal to. In the third drop-down, select Type Text.
In this field, you will enter the specific data property you want to pull from the user profile service. For the Attendee text box, the user profile field that makes the most sense is PreferredName because it is basically in the general “first name last name” format. Therefore, enter the text PreferredName, and then press the Tab key.
Click OK several times until you get back to the Design surface.
If you preview your form now, you should see that the Attendee field is filled in with whatever user account you are currently logged on with. Remember, you need to be on a system that has access to a SharePoint site with user profiles for this to work.
Now you need to add four more action steps to the rule, repeating steps 5–11 for each one for the remaining fields of user data. When you get to step 10 in the exercise, replace the PreferredName text in the condition filter with the following values:
For the Phone field, use the text WorkPhone.
For Title, use Title.
For Manager, use Manager.
For Picture, use PictureURL.
If you’ve done the rest of your steps properly, the rule in your Rules pane should now look as shown in the following illustration:
Preview your form. It should now appear as shown in the following screenshot, except all the values will be replaced by the relevant values for the logged-on SharePoint server user.
Tip
Notice that the Manager data comes back in the SharePoint user account name format (domainusername). This option is available for the currently logged-on user also, if you’d rather have the current user name in account name format rather than the standard name, use AccountName in the filter conditions rather than PreferredName.


Congratulations! You now have an event registration form that pre-populates five fields with user data from the SharePoint User Profile Service.
Adding a People Picker and Submit Button to the Event Registration Form
At this point, the registration form is great for a scenario in which whoever is currently logged on is filling out the registration form for themselves. But what if you would like to give the option for the person who is logged on and performing the data input to register someone else? The form, in its present configuration, has been designed to populate on form load with the information of the currently logged-on user. So how do you make that transition to populating a different user’s profile data in the form? The tactic in this exercise is to utilize a people picker control along with data from the User Profile web service, and we’ll also add a button that will drive another set of rules.
Note
SET UP In InfoPath Designer, open the Event Registration form from the previous exercise in this chapter. Alternatively, you can open the file Event Registration Post Exercise 2.xsn from the practice files. This exercise assumes that you have access to a SharePoint server with user profiles and that you have published the Event Registration form to a SharePoint form library.
Add a Person/Group Picker button on the form below the table. Also add a line of instruction to inform your users why the people picker control is there.
Add a button control below the people picker. In the button properties, change the text to Click to load user data, or something similar.
Make the button the active selection, and then open the Rules pane.
You will use this button to invoke a new set of rules on the form to reload the five profile fields with the user data for whomever is selected in the people picker.
Add an Action rule for the button named Load Alternate User Data.
Add an action to set a field’s value in the rule.
In the Field dialog box, navigate to the GetUserProfilebyName(Secondary) data source and drill into the queryFields group until you get to the AccountName node. Select it, and then click OK.
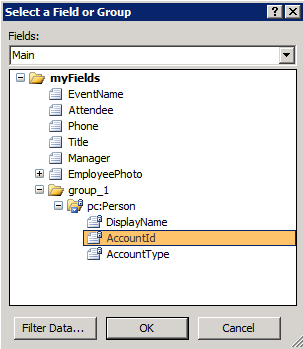
Click the formula button, and then choose Insert Field or Group. Browse to the group_1 group (or whatever your Person/Group Picker group is named), and then select the AccountID node.
Important
The preceding rule enables the subsequent rules to populate the form fields with data about a user selected in the people picker control, rather than the user who is currently logged on.
The second rule is also critical. You need to instruct the button to refresh the connection to the User Profile web service so that your subsequent rules can find the necessary data.
Add a Query for data step for your GetUserProfile ByName data connection. That should be all that’s needed to ensure that the form will have a fresh connection to the web service when the button is clicked.
Now that you’ve used a rule to tell the form to look to the people picker to determine which user’s data to use, you must add the same rules that you added for the form load in the previous exercise in this chapter. Specifically, you need to perform steps 5–11 of that exercise.
These rules will reload the appropriate data for each field when the button is clicked. You can either refer to the previous exercise or see the steps summarized below:
Add a Set a Field’s Value step, and then select the Attendee field from the Main data source as the one you want to work with.
Click the formula button, and then choose Insert Field or Group.
In the Select a Field or Group dialog box, change the drop-down box to the GetUserProfileByName(Secondary) data source.
In the dataFields folder, expand everything in the tree until you can access the Value field; select it, but do not click OK yet. The Value field requires you to pass a filtered parameter to get at the specific field of data that matches Attendee.
Click the Filter Data button, and then click Add. In the first drop-down box, choose Select Field or Group. The Name field is the one that we will filter on for all the user profile properties. Select the Name field underneath the PropertyData group, and then click OK.
Leave the second drop-down set at is equal to. In the third drop-down box, choose Type Text. In this field, you will enter the specific data property that you want to pull from the User Profile Service. For the Attendee text box, the profile field that makes the most sense is PreferredName. So enter the text PreferredName, and then press the Tab key.
Click OK several times until you get back to the Design surface. Preview your form now. Select a user other than yourself in the people picker control. You should see that the Attendee field is filled in with whatever user account you have selected in the people picker.
Add four more action steps to the rule, repeating the steps for each of the remaining fields of user data.
Just as in this chapter’s previous exercise with the form load rules, when you get to the formula step in each rule, replace the PreferredName text in the condition filter with the values as follows:
For the Phone field, use the text WorkPhone.
For Title, use Title.
For Manager, use Manager.
For Picture use PictureURL.
If you have entered your action steps properly, your rule should now appear as shown in the following illustration.
Save the form, and then on the ribbon, click Quick Publish to update the form library with your changes.
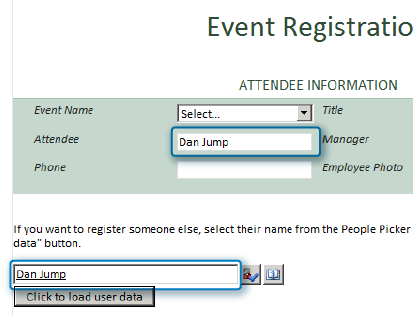
Preview the form. Select a different user in the people picker, and then click the button. Your form should load up with the other user’s information, as shown in the following illustration:
Now if you want to finish off the form for real-world usage, you would definitely want to add a Submit button to the form with a connection to the form library in which it is hosted.


Congratulations! You have a functional event registration form that utilizes the SharePoint User Profile web service!
Key Points
SharePoint User Profiles are a rich source of information that can be used to populate data in your forms.
InfoPath can connect to various types of web services, including SOAP web services such as the SharePoint User Profile web service.
Form load rules are a great technique to pre-populate a form with data.
Connecting form fields to web services is not difficult but requires careful navigation of the secondary data source.
The InfoPath people picker control, along with rules, can be used to populate a form with user data from a SharePoint user profile.