Chapter 4. Working with SharePoint List Forms
Chapter at a Glance
In Microsoft SharePoint 2010 and SharePoint Online, SharePoint list forms can be customized by using Microsoft InfoPath 2010. By default, when SharePoint lists are created, such as tasks, contacts, and other custom lists, the forms that we fill out are .ASPX web pages. The problem with these types of web page forms is that customizing them is not an easy task and usually entails custom development and code modification.
With the ability to quickly and easily customize SharePoint list forms without the need for code or developers, professional-looking business forms can be created efficiently. What is gained by converting a list form to InfoPath? Reasons can range from simply modifying the colors to have a standard corporate look and feel to using advanced concepts such as rules to hide and show controls based on certain conditions.
Basics of a SharePoint List
A SharePoint list is a simple list of items made up of one or more columns. It can be compared to a spreadsheet or a table in a database. In its simplest form, a SharePoint list consists of a single column called Title; this basic list is called a custom list. When a SharePoint list is first created, the custom list template can be selected and any needed columns can be added and modified to create a business solution. Besides a simple custom list, there are several other templates that you can start with instead, such as the contacts template if you are creating a list of people. A SharePoint list consists of some of the following fundamental components:
Columns Also referred to as fields, columns are the attributes of all of the items that will be entered in the list. For example, for a contacts list, included columns might be First Name, Last Name, Email Address, and Job Title. Each column has a column type that is selected when the column is created. The most common column types are Single Line Of Text, Multiple Lines Of Text, Choice, Number, Currency, Date And Time, Lookup, Yes/No Check Box, Person Or Group, Hyperlink Or Picture, Calculated, External Data, and Managed Metadata.
Views Views are simply another way of looking at the same list of data. They are also considered to be a very simple reporting method. For each different view that exists in a list, different columns, sorting, grouping, and filtering can be set up. You also have a few more options in view settings, such as inline editing, styles, and totals.
Items Also referred to as records, items are the data that exist in the list. In the example of a list of contacts, each item would be a different person.
Versioning On each list and library in SharePoint, versioning is a setting that can be turned on. When versioning is used, each time someone saves changes to an item, it is saved as a new version. This gives a nice detailed version history that can be explored, which lists not only who made the change and when, but what fields were changed. Older versions can be viewed and even restored.
Alerts Each user who visits a SharePoint site has the ability to create alerts on lists or items about which they want to stay informed. An alert is an email alert or text message that is sent each time data in the list changes, and several different settings can be configured for each alert. Choose from settings such as whether you would like to be notified when only new items are added, when existing items are changed, and if the notification should come immediately or on a daily or weekly basis.
Forms When entering items into a list, the form is the page with the text boxes, drop-down boxes, and other controls that are filled out with data about that individual item. The transition between the different forms is seamless to the end user, but each list contains three basic forms by default, which will be covered a little later in the chapter.
As you can see, SharePoint lists alone contain a rich set of functionality, even before forms are customized. Concepts such as views and alerts are great as basic methods for reporting and workflows. All of this exists before InfoPath is brought into the picture.
What does InfoPath 2010 give you when it comes to customizing a SharePoint list? Before SharePoint 2010, if list forms needed to be customized, it was done by modifying the code behind the form, using SharePoint Designer or Microsoft Visual Studio. In some cases, it could be done by using a data view Web Part for simple changes, but for more complex functionality, it required some programming knowledge. With InfoPath 2010 and SharePoint 2010, these browser-based forms can be customized so that they are not only visually enhanced but you can also take advantage of the robust features such as conditional formatting. This can all be done with zero programming knowledge, just a little understanding of basic logic.
Note
Even though we will use the InfoPath Designer 2010 client to create these forms, the client computers will simply use the browser to fill out forms, so no special software is needed on the end-user computers.
In the following exercise, you will create a travel request as a SharePoint list and customize the list’s form using InfoPath.
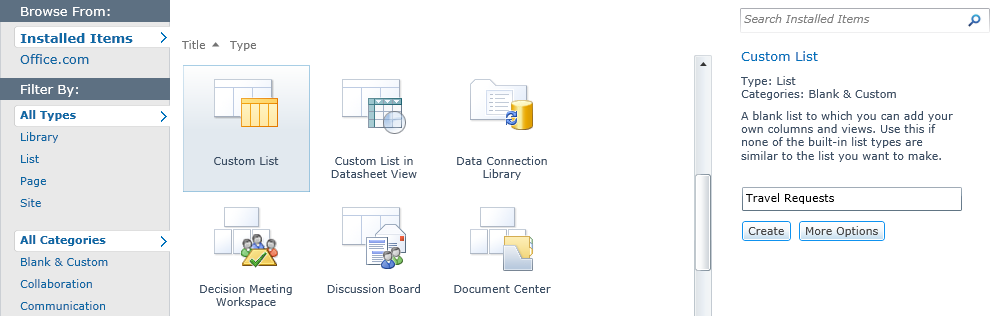
Click Site Actions, choose More Options, and then choose Custom List as the template. Type Travel Requests as the list name, and then click Create.
Now that the list has been created, you need to create all of the columns needed for a travel request.
On the ribbon, click the List tab, and then click the List Settings button.
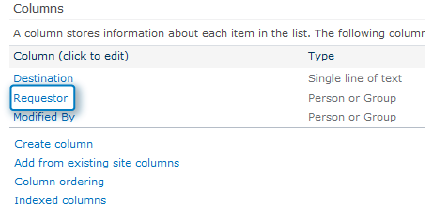
Scroll down to the Columns section, click the name of the Title column, and then rename it Destination. Click OK.
Click the Created By column, rename it Requestor, and then click OK. Every list and library in SharePoint has this Created By field, and it can always be renamed.
Click Create column, and create several more columns, as itemized in the following table.
Column Name
Data Type
Other Settings
Begin Date
Date and time
End Date
Date and time
Event Name
Single line of text
Event Type
Choice
Drop-down menu: Conference, Meeting
Choice
Radio buttons: Presenting, Learning, Marketing
Estimated Cost
Currency
Number of decimal places: 2
Explanation
Multiple lines of text
Specify the type of text to allow: Plain text
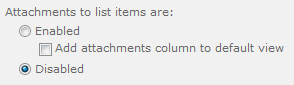
While still on the List Settings page, click Advanced Settings. For the attachments setting, change it to Disabled, click OK at the bottom of the Advanced Settings page, and then click OK to dismiss the pop-up warning.
Now it’s time to create a travel request before converting the list form to InfoPath. In the breadcrumb trail at the top, click the name of the Travel Requests list to open the default view of the list.
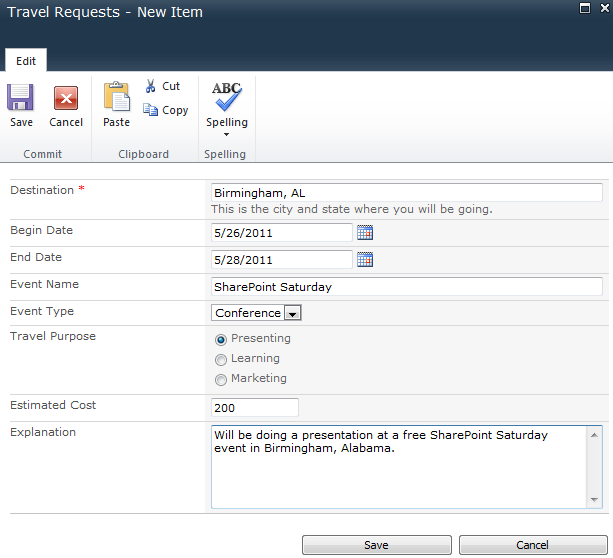
Click the Add new item link next to the green plus symbol, and then fill out a new travel request.
Click Save after all the information has been filled in.
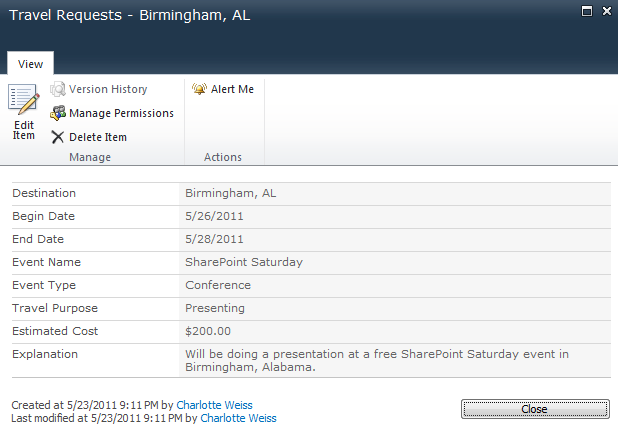
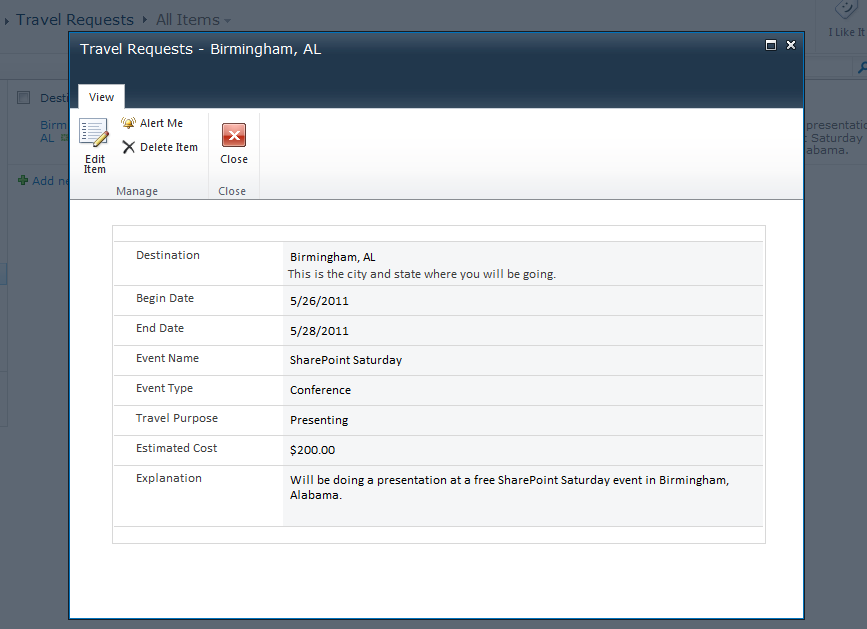
Now that the first list item has been submitted to the list, notice that one row (record) of data appears in the list. Click the name of the new item (Birmingham, AL) to display it.
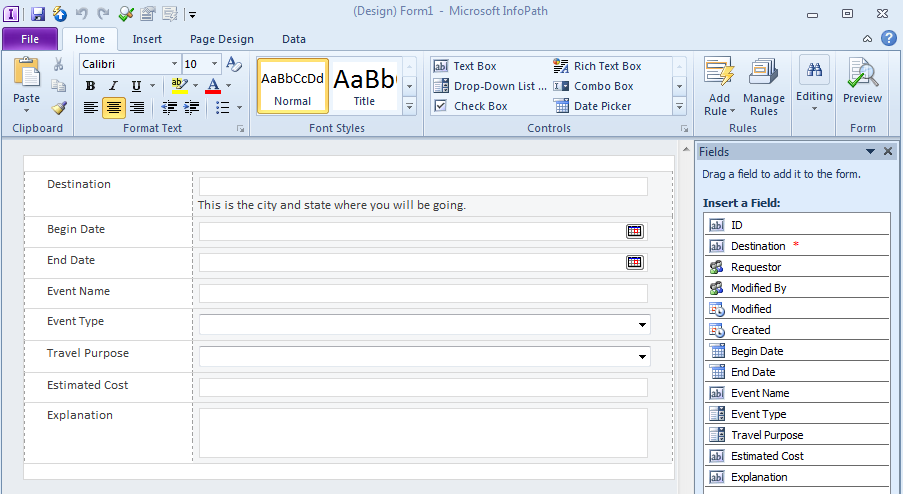
Now the form can be customized by using InfoPath Designer 2010. In the Travel Requests list, on the ribbon, click the List tab, and then click the Customize Form button.
Tip
A best practice is to create all of the form fields first and then start customizing the form as a last step so that the layout of the fields on the form has to be done only once.
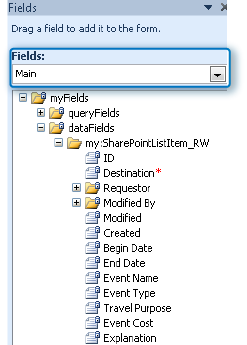
In InfoPath, notice that the fields are all listed in a Fields pane on the right side of the screen and that the form itself looks a bit similar to the regular list form before it was converted to InfoPath.
Click the Quick Publish icon at the upper-left corner, click OK on the confirmation pop-up box, and then close InfoPath.
With the Travel Requests list still open in the browser, it’s time to take a look at the form again. Click the name of the previously created list item (Birmingham, AL) to view it.


Finally, a simple list has been created and customized by using InfoPath, and the differences between the two types of forms are visible. We will further explore these differences and how they impact your form design decisions.
List Form Layout
The layout of the form consists of the way it looks visually, its colors, and the arrangement of controls (such as in tables). One of the main benefits of converting a SharePoint list to InfoPath is that you have more control over the way the form looks. It is important to design forms that make sense and are easy to understand. Think about the form from the perspective of the person filling it out, and develop the form so that it will be easy to use. The layout, look, feel, and overall structure are important concepts in making a form that is polished and functional. When it comes to modifying a form’s layout, the page design and table layout options are no different than when working in an InfoPath form that has been published to a form library. Not only do you have a plethora of table layout templates to choose from, you have many creative possibilities, including the ability to create custom tables, modify cell padding and shading, and insert images. It can seem a bit overwhelming at times, getting the form to look just right. The exercises in this chapter will give you the confidence to create some well-built, easy to use forms.
In the following exercise, you will customize the layout of the InfoPath form to make it more professional-looking. With the 2010 layout and table features, you will be on your way to creating some great forms.
Note
SET UP In the web browser, open your SharePoint site and navigate to the Travel Requests list that was created in the previous exercise.
On the ribbon at the top of the Travel Requests list, on the List tab, click the Customize Form button.
To wipe out the default layout and start from scratch, the existing layout needs to be deleted. Click the gray square at the upper-left of the table to select the whole table. Press the Delete key on the keyboard to delete this table.
On the now completely blank form, notice that in the Fields pane on the right, all of the fields are still there. They are simply not used anywhere on the form yet.
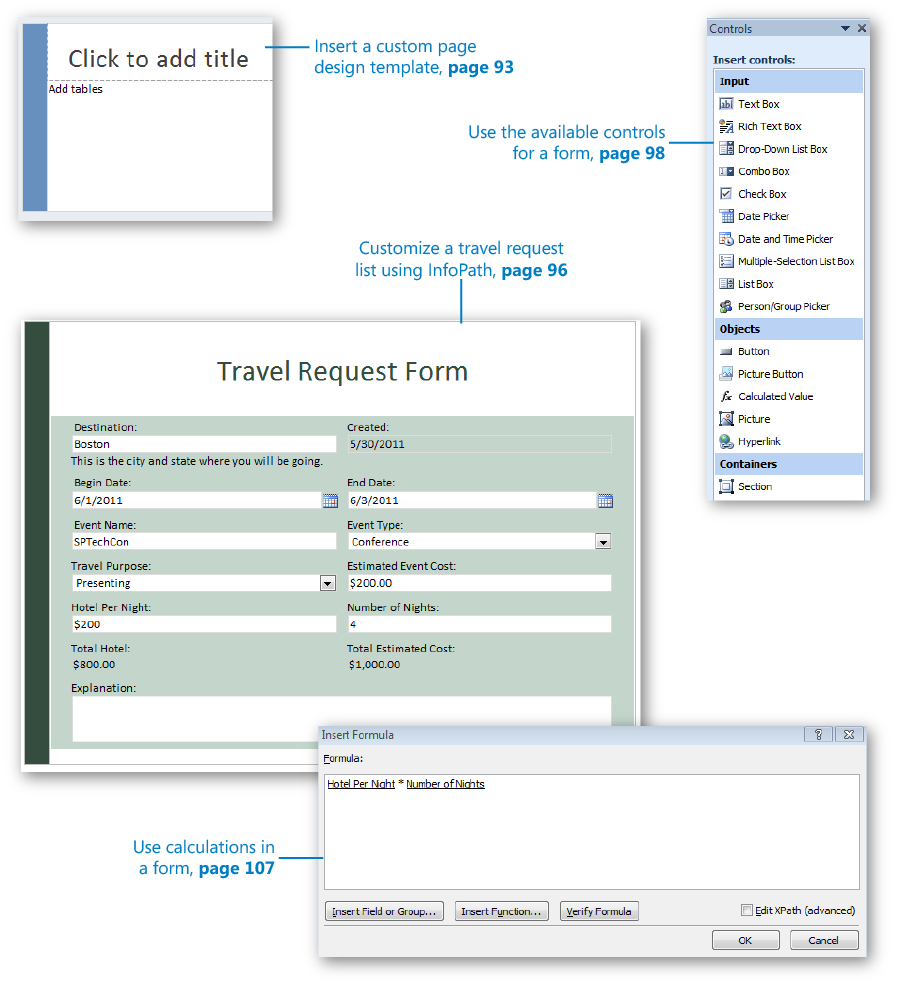
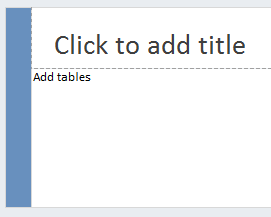
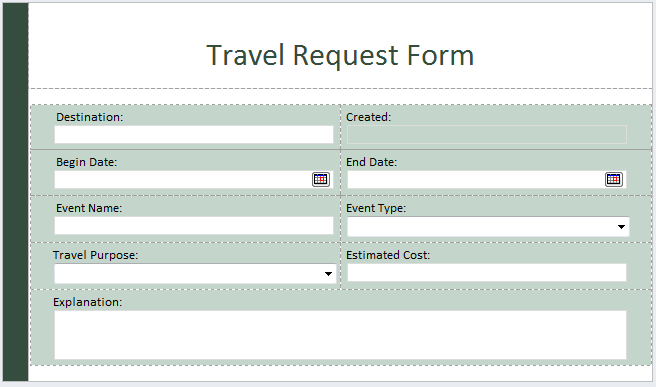
On the ribbon, click the Page Design tab, click the Page Layout Templates button, and then click to select the layout called Color Bar.
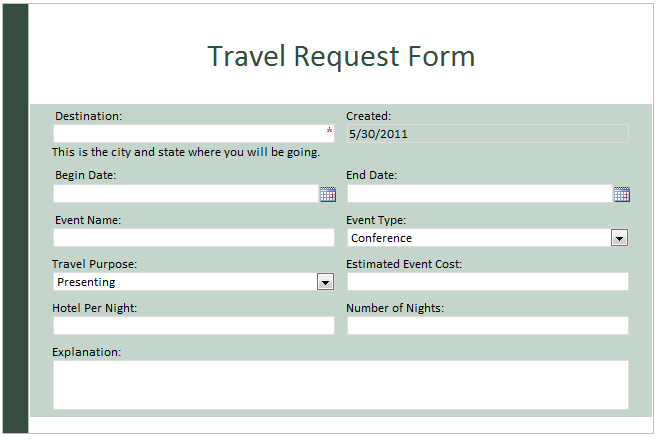
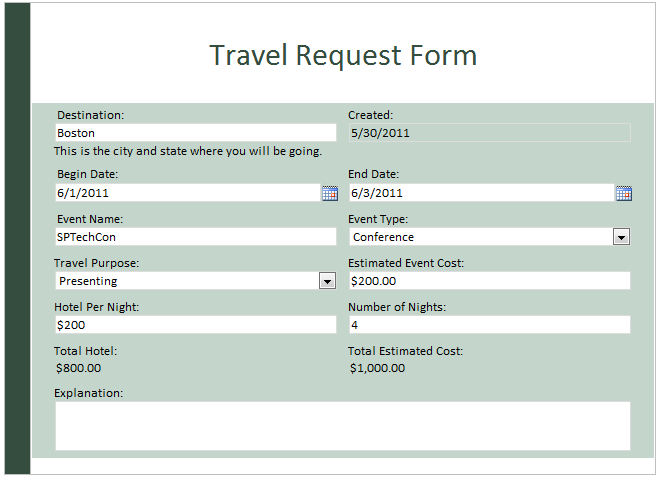
In the field labeled Click to add title, type Travel Request Form.
Put the cursor where it says Add Tables, and then on the ribbon, click the Insert tab. In the section that has table templates, insert the table template called Two Column With Emphasis 4.
You can now change the color scheme to reflect the company colors or just your favorite color. On the ribbon, click the Page Design tab to see all of the choices for themes. Select the theme called Professional - Summer.
Notice that the left column says Add label and the right column says Add control. With the goal of efficiency and not wasting space on the form, this travel request is going to be configured with each label above each control, instead of in parallel columns. We just need to modify a bit of formatting.
Put the cursor in the left column. In the Layout tab, click the Select button, and then click Column.
With the left column selected, click the Home tab, and then select the Normal style.
In addition to switching the style, notice that the bold button is currently toggled on.
Click the Bold button in the format text section on the ribbon to remove the bold formatting.
Two more rows need to be added at the bottom of the table. With the cursor in the last cell, click the Insert Below button in the Layout tab, twice.
From the Fields list on the right, drag the following fields into the table:
Table Cell
Field
Row 1, Left
Destination
Row 1, Right
Created
Row 2, Left
Begin Date
Row 2, Right
End Date
Row 3, Left
Event Name
Row 3, Right
Event Type
Row 4, Left
Travel Purpose
Row 4, Right
Estimated Cost
Row 5, Left
Explanation
Select both cells in the row that Explanation is in, and then on the ribbon, on the Layout tab, click Merge Cells.
The Created field is a built-in date that exists in every list and library in SharePoint, and along with the Created By (person) field, it is automatically captured each time a new item is added to the list. Because a date will not exist in the Created field until the form has been submitted for the first time, a default value can be displayed so that today’s date can be shown while the form is being filled out.
Double-click the Created field in the Fields pane on the right.
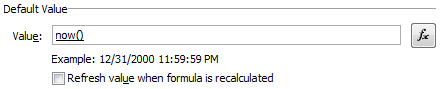
Click the fx button next to the Value field.
Note
Functions are similar to math formulas and are discussed in Chapter 5.
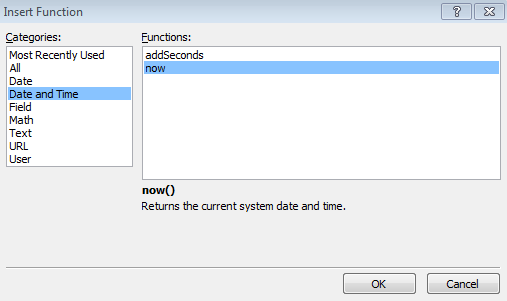
On the Insert Formula page, click the Insert Function button.
In the Insert Function dialog, under Categories, select Date and Time, click now, click OK, and then click OK again.
On the Field or Group Properties page, clear the Refresh value when formula is recalculated check box. Click OK.
It should be made obvious when filling out the form that the Created date is not something that can be changed. A couple of small cosmetic modifications can change the way this field looks.
Delete the second box, which is the time portion of the date. Right-click the date picker box, click Change Control, and then click Text Box.
On the ribbon, on the Properties tab, click the Shading box, and then choose No Fill.
Close the window by clicking the X at the upper-right corner of the InfoPath window. At the prompt, click Save and Publish.


The form has now been customized by using InfoPath, and it can be filled out. Examine your new creation by filling out and saving a new form. The form is much more visually appealing with just a few changes. We’ve turned an ordinary SharePoint list into an aesthetically pleasing form that is easy to fill out and makes sense.
List Form Fields
With a SharePoint list form that has been customized with InfoPath, there is a one-to-one ratio of columns that exist in the list settings to the list in the Fields pane in InfoPath. When it comes to this list of fields, not only is there an interface difference between list forms and form library forms but there is a major functional difference, as well. List forms inherently have a flat structure; thus, they cannot have a hierarchical information structure the way form library forms can.
What does this mean to you? It means that there can be no repeating tables in the form or any kind of lists inside of the form. An example of a great use of a repeating table is an expense report. At the top of the form, the information about the trip is entered, such as the destination and department name. In a table inside of the form, all of the rows of data are entered regarding each expense that was incurred. This list could range from one item to as many as necessary. The type of control that is typically used for this in InfoPath is a Repeating Table or Repeating Section. If your form needs a list like this, a SharePoint list is not the best option, and a SharePoint form library would be needed.
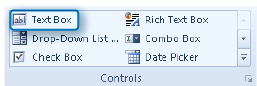
Sixteen different types of controls can be used in a SharePoint list, and they are indicated by unique icons. The Home tab on InfoPath’s ribbon provides an expandable list of controls.

Click the small gray arrow at the lower-right of the Controls section to see the full panel of controls.

Note
Chapter 3, has more details about all of the types form controls and what each one is used for.
The names of the column types in the lists settings do not match the names of the input controls in InfoPath. The following table displays a mapping of column data types in SharePoint with InfoPath controls.
Note
Objects and Containers can be placed on a form and utilized, without the necessity of creating new fields in the form. Input fields need to be bound to list columns.
In the form that was created in the example earlier in this chapter, fields were dragged from the Fields pane and placed in an organized table structure. There are three different ways to modify, add to, or remove columns from the list of fields.
After fields have been added and are seen in the Fields pane on the right in InfoPath Designer, by default they are displayed in a simple list, with each field represented by an icon that shows its field type. This is referred to as the basic view of fields and is seen in step 11 in the preceding exercise. At the bottom of the Fields pane, when Advanced View is selected, you can see the fields in the same manner in which they are seen in form library forms. There is also a drop-down box that contains other data connections. Select any other data connection to see its fields listed.
In the following exercise, you will add new fields to the form, using different methods.
Note
SET UP In the web browser, open your SharePoint site and navigate to the Travel Requests list that was created previously in this chapter.
On the ribbon at the top of the Travel Requests list, on the List tab, click the Create Column button.
Create a new Currency column called Hotel Per Night, and then click OK.
You can now see the Hotel Per Night column in the default view of the list. However, when any new columns are added from SharePoint, they will not be dynamically added to an already customized form.
In the Travel Requests list, on the List tab, click Customize Form.
The following dialog box opens, stating One or more fields in the SharePoint list have changed. Do you want InfoPath to update the set of available fields? You may need to modify your form view to add or remove the updated fields. Take a quick look at the list of fields on the right, and notice that the new field is not yet listed.
Click Yes. The Hotel Per Night field now appears in the Fields pane.
Put the cursor in the Travel Purpose cell so that a new row can be inserted below it. In the Layout tab, click Insert Below.
Drag the Hotel Per Night field from the list of fields to the left cell of the new row.
The next new field will be added from InfoPath instead of from the List Settings dialog, which is how all of the other fields have been created so far in this chapter.
Put the cursor in the blank cell next to the Hotel Per Night field. On the ribbon, click the Home tab, and then in the Controls list, click the Text Box control.
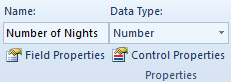
By default, the newly created field is called field1 and is formatted as a single line of text. Double-click to select this new text box, and then on the ribbon, take a look at the Control Tools Properties tab. Change the Name to Number of Nights, and change the Data Type value to Number.
Put the cursor to the left of the new text box, and then type Number of Nights in the form.
Close InfoPath. When prompted, click Save and Publish.
In the Travel Requests list in the browser, click Add new item to add a new travel request, and then save it.
Notice that the two new columns now have the information that you filled in about the hotel and nights.


Calculated Fields
Calculated fields have always existed as a column type in SharePoint. This concept has not changed, but it is important to understand how these columns behave in a form. What are the differences between a calculated column in a SharePoint list and a calculated value control in InfoPath?
When a calculated column is created in a SharePoint list, the following behaviors can be expected:
The result of the calculation is a column that can be displayed in any view in the SharePoint list.
The result of the calculation is a read-only value.
When the form is filled out for the first time or edited, the result of the calculation does not dynamically change on the form as the values of the other fields change.
The new result of a changed calculation is not updated until the form changes are saved.
Alternatively, when a calculation is created on an InfoPath form, the following behaviors can be expected:
The calculation result is displayed dynamically on the form, which means that it changes immediately as other column values change.
The calculation can be added to a form whether or not there is a calculated column in the SharePoint list.
If the calculated value is added to the form independently of a list calculated column, there will not be a column in the SharePoint list to display the result of the formula.
The list of functions available for calculations in the form is drastically different than the calculations available in the SharePoint list column.
In the following exercise, you will add two new calculated columns to the Travel Request form. Now that new fields have been added to the Travel Request form, the next type of field needed would be a calculation that multiplies the hotel cost-per-day by the number of nights. In doing this, the differences between types of calculation fields will be explored.
Note
SET UP In the web browser, open your SharePoint site and navigate to the Travel Requests list that was created previously in this chapter.
On the ribbon, on the List tab, click List Settings.
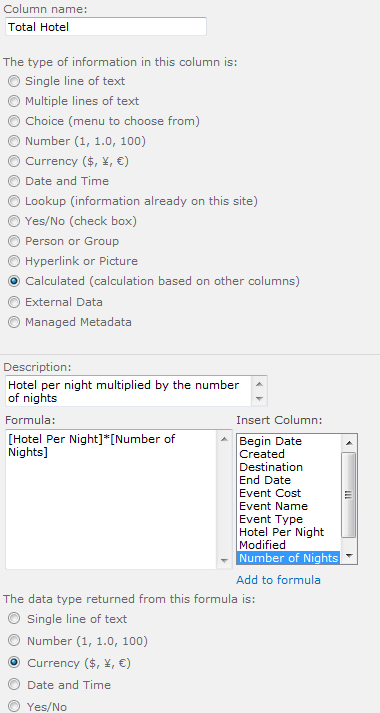
In the Columns section, create a new column called Total Hotel. Fill in the new column information according to the following table, and then click OK.
Column Data
Value
Column name
Total Hotel
Column type
Description
Hotel per night multiplied by the number of nights
Formula
[Hotel Per Night]*[Number of Nights]
Data type
Currency
Create a new travel request in the list, ensuring that the Hotel Per Night and Number of Nights fields are filled in.
Notice that the new Total Hotel field does not exist in the form yet, but after the new item is saved, the calculation is apparent as a column in the list.
On the ribbon, on the List tab, click Customize Form. Click Yes to the prompt to update the fields.
Right-click in the Number of Nights table cell, click Insert, and then choose Rows Below to add a new row to the table.
Type Total Hotel: in the left cell of the new row, and then drag the Total Hotel field from the Fields pane to the table; position it immediately after the text that was just typed.
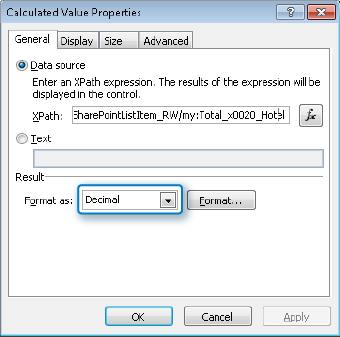
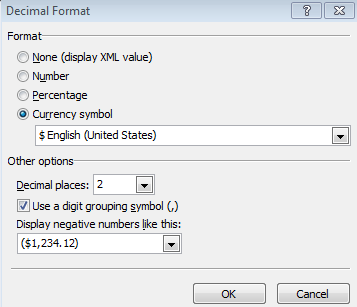
With the Total Hotel control selected, press Alt+Enter to open the Control Properties screen. In the Format as drop-down box, click Decimal.
Click the Format button. Select the format of Currency symbol, and then in the Other Options section, select 2 in the Decimal places drop-down box.
Close InfoPath. When prompted, click Save and Publish.
Open an existing form, and notice that the calculation now appears on the form. Create a new travel request. Notice that as the number of nights and hotel cost-per-night are entered in the form, the Total Hotel field does not show any data. The calculated value will not show in the form until after it has been saved. On the ribbon, click Customize Form again.
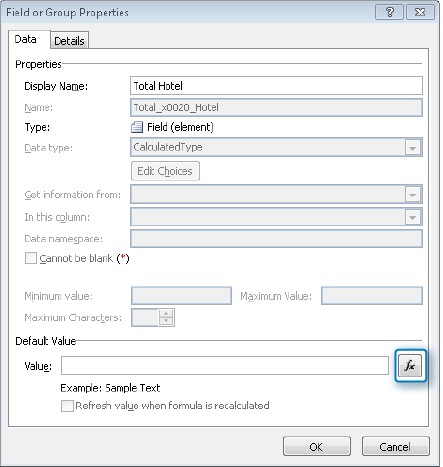
In the Fields pane on the right, double-click the Total Hotel field.
On the Data tab of the Field or Group Properties dialog box, click the fx button adjacent to the Default Value box at the lower-right corner.
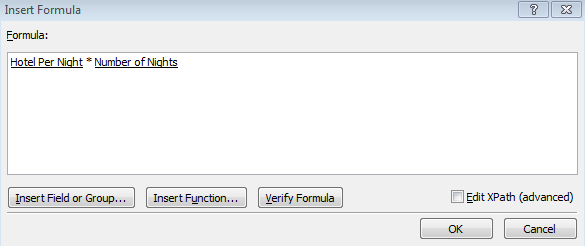
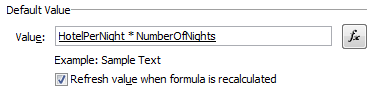
Click the Insert Field or Group button to select Hotel Per Night. Type the multiplication symbol (asterisk) with a space on each side of it, and then insert the Number of Nights field. Click OK.
To give this control dynamic functionality, on the Field or Group Properties page, ensure that the Refresh value when formula is recalculated check box is selected. Click OK.
Now that a SharePoint list calculated column has been added to the form, an InfoPath calculated value control can be added so that the difference between the two will be obvious.
Put the cursor in the empty cell to the right of Total Hotel. Type Total Estimated Cost:.
On the ribbon, click the Home tab, and then in the Controls section, click Calculated Value to add a new calculation to the form.
Click the fx button next to the empty box.
Using the same method that fields were added to the formula box in step 12 of this exercise, create a calculation that adds Event Cost to Total Hotel, and then click OK. (Start by clicking Insert Field or Group.)
Format the new calculation as currency by repeating steps 7 and 8 for the Total Estimated Cost field.
Close InfoPath, and then click Save and Publish.
Notice that this second field was a lot quicker to set up, includes the dynamic functionality, but does not appear as a column in the SharePoint list.


After completing the preceding exercise, you’ll notice that the second method of creating a calculated field is great for displaying in the form, but because it is not a column in the list, it will not be available for filtering and sorting in the list of travel requests. Both methods of creating calculated fields have now been covered, so you can see that different behavior is apparent, depending on the way the column is created.
List Form Pages
SharePoint 2010 provides a new Web Part called the InfoPath Form Web Part. (Chapter 8, describes this Web Part in detail.) This Web Part is fundamental to how the forms are displayed in a list. When forms are opened in SharePoint 2010, they are presented in a modal pop-up box. This is the default behavior, and each form is inherently alone on its own Web Part page. As you can see, with modal pop-ups, time is saved by eliminating the time the browser takes to navigate to a new web page. The form simply comes up in front of the current page.
Tip
When a SharePoint list has been customized by using InfoPath, the changes can be reverted at any time. On the list settings page, click Form Settings, and you can change the setting back to Use The Default SharePoint Form.
Before digging into the form’s design, it’s important to understand how the form pages work.
On the ribbon, on the List tab, you can click the Form Web Parts button to open any of the form Web Part pages in Edit mode. By default, a custom list has three different form pages:
New Form The name of the default file is NewForm.aspx. This is the form that is filled out only when creating a new item in the list.
Edit Form The name of the default file is EditForm.aspx. This is the form that is filled out when the list item already exists and is being modified from its original version. By default, this form looks the same as the New Form.
Display Form The name of the default file is DispForm.aspx. When the name of an item in a list is clicked to view the item, the display form is the form that is used and shows the values in all of the fields in a read-only interface.
The Default New Form, Default Display Form, and Default Edit form are the Microsoft ASP.NET Web Forms that existed before the SharePoint list was customized with InfoPath.
The (Item) New Form, (Item) Display Form, and (Item) Edit Form are specific to the Item content type and are Web Part pages. Each of these Web Part pages contains one InfoPath Form Web Part of the current form. The actual file names of these are newifs.aspx, displayifs.aspx, and editifs.aspx.

Now that the list form page fundamentals have been covered, we can delve into the form’s design.
Limitations of List Forms
When a SharePoint list is customized as an InfoPath form, there are several nuances to be aware of when it comes to the difference in form behavior between a SharePoint ASP.NET page, a SharePoint list as an InfoPath form, and a form library form. Chapter 2, included a decision matrix with details about gathering form requirements and deciding which direction to take in InfoPath. This section covers several examples of inconsistencies to look out for when working with a SharePoint list as an InfoPath form.
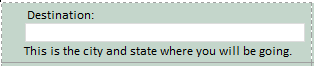
Field Descriptions In the SharePoint list settings, each time a new column (field) is created, a description box is provided so that you can type a description of the data that should be entered in that field. For example, in the travel request form that we’ve created in this chapter, for the Destination text box, a description was entered in the column settings. If the description were to be changed at any point from the list’s settings, the default ASP.NET form would immediately reflect the change in the existing forms. When the form was converted to InfoPath, the description was still seen in the form. Unfortunately, when we wiped out the whole form to start from scratch with a new layout, the description did not come back when the Destination field was added back to the form.
Data Connections In form library forms, there are no data connections at first, and each one must be created by using a wizard. However, a SharePoint list form inherently has a “submit” data connection that saves data to the current SharePoint list. This data connection cannot be removed or modified. Also, for each “choice” or lookup field that exists in the form, a “receive” data connection exists. These are also locked down and cannot be deleted or modified. However, new connections can always be added, with full functionality.
Views With a SharePoint list form, multiple views can be created as with a form library form, but the behavior is slightly different.
Option Buttons These are not listed in the insert controls but can still be used in the form. Right-click a control, and in the Change Control To list, the option button is there.
No Developer Tab There is no Developer tab on the ribbon, which means that custom code cannot be added to these types of forms.
The Travel Purpose field was created as a radio button choice, but when the form was converted to InfoPath, the control changed to a drop-down box. Also, the Destination box had descriptive text underneath it, which is now gone. Another thing to notice is that when the dates are being filled out, although the Begin Date should be before the End Date, any dates can be entered.
In the following exercise, you will add the descriptive text back to the field and then explore the results when the description is changed from the list’s settings.
Note
SET UP In the web browser, open your SharePoint site and navigate to the Travel Requests list from the previous exercise.
On the ribbon at the top of the Travel Requests list, on the List tab, click the Customize Form button.
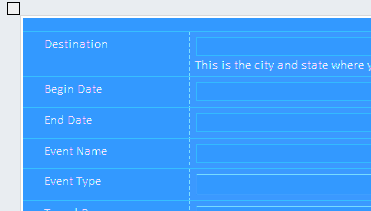
Put the cursor after the white text box under Destination, and then press the Enter key to add a new line. Type This is the city and state where you will be going.
Close InfoPath. When prompted, click Save and Publish.
In the browser, on the List tab, click List Settings.
In the Columns section, click the name of the Destination column. Change the description to This is the city and state, and then click OK.
Now click Travel Requests in the breadcrumb trail at the top of the page. Click Add new item to fill out a new form. Notice that the description has not changed.

The point of the preceding exercise was to show that when a form has been customized by using InfoPath, the description that is typed into the list settings cannot be expected to dynamically change in the form. Therefore, any descriptions that are needed should be typed directly on the form itself, as we did in step 2 of the exercise.
Form Options
In a SharePoint list that has been customized to use an InfoPath form, the form options screen looks a bit different from a form library form. To take a look at the form options for any form, click the File menu to display the Backstage view, click the Info tab, and then select Form Options.
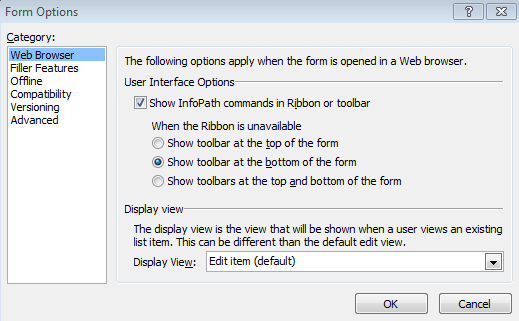
The form options consist of several tabs down the left side of the dialog box. Many of these options also exist in form library forms. The following items are significantly different in SharePoint list forms:
Web Browser Optionally clear the Show InfoPath Commands In Ribbon Or Toolbar check box. This removes the ribbon from the form. When the form is opened, it displays no button for a user to click to edit the data in the form. Additionally, when this check box is cleared, the three options under When The Ribbon Is Unavailable are disabled.
Filler Features The settings on this dialog box have no impact on SharePoint list forms.
Offline Determines whether this form data should be available offline and whether queried data expires.
Note
Learn more about offline capabilities in Chapter 14.
Compatibility All options on this tab are grayed-out (disabled) because they are not configurable in a SharePoint list form.
Versioning Each time the form is modified, a new version number is automatically created. These settings are usually used as a reference to see the current revision number.
Advanced This tab contains the Enable Form Merging option, which is not applicable to list forms.
Key Points
It is important to understand the inherent fundamentals of SharePoint lists before customizing them by using InfoPath.
SharePoint list forms are very plain-looking before they are customized, and they all have the same standard look and feel.
There are three different forms for every list: Display Form, Edit Form, and New Form.
SharePoint lists have a flat structure, which precludes the use of repeating tables, and every field in the form is a column in the list.
Descriptions typed in SharePoint columns are not dynamically updated in the form after it has been customized by using InfoPath.
Calculations can be done in the InfoPath form, but there is a difference between a calculated field in SharePoint and a calculation control in InfoPath. There is also a big difference in the functions available using the two different methods.
There are many different layout table templates and color schemes to choose from when customizing the way a form looks.
With InfoPath and SharePoint lists, all of the required data connections already exist, and other customized connections can be added manually.
There are several ways that columns can be added to a SharePoint list that has been customized by using InfoPath, including SharePoint, SharePoint Designer, and InfoPath.
There are some limitations when working with SharePoint lists compared to form library forms—for example, there are fewer form options, and the default data connections are not editable.