
Chapter 8. Using the InfoPath Form Web Part
Chapter at a Glance
Newly introduced in Microsoft SharePoint 2010, you can use the InfoPath Form Web Part to insert a browser-based form directly onto a page on any site in SharePoint Enterprise or Microsoft Office 365. These types of forms are not available in SharePoint Foundation. When you have the ability to display an interactive form directly on the site, it makes the form more readily accessible for users to fill it out. Any browser-based forms will be available for display in this Web Part. This includes administrator-approved templates that have been uploaded to forms services in Central Administration, forms that have been published as content types in the site, form library forms, and even SharePoint list forms that have been converted to use InfoPath.
When working with SharePoint lists whose forms have been customized by using InfoPath, the interface that is seen on the display, edit, and new forms is actually the InfoPath Form Web Part on a page. Not only can you fill out forms on these default pages, but custom Web Part pages and other ASPX pages can be created. These types of interfaces and mashups are very useful when creating custom business solutions.
Web Part Settings
After the InfoPath Form Web Part has been inserted onto a page in SharePoint, the Web Part settings are used to configure it further. Not only can the specific form from the site be selected, but a form view can also be chosen, along with even more customizations regarding the display and behavior of the form.
In this section, each Web Part setting will be described. The following illustration shows an example of the Web Part tool pane for the InfoPath Form Web Part properties that has been added to a page.
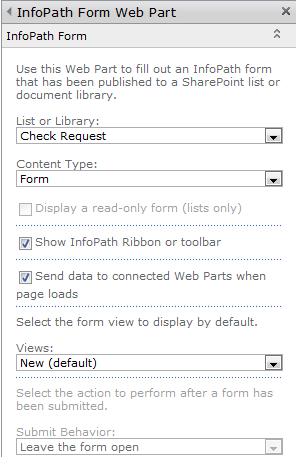
List Or Library This option allows for the selection of a form that has been previously published to the site. For a form name to exist in this list, one of the following conditions must be met:
A SharePoint list on the current site has been customized to use an InfoPath form instead of the default list form.
A form has been published directly to a form library on the current site.
A form that was published as a content type or an administrator-approved template has been added as a content type in at least one library in the current site.
Content Type If more than one form content type exists in the selected list or library, choose the name of the specific content type to be displayed in this Web Part.
Display A Read-Only Form (Lists Only) This option can be used only if the selected form is associated with a SharePoint list, as opposed to a library. Choose this if the form simply needs to be displayed on the page and not filled out.
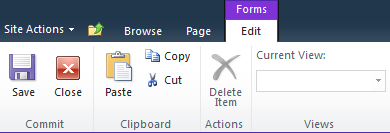
Show InfoPath Ribbon Or Toolbar When this check box is selected, the contextual ribbon is enabled. This means that while the form is actively being filled out or selected, the ribbon at the top of the browser window displays context that is relevant to form submittal. The following illustration shows an example of the contextual toolbar when a list-based form is being filled out.
Tip
When this Web Part option is selected, the interface on the page is a bit awkward, especially if the InfoPath Form Web Part is not close to the top of the page. When the form is being filled out, the site visitor would need to look at the top of the page, on the Edit tab on the ribbon, to find the Save or Submit button when the form is ready to be submitted. To avoid confusion during form submittal, you can clear the Show InfoPath Ribbon Or Toolbar check box. In this case, a Submit button would need to be added to the form.
Send Data To Connected Web Parts When Page Loads This check box is relevant only when Web Part connections are used in relation to the InfoPath Form Web Part. When filter data is being sent from this Web Part to another, any default value that exists in the form when the page first loads is sent to the connected Web Part. This results in the consumer (receiving) Web Part being automatically filtered to show that default value in the form.
Select The Form View To Display By Default Select the desired form view to display in this Web Part. Read more about form views in Chapter 3.
Tip
Because this Web Part will display the selected form view in its original size, a smaller view can be created specifically for use in this Web Part. In the form, create a new view and reduce the size by narrowing the tables and removing any unnecessary spacing. Learn more about views in Chapter 3.
Submit Behavior You can choose the action to be performed after the form has been filled out and submitted:
Close The Form After the form is filled out, the form is replaced with the following gray text: The Form Has Been Closed.
Open A New Form As soon as the form is submitted, a new blank form appears.
Leave The Form Open The form is submitted to the list or library, but it remains open with no indication that the data was submitted. Site visitors might end up submitting the same form multiple times if it’s not obvious that the form submission occurred.
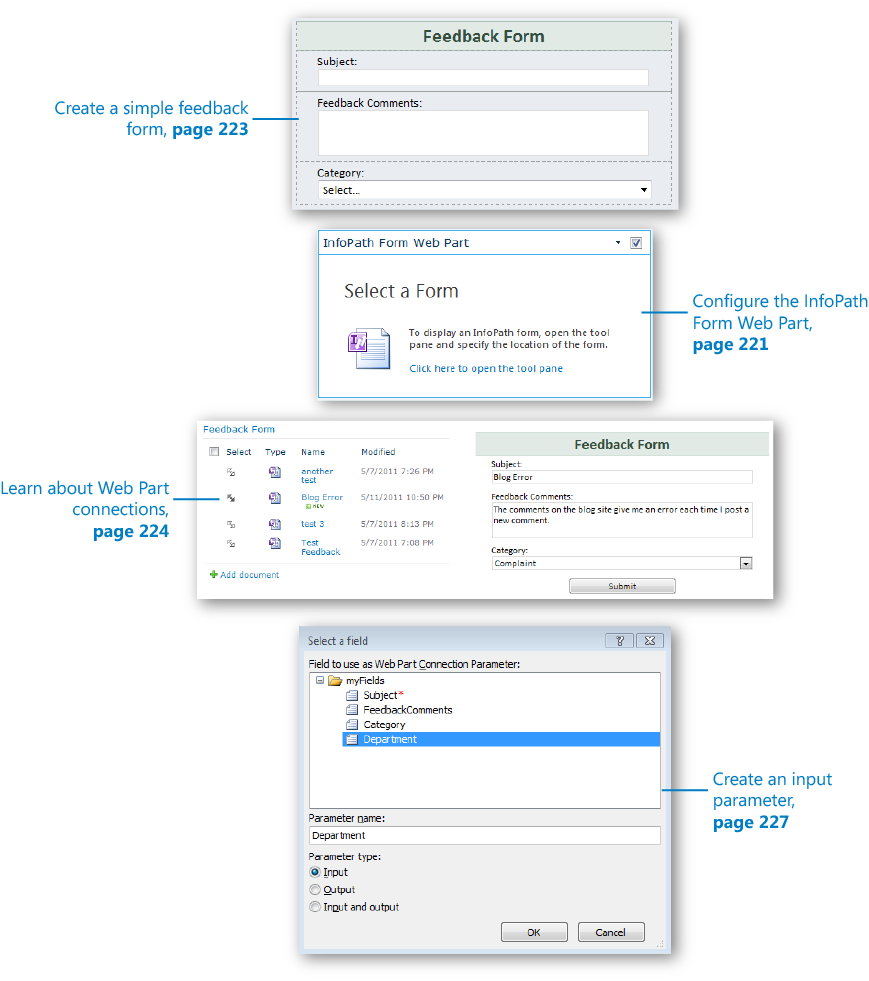
In the following exercise, you will create a new SharePoint 2010 sample site and a simple form library form that will be used to capture website feedback from site visitors. This form will be used in the rest of the exercises in this chapter.
Note
SET UP In the web browser, open your sample SharePoint site so that a new subsite can be created.
Click Site Actions, choose New Site, and then create a site using the Document Workspace template. Name the site Test Feedback.
From your computer’s Start menu, open InfoPath Designer 2010. On the New menu (on the left), select SharePoint Library in the Popular Form Templates section.
Click Design Form on the right.
In the Fields pane on the right side of the screen, right-click myFields, and then choose Add.
Create the fields listed in the following table by repeating step 4 for each, with Subject being the only required field.
Name
Data Type
Subject
Text
FeedbackComments
Text
Category
Text
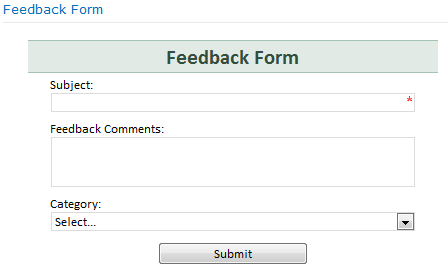
In the main area of the form, press Ctrl+A to select everything on the form, and then press Delete to delete the form content so that the form is completely blank.
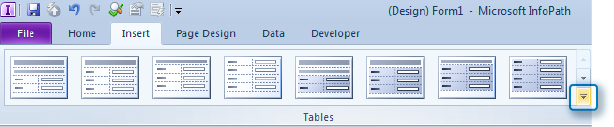
On the ribbon, on the Insert tab, click to expand to see more tables, and then select the table called Single-Column Stacked 2.
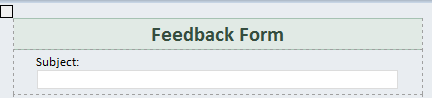
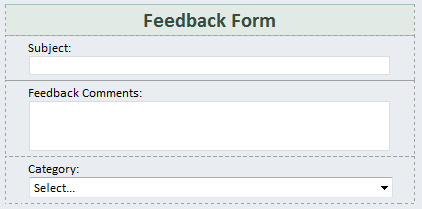
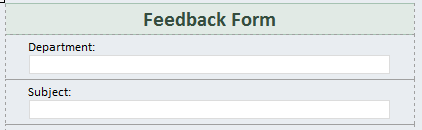
In the heading of the table you just inserted, type Feedback Form.
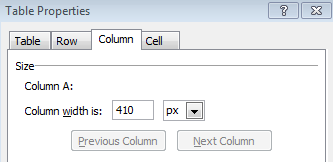
On the Layout tab, narrow the entire table to a width of 410 px, using the Width button, and then click OK.
From the Fields pane on the right side of the screen, drag the Subject field to the next row of the table, under the heading.
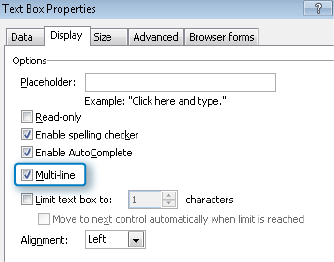
Drag the Feedback Comments field to the next row down, and then double-click to select this Feedback Comments text box. On the ribbon, check the Properties tab, and then change the height of the text box to 50 px.
Click the Control Properties button, and then on the Display tab of the text box properties, select the Multi-line check box and click OK.
This ensures that if more than two rows of text are typed, the box will expand to accommodate more text.
Drag the Category field to the last row of the table.
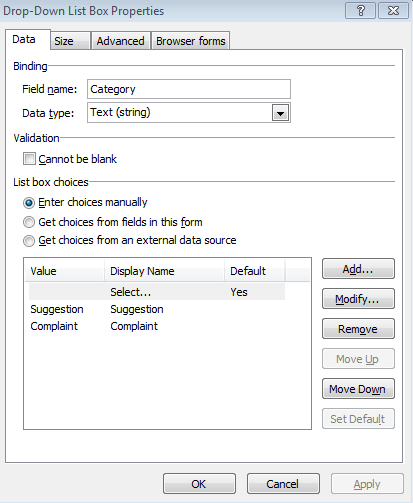
The Category field needs to be a drop-down box instead of a text box, so right-click the text box, choose Change Control, and then choose Drop-Down List Box.
To add the category choices, click to select the Category Drop-Down List Box control. Press Alt+Enter to quickly open the control properties.
In the Drop-Down List Box Properties window, use the Add button to add two choices: Suggestion and Complaint. Click OK.
Now the form is ready to publish to SharePoint.
On the ribbon, click the File tab, choose Publish, and then choose SharePoint Server.
Publish the form to a new SharePoint form library called Feedback Form on the site that was created in step 1.


For more information about details of the publishing process, please refer to Chapter 6. When you are prompted to save a copy of the XSN file to the file system, be sure to remember that location. On the Property Promotion page of the wizard, add all three fields in the form to be promoted.
Note
CLEAN UP Leave InfoPath Designer and the browser open if you are continuing to the next section of this chapter. Otherwise, close InfoPath Designer and the browser.
Now that the basic feedback form has been created, it can be used to gather feedback information. However, the form does not have any submit functionality yet. The next step in this process is the creation of a data connection so that the form can be filled out and submitted to SharePoint.
In the following exercise, you will create a data connection, and then you will add the InfoPath Form Web Part to the home page of your site so that it is intuitive and easy for users to fill out the form.
Note
SET UP In the web browser, browse to the Test Feedback SharePoint site that was created in the previous exercise. Open the previously created form in Design mode by using InfoPath Designer 2010. In step 18 in the previous exercise, the XSN file was saved to the file system. To open the form in Design mode, right-click this XSN file and then choose Design.
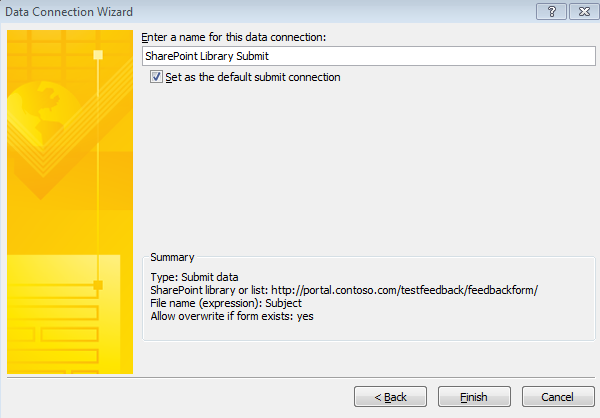
In InfoPath, on the Data tab, click To SharePoint Library.
Create a submit connection to the Feedback Form library that was created in step 18 of the preceding exercise. (More detailed information about data connections can be found in Chapter 7.) In the Data Connection Wizard, be sure to select the default setting of Set as the default submit connection.
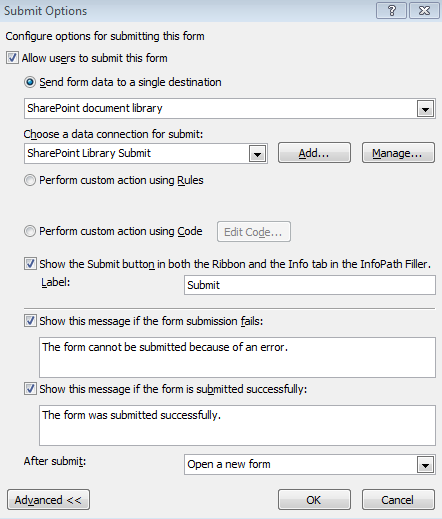
Click the Advanced button, and then select the Show this message if the form is submitted successfully check box. For the After Submit drop-down box, change the selection to Open a new form, and then click OK.
Use the blue Quick Publish button to publish the latest changes to the form.
On the home page of the Test Feedback site, click Site Actions, and then choose Edit Page.
In the right zone of the page, click Add a Web Part.
In the Categories of Web Parts, on the left, select Forms. In the Web Parts section on the right, click the name of the InfoPath Form Web Part to select it, and then click the Add button.
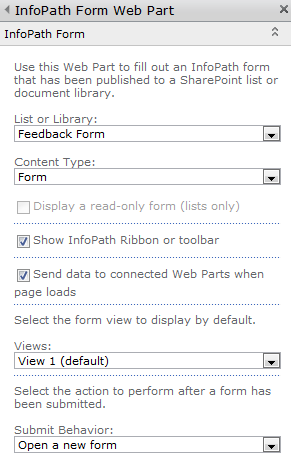
Now that the Web Part has been added to the page, it needs to be configured to show the Feedback Form that has been published to the site. Click the Click here to open the tool pane link.
In the Web Part tool pane on the right side of the screen, in the List or Library drop-down box, choose Feedback Form. The Content Type field will have a default value of Form because it is the only content type in the library.
Verify that the Show InfoPath Ribbon or toolbar check box is selected. The Views drop-down box will default to View 1 because that is the only view in the form. In the Submit Behavior drop-down box, choose Open a new form.
Expand the Appearance section in the Web Part tool pane. In the Title box, type Feedback Form. At the bottom of the InfoPath Form Web Part tool pane, click OK.


Note
CLEAN UP Leave InfoPath Designer and the browser open if you are continuing to the next section of this chapter. Otherwise, close InfoPath Designer and the browser.
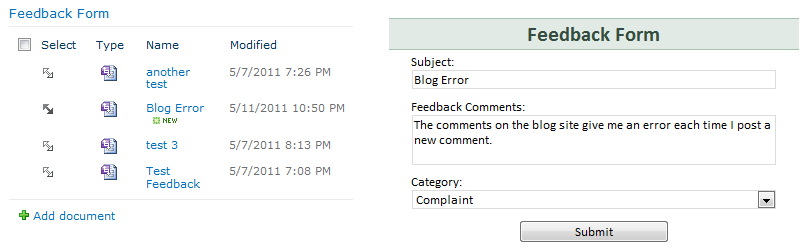
Now that a form has been created and inserted on the home page as a Web Part, it can be tested. Fill out the form with some test information. On the ribbon in the browser (at the top left of the screen), click Submit.
When a form must be submitted by using the default submit button on the Toolbar, it can be a bit confusing to end users, depending on the location of the form Web Part on the page. In the following exercise, the form will be modified so that the submit button is on the form itself, and not the ribbon.
Note
SET UP In InfoPath, open up the Feedback Form created in the previous exercise, and make sure that the form is in Design mode. The following exercise is a continuation of the steps that were already completed.
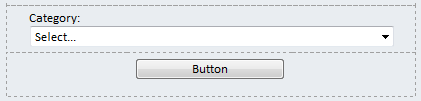
In the InfoPath form, position the cursor in the last cell of the table that contains the Category drop-down box. Press the Tab key on the keyboard to create a new cell at the bottom of the table.
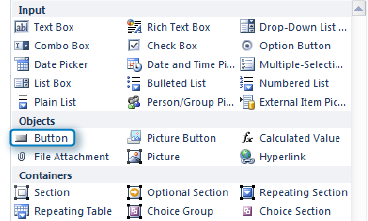
On the ribbon, on the Home tab, click the Button object to insert a button on the form.
Also on the Home tab, with the new button selected, in the Format Text section, click the Center text button to center the text, which will align the button in the center of the bottom row of the feedback form.
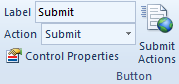
Double-click the new Button button, which will open the Properties tab in the ribbon. In the Action drop-down box, choose Submit.
This automatically changes the Label value to Submit.
Click the Quick Publish button to publish the changes to SharePoint.
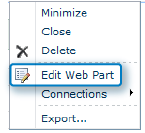
Now that the form has been modified and published, in the browser, refresh the Test Feedback site home page. Click the drop-down box at the upper-right corner of the Feedback Form Web Part, and then choose Edit Web Part, which will open the Web Part tool pane on the right side of the screen.
In the Web Part tool pane, clear the Show InfoPath ribbon or toolbar check box, and then click OK.

Note
CLEAN UP Leave InfoPath Designer and the browser open if you are continuing to the next section of this chapter. Otherwise, close InfoPath Designer and the browser.
Notice that now when the form is filled out, you have an obvious submit button to click, which will make more sense to people visiting the site. When the form is filled out and submitted, the data will be stored in the Feedback Form form library.
Web Part Connections
In the first part of this chapter, you learned how to add one Web Part to a page. When multiple Web Parts are placed on a page, Web Part connections can be created between Web Parts. These connections allow the passing of filter data or parameters from one Web Part to another.
In this section, you will learn how to connect an InfoPath form Web Part to another Web Part, and you will see that you have several methods for accomplishing this. The following options are available when a new connection is created:
Send Data To This flyout menu will display choices of all of the Web Parts on the page that this Web Part can send data to. This option is to be used with form library forms that contain output parameters.
Note
Parameters are described later in this chapter, in the Parameters section.
Get Form From When this option is selected, the Web Part will be filtered to show one form that already exists in the list or library. The Web Part selected must be a list view Web Part of the form library in which this form is located. The end result is that the desired form is selected in the list view, which will display the associated filled-out form in the InfoPath Form Web Part. The black double-arrow icon in the Select column on the left, as shown in the following illustration, is the selected item indicator.
Get Data From This option can be used only if parameters have been defined in the InfoPath form, and this applies only to form library forms. InfoPath forms based on SharePoint lists cannot receive form data. You cannot receive data from more than one Web Part on a page.
Parameters
What are parameters in InfoPath? A parameter is data that is passed from outside of the form, to be consumed by the form. This piece of information is received in the form, either affecting the behavior of the form as a whole or being passed into one of the fields that has been deemed one of the form parameters.
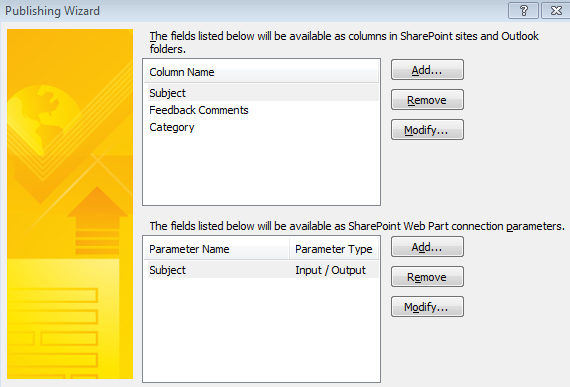
Parameters are defined during the publishing process and can be set as input, output, or both. The top section of the following screenshot is the familiar property promotion area, and the section on the bottom, new in SharePoint 2010, is used for the creation of parameters.
To send data from the form, one Web Part to another Web Part, an output parameter must be used. To retrieve data from other Web Parts, an input parameter must be used.
In the following exercise, you will create a new field in the previously created form, making this field a Web Part connection parameter. Then you will pass a parameter from the Current User Filter Web Part to the InfoPath Form Web Part on the home page. The current user filter Web Part will be used to capture the department name of the currently logged-on user, passing it into the form.
Tip
In the following example, you will be displaying the value of the passed parameter as a text box on the form. This part is not required, because the form can still receive the parameter information without the need to display that information in the form.
Note
SET UP Open the previously created Feedback Form in Design mode. This exercise builds on the previous exercises in this chapter.
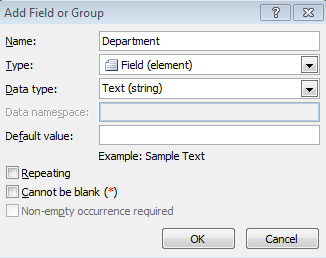
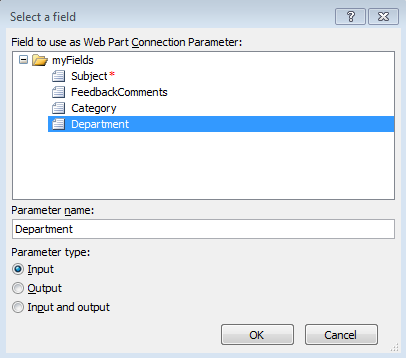
In the list of fields in the pane on the right side of the screen, right-click the myFields group, and then click Add to open the Add Field or Group dialog.
Name this new field Department, and then click OK.
In the form, position the cursor next to the word Subject in the third row of the table. On the ribbon, click the Layout tab, and then click Insert Above.
Drag the new Department field from the Fields pane to the new empty row of the table.
Click the File menu at the top left, choose Publish, and then click SharePoint Server.
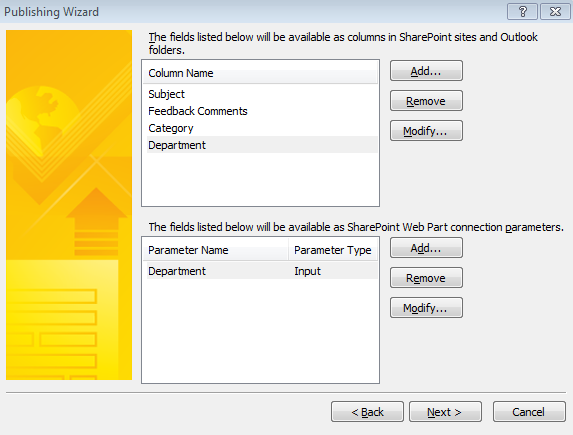
Click Next through three screens of the Publishing Wizard, until you see the page in which you can select fields to publish as columns.
Click the Add button to add the new Department field to the top list of columns. Do the same for the Subject, FeedbackComments, and Category fields.
Also click Add to add the Department field as a parameter in the bottom section. Department will be an input parameter. Click OK.
Four columns appear in the top section and one parameter in the bottom section.
Click Next.
Click the Publish button, and then click the Close button.
Go back to your Test Feedback site in the browser. When you refresh the web page, you’ll see that the Feedback Form Web Part has now been updated to display the new Department field. Click Site Actions, and then choose Edit Page.
In the right zone on the page, click Add a Web Part.
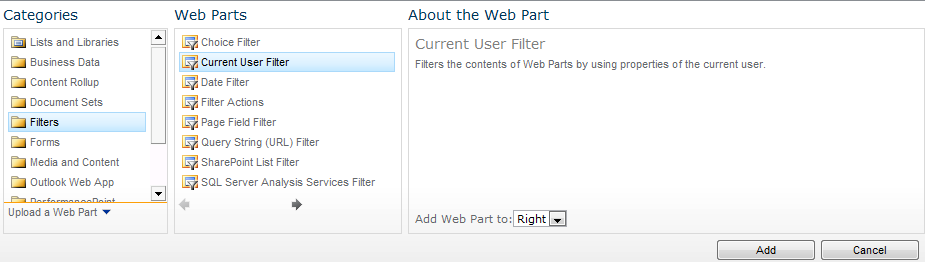
You will be adding the Current User Filter Web Part to the page, and it does not matter which zone it is placed in because it will not actually be seen on the page.
In the Categories list on the left, select Filters. In the Web Parts list, select Current User Filter, and then click Add.
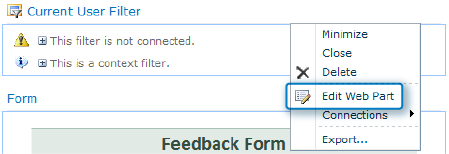
After the Web Part has been added to the page, it must be configured before it has any functionality. In the upper-right corner of the Current User Filter pane, click the arrow, and then click Edit Web Part.
By default, the Current User Filter stores the value of the current user’s logon name, with the syntax of DOMAINusername. You need to obtain the logged-on user’s department name.
Change the SharePoint profile value for current user drop-down box to Department.
Click OK at the bottom of the Web Part tool pane.
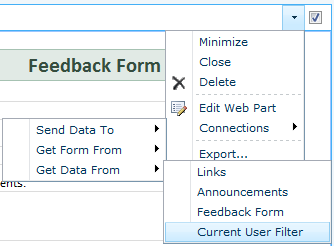
Now you need to create a Web Part connection between the filter Web Part and the form Web Part.
With the page in Edit mode, in the upper-right corner of the Feedback Form (the form itself, not the list of forms), click the black drop-down arrow. On the flyout menu, select Connections | Get Data From | Current User Filter.
On the Configure Connection page, the consumer field name of Department will already be selected because Department is the only input parameter that has been created for this form. Click Finish.
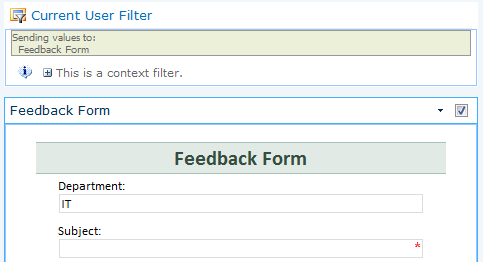
With the page still in Edit mode, in the connection that has been created, the filter Web Part will now indicate the name of the Web Part to which it is sending information. Also, the Department field in the form will now display the department name of the currently logged on user. In this example, the current user is in the IT department.
Click Stop Editing at the upper-left of the web page.


Now that the steps are complete, notice that even though you cannot see the current user filter Web Part on the page, it is capturing information and passing it to the form Web Part. Try submitting a new feedback form. When you click the name of the Feedback Form library in the quick launch on the left side of the page, you’ll see all of the submitted forms, and the Department column will show the name of the department of whoever submitted each form.
Note
Another method for pulling user information into an InfoPath form entails creating a data connection to the UserProfileService web service. This method is covered in detail in Chapter 9.
Other Parameters
The ability to pass parameters to an InfoPath form is very powerful when it comes to creating custom business solutions. Often, when an InfoPath form is being created, it is part of an overall business solution, such as a site for new employee onboarding, travel requests, or project management. The ability to create useful page interfaces for visitors to the site and for people filling out forms is very important for ensuring that the site makes sense to them. The concept of the user interface will be covered in further depth in Chapter 13.
Following are additional parameter concepts to know when working with InfoPath browser-based forms:
Source The source parameter tells the form what URL to navigate to after someone has submitted or closed a form. By default, this parameter contains the URL of the default view of the form library. In situations where it is not necessary to send users to the form library, this parameter can be modified to more tightly control where in the site you end up after filling out a form. Following are two examples of situations in which a customized source URL is desirable:
A link is created on the home page so that site visitors can click once to fill out a form. When this custom link is clicked, someone fills out the InfoPath form and submits it and then she is immediately directed back to the home page of the site where they began.
An email is sent as part of a workflow, with a URL link to a specific form. When the email recipient clicks the link to open the form, the form is viewed and closed or it is submitted. The person is then immediately directed to the home page of the form site.
DefaultView The default view parameter is used for navigating directly to a specific view in the form, other than the view that is set as the default in the form. Add the DefaultView parameter to the end of the URL with the following syntax: &DefaultView=View Name. Another method for controlling switching between views is to use Form Load action rules in the form, with conditions set up to determine when the view should be switched, using the Switch Views action.
Note
See Chapter 14, for more information about form load rules.
URL Dissection To understand how some typical URLs are constructed when working with browser-based forms, two different types of URLs will now be taken apart, with each parameter explained in a table.
New Form example full URL: http://portal.contoso.com/testfeedback/_layouts/FormServer.aspx?XsnLocation=http://portal.contoso.com/testfeedback/FeedbackForm/Forms/template.xsn&SaveLocation=http%3A%2F%2Fportal%2Econtoso%2Ecom%2Ftestfeedback%2FFeedbackForm&Source=http%3A%2F%2Fportal%2Econtoso%2Ecom%2Ftestfeedback%2FFeedbackForm%2FForms%2FAllItems%2Easpx&DefaultItemOpen=1
Link to an existing form URL: http://portal.contoso.com/testfeedback/_layouts/FormServer.aspx?XmlLocation=/testfeedback/FeedbackForm/Blog%20Error.xml&Source=http%3A%2F%2Fportal%2Econtoso%2Ecom%2Ftestfeedback%2FFeedbackForm%2FForms%2FAllItems%2Easpx&DefaultItemOpen=1
Note
For more information about InfoPath 2010 query string parameters, see the MSDN article at http://msdn.microsoft.com/en-us/library/ms772417.aspx.
Key Points
Using the InfoPath Form Web Part, you can insert a browser-based form directly onto a page on any site in SharePoint Enterprise or Office 365.
In the Web Part settings, the form’s content type and view can be selected, as well as ribbon settings and form submission behavior.
When the form’s submit options are not enabled, the form submit behavior in the Web Part is disabled.
The form’s default submit button location can be awkward because it exists only in the ribbon unless a submit button is explicitly inserted on the form.
With a Web Part connection, other Web Parts on a page can send data to input parameters in the InfoPath Form Web Part.
With a Web Part connection, a Web Part that displays a list view of the form library can send connection information to open each specific form on the same page.
With a Web Part connection, other Web Parts can get filter data from the current InfoPath Form Web Part.
Parameters cannot be created in SharePoint list forms.
Filter Web Parts can send data to the InfoPath Form Web Part on the same Web Part page.
Only one parameter at a time can be passed to the InfoPath form Web Part.
The Query String (URL) Filter Web Part can pass URL information through to the InfoPath form Web Part.
Other InfoPath browser-based parameters can be utilized, such as the Source and DefaultView parameters.