
Chapter 2. Form Requirements: Using a Decision Matrix
Chapter at a Glance
For each new form that you create, you need to make several decisions before the form creation process even starts. When you are aware of the factors to consider, you can save a lot of time and effort from the beginning. You will need to make key decisions based on form requirements, and some of them are easier to make than others.
In this chapter, you will learn the most important factors to consider before creating an InfoPath form so that your form development process can be as efficient as possible. All the decisions will be discussed, and then you will learn all the factors involved. Each factor affects the final decision. First, all of the available templates will be described. Then you will learn how to determine the best choice for each form. Most of the concepts that are mentioned in this chapter will be covered more extensively in future chapters. This chapter’s purpose is to provide a reference when you start to develop your own forms.
Form Templates
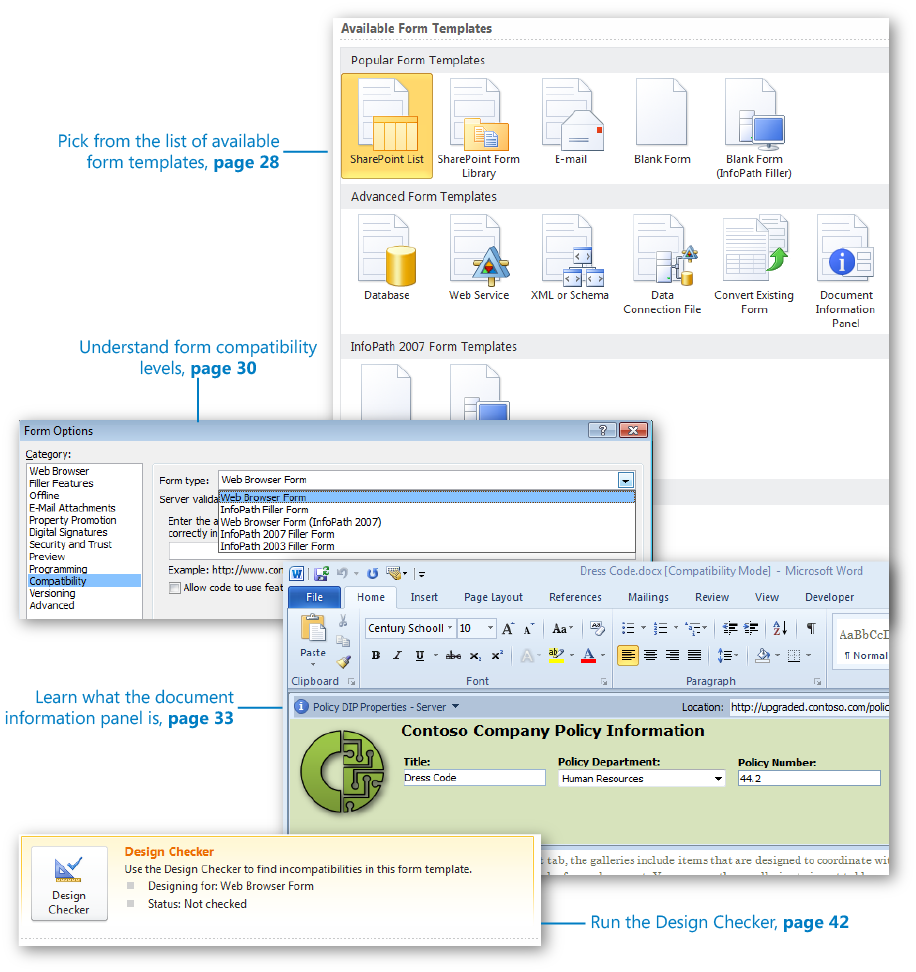
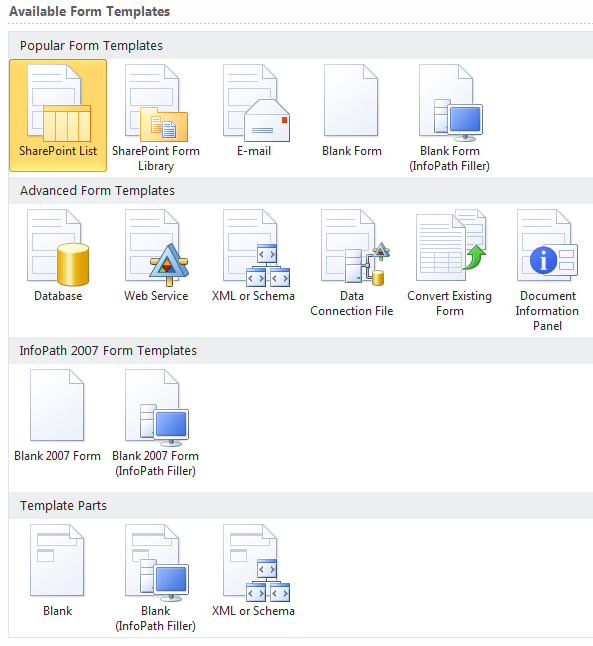
When InfoPath Designer 2010 is started, the initial interface is a set of choices, which comprises a list of the available form templates. To create a new InfoPath form, one of these templates must be selected. At first, it might appear that you can create sixteen different types of forms, but that’s not really the case because a few of these templates are redundant. Each template will be described in this section, and the “what” and “why” will follow later, when you are guided through your form decisions.
One common theme to notice among the template names is the word Filler. This leads us to the topic of filler forms (client-based) versus browser-based forms. It’s important to understand these concepts before being overwhelmed by all of the template choices.
InfoPath Forms Services was first introduced in Microsoft Office SharePoint Server 2007. InfoPath Forms Services provided the ability to create browser-based forms in InfoPath. In InfoPath and SharePoint 2003, before Forms Services was introduced, forms could be created and published to SharePoint but everyone filling out the forms was required to have the InfoPath software on their computers. This was a show-stopper in many larger organizations because it simply was not feasible to deploy InfoPath and ensure that every client computer (possibly thousands) had the correct version of Microsoft Office. When InfoPath Forms Services with new browser-based forms were introduced, this opened up many more possibilities for form development. With a browser-based form, no special software is required when filling out forms; all you need is a web browser such as Internet Explorer. Thus, the two implementations of InfoPath can be summarized as follows:
Client-Based Library Form The InfoPath client software is part of the Office 2010 suite of products (in Office Professional Plus). When a form is created as an InfoPath Filler form, anyone filling out the form needs to have the InfoPath software installed. For organizations that have systematically deployed InfoPath to all of the computers, this option is feasible.
Browser-Based Library Form Forms that are browser-based can be filled out in Internet Explorer and in some other web browsers. When a form is browser-compatible, InfoPath software is not required, and virtually anyone can fill out a form, from anywhere. The only person who needs the InfoPath software is you, the form creator. As of the time of this writing, the compatible browsers are Internet Explorer, Mozilla Firefox, and Apple Safari.
One reason for the long list of available forms is that many of them are simply providing you a choice between a filler form and a browser-based form (compatibility). After you have selected a template, a compatibility setting is associated with that template in InfoPath. This setting can be changed at any time.
Another common thread is that some of these templates are named after types of data connections. Data connections will be covered extensively in Chapter 7. Basically, creating connections is how you define where the data in the form will go after the form is filled out as well as what lists or databases the data will come from if it needs to be used in the form (such as in a drop-down list).
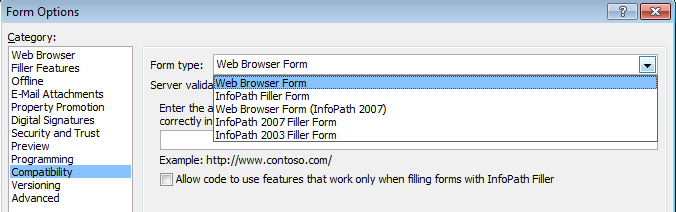
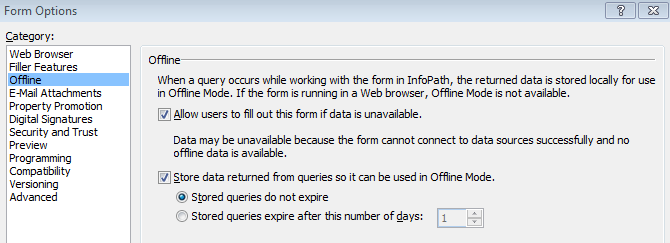
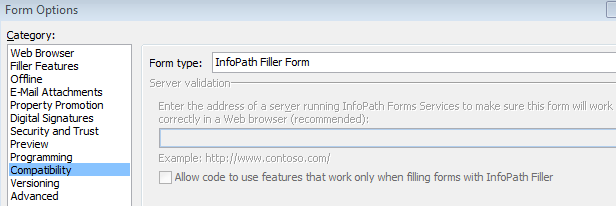
Form compatibility settings are important to understand when prompted with a list of templates. The client-based (filler) and browser-based settings can be changed after a form has been created. The compatibility can be changed at any time during the form design process by clicking File and then clicking Form Options. Take a look at the Compatibility section in the following screenshot.
The following forms are available:
Web Browser Form Fill out forms in the browser in SharePoint 2010
InfoPath Filler Form Fill out forms by using the 2010 Filler
Web Browser Form Fill out forms in the browser in SharePoint 2007
InfoPath 2007 Filler Form Fill out forms by using the InfoPath client in Office 2007
InfoPath 2003 Filler Form Fill out forms by using the InfoPath client in Office 2003
Important
Unlike the other templates, a SharePoint list form cannot be changed to a form library form and vice versa. A SharePoint list form is browser-based only.
Following is a list of the templates and their descriptions:
SharePoint List Introduced in the SharePoint 2010 Enterprise version, InfoPath can now be used as the form interface to SharePoint lists. Instead of the .aspx pages for filling out forms, the form can be completely designed and customized by using InfoPath. Many of your organization’s simpler forms can be created as SharePoint lists and customized by using InfoPath. Using this method, the broadest audience of users can create forms. The interface is simplified, which means that end users will require a minimal amount of training to get up to speed in creating basic forms. Read more about SharePoint list forms in Chapter 4.
SharePoint Form Library This is the most frequently used template. With this template, a browser-based form is created with some layout tables on it to give you a head start in form design. The following image shows an example of a form library template.
E-mail This is a template that is intended for use in conjunction with a data connection that submits information directly in an email. You can pick the SharePoint Form Library template instead of this one and simply add an email data connection by using the form’s Data tab.
Blank Form This is an empty browser-based form. It is the same as the form library template, except that it does not contain the formatted table layout.
Blank Form (InfoPath Filler) This template is the same as the blank form. The difference is that the compatibility setting is for an InfoPath filler form. This is also a form library.
Database This template allows for the selection of any Microsoft Access or SQL database. The forms fields would be directly connected to tables in the database. This type of template is not compatible with browser-based forms. This template can become a bit tricky when authenticating to the back-end database.
Web Service This template is a type of data connection where a form can be created and data can be received and/or submitted through a web service. With this template, the web service fields will automatically be populated in the form’s main list of fields. This is also a form library.
XML or Schema With this template, an existing XML file can be used to create the main list of fields in the new form. Alternatively, select the form library template instead, and add this template as a secondary data connection.
Data Connection File Select an existing universal data connection that is based on a web service. This connection will be selected from a data connection library in SharePoint. All of the fields in the data connection will comprise the main list of fields in the new form. This is also a form library.
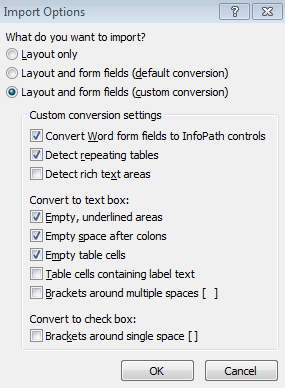
Convert Existing Form Select an existing Microsoft Word document or Microsoft Excel spreadsheet to convert into a new InfoPath form. You will have options to select certain attributes in the file and select what types of fields or cells will be converted to InfoPath fields. In cases where a large number of forms need to be converted, this useful tool can save a bit of time. Unfortunately, in many cases, the end result is not the most aesthetically pleasing form. You might end up spending just as much time fixing the formatting on the converted form as you would have in creating a new form from scratch. This is also a form library.
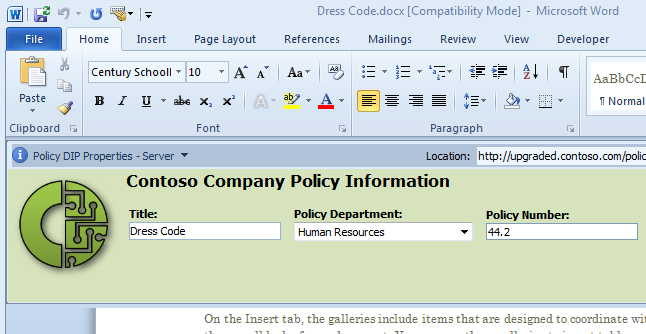
Document Information Panel The document information panel is seen at the top of Office files that are stored in SharePoint document libraries. Interact with the file’s metadata in this panel. The term metadata refers to all the columns in the library. The following image shows a document information panel before it has been customized using InfoPath.
InfoPath 2007 - Blank 2007 Form This is a blank form. It is the same as the blank form template with the exception that the compatibility setting is Web Browser Form (InfoPath 2007).
InfoPath 2007 - Blank 2007 Form (InfoPath Filler) This is a blank form. It is the same as the blank form template with the exception that the compatibility setting is InfoPath 2007 Filler Form.
Template Part - Blank An InfoPath template part is a modular template that can be reused inside of multiple forms. These are commonly used when a standard set of data is to be collected such as the requestor data at the top of a form. This would include a name field, department, phone number, and other commonly used fields. When the template part is saved, all the fields, controls, and data connections are stored along with it. This file is saved as an XTP2 file and can be inserted into other InfoPath forms as a custom control.
Template Part - Blank (InfoPath Filler) This is the same as the template part, with the compatibility setting as InfoPath Filler Form.
Template Part - XML or Schema This is the same as the template part, with the additional functionality of selecting an existing XML file to base it on.
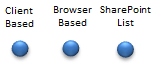
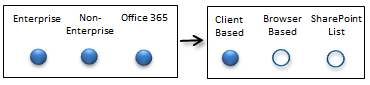
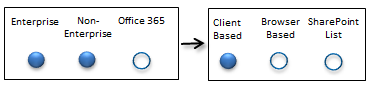
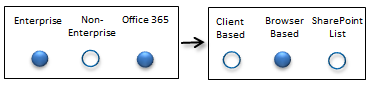
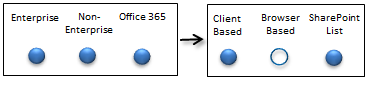
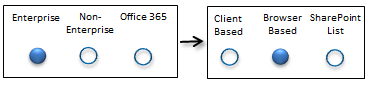
When creating a form, you first need to decide which type you want it to be. There are three options: a client-based form, a browser-based form, or a SharePoint list form. As we go over the factors in form decision-making, these options will be represented by circles. A solid circle indicates that the factor applies to the option; an open circle means the factor does not apply to the option.
Where’s the Data?
Another important requirement is to learn about the data. Where is it coming from, and where is it going?
Submit To When someone fills out a form and submits it, where would you like this form data to go? The typical answer is “to SharePoint.”
Receive From Where is the data coming from? Sometimes information will be received in the form from external sources. This data can be presented in drop-down lists and other such lookups. It is important to find out about these external data sources because of authentication considerations. For example, if the list of information for a drop-down list exists in a table inside of a SQL database, some sort of logon authentication will be required for gaining access to that data.
Not every form is going to receive data, but most forms will be submitted to a location. When form data is submitted to SharePoint, much can be done with that information. Custom views, reporting, filtering, and workflows can be used. If the first requirement is that all forms should be submitted to a database, it is important to ask yourself why. The simplest way to gather form data is in a library. As long as you understand that users can easily discern what is needed from submitted data, you often have no need to get a database involved. As we go through the next factors, the data will be a consideration in several cases.
Note
In Chapter 13, you will learn about reporting and how to make the most of the data that has been gathered in forms and submitted to SharePoint.
Your SharePoint Version
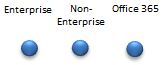
Depending on which version of SharePoint you have—whether it is SharePoint Online with Office 365, SharePoint Server 2010, or SharePoint Foundation—you are going to have limitations:
Office 365 plans E3 and E4 These plans provide InfoPath Forms Services, which means that browser-based forms can be created.
Other Office 365 plans The E1, E2, and other Office 365 plans do not include InfoPath Forms Services, which means that browser-based forms are not supported. A person filling out the form would need the InfoPath Filler software on his computer.
SharePoint Server 2010 Enterprise With SharePoint Server Enterprise, there are no limitations. Every type of form can be created. However, just because there are no compatibility hindrances doesn’t mean that form decisions are any easier. With no limits and all options available, it is even more difficult to know what direction to go each time you create a new form.
SharePoint Foundation and Standard These versions of SharePoint do not offer forms services, which means no browser-based forms. A person filling out the form would need the InfoPath Filler software on his computer.
In this chapter, as we go over the factors in form decision-making, the following options will be represented by circles:
Factors to Consider
Before creating an InfoPath form, it is important that the requirements have been gathered and that you have a clear vision of what the form, layout, rules, and possible workflow might look like. What is different about these types of form templates, and why is the compatibility level important? Specific controls and functions are used in each form, and some of these can be used only with certain versions of SharePoint and the client. Don’t worry: if you try to do something like insert a control that is not compatible, InfoPath’s Design Checker will let you know. For each factor that is listed, in the box on the left, find your SharePoint version, and the box on the right will let you know which types of form template or compatibility can be used.
Repeating Tables
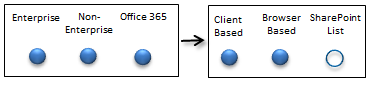
Will the form need to have repeating tables? What is a repeating table? An example is an expense report form. A form is filled out for each trip you take, but each trip has multiple expenses to enter. This type of list uses controls called repeating tables and repeating sections, which can allow multiple list items inside of a single form. This is called a hierarchical information structure, and it is not available in SharePoint list forms.
Note
For more information about repeating tables, see Chapter 3.
Large Number of Fields
How many fields will there be in the form? When a client-based or browser-based form library form is created, you can pick and choose which fields are promoted to become columns in the library. When a SharePoint list form is created, each field is equivalent to a column in SharePoint. As a general rule, if a form is going to have more than 50 or 60 fields, it is a better idea to use a form library form.
User Roles
This feature allows you to define a set of Active Directory users and their roles in the form. For each set of user names or group names, roles can be assigned. Conditions in the rules of the form can look at what the current user’s role is and perform actions accordingly. Following are some caveats when working with user roles:
They do not work with SharePoint groups.
Only Active Directory groups or individual logon names can be used. In general, it is not a good practice to put individual names in a form. When there is attrition in the company, it is hard for form developers to keep track of which forms need to be modified.
User roles are available only with client-based (filler) forms, but that’s okay. You have several ways to achieve the same functionality without it. For example, there is a user profile service, which is discussed in Chapter 9.
When we can tap into all of the profile information about any user, such as her department or manager’s name, the form’s rules can be tailored by basing conditions on the values in those fields.
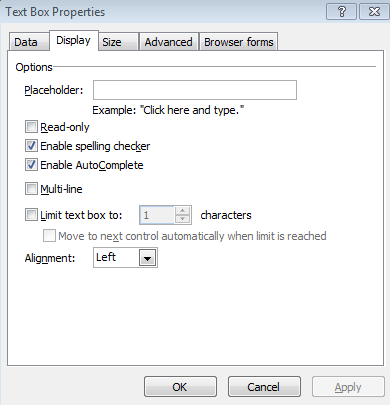
Spelling Checker, AutoComplete, Placeholder Text
Text box controls have settings on the display tab of their properties, which lets you select check boxes to enable AutoComplete and the spelling checker. Placeholder text is the gray text that appears in a field before it is filled in. These settings will be visible, but the functionality will not exist when the form is filled out in a browser.
Submit to a Database
One of the templates you can choose creates a form based on a database. Even if this template is not initially selected, there is also a type of data connection that can be created for submitting data directly to a database. Third-party tools can be purchased to accomplish this. In many cases, companies use in-house developers to write web services to communicate with their proprietary systems.
Form Parameters
New in SharePoint 2010 are form input and output parameters. During a form’s publishing process, a dialog box opens in which you can select form fields to use as input, output, or input/output parameters. With parameters, you can use the InfoPath Form Web Part on Web Part pages. Parameters can be passed to the form from other Web Parts, and vice versa.
Note
Learn more about the InfoPath Form Web Part and parameters in Chapter 8.
Offline Forms
Does the form need to be filled out when the client computer is offline, not connected to the network? A setting in the form’s options allows users to fill out the form if data is unavailable. Before making the initial form decision, you’ll need to understand the following factors:
A form cannot be filled in offline in the browser. This means that although a form can be configured with browser-based compatibility, some client software will be required for those users who will be filling out the form offline.
If the form is a SharePoint list form, it can be filled out offline by using SharePoint Workspace 2010.
For form library forms, the InfoPath Filler software must be installed on the client. Also, caching data from secondary data sources occurs only when the form is filled out on the client.
Note
The offline setting and how it is used will be covered in Chapter 14.
Other Controls
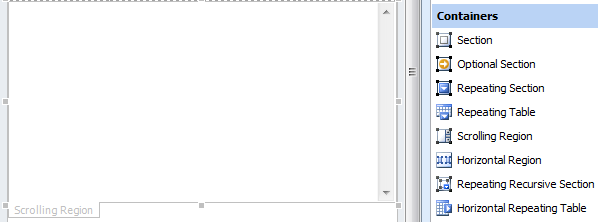
A set of more obscure form controls are available only in client-based forms. These controls are vertical labels, ink pictures, signature lines, scrolling regions, horizontal regions, repeating recursive sections, horizontal repeating tables, master/detail, and repeating choice groups. If any of these are used on the form, it cannot be published as a browser-based form.
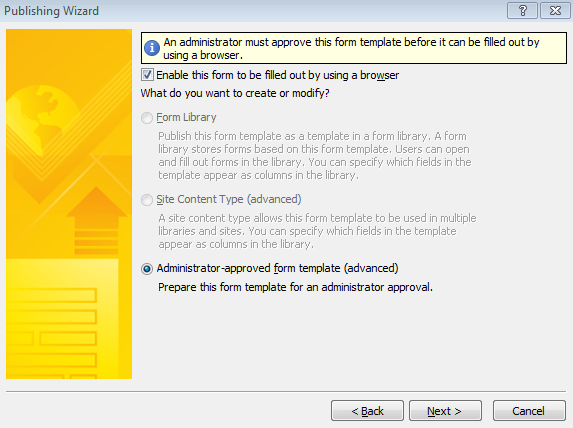
Administrator-Approved Template
An administrator-approved template is an XSN file that is created and uploaded in Central Administration in the Enterprise version of SharePoint Server. This can be done in cases where a form needs to be deployed globally, to multiple site collections. In some cases, the form must be created as an administrator-approved template and cannot simply be published to a form library. The following are some major factors:
Custom code In some cases, the built-in functionalities in InfoPath are not sufficient, and custom code is added to the form. When custom code is involved, the form’s compatibility settings must be browser-based and it must be published as an administrator-approved template.
Data sources across site collections When data sources receive data from or submit data to a site collection other than the one where the form is being filled out, the form must be created as an administrator-approved template. Otherwise, when the form is opened and queries the data, the user is presented with an error.
Full-trust or restricted security level There are some security settings in the form’s options. When the full-trust security level is selected, the form must be published as an administrator-approved template. Furthermore, it must be digitally signed with a trusted root certificate.
When an administrator-approved template is required, it will be obvious during the form publishing process.
Note
Learn more about publishing and submitting forms in Chapter 6, and learn more about InfoPath Forms Services in Chapter 12.
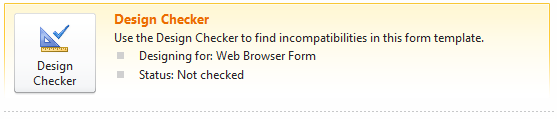
The Design Checker
When overwhelmed with form decisions and compatibility considerations, InfoPath’s Design Checker can help you out. When compatibility issues occur, InfoPath will let you know. In InfoPath, when designing a form, click the File menu to see the Design Checker button.
In the following exercise, you will create a new blank form and then test it by using the Design Checker. When controls that are not supported in the current compatibility setting are added to a form, the Design Checker will show an error. Chapter 3 will cover form layouts and controls in detail; in this exercise, you will be testing compatibility settings only.
In the Backstage view, select New. Click SharePoint Form Library from the list of templates, and then click Design Form on the right.
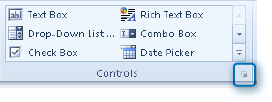
By default when this form library template is selected, the form is browser-compatible. Take a quick look at the list of controls that are available. On the ribbon, click the Home tab, and then click the arrow at the bottom right of the Controls section.
Scroll through the list of controls in the pane on the right, and take a quick look at the control names.
Click File, and then select Form Options.
In the Category section, select Compatibility, and then in the Form type field, change the selection to InfoPath Filler Form. Click OK.
A non–browser-compatible control will be inserted on the form. Now that the form has been converted to a Filler form, you will add a control from the Containers section.
Click the Scrolling Region control to add it to the form.
The location on the form is not important because this is a simple test. The following screenshot shows the empty scrolling region and some of the controls on the right.
Some features and settings are not compatible, and InfoPath is intelligent enough to indicate this with an error. InfoPath will not allow the form to be published until the errors are resolved. Other incompatible settings will give a warning but will not prevent the form from being published. One such example is the placeholder text.
From the list of controls on the right, insert a text box on the form. Again, because this is a test, it is not important where this text box is placed.
Double-click the new text box, and then on the Properties tab, click the Control Properties button.
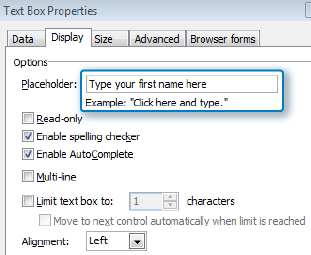
On the Data tab, for the Field Name, type FirstName. On the Display tab, in the Placeholder box, type Type your first name here, and then click OK.
On the Home tab, click the Preview button to see what the placeholder looks like.
Notice that as soon as you start to type in the text box, the placeholder text disappears.
Click the Close Preview button.
To demonstrate the Design Checker’s compatibility errors and warnings, the form will change back to a browser-based form. Click File, and then select Form Options again. In the compatibility section, set the form type to Web Browser Form, and then click OK.
Notice that the horizontal region on the form has a red error on it now, alerting you that this control is not supported. A message about the placeholder text will also be displayed on the text box that was inserted. It’s time to run the Design Checker.
Click the File menu, and then select Design Checker.


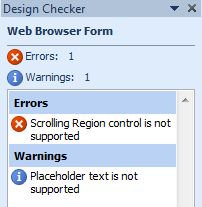
All of the errors on the form will be displayed in the Design Checker pane. When you go through the form and remove incompatibilities such as the placeholder text and scrolling region, click the Refresh button at the bottom of the pane to refresh the list of errors.
Note
For a full list of all InfoPath features that are not compatible with browser-based forms, see the following web page: http://office.microsoft.com/en-us/infopath-help/infopath-2010-features-unavailable-in-web-browser-forms-HA101732796.aspx.
In a form library’s advanced settings, there is an option that enables documents to open in the browser. For the non-enterprise clients, this setting is irrelevant because the forms will never open in the browser.
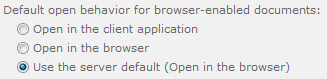
By default, when forms are opened, they use the server default option, which is to open in the browser. However, you can select the Open In The Client Application setting if you want to force the form to open in InfoPath Filler. If you want to make sure that the form is always opened in the browser, whether the client has the filler installed or not, select Open In The Browser.
Combine Client-Based and Browser-Based Controls
Are there some controls or features that need to be included in your form that are not browser-compatible but that a certain subset of users need access to? There’s a setting for that!
Note
Chapter 3 provides detailed information about the concept of views in a form.
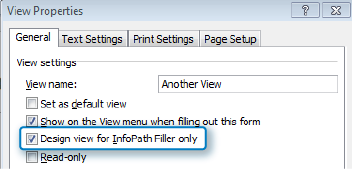
The compatibility settings can be changed per view in a single form. On the Page Design tab in InfoPath, when a view is selected, the Properties button can be used to modify the settings for each view.
To add browser-incompatible controls to this view, select the Design view for InfoPath Filler Only check box. With this option enabled, only clients who are filling out the form with the InfoPath client software can use this view.
Using the Decision Matrix
This chapter has presented an overview of design considerations when starting to build a form. Each time a new form is created, this quick list of factors can be used for deciding which type of form can or should be created. Again, before deciding what type of form or template to create, form requirements should be gathered. Now we’ll go through some examples of the decision-making process:
The Simple “New Employee” Form The new employee form has 20 fields that need to be filled out for each new hire in the company. The fields are all text boxes and drop-down boxes. The form contains no repeating tables, and no other complex requirements are needed.
If you have SharePoint Server 2010 Enterprise or Office 365, this form can be created from the SharePoint List template.
If you have a non-enterprise version of SharePoint or Office 365, this form will be created from the Blank Form (InfoPath Filler) template and published to a form library.
The Expense Report Each time an employee travels, he needs to fill in this form. It will contain multiple lines in a table, representing a row for each receipt from the trip. Because the form will need a repeating table, it cannot be created as a SharePoint list form. No special controls are needed, but the form might need to be filled out offline.
For all versions of SharePoint, this form is created as a form library form, and the SharePoint Form Library template can be used. For non-Enterprise customers, the compatibility level will need to be changed to InfoPath Filler Form.
Clients who will be filling out the form offline need to install the InfoPath Filler client on their computers.
The Vacation Request This form needs to be deployed to multiple site collections and have a data connection that receives data from a SharePoint list in another site collection.
For Enterprise versions, this form can be published as an administrator-approved template and can be uploaded to the list of form templates in Central Administration. The data connection can be converted to a universal data connection and uploaded to the list of data connections in forms services in Central Administration.
For non-Enterprise versions and Office 365, it is not possible to deploy a single form to multiple site collections at once. It could be published as a content type, but this could be done only for one site collection at a time. The data connection to another site collection would not be supported.
Key Points
When a new form is created in InfoPath Designer, a form template must be selected.
Browser-based forms do not require any specific client software, but filler forms require that InfoPath Filler is installed on client computers.
There are five compatibility settings; these settings can be changed at any point.
Newly introduced in SharePoint 2010, SharePoint list forms can be customized by using InfoPath.
Existing Word documents or Excel spreadsheets can be converted to InfoPath forms.
The location of the data is important to know because a form’s complexity can be increased if it needs to be received from or submitted to a database, rather than SharePoint.
It is important to become familiarized with the organization’s current version of SharePoint or Office 365 because it is a big factor in the form decision-making process.
With each of the list of factors, to determine which type of template should be used, consider the current version of SharePoint and the priority of the requirement.
When custom code is included in the form, the form can be deployed in only a limited number of scenarios.
The Design Checker can compare the current compatibility settings to the currently used controls and functionalities and subsequently list any errors and warnings.