
Chapter 11. Building an Approval Process
Chapter at a Glance
Typically, when a form is filled out and submitted, an approval process is associated with the form. A common process involves obtaining management approval of a completed form. The number of approvals and the level of complexity can vary greatly from form to form. In planning out approvals, the process requirements will dictate the way that the form is created in InfoPath. The more information that is gathered at the beginning, the more efficient the form creation process will be. When you hear the term workflow, you might initially think about SharePoint Designer workflows, but much of the workflow can be built right in to InfoPath, using logic. Not to say that other workflows are unnecessary, but a form’s workflow can be used in conjunction with SharePoint Designer workflows. Workflows such as those created with SharePoint Designer will add benefits that are not found within the InfoPath form logic alone.
In this chapter, you will learn how to create an approval process within an InfoPath form. Conditions and rules are powerful tools that can be used to create a workflow inside a form. Some basic approval process requirements will be discussed, and you will build on an existing form. New fields will be added, and views for approvers will be configured. This is a more advanced chapter, building on the principles that you have learned so far in this book.
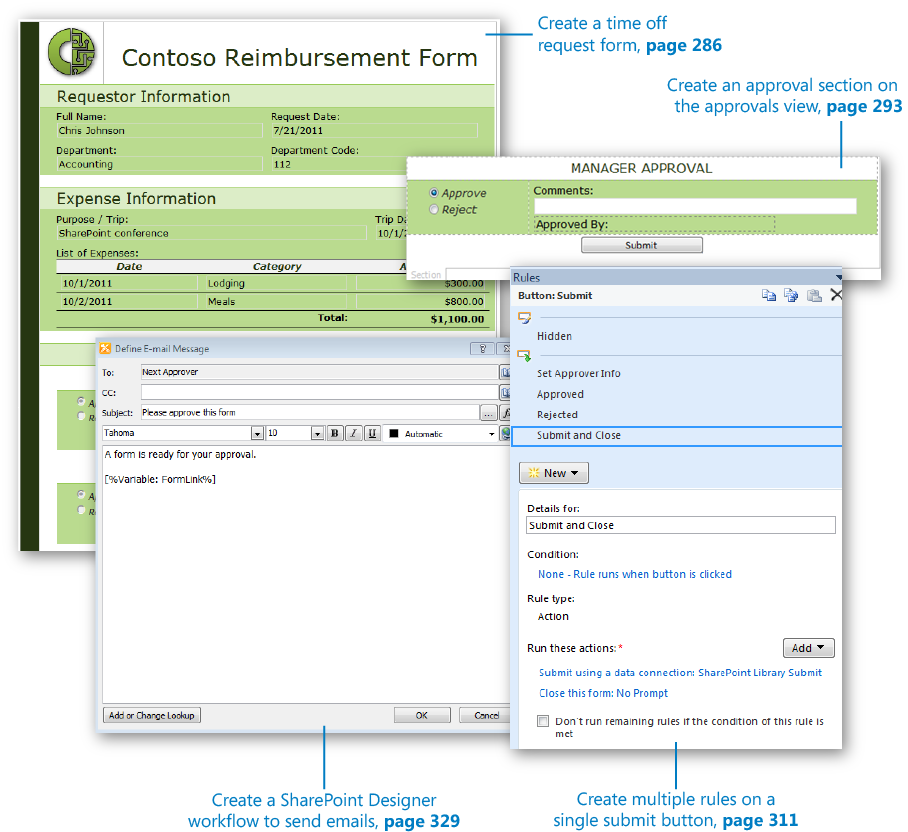
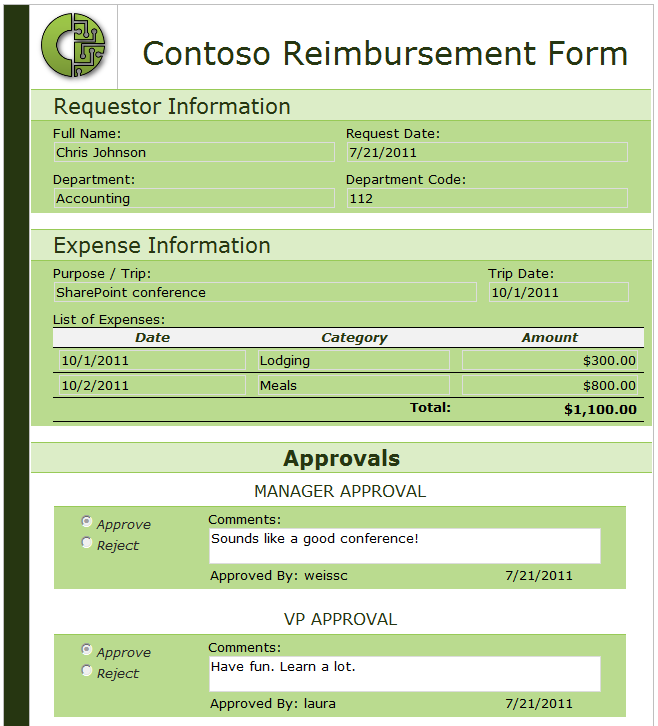
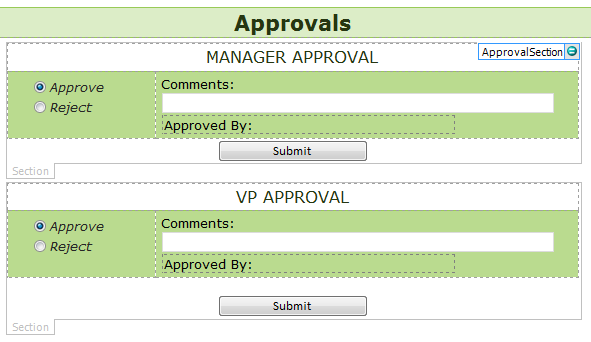
The following screenshot shows a form that has gone through the approval process.
Note
Practice Files Before you can complete the exercises in this chapter, you need to copy the book’s practice files to your computer. The practice files you’ll use to complete the exercises in this chapter are in the Chapter 11 practice file folder. A complete list of practice files is provided in Downloading the Practice Files and eBook on page xxvi.
Gathering Requirements
When you create a new form in InfoPath that will need to go through an approval process, you need to gather some basic information. Having this information will not only help you build the form according to requirements but it will save time in the long run. Following is a list of basic requirements:
Workflow diagram Draw out a diagram of what the workflow process should be. Use Microsoft Visio, Microsoft Word, Microsoft PowerPoint, or just draw it on a whiteboard. All parties involved should come to a consensus as to the order and flow of the approvals.
Security considerations With InfoPath, you can create views to hide and show certain information. Views in SharePoint can also be used as filters to show people what you want them to see. This can be considered “security by obfuscation.” There’s no true security involved with this method. Alternatively, item-level permissions can be used in SharePoint and assigned through a workflow. Determine which method is appropriate for the form. For example, a form that contains Social Security numbers or salaries needs tighter security.
List of approvers Who will approve each form, and how will their names be obtained? Will the form be routed to a name that is dynamic, like the logged-on user’s manager? Can each person pick the next approver by using a people picker control? Maybe a special SharePoint group exists, and the approval email should be sent to the entire group. All three of these are common scenarios, and sometimes there is a combination of several methods within a single form.
Form lifecycle What will happen to the form after it has been approved? Commonly, the form is set to read-only after it has been approved. How long does each form need to be kept? Library views can be filtered so that completed forms are not displayed.
User interface When users visit the SharePoint site, what will their experience be? Plan the Web Parts and views that will be created. Some common filtered views are My Forms and Active Forms. Chapter 13, will cover these considerations more thoroughly.
Contoso Reimbursement Form
At Contoso, after meeting with the reimbursement department, the following requirements have been gathered:
After final approval, the form will be read-only.
Approvers cannot modify any of the original data that was submitted.
If a form is rejected by anyone, the approval process is over and the form is set to read-only. To resubmit a form, the initiator must start from a new form.
Form Views
When working with multiple views of an InfoPath form, remember to keep it simple. Views are extremely useful, but the more of them you have, the more work you could be creating for yourself. The best practice is to create one view, with the form’s’ layout and fields finalized before copying them to other views. For a situation in which a field is displayed across multiple views and the name of the field’s label needs to be modified, this text will need to be edited in each separate view.
The following three views will be used in the Contoso Reimbursement form for the exercises in this chapter:
New When a new form is filled out for the first time, this is the default view.
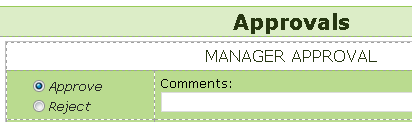
Approvals Approvers use this view to reject or approve a form as well as to include comments. The approvers cannot modify any of the original information in the request.
Read Only When the form has gone through the approval process or has been rejected, this view is used to display all the information, but nothing can be modified.
During form approval, you do not want the approvers to be able to modify the information that was submitted. These fields can be set to read-only. However, you do not want the entire view to be read-only, so this setting must be applied to each individual field, as needed.
The three views have already been created in the Contoso Reimbursement request form. The controls on the approvals view have each been set to read-only, and each control’s background has been set to no fill. Because the fields are read-only, the background has been changed so that they do not appear editable.
Approval Fields
When a form reaches the approval stage, the approver will open the form, select to approve or reject the form, and type his comments. For accountability, when the submit button is clicked, the user’s name and the date will be saved. For each level of approval that is required, there will be four fields:
Approval This is a radio button that has the value of Approved or Rejected.
Comments This is a text box in which the approver can type comments. Comments will be required if the form is rejected.
Approver The name of the approver will be stored in this field and will be displayed as read-only the next time the form is opened.
ApprovalDate The date of the approval will be stored in this field and will be displayed as read-only.
The Contoso reimbursement form will have two levels of approvals; therefore, it will have eight approval fields.
In the following exercise, you will create the Approvals table and add the approval information to the bottom of the form.
Note
SET UP Open the ContosoReimbursementform.xsn in Design mode, and then switch to the Approvals view. (On the Page Design tab, click the View drop-down box, and then select the Approvals view.)
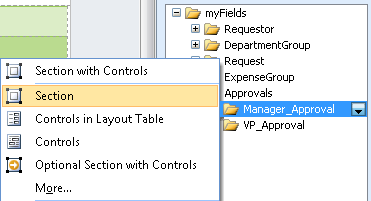
In the Approvals table, put the cursor in the first white row of the table under the word “Approvals”. In the list of fields on the right, in the Approvals section, click the drop-down box on the Manager_Approval section, and then click Section to insert a new, empty section on the form.
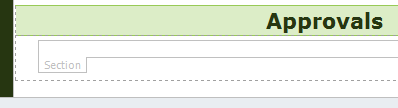
With the cursor inside the newly inserted section, press Delete two times to remove as much extra space as possible.
On the Insert tab on the ribbon, in the list of tables, select the table called 2 Column Offset With Emphasis 3.
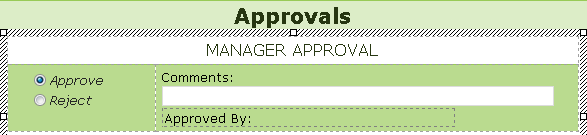
With the cursor in the area that says Click to add subheading, type Manager Approval.
The approval fields have been pre-created in the template, and the beginning of the approval section has been started.
Position the cursor in the first green row under the MANAGER APPROVAL header, where it says Add Label. In the list of fields on the right, click the drop-down box on the ManagerApproval field under the Approvals / Manager_Approval node. Select Option Button.
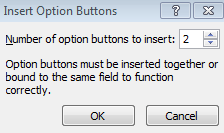
For the number of option buttons to insert, select 2, and then click OK.
Next to each option button on the form, type the words Approve and Reject.
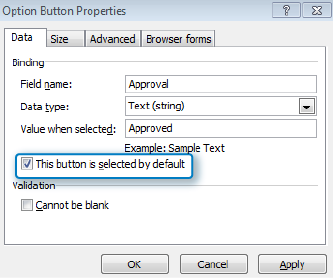
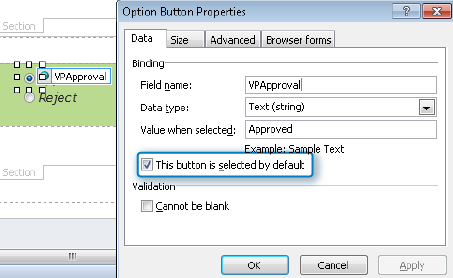
Select the Approve option, and then press Alt+Enter to open the control properties. In the Value when selected field, type Approved. Select the This button is selected by default check box, and then click OK.
Select the Reject option, and then press Alt+Enter to open the control properties. In the Value when selected field, type Rejected, and then click OK.
From the list of Manager_Approval fields on the right, drag the ManagerComments field to the table in the cell next to the Approve and Reject buttons. Change the label text to Comments.
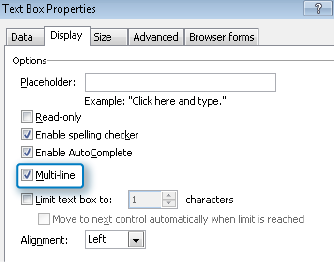
Click to select the Comments text box. Press Alt+Enter, and then in the control’s properties, go to the Display tab. Select the Multi-line check box, and then click OK.
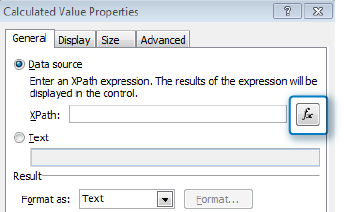
With the cursor to the right of the Comments text box, on the ribbon, click the Home tab. In the list of controls, click Calculated Value.
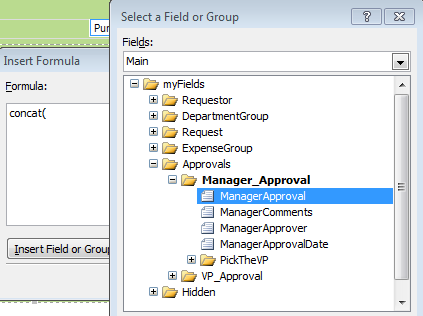
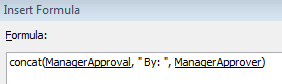
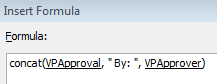
Click the function button to edit the formula. Type concat(, and then click the Insert Field or Group button. In the Manager_Approval section, select the ManagerApproval field, and then click OK.
The formula will concatenate ManagerApproval By: and ManagerApprover, so complete the full formula, click OK, and then click OK again.
With the cursor to the right of the calculated field that was just inserted, click the drop-down box on the ManagerApprovalDate field, and then from the list of Manager_Approval fields, select Text box.
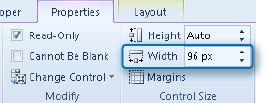
Select the ManagerApprovalDate text box, and then on the ribbon, click the Properties tab. Select the Read-only check box, and then use the Shading button to set the background to No Fill.
The widths of the calculated field and date field will now be modified so that they fit neatly next to each other. With the ManagerApprovalDate text box selected, on the Properties tab, and then change the Width value to 96 px.
Change the width of the calculated field (the one labeled Approved By) to 293 px.
Delete the last two green empty rows of the table.
With the ManagerApprovalDate text box selected, on the ribbon, click Borders. Click None, and then click OK.
Notice that the date field is no longer visible. This is because you just removed the background and borders.
With the first approval section created, you can copy it and use it as a basis for the other approval sections. But before you do that, several rules will be created on each control.


The Status Field
Before you create rules on each approval section, you first need to understand the basis for how the logic will work for the form as a whole. To reiterate, the form will have its own workflow, which will be created by using form load rules and many different formatting and action rules. There will be a field called Form Status, which will be the foundation for much of the form’s logic.
The Form Status values will be changed as the form goes through the approval process. The status levels are as follows:
New This is the first status. It will be the initial default value.
Manager Approval As soon as a form is submitted for the first time, because the manager is the first approver, the status will immediately be set to this.
VP Approval This is the status after the manager approves a form.
Completed When the VP has approved a form, the process is over and the form is complete.
Rejected If any of the approvers reject the form, this is the status.
This Form Status field will also be promoted to be a column in the SharePoint form library on which it can be filtered and sorted. Any SharePoint workflows that send emails will use the status as a workflow condition.
When thinking about the big picture and creating many different forms and approval processes, you will discover that the Form Status field will be a common element in your architecture. Because of the need to use it across forms and in workflows, this field can be created as a site column.
In the following exercise, you will create Form Status as a site column and as a field in the reimbursement form. Then, the two will be tied together by publishing the form and promoting the field to SharePoint as a column.
For InfoPath fields that are also used for workflows and other activities transparent to the end users, it is a good practice to keep them in a pre-defined place within the list of fields so that you can find them quickly, later on. A group of fields called Hidden will be created in the form, which is where the form status will be.
Note
SET UP Open ContosoReimbursementform.xsn in Design mode. Decide to which of your test SharePoint sites you will publish this form. In the following example, the site will be http://forms.contoso.com. Open your SharePoint site in the browser.
In SharePoint in the browser, click Site Actions, and then select Site Settings.
In the Galleries section, click Site Columns.
Click the Create button.
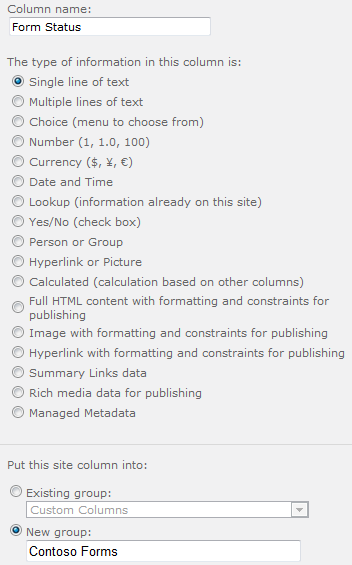
Name the column Form Status, and then select Single line of text. Scroll down, to Put this site column into. In the New group field, type Contoso Forms. Leave the rest of the information as default, and then click OK.
Repeat steps 3 and 4, creating another text column called Next Approver. In the Existing Group drop-down box, choose Contoso Forms. Both of the new fields are in the Contoso Forms group in the list of site columns.
In InfoPath Designer, create the group for hidden fields and the form status field inside it by clicking the drop-down box on myFields, and then clicking Add.
Click the drop-down box on the new Hidden group, and then click Add.
Name the field FormStatus, as a text data type, and then click OK.
Repeat steps 8 and 9, creating a field called NextApprover.
Double-click the new FormStatus field. In the Default value box, type New, and then click OK.
This value is important because form load rules will depend on it later.
On the File tab at the top, and click Publish, and then click SharePoint Server. This is the Publishing Wizard.
Type the URL of your SharePoint site. In this example, it is http://forms.contoso.com. Click Next.
Note
For more information about publishing and submitting forms to SharePoint, see Chapter 6.
Select Form Library, and then click Next. Select Create a new form library, and then click Next.
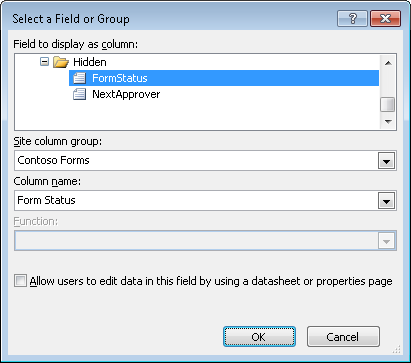
Click Add, select the new FormStatus field from the Hidden group, and then click OK.
Notice that the Site column group drop-down box automatically shows the value of the Contoso Forms group, and the Column name drop-down list shows Form Status—this is the site column.
Tip
InfoPath recognizes that the name of the field you selected has the same name as the existing site column. If the field in InfoPath had been named FormStatus (with a lowercase s), the field would not have been automatically matched up with the site column because InfoPath sees a capital letter or an underscore character as a word delineator.
Repeat step 16, adding the NextApprover field as another column.
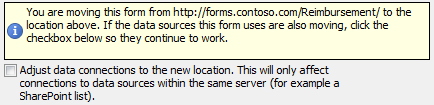
Click Next. Select the Adjust data connections to new location check box, and then click Publish.
Important
It is important that this check box is selected, because the template provided to you contains data connections to locations that do not exist in your own environment. When you allow InfoPath to adjust the data connections automatically, both the existing submit connection and the user profile service connection will be changed to point to your own site.
After the Publishing Wizard has completed publishing the form, click Close.

The form now has a status field, and the site column called Form Status is being used in the reimbursement form library. This status will be changed each time a submit button is clicked, and its value will be used in form load rules.
Form Load Rules
In Chapter 5, you learned about form rules and logic. Each button and control can have rules applied to it. Not only can rules be created on individual controls but action rules can be created, which run each time a form is opened. These are called form load rules. For forms that go through an approval process and in this chapter’s example, these types of rules can be used as sort of a workflow within InfoPath. Each rule can have its own conditions and actions. For example, one rule can take certain actions on new forms, another rule can be used for the approval process, and another rule can be created for forms that have been approved and completed.
On the ribbon, on the Data tab, click the Form Load button to open the Manage Rules pane on the right. You will notice that one form load rule has already been created; this rule will be addressed later in the chapter.
In your form, you do not want the end users to have the ability to switch between the form’s views. The reimbursement form’s process can be outlined as follows:
When a new form is filled out, the default value of FormStatus is New.
The first time the Submit button is clicked on the New view, the value of the FormStatus field will be set to Manager Approval.
Use the following form load rule: If FormStatus contains Approval, switch to the Approvals view.
As each person approves and submits the form and the FormStatus value goes from Manager Approval to VP Approval, each submit button will set the value of the FormStatus.
Because the CEO is the last approver, when she approves and clicks Submit, the FormStatus value is set to Completed.
If anyone along the way rejects the form, the FormStatus field is set to Rejected.
Use the following form load rule: if FormStatus equals Completed or FormStatus equals Rejected, switch to the Read-only view.
In the following exercise, you will create the two new form load rules so that views will be switched automatically.
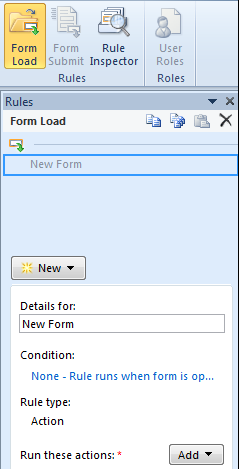
On the ribbon, click the Data tab, and then click the Form Load button.
Click the New button, and then select Action.
In the Details for box, type Approvals.
This is the name that you are giving the rule for your own reference later.
In the Condition section, click the None - Rule runs when form is opened link.
In the myFields drop-down box, click Select a field or group.
Expand the Hidden group, select FormStatus, and then click OK.
In the second drop-down box, select Contains.
In the third drop-down box, select Type text. Type Approval, and then click OK.
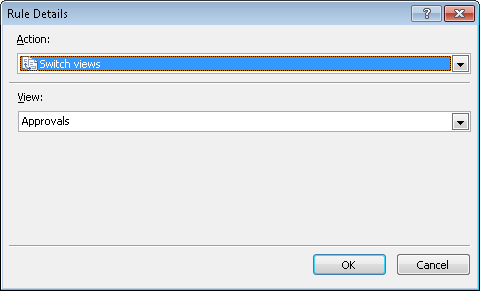
Click the Add button next to Run these actions, and then select Switch views.
Select the Approvals view, and then click OK.
Now that the approvals rule has been created, the rule for completed or rejected forms can be created.
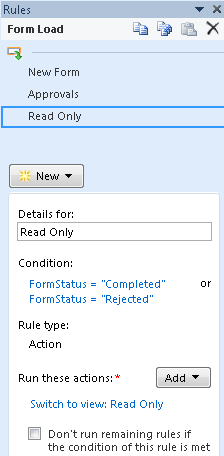
Again, in the Form Load pane, click the New button, and then select Action.
In the Details for dialog box, type Read Only. In the Condition section, click the None-Rule runs when form is opened link.
There are two conditions: FormStatus is equal to “Completed” and FormStatus is equal to “Rejected”. Notice the or condition in the drop-down box at the end of the first line.
Click OK. In the Run these actions section, click Add, and then select Switch views.
Select the Read Only view, and then click OK.
Even with two levels of approvals available, having one view for approvals will be efficient because our form load rules can be kept simple. Keep in mind that conditions are case sensitive, so be sure to follow the instructions carefully.


Note
CLEAN UP Leave InfoPath open if you are continuing to the next section of this chapter. Otherwise, click the Save button to save the XSN file to your computer, and then close InfoPath Designer.
So far, we have created some approval fields, one approval section, and a couple of form load rules. The next task is to tie together all of this functionality with some customized submit buttons and more rules.
Approval Sections
The layout of a single approval section was created in an earlier exercise, but it doesn’t do anything yet. It’s time to utilize the power of InfoPath rules to control the functionality of each approver’s interface. The Approve and Reject radio buttons as well as the Comments box will be disabled after the form moves to the next approver status. The approver’s name and date will be saved when he clicks the Submit button, and then the next approvers will see that read-only information. After each approver submits the form, the Submit button is hidden in that approver’s section.
In the following exercise, you will create several rules on the Submit button in the New view. Formatting rules will be created on controls in the manager approval section.
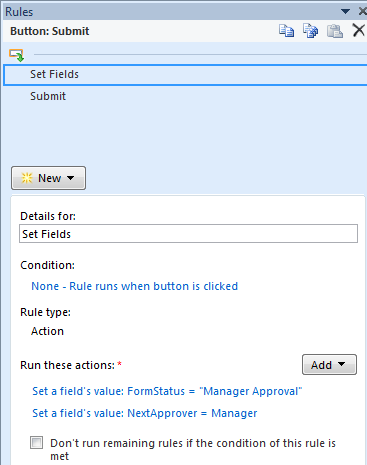
Double-click to select the Submit button, and then on the ribbon, click Manage Rules.
Click the New button, and then select Action.
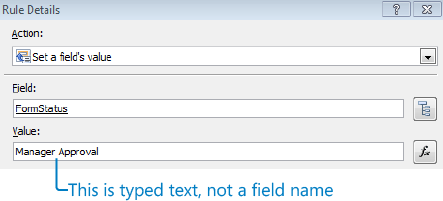
In the Details for dialog box, type Set Fields. Click the Add button, and then select Set a field’s value. In the Field text box, select FormStatus. In the Value text box, type Manager Approval, and then click OK.
Click the drop-down box for the Set Fields rule, and then select Move up; you want this rule to apply before the Submit rule.
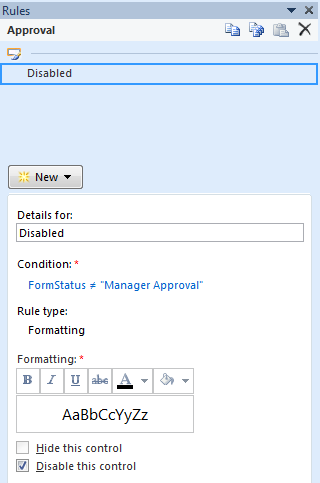
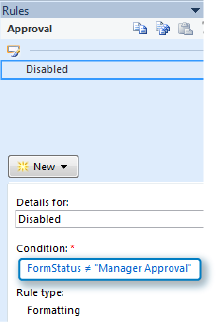
Switch to the Approvals view. In the Manager Approval section, select the Approve option. In the Rules pane, click the New button, and then select Formatting.
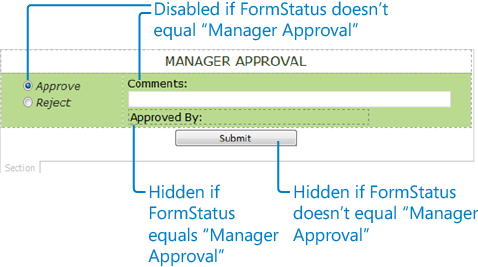
Call this rule Disabled. Create the following condition: FormStatus is not equal to Manager Approval. Select the Disable this control check box.
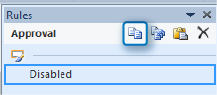
Now you can copy and paste this rule to other controls. With the Disabled rule selected, at the top of the Rules pane, click the Copy Rule button.
Select the Rejected option. In the Rules pane, click the Paste Rule button.
Click to select the Comments text box, and then click the Paste Rule button.
Now, all three controls have the same rule. They will all be disabled if the FormStatus is not “Manager Approval”.
At this point, formatting rules can be created on the controls that are under the Comments box.
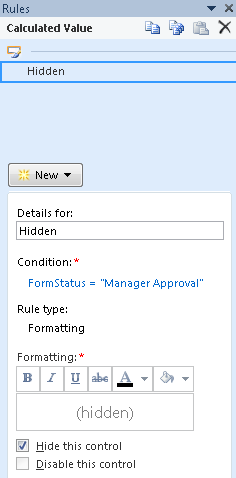
Click to select the calculated field (with the Approved By text in it), click the New button in the Rules pane, and then choose Formatting. Create one condition, which is FormStatus is equal to “Manager Approval”. Select the Hide this control check box.
Select the ManagerApprovalDate text box, and then in the Rules pane, click the Paste Rule button.
Note
An identical copy of the rule has been copied from one control to another. You do not want the manager to see these two empty fields, which is why they are now hidden. When the form is routed to the next approver after the manager, these filled in fields will be visible. The manager’s name will be captured when the manager clicks the Submit button, which is why the controls are read-only.
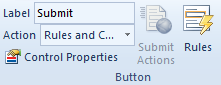
Add the Submit button by placing the cursor at the bottom of the Manager Approval section, and then on the Home tab, from the list of controls, click to add a button to the form.
Also on the Home tab, click the Center button. Double-click the new button. In the label box, type Submit. Leave the Action drop-down default of Rules and Custom Code.
Select the Submit button, and then create a formatting rule with the condition that the button is hidden if the FormStatus is not equal to “Manager Approval”.


Only one approval section has been created so far, but the formatting rules have been created on each control in the section. When all rules have been created, this section can be copied to create the other level of approval.
Submit Button Actions
With each different approval, different actions will take place in a specific order. Also, different actions will take place depending on whether the form is approved or rejected. However, whether the form is approved or rejected, the logged-on user’s name and the current date will be saved. Here is how the form will behave according to the rules that you will define:
No conditions When the submit button is clicked, the following actions will occur:
Approved When a form is approved, the FormStatus value will be set to “VP Approval”. The VP will be the next person to approve this form, and the VP approval section will be below the manager approval.
Rejected When a form is rejected, the FormStatus value will be set to “Rejected”.
In the following exercise, you will create action rules that will be carried out when the Submit button is clicked.
Note
SET UP Open ContosoReimbursementform.xsn in Design mode, and then switch to the “Approvals” view.
Double-click to select the Submit button. If the Rules pane is not already showing on the right side of the screen, then on the ribbon, click the Manage Rules button.
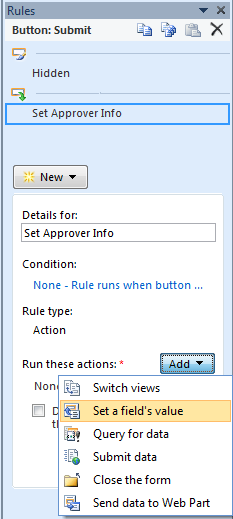
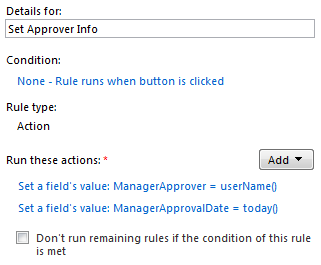
In the Rules pane, click the New button, and then select Action. In the Details for box, type Set Approver Info.
Next to Run these actions, click the Add button, and then select Set a field’s value.
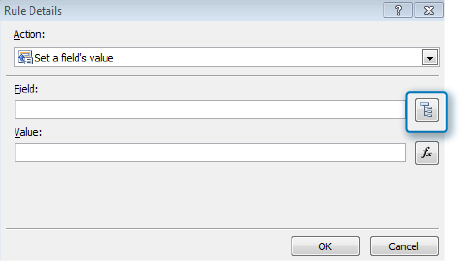
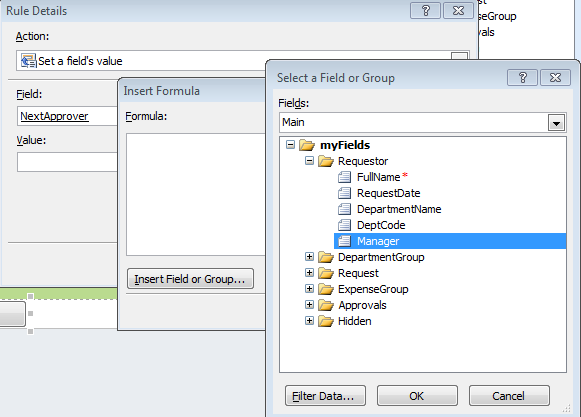
Click the field picker button adjacent to the Field box.
The Select a Field or Group dialog box opens.
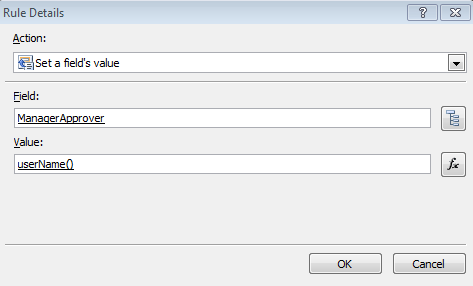
In the Manager_Approval section, select the ManagerApprover field, and then click OK.
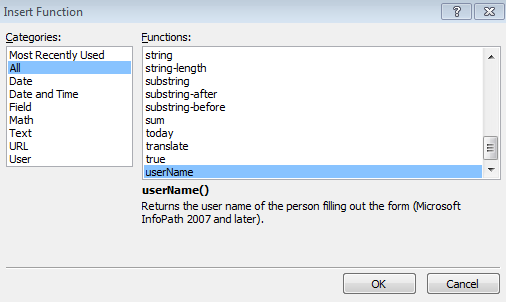
Click the function button next to the Value box, and then click the Insert Function button.
Select the userName function, and then click OK. Also, click OK on the Insert Formula window.
In the Rule Details dialog box, click OK.
In the Rules pane, click the Add button again, and then select Set a field’s value. Repeat steps 4–7, except that the field should be ManagerApprovalDate and the value should be the Today() function.
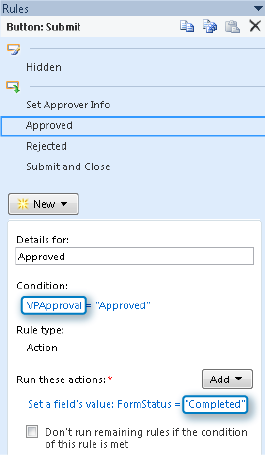
In the Rules pane, click the New button, and then select Action. Name this rule Approved. For the condition, select ManagerApproval is equal to Approved. Click OK.
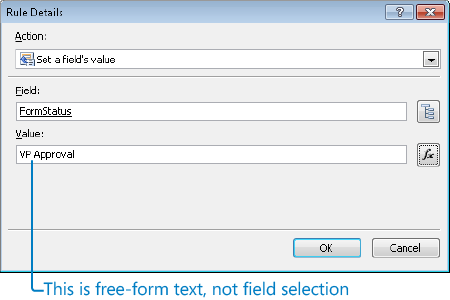
For the action, add a new action to set a field’s value. In the Value text box for FormStatus, type VP Approval, and then click OK. Remember that the typed text here is case-sensitive.
Click the New button to create another action rule. Name this rule Rejected, and then set the condition as Manager Approval is equal to Rejected.
This action sets the FormStatus field to “Rejected”.
After all of these values are set, the form needs to be submitted and closed. Click New again, and then select Action. Name this rule Submit and Close. There are no conditions. Create two actions: the first one submits the form to SharePoint (Submit Data), and the second closes the form.
You now have five rules on the Submit button.


As you’ve seen so far, there is a lot going on behind the scenes to automate this form. All this complexity will be transparent to the people filling out the form. The approval process will be easy to understand and very simple.
Note
CLEAN UP Leave InfoPath open if you are continuing to the next section of this chapter. Otherwise, click the Save button to save the XSN file to your computer, and then lose InfoPath Designer.
In the following exercise, you will copy the Manager Approval section to create the other approvals.
Note
SET UP Open the ContosoReimbursementform.xsn in design mode, and switch to the “Approvals” view.
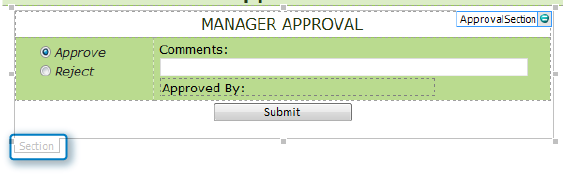
Using the cursor, select the entire Manager Approval section. At the lower-left corner, click Section. Press Ctrl+C to copy this selection to the clipboard.
Press the right-arrow key on the keyboard until the cursor is positioned to the immediate right of the section. Press Ctrl+V to paste the copy.
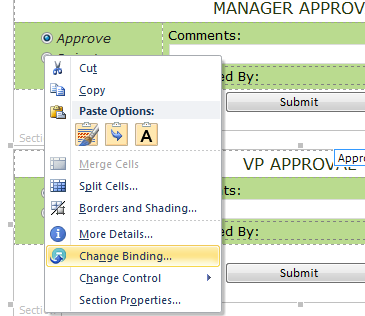
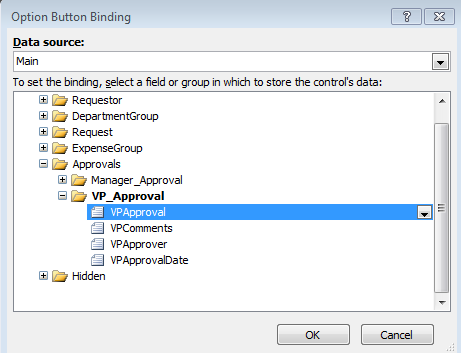
In the heading of the new section, change the word Manager to VP. Now that the section has been copied, all of the VP fields need to be used instead of the manager fields. Right-click Section at the lower-left of the VP section, and then select Change Binding.
The control needs to be bound to the VP Approval section instead of Manager Approval, so select the VP_Approval section, and then click OK.
Now each individual control needs to have its binding changed.
In the VP Approval section, right-click the Approve option, and then select Change Binding. In the VP_Approval section, select the VPApproval field, and then click OK.
Using the same method as in step 5, change the binding for the following controls to that listed in the following table.
The calculated Approved by field is a bit different. Click to select this control, and then press Alt+Enter to open the properties. The XPath field will show as empty, so the calculation needs to be recreated. If the XPath is not empty, clear out the existing value. Click the function button next to the XPath box.
The formula will concatenate VPApproval By: and VPApprover, so create this formula (again). Click OK two times.
The Approve option needs to be set as the default radio button again.
Select the Approve option, and then in the control’s properties, select the This button is selected by default check box. Click OK.
Now the rules need to be modified slightly.
Double-click to select the Approve option again. If the Rules pane is not already displayed, click the Manage Rules button. There is one rule, called Disabled. Click the link to go to the rule’s condition.
Modify the condition by changing the text from “Manager Approval” to “VP Approval”.
Modify each of the six controls in the approval section to have a formatting rule exactly the same as the manager approval rules, with the exception that the condition needs to be “VP Approval”.
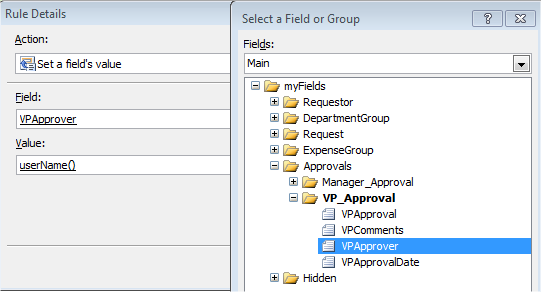
The Submit button’s action rules also need to be modified. In the VP Approval section, select the Submit button. In the Rules pane, click the Set Approver Info rule. Under Run these actions, click Set a field’s value: ManagerApprover = username().
The field needs to be changed so that instead of ManagerApprover, it shows VPApprover. Click OK, and then click OK again to save the action.
Do the same thing with the Approval Date action by selecting the VPApprovalDate field.
The conditions behind the Approved and Rejected rules also need to be modified. In the VP_Approval section, change the field in each rule so that it is the VPApproval field.
In the VP Approval section, click to select the Submit button. In the Rules pane, select the Approved rule. Set the FormStatus field value to Completed.
When the Manager is filling out approval information, you don’t want to see the VP Approval section yet.
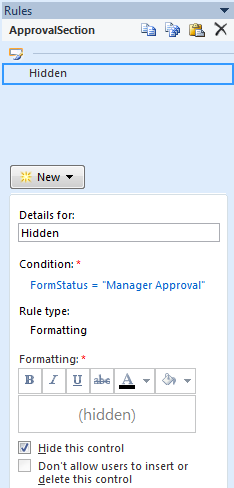
Select the VP Approval section by clicking Section at the lower-left of the control.
Create a new formatting rule called Hidden. The condition is FormStatus is equal to Manager Approval. Select the Hide this control check box.

The form’s approval process is almost complete. After the form is submitted for the first time, it automatically switches to the Approvals view the next time it is opened. Lastly, the read-only view will need to be configured. Take a look at the progress that has been made on this view.
Note
CLEAN UP Leave InfoPath open if you are continuing to the next section of this chapter. Otherwise, click the Save button to save the XSN file to your computer, and then close InfoPath Designer.
As part of the form’s lifecycle, you do not want any of the form’s data to be edited after the form has been completed and approved. Therefore, you use a read-only view and the form load rule so that when the form’s status is completed, it automatically switches over to that view. This maintains the integrity of the data.
In the following exercise, you will copy the approvals view over to the read-only view.
Note
SET UP Open ContosoReimbursementform.xsn in Design mode, and then switch to the “Approvals” view.
Press Ctrl+A to select everything on the Approvals view, and then press Ctrl+C to copy this information to the clipboard.
On the ribbon, on the Page Design tab, select the Read Only view from the View drop-down box. Press Ctrl+V to paste the information from the clipboard onto this view.
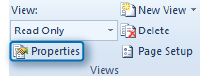
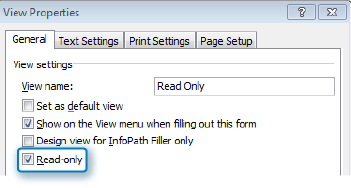
Again, on the Page Design tab, in the Views section, click Properties.
On the General tab of the view settings, select the Read-only check box, and then click OK.
Click the File menu, and then click Quick Publish.
Now the read-only view is truly read-only. Keep in mind that when the last approver approves the form, the Submit button sets the FormStatus value to Completed. Then a form load rule automatically switches over to the read-only view if the FormStatus value is equal to Completed or Rejected.
Tip
If you are using the attachment control, the attachments cannot be opened or viewed at all when they are put in a read-only view. The workaround is to not select the read-only check box if attachment controls are involved. Instead, set each individual control on the view as read-only.
Note
CLEAN UP Leave InfoPath open if you are continuing to the next section of this chapter. Otherwise, click the Save button to save the XSN file to your computer, and then close InfoPath Designer.
Feel free to publish and test the form that has been created so far. The form can be filled out and submitted. The next time the form is opened, it will switch to the approvals view so that the manager can approve it. The manager approves and submits it, and then the next time the form is opened, the VP approves and submits it. Finally, the next time it is opened, it is on the read-only view because the process is complete.
Workflow Approvers
There is one last item to finish up. The approver names and the emails are still missing. Each time the form is submitted, a workflow needs to send an email to someone so that they know it is their turn to take action. Before the workflow can be created to send emails, you need to define who exactly the approvers will be.
For Contoso’s reimbursement form project, the requirements are as follows:
Because the user profiles in the organization are up to date and have accurate manager names for each user, the user profile service will be used to obtain the initiator’s manager name.
The manager will be prompted with a people picker control so that they can pick the name of the VP who needs to approve this request.
The next step will be to build functionality into the form so that the proper user names are obtained. In Chapter 9, you learned about working with the User Profile Service to obtain information about a user. In this reimbursement form, the User Profile Service will be used to get the manager’s name of the person submitting the request. One way to get information about the currently logged-on user is by using the userName function. However, this function is limited because it returns only the logon name. You have used this function in a couple of places so far in this chapter. When you want to get any detailed information about a user other than just her user name, the User Profile Service comes in handy.
In the following exercise, you will create a new field for the next approver’s name and populate it at each step of the approval process. Throughout the approval process, each time the form is submitted, the name of the next approver needs to be determined. The NextApprover field that was created earlier in this chapter will now be used. The first approver will be the manager.
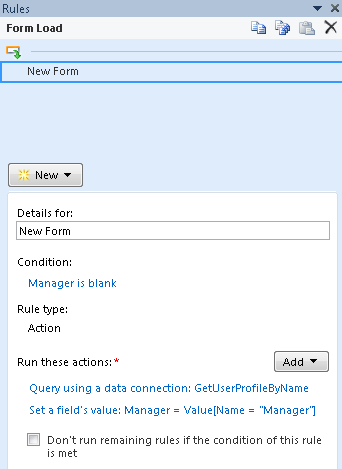
Notice that the New Form rule is a disabled. Click the drop-down box for this rule, and then select Enable.
A data connection has already been created, which receives data about the logged-on user from the User Profile Service web service. This New Form rule first queries the User Profile Service and then sets the form’s Manager field to the name of the logged-on user’s manager. Then it sets the requestor’s FullName field to the current user’s full name. When the form is first submitted, because the next approver will be the manager, you will set the NextApprover field to that value.
On the form’s New (default) view, double-click the Submit button, and then click the Manage Rules button.
Click to select the Set Fields rule that you have already created. Click the Add button to add another action, and then select Set a Field’s Value.
Set the NextApprover field to the value of the Manager field, which can be found under the Requestor Group. Click OK on all three dialog boxes.
Now, the first Submit button sets two fields. In a previous exercise, you created the rule that sets the FormStatus value to “Manager Approval”. Now, there is a new rule that sets the NextApprover field to Manager. This manager field will have a specific person’s name in it, and the first email will be sent to that person.
The second requirement in this project was to allow the first approver to select the next approver’s name from a people picker. Switch back to the Approvals view.
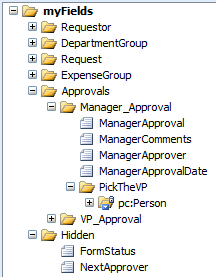
In the list of fields on the right, expand the Approvals section and the Manager_ Approval section to see the PickTheVP section.
This section will be used as a people picker control. If you don’t see the fields on the right, then on the ribbon, click the Data tab, and then click Show Fields button.
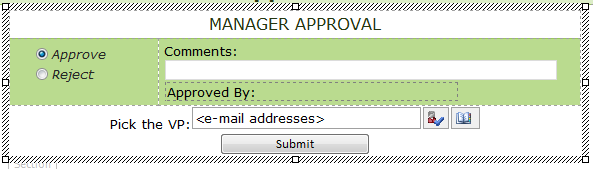
Drag PickTheVP onto the form, in the space above the Manager Approval form’s Submit button. At the left of this control, type Pick the VP:.
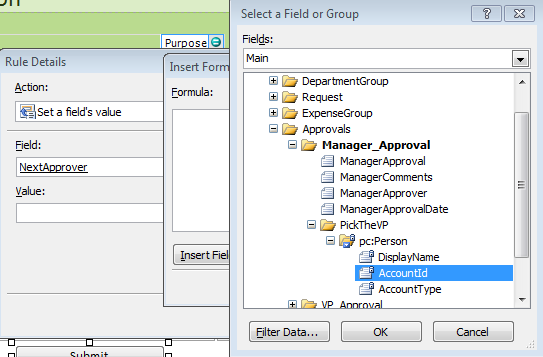
In the Manager Approval section, click to select the Submit button. In the Rules pane, click to select the Approved rule that you created in the previous exercise. Click the Add button, and then select Set a field’s value.
In the Field box, select the NextApprover field.
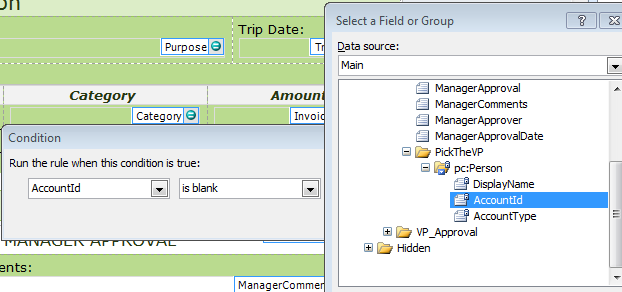
For the Value, click the Function button. Click Insert Field or Group, and then inside the PickTheVP section, choose the AccountId field.
Note
The Account ID is the domainuser name of the person who has been selected in the people picker. You want to ensure that when it is time to pick a VP, the manager cannot submit the form with no one selected in the people picker. Typically, a validation rule would be the way to go, but because validation rules cannot be created on people picker controls, another method can be used. You can disable the Submit button if the people picker is empty.
In the Manager Approval section, select the Submit button; in the Rules pane, click New, and then select Formatting.
Name this rule Disabled. Set the condition to AccountId is blank, and then select Disable this control.
The NextApprover field needs to be cleared out if the form is rejected. Click to select the Rejected rule that you already created. Click the Add button, and then select Set a Field’s value. Set the NextApprover field to a value of nothing (empty), and then click OK.
The NextApprover field also needs to be cleared out after the form is finished, because whether or not it is rejected at the end, there is no NextApprover.
In the VP Approval section, click to select the Submit button. In the Rules pane, select the Set Approver Info rule.
Because this rule runs on every form that is submitted, the new action can be added here. Click the Add button, and repeat the action that was performed in step 14.
Click the Quick Publish button to publish the changes to the form.

Now that the next approver field will have the correct values in it at the correct time, it can be used as a column. The idea being that it is more efficient to have one field with the next approver’s name than it is to promote all those different fields up to SharePoint as columns. This is especially the case when the approval process becomes longer and more complex with multiple levels of approvals. Think about the big picture when it comes to SharePoint views and workflows. Having a single field that you always use for the next approver is a good standard practice.
Note
CLEAN UP Click the Save button to save the XSN file to your computer, and then close InfoPath Designer.
This NextApprover field can also contain the name of a SharePoint group. For example, if another level of approval needs to be added—such as to send the form to the Accounting department—a SharePoint group can be created called “Accounting Team.” The action on submit would then be to set the value of the NextApprover field to “Accounting Team.”
Workflow for Emails
Much of the workflow for this reimbursement form has been done inside the form itself. Because of this, the SharePoint Designer workflow that will be created will be very simple. We want to make it easy for the approver to simply click the hyperlink so that he can activate the workflow. The FormStatus and NextApprover fields will be used in a workflow that will have a very simple structure, as follows:
If the FormStatus is not Rejected or Completed, send an email to NextApprover. This email will let the next approver know that there is a form ready for approval.
If the FormStatus is Rejected, send an email to the person who created the form, informing him that it has been rejected.
If the FormStatus is Completed, send an email to the person who created the form, informing him that it was approved at all levels.
That’s it! Extremely simple. Let’s get started.
Tip
If the workflow that you are creating is going to be specific to only a single list or library, a reusable workflow is not necessary and a list workflow can be created instead.
In the following exercise, you will create a workflow in SharePoint Designer 2010. The goal is to create a standard workflow that can be used with not only this reimbursement form but with any other forms in the organization. When much of the logic is accomplished inside the form itself, the workflow does not need to be complex. Because the FormStatus and NextApprover fields were created as site columns, they can be used in multiple forms, and they can also be used in a reusable workflow. After a reusable workflow is created, it can be associated with any library.
Note
SET UP Open SharePoint Designer 2010, and then open the site where the form has been published. Click Workflows on the left side. Also open the reimbursement form library in the browser.
On the ribbon, click the Reusable Workflow button.
Name the workflow Form Approvals, change the content type to Form, and then click OK.
Because you will need to insert a hyperlink in each email, to directly open the form that is being approved, you will create this hyperlink in a workflow variable so that it can be reused. Use the Action button to add a Set Workflow Variable action.
Click workflow variable, and then choose Create a new variable.
Name the variable FormLink, as a string, and then click OK.
Click value, click the ellipsis (…) button, and then open the string builder.
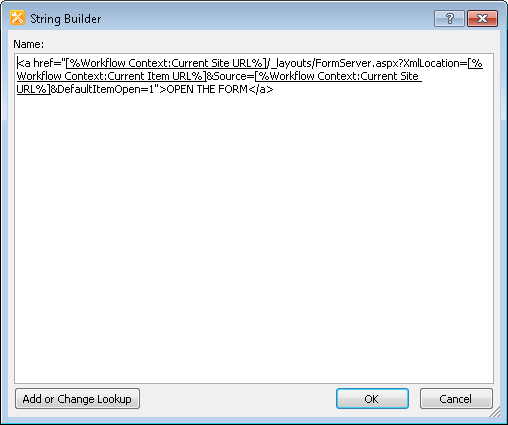
The following URL depicts the necessary format. It will need to be built here as a hyperlink: CurrentSite/_layouts/FormServer.aspx?XmlLocation=CurrentItem&Source=CurrentSite&DefaultItemOpen=1
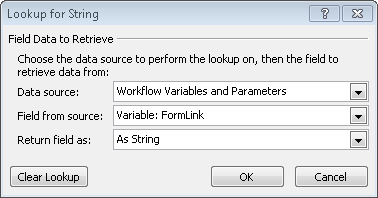
Each instance of bold text is a lookup to be added by using the Add or Change Lookup button. For each of the three references, pick Workflow Context as the data source, and then choose either Current Site URL or Current Item URL for the field, as appropriate. Click OK.
After all of the references have been added, use the following screenshot as a guideline to ensure that the URL is a clickable hyperlink. At the bottom of the String Builder dialog box, click OK.
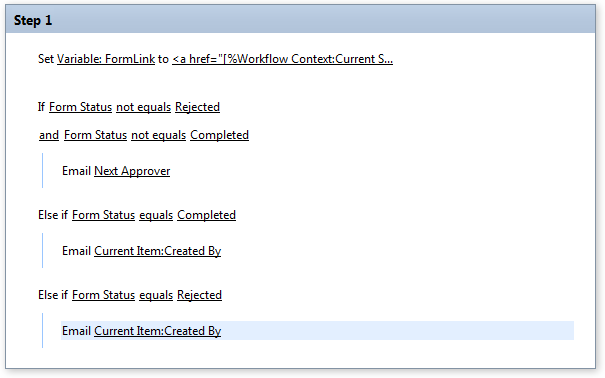
This first step in the workflow will appear as shown in the following illustration:
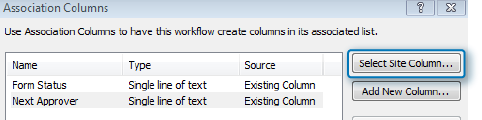
Because this workflow will use site columns, click the Association Columns button. Use the Select Site Column button to add both the FormStatus and the NextApprover columns, and then click OK.
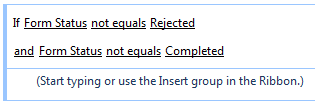
Add the first condition to the workflow. With the cursor below the Set variable action, use the Condition button to add two conditions called If current item field equals value.
You want the conditions to be that the form status is not equal to Rejected or Completed, as shown in the following illustration.
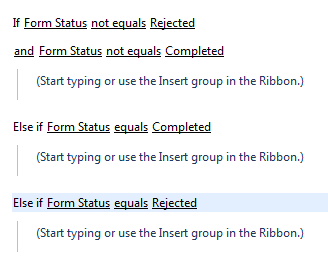
Click the Else-If Branch button to add another branch. Put the cursor under the word Else, and then add another If current item field equals value. Repeat this again, adding a third else-if branch and a third condition.
The second else-if statement should be that the form status equals Completed, and the third else-if should be if the form status equals Rejected.
Now it’s time to create the actions. The first condition’s action should be to send an email to the next approver.
With the cursor in the first area labeled (Start typing or use the Insert group in the Ribbon), on the ribbon, click the Action button, and then add the Send an email action. Click these users to configure the email.
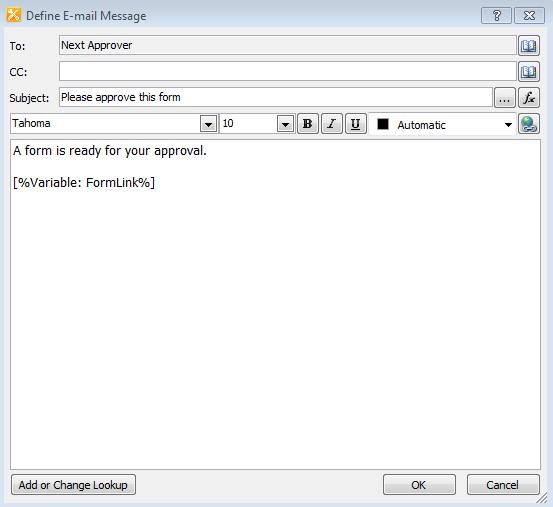
In the To box, use Workflow Lookup for a User to select the Next Approver field, and then click OK.
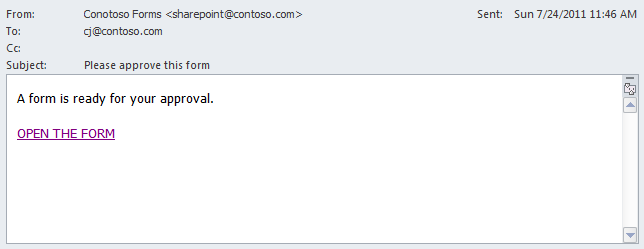
For the subject, type Please approve this form. In the email body, type A form is ready for your approval.
Also in the email body, click the Add or Change Lookup button to add the workflow variable called FormLink, and then click OK.
The simple email notification is complete. Click OK.
After each of the other two conditions in the workflow, use the Send an email action. The following table outlines the settings for the other two conditions. Also insert the FormLink variable in each email.
Condition
To
Subject
Body
User who created current item
Form has been approved
Your form has been approved at all levels.
Form status equals rejected
User who created current item
Form has been rejected
Your form has been rejected.
On the ribbon, click the Publish button to publish the workflow to SharePoint.
Tip
If the reusable workflow is created at the top level of the site collection, the Publish Globally button can be used to publish the workflow for use in any form library in the whole site collection.
Now it’s time to associate the reusable workflow with the reimbursement form library.
In the library in the browser, on the ribbon, click the Library tab, and then click Workflow Settings.
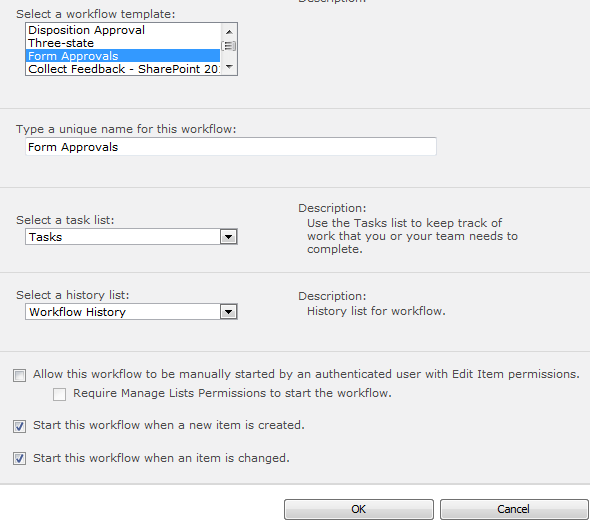
In the All drop-down box, select Form, and then click Add a workflow.
Select Form Approvals, which is the workflow you just created, and then type the name Form Approvals in the name field. Clear the check box to allow the workflow to be manually started; select the check boxes to start the workflow when an item is created and when one is changed. Click OK.


Now that the form and workflow have both been created, they will all work together in conjunction with one another.
To run through the solution that has been created in this chapter, go to the Reimbursement form library, and then click the Add Document button to fill out a new form. Take a look at the Next Approver column in the library to see the account name of the manager who will receive the first email.

The manager receives the following email and clicks the link, which takes her directly to the form.
The manager approves or rejects the form; if it’s approved, an email goes to the next approver. Using this next approver concept behind each Submit button, your approval process can have a varying number of approval levels and still use this same workflow.
Another potential project requirement would be to allow only certain people to see the approval section of the form. The userName function can be used to take certain actions and show certain sections of the form, according to who the logged-on user is.
Not every form approval process will have the same requirements. There will be different approval levels and an endless set of possible combinations of what each approver needs to do. There will also be different possibilities as to what takes place when a form is rejected. In this form, the workflow is over when it is rejected, and the initiator would need to start over with a new one if she wanted to change any of the original fields. Sometimes it is a requirement that the initiator should be able to open the form, make changes, and resubmit for approval.
With three different types of rules, many different actions, and endless possibilities, with InfoPath, you can get creative with how each form will turn out and what the user’s experience will be. Using the skills you’ve developed in this chapter, with conditions that use logic, you can build in more functionality by just thinking through the form’s process logically.
Key Points
While approval processes are commonly requested, requirements can vary greatly from form to form.
Each InfoPath form can have its own workflow inside the form, using logic and conditions. SharePoint Designer workflows can also be used in conjunction with an InfoPath form.
Multiple form views can be used to represent each phase of a form’s workflow.
Fields can be created for workflow use, and they do not need to be displayed on the form.
A calculated value can be inserted to display multiple fields concatenated into one phrase.
InfoPath form fields can be promoted to SharePoint by using existing site columns.
Form load rules that switch views are a great way to tightly control what is seen in the form at each stage, instead of letting users manually switch between views.
Many formatting rules can be created in each approval section, to control what can be done at each stage of approval.
The user name and today functions can be used to store information about the current user and date.
A SharePoint Designer workflow can be used to look at the values in the form’s columns and send emails accordingly.