Chapter 31. Improving your requirements processes
Everyone agreed that the last few projects had not gone smoothly. As the lead business analyst, Joanne knew that requirements issues had caused at least some of the problems. The BAs on the various projects varied greatly in their education and experience levels. They each used different approaches for developing and managing requirements, just doing the best they could based on what they knew. They each organized their requirements in different ways. Some teams followed effective requirements change processes, which reduced the turmoil in their projects, whereas others reacted to every change request that came along in a knee-jerk fashion. The frustration level was high all around.
Joanne had tried mentoring her less experienced BAs; some were more receptive to her input than others. Some of the teams in Joanne’s organization did do a good job on their requirements, and those projects suffered fewer headaches than those of the other teams. Joanne realized that it would be great to bring all of the teams up to a higher level of requirements performance. Maybe now the time was right to get serious about improving their requirements practices. But would the other BAs and their fellow team members play along? Was management truly committed to reducing the pain points? Would anything really change this time, or would this improvement initiative founder on the rocks of indifference, as the earlier ones had?
Previous chapters have described several dozen requirements engineering “good practices” to consider applying in your organization. Putting better practices into action is the essence of software process improvement. In a nutshell, process improvement consists of using more of the approaches that work well for you and avoiding those that have given you headaches in the past. However, the path to improved performance is paved with false starts, resistance from those who are affected, and the challenge of having too little time to handle improvement activities in addition to current tasks.
The ultimate objective of process improvement is to reduce the cost of creating and maintaining software, thereby increasing the value delivered by projects. Ways to accomplish this include:
Correcting problems encountered on previous projects that arose from process shortcomings.
Anticipating and preventing problems that you might encounter on future projects.
Adopting practices that are more efficient and effective than those currently being used.
If your team’s current methods seem to work well—or if people insist that they do, despite evidence to the contrary—people might not see the need to change their approach. However, even successful software organizations can struggle when confronted with larger or more complex projects than they are used to, different customers, long-distance collaborations, tighter schedules, or new business domains. Approaches that worked for a team of 5 people with a single customer don’t scale up to 100 people located in 3 time zones who are serving 50 corporate customers. At the least, you should be aware of other approaches to requirements engineering that could be valuable additions to your tool kit.
This chapter describes how requirements relate to various other project processes and stakeholders. We present some basic concepts about software process improvement and a suggested process improvement cycle. We also list several useful requirements “process assets” that your organization should have available. The chapter concludes by describing a process improvement road map for implementing improved requirements engineering processes.
How requirements relate to other project processes
Requirements lie at the heart of every well-run software project, supporting and enabling the other technical and management activities. Changes that you make in your requirements development and management approaches will affect these other project processes, and vice versa. Figure 31-1 illustrates some connections between requirements and other project processes; the sections that follow briefly describe these process interfaces.
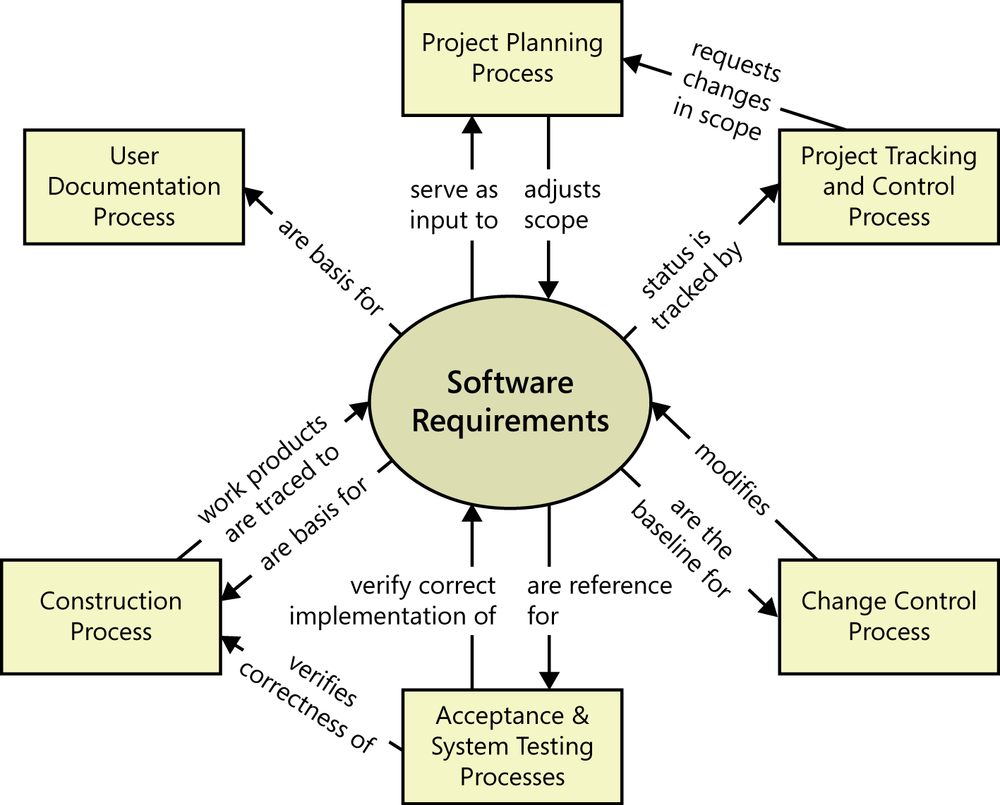
Project planning Requirements serve as the foundation of the project planning process. The planners select an appropriate software development life cycle and create resource and schedule estimates based on the requirements. Project planning might indicate that it’s not possible to deliver the entire desired feature set within the available bounds of resources and time. The planning process can lead to reductions in the project scope or to the selection of an incremental or staged-release approach to deliver functionality in phases. On an agile project, scope is defined through the set of user stories in the product or release backlog and is incrementally implemented in each iteration. The scope planned for future iterations is based on the velocity measurements from earlier iterations.
Project tracking and control Project tracking includes monitoring the project’s status so the project manager can see whether construction and verification are proceeding as intended. If they are not, management, customers, or other stakeholders might need to request scope modification through the planning process. This would change the requirements set being worked on. On an agile project, scope is adjusted by moving lower-priority items to future iterations if necessary to complete each iteration on schedule.
Change control After a set of requirements has been baselined, all subsequent changes and additions should be made through a defined change control process. Requirements changes modify the backlog of remaining work to be done and the priorities of the work items in the backlog. Requirements tracing helps you assess the impact of scope changes. As described in Chapter 28 the change control process helps ensure that the right people make informed and well-communicated decisions to accept appropriate requirements changes.
Acceptance and system testing User requirements and functional requirements are essential inputs to acceptance testing and system testing, respectively. If the expected behavior of the software under various conditions isn’t clearly specified, the testers will be hard-pressed to verify that all planned functionality has been implemented as intended. A colleague related her recent experience: “I was assigned to write a test plan for an SRS from another analyst. I ended up going way over the estimated time because I had to wade around to figure out what the functionality was. The related functionality was sometimes in unexpected sections of the SRS. Other times, the analyst who wrote the SRS talked us through the full description of options that were not chosen before finally getting to the one that was. It was painful.”
Construction Requirements are the basis for the design and implementation work, and they tie together the various construction work products. Use design reviews to ensure that the designs correctly address all of the requirements. Unit testing can determine whether the code satisfies the design specifications and the pertinent requirements. Requirements tracing lets you identify the software design and code elements that were derived from each requirement.
User documentation I once worked in an office area that also housed the technical writers who prepared user documentation for complex software products. I asked one of the writers why they worked such long hours. “We’re at the end of the food chain,” she replied. “We have to respond to the final changes in user interface displays and the features that got dropped or added at the last minute.” The product’s requirements provide input to the user documentation, so poorly written or late-breaking requirements lead to documentation problems. It’s not surprising that the people at the end of the requirements chain, such as technical writers and testers, are often enthusiastic supporters of improved requirements engineering practices and of being engaged earlier in the process.
Requirements and various stakeholder groups
Figure 31-1 shows some of the project stakeholders who might interact with a software development group and some of the contributions they make to a project’s requirements activities. If you’re the business analyst or project manager, explain to stakeholders in each area the information and participation you need from them if the product development effort is to succeed. Agree on the communication interfaces between the development group and other functional areas, such as a system requirements specification, a market requirements document, or a set of user stories.
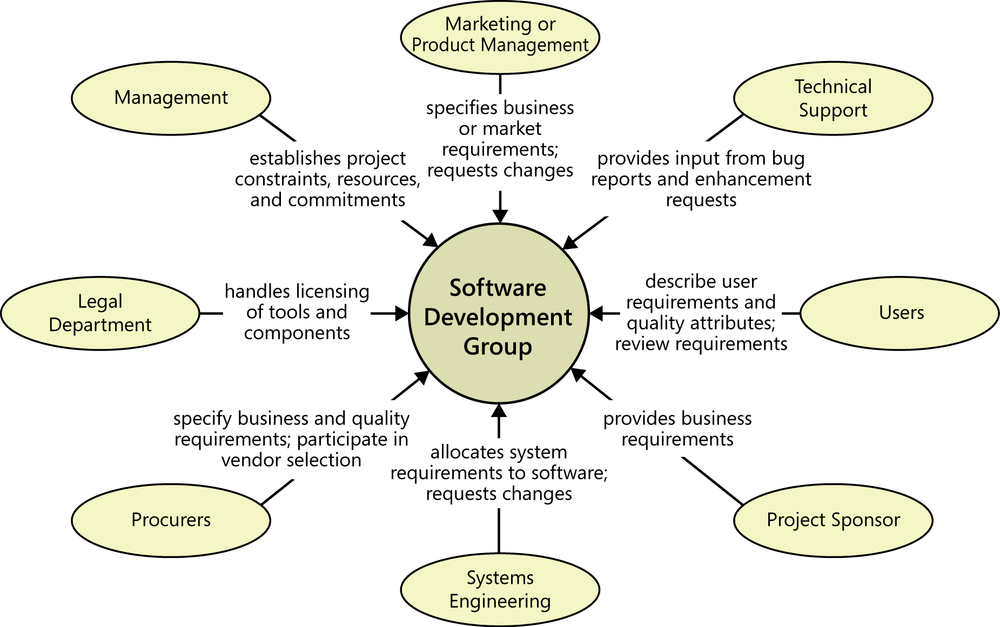
On the flip side, the BA and project manager should ask the other stakeholders what they need from the development team to make their jobs easier. What input about requirements feasibility will help marketing plan their product concepts better? What feedback about requirements status will give the sponsor adequate visibility into project progress? What collaboration with systems engineering will ensure that system requirements are properly partitioned among software and hardware subsystems? The business analyst and project manager should strive to build collaborative relationships between the development team and the other stakeholders of the requirements process.
Gaining commitment to change
When a software organization changes its requirements processes, the interactions it has with other stakeholder communities change as well. People don’t like to be forced out of their comfort zone, so expect some resistance to the process changes you propose. Understand the origins of the resistance so you can both respect it and defuse it.
Much resistance comes from fear of the unknown. To reduce this fear, communicate your process improvement rationale. Explain the benefits that the other groups will receive from the new process. Begin from this viewpoint: “Here are the problems we’ve all experienced. What are the issues from your perspective? Can we put our heads together to figure out a better way to do things here?” Engaging other stakeholders in the improvement initiative leads to shared ownership of the solutions.
Following are some forms of resistance that you might encounter:
People who are already too busy to get their project work done don’t think they have time to invest in adopting better practices. But if you don’t invest that time, there’s no reason to expect the next project to go more smoothly than the last one.
A change control process might be viewed as a barrier thrown up by development to make it harder to get changes made. In reality, it is a structure, not a barrier. It permits well-informed people to make good business decisions and to communicate those decisions. The software team must ensure that the requirements change process really does work. If new processes don’t yield better results, people will naturally find ways to work around them.
Some developers and managers view writing and reviewing requirements as bureaucratic time-wasters that delay the “real work” of coding. If you can explain the high cost of continually rewriting the code while the team tries to figure out what the system should do, developers and managers will better appreciate the need for good requirements. Overlooked requirements can reduce profitability during the operational lifetime of a software product, because effort must continually be invested in producing upgrades.
Any time people are asked to change the way they work, the natural reaction is to ask, “What’s in it for me?” However, process changes don’t always result in fabulous, immediate benefits for each person involved. A better question—and one that deserves a good answer—is “What’s in it for us?” Every process change should offer clear benefits to the project team, the development organization, the company, and/or the customer. Stakeholders who are asked to spend more time helping to create better requirements just see this as more work for them to do today. But suppose they understand that this investment on their part can pay off significantly with reduced rework later in the project, reduced support costs, and increased value for the customers. This understanding might make them more willing to spend the time now.
It’s common for some project stakeholders to be unaware of the requirement-related impacts from the organization’s current ways of working. Therefore, an important method for gaining commitment to process change is to make the problems visible in a nonjudgmental and constructive fashion. Suppose the development team builds an application that requires considerable customer support because of user interface problems. If a support team separate from development has to deal with those issues, the development team might not even be aware of the problems. Or suppose management has outsourced development in an attempt to save costs or time, but has not dealt with the resulting communication barriers and cultural differences. If management is not aware of these consequences, they won’t have any reason to change their approach to correct the shortcomings.
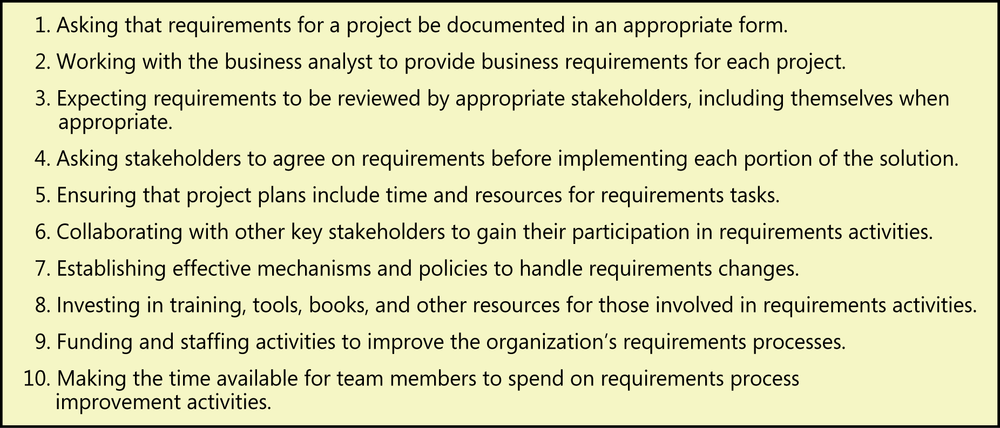
We’ve often heard business analysts and other practitioners say that they can’t make some process change in their organization without “management support.” Too often, management support translates merely into permission to do something different. But as an intelligent professional, you don’t need management’s permission to work in the best way you know how: that’s your job. However, you definitely do need management commitment for a project-wide or organization-wide improvement effort to be sustained and successful. Without management commitment, only those practitioners who think that better requirements are important will get on board. It doesn’t help if your senior people say they “support” the improvements but then revert to the same old processes as soon as problems arise. Behaviors—not pronouncements—constitute evidence of commitment to quality. Figure 31-3 lists 10 signs that your organization’s management is truly committed to excellent requirements processes.
Fundamentals of software process improvement
Because you’re reading this chapter, presumably you intend to change some of the approaches your organization currently uses for requirements engineering. As you begin your journey, keep in mind the following principles of software process improvement ([ref240]):
Process improvement should be evolutionary and continuous. Instead of aiming for perfection, develop a few improved templates and procedures and get started with implementation. Adjust your approaches as the team gains experience with the new techniques. Sometimes simple and easy changes can lead to substantial gains, so look for the low-hanging fruit, problem areas that everyone involved agrees are ripe for improvement. See Table 3-2 in Chapter 3 for some suggestions of effective practices to implement.
People and organizations change only when they have an incentive to do so. The strongest incentive for change is pain. Not artificially induced pain, such as management-imposed schedule pressure to make teams work harder, but rather the very real pain people have experienced on previous projects. Following are some examples of problems that can provide compelling drivers for changing your requirements processes:
The project missed deadlines because requirements were more extensive than expected.
Developers worked a lot of overtime because of misunderstood or ambiguous requirements.
System test effort was wasted because the testers didn’t understand what the product was supposed to do.
The right functionality was present, but users were dissatisfied because of sluggish performance, poor usability, or other quality shortcomings.
The organization experienced high maintenance costs because customers requested many enhancements that could have been identified during requirements elicitation.
Requirement changes weren’t implemented appropriately during the course of the project, so the delivered solution did not meet the customer needs.
Edits to requirements were lost or overwritten because multiple BAs were working on them concurrently without a version control process.
Customers were not available to clarify and flesh out requirements.
Requirements-related issues were not resolved in a timely fashion, causing rework.
Process changes should be goal-oriented. Before you begin the journey to superior processes, make sure you know your objectives ([ref192]). Do you want to reduce the amount of work that is redone because of requirements problems? Do you want to overlook fewer requirements during implementation? Do you want to cut unneeded features sooner? A road map that defines pathways to your objectives greatly improves your chances of successful improvement.
Treat your improvement activities as mini-projects. Many improvement initiatives founder because they’re poorly planned or because resources never materialize. Include process improvement resources and tasks in an overall project plan. Perform the planning, tracking, measurement, and reporting that you’d do for any project, scaled for the size of the improvement project. Write a simple action plan for each improvement area you tackle.
Trap
The single biggest threat to a software process improvement program is lack of management commitment, followed closely by reorganizations that shuffle the program’s participants and priorities.
All team members have the opportunity—and the responsibility—to improve how they do their work. If you address something obvious on your own, your fellow team members might well see the merit and adopt the new way of working without fuss. However, a broad process improvement effort can succeed only if management is motivated to commit resources, set expectations, and hold team members accountable for contributing to the change initiative.
Root cause analysis
It’s important to focus your limited time and budget for process improvement efforts where they will do the most good. If you can identify the causes of any process shortcomings you’ve experienced, you can home in on those as high-yield improvement opportunities.
Root cause analysis seeks to identify the underlying factors that contribute to an observed problem, distinguishing symptoms from their causes. Root cause analysis involves asking “why” the problem exists several times in succession, each time probing for the reason that underlies the answer to the previous “why” question. Perform root cause analysis before adopting process changes, to determine why your current approaches aren’t already achieving your desired outcomes. Otherwise, it’s easy to run around blindly, trying new methods without any confidence that they’ll address the real problems.
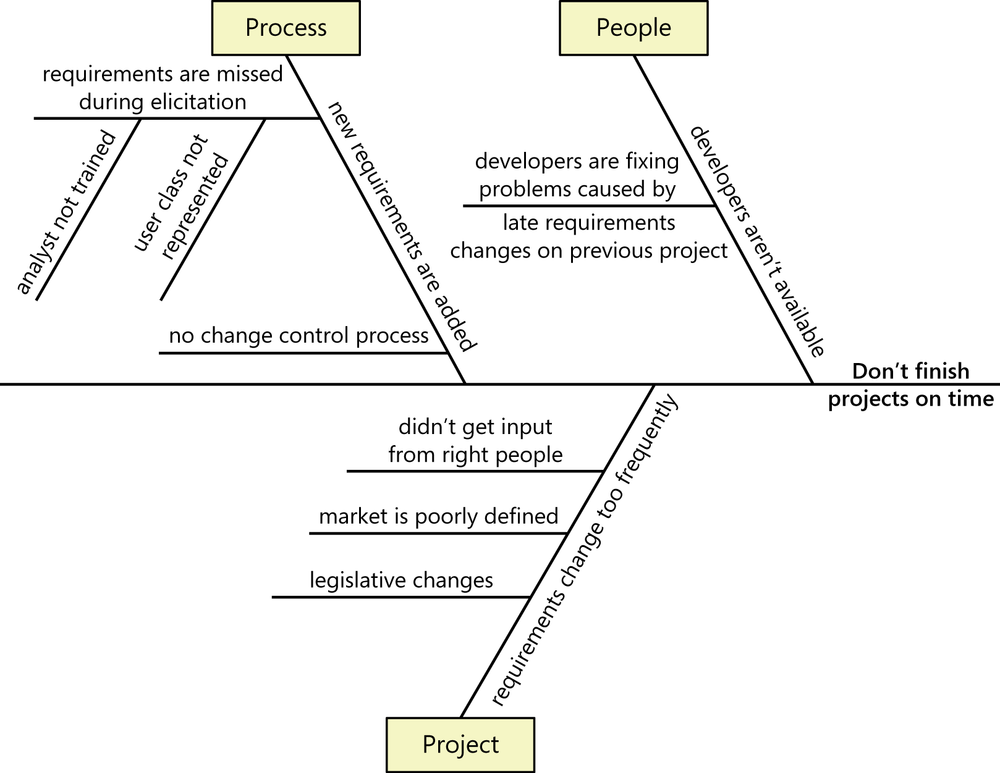
Sometimes it’s not clear which is the problem and which is the root cause. Certain symptoms and root causes chain together, with one symptom being the root cause of another symptom. Suppose you’re experiencing a symptom of too many requirements being missed during elicitation. One possible root cause is that the business analysts didn’t ask the right questions. This root cause is itself a symptom of another problem, that the people performing the BA role don’t know how to do it well.
A cause-and-effect diagram—also called a fishbone diagram or Ishikawa diagram, after its inventor, Kaoru Ishikawa—is a useful way to depict the results of a root cause analysis. Figure 31-4 illustrates a cause and effect diagram that partially analyzes a problem in which an organization’s project teams repeatedly fail to complete projects on time. The “bones” in the diagram that branch off the main “backbone” show the answers to the question “Why don’t teams finish projects on time?” Additional bones show the answers to subsequent “why” questions. Eventually this analysis reveals fundamental root causes in the most highly branched bones.
You won’t have to tackle every root cause you identify by using this type of analysis. The Pareto principle states the familiar 80/20 rule, which suggests that perhaps 20 percent of the vital root causes lead to approximately 80 percent of the observed problems. Even a simple root cause analysis will likely reveal the high-leverage causes that your requirements improvement actions should target.
The process improvement cycle
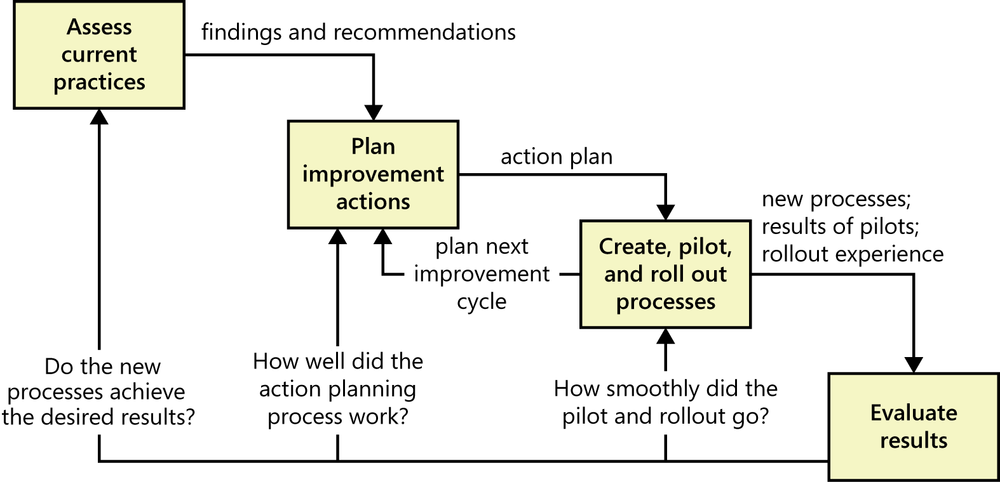
Figure 31-5 illustrates an effective process improvement cycle. This cycle reflects the importance of knowing where you are before you take off for someplace else, the need to chart your course, and the value of learning from your experiences as part of continuous improvement.
Assess current practices
Step 1 of any improvement activity is to assess the practices currently being used to identify their strengths and shortcomings. The assessment lays the foundation for selecting the changes you should make. It also brings visibility to the processes actually being used in the organization, which are frequently different from the stated or documented processes. And you’ll find that different team members often have rather different perspectives as to what processes the team is actually using.
You can evaluate your current requirements processes in several ways. If you tried any of the “Next steps” at the end of previous chapters, you’ve already begun an informal evaluation of your requirements practices and their results. Appendix C offers dozens of symptoms of common requirements problems, along with possible root causes and possible solutions. Structured questionnaires can reveal insights about your current processes at a low cost. Interviews and discussions with team members provide a more accurate and comprehensive understanding than questionnaires reveal. Formal evaluations by outside consultants produce a list of findings—statements of both strengths and weaknesses in the current processes—and recommendations for addressing the improvement opportunities.
For a simple do-it-yourself approach, use the questionnaire in Appendix B to calibrate your organization’s current requirements engineering practices. This self-assessment helps you decide which of your requirements processes are most in need of improvement. Just because you give yourself a low rating on a particular question isn’t reason enough to address it immediately or perhaps at all. Focus your energy on improving those practice areas that cause your projects the most difficulties and those that pose risks to the success of your future projects.
Plan improvement actions
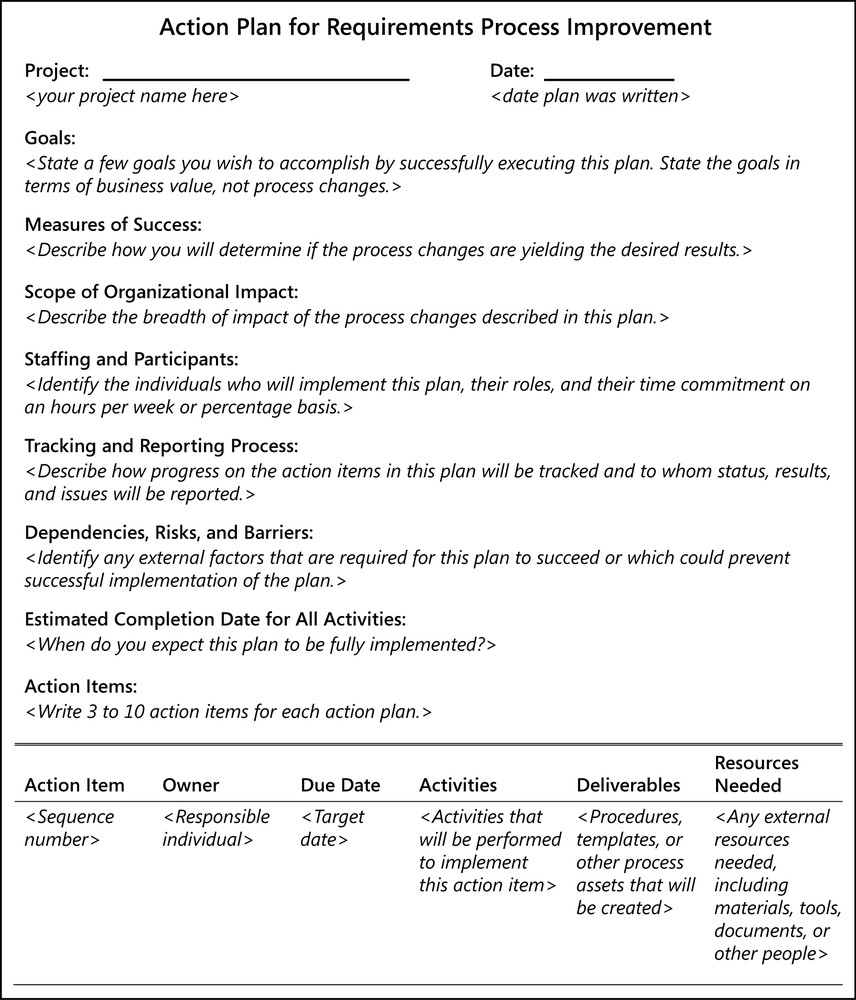
In keeping with the philosophy of treating process improvement activities as projects, write an action plan following your current-practices assessment ([ref192]). Tactical action plans target specific improvement areas, such as the ways you elicit or prioritize requirements. Each action plan should identify measurable improvement goals, the participants, and the individual action items that must be completed to implement the plan. Without a plan, it’s easy to overlook important tasks. The plan also lets you monitor progress as you track the completion of individual action items.
Figure 31-6 illustrates a process improvement action plan template we’ve used many times. Include no more than about 10 items in each action plan, scoped such that the plan can be completed in 2 or 3 months. As an example, I saw a plan for requirements management improvements that included these action items:
Draft a requirements change control process.
Review and revise the change control process.
Pilot the change control process with Project A.
Revise the change control process based on feedback from the pilot.
Evaluate problem-tracking tools, and select one to support the change control process.
Procure the problem-tracking tool, and customize it to support the change control process.
Roll out the new change control process and tool to the organization.
Assign each action item to a specific individual who is responsible for seeing that the item is completed. Don’t assign “the team” as an action item owner. Teams don’t do work; individuals do.
If you need more than about 10 action items, focus the initial activity cycle on the most important issues and address the rest later in a separate action plan. Remember, process change is incremental and ongoing. The process improvement road map described later in this chapter illustrates how you can group multiple improvement actions into an overall software process improvement plan.
Create, pilot, and roll out processes
So far, you’ve evaluated your current requirements practices and crafted a plan for addressing the areas you think are most likely to yield benefits. Now comes the hard part: implementing the plan.
Implementing an action plan means developing processes that you believe will yield better results than your current ways of working do. Don’t expect to get the new processes perfect on the first try. Many approaches that seem like a good idea in the abstract turn out to be less pragmatic or less effective than anticipated. Therefore, pilot most of the new procedures or templates you create on a small scale before implementing them for real. Use the knowledge gained from the pilot to adjust the new process. This improves the chance that it will be effective and well received when you roll it out to the affected community. Keep the following suggestions in mind for your process pilots:
Select pilot participants who will give the new approaches a fair try and provide helpful feedback. These participants could be either allies or skeptics, but they shouldn’t strongly oppose the improvement effort.
Quantify the criteria the team will use to evaluate the pilot’s results.
Identify the stakeholders who need to be informed about the pilot and why it is being performed.
Consider piloting portions of the new processes on different projects. This engages more people in trying new approaches, which increases awareness, feedback, and buy-in.
As part of the evaluation, ask pilot participants how they would feel if they had to go back to their former ways of working.
If the pilot was successful, you’re ready to make any final adjustments to the process and roll it out to the affected community for implementation. Even motivated and receptive teams have a limited capacity to absorb change, so don’t place too many new expectations on a project team at once. Craft a roll-out plan that defines how you’ll distribute the new methods and materials to the project teams, and provide sufficient training, coaching, and assistance. Also consider how management will set and communicate their expectations about the new processes.
Evaluate results
The final step of a process improvement cycle is to evaluate the activities performed and the results achieved. This evaluation will help the team do an even better job on future improvement activities. Assess how smoothly the pilots ran. How effective were they in resolving the uncertainties about the new processes? Would you change anything the next time you conduct a process pilot?
Consider how well the rollout of the new processes went. Was the availability of the new processes or templates communicated to everyone affected? Did participants understand and successfully apply the new processes? Would you change anything about how you handle the next rollout?
A critical step is to assess whether the new processes are yielding the desired results. Some new practices deliver visible improvements quickly, but others take time to demonstrate their full value. For example, you should be able to tell quickly whether a new requirements change control process is effective. However, a new document template can take some time to prove its worth as business analysts and other stakeholders get used to it. Give new approaches adequate time to work, and select measures early on that will demonstrate the success of each change.
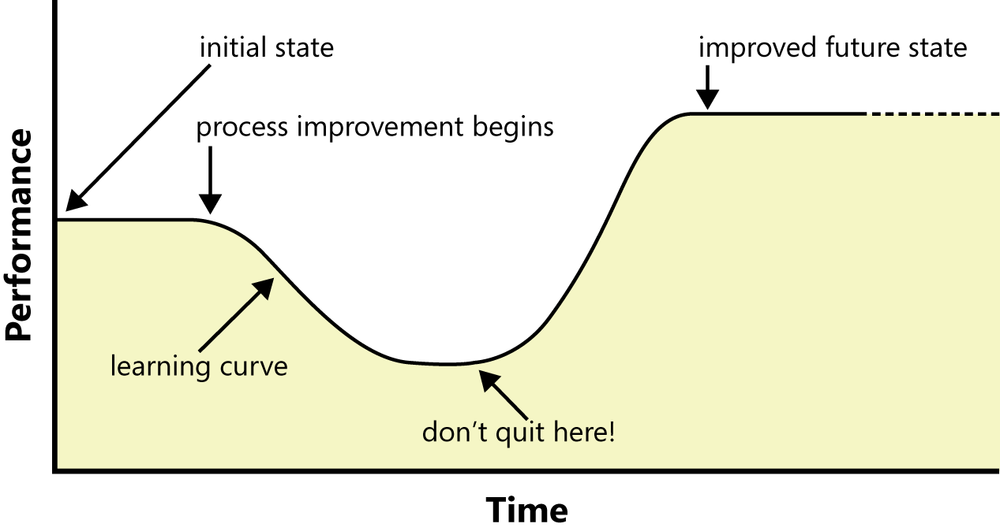
Accept the reality of the learning curve, the productivity drop that takes place as practitioners take time to assimilate new ways of working, as illustrated in Figure 31-7. This short-term productivity drop—sometimes called the “valley of despair”—is part of the investment your organization is making in process improvement. People who don’t understand this might be tempted to abandon the improvement effort before it begins to pay off, thereby achieving a zero—or worse—return on their investment. Educate your managers and peers about the learning curve, and commit to seeing the change initiative through.
Requirements engineering process assets
High-performance projects have effective processes for all of the requirements engineering components: elicitation, analysis, specification, validation, and management. To facilitate the performance of these processes, every organization needs a collection of requirements process assets ([ref242]). A process encompasses the actions you take and the deliverables you produce; process assets help the team members perform processes consistently and effectively. These process assets will help those involved in the project understand the steps they should follow and the work products they’re expected to create. Process assets include the types of documents described in Table 31-1.
Type | Description |
Checklist | A list that enumerates activities, deliverables, or other items to be noted or verified. Checklists are memory joggers. They help ensure that busy people don’t overlook important details. |
Example | A representative of a specific type of work product. Accumulate and share good examples as your project teams create them. |
Plan | An outline of how an objective will be accomplished and what is needed to accomplish it. |
Policy | A guiding principle that sets a management expectation of behaviors, actions, and deliverables. Processes should enable satisfaction of the policies. |
Procedure | A step-by-step description of the sequence of tasks that accomplishes an activity. Describe the tasks to be performed and identify the project roles that perform them. Guidance documents can support a process or procedure with tutorial information and helpful tips. |
A documented definition of a set of activities performed for some purpose. A process description might include the process objective, key milestones, participants, communication steps, inputs and outputs, deliverables, and how to tailor the process to different project situations. | |
Template | A pattern to be used as a guide for producing a work product. Templates for key project documents provide many “slots” for capturing and organizing information. Guidance text embedded in the template will help the document author use it effectively. Other templates define a structure that is useful for writing a specific type of information, such as a functional requirement, quality attribute, business rule, or user story. |
Figure 31-8 identifies some valuable process assets for requirements engineering. These items should be no larger than they need to be to let team members use them consistently and effectively. They need not be separate documents; an overall requirements management process could include the status tracking procedure, change control process, and impact analysis checklist. Store these items in a shared process assets library for ease of access and ready availability, and establish mechanisms for improving them with experience ([ref242]). Many of the process assets in Figure 31-8 are available with the companion content for this book.
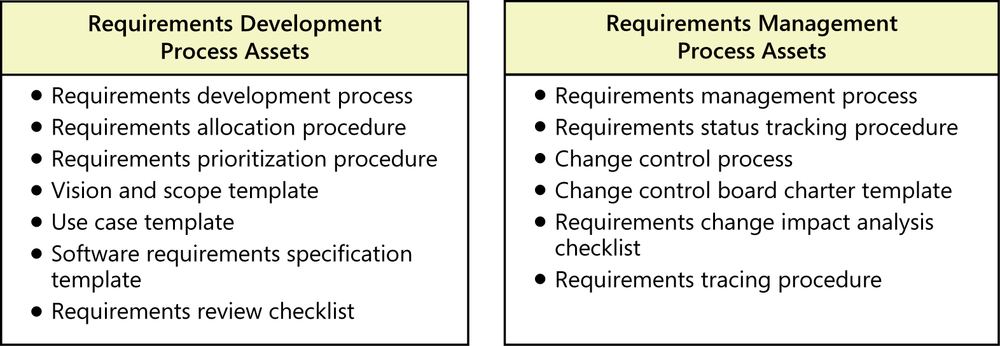
Following are brief descriptions of each of the process assets listed in Figure 31-8, along with references to the chapters in which they are discussed further. Each project should plan how it will perform its requirements activities, drawing from and tailoring the contents of the organization’s process assets to best suit its needs. For instance, a large project that involves numerous user classes and other stakeholders in multiple locations would benefit from a written elicitation plan that identifies the techniques to be used for eliciting requirements, who will perform them, when, and where. A project that has co-located and highly engaged stakeholders can use a simpler, more agile process.
Requirements development process assets
The items listed here will help your teams do a better job of eliciting, analyzing, specifying, and validating requirements for their projects.
Requirements development process This process describes how to identify and classify stakeholders in your domain and how to plan the elicitation activities. The process describes the requirements deliverables each project is expected to create and the requirements analysis and validation activities to perform. Chapter 7 describes the contents of an elicitation plan.
Requirements allocation procedure This procedure describes how to allocate high-level product requirements to specific subsystems when you are developing systems that contain both hardware and software components or multiple software subsystems. See Chapter 26 for more about requirements allocation.
Requirements prioritization procedure This procedure describes techniques and tools to be used for prioritizing requirements and dynamically adjusting the backlog contents throughout the project. Chapter 16 describes several prioritization techniques.
Vision and scope template This template guides the project sponsor and the business analyst in thinking through the business objectives, success metrics, product vision, and other elements of the business requirements. Chapter 5 recommends a template.
Use case template As described in Chapter 8 the use case template provides a structured format for describing tasks that users need to perform with a system.
Software requirements specification template The SRS template provides a structured, consistent way to organize the product’s functional and nonfunctional requirements. Consider adopting more than one template to accommodate the various types or sizes of projects your organization undertakes. Chapter 10 describes a sample SRS template.
Requirements review checklist Peer review of requirements documents constitutes a powerful software quality technique. A review checklist identifies the types of errors commonly found in requirements documents, which helps the reviewer to focus his attention on common problem areas. Chapter 17 contains a sample requirements review checklist.
Requirements management process assets
The following items can assist your teams in managing sets of documented requirements.
Requirements management process This process describes the actions a team takes to distinguish versions of the requirements, define baselines, deal with changes, track requirements status, and accumulate traceability information (see Chapter 27). For a sample requirements management process description, see Appendix J of CMM Implementation Guide ([ref035]).
Requirements status tracking procedure Requirements management includes monitoring and reporting the status of each functional requirement. See Chapter 27 for more about requirements status tracking.
Change control process The change control process defines the way that a new requirement or a modification to an existing requirement is proposed, communicated, evaluated, and resolved. Chapter 28 describes the change control process.
Change control board charter template As described in Chapter 28, the change control board (CCB) charter describes the composition, function, and operating procedures of the CCB.
Requirements change impact analysis checklist As illustrated in Chapter 28, an impact analysis checklist helps you contemplate the possible tasks, side effects, and risks associated with implementing a specific requirement change, as well as estimating the effort for the tasks.
Requirements tracing procedure This procedure describes who provides the trace data that connects each requirement to other project artifacts, who collects and manages the data, and how and where it is stored. Chapter 29 addresses requirements tracing.
Are we there yet?
As with other journeys, a process improvement initiative should have a goal. If you don’t define specific improvement goals, people might not work in alignment, you can’t tell whether you’re making progress, you can’t prioritize improvement efforts, and you can’t tell if you’ve reached your destination. Metrics are quantifiable aspects of a software project, product, or process. Key performance indicators, or KPIs, are metrics that are tied to a target and reveal your progress toward achieving a specific goal or outcome. A set of KPIs can be displayed in a measurement dashboard that shows how you are approaching meeting your goals.
Keep two considerations in mind when setting process improvement goals. First, remember that process improvement for its own sake is meaningless. Therefore, ask yourself whether achieving that goal would in fact deliver the business value improvements that you seek. Second, you don’t want the team members to get frustrated trying to reach a target they cannot realistically attain, so ask yourself whether the goal is achievable in your environment. The answer to both questions must be “yes” for an improvement goal to be appropriate.
Numerous aspects of requirements work on a project can be measured, including product size, requirements quality, requirements status, change activity, and the effort devoted to requirements engineering and management ([ref247]). In addition, measurements of whether the project achieved its business objectives will reflect whether the requirements activities were on target. For process improvement activities, though, you need to select measurement targets that will tell you whether your improvement investments are paying off in the ways you hope they will. We mentioned earlier in this chapter that process improvement should be goal-oriented, and that a great motivator for process change is pain the organization has experienced on previous projects. So select your KPIs by defining quantitative improvement goals and then determining how you could judge whether the pain that led you to choose those goals is lessening.
Note that you can’t measure quantitative progress unless you’ve established a baseline, a reference starting point of how things are working for you today. Ideally, you would measure the current value of some indicator, then set a desired target value you’d like to reach after a certain period of time, and direct your process improvement activities toward achieving that outcome. In reality, many software organizations lack a measurement culture, so they will have difficulty establishing such a quantitative baseline. Nonetheless, it’s hard to tell how close you’re getting to your objective if you have neither a starting point nor a yardstick.
Table 31-2 lists several possible requirements process improvement goals you might have. For conciseness, we’ve omitted the suffix “by X <amount> in Y <period of time>” that should be applied to each of these. For each goal, the table suggests possible indicators that would tell whether the changes you’re making are paying off as intended. Most measurements of software are lagging indicators. It takes a while for new approaches to demonstrate sustained benefits, so give the new ways of working a chance to take hold and begin to yield benefits.
Improvement goal | Suggested indicators |
Reduce rework performed because of requirements errors |
|
Reduce the negative impact of requirements changes |
|
Reduce the time needed to clarify requirements during development |
|
Improve estimation accuracy for total requirements development effort |
|
Reduce the number of unneeded features implemented |
|
If you’re not sure what indicators to select, follow a simple thought process called goal-question-metric or GQM ([ref011]; [ref248]). GQM is a way of thinking backward to figure out what metrics would be valuable. First, state the improvement goals. For each goal, think of questions you would have to answer to judge whether the team is reaching that goal. Finally, identify metrics that will provide an answer for each question. These metrics, or combinations of them, will serve as your key performance indicators.
If you select realistic KPIs for your goals but don’t see signs of progress after a reasonable period, you need to investigate:
Were the problems correctly analyzed and root causes identified?
Did you select improvement actions that directly addressed those root causes?
Was the plan created to implement those improvement actions realistic? Was the plan executed as intended?
Has something changed since your original analysis that should lead you to redirect the team’s improvement activities?
Have team members actually adopted new ways of working and pushed through the learning curve to begin applying them in practice?
Did you set realistic targets that the team had a chance of achieving?
Many points of failure are on the path to improved requirements practices; make sure that your improvement initiative doesn’t get caught in one of those traps.
Creating a requirements process improvement road map
Haphazard approaches to process improvement rarely lead to sustainable success. Rather than just diving in, consider developing a road map for implementing improved requirements practices in your organization. If you tried any of the requirements process assessment approaches described in this chapter, you have some ideas about the practices and process assets that would be most helpful to your organization. The process improvement road map sequences improvement actions to yield the greatest and quickest benefits with the smallest investment.
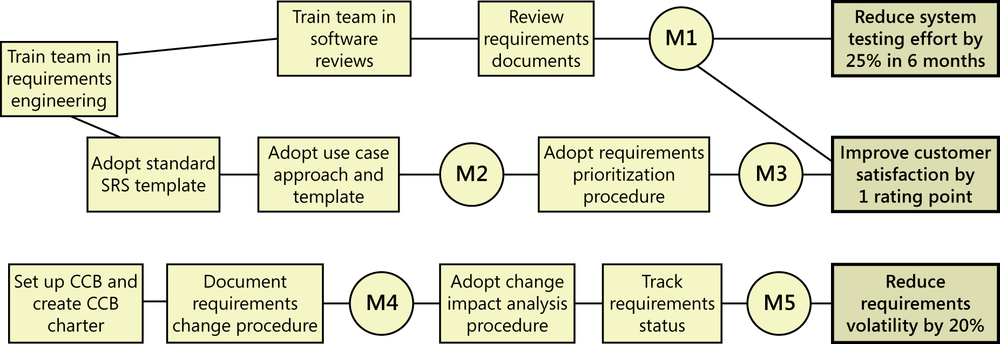
Because every situation is different, there is no one-size-fits-all road map. Formulaic approaches to process improvement don’t replace careful thinking, good judgment, and common sense. Figure 31-9 illustrates one organization’s road map for improving its requirements processes. The desired business goals are shown (in simplified form) in the boxes on the right side of the figure, and the major improvement activities are shown in the other boxes. The circles indicate intermediate milestones along the paths toward the business goals. M1 means milestone 1. Implement each threaded set of improvement activities from left to right. After you’ve created a road map, give ownership of each milestone to an individual, who can then write an action plan for achieving that milestone. Then turn those action plans into actions!