
Hour 7 Get Visual, Part 2: Advanced Image Editing, Thumbnails, and Hotspots
What You’ll Learn in This Hour:
![]() How to use the Pictures toolbar to insert and edit images
How to use the Pictures toolbar to insert and edit images
![]() How to create thumbnails using the Auto Thumbnail function
How to create thumbnails using the Auto Thumbnail function
![]() How to create and edit hotspots
How to create and edit hotspots
Introduction
Now that you know how to import and insert an image, it’s time to look at the new image-editing tools featured in Expression Web 2. The program goes beyond the norm and gives you several quick and easy tools to make changes to your image files—changes that would normally require an image editor. One such feature is the ability to make thumbnails with a few mouse clicks. In this hour, you will learn how to use these tools to make changes to image files you have already inserted into your page.
In addition to being visual elements, images in a web page can be functional elements if you turn them into links and buttons. You can even designate separate areas within an image to interact with the user either by highlighting when the user hovers over them or by linking to other images or pages. You do this by creating hotspots in your image.
Exploring the Pictures Toolbar
In Hour 6, “Get Visual Part 1—Adding Images to Your Page,” you learned how to insert an image into a page and how to use the Picture Properties dialog to change theway the image relates to the other content on the page. But what if you want to change the appearance of the image itself? Maybe after you inserted it into the page you noticed that it was too light or needed cropping. Normally this requires you to open the image file in an image editor such as Photoshop or Expression Design, make the necessary changes, reimport the image into Expression Web 2, and finally replace the image on your page with a new one. Well, those days are over. Expression Web 2 has a built-in set of tools to help you do simple image editing without leaving the program. The Pictures toolbar conveniently contains these tools (see Figure 7.1).
Figure 7.1 The Pictures toolbar gives you instant access to all the image editing features in Expression Web 2.
![]()
As you learned in Hour 1, “Get to Know Microsoft Expression Web 2,” all you have to do to open the Pictures toolbar is select View, Toolbars on the menu bar and click Pictures. The Pictures toolbar opens as a hovering toolbar that you can move around the work area. Normally it’s easier if you dock your toolbars to the top or sides of the window, but in this case, leaving the toolbar floating makes the next steps easier.
If you haven’t already done so, open the myDesk.html file. To activate the functions of the Pictures toolbar, click the image you inserted in Hour 6, “Get Visual Part 1—Adding Images to Your Page.” Expression Web 2 always tells you which functions are available by graying out those that are unavailable. Place your cursor anywhere else inside the page and notice that the icons in the toolbar gray out and become unavailable.
The Buttons of the Pictures Toolbar and What They Do
With the image selected, hover over each button to view its ScreenTip and see what function the icon represents.
![]() Insert Picture from File is the only button that remains active no matter where you are in the document. Clicking this button lets you insert a new image in the current cursor location or replace the selected image with a different image.
Insert Picture from File is the only button that remains active no matter where you are in the document. Clicking this button lets you insert a new image in the current cursor location or replace the selected image with a different image.
|
Insert Picture |
![]() When you click Auto Thumbnail, Expression Web 2 creates a small version of the selected image and inserts it on the page in place of the larger one. The smaller image (the thumbnail) is fitted with a hyperlink that points to the larger image.
When you click Auto Thumbnail, Expression Web 2 creates a small version of the selected image and inserts it on the page in place of the larger one. The smaller image (the thumbnail) is fitted with a hyperlink that points to the larger image.
|
Auto Thumbnail |
![]() The Bring Forward and Bring Backward buttons tell the browser to change the stacking order of your content. A good analogy is to think of the page as a deck of cards; when you click the Bring Forward or Bring Backward button, you move the current card up or down in the stack. You use these functions when you start placing content on top of other content—for example, text on top of an image.
The Bring Forward and Bring Backward buttons tell the browser to change the stacking order of your content. A good analogy is to think of the page as a deck of cards; when you click the Bring Forward or Bring Backward button, you move the current card up or down in the stack. You use these functions when you start placing content on top of other content—for example, text on top of an image.
|
Bring Forward |
|
Bring Backward |
![]() The orientation buttons change the orientation of the image. They are Rotate Left 90° (counter-clockwise), Rotate Right 90° (clockwise), Flip Horizontal, and Flip Vertical. These buttons are useful if you import an image from a digital camera whose orientation is incorrect—for example, a photo taken with the camera in a vertical orientation but the image in a horizontal orientation.
The orientation buttons change the orientation of the image. They are Rotate Left 90° (counter-clockwise), Rotate Right 90° (clockwise), Flip Horizontal, and Flip Vertical. These buttons are useful if you import an image from a digital camera whose orientation is incorrect—for example, a photo taken with the camera in a vertical orientation but the image in a horizontal orientation.
|
Rotate Left 90° |
|
Rotate Right 90° |
|
Flip Horizontal |
|
Flip Vertical |
![]() The More Contrast and Less Contrast buttons bring the contrast levels of the image up or down. If you add more contrast to an image, the bright colors become brighter and the dark colors become darker. If you reduce the contrast, the image becomes more even. The More Brightness and Less Brightness buttons bring the overall brightness level up and down. If you bring up the brightness level, you usually also have to bring up the contrast level to prevent the image’s colors from fading.
The More Contrast and Less Contrast buttons bring the contrast levels of the image up or down. If you add more contrast to an image, the bright colors become brighter and the dark colors become darker. If you reduce the contrast, the image becomes more even. The More Brightness and Less Brightness buttons bring the overall brightness level up and down. If you bring up the brightness level, you usually also have to bring up the contrast level to prevent the image’s colors from fading.
|
More Contrast |
|
Less Contrast |
|
More Brightness |
|
Less Brightness |
![]() The Crop button lets you cut out an area of the image and discard the rest, much as if you used a ruler and a knife to cut out part of a photo. The Set Transparent Color button lets you set a specific color to be transparent. This function works only with GIF images. If you apply the function to a non-GIF image, Expression Web 2 converts the image to the GIF format and reduces its color depth. Expression Web 2 warns you about this before performing any changes. The Color button changes the image by giving it a grayscale or washed-out look. Bevel puts a beveled border on your image to make it look as if it’s standing up from the page. Designers often use this function when creating buttons from images. The Resample Image button becomes available only if you change the dimensions of the image in Design view or through the Picture Properties dialog. When you click this button, the image permanently changes to the new dimensions rather than simply resizing in the browser.
The Crop button lets you cut out an area of the image and discard the rest, much as if you used a ruler and a knife to cut out part of a photo. The Set Transparent Color button lets you set a specific color to be transparent. This function works only with GIF images. If you apply the function to a non-GIF image, Expression Web 2 converts the image to the GIF format and reduces its color depth. Expression Web 2 warns you about this before performing any changes. The Color button changes the image by giving it a grayscale or washed-out look. Bevel puts a beveled border on your image to make it look as if it’s standing up from the page. Designers often use this function when creating buttons from images. The Resample Image button becomes available only if you change the dimensions of the image in Design view or through the Picture Properties dialog. When you click this button, the image permanently changes to the new dimensions rather than simply resizing in the browser.
|
Crop |
|
Transparent Color |
|
Color |
|
Bevel |
|
Resample Image |
![]() The next set of tools let you insert and modify hotspots in the image. Select lets you select the whole image or the respective hotspots within it. The Rectangular Hotspot, Circular Hotspot, and Polygonal Hotspot tools set the hotspots within an image. The Highlight Hotspots button replaces the image with an imagemap in which the hotspots are black and the rest of the image is white. This tool is a visual aid to help you find the hotspots and makes no actual changes to the image.
The next set of tools let you insert and modify hotspots in the image. Select lets you select the whole image or the respective hotspots within it. The Rectangular Hotspot, Circular Hotspot, and Polygonal Hotspot tools set the hotspots within an image. The Highlight Hotspots button replaces the image with an imagemap in which the hotspots are black and the rest of the image is white. This tool is a visual aid to help you find the hotspots and makes no actual changes to the image.
|
Select |
|
Rectangular Hotspot |
|
Circular Hotspot |
|
Polygonal Hotspot |
|
Highlight Hotspots |
![]() The most important button on the Pictures toolbar is the Restore button. It restores the image to its original state and undoes all the changes you made to the image since you last saved the page. Be aware that if you save the page you are working in, Expression Web 2 saves the new edited version of the
The most important button on the Pictures toolbar is the Restore button. It restores the image to its original state and undoes all the changes you made to the image since you last saved the page. Be aware that if you save the page you are working in, Expression Web 2 saves the new edited version of the
|
Restore |
All the editing functions on the Pictures toolbar (orientation, contrast, brightness, crop, color, and so on) are destructive image-editing tools. Destructive means the function permanently changes the file it affects and you cannot reverse the change. For that reason it is paramount that you always keep backup copies of your original image files in case you make changes you are not satisfied with. Likewise, if you use the same image several times throughout your site and you make a change to one of these instances of the image using the Pictures toolbar, the change affects all other instances of that image. If you intend to make a change to an image you are using in multiple locations, you must first make a copy of the image and then apply the change to only the copy.
Using the Pictures Toolbar to Add and Change an Image
Now that you know what the different tools on the Pictures toolbar do, it’s time to put them to use. In the project files for this hour is the file KennyOriginal.jpg. This is a picture straight from my digital camera. As you learned in Hour 6, the first step when dealing with an image file is to import it into Expression Web 2 by selecting File, Import File in the menu bar. Make sure the new image is stored in the Images folder in the Folder View task pane. If it isn’t there, simply drag and drop the file into the Images folder.
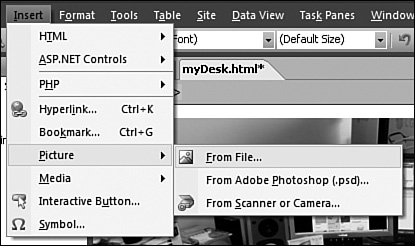
After you import the image, there are three different methods of inserting it into the page. In Hour 6, you used the drag-and-drop option. You can also insert an image by putting the cursor where you want to place the image, opening the Insert, Picture submenu on the menu bar, and selecting From File (see Figure 7.2). Finally, you can use the Insert Picture button on the Pictures toolbar. The last two methods are the same function. Both approaches open a standard browser window from which you select the file you want to insert.
In Design view, place the cursor at the beginning of the second paragraph directly under the Desk Kipple Inventory heading. Use one of the two options described earlier to open the Insert Picture dialog. Navigate to the Images folder and select the KennyOriginal.jpg file you just imported.
Figure 7.2 You can use the Insert Picture from File option on the menu bar to insert an image at the current cursor location.
![]()
Expression Web 2 is finicky when it comes to importing image files properly. It is also a bit forgetful when it comes to which files it imported into the program. From time to time, you might notice that recently imported images don’t show up in the Insert Picture dialog. To solve this problem, refresh the dialog by right-clicking in the browser window and selecting Refresh.
The same thing goes for the Folder List task pane: Even after images have been imported properly they don’t always appear in the file list. To refresh the Folder List task pane click inside it and press the F5 key.
When you click OK, the Accessibility Properties dialog opens, as it did when you inserted the desk.jpg image in Hour 6. Enter the alternative text Kenny squeeze toy and click OK. At this point, you might think you made a mistake because the Design View pane fills with an image that is mostly white with some black in it, much like Figure 7.3.
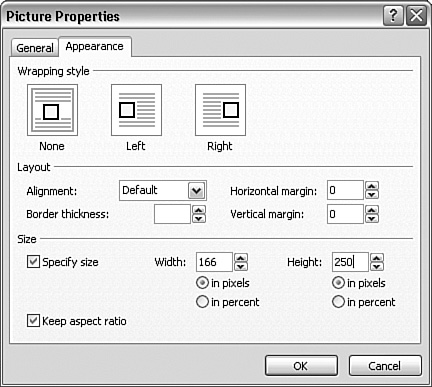
What you are seeing is the corner of a large image. This is a common problem: The image is not an appropriate size for the Web and therefore it doesn’t fit on a web page. In fact, the image you just inserted is more than three times as tall as a regular computer screen. If you click the image and look in the Tag Properties task pane on the bottom left, you can see that the image is 3072 pixels high and 2048 pixels wide. A good rule of thumb is that an image in a web page should never be more than 400 pixels high and 600 pixels wide. So, before you do anything else, you need to drastically reduce the size. To do so, right-click the image, open the Picture Properties dialog, and select the Appearance tab. In the Size section, enable the Keep Aspect Ratio check box and change the Width setting to 400 pixels (see Figure 7.4). The height changes accordingly.
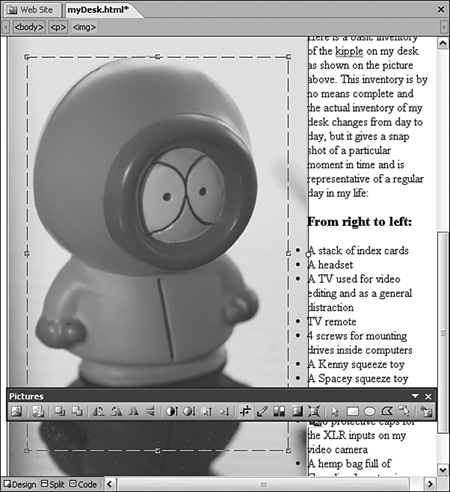
At the same time, change the Wrapping Style setting to Left so that the text moves to the right of the image rather than underneath it. When you click OK, Expression Web 2 reduces the image to a workable size. Now you can alter the image to make it work better within the page. First off, Kenny is facing the wrong way. To turn him to face the text, click the image to select it and then click the Flip Horizontal button on the Pictures toolbar.
Figure 7.3 The page as it appears in Design view after you insert the KennyOriginal.jpg image.

Figure 7.4 You can change the image to an exact size from Picture Properties.
The framing of the photo isn’t very good and it could use some cropping. With the image still selected, click the Crop button on the Pictures toolbar. This produces a dashed rectangle that indicates the crop area within the image (see Figure 7.5).
Figure 7.5 The crop area inside the image is indicated by a dotted line with handles.
Using your mouse, you can either draw a new crop area within the image by clicking and dragging the mouse to create a new rectangle, or simply resize the existing rectangle by grabbing the handles (marked by small squares) in the corners or at the middle of all four sides. Resize the rectangle so that you leave an equal amount of space on all sides of Kenny. When you are satisfied with your crop area, press Enter and Expression Web 2 crops the image.
The photo is a little dark. To lighten the image, select it and click the More Brightness button three or four times. This brings up the brightness of the image slightly.
If you are not satisfied with your alterations, this is the time to start over. If you want to undo any of your changes or just want some practice, click the Restore button to return the image to its original state. If you click the Restore button by mistake, simply go to the Edit menu and select Undo Edit Picture, or press Ctrl+Z on your keyboard.
There is one final step left. You might remember from earlier in the hour that the Resample button becomes active only if you change the size of the image. You might also remember from Hour 6 that you should never make the browser resize your images for you. When you resized the KennyOriginal.jpg image earlier in this hour, you asked the browser to squish the large image down to make it fit certain dimensions. Now you want to resample the image so that the picture in the image file is of the correct dimensions. You can do this in two ways: Either click the Resample button on the Pictures toolbar, or select Resample Picture to Match Size from the Picture Actions drop-down menu found under the small icon attached to the image (see Figure 7.6).
Figure 7.6 You can resample the image from the Picture Actions drop-down menu found under the inserted image.

This function overwrites the old image file and replaces it with the reoriented, cropped, and resized image as it appears in Design view. To make the changes permanent (a.k.a. The Point of No Return), simply save the page. Expression Web 2 opens the Save Embedded Files dialog and asks you whether, where, and how you want to save the changed image file (see Figure 7.7). When you are sure the image looks the way you want it to look, click OK and the new image replaces the original one.
Figure 7.7 The Save Embedded Files dialog appears every time you have made changes to other external files while modifying the file you are currently saving.

Try it Yourself
Create a Thumbnail Using Auto Thumbnail
Because most web pages contain a lot of content and not all visitors are on high-speed connections, using smaller versions of images (commonly referred to as thumbnails) that link to the larger version of the image is common. Using thumbnails helps the page load faster because the browser doesn’t have to download large image files. In addition, thumbnails can help designers because they can link to large images rather than inserting them in the page.
In the myDesk.html file, it’s obvious that even though you reduced the image to a Web-friendly size, it’s still much too big. What you want is a small thumbnail of the KennyOriginal.jpg image that links to the bigger version. In Expression Web 2, you can do this with a single click of your mouse: With the KennyOriginal.jpg image selected, click the Auto Thumbnail button on the Pictures toolbar or use the Ctrl+T shortcut.
This creates a 100-pixels-wide thumbnail with a blue outline that, when clicked, opens the original full size image in the same window. To finalize this process, it is necessary to save the page. When you save the page, the Save Embedded Files dialog you saw in Figure 7.8 opens and asks you to save a new file called KennyOriginal_small.jpg. This is the smaller thumbnail file that Expression Web 2 created and inserted in your page. By default Expression Web 2 saves the thumbnail in the currently open folder, but you can pick a different folder by clicking the Change folder button in the dialog. Finally click OK and preview the page in your browser.
Figure 7.8 Creating a rectangular hotspot around the Kenny figure on top of the TV.
If you don’t want the thumbnail to have a blue border or you want it to be a different size, you can modify the Auto Thumbnail default settings from the Page Editor Options dialog. To do this, open the Page Editor Options dialog from the Tools button on the menu bar and select the Auto Thumbnail tab. From here you can define the size of the thumbnail by setting the width, height, shortest side, or longest side to a specific pixel length, changing the thickness of the border around the image (0 for no border), and even give the thumbnail a beveled edge.
![]()
Note that changes to the Auto Thumbnail settings apply only to new thumbnails and not ones that already exist.
Creating Hotspots
A hotspot is a defined area or region within an image that has a hyperlink attached to it. There is no limit to how many hotspots with different hyperlinks you can set in a given image. Hotspots are a great tool if you want to provide further information about a certain element within an image or use an image as a navigational tool.
![]()
Just so there is no confusion: What Expression Web 2 calls a hotspot is more commonly called an imagemap
Try it Yourself
Create a Hotspot and Link It to a File
In Expression Web 2, you can create and edit hotspots from the Pictures toolbar using the hotspot buttons:
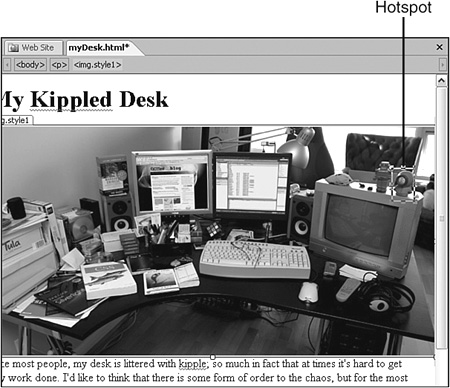
1. In the myDesk.html file, click the desk.jpg image to activate the Pictures toolbar. Click the Rectangular Hotspot button, and click and drag the image to draw a rectangle around the Kenny figure on top of the TV (see Figure 7.8). This opens the Insert Hyperlink dialog.
2. In the Insert Hyperlink dialog, find and select the KennyOriginal.jpg file in the Images folder. Set the ScreenTip to Detail of Kenny squeeze toy and set the target frame to New Window. Click OK.
Save the page and preview it in your browser. Note that although the desk.jpg image looks unchanged, if you hover your mouse over the Kenny figure on top of the TV, the mouse pointer changes to a hand indicating a hyperlink and a ScreenTip appears. If you click the hotspot, a new window opens showing the KennyOriginal.jpg file.
To edit the hyperlink or ScreenTip attached to the hotspot, simply right-click the hotspot in Design view and select Picture Hotspot Properties. If you want to resize the hotspot, you can do so by clicking it, grabbing the resizing handles, and moving them. You can also reposition the hotspot by clicking and dragging it to a different location within the image.
Hotspots can also be circular or even polygonal. To create a circular hotspot, click the Circular Hotspot button and draw the circle on the image in the same way you created the rectangle earlier. To create a polygonal hotspot, click the Polygonal Hotspot button and use the mouse to define each corner of the hotspot until you outline the desired area. To finalize a polygonal hotspot, you have to set the last corner point on top of the first one. Doing so opens the Insert Hyperlink dialog.
Because it can be hard to see exactly where all your hotspots are located, the Pictures toolbar features a Highlight Hotspots function. Clicking the Highlight Hotspots button replaces the image with an imagemap in which the hotspots have black outlines and the remaining image is gray. If you select one of the hotspots, it turns solid black (see Figure 7.9).
Figure 7.9 The desk.jpg image with the Highlight Hotspots function turned on.

This tool is only a visual aid and does not affect the image in any way. To close the imagemap and see the original image, simply click the Highlight Hotspots button again or click anywhere outside the image.
Summary
The ability to make quick alterations to images without having to leave the program is a feature that puts Expression Web 2 above the fold. Not to mention that it can be a real time saver as long as you think things through and make backups of your image files before changing them. In this hour, you learned how to use the powerful tools in the Pictures toolbar to edit the appearance of images in your page. You saw that the Reset button on the toolbar gives you the ability to experiment with different effects without ruining your files, and that scaling down large photos to make them fit in your page is a relatively simple task.
You also learned how to use the Auto Thumbnail function to make linked thumbnails of your images with one click. Finally you learned how to set and edit hotspots within an image to create a more interactive and immersive experience for your visitors.
This hour concludes Part I of this book. You now have all the tools necessary to create and edit the content of your website. In Part II, you will learn how to style the content to make it more visually pleasing and easier to read.
Q&A
Q. I imported the image as instructed and I can see the image in the Folder List task pane but when I open the Insert Picture dialogue I can’t find it anywhere.
A. Expression Web 2 is very finicky when it comes to image files and for some reason it tends to either forget or ignore recently imported images. If you can see the image file in the Folder List task pane but it doesn’t appear when you browse for it try right-clicking in the browser window and selecting Refresh. This works 95% of the time. The remaining 5% is usually caused by the image file being corrupt.
Q. I placed the image in the page but all I get in Design view is a box with a red x in it.
A. There could be two reasons for this: a) the image is not a supported image file or is not in a supported color mode. The most common cause for this problem is that the image is stored as CMYK (Cyan, Magenta, Yellow, Kelvin) instead of RGB (Red, Green, Blue). CMYK is the color mode for professional printing and does not translate to screen graphics. To correct this you need to open the image in an image editor and change the color mode. b) Expression Web 2 didn’t import the image properly. To test if this is the problem preview the page in your browser. If the image appears in your browser it means Expression Web 2 screwed up while importing the image and you’ll need to re-import it.
Workshop
The Workshop has quiz questions and exercises to help you put to use what you just learned. If you get stuck, the answers to the quiz questions are in the next section. But try to answer the questions first. Otherwise you’ll only be cheating yourself.
Quiz
1. There are three different methods of inserting an image into your page. Name them and explain how they are used.
2. Why should you always use the Resample Picture function when resizing an image on a page?
3. How many hotspots can you insert into an image?
Answers
1. To insert an image into a page, you can drag and drop it directly from the Folder View task pane, use the Insert Picture from File function found under Insert on the menu bar, or use the Insert Picture button on the Pictures toolbar.
2. If you insert a large image on a page and resize it using the Picture Properties dialog, you force the browser to resize the image for you. That means that the browser downloads far more image information than it displays. As a rule of thumb you should always reduce the amount of information downloaded by the browser to an absolute minimum. That means resampling all your images so that the actual image dimensions match the displayed image dimensions.
3. In theory there is no limit to how many hotspots an image can contain. In reality the number of hotspots is limited to the number you can fit within the borders of the image. There is not much sense in inserting so many hotspots that the user can’t find them or discern one from another.
Exercise
Use the Polygonal Hotspot tool to create a hotspot around the left screen on the desk and create a hyperlink to the the Pink & Yellow Media Blog located at http://blog.pinkandyellow.com. Give the hotspot a descriptive ScreenTip and set the hyperlink to open in a new window.