
Chapter 4
Document Type Definitions
WHAT YOU WILL LEARN IN THIS CHAPTER:
- How to create DTDs
- How to validate an XML document against a DTD
- How to use DTDs to create XML documents from multiple files
As you have seen so far, you can write well-formed XML by following a few simple rules. In effect, these rules describe how to determine one of XML’s key characteristics: its structure. Without the rules, the material is ambiguous. But well-formedness only goes so far. Several other technologies are available for validating XML documents, each with their own advantages and disadvantages. Document Type Definitions (DTDs) offer a way of specifying further rules that help in the interpretation of documents and their structure. By using namespaces (see Chapter 3) it’s possible to create unambiguously distinct sets of elements and attributes according the purpose you have in mind. Whether or not they appear in a namespace, such special-purpose sets of terms are sometimes known as vocabularies. You can describe an XML language’s structure and vocabulary in a software-friendly fashion, which can be used to check whether XML documents meet the requirements. This checking is known as validation.
WHAT ARE DOCUMENT TYPE DEFINITIONS?
When the vocabulary and structure of potential XML documents for a given purpose are considered together, you can talk about the type of the documents: the elements and attributes in these documents, and how they interrelate are designed to cover a particular subject of interest. Generally speaking, this isn’t any more than using a specific XML language, for example XMLTV (used for television listings) or X3D (for 3D graphics). But for validation purposes, the nature of an XML language can be much more specific, and Document Type Definitions (DTDs) are a way to describe fairly precisely the “shape” of the language. This idea has parallels in human language.
If you want to read or write in English or German, you must have some understanding of the grammar of the language in question. In a similar fashion, it’s useful to make sure the structure and vocabulary of XML documents are valid against the grammatical rules of the appropriate XML language. Fortunately, XML languages are considerably simpler than human languages. As you would expect, the grammars of XML languages are expressed with computer processing in mind. The breaking down of a human-language sentence into its grammatical components is known as parsing. The same applies with XML, although being simpler, a machine parser can do the job.
As mentioned in Chapter 1, parsers are the software subsystems that read the information contained in XML documents into our programs. The XML specification separates parsers into two categories: validating and nonvalidating. Validating parsers must implement validity checking using DTDs. With a validating parser, a lot of content-checking code you might otherwise need in your application is unnecessary; you can depend on the parser to verify the content of the XML document against the DTD.
Working with DTDs
There are two ways of associating a DTD with a document: internally and externally. The internal approach includes the DTD within the XML document. Although this isn’t a very common way of using DTDs in the wild, it can be very useful during development because you can easily change the shape of the XML and associated DTD and you can quickly confirm they are consistent with each other. Once a DTD has been developed, typically XML documents will be associated with it by reference. It’s very likely you will have seen such a reference already; a large proportion of HTML pages include a line like the following:
<!DOCTYPE html PUBLIC “-//W3C//DTD XHTML 1.0 Transitional//EN”
“http://www.w3.org/TR/xhtml1/DTD/xhtml1-transitional.dtd”>
You will soon see what all of this means, but first you need to get equipped to write your own DTDs. To get started, the following section examines a text editor with DTD support that can be used to parse and validate XML documents.
Using jEdit
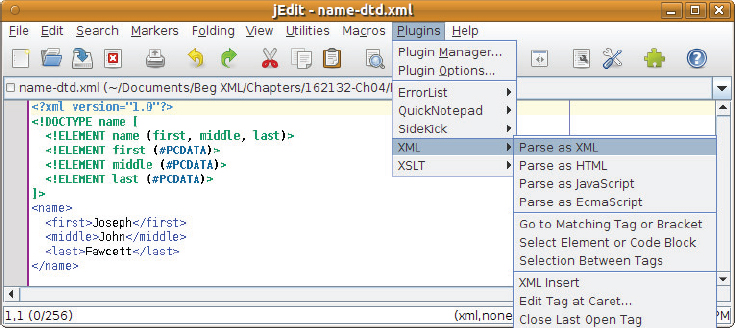
To author XML documents and DTDs all you need is a text editor, but if you want to experiment with validation you’ll want something with dedicated support built in. Lots of free, open source, and commercial tools are available for XML, and many support validation. Most Integrated Development Environments (IDEs), such as Eclipse and NetBeans, have some XML facilities, and if you’re already using one of these you may want to read the appropriate parts of your IDE’s documentation. For the practical examples in this chapter and the next, you’ll be using the jEdit programmer’s editor available from www.jedit.org. It’s open source and a free download is available for all major operating systems. At its core jEdit is a simple, relatively lightweight text editor. But a vast number of plugins are available which enable you to customize it to the programming language(s) of your choice.
Once you have downloaded and installed jEdit you will need to add XML support. This is very easy.
Now that you’ve set up your development environment, you’ll use jEdit’s DTD capabilities to validate an XML document. You’ll also see what happens when the content doesn’t match the structure specified in the DTD.
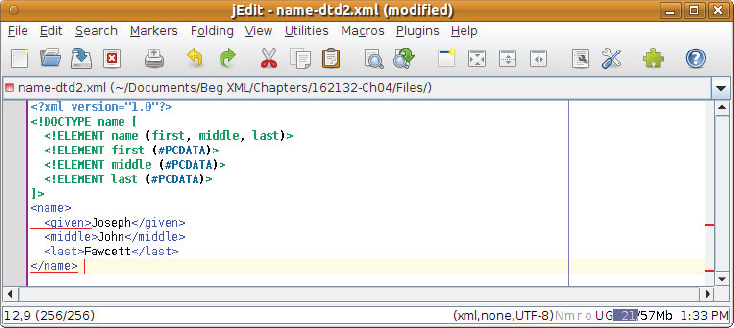
<?xml version=”1.0”?>
<!DOCTYPE name [
  <!ELEMENT name (first, middle, last)>
  <!ELEMENT first (#PCDATA)>
  <!ELEMENT middle (#PCDATA)>
  <!ELEMENT last (#PCDATA)>
]>
<name>
  <first>Joseph</first>
  <middle>John</middle>
  <last>Fawcett</last>
</name>
<?xml version=”1.0”?>
<!DOCTYPE name [
  <!ELEMENT name (first, middle, last)>
  <!ELEMENT first (#PCDATA)>
  <!ELEMENT middle (#PCDATA)>
  <!ELEMENT last (#PCDATA)>
]>
<name>
   <given>Joseph</given>
   <middle>John</middle>
   <last>Fawcett</last>
</name>
Let’s break the DTD down into smaller pieces so that you can get a preview of what you will learn later. As you have learned so far, you begin with the XML declaration. This is optional, but it is recommended that you include it to avoid potential XML version conflicts in the future:
<?xml version=”1.0”?>
Immediately following the XML header is the document type declaration, commonly referred to as the DOCTYPE:
<!DOCTYPE name [
The DOCTYPE informs the parser that a DTD is associated with this XML document. When using a DTD, the document type declaration must appear at the start of the document (preceded only by the XML header) — it is not permitted anywhere else within the document. The DOCTYPE declaration has an exclamation mark (!) at the start of the element name. The XML Recommendation indicates that declaration elements must begin with an exclamation mark. Declaration elements may appear only as part of the DTD. They may not appear within the main XML content.
In the previous example, you created a relatively simple DOCTYPE declaration. Directly following the DOCTYPE declaration is the body of the DTD. This is where you declare elements, attributes, entities, and notations:
<!ELEMENT name (first, middle, last)>
<!ELEMENT first (#PCDATA)>
<!ELEMENT middle (#PCDATA)>
<!ELEMENT last (#PCDATA)>
In the preceding DTD, you have declared several elements that make up the vocabulary of the <name> document. Like the DOCTYPE declaration, the element declarations must start with an exclamation mark.
Finally, the declaration section of the DTD is closed using a closing bracket and a closing angle bracket (]>). This effectively ends the definition, and the XML document immediately follows.
Now that you have seen a DTD and a validating parser in action, you may feel ready to create DTDs for all of your XML documents. Bear in mind that validation uses more processing power than simply reading a document into an application, so it’s a good idea to be systematic about your use of DTDs. But if you’re hand-authoring with a tool like jEdit then it certainly makes sense to validate before saving.
The Document Type Declaration in Detail
The document type declaration, or DOCTYPE, informs the parser that your document should conform to a DTD. It also indicates where the parser can find the rest of the definition. In the first example, the DOCTYPE was simple:
<!DOCTYPE name [ ]>
The document type declaration always begins in the same way, with <!DOCTYPE, followed by some whitespace, just as there is after element names. Note that whitespace is not allowed to appear in between DOCTYPE and the opening <!.
After the whitespace, the name of the XML document’s root element must appear exactly as it will in the document, including any namespace prefix. Because the document’s root element is <name>, the word name follows the opening <!DOCTYPE in the previous declaration.
Following the name of the root element, you have several options for specifying the rest of the document type declaration. In the <name> example, the element declarations appeared between the [ and ] of the DTD. When declarations appear between the [ and ], as in the example, they are called internal subset declarations. It is also possible to have some or all of your declarations in a separate document. DTD declarations that appear in external documents are external subset declarations. You can refer to an external DTD by either using system identifiers or public identifiers.
System Identifiers
A system identifier enables you to specify the location of an external file containing DTD declarations. It is comprised of two parts: the keyword SYSTEM, and a URI reference pointing to the document’s location. A URI can be a file on your local hard drive, a file on your intranet or network, or even a file available on the Internet:
<!DOCTYPE name SYSTEM “name.dtd” [...]>
You must type the word SYSTEM after the name of the root element in your declaration. Following the SYSTEM keyword is the URI reference to the location of the file, in quotation marks. The following examples use system identifiers:
<!DOCTYPE name SYSTEM “file:///c:/name.dtd” [ ]>
<!DOCTYPE name SYSTEM “http://wiley.com/hr/name.dtd” [ ]>
<!DOCTYPE name SYSTEM “name.dtd”>
Notice that the last example has no [ and ]characters. This is perfectly normal. Specifying an internal subset is optional. An XML document might conform to a DTD that uses only an internal subset, only an external subset, or both. If you do specify an internal subset, it appears between the [ and ], immediately following the system identifier.
You’ll see how to use an external DTD in the next Try It Out, but before you do, take a look at an alternative way to refer to external DTDs: public identifiers.
Public Identifiers
Public identifiers provide a second mechanism to locate DTD resources and look like this:
<!DOCTYPE name PUBLIC “-//Beginning XML//DTD Name Example//EN”>
Much like the system identifier, the public identifier begins with a keyword, PUBLIC, followed by a specialized identifier. However, instead of a reference to a file, public identifiers are used to identify an entry in a catalog. According to the XML specification, public identifiers can follow any format; however, a commonly used format is called Formal Public Identifiers, or FPIs.
The syntax for FPIs matches the following basic structure:
-//Owner//Class Description//Language//Version
At the most basic level, all public identifiers function similarly to namespace names, but public identifiers cannot be used to combine two different vocabularies in the same document. This makes namespaces much more powerful than public identifiers.
Following the public identifier string, you can include an optional system identifier as well. This enables the processor to find a copy of the document if it cannot resolve the public identifier (most processors cannot resolve public identifiers). When including the optional system identifier, the SYSTEM keyword shown earlier isn’t required. A valid document type declaration that uses a public identifier might look like the following:
<!DOCTYPE name PUBLIC “-//Beginning XML//DTD Name Example//EN” “name.dtd”>
The preceding declaration assumes you are defining a document type for a document whose root element is <name>. The definition has the following public identifier:
-//Beginning XML//DTD Name Example//EN
In case this cannot be resolved, there is a URI to a file called name.dtd. In the preceding example, no internal subset is included.
Now that you have learned how to use public and system identifiers, in the following Try It Out you create an external DTD file and associate it with the XML document. Remember that you can have an internal subset, an external subset, or both. When using an internal subset, the DTD declarations will appear within the XML document. When using an external subset, the DTD declarations will appear in a separate file.
<!ELEMENT name (first, middle, last)>
<!ELEMENT first (#PCDATA)>
<!ELEMENT middle (#PCDATA)>
<!ELEMENT last (#PCDATA)>
<?xml version=”1.0”?>
<!DOCTYPE name PUBLIC “-//Beginning XML//DTD Name Example//EN” “name.dtd”>
<name>
   <first>Joseph</first>
   <middle>John</middle>
   <last>Fawcett</last>
</name>
Sharing DTDs
In reality, most DTDs will be much more complex than the example here; for instance, the DocBook DTD (used for any kind of documentation) runs to over 4000 lines. Due to this complexity, it is better to use DTDs that are widely accepted, wherever possible. However, in the cases where you are covering new ground, you can actually share DTDs, which not only removes the burden for others to have to create the declarations, but it also enables you to more easily integrate with other companies and developers.
Many individuals and industries have developed DTDs that are de facto standards; your favorite search engine will probably find what you need. If you do want to publish your own, here are a few good practices to bear in mind:
- It should be error-free: This is rather obvious, but mistakes are easy to make. The best way to be sure is to use the DTD yourself for a while before making it public (or at least announcing it).
- Choose a simple, informative URL: Again this is something that applies more generally, but you should think particularly carefully about how you might publish any revisions — for instance, whether to include the date in the URL or reuse the same URL for subsequent versions.
- Make sure your server is delivering the DTD using the correct media (MIME) type in the HTTP headers: IETF RFC 3023: XML Media Types states that application/xml-dtd should be used for DTDs. This may happen automatically if the file is saved on the server with the extension .dtd. Online tools are available to check the HTTP MIME type, but every developer should have a copy of the cURL command-line tool. It’s available from http://curl.haxx.se, free and open source. The command for showing the HTTP headers from a URL looks like this:
curl -I http://dannyayers.com/dtd/name.dtd
Somewhere in the results you also want to see the following:Content-Type: application/xml-dtd
If that doesn’t appear, you should check your server documentation. - Provide documentation: Though you may prefer to provide explanatory documentation inside the DTD itself (comments use the same syntax as XML), keep in mind that your DTD may be repeatedly downloaded by tools that lack caching and therefore gobble up a lot of bandwidth. A good alternative is to just provide a single link to an HTML page describing the DTD, for example:
<!-- DTD for naming people, see http://example.org/name -->
ANATOMY OF A DTD
In addition to the different types of DTDs and their basic function, DTD declarations can be broken down into even more detail. Generally, DTDs consist of three basic parts:
- Element declarations
- Attribute declarations
- Entity declarations
The following sections examine these three parts. To achieve a full understanding of each DTD part, you will create an XML vocabulary for listing contacts — all of your friends and family. Note, however, that many existing vocabularies for contacts are available on the Internet and using a simplified format like that enables you to quickly create your own vocabulary.
Element Declarations
The beginning of this chapter demonstrated element declarations in use, but you have not yet looked at an element declaration in detail. When using a DTD to define the content of an XML document, you must declare each element that appears within the document. Additionally, DTDs can include declarations for optional elements: elements that may or may not appear in the XML document. Element declarations consist of three basic parts:
- The ELEMENT declaration
- The element name
- The element content model
<!ELEMENT name (first, middle, last)>
The ELEMENT declaration is used to indicate to the parser that you are about to define an element, and following the ELEMENT keyword is the name of the element that you are defining. Just as you saw in the DOCTYPE, the element name must appear exactly as it will within the XML document, including any namespace prefix.
After the element name, an element’s content model defines the allowable content within the element. An element may contain element children, text, a combination of children and text, or the element may be empty. As far as the XML Recommendation is concerned, four kinds of content models exist:
- Element
- Mixed
- Empty
- Any
Let’s look at each of these content models in more detail.
Element Content
When defining a content model with element content, simply include the allowable elements within parentheses. For example, if you have a <contact> element that is allowed to contain only a <name> element, the declaration should read as follows:
<!ELEMENT contact (name)>
In the contact list, however, the <contact> element needs to include more than just the name. This example includes as its children a <name>, <location>, <phone>, <knows>, and <description> element:
<!ELEMENT contact (name, location, phone, knows, description)>
Each element specified within this element’s content model must also have its own definition within the DTD. Therefore, in the preceding example, ELEMENT declarations are included for the <name>, <location>, <phone>, <knows>, and <description> elements to complete the DTD. The processor needs this information so that it knows how to handle each element when it is encountered. You can put the ELEMENT declarations in any order you like.
Of course, even in the small example at the start of the chapter the element had more than one child. There are two fundamental ways of specifying the element children:
- Sequences
- Choices
Sequences
Often the elements within these documents must appear in a distinct order. If this is the case, you define the content model using a sequence. When specifying a sequence of elements, you simply list the element names separated by commas, as in:
<!ELEMENT name (first, middle, last)>
The declaration indicates that the <name> element must have exactly three children — <first>, <middle>, and <last> — and that they must appear in this order. Likewise, here the <contact> element must have exactly five children in the order specified, like so:
<!ELEMENT contact (name, location, phone, knows, description)>
Take care when creating this line of code. The parser raises an error in three instances:
- If your XML document is missing one of the elements within the sequence
- If your document contains more elements
- If the elements appeared in another order
Choices
Suppose you needed to allow one element or another, but not both. Consider a <location> element, which specifies where each contact lives:
<!ELEMENT location (address)>
Instead of requiring one element, you could require a choice between two elements:
<!ELEMENT location (address | GPS)>
This declaration allows the <location> element to contain one <address> or one <GPS> element. If the <location> element were empty, or if it contained more than one of these elements, the parser would raise an error.
Constructing a choice content model is very similar to constructing a sequence content model. The main difference is that instead of separating the elements by commas, you must use the pipe (|) character. The pipe functions as an exclusive OR. An exclusive OR allows one and only one element of the possible options.
Combining Sequences and Choices
Many XML documents need to leverage much more complex rules. DTDs offer an intuitive way of achieving this: using both simple sequences and choices as building blocks.
Suppose you wanted to declare <latitude> and <longitude> elements within the <location> content model instead of the single <GPS> element. When creating the <location> declaration, you would need to specify that the content can include either an <address> element or the <latitude> and <longitude> sequence of elements, but not both. The model could be declared as follows:
<!ELEMENT location (address | (latitude, longitude))>
The entire content model is enclosed within parentheses as before, but here you have a second set of parentheses within the content model. Think of this as a content model within a content model. The inner content model is a sequence specifying the elements <latitude> and <longitude>. The XML Recommendation allows content models within content models within content models, and so on, indefinitely.
Mixed Content
The XML Recommendation doesn’t really talk about mixed content or text content on its own. Instead, it specifies that any element with text in its content is a mixed content model element. Within mixed content models, text can appear by itself or it can be interspersed between elements.
The rules for mixed content models are similar to the element content model rules that you learned in the preceding section. You have already seen some examples of the simplest mixed content model — text-only:
<!ELEMENT first (#PCDATA)>
The preceding declaration specifies the keyword #PCDATA within the parentheses of the content model. PCDATA is a keyword derived from Parsed Character DATA. It simply indicates that the character data within the content model should be parsed by the parser. Here’s an example element that conforms to this declaration:
<first>John</first>
Mixed content models can also contain elements interspersed within the text. Suppose you wanted to include a description of each contact in your XML document. You could create a new element <description>:
<description>Joe is a developer and author for <title>Beginning XML</title>, now in
 its <detail>5th Edition</detail></description>.
In this example, you have a <description> element. Within the <description> element, the text is interspersed with the elements <title> and <detail>.
There is only one way to declare a mixed content model within DTDs — by using the choice mechanism when adding elements. This means that each element within the content model must be separated by the pipe (|) character:
<!ELEMENT description (#PCDATA | title | detail)∗>
The preceding example declares the new <description> element. Notice that you use the choice mechanism to describe the content model; a pipe separates each element. You cannot use commas to separate the choices.
When including elements in the mixed content model, the #PCDATA keyword must always appear first in the list of choices. Unlike element-only content models, you cannot have inner content models in a mixed declaration.
The ∗ outside the parentheses of the content model indicates that the element may appear zero or more times. You can have an unlimited number of <title> elements, an unlimited number of <detail> elements, and any amount of text. All of this can appear in any order within the <description> element. This potential variation is a limitation of validation by DTD. Later you learn how XML Schema has improved validation of mixed content models.
In summary, every time you declare elements within a mixed content model, they must follow four rules:
- They must use the choice mechanism (the pipe (|) character) to separate elements.
- The #PCDATA keyword must appear first in the list of elements.
- There must be no inner content models.
- If there are child elements, the ∗ cardinality indicator must appear at the end of the model.
Empty Content
Some elements within your XML documents may or may not have content, and some might never need to contain content. For example, if you were working on an HTML-like XML language you might have a <br> element indicating a line break. It wouldn’t really make any sense for this to have any child elements or text content.
To define an element with an empty content model, simply include the word EMPTY following the element name in the declaration:
<!ELEMENT br EMPTY>
Remember that this requires the element to be empty within the XML document. Using the EMPTY keyword, you shouldn’t declare elements that may contain content. For example, a <middle> element used to hold a middle name may or may not contain text, and therefore should not use the EMPTY keyword.
Any Content
Finally, you can declare an element using the ANY keyword. For example:
<!ELEMENT description ANY>
Here, the ANY keyword indicates that text (PCDATA) and/or any elements declared within the DTD can be used within the content of the <description> element and that they can be used in any order any number of times. However, the ANY keyword does not allow you to include elements that are not declared within the DTD.
The following Try It Out builds on the previous one. You’ll see how to define more complicated structures that are more representative of real-life XML. These structures include mixed content, where you have text and XML interleaved, as well as situations where the author of a document has a choice of content type.
<?xml version=”1.0”?>
<!DOCTYPE contacts PUBLIC “-//Beginning XML//DTD Contact Example//EN”
“contacts1.dtd”>
<contacts>
  <contact>
    <name>
      <first>Joseph</first>
      <middle>John</middle>
      <last>Fawcett</last>
    </name>
    <location>
      <latitude>50.7218</latitude>
      <longitude>-3.533617</longitude>
    </location>
    <phone>001-234-567-8910</phone>
    <knows>John Doe, Danny Ayers</knows>
    <description>Joseph is a developer and author for Beginning XML <em>5th
edition</em>.<br/>Joseph <strong>loves</strong> XML!</description>
  </contact>
</contacts><!ELEMENT contacts ()>
<!ELEMENT contacts (contact)>
<!ELEMENT contact (name, location, phone, knows, description)>
<!ELEMENT name (first, middle, last)>
<!ELEMENT first (#PCDATA)>
<!ELEMENT middle (#PCDATA)>
<!ELEMENT last (#PCDATA)>
<!ELEMENT location (address | (latitude, longitude))>
<!ELEMENT address (#PCDATA)>
<!ELEMENT latitude (#PCDATA)>
<!ELEMENT longitude (#PCDATA)>
<!ELEMENT phone (#PCDATA)>
<!ELEMENT knows (#PCDATA)>
<!ELEMENT description (#PCDATA | em | strong | br)∗>
<!ELEMENT em (#PCDATA)>
<!ELEMENT strong (#PCDATA)>
<!ELEMENT br EMPTY>
<!ELEMENT contacts (contact)>
<!ELEMENT contact (name, location, phone, knows, description)>

<!ELEMENT name (first, middle, last)>
<!ELEMENT first (#PCDATA)>
<!ELEMENT middle (#PCDATA)>
<!ELEMENT last (#PCDATA)>

<!ELEMENT location (address | (latitude, longitude))>
<!ELEMENT address (#PCDATA)>
<!ELEMENT latitude (#PCDATA)>
<!ELEMENT longitude (#PCDATA)>

<!ELEMENT phone (#PCDATA)>
<!ELEMENT knows (#PCDATA)>

<!ELEMENT description (#PCDATA | em | strong | br)∗>
<!ELEMENT em (#PCDATA)>
<!ELEMENT strong (#PCDATA)>
<!ELEMENT br EMPTY>
The preceding example provides a great overview of using the four different types of element content, however, the contacts DTD is still limited. It allows only one contact. You now need a way to tell the processor that the (contact) sequence may appear many times or not at all.
Cardinality
An element’s cardinality defines how many times it will appear within a content model. DTDs allow four indicators for cardinality, as shown here in Table 4-1:
TABLE 4-1: Cardinality Indicators
| INDICATOR | DESCRIPTION |
| [none] | As you have seen in all of the content models thus far, when no cardinality indicator is used, it indicates that the element must appear once and only once. This is the default behavior for elements used in content models. |
| ? | Indicates that the element may appear either once or not at all. |
| + | Indicates that the element may appear one or more times. |
| ∗ | Indicates that the element may appear zero or more times. |
These indicators are associated with elements in the DTD to correspond to the requirements of the document model. The following activity improves the example you have been working with by expressing the cardinality of the elements in the DTD, making it a more accurate description and hence allowing tighter validation of documents. As you will now see, the syntax for this is straightforward: the cardinality indicators are simply appended to the element names.
<!ELEMENT contacts (contact∗)>
<!ELEMENT contact (name, location, phone, knows, description)>

<!ELEMENT name (first+, middle?, last)>
<!ELEMENT first (#PCDATA)>
<!ELEMENT middle (#PCDATA)>
<!ELEMENT last (#PCDATA)>

<!ELEMENT location (address | (latitude, longitude))∗>
<!ELEMENT address (#PCDATA)>
<!ELEMENT latitude (#PCDATA)>
<!ELEMENT longitude (#PCDATA)>

<!ELEMENT phone (#PCDATA)>
<!ELEMENT knows (#PCDATA)>

<!ELEMENT description (#PCDATA | em | strong | br)∗>
<!ELEMENT em (#PCDATA)>
<!ELEMENT strong (#PCDATA)>
<!ELEMENT br EMPTY>
<?xml version=”1.0”?>
<!DOCTYPE contacts PUBLIC “-//Beginning XML//DTD Contact Example//EN”
“contacts2.dtd”>
<contacts>
  <contact>
    <name>
      <first>Joseph</first>
      <first>John</first>
      <last>Fawcett</last>
    </name>
    <location>
      <address>Exeter, UK</address>
      <latitude>50.7218</latitude>
      <longitude>-3.533617</longitude>
    </location>
    <phone>001-234-567-8910</phone>
    <knows>John Doe, Danny Ayers</knows>
    <description>Joseph is a developer and author for Beginning XML <em>5th
    edition</em>.<br/>Joseph <strong>loves</strong> XML!</description>
  </contact>
  <contact>
    <name>
      <first>John</first>
      <last>Doe</last>
    </name>
    <location>
      <address>Address is not known</address>
    </location>
    <phone>321 321 3213</phone>
    <knows>Joseph Fawcett, Danny Ayers</knows>
    <description>Senior Technical Consultant for LMX.</description>
  </contact>
</contacts>
Attribute Declarations
Attribute declarations are similar to element declarations in many ways except one. Instead of declaring allowable content models for elements, you declare a list of allowable attributes for each element. These lists are called ATTLIST declarations, and look like this:
<!ELEMENT contacts (contact∗)>
<!ATTLIST contacts source CDATA #IMPLIED>
The preceding example has the same element declaration for your <contacts> element from the contacts list example. This particular ATTLIST declares only one attribute, source, for the <contacts> element.
An ATTLIST declaration consists of three basic parts:
- The ATTLIST keyword
- The associated element’s name
- The list of declared attributes
Following the ATTLIST keyword in the example is the name of the associated element, contacts. Each attribute is then listed in turn with three pieces of information:
- The attribute name
- The attribute type
- The attribute value declaration
In the example the name of the attribute is source. This source attribute can contain character data — the CDATA keyword is used to give the attribute’s type. Lastly, the declaration indicates that the attribute has no default value, and that this attribute does not need to appear within the element using the #IMPLIED keyword. This third part of the attribute declaration is known as the value declaration; it controls how the XML parser handles the attribute’s value.
Attribute Names
In addition to the basic XML naming rules, you must also ensure that you don’t have duplicate names within the attribute list for a given element. To declare an attribute name, simply type the name exactly as it appears in the XML document, including any namespace prefix.
Attribute Types
When declaring attributes, you can specify how the processor should handle the data that appears in the value. Within the element declarations, you could specify that an element contained text, but you couldn’t specify how the processor should treat the text value. Several new features are available for attribute declaration.
Table 4-2 provides a summary of the different attribute types:
TABLE 4-2: Attribute Data Types
| TYPE | DESCRIPTION |
| CDATA | Indicates that the attribute value is character data, the default type. Notice that this is slightly different from the PCDATA keyword in ELEMENT declarations. Unlike PCDATA, within CDATA, the parser can ignore certain reserved characters. |
| ID | Indicates that the attribute value uniquely identifies the containing element. |
| IDREF | Indicates that the attribute value is a reference, by ID, to a uniquely identifiable element. |
| IDREFS | Indicates that the attribute value is a whitespace-separated list of IDREF values. |
| ENTITY | Indicates that the attribute value is a reference to an external unparsed entity (you’ll learn more about entities later). |
| ENTITIES | Indicates that the attribute value is a whitespace-separated list of ENTITY values. |
| NMTOKEN | Indicates that the attribute value is a name token. An NMTOKEN is a string of character data consisting of standard name characters. |
| NMTOKENS | Indicates that the attribute value is a whitespace-separated list of NMTOKEN values. |
| Enumerated List | Apart from using the default types, you can also declare an enumerated list of possible values for the attribute. |
There isn’t space here to go into these attribute types in depth, though a couple of the more common ones are used in the next example. As usual, the key reference for this material is the XML Recommendation (http://www.w3.org/TR/xml), and your favorite search engine will find you a lot more explanatory material on the Web.
Attribute Value Declarations
Within each attribute declaration you must specify how the value will appear in the document. The XML Recommendation allows you to specify that the attribute either:
- Has a default value
- Has a fixed value
- Is required
- Is implied (or is optional)
Default Values
By specifying a default value for the attribute, you can be sure that it is included in the final output. As the document is being processed, a validating parser automatically inserts the attribute with the default value if the attribute has been omitted. If the attribute has a default value but a value has also been included in the document, the parser uses the attribute included in the document, rather than the default.
So what does this look like in practice? Try starting with an enumerated list to say that the kind attribute of the <phone> element should have the value of one of several alternatives like so:
<!ATTLIST phone kind (Home | Work | Cell | Fax)>
Given this in the DTD, one possible valid form of the element with attribute would be:
<phone kind=”Work”>
You can then easily specify the default attribute by simply including the value in quotation marks after the attribute type:
<!ATTLIST phone kind (Home | Work | Cell | Fax) “Home”>
Here, the default value is Home. When a validating parser is reading the <phone> element, if the kind attribute has been omitted, the parser will automatically insert the attribute kind with the value Home. If the parser encounters a kind attribute within the <phone> element, it will use the value that has been specified within the document.
Fixed Values
When an attribute’s value can never change, you use the #FIXED keyword followed by the fixed value. Fixed values operate much like default values. As the parser is validating the file, if the fixed attribute is encountered, the parser checks whether the fixed value and attribute value match. If they do not match, the parser raises an error. If the parser does not encounter the attribute within the element, it inserts the attribute with the fixed value.
A common use of fixed attributes is specifying version numbers. Often, DTD authors fix the version number for a specific DTD, like this:
<!ATTLIST contacts version CDATA #FIXED “1.0”>
So this would be valid:
<contacts version=”1.0”>
But this would not:
<contacts version=”1.1”>
Required Values
When you specify that an attribute is required, it must be included within the XML document. Suppose you require this kind attribute:
<!ATTLIST phone kind (Home | Work | Cell | Fax) #REQUIRED>
In the preceding example, the declaration indicates that the kind attribute must appear within every <phone> element in the document. If the parser encounters a <phone> element without a kind attribute as it is processing the document, it raises an error.
When declaring that an attribute is required, you are not permitted to specify a default value.
Implied Values
These are the most common form of values. When declaring an attribute, you must always specify a value declaration. If the attribute you are declaring has no default value, has no fixed value, and is not required, then you must declare that the attribute is implied. You can declare that an attribute is implied by simply adding the keyword #IMPLIED after the attribute’s type declaration, like the following:
<!ATTLIST knows contacts IDREFS #IMPLIED>
Specifying Multiple Attributes
The ATTLIST declaration enables you to declare more than one attribute, like so:
<!ATTLIST contacts version CDATA #FIXED “1.0”
                    source CDATA #IMPLIED>
In the preceding ATTLIST declaration for the <contacts> element, there is both a version and a source attribute. These declarations don’t have to be expressed together; an alternative is to use multiple ATTLISTs, each describing characteristics of the attributes one at a time:
<!ATTLIST contacts version CDATA #FIXED “1.0”>
<!ATTLIST contacts source CDATA #IMPLIED>
Either style for declaring multiple attributes is legal; it’s really a matter of taste.
Now that you have seen how to describe attributes in a DTD, you can try it in practice in the following activity.
<?xml version=”1.0”?>
<!DOCTYPE contacts PUBLIC “-//Beginning XML//DTD Contact Example//EN”
“contacts3.dtd”>
<contacts source=”Beginning XML 5E” version=”1.0”>
  <contact person=”Joe_Fawcett” tags=”author xml poetry”>
    <name>
      <first>Joseph</first>
      <first>John</first>
      <last>Fawcett</last>
    </name>
    <location>
      <address>Exeter, UK</address>
      <latitude>50.7218</latitude>
      <longitude>-3.533617</longitude>
    </location>
    <phone kind=”Home”>001-234-567-8910</phone>
    <knows contacts=”John_Doe Danny_Ayers”/>
        <description>Joseph is a developer and author for Beginning XML <em>5th
        edition</em>.<br/>Joseph <strong>loves</strong> XML!</description>
  </contact>
  <contact person=”John Doe” tags=”author consultant CGI”>
    <name>
      <first>John</first>
      <last>Doe</last>
    </name>
    <location>
      <address>Address is not known</address>
    </location>
    <phone>321 321 3213</phone>
    <knows contacts=”Joseph Fawcett Danny_Ayers”/>
    <description>Senior Technical Consultant for LMX.</description>
  </contact>
</contacts>
<!ELEMENT contacts (contact∗)>
<!ATTLIST contacts version CDATA #FIXED “1.0”>
<!ATTLIST contacts source CDATA #IMPLIED>

<!ELEMENT contact (name, location, phone, knows, description)>
<!ATTLIST contact person ID #REQUIRED>
<!ATTLIST contact tags NMTOKENS #IMPLIED>

<!ELEMENT name (first+, middle?, last)>
<!ELEMENT first (#PCDATA)>
<!ELEMENT middle (#PCDATA)>
<!ELEMENT last (#PCDATA)>

<!ELEMENT location (address | (latitude, longitude))∗>
<!ELEMENT address (#PCDATA)>
<!ELEMENT latitude (#PCDATA)>
<!ELEMENT longitude (#PCDATA)>

<!ELEMENT phone (#PCDATA)>
<!ATTLIST phone kind (Home | Work | Cell | Fax) “Home”>

<!ELEMENT knows EMPTY>
<!ATTLIST knows contacts IDREFS #IMPLIED>

<!ELEMENT description (#PCDATA | em | strong | br)∗>
<!ELEMENT em (#PCDATA)>
<!ELEMENT strong (#PCDATA)>
<!ELEMENT br EMPTY>
Entity Declarations
In Chapter 2, you saw how you could escape characters or use entity references to include special characters within the XML document. You learned that five entities built into XML enable you to include characters that have special meaning in XML documents. In addition to these built-in entities, you also learned that you can use character references to include characters that are difficult to type, such as the (c) character in the following example:
<contacts source=”Beginning XML 5E's Contact List” version=”1.0”> <description>Joseph is a developer and author for Beginning XML <em>5th edition</em> © 2012 Wiley Publishing. <br/>Joseph <strong>loves</strong> XML!</description>
The first entity reference here is an ' within the attribute content. This allows you to include a (') character without the XML parser treating it as the end of the attribute value. As part of the description there is an © character reference within the element content. This allows you to include the (c) character by specifying the character’s Unicode value.
In fact, entities are not limited to simple character references within XML documents. Entities can be used throughout the XML document to refer to sections of replacement text, other XML markup, and even external files. You can separate entities into four primary types, each of which may be used within an XML document:
- Built-in entities
- Character entities
- General entities
- Parameter entities
You’ve already seen the roles the five built-in entities play in well-formed XML. Here they are again as a reminder:
- & — The & character
- < — The < character
- > — The > character
- ' — The ' character
- " — The “ character
All XML parsers must support these. In general, you can use these entity references anywhere you can use normal text within the XML document, such as in element contents and attribute values. You can also use entity references in your DTD within default and fixed attribute value declarations, as well as entity declarations (as shown later). Although the built-in entities allow you to refer to markup characters, they cannot be used in place of XML markup. For example, the following is legal:
<description>Author & programmer</description>
Here, the & built-in entity allows you to include an ampersand (&) in the content of the <description> element. This is allowed because it is within the element’s text content. Conversely, the following would be illegal:
<contacts version="1.0">
The XML within the document is first checked for well-formedness errors; only then are entity references resolved.
There are actually three other general kinds of entities you can use within an XML document: character entities, general entities, and parameter entities. The latter two are of particular relevance to DTDs, but here’s as good a place as any to mention character entities.
Character Entities
Character entities are typically used when unusual characters are needed in a document. Their form is similar to the built-in entities, beginning with an ampersand (&) and ending with a semicolon(;). In between there is a numeric reference to the required Unicode character code. For example, the Unicode value for the (c) character is 169, so to include a (c) in an XML document you can use the following:
©
The extra # character before the number indicates that it’s a decimal number. You can also refer to a character entity by using the hexadecimal Unicode value for the character:
©
Here, the hexadecimal value 00A9 is used in place of the decimal value 169.
Charts listing the numeric values that correspond to different characters are available from www.unicode.org/charts/.
General Entities
General entities must be declared within the DTD before they can be used within an XML document. Most commonly, XML developers use general entities to create reusable sections of replacement text. Instead of representing only a single character, general entities can represent characters, paragraphs, and even entire documents.
You can declare general entities within the DTD in two ways. You can specify the value of the entity directly in the declaration or you can refer to an external file. Let’s begin by looking at an internal entity declaration:
<!ENTITY source-text “Beginning XML”>
Following the ENTITY keyword is the name of the entity, in this case source-text. You use this name when referring to the entity elsewhere in the XML document, like so:
&source-text;
After the entity name in the preceding declaration is a line of replacement text. Whenever an XML parser encounters a reference to this entity, it will supply the replacement text to the application at the point of the reference. This example is an internal entity declaration because the replacement text appears directly within the declaration in the DTD.
Within a general entity, the replacement text can consist of any well-formed XML content, although content without a root element is allowed. For example, the following are legal general entity values:
<!ENTITY address-unknown “The address for this location is "Unknown"”> <!ENTITY empty-gps “<latitude></latitude><longitude></longitude>”>
Notice that entity references can be included within the replacement text. Although you can include entity references within replacement text, an entity is not permitted to contain a reference to itself. The following declaration is not legal:
<!ENTITY address-unknown “The address for this location is &address-unknown;”>
Because no limits exist on the length of replacement text, your DTD can quickly become cluttered by sections of replacement text, making it more difficult to read. When declaring your entities, instead of declaring the replacement text internally you can refer to external files. In this case the entity is declared using an external entity declaration. For example, you could declare your entities as:
<!ENTITY joe-description SYSTEM “joe.txt”>
or:
<!ENTITY joe-description PUBLIC
  “-//Beginning XML//Joe Description//EN” “joe.txt”>
Just as you saw with the document type declaration, when referring to external files, you can use a system identifier or a public identifier. When you use a public identifier, you can also include an optional URI reference, as this example does. Each of these declarations refers to an external file named jeff.txt. As an XML parser is processing the DTD, if it encounters an external entity declaration, it might open the external file and parse it. If the XML parser is a validating parser, it must open the external file, parse it, and be able to use the content when it is referenced. If the XML parser is not a validating parser, it might or might not attempt to parse the external file; you need to check the parser documentation.
Parameter Entities
Parameter entities, much like general entities, enable you to create reusable sections of replacement text. However, parameter entities cannot be used in general content; you can refer to parameter entities only within the DTD. Unlike other kinds of entities, the replacement text within a parameter entity can be made up of DTD declarations or pieces of declarations.
Parameter entities can also be used to build modular DTDs from multiple files. This is very helpful in their reuse; you only need to use the parts relevant to your application.
Parameter entity declarations are very similar to general entity declarations. Here is an example:
<!ENTITY % DefaultPhoneKind “Home”>
This example contains a declaration for an internal parameter entity named DefaultPhoneKind. The percent sign (%) before the name of the entity indicates this is a parameter entity.
Like general entities, parameter entities can also refer to external files using a system or public identifier. The references look like this:
<!ENTITY % NameDeclarations SYSTEM “name.dtd”>
or:
<!ENTITY % NameDeclarations
  PUBLIC “-//Beginning XML//DTD External module//EN” “name.dtd”>
Instead of redeclaring the <name>, <first>, <middle>, and <last> elements in the DTD for the contacts list, you could refer to the name.dtd from earlier in the chapter. Reusing existing declarations in your DTD through external parameter entities is a good way to modularize your vocabulary.
References to Parameter Entities
When referring to a parameter entity within a DTD, the syntax changes slightly. Instead of using an ampersand (&) you must use a percent sign (%), as shown in the following example:
%NameDeclarations;
The reference consists of a percent sign (%), followed by the entity name, followed by a semicolon (;). References to parameter entities are permitted only within the DTD. Suppose you wanted to make use of the DefaultPhoneKind parameter entity within the ATTLIST declaration for the phone element. You could change the declaration as follows:
<!ENTITY % DefaultPhoneKind “"Home"”> <!ATTLIST phone kind (Home | Work | Cell | Fax) %DefaultPhoneKind;>
In this example, the parameter entity called DefaultPhoneKind is used in place of the attribute value declaration. Parameter entity references can be used in place of DTD declarations or parts of DTD declarations. Unfortunately, you can’t use the built-in entity " because general entities and built-in entities that appear in parameter entity values are not expanded as they are elsewhere. Therefore, you instead use character entities for the quotation marks. The following is perfectly legal:
<!ATTLIST phone kind (Home | Work | Cell | Fax) “%DefaultPhoneKind;”>
Now that you have seen how to express the different kinds of entities, you’re ready to try them in the following DTD activity.
<!ENTITY % DefaultPhoneKind '“Home”'>
<!ATTLIST phone kind (Home | Work | Cell | Fax) %DefaultPhoneKind;>
<!DOCTYPE contacts PUBLIC “-//Beginning XML//DTD Contact Example//EN”
  “contacts4.dtd”>
DTD LIMITATIONS
DTDs are a rather old technology and over time various limitations have become apparent. Most significantly, DTDs have:
- Poor support for XML namespaces
- Poor data typing
- Limited content model descriptions
However, it is important to remember that even with their limitations, DTDs are a fundamental part of the XML Recommendation. DTDs will continue to be used in many diverse situations, even as other methods of describing documents emerge.
SUMMARY
In this chapter, you learned the following:
- By using DTDs, you can easily validate your XML documents against a defined vocabulary of elements and attributes. This reduces the amount of code needed within your application.
- An XML parser can be used to check whether the contents of an XML document are valid according to the declarations within a DTD.
- DTDs enable you to exercise much more control over your document content than simple well-formedness checks do.
- Use a DTD to provide a description against which documents can be validated.
- Create element declarations using the <!ELEMENT ... > construct.
- Create attribute declarations using the <!ATTLIST ... > construct.
- Create entity declarations using the <!ENTITY ... > construct.
- Specify the DTD associated with an XML document using the <!DOCTYPE ... > construct.
- DTDs have several limitations. The next two chapters illustrate how these limitations have been addressed in newer standards, such as XML Schemas and RELAX NG.
EXERCISES
You can find suggested solutions to these questions in Appendix A.
WHAT YOU LEARNED IN THIS CHAPTER
| TOPIC | KEY POINTS |
| Purpose of DTDs | To describe the structure of XML documents in a way that they may be validated. |
| Associating XML documents to DTDs | The DTD can be included within the XML document itself, or specified by reference in the document’s DOCTYPE declaration. |
| Element declarations | Elements and their allowed children can be specified in DTDs, e.g. <!ELEMENT name (first, middle, last)>. |
| Content models | DTDs support four different kinds of content model: Element (child elements only); Mixed (elements and text); Empty (no content); and Any (unrestricted). |
| Child element structure | The structure of the children of an element may be specified using a combination of sequences (comma-separated lists) or choices (lists separated by the “|” character), e.g. <!ELEMENT location (address | (latitude, longitude))>. |
| Cardinality indicators | When no cardinality indicator is used on an element, by default it indicates that the element should appear once and once only. The indicators are: ? (zero or one occurrence of the element); + (one or more occurrences); and ∗ (zero or more occurrences). |
| Attribute declarations | Attributes and the details of their nature can be specified in DTDs, e.g. <!ATTLIST phone kind (Home | Work | Cell | Fax)>. |
| Entity declarations | There are four kinds of entities to be found in XML: Built-in (for example & for the & character); Character (for example © for the copyright symbol); General (replacement text); and Parameter (replacement text for use in DTDs). |