
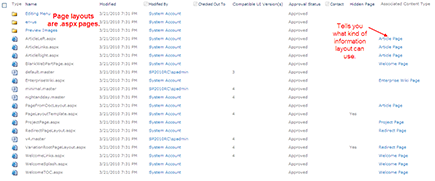
Figure 20-1: The default Page Layouts.
Chapter 20
Creating Page Layouts with SharePoint Designer
In This Chapter
![]() Working with placeholders, page layouts, and master pages
Working with placeholders, page layouts, and master pages
![]() Deciding on your content controls and content types
Deciding on your content controls and content types
![]() Creating a new page layout in various ways
Creating a new page layout in various ways
![]() Adding containers and controls to your layout
Adding containers and controls to your layout
In Chapter 18, I show you how to choose and apply different page layout templates in SharePoint 2010. Like many other applications, when I started with these templates, I was perfectly happy until I realized that I couldn’t do this, or that, or that other thing (you get the picture). Sometimes you just need to create your own layouts.
Many SharePoint techies and branding resources may confuse what functionality they get from the master page (or the outer template) and what functionality they get from the page layout until they populate page content. Then they realize it’d help to have the title display (or not display) in a certain location, to have a certain Web Part embedded on the page, or to keep the content on the right to a certain width. Here’s when shortcomings of a predefined page layout start to appear.
SharePoint 2010 comes with multiple default page layouts for a publishing site, as shown in Figure 20-1. Several of these are extremely flexible in terms of what types of content you can add and where on the page you can add them to. However, when you’re using SharePoint for the Internet or across corporate intranet pages, you start to value the ease and control of specific page layouts you can provide your content editors.
 I use some HTML terms in this chapter. After all, SharePoint page layouts are web pages. Before you do any major modifications of a page layout or create a new page layout, you should be familiar with SharePoint and ASP.NET controls, HTML, and CSS. Minor modifications, such as changing the orientation of a Web Part zone or adding additional predefined controls, can be done with the SharePoint Designer 2010 interface without detailed web design training.
Getting Inside a SharePoint Page Layout
Have you ever wondered what’s going on behind the scenes in SharePoint? Cracking open a page layout is one of the easiest ways to do that. Start by opening one of the standard SharePoint page layouts in SharePoint Designer 2010:
1. Open SharePoint Designer 2010 and then click the Open Site button and type (or paste in) the web address to your publishing site.
You must access a site created using the Publishing site template to work with page layouts. (See Chapter 7 for details on creating new sites.)
2. In the Navigation pane, click the Page Layouts button.
A list of the page layouts in your site appears.
3. Click the Blank Web Part Page layout file.
A summary of the file appears, which shows the file’s versioning status and permissions as well as provides links to customize the file.
4. In the Customization section, click the Edit File link, as shown in Figure 20-2.
5. When prompted to check out the file, click No.
Because you’re just browsing, don’t check out the file.
The file opens in Design view for your viewing pleasure, as shown in Figure 20-3.
While Design view is interesting, the Code view is where all the real action takes place. To access the Code view of the page layout, click the Code button at the button of the screen, which you can see in Figure 20-4, along with the Code view.
Figure 20-2: Open a page layout for editing.
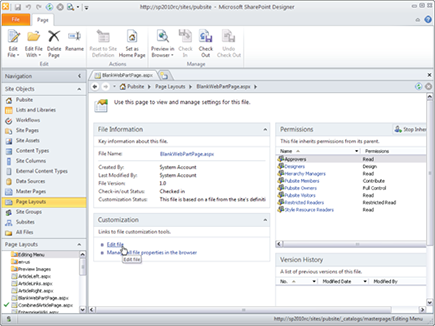
Figure 20-3: Looking over the layout in Design view.

Figure 20-4: Looking over the layout in Code view.
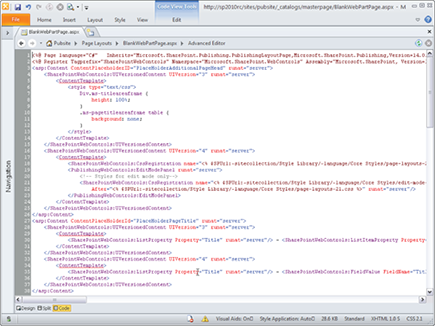
If you’re like me, the first thing you notice in the text editor is that all the text is highlighted in a sickly orange. That’s because the page opens by default in basic Edit mode, which protects you from changing anything you aren’t supposed to change. To make the highlight disappear, click the Advanced Mode button on the Home tab of the Ribbon.
Here I walk you through this page layout at a very high level and give you an overview of what you see (refer to Figure 20-4). Starting from the top, you see these elements:
![]() Standard registrations and page directives: The top of the ASPX page contains standard registrations needed for the page layout to work with SharePoint. Warning: Leave this code alone unless you know what you’re doing.
Standard registrations and page directives: The top of the ASPX page contains standard registrations needed for the page layout to work with SharePoint. Warning: Leave this code alone unless you know what you’re doing.
The page directives are everything that you see included in the symbols:
<%@ some page directive here %>
 The directives at the top of the page are responsible for registering groups of controls with your page layout. Each directive designates a tag prefix attribute that defines the prefix that you must use to access the controls associated with the directive. If you try to use a control that isn’t registered or you use an incorrect prefix, you get an error when you view your page in the browser. This is all ASP.NET stuff; it’s not specific to SharePoint.
![]() Content placeholders: As you scroll down the page, notice that all the markup in the page is contained with special content tags that look like this:
Content placeholders: As you scroll down the page, notice that all the markup in the page is contained with special content tags that look like this:
<asp:Content ContentPlaceholderID=
”PlaceHolderNameGoesHere” runat=”server”>
. . . Markup goes here . . .
</asp:Content>
These content placeholders are predefined in the site’s master page. Any content placeholder that you see in the page layout replaces the content that’s normally found in the master page. For example, most master pages have a PlaceHolderLeftNavBar content placeholder where the Quick Launch menu and other navigation controls are placed. By placing this placeholder in your page layout, you can override what’s in the master page and display your own content in that placeholder.
In most cases, you won’t make any changes to the layout’s page directives, but you’ll most definitely be working with the content placeholders. That’s the whole point of creating a page layout — to define something that you want to happen that’s different than the master page.
 All your changes must reside inside a content placeholder in your page layout.
Working with content placeholders
SharePoint Designer makes it easy to override placeholders from the master page. To put your content into a placeholder instead of using the master page’s content:
1. Open a page layout in Edit mode, which I describe in the preceding section, and check it out by clicking Yes when prompted to check out the file.
I recommend doing this in a non-production site. If you have to use a production site, be sure to discard your changes without publishing a major version.
2. Place the page in Design mode by clicking the Design button in the lower-left corner of the screen.
You see a WYSIWYG (what you see is what you get) display of the page layout. Most of what you see actually comes from the master page.
3. Hover your mouse over different areas of the page.
As you do, notice that names of placeholders appear. Those with Master in them display content from the master page. Those with Custom are in your page layout.
4. Find the PlaceHolderMain content placeholder and click it.
The PlaceHolderMain content placeholder is used to contain the body of the page, so it’s usually the largest placeholder on the page.
One way to make sure you’ve selected the proper element is to use the Visual Aids tags at the bottom of the screen.
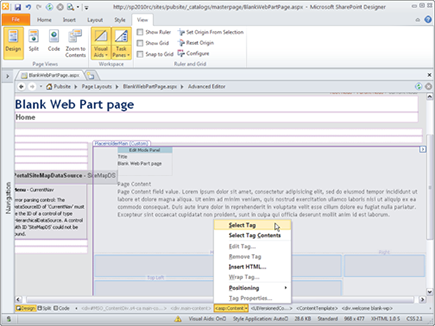
5. In the Visual Aids toolbar, click the <asp:Content> tag and choose Select Tag, as shown in Figure 20-5.
The entire tag is highlighted.
6. Click the Split button on the View tab of the Ribbon to display half the page in Code view and the other half in Design view.
The PlaceHolderMain content placeholder and its contents are highlighted. As you select different elements in Design view, notice that the code is highlighted in the Code view. This is a great way to browse through a layout and see how it works.
Figure 20-5: Use Visual Aids to select tags.
7. Select the PlaceHolderPageDescription content placeholder in Design view and click the arrow on the far right of the placeholder.
A smart tag appears. Any place you see these arrows, click them and then you see common tasks that are associated with that placeholder or control.
8. In the Common Content Tasks tag, click Create Custom Content.
The placeholder appears in Code view.
9. In Code view or Design view, type Hello world in the PlaceHolder PageDescription content placeholder.
10. Preview your changes in the browser by clicking the Preview in Browser button on the Home tab of the Ribbon.
As you may have surmised, the PlaceHolderContentMain placeholder is the one you use most often. The other placeholders are used for more specialized content, such as navigation bars and editing consoles. Another useful placeholder is PlaceHolderAdditionalPageHead. If you know anything about the markup used to create web pages, you know that all web pages have a head section where you place the title and references to style sheets and JavaScript files. Anything you put in the PlaceHolderAdditionalPageHead placeholder is merged into the master page’s head section.
Page layouts and styles
Page layouts get styles from a myriad of places, including the core style sheet, page layout CSS, Edit mode styles, the style sheet attached to any master used, item styles for controls and Web Parts, such as Summary Link and Content Query, and the list goes on.
Bonus Chapter 2 on the companion website talks about where to put your own styles if you create them. Figuring out what and where SharePoint styles are and how to override them are time-consuming processes. If you’re creating custom page layouts, especially if you’re following web and accessibility standards and are using a CSS-based layout, at a minimum, you’re probably going to write a few styles to position the content on the page, unless you started from a predefined layout. For more on this book’s companion website, see the Introduction.
The relationship between the page layout and a master page
In Chapter 18, I touch on the relationship between a master page and the page layout as well as how the master (the outer template) works with the page layout (the inner template). This relationship, and its dependencies, becomes more pronounced with custom-designed master pages and page layouts.
Although this chapter is about custom page layouts, not master pages, they often go hand in hand in a branded SharePoint Internet or intranet site.
Sometimes my clients are surprised when a custom master page doesn’t look good with every out-of-the-box page layout or vice versa. This might have to do with fixed sizes versus fluid layouts or elements shown in the page layout that aren’t styled in the master CSS. One example of this disconnect is when an out-of-the-box page layout contains an element, such as page breadcrumbs or navigation flyouts, that you may not have styled in a style sheet attached to the master.
 If having your page layout work well with any master page in the site collection is important to you, test, test, and test and then make adjustments.
Having your page layout work well with a master page comes into play a lot with intranets. Examples of this are when different sites can be created under the site you planned, you don’t foresee what combination of page layouts and master pages the owners and editors select, you don’t know how many levels of navigation they’ll choose, and so forth.
If you’re creating an Internet or custom intranet site and have no intention of using anything but your custom master with custom page layouts, you can restrict the page layouts used.
Making Decisions before You Start
Depending on site complexity, you may need to consider making a new content type and/or additional site columns for your page layouts.
If your site needs are basic and you simply want a variation of an out-of-the-box page layout, skip ahead to the section, “Creating a New Page Layout,” later in this chapter. However, if you want your pages to have additional fields beyond those provided in the Article Page and Welcome Page content types, consider the following:
![]() Do you need a new content type for your pages?
Do you need a new content type for your pages?
Do you want to be able to manage the pages by the content type, including rolling up content under just this type? Are the out-of-the-box page content types too detailed or too simple for your needs? If so, you need to create your new content type and add the necessary site columns. (Review Chapter 26 on content types to understand inheritance and how picking the parent content type can help or hinder your efforts.)
![]() Do you need new field controls or site columns for your pages?
Do you need new field controls or site columns for your pages?
Regardless of whether you create a new custom content type or use a predefined one, you may not have all the page fields or content fields you need.
For example, usually only one page content control is in a SharePoint out-of-the-box page layout. What if you need more than one content control? You can create additional site columns based on the Full HTML column type with formatting and constraints for the publishing type. Several other fields are created for publishing or content management as well, including images, hyperlinks, and summary links.
After creating and adding these to the appropriate content type, they’re available to insert into your page layout.
![]() Do you have what you need for branding, static content, and page layout?
Do you have what you need for branding, static content, and page layout?
One of the compelling reasons for creating a new page layout is because you want to lay out your content in a different way on the page. Maybe you want to have four columns, to use tabs, or to have all your new pages display text to help the person using it to create a new page. Gather your thoughts around what you want to accomplish with this new layout.
Create a prototype (or a roadmap) before you actually create your page layout. In the process, think about stuff that you don’t know how to do; if you can’t do it outside SharePoint, you can’t do it in SharePoint. If you aren’t a whiz at HTML and CSS, don’t fret. You can probably cobble together what you need by looking at other page layouts, and you can find lots of tutorials on the web.
One way to discover interesting ways of using HTML and CSS is to use the browser to look at the source of any web page, such as a SharePoint web page. All browsers give you the ability to view the source of the web page. Another good approach is to use the Firefox browser along with the Web Developer and Firebug extensions.
Creating New Page Content Fields
SharePoint’s default publishing content types — Article Page and Welcome Page — usually provide most of the site columns you need for creating publishing pages. The site columns in a page layout’s content types map to the fields that are available for entering content in the page layout. For example, both the Article Page and Welcome Page content types include the Page Content field. This is usually the main field on the page where users enter their content. What if you want your page layout to display the division of your company associated with each publishing page? You use a site column to add the division field to your page layout.
In this section, I describe how to create new site columns and associate them with content types, and how to add them to your page layouts.
Page layouts are supposed to be templates that your users use to create publishing pages. If those templates don’t make it easy for your users to enter content, they aren’t very good templates. One way to make your page layouts better is to add the fields, or site columns, that allow users to enter their content.
Creating a site column for page content
In Chapter 11, I include detailed instructions on creating a new site column. However, if you need to make new page content fields to add to your page layout, here’s an overview focusing on the publishing content column types:
1. Navigate to the Site Columns Gallery by choosing Site Actions⇒Site Settings and then clicking the Site Columns link.
You’re in the Site Column Gallery.
2. Click the Create button at the top of the page to create a new site column.
The New Site Column page appears.
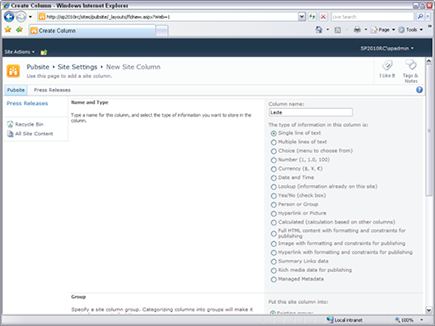
3. In the Name and Type section, type a name for your site column in the Column Name field and then select your new column type.
The following types are part of the publishing framework (see Figure 20-6):
• Full HTML Content with Formatting and Constraints for Publishing: This is the same kind of column type as the out-of-the-box page content control; basically, a general HTML editor where you can add text, images, tables, hyperlinks, styles, and so forth.
• Image with Formatting and Constraints for Publishing: A publishing image control that allows for a hyperlink. Because this control is part of the publishing web content structure, you can rely on the versioning and approval process of the page versus a Web Part.
• Hyperlink with Formatting and Constraints for Publishing: A publishing control that allows you to select a hyperlink to display in your Web page.
• Summary Links Data: Summary Links provide more benefits than a Links list or individual links you create because they come with the ability to create groupings and apply several predefined styles. Two Summary Link fields are provided out-of-the-box.
• Rich Media Data for Publishing: A container with all the publishing content management benefits for Silverlight content.
Of course, all the other SharePoint column types you know and love, such as Choice fields and Managed Metadata, are fair game for page layouts.
Figure 20-6: A new site column showing a selection of full HTML content.
4. Select a group for your column using the drop-down list in the Group section.
Selecting a predefined group or adding your own makes it easier to locate in the Site Columns library and when you select it for inclusion in a content type.
For the type of content I’m describing, you may want to add it to the Page Layout Columns group or a custom group.
5. Select or add other properties as applicable.
These may include a description, whether the field is required or unique, and so on.
6. Click OK to create your site column.
Your site column is created and can be added to content types.
You can use this same process for creating new page fields (information about the page, not content) for your custom layout.
Adding your publishing content site column to a content type used by page layouts
Before you can add your new site column to the page layout in the form of a content control, it must be included in a content type for page layouts. You can add your new site column to a new custom content type you made or add it to predefined page layout content types.
I discuss the predefined page layout content types, such as Article and Welcome, in Chapter 18. If you’re using those content types to create new page layouts (for example, several new Article Page layouts), you can add your new site columns to that type for use, rather than create a new custom type.
If you’re creating custom content types for your project, which could be desirable for long-term maintenance and content management in projects that have many variations from out-of-the-box SharePoint, add the site column in the same way to your custom content type.
I discuss creating new content types at length in Chapter 26; however, here are a couple items of note about content types for page layouts. You can inherit columns by picking predefined content types as parents for your new content type, automatically adding all the columns they contain. If you want more control over your custom type, you may choose a more skeletal parent with less base information.
Sometimes creating your first custom content type is easier than reviewing existing ones. To do so, follow these steps:
1. Navigate to the Site Content Types Gallery by choosing Site Actions⇒Site Settings, and then click the Site Content Types link.
2. Scroll down to locate the Page Layout Content Types group and the Publishing Content Types group in the library.
Article Page and Welcome Page types are in the Page Layout Content Types group, and the Page type is in the Publishing Content Types group.
3. Click the Welcome Page or Article Page link to open the content type.
You see the columns they contain, and near top of the page, you see their parent — the Page content type.
4. Click the Add from Existing Site Columns link to add your site column to the content type.
The Add Columns to Content Type page appears.
5. In the Select Columns section, select the column you created in the previous section.
6. Click OK.
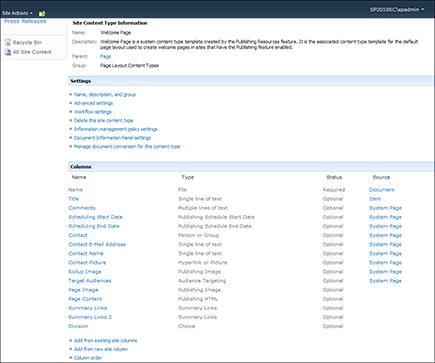
The site column is added to the content type. Figure 20-7 shows the Welcome Page content with a new site column called Division. You still have to add the site column to your page layout in order for it to be visible to users when they create new publishing pages using your layout.
Figure 20-7: Adding a site column to a content type.
Adding your site column to the page layout
With your site column added to the content type, now you have to add the site column to the page layout. Here’s how:
1. Open your page layout in Edit mode in SharePoint Designer 2010.
See the section “Getting Inside a SharePoint Page Layout,” earlier in this chapter if you need a refresher for editing an existing page layout. If you want to create a new page layout, see the next section.
2. Open the Toolbox by clicking the View tab on the Ribbon and then choosing Task Panes⇒Toolbox.
3. In the Toolbox task pane, expand the SharePoint Controls pane.
4. Click the plus (+) sign to expand the Content Fields section.
You see a list of site columns, or content fields, listed, as shown in Figure 20-8. You can click the Refresh button to make sure you have the latest list of columns from the server.
The content fields you see listed here come from the list of site columns associated with the page layout’s content type. If you don’t see all the fields you expect, then double check your content type.
5. To add your content field to the page layout, drag and drop the field from the Toolbox to your page layout.
It doesn’t matter whether you’re in Design view or Code view. SharePoint Designer inserts the code that represents the field control.
You can’t just drag a content control onto the page and rename the fieldname property.
6. Click the Save button on the File tab to save your page layout.
Figure 20-8: Add new page fields to your page layout.
Test that your change works as expected by creating a new publishing page that uses your page layout. I describe how to create new publishing pages in Chapter 18.
Creating a New Page Layout
Although it’s possible to create a new page layout from an existing one, I don’t recommend it. Instead, I suggest you create a new page layout from scratch. I believe it’s too easy to make mistakes when you copy and modify an existing layout.
If there is an existing page layout that’s close to what you want, I suggest you study what you like about that layout and manually recreate it as a new page layout. Because a page layout is used in conjunction with a master page, you also have to be familiar with the structure of your master page. You can use SharePoint Designer 2010 to open your site’s master page and review its structure and content placeholders.
Examples of modifications you may want to make to a page layout can include using DIV tags to create the structure of the page, inserting Web Part zones, adding new content controls, adding ASP.NET and HTML controls, adding additional styles in the head of the page, and/or attaching a style sheet for that page.
Make sure that you have SharePoint Designer 2010, that your organization supports you having it, and that you have the correct permissions before you start.
Page layouts and master pages, although they can be applied at a subsite level, reside in the top-level site in the site collection.
To create a new page layout:
1. Open your publishing site in SharePoint Designer 2010.
2. Click the Page Layouts button in the Navigation pane.
3. Click the New Page Layout button on the Page Layout tab of the Ribbon.
The New dialog box appears, as shown in Figure 20-9.
4. In the Content Type Group dialog box, select the content type group for the content type you want to use.
If you’re using SharePoint’s publishing content types, select Page Layout Content Types. Otherwise, select the content type group that you use in Step 4 in the section “Creating a site column for page content,” earlier in this chapter.
Figure 20-9: Create a new page layout.
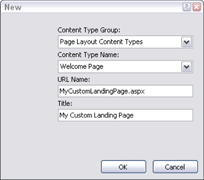
5. Select your content type from the Content Type Name drop-down list.
6. Type the filename for your page layout in the URL Name text box.
7. Type the title for your page layout in the Title text box.
8. Click OK.
SharePoint Designer 2010 creates your new page layout and opens it for you to begin editing.
A page layout is like any other kind of document in SharePoint. It’s stored in a document library, has properties, and can be checked out, version controlled, and subject to content approval.
The document library where page layouts (and master pages) are stored is called the Master Page Gallery. You can access this library using either SharePoint Designer 2010 or the browser. To access this library from the browser:
1. Browse to your site collection.
2. Choose Site Actions⇒Site Settings.
The Site Settings page appears.
3. Click the Master Pages and Page Layouts link.
The Master Page Gallery opens.
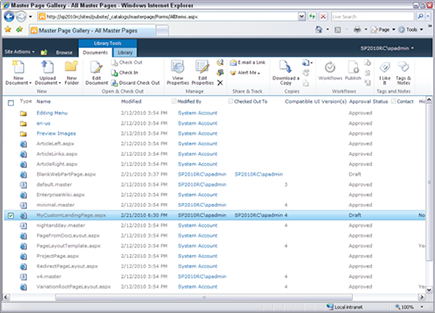
Figure 20-10 shows the Master Page Gallery with a custom page layout.
Figure 20-10: The Master Page Gallery.
Before you can start using your page layout to create new publishing pages, you need to check it in and approve the file. You can read about managing documents in document libraries in Chapter 10.
Your new page layout is available to you and your editors when you create a new publishing page or change the page settings for a publishing page of the same content type.
When you or your users initially select a page layout and then decide to change the page layout later, you can make changes only to other pages of the same content type. Therefore, if I have no specific need for a custom content type, I often choose the Welcome Page type so that my users can change the default home page of a site to my new page layout because the home page is usually some sort of welcome.
In the sections that follow, I tell you how to restrict the page layouts your editors can select and set the default page layout for new subsites in the site collection.
Putting Containers and Controls in Your Layout
You may be wondering what goes inside these content placeholders in your page layout. Although you can place text and HTML markup inside placeholders, most often you put fields, controls, containers, and Web Parts in your page layout.
A page layout is a kind of ASP.NET page. Most any controls that you might use in an ASP.NET page are fair game for SharePoint. A most notable exception is the regular ASP.NET data source controls. SharePoint has its own data source controls that you use instead.
If you really want to get hard-core with your page layout development, I suggest getting acquainted with creating web sites with ASP.NET. Visual Studio Web Developer is a free download, and you can use it to get started in ASP.NET. Most of what you know in ASP.NET can be applied to SharePoint pages.
Here are multiple control types that you can put in a page layout to contain content:
![]() Web Parts/Web Part zones: Web Part zones are containers that contain other containers — Web Parts. Generally, you place zones in a way that defines the page layout using a combination of HTML/CSS positioning and inserted zones. By default, the zones are oriented vertically; the Web Parts inserted are stacked up and down, and you can move them above or below each other. Web Part zones, however, have properties that can be set in SharePoint Designer that allow Web Parts to sit horizontally next to each other.
Web Parts/Web Part zones: Web Part zones are containers that contain other containers — Web Parts. Generally, you place zones in a way that defines the page layout using a combination of HTML/CSS positioning and inserted zones. By default, the zones are oriented vertically; the Web Parts inserted are stacked up and down, and you can move them above or below each other. Web Part zones, however, have properties that can be set in SharePoint Designer that allow Web Parts to sit horizontally next to each other.
In SharePoint 2010, you can insert Web Parts directly into a page layout without a zone; but remember, this should be done only when an element should be on every page using that page layout, and there are benefits to not using a zone or letting the page editors control the Web Part.
![]() HTML controls: HTML controls that can be inserted include HTML markups, such as
HTML controls: HTML controls that can be inserted include HTML markups, such as IMG tags, DIV tags, paragraph tags, and HTML form controls, such as input boxes and submit buttons. You can manually type HTML in the page layout as well.
![]() ASP.NET controls: If you have .Net programming experience, you’ll recognize many of the ASP.NET controls you can insert, such as standard controls like ad rotators, calendars, and ASP.NET form controls. These also include data controls, such as grid views and data sources, validation controls, such as RequiredFieldValidator, and navigation controls.
ASP.NET controls: If you have .Net programming experience, you’ll recognize many of the ASP.NET controls you can insert, such as standard controls like ad rotators, calendars, and ASP.NET form controls. These also include data controls, such as grid views and data sources, validation controls, such as RequiredFieldValidator, and navigation controls.
![]() SharePoint controls: Data View and server controls specific to SharePoint as well as page fields and content fields.
SharePoint controls: Data View and server controls specific to SharePoint as well as page fields and content fields.
![]() Page fields: Site columns about the page itself; for example, Comments, Content Type, and Title Scheduling Start Date.
Page fields: Site columns about the page itself; for example, Comments, Content Type, and Title Scheduling Start Date.
To assist editors, you can place some of these fields in the Edit mode panel so that they can edit while they’re editing the page instead of navigating to the page library to edit. Content shown in the Edit mode panel isn’t visible to users viewing the approved page.
![]() Content controls: Controls on the page that store content, such as summary links, page image, and page content are different from Web Parts.
Content controls: Controls on the page that store content, such as summary links, page image, and page content are different from Web Parts.
Page fields and content controls are site columns in the content type associated with your page layout. Any time you want to add a new field or content control to your page layout, you must add a site column to your content type.
Generally, SharePoint page layouts for publishing sites contain at least one content control (an HTML container) as well as Web Part zones. However, you can make additional field controls in the browser as site columns and add to page layout content types for insertion on the page.
I often find that I need a main page content control in the middle area of the page and a right-hand callout content control as an aside on the right.
Other field controls that are created already for your use in page layouts (depending on whether you’re using the Article Page parent content type or the Welcome Page content type) include Page Image, Author, Byline, and so on.
What’s so special about content controls? They’re part of the publishing infrastructure and stored with the page information. That means they’re part of the versioning of the page (meaning you can revert to a previous version of content) and the approval process (meaning visitors won’t see the content until the page is approved). Web Part information is stored with the Web Part, so after you click OK on your Web Part changes, they’re immediately visible.
I’d been entrenched in the SharePoint collaboration world for a while before publishing pages and control controls appeared in SharePoint 2007. So breaking the habit of using certain Web Parts for text and pictures (like the content editor) was hard for me at first. I missed being able to close the Web Part and modify the chrome as I wanted, which the page content control did not allow. However, finding that content in certain Web Parts didn’t migrate across servers — you had to open the Web Part every time you needed to modify, plus no version control — showed me the content-control light!
Using the Edit Mode Panel
An Edit mode panel is visible only in, well, publishing page Edit mode. That makes this panel great for all kinds of information or properties that are helpful to your editors but that you don’t want visible when the page is in Read mode.
If you insert an Edit mode panel into your layout, you can place page fields, such as Title or Schedule Dates, into this panel, allowing you and your editors to add or change this content while they’re editing the page rather than going to the page library to add this information.
You can also add text about helpful training and tips into these Edit modes; for example, the optimal size for an image or hints on how to add or edit certain content. To insert an Edit mode panel on your page, follow these steps:
1. Open your new or existing page layout in SharePoint Designer.
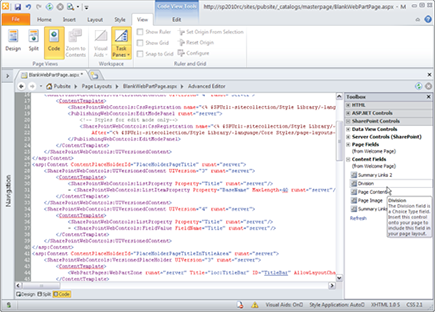
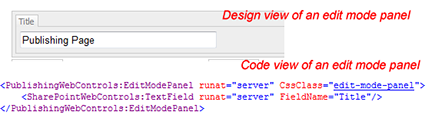
You can do this by navigating to the Master Page gallery and using the drop-down list on the page layout name, or by opening SharePoint Designer 2010 and locating the page layout in the _catalogs/masterpage folder. Make sure your page is checked out. You can insert an Edit mode panel in either Design or Code view, as shown in Figure 20-11. I tend to use Code view as much as possible to make sure my insertions are placed correctly and then use Design mode to cross-check.
Figure 20-11: Edit mode panel of a page layout.
2. Click the Insert tab on the Ribbon and then SharePoint drop-down list in the Controls section.
The SharePoint drop-down list includes data view controls and server controls. The EditModePanel control is in the Server Control section.
On the drop-down list, you can choose to open the toolbox to see all the insertable controls. If you have the toolbox open, locate the server controls (SharePoint) in the SharePoint Controls heading. You can drag the EditModePanel into your page code or right-click the control name and choose Insert.
3. Insert the EditModePanel control using one of the methods that I describe in Step 2.
This code appears on your page:
<PublishingWebControls:EditModePanel runat=server
id=”EditModePanel1”>
</PublishingWebControls:EditModePanel>
Note: Both the opening and closing tags appear.
4. Type or place content between the opening and closing tags.
Use the Controls section on the Ribbon or the toolbox to place content in the Edit mode panel. Page field controls, such as the page’s title, are located in the Page Field Controls section of the SharePoint Controls categories. You can also type information directly between the opening and closing tags for your users.
You may want to apply a style to your text input so that your text looks as polished as the rest of the page.
5. When you’re done with all your editing for this session and have published the page layout and approved (if applicable), test an instance of your new page and its Edit mode.
You don’t see the Edit mode panel(s) while in the Read view of the page, only while in the Edit mode.
Multiple Edit mode panels may be placed on the page — be careful if you copy/paste — the IDs will need to be changed.
..................Content has been hidden....................
You can't read the all page of ebook, please click here login for view all page.