
PROCEDURAL WPF
The previous sections explained how to use XAML to build WPF windows. By using XAML, you can define controls, resources, styles, templates, transformations, and even animations.
Behind the scenes, an application reads the XAML code, and then builds corresponding controls and other objects to make the user interface. Often, it’s easiest to build forms by using the XAML editor, but if necessary, your Visual Basic code can build exactly the same objects.
For example, the MakeButton example program, which is available for download on the book’s website, uses the following Visual Basic code to add a button to its WPF window when you click the initial button:
' Add a new Button to the StackPanel.
Private Sub btnMakeButton_Click() Handles btnMakeButton.Click
    Dim btn As New Button()
    btn.Content = "Make Button"
    AddHandler btn.Click, AddressOf btnMakeButton_Click
    stkButtons.Children.Add(btn)
End Sub
The code starts by creating a new Button object and setting its Content property to the string Make Button. It uses an AddHandler statement to make the btnMakeButton_Click event handler catch the new button’s Click event. Finally the code adds the new button to the stkButtons StackPanel control’s Children collection.
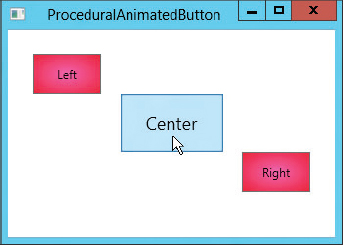
Example program ProceduralAnimatedButton, which is available for download on the book’s website, uses Visual Basic code to implement several of the techniques described earlier using XAML code. It creates a brush object and uses it to define a Style for buttons. It then creates three Buttons using that Style.
When the mouse moves over a button, the program’s code builds and plays an animation to enlarge the button. When the mouse moves off of the button, the code restores the button to its original size.
The following code builds the user interface objects when the program’s window loads:
Private WithEvents btnCenter As Button
Private Const BIG_SCALE As Double = 1.5

Private Sub Window1_Loaded() Handles Me.Loaded
    ' Make a style for the buttons.
    Dim br_button As New RadialGradientBrush(
        Colors.HotPink, Colors.Red)
    br_button.Center = New Point(0.5, 0.5)
    br_button.RadiusX = 1
    br_button.RadiusY = 1

    Dim style_button As New Style(GetType(Button))
    style_button.Setters.Add(New Setter(Control.BackgroundProperty,
        br_button))
    style_button.Setters.Add(New Setter(Control.WidthProperty, CDbl(70)))
    style_button.Setters.Add(New Setter(Control.HeightProperty, CDbl(40)))
    style_button.Setters.Add(New Setter(Control.MarginProperty,
        New Thickness(5)))

    ' Set the transform origin to (0.5, 0.5).
    style_button.Setters.Add(New Setter(
        Control.RenderTransformOriginProperty, New Point(0.5, 0.5)))

    ' Make a StackPanel to hold the buttons.
    Dim stack_panel As New StackPanel()
    stack_panel.Margin = New Thickness(20)

    ' Add the Left button.
    Dim btn_left As Button
    btn_left = New Button()
    btn_left.Style = style_button
    btn_left.Content = "Left"
    btn_left.RenderTransform = New ScaleTransform(1, 1)
    btn_left.SetValue(
        StackPanel.HorizontalAlignmentProperty,
        Windows.HorizontalAlignment.Left)
    AddHandler btn_left.MouseEnter, AddressOf btn_MouseEnter
    AddHandler btn_left.MouseLeave, AddressOf btn_MouseLeave
    stack_panel.Children.Add(btn_left)

    ' Make the Center button.
    btnCenter = New Button()
    btnCenter.Style = style_button
    btnCenter.Content = "Center"
    btnCenter.RenderTransform = New ScaleTransform(1, 1)
    btnCenter.SetValue(
        StackPanel.HorizontalAlignmentProperty,
        Windows.HorizontalAlignment.Center)
    AddHandler btnCenter.MouseEnter, AddressOf btn_MouseEnter
    AddHandler btnCenter.MouseLeave, AddressOf btn_MouseLeave
    stack_panel.Children.Add(btnCenter)

    ' Make the Right button.
    Dim btn_right As New Button
    btn_right.Style = style_button
    btn_right.Content = "Right"
    btn_right.RenderTransform = New ScaleTransform(1, 1)
    btn_right.SetValue(
        StackPanel.HorizontalAlignmentProperty,
        Windows.HorizontalAlignment.Right)
    AddHandler btn_right.MouseEnter, AddressOf btn_MouseEnter
    AddHandler btn_right.MouseLeave, AddressOf btn_MouseLeave
    Stack_panel.Children.Add(btn_right)

    Me.Content = stack_panel
End Sub
This code starts by declaring a Button control using the WithEvents keyword. The program makes three buttons, but only catches the Click event for this one. The code also defines a constant that determines how large the button will grow when it enlarges.
When the window loads, the code creates a RadialGradientBrush and defines its properties. It then creates a Style object that can apply to Button objects. It adds several Setter objects to the Style to set a Button control’s Background, Width, Height, Margin, and RenderTransformOrigin properties.
Next, the code creates a StackPanel object. This will be the window’s main control and will replace the Grid control that Visual Studio creates by default.
The program then makes three Button objects. It sets various Button properties, including setting the Style property to the Style object created earlier. It also sets each Button control’s RenderTransform property to a ScaleTransform object that initially scales the Button by a factor of 1 vertically and horizontally. It will later use this transformation to make the Button grow and shrink.
The code uses each Button control’s SetValue method to set its HorizontalAlignment property for the StackPanel. The code uses AddHandler to give each Button an event handler for its MouseEnter and MouseLeave events. Finally, the code adds the Button controls to the StackPanel’s Children collection.
The window’s Loaded event handler finishes by setting the window’s Content property to the new StackPanel containing the Button controls.
The following code shows how the program responds when the mouse moves over a Button:
' The mouse moved over the button.
' Make it larger.
Private Sub btn_MouseEnter(btn As Button, e As MouseEventArgs)
    ' Get the button's transformation.
    Dim scale_transform As ScaleTransform =
        DirectCast(btn.RenderTransform, ScaleTransform)

    ' Create a DoubleAnimation.
    Dim ani As New DoubleAnimation(1, BIG_SCALE,
        New Duration(TimeSpan.FromSeconds(0.15)))

    ' Create a clock for the animation.
    Dim ani_clock As AnimationClock = ani.CreateClock()

    ' Associate the clock with the transform's
    ' ScaleX and ScaleY properties.
    scale_transform.ApplyAnimationClock(
        ScaleTransform.ScaleXProperty, ani_clock)
    scale_transform.ApplyAnimationClock(
        ScaleTransform.ScaleYProperty, ani_clock)
End Sub
This code first gets the button’s ScaleTransform object. It then creates a DoubleAnimation object to change a value from 1 to the BIG_SCALE value (defined as 1.5 in the earlier Const statement) over a period of 0.15 seconds. It uses the object’s CreateClock statement to make an AnimationClock to control the animation. Finally, the code calls the ScaleTransformation object’s ApplyAnimationClock method twice, once for its horizontal and vertical scales. The result is that the Button control’s ScaleTransform object increases the Button control’s scale vertically and horizontally.
The btn_MouseLeave event handler is very similar, except that it animates the Button controls’ scale values shrinking from BIG_SCALE to 1.
Figure 11-8 shows example program ProceduralAnimatedButton in action with the mouse resting over the center button.
FIGURE 11-8: Program ProceduralAnimatedButton uses Visual Basic code to animate buttons.
Other examples available for download on the book’s website demonstrate other procedural WPF techniques. For example, program ProceduralCalculator builds a calculator similar to the one shown in Figure 11-3, but it builds its user interface in Visual Basic code. Example program GridButtonCode uses Visual Basic code to build a button that holds a grid similar to the one shown in Figure 11-1.