
Chapter 7
The Basics of Layouts
In This Chapter
![]() Understanding bill layouts
Understanding bill layouts
![]() Assigning layouts to clients
Assigning layouts to clients
![]() Including messages on bills
Including messages on bills
Chapter 6 shows you how to generate bills to send to your clients, and Chapter 13 helps you set options associated with printing bills, such as selecting only certain clients to bill and sorting the order of information on the bill. Neither chapter, however, describes how to control the appearance of the bill. And that’s what you read about in this chapter and the next.
Timeslips uses a bill layout to store the settings that control the appearance of a bill. In this chapter, you learn basic information about bill layouts, including how to assign a layout to a client and how to include messages to your client. In Chapter 8, you learn how to create your own bill layout and customize it.
 Timeslips uses a statement layout for statements, and everything I tell you in this chapter about bill layouts also applies to statement layouts.
What’s a Layout?
You can think of a bill layout as a template that stores formatting information for your bill. The bill layout controls the appearance and the placement of information on your bill. Figures 7-1 and 7-2 show two bills that use different bill layouts.

Figure 7-1: A sample client bill.

Figure 7-2: A client bill that includes a cover page.
The bill shown in Figure 7-1 shows time charges to the client. Further down the bill are a subtotal for charges, expenses, a subtotal for expenses, previous balance information, a list of payments received, and finally a total amount due. In addition, the bill lists the client’s funds balance and transactions that reduce the funds balance to pay the bill.
The bill shown in Figure 7-2 starts with a cover page that summarizes the information on the bill and follows with pages that details charges, expenses, previous balance information, and funds account activity.
Both bills include a message at the bottom of the bill that indicates that payment is due upon receipt.
Timeslips uses a bill layout to control the formatting and appearance of each bill. For example, the layout of the bill shown in Figure 7-2 includes a cover page that doesn’t appear in the layout for the bill shown in Figure 7-1.
The bill layout controls the font that appears in various sections of the bill along with the order of the bill information; that is, time charges appear first, followed by expense charges.
Assigning a Layout
Timeslips comes with some predefined bill layouts. You assign one layout to each client, and you typically use the same layout for all clients. But, depending on your needs, you might find the need to use a few different layouts in your Timeslips database. For example, when you perform a great deal of work for a particular client, you might opt to include a cover page that summarizes bill information. For other clients whose bills include only a few charges, a cover page might seem superfluous.
You can use the Bill and Statement Layout List window to assign a bill layout to clients. Follow these steps:
- Choose Bills⇒Bill and Statement Layouts.
Timeslips displays the Bill and Statement Layout List window shown in Figure 7-3, which lists the layouts available to you.
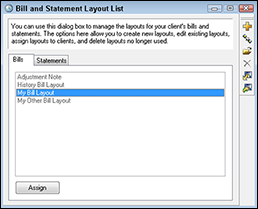
Figure 7-3: A list of available bill layouts.
- Select the layout you want to assign, and then click the Assign button below the list.
Timeslips displays the Assign Layouts to Clients dialog box shown in Figure 7-4. The layout you selected appears at the top of the dialog box.
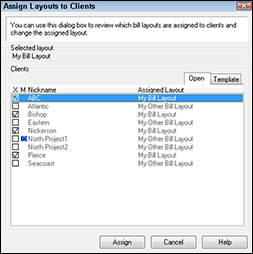
Figure 7-4: Select clients to whom you want to assign the selected layout.
- Select the clients to whom you want to assign the layout.
- Click the Assign button.
Timeslips displays a message asking you to confirm that you want to assign the selected layout to the selected clients.
- Click Yes.
Timeslips displays a message confirming that the layout is assigned to the selected clients.
- Click OK.
- Click the Close button (the X in the upper-right corner) to close the Bill and Statement Layout List window.
You can use the same steps to assign a statement layout to each client. Just switch to the Statements tab after Step 1.
Including Messages on Bills and Statements
You can include messages to your clients on your bills. Some messages can appear on all client bills, and you can establish other messages that apply to only particular clients. Typically, messages appear at the end of your bill, but you can change their placement using bill layout design tools described in Chapter 8.
When creating messages that appear on all client bills, you might, for example, include a message that explains when payment is due for your bill. You also might want to include messages on bills with overdue balances. You can set up messages that appear based on how long an accounts receivable balance has been overdue.
On a particular client’s bill, you might want to include a message that explains a particular action you took on the client’s behalf.
Setting up messages that appear on all bills
You establish various messages that apply to all clients using the Messages dialog box shown in Figure 7-5. You open this dialog box by choosing Setup⇒Messages.

Figure 7-5: Set up messages that apply to all clients.
The Text for All Bills messages, the Charges Due in Period messages, and the Debit and Credit Balance messages appear on all bills if you set up these messages. The only way you can suppress any of these messages is to delete any text you include in them. To create any of these messages, select it in the list and then click Open. In the Message Edit dialog box that appears, type your message and click OK.
 As you create any message, you can right-click to display a shortcut menu of additional commands. Use these commands to format text, insert today’s date, and insert field data tokens such as an invoice number or the date of the client’s last bill.
Use the Text for All Bills 1 and Text for All Bills 2 messages to create general messages that appear on all bills. You might, for example, create a “Thank you for your business” message in one of these two messages. Or if your business moves, you might include a reminder message that your address has changed.
Use the four Charges Due in Period messages to establish messages that appear only on bills that include overdue accounts receivable balances. The actual message that appears depends on the age of the overdue balance. You might want to use a gentle reminder for balances that fall into Period 1 and increase the strength of the message as the balance ages.
The debit and credit balance messages appear on all bills that have either a debit or a credit balance.
A bill showing that a client owes you money has a debit balance, while a bill showing that a client has overpaid you has a credit balance. A credit balance appears in parentheses on the bill, and its description states that it is a credit balance.
Global 1 through Global 20 messages differ from the other types of messages listed in the Messages dialog box because they are optional. That is, you can choose to display them on some client bills and not on other client bills. Timeslips calls them global messages to indicate that the text you include in these messages should be generic enough to apply to all clients. You assign a global message to a client in the same way that you create a specific message for a particular client. Read on.
Setting up messages that appear on selected client bills
When you need to create a message specific to a particular client, you can use the Client Message 1 or Client Message 2 features. Choose Names⇒Client Info to open the Client List window. Then double-click the client and, in the Client Information window that appears, click the Layout tab (see Figure 7-6).

Figure 7-6: Set up custom messages for a particular client using the Message 1 and Message 2 fields.
Place a check mark beside the Message 1 field or the Message 2 field. To specify the number of bills on which the message should appear, click the drop-down list beside the field and select a number of bills — from 1 bill to 255 bills — or leave the setting at the default Ongoing. To assign a global message to the client, open the list to the right and choose a global message.
To create a client-specific message, don’t select a global message. Instead, leave the setting at Custom and click the Edit button beside the message field. In the dialog box that appears, type the message and click OK.