
Chapter 10
Using Flat Fee Billing Arrangements
In This Chapter
![]() Understanding the relationship between slips and flat fee arrangements
Understanding the relationship between slips and flat fee arrangements
![]() Setting up a flat fee arrangement
Setting up a flat fee arrangement
![]() Exploring various types of flat fees
Exploring various types of flat fees
![]() Overriding flat fees with slip charges
Overriding flat fees with slip charges
The most typical billing arrangement is the slip-based arrangement, which displays the slips you record in Timeslips on your client’s bill. Effectively, when you use the slip-based billing arrangement, you bill for the time you spend. Chapter 9 discusses the slip-based arrangement and the ways in which you can change the billed values of slips that appear on the bill.
Sage Timeslips is a powerful software package and doesn’t limit you to billing clients based on slips. You can bill some clients based on slips and other clients by using a variety of flat fee and percent complete billing arrangements, as described in this chapter.
Slips and Flat Fee Arrangements
Before we dive into exploring various flat fee arrangements, it’s important to understand that entering slips and using a flat fee billing arrangement are not mutually exclusive activities. In fact, you should enter slips even though you plan to charge a flat fee.
Why?
First, you can establish flat fee billing for, say, time charges and bill expenses based on slips. Or you can establish flat fee billing for expenses only, billing time charges based on slips. In either case, you need slips.
“But,” you say, “I plan to establish a flat fee arrangement that covers both time and expenses. Do I still need to enter slips?”
Yes, you should still enter slips, for two reasons:
- Even when you use a flat fee arrangement, Timeslips by default prints the slips you enter on the bill. By using the flat fee arrangement, you tell Timeslips to charge the amount of the flat fee instead of the slip values.
- By entering slips, you have a record of the time it took you to finish the work so that you can compare what you earn from a flat fee billing arrangement with what you would have earned had you billed your clients based on slips entered. For details on measuring the profitability of your flat fee arrangements, see the section in Chapter 12 that describes reporting on billing arrangements.
 You can suppress printing slips on flat fee arrangement bills by editing the bill layout. (See Chapter 8 for details on editing bill layouts.) Click the Layout button and then click Layout Options to display the Global Bill Layout Options dialog box. On the Layout tab, in the Billing Arrangements section, select the Only Show Slips Marked Override check box to hide regular slips but print override slips. See the “Using Override Slips” section, later in this chapter, for more information on override slips.
To establish a point of reference as you work through this chapter, Figure 10-1 shows you a bill for PQR, Inc. using a slip-based billing arrangement.

Figure 10-1: The slips on this bill will be covered by flat fee arrangements as you work through this chapter.
As you work through this chapter and I show you each billing arrangement, I also show you the bill for PQR, Inc. using each billing arrangement. In that way, you can see how the arrangement affects and is affected by the slips recorded for the client.
Setting Up a Flat Fee Billing Arrangement
You set up all flat fee arrangements from the Arrangement 1 tab of the Client Information window (see Figure 10-2). You can use the two options at the top of the Billing Arrangements section to assign billing arrangements separately to time slips and expense slips, or you can opt to have one billing arrangement for both fees and costs. Throughout this chapter, I use separate billing arrangements for time and expenses, and I set up my flat fee examples to cover time charges.
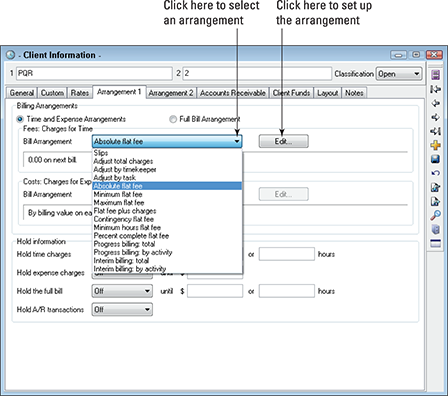
Figure 10-2: Selecting a billing arrangement.
 You set up flat fee arrangements for expenses and for full bills in the same way that you set up flat fee arrangements for time charges, with one exception: You cannot set up a percent complete flat fee or a minimum hours flat fee arrangement for expenses or for full bill arrangements.
To start the process of setting up any flat fee arrangement, click the Bill Arrangement drop-down list in the appropriate section — Fees: Charges for Time and Costs: Charges for Expenses — and select an option. Then click the Edit button to set up the flat fee billing arrangement.
Using the absolute, minimum, maximum, and flat fee plus charges arrangements
You set up the absolute, the minimum, the maximum, and the flat fee plus charges billing arrangements in much the same way, so I describe them all here. When you opt to use any of these arrangements, the slips you’ve entered appear on the bill but Timeslips substitutes an amount you specify for the slip values:
- Absolute flat fee billing arrangement: Timeslips charges the amount you specify instead of the slip values.
- Minimum flat fee billing arrangement: You and your client agree that the client will pay the flat fee amount if the total of slip values is less than the flat fee amount. If the total of slip values is greater than the flat fee amount, the client will pay the total of slip values. Effectively, when you use a minimum flat fee billing arrangement, you specify the minimum amount the client will pay. That is, the client will pay whichever amount is larger — the total of slip values or the flat fee amount.
- Maximum flat fee billing arrangement: You and your client agree that the client will pay the flat fee amount if the total of slip values is greater than the flat fee amount. If the total of slip values is less than the flat fee, then client will pay the total of slip values. Effectively, when you use a maximum flat fee billing arrangement, you specify the maximum amount the client will pay. That is, the client will pay whichever amount is smaller — the total of slip values or the flat fee amount.
- Flat fee plus charges billing arrangement: You and your client agree that the client will pay the flat fee amount in addition to any charges on slips. On the bill, Timeslips adds the flat fee amount to the slip charges with no special description except, perhaps, the standardized description you might apply in the Message box.
After you select the appropriate arrangement on the Arrangement 1 tab of the Client Information window, you can click the Edit button to display the dialog box where you establish the amount and duration of the flat fee. Figure 10-3 shows the Absolute Flat Fee dialog box; the dialog box for all these arrangements is similar.

Figure 10-3: Setting up an absolute flat fee to cover time spent.
In the Amount box, type the amount of the flat fee. Then use the Duration list to select how long the billing arrangement should remain in effect; see the “Flat fees and duration” sidebar for details.
In the Bill Arrangement Message for the Bill box, you can type a message associated with the flat fee. By default, the message appears after the total new charges on the bill, but you can change the message’s placement (as I did in Figure 10-4) by using the Configure Layout Sections dialog box from the bill layout’s Design tab. See Chapter 8 for details on reorganizing elements on a bill layout.

Figure 10-4: A bill using an absolute flat fee billing arrangement.
Because some flat fee billing arrangements show no charges due until you present the final bill, you might want to include a bill message that explains that the amount due will appear on the last bill.
Figure 10-5 shows a bill using a minimum flat fee arrangement. In this example, the minimum flat fee amount is $800.00, and the total of slip values is less than the flat fee amount. Therefore, Timeslips charges the flat fee amount.
Figure 10-6 shows a bill using a maximum flat fee arrangement. In this example, the maximum flat fee is $650.00, and the total of slip values is greater than the flat fee amount. Therefore, Timeslips charges the flat fee amount.

Figure 10-5: Timeslips charges the minimum flat fee of $800 because it exceeds the $750.00 in slip charges.

Figure 10-6: Timeslips charges the maximum flat fee of $650 because it is less than the $750.00 in slip charges.
Figure 10-7 shows a bill using a flat fee plus charges billing arrangement. In this example, I use a flat fee of $100.00 to make Timeslips add that amount to the bill’s slip charges. The total of the slip values is $750.00, so Timeslips charges $850.00.

Figure 10-7: Timeslips adds a $100.00 flat fee to the slip charges of $750.00.
Charging a contingency flat fee
The contingency flat fee billing arrangement is used primarily by attorneys who agree with their clients to accept either a flat amount or a percentage of a judgment award when a case settles. Attorneys often generate bills as a case progresses to show their clients the work being performed before judgment.
Like the job duration you can set for the absolute, minimum, maximum, flat fee plus charges, and minimum hours flat fee arrangements, the contingency flat fee billing arrangement uses a Status field to identify the case's status in the billing process. And, like the job duration, Timeslips displays slips on each bill generated.
Unlike the job duration, however, which displays the flat fee on the first bill and thereafter displays slips with no charges, the contingency flat fee displays slips with no amount due on all bills until you change the status of the billing arrangement to Final Bill. At that time, you specify a flat fee amount.
Therefore, the distinction between the job duration and the contingency flat fee billing arrangement lies in the timing of the charges appearing on the bill. The job duration charges the flat fee on the first bill, and the contingency flat fee billing arrangement charges the flat fee on the last bill.
On the Arrangement 1 tab of the Client Information window, select the Contingency Flat Fee Bill Arrangement for fees or costs or both. Then click the Edit button to display the Contingency Flat Fee dialog box shown in Figure 10-8.

Figure 10-8: The Contingency Flat Fee dialog box.
Initially, leave the Amount box at $0.00 and the Status field at First Bill. After you prepare and approve a bill, Timeslips automatically changes the Status field to In Progress, begins to accumulate the slip charges that appear on each bill you approve, and shows the total of the accumulated slip values in the Billed to Date box. You can, optionally, include a message on the client’s bill for the billing arrangement. Then click OK to save the settings.
In Figure 10-9, you can see that Timeslips shows the slips on the bill but no amount is due for time charges.
Until the case settles, you don’t need to take any special action; just generate and approve a bill whenever you want to show the client progress on the case.
When the case settles and you know the amount of the flat fee, you reopen the Contingency Flat Fee dialog box (refer to Figure 10-8). Change the Status to Final Bill, and then click the Amount Calculator button to display the Calculator dialog box shown in Figure 10-10.
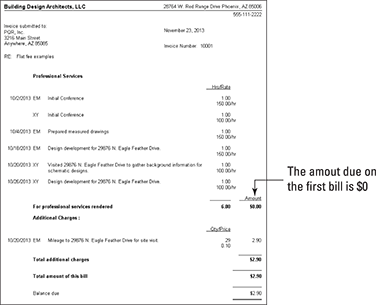
Figure 10-9: A contingency flat fee bill before settlement.

Figure 10-10: Specify the amount to charge for a Contingency flat fee.
Type the judgment amount and then specify the percentage or the amount due to you for the case. In the example, I use a judgment amount of $10,000 and a percentage due of 5 percent; Timeslips calculated the amount.
Click OK to save the changes and then generate a bill. As you can see in Figure 10-11, Timeslips creates a bill showing $500.00 due.
When you approve this bill, Timeslips changes the billing arrangement status from final bill to completed.
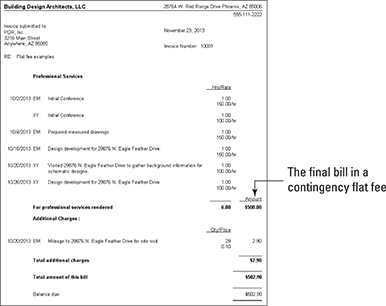
Figure 10-11: The final bill of a contingency flat fee arrangement.
Charging a minimum hours flat fee
You use the minimum hours flat fee arrangement only to cover time charges. When you use this arrangement, you and your client agree to a minimum number of hours you work and an absolute flat fee for that minimum number of hours. To handle hours that exceed the agreed upon minimum number of hours, you establish an hourly rate that Timeslips assigns, regardless of timekeeper.
If you work more than the minimum number of hours, Timeslips charges the full amount of the minimum hours flat fee and adds to that flat fee an amount equal to the number of hours that exceed the minimum times the hourly rate you establish.
If you work less than the minimum, you can opt to charge just the flat fee amount or to prorate the flat fee amount.
On the Arrangement 1 tab of the Client Information window, select Minimum Hours Flat Fee. Then click the Edit button to display the Minimum Hours Flat Fee dialog box shown in Figure 10-12.

Figure 10-12: Setting up a minimum hours flat fee.
Specify the minimum flat fee amount, the number of hours covered by that minimum flat fee, and the hourly rate Timeslips should use for hours that exceed the minimum number of hours. Then use the Duration list to select how long the billing arrangement should remain in effect; see the “Flat fees and duration” sidebar for details. You can, optionally, include a message on the client’s bill for the billing arrangement. Then click OK to save the settings.
Let’s look at some examples. The sample bill I use throughout the chapter shows 6 hours of work (refer to Figure 10-1). In each of the following examples, I set the per hour rate for hours that exceed the minimum to $100; note that both timekeepers on the bill use that hourly rate.
In Figure 10-13, I set the amount at $1000 for the first 2 hours. The time charges total $1400: $1000 for first 2 hours plus $400 for the additional 4 hours.
When I change the minimum hours from two to 10 hours, the time charges total $1000 on the bill (see Figure 10-14).
Proration affects the total time charges only when the minimum number of hours exceeds the hours worked on the bill. If you set the amount at $1000 for the first 10 hours and prorate the bill, the time charges total $600.00, which is 60 percent of the agreed upon minimum of 10 hours (see Figure 10-15). That is, if you’d worked 10 hours, you’d have earned the $1000, but because you worked only 6 hours, Timeslips prorates the amount due for time spent to 60 percent of the total minimum hours.

Figure 10-13: A minimum flat fee that covers the first 2 hours of a bill containing 6 hours of work.

Figure 10-14: A minimum flat fee that covers the first 10 hours on a bill containing 6 hours of work.

Figure 10-15: A prorated minimum flat fee that covers the first 10 hours on a bill containing 6 hours of work.
Charging a percent complete flat fee
The percent complete flat fee billing arrangement is often used by architects, who divide their work into phases that represent a percentage of the project. When you use this billing arrangement, you establish the total flat fee for the project and set up phases. For each phase, you specify, as a percentage, how much of the project the phase represents.
Like the minimum hours flat fee, the percent complete flat fee is available only for time charges.
When you decide to generate a bill for the client, you reopen the Percent Complete Flat Fee dialog box, open each phase, and specify, as a percentage, how complete the phase is. Timeslips uses that value to determine how much of the flat fee to bill for each phase.
Let’s walk through an example. On the Arrangement 1 tab of the Client Information window, select Percent Complete Flat Fee. Then click the Edit button to display the Percent Complete Flat Fee dialog box shown in Figure 10-16.
Click the Change Total Fee button to display the Change Total Fee dialog box shown in Figure 10-17. You use this dialog box to set or update the flat fee amount. Supply the flat fee amount in the Total Fee box and click OK.

Figure 10-16: Establish the flat fee amount and set up the project’s phases.

Figure 10-17: Establish the flat fee amount.
As a project progresses, architects sometimes need to renegotiate the flat fee amount; hence the name Change Total Fee. Should a renegotiation take place, you can use the Phases/Components at 100% Complete Are Recalculated check box to specify whether Timeslips should recalculate values for completed phases.
Next, set up phases for the project; for my example, I set up two phases, each representing 50 percent of the project. Yes, your phase percentages should sum to 100 percent of the project. To set up a phase, click the New button to display the Percent Complete Entry dialog box. Supply a name for the phase and the percentage it represents of the project. Timeslips automatically calculates the phase’s total value based on its percentage of the total flat fee and displays that value in the Total Charge box. Click OK and repeat this process for each phase in your project. Each phase you create appears in the Phase List below the Total Fee field and the Change Total Fee button.
When you’re ready to generate a bill, reopen the Percent Complete Flat Fee dialog box and edit each phase to specify, as a percentage, how far along that phase is. In Figure 10-18, Phase 1 is 75 percent complete.

Figure 10-18: Phase 1 represents 50 percent of the $2000 flat fee and is 75 percent complete.
You’re not limited to specifying a percentage to indicate how much of the project you’ve completed. In the New Charges field, you can specify a dollar amount to bill instead of specifying the Percent Complete value.
For the example bill shown in Figure 10-19, I also edited Phase 2 and set its Percent Complete value at 10 percent. In the example, Timeslips bills $750 for Phase 1 and $100 for Phase 2, for a total of $850.
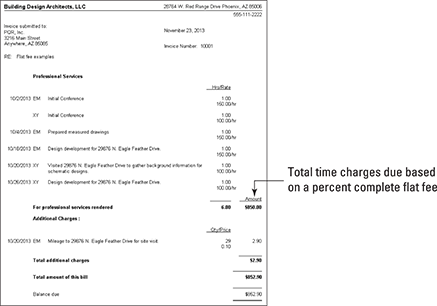
Figure 10-19: A bill using the percent complete billing arrangement.
After you approve a bill, Timeslips changes the Status field in the Percent Complete Flat Fee dialog box from First Bill to In Progress. When you are ready to generate the last bill for the project, manually change the Status field to Final Bill, and then generate and approve the bill. At that point, Timeslips changes the Status to Completed.
Using Override Slips
You might run into a situation in which you and your client have agreed upon a flat fee arrangement but then something unexpected arises, and you and your client agree that you can charge the client for the time you spend dealing with the unexpected circumstance. Essentially, you want to keep the flat fee arrangement in effect but you also want to bill for your time.
In this case, you can create an override slip, which is a slip with a billing status of override. Timeslips bills override slips regardless of any other billing arrangement you might establish for a client.
To create an override slip, simply enter a slip as you usually would. Then, set the Billing Status field to Override (see Figure 10-20).
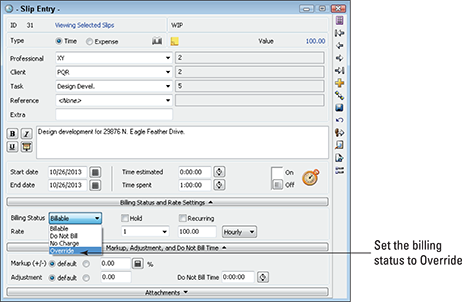
Figure 10-20: Creating an override slip.
When you use the Adjustment field to adjust a slip’s value, as described in Chapter 9, Timeslips automatically treats that slip as an override slip and lists it on the client’s bill, regardless of the billing arrangement you establish for the client.
To make the override slip and its value appear on the client’s bill, edit the bill layout you use for the client. (See Chapter 8 for details on editing bill layouts.) Click the Layout button and then click Layout Options to display the Global Bill Layout Options dialog box. On the Layout tab, in the Billing Arrangements section, select the With a Flat Fee Show Charges from Slips Marked Override check box.
If you don’t make the override slip’s value appear on the client’s bill, you might confuse the client because the flat fee amount won’t be the one to which you both agreed.