
Chapter A
Installing Sage Timeslips
In This Chapter
![]() Working in a single-user or a network environment
Working in a single-user or a network environment
![]() Installing Timeslips
Installing Timeslips
The way you intend to use Sage Timeslips determines the method you use to install it. If you intend to have one person in your office use Timeslips, your installation process is simple and straightforward. However, if you intend to have multiple people use Timeslips, you have a slightly more complex road to travel.
Working in a Single-User Environment
Let’s assume that you intend to have only one person in your office using Sage Timeslips, and you didn’t download a free 30-day trial of Timeslips. Instead, you purchased Sage Timeslips and you want to install it. Getting up and running in this case is fairly simple.
The Sage Software Customer Service representative sends you an e-mail message with an installation (or configuration) code and a serial number, along with a link to an Internet location from which you can download the product.
You don’t have any serious decisions to make other than the computer on which to install Timeslips. During the installation process, the wizard will suggest that you install in C:Program FilesTimeslips, and that location is a good one. Just follow the steps in the upcoming “Installing Timeslips” section while you’re sitting at the computer of the person who will handle Timeslips functions for your office.
Working in a Network Environment
If you’re installing Timeslips in a network environment in which more than one person will use the software, you have some decisions to make and possibly some homework to do before you install. To enable multiple users to share one Timeslips database, the program and the database must reside on a server. In addition, a portion of the program files must also reside on each workstation that will use Timeslips.
You can use Timeslips in either a peer-to-peer network configuration or in a server/client network configuration. Be aware that Timeslips tends to function better in server/client networks, in which one machine acts as a standalone server with no other jobs to perform on the network other than managing network traffic. In a peer-to-peer network, in which each workstation in the network performs many functions daily, you establish one workstation — the first one on which you install Timeslips — as the server in the Timeslips network installation.
 If you installed the trial version of Timeslips on any workstation that will be using Timeslips, you need to uninstall it. In the Windows Control Panel, use the Add or Remove Programs applet to uninstall the trial version of Timeslips.
Purchasing station licenses
Every computer on which you intend to use Timeslips must have a network station license, which you purchase from Sage Software Customer Service. For example, if you want four users to be able to simultaneously use Timeslips from four different computers, you must purchase four station licenses. The installation (or configuration) code that the Sage Software Customer Service representative gives you when you purchase the software defines the number of stations you purchased.
You also can have your staff work in Timeslips using a remote connection. Be aware that remote connection uses a network station license.
Using mapped drives
Network workstations must use the identical file drive letter and path to access Timeslips. Mapping a drive for Timeslips is the easiest way to meet this need. You might, for example, set up a mapped drive such as T:AppsTimeslips, and install the software to that mapped drive and create the Timeslips database on that mapped drive. Then, from each workstation that will use Timeslips, you install a portion of the program and then connect to the database stored on the mapped drive.
All workstations in your network should run Timeslips using the same path, even in a peer-to-peer network environment, in which the workstation acting as the server also performs other functions. In a peer-to-peer network, the installation path might be C:Program FilesTimeslips, but all workstations, including the peer-to-peer network server, should use a mapped drive such as T:AppsTimeslips to open the Timeslips database.
Using UNC paths
If you want, you can use UNC drive mapping, such as \serverapps imeslips. If you use UNC drive mapping, you must map each network workstation on which you are installing Timeslips with UNC paths.
 To install and use Timeslips, all network users must have change rights (read, write, execute, and delete) for the installation folder.
Installing Timeslips
You use the same process to install Timeslips on a network server or on a standalone workstation that will be the only one running Timeslips. To install Timeslips on a network workstation, read the next section, “Installing Timeslips on Network Workstations.”
Sit down at the computer where you intend to install Timeslips and log in to Windows using an administrator account; if you’re working in a network environment and you can’t actually sit at the server, use Windows Explorer to navigate to the server. Then follow these steps:
- Using the link you receive from Sage Software Customer Service, download the product, making sure that you note the location on your computer where you save it.
I prefer to save programs that I download from the Internet to the Downloads folder, but feel free to save the program to another location. Just remember where you save it.
- Double-click the downloaded program.
A dialog box asks if you want to install Sage Timeslips 2014.
- Click Yes to display the Sage Timeslips Setup and Installation window.
- Click Install Sage Timeslips 2014.
The Timeslips Installation Wizard prompts you to review considerations and advice regarding installing Sage Timeslips.
- If you want to review the information, click Yes. Otherwise, click No to continue with the installation process and click Next in the Welcome to the Sage Timeslips Setup dialog box.
- When you’re prompted, read and accept the terms of the license agreement, and then click Next.
The window shown in Figure A-1 appears.

Figure A-1: Type the installation code supplied by the Sage Software Customer Service representative.
- Fill in the installation code provided by your Sage Software Customer Service representative, and then click Next. If you see the Verification of Configuration Information dialog box, click Next.
The installation wizard prompts you for a destination folder in which to install Timeslips.
- If the default location doesn’t work for you, click the Browse button and navigate to the folder in which you want to install Timeslips. After selecting the folder, click Next in the installation wizard.
The installation wizard prompts you to select an installation type.
- Select Complete and then click Next.
 You will need most of what Timeslips installs, so don’t try to conserve hard drive space by installing only portions of the program.
As you can see in Figure A-2, the installation wizard prompts you for the last pieces of information it needs to complete the installation.
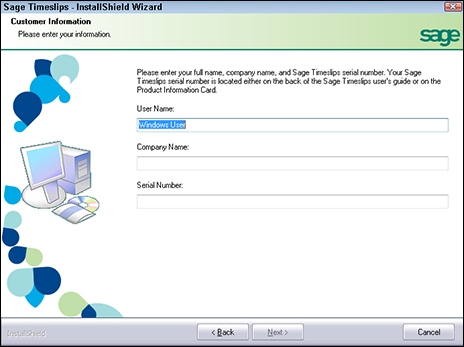
Figure A-2: Type a user name, your company name, and your Timeslips serial number.
- Type a user name, your company name, and the serial number given to you by the Sage Software Customer Service representative. Click Next.
The wizard displays a window telling you that it’s ready to install.
- Click Install.
The wizard begins installing Timeslips.
- When prompted, supply a folder name for Sage Timeslips 2014 and then click Next.
The name you supply here will appear on Windows’ All Programs list, and the default the wizard suggests is Timeslips. I usually add the year associated with the product so that I can quickly identify the edition of Timeslips I’m using without opening the program.
- When the wizard finishes, you see the window shown in FigureA-3; select or deselect boxes as you desire.
Most users like an icon on the desktop for Sage Timeslips, and it’s typically a good idea to check the web for program updates.
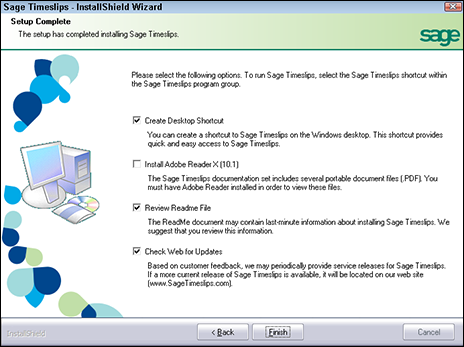
Figure A-3: Select options that you want the wizard to perform.
- Click Finish.
The Setup and Installation window reappears.
- Click Exit.
If you’re installing Timeslips on a network, you have a little more work to do; read on.
Installing Timeslips on Network Workstations
After installing Timeslips on a network server and mapping the same drive letter from each workstation to the folder on the server, you should use the following process to install Timeslips locally on each workstation.
During a local installation, the installation wizard copies Timeslips program files from the network server to a network workstation, enabling users to run the Timeslips from their workstations while sharing a common database.
To install Timeslips locally on a network workstation, follow these steps:
- At the network workstation, close any open applications.
- Right-click the Windows Start button and choose Open Windows Explorer.
- Navigate to the (mapped or UNC path) server drive where you installed Timeslips.
- Find and open the LoclInst folder (see Figure A-4).
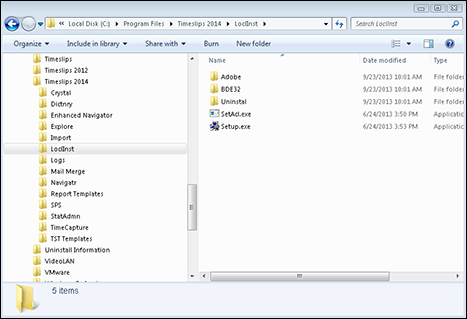
Figure A-4: Find the LoclInst folder.
- Double-click the Setup.exe file located in the LoclInst folder.
The Welcome to the Timeslips Local Installer view of the Timeslips Local Install dialog box opens.
- Click Next to display the Installation or Update page.
- Click Install and then click Next.
- On the Installation type page of the wizard, click Complete and then click Next.
- On the Destination Folder Location page of the wizard, choose a local folder and click Next.
The default location and the one most people use is C:Program FilesTimeslips.
- Click Install.
The installation wizard takes care of the rest for you.