Chapter 16
Building Business Apps with PowerApps
IN THIS CHAPTER
![]() Gaining an understanding of PowerApps
Gaining an understanding of PowerApps
![]() Building your first PowerApp
Building your first PowerApp
![]() Using a PowerApp on your mobile device
Using a PowerApp on your mobile device
![]() Making SharePoint tolerable on a mobile phone
Making SharePoint tolerable on a mobile phone
Microsoft PowerApps is a service that spans many different products. The idea of PowerApps is to provide a platform for non-developers to build apps that people can use on their smartphones and other computing devices. PowerApps is designed for business needs and thus, fits in nicely with SharePoint.
In this chapter, you learn how to build and deploy an app using PowerApps. You also learn how to integrate your app with SharePoint and take a look at SharePoint’s mobile environment.
Introducing PowerApps
When we first started using PowerApps, we were excited. It seemed like a platform designed specifically for SharePoint. The PowerApps we built we made available to all types of users on their mobile phones. All of a sudden, people started using SharePoint and had no idea they were using SharePoint. They just used an app on their phones and knew that it solved a specific business problem. So we initially thought of PowerApps as a mobile app platform, and we used it almost exclusively with SharePoint. Now that we have some experience under our belts, we realize that PowerApps is more than just making SharePoint apps available on a mobile device (though this is still the biggest value in our opinion).
 Even though we think of PowerApps as primarily a mobile experience, you can also add the PowerApps you build to SharePoint pages as well.
Signing into PowerApps
The easiest way to access PowerApps is by clicking the Office 365 app menu and then selecting PowerApps.
You can also access PowerApps by opening your web browser and navigating to the site directly. The PowerApps site is located at https://powerapps.microsoft.com. When you sign into the PowerApps site, you use your Office 365 credentials (see Chapter 1).
Getting familiar with PowerApps
The Microsoft PowerApps service uses your web browser as a development tool for building apps. The development environment is shown in Figure 16-1.

FIGURE 16-1: The main PowerApps page.
Notice along the left side of the page you have the following navigation options: Home, Learn, Apps, Create, Data, Business Logic, and Solutions. The Home navigational link is your friend that will always take you back to the beginning if you get lost. The PowerApps home page includes overview information and is always a good place to start when you are developing PowerApps.
Next up is the Learn link. The Learn link includes guided learning, help topics, and a PowerApps community.
When you first get started with PowerApps, make sure to spend some time to go through the Guided Learning experience found on the Learn page. It is time well spent and will save you lots of frustration and headaches down the road.
The Apps link takes you to a location that shows you all your PowerApps. You will find the recent apps you have developed, apps that have been shared with you, apps you have permissions to edit, and apps that are part of your organization.
After the Apps link is the Create link. The Create link is where you go to create a new PowerApp. You will use this in the next section when you create your first PowerApp. After the Create link is the Data link. The Data link expands and includes links for Entities, Connections, Custom Connectors, and Gateways. This is where you can create connections and manage the data you are using in your PowerApps. Data is at the heart of a business app, so you will spend a lot of time here once you get comfortable with building and customizing PowerApps.
After the Data link is the Business Logic navigational link, which lets you integrate your Microsoft Flow workflows directly into your PowerApps. We cover Microsoft Flow in Chapter 14.
Last in the list is the Solutions navigational link. Solutions is a relatively new feature of PowerApps (Microsoft is adding new functionality all of the time). Solutions is beyond the scope of this book, but in a nutshell, a Solution allows you to encapsulate a group of PowerApps and move them all at once to another environment instead of one at a time. Imagine a PowerApps solution for a finance team that includes apps used by financial departments. This is the idea behind Solutions.
Building your first PowerApp
A very simple, but incredibly powerful, use for PowerApps is to let users work with a custom SharePoint List-based app using their mobile phones or tablets. Just about everyone has a smartphone now, and building an app that lets your users interact with a SharePoint list brings your intranet to their mobile devices.
In Chapter 14, we build a support ticketing app based on a SharePoint list. We built a flow to send an email whenever a new ticket came into the app. Users could go to the app in their web browsers and submit tickets. Now you will build a PowerApp so that users can work with the ticketing app from their mobile devices.
To build a PowerApp for working with a SharePoint list:
Open your web browser and navigate to the SharePoint list.
In our case we will use the For Dummies Support List-based app we created in Chapter 14.
Click the PowerApps drop-down menu and select Create an App, as shown in Figure 16-2.
A dialog displays where you can enter a name for the app.
Enter a name and click Create, as shown in Figure 16-3.
Your browser redirects you to the PowerApps development environment called PowerApps Studio.
PowerApps Studio might sound impressive, but it is really just a web page with a lot of functionality for building apps. All you need is your web browser to work with it and build PowerApps. Since we started with an existing SharePoint list, the heavy lifting of creating the PowerApp was already done for us.
- Click the link to see a preview of the app, as shown in Figure 16-4.
Click the play button, displayed in the top-right corner of the page, to display the app in a preview window.
The preview shows you what the app will look like when viewed on a mobile phone.
The SharePoint list that contains the data for this app doesn’t have any items in it yet so let’s create one.
Click the plus (+) sign in the top-right corner of the screen.
A form that represents the columns in the SharePoint list appears.
Enter information into the form to create a new list item and then click the check mark in the upper-right corner of the app to create a new item, as shown in Figure 16-5.
A new list item will be added and the main app page will reload. Let’s head back over to our SharePoint list in our web browser to confirm the item was created.
Open the For Dummies Support list in our browser and confirm the new item has been created from the PowerApp, as shown in Figure 16-6.
Next, let’s create a new item in the SharePoint list in our web browser and then confirm it appears in the PowerApp.
Click the plus (+) sign to create a new item in the SharePoint list, then head over to the PowerApp preview and click the refresh icon (it looks like a circle).
Our new item is pulled into the PowerApp. We can now work with a SharePoint list from a PowerApp.
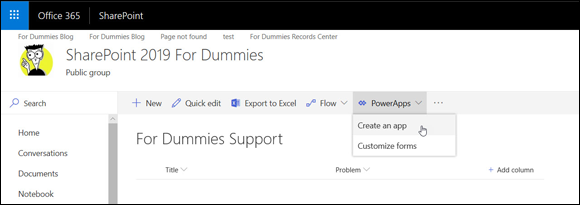
FIGURE 16-2: Creating a new PowerApp for a SharePoint list.

FIGURE 16-3: Providing a name for a PowerApp.

FIGURE 16-4: When new PowerApp is created from a SharePoint list we can preview it.
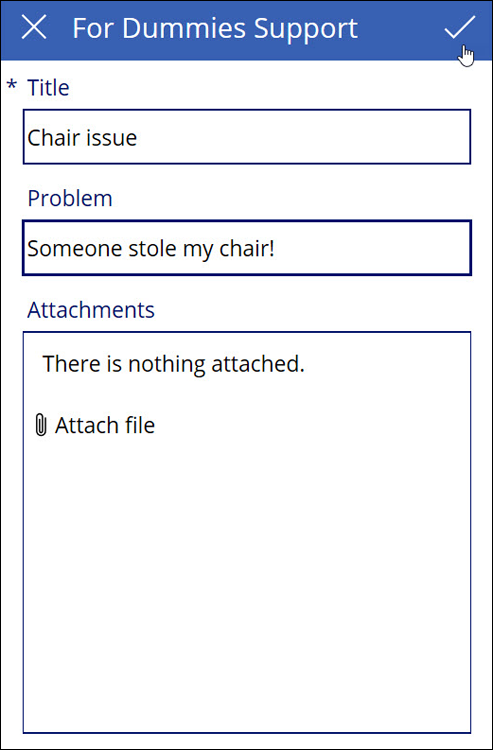
FIGURE 16-5: Create a new SharePoint list item from a PowerApp.

FIGURE 16-6: Viewing a SharePoint list that contains items created from a PowerApp.
PowerApps can be integrated with Microsoft Flow. This combination lets you take SharePoint to the mobile world and also incorporate your workflow at the same time. In our view, this is a game changer in the technology world.
PowerApps Studio is a complex development environment. It will take some time to get a feel for customizing and creating new PowerApps. Remember to check out the Learn navigational link at https://powerapps.microsoft.com to see hands-on training guides and videos.
Sharing your PowerApp
Now that you have a working PowerApp, the last step is to share your app so that it is available to use. To share a PowerApp:
Open the PowerApp you want to share in PowerApps Studio.
If you followed the previous procedure, you will already be viewing the app that was created for the SharePoint list.
- Click the File tab, as shown in Figure 16-7, and then click the Share button.
Enter the name or email addresses of the people you want to be able to use the app and then click Share.
An email will be sent with instructions on how to access the app.

FIGURE 16-7: Clicking the File tab in PowerApps Studio.
Using PowerApps on your Mobile Device
Using apps you have developed in PowerApps Studio is fairly straightforward. You will find the app in both the Apple store and the Google Play store called PowerApps.
Once you have installed the PowerApps app, open it and sign in with your Office 365 credentials. You will see all of the PowerApps that you have created and also any apps that have been shared with you. Tap the For Dummies app we created in the previous section and you will see the exact same app you previewed earlier, except now it is running right on your mobile phone! Notice that all the items we created earlier are displayed and we can create new items or edit existing items. Our SharePoint List-based app is now a full-fledged mobile phone or tablet app thanks to PowerApps.
Embedding a PowerApp within a SharePoint Page
Most people will use PowerApps from their mobile phones or tablets. However, Microsoft recently released functionality that lets you embed a PowerApp directly in a SharePoint page, too. To embed a PowerApp in a SharePoint page:
- Open the SharePoint page where you want to embed the PowerApp.
- Click the plus (+) sign to add a Web Part to the page and select the Embed Web Part.
Find the URI of your PowerApp by looking on the app details page in PowerApps.
You will find it by selecting the Apps navigational component in PowerApps and then selecting the radio button next to the app you want to embed and clicking Details at the top of page. The App ID is a Globally Unique Identifier (GUID). On our sample app it is:
f9cc3913-2e66-4053-b514-04e41823c38cCreate the URL that you will embed.
The URL takes the form of:
https://web.powerapps.com/webplayer/iframeapp?source=iframe&appId=/providers/Microsoft.PowerApps/apps/[AppID]where [AppID] is replaced with the actual ID of your PowerApp.
In our example, we added a screencolor parameter, so the URL is:
https://web.powerapps.com/webplayer/iframeapp?source=iframe&screenColor=rgba(100,100,100,1)&appId=/providers/Microsoft.PowerApps/apps/f9cc3913-2e66-4053-b514-04e41823c38cNow that you have the URL to your PowerApp, the last step is to surround it in an iframe HTML tag. An iframe HTML tag includes some options you can set such as the width and height and source. The source is the URL of the PowerApp and the width and height are how big the frame will be on the page.
In this example, we set the width to 853 pixels and the height to 480 pixels. The final code that we will past into our Embed Web Part is:
<iframe width="853px" height="480px" src="https://web.powerapps.com/webplayer/iframeapp?source=iframe&screenColor=rgba(100,100,100,1)&appId=/providers/Microsoft.PowerApps/apps/f9cc3913-2e66-4053-b514-04e41823c38c"></iframe>Once you enter the embed code the SharePoint page instantly shows you a preview.
Click Publish to publish the page and view the PowerApp embedded right inside of your SharePoint page, as shown in Figure 16-8.
Note that the PowerApp was built for a mobile phone. If we wanted to build it for a web browser, we would probably want to increase the width.

FIGURE 16-8: A PowerApp embedded in a SharePoint page.
You can embed a PowerApp any HTML web page, not just SharePoint.
Viewing SharePoint Sites in a Web Browser on a Mobile Device
PowerApps is definitely the way to go when working with SharePoint from a mobile device. However, if there are people who don’t want to install the PowerApps app, they can still work with SharePoint using the web browser on their mobile devices.
A SharePoint feature called Mobile Browser View makes it possible to customize how a site will look depending on the dimensions of the web browser being used. When you activate the feature, three different site views become available to mobile devices:
- Classic view shows the site with HTML links to the different navigation components.
- Contemporary view shows the navigation components of the site using tiles that you click on to navigate.
- Full Screen UI is the same view of SharePoint you would see on a regular desktop computer, only rendered in your smaller mobile browser.
Creating views for small screens
When you create a view for your app data, you select whether it should be available on a mobile device. You can even select if the view should be the default view for a mobile device. Chapter 11 walks you through creating a new view and discusses the Mobile section on the Create View page.
The bottom of the app settings page (such as List Settings or Library Settings) shows the views available for the app. A column shows whether the view is available for mobile devices and if it is the default view. Figure 16-9 shows these columns on the List Settings page for an app.
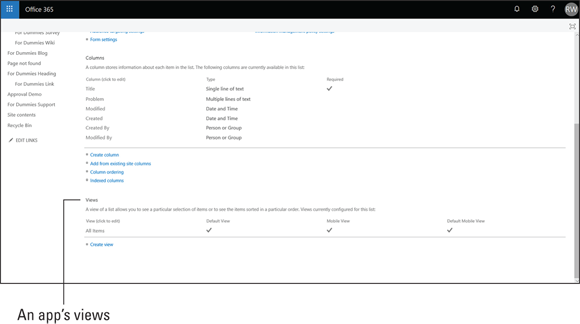
FIGURE 16-9: The Views section of a List-based app.
Targeting devices using channels
If you have a complex SharePoint site, you might want to render it depending on the device being used to view it. You can do this using the Device Channels functionality of SharePoint. Using Device Channels, you can dictate that certain devices should use certain master pages and style sheets. When a particular device, such as an iPad or Android tablet browses the site, it displays in a customized way for that type of device.
 Creating custom master pages and style sheets is a very technical task and should be done by experienced web developers.
Note: Device Channels are only available for sites with the SharePoint Server Publishing Infrastructure feature activated.
Click the Device Channels link in the Look and Feel section of the Site Settings page to create and configure channels. When you create a new channel, you provide a name, an alias for reference in website design code, a description, and inclusion rules. A web designer can then build the SharePoint master page to display differently based on the channels available. Developing master pages and referencing Device Channels in code is beyond the scope of this book, but you should know that the option is available when you need to customize SharePoint. The result is that SharePoint displays differently, depending on different channels of devices.