

23
From Concept to Curating—Four Detailed Case Studies
The goal of this chapter is to illustrate all the concepts described in the book through four case studies. Two involve sky-priority images; two involve foreground-priority images. Each case study integrates the foundations of astronomy and photography described in this book along with specific information obtained from our planning tools. A few stumbling blocks are also revealed along the way!
Case Study Orion Over Mt. Whitney and through Möbius Arch

23.1
The constellation Orion poised over the Eastern Sierra in the early morning twilight and peeking through the portal of the Möbius Arch. There are only a few days out of the entire year when this image is possible. The following conditions need to be simultaneously satisfied: (i) Orion is positioned at this precise altitude and azimuth; (ii) at this point within the period of pre-dawn astronomical twilight; and (iii) with the moon below the horizon. A few minutes later, Orion is obscured by the bright sky; a few minutes earlier and it is overwhelmed by the abundance of stars. Furthermore, Orion is not properly positioned through the arch at this same time a month earlier or later. Finally, this image can only be created within a few days of the new moon, otherwise the moonlight sky is too bright. Clearly, thorough planning is needed to ensure success!
Möbius Arch is an iconic landmark of California’s Alabama Hills in the Eastern Sierra, Figure 19.7. First popularized by David Muench and Galen Rowell, it features a view of Mt. Whitney, the tallest mountain in the continental United States, through its graceful portal.
One morning in mid-November, I happened to notice the constellation Orion positioned majestically over Mt. Whitney, Figure 1.5. Suddenly, it occurred to me that it might be possible to photograph Orion in this position through Möbius Arch! I ran up the trail just in time to confirm that yes, it was possible. Unfortunately, the morning sky quickly brightened and Orion slipped into obscurity. I made repeated attempts over the next several years to create this photograph; this case study will take you along the journey.
The key to this image’s success lies in several concurrent requirements, starting with the eastern escarpment of California’s Sierra Nevada being perfectly oriented to catch the first light of the new day. At sunset, its entire eastern face is in deep shadow and this image doesn’t work. Next, as we face to the west, we have the juxtaposition of Orion with the eastern Sierra crest, including Mt. Whitney, in the precise moments when there is sufficient light from the imminently rising sun behind our back to illuminate the mountains. Second, the stage of twilight is such that there aren’t an overwhelming number of stars visible; Orion clearly stands out. You will see that these dual requirements limit the window of possible shooting times to literally just a few minutes! Third, the altitude of Orion through the portal of Möbius Arch must be such that it creates a pleasing composition while not blocking any of the key image constituents. As you will see, this latter requirement, coupled with its special timing within twilight, results in its availability for only a few weeks each year! Finally, we have chosen the correct focal length lens, foreground subject distance and depth of field (DOF) to ensure a pleasing framing by an in-focus Möbius Arch.
This image qualifies as a sort of hybrid sky-priority/foreground priority image, Figure 16.1, since it relies on the concurrent presence of Orion, Mt. Whitney, and the Möbius Arch. Nonetheless, since it hinges on the appearance, position, and timing of Orion, we will treat it as a sky-priority image. We therefore start by consulting our virtual planetarium software to determine the dates when Orion is correctly positioned during the transition between astronomical and nautical twilight, Figure 23.2(a). We know that November is a suitable month, based on the date of our initial observations. In October, however, we find that Orion is too high in the sky during pre-dawn astronomical twilight to fit inside the portal; in December, it has already set below the Sierra crest. November it is!
In tandem, we consult our moon phase calendar for the upcoming window of opportunity; in this case, November 2012, Figure 23.2(b). We see that there are only two weekends during which the moon is below the horizon just before dawn—the weekends of November 17 and 25. We also note that Orion lies at an azimuth of approximately 280° on these dates and times, Figure 23.2(a). We confirm that Mt. Whitney lies at an appropriate azimuth from the Möbius Arch for Orion to be in its proper position, Figure 23.3. Right away we see the value of planning; it was only through sheer good luck that I happened to be at this location when the concept originally presented itself, and I was totally unprepared for it. Planning gives us the confidence that we will be ready the next time around!
The next step is to examine the times of astronomical and nautical twilight on November 10, 2012, and at the location of the Möbius Arch. We see that astronomical twilight ends at 5:27 am, Figure 23.3, so we have between approximately 5:30–5:45 am to make our image; the sky is too dark or bright, otherwise. Once we arrive at the Möbius Arch, we estimate that it will take approximately an hour to properly set up our equipment, compose our final composition and achieve a sharp focus. We know that it takes approximately 20 minutes to hike into the Möbius Arch from the trailhead. Therefore, we decide to leave the trailhead at 4 am to give ourselves a buffer for the unexpected.

23.2
(a) Virtual planetarium view of Orion in the early morning hours of November and (b) moon calendar for November 2012.
Source: Distant Suns,
http://www.photopills.com

23.3
Confirmation in The Photographer’s Ephemeris (TPE) of the azimuth of Mt. Whitney from the Möbius Arch. We place the gray subject pin on Mt. Whitney, the red camera location pin on the Möbius Arch, and simply read off the azimuth of approximately 255°.
Source: http://app.photoephemeris.com/
Our next step is to decide what focal length lens to use for the image. While we could simply wait until the morning of the shot and try out several compositions with different focal lengths, we know that we only have a few minutes of optimum shooting time before the sky brightens excessively. We, therefore, conduct a few scouting expeditions during the day to create a series of test images with different focal length lenses, Figure 23.4. We can take as much time during these daytime scouting trips as is necessary to fine-tune and perfect the composition, and then use these images as the basis for our subsequent final selection. We settle on the 24 mm focal length setting of our 14–24 mm zoom lens as our first choice; if anything, a slightly shorter focal length may be necessary.

23.4
It is always a good idea to practice during the day making a variety of test images from different vantage points and with different focal length lenses. This is a time-consuming process, and in this case study—we don’t have much shooting time available to us!
During our scouting expeditions, we noted that the optimal composition places the camera approximately 25 feet away from the arch. We, therefore, need to choose an aperture setting that will guarantee a DOF between say, at least 20 feet, and infinity. Consulting our DOF planning tools in the field on our mobile device, we see that the minimum aperture that will allow this for a 24 mm lens is f/5.6. We, therefore, decide to set our initial aperture to f/5.6 and create a test image during the day at this aperture. To be on the safe side, we also make a few test images at apertures of f/4.0, f/2.8 as well as f/8 and f/11. Again, here is the value of day scouting; we can analyze these test images on our laptops before the following morning to make sure our chosen aperture indeed provides an adequate DOF. I did not do this on one of my early attempts, and while I had a beautifully timed and framed image of a sharply in-focus Orion, the edges of the arch were disappointingly out of focus and unacceptably blurred.
You might think that this image would benefit from the focus blending techniques described earlier. Why not simply make an in-focus image of Orion, a second one after refocusing on the arch, and then blend the two images together in post-processing? The only drawback would be if you wanted to make additional images at later stages of astronomical twilight. The length of time required to re-focus on Orion after making the image focused on the arch, compared to the short window of ideal sky brightness, would likely severely limit the number of such attempts.
Now that we have established our aperture, we turn our attention to the shutter speed. We know that the longest exposure time that we may safely choose to avoid noticeable streaking of the stars is given by the Rule of 400/500/600; in this case it is approximately 500/24 ~ 20 seconds.
Our final exposure setting decision is the choice of the appropriate ISO setting. First, we need to know what our camera’s exposure value (EV) needs to be in order to match it with the scene light value (LV). Thus, we need to know the approximate LV of our scene. Since we intend to create our images during astronomical twilight, we know from Figure 10.6 that the scene LV will be approximately 0. Turning back to our tables of camera EVs, Figure 12.1, we find that an ISO of 400 will set the camera’s EV to −2 for our previously determined aperture of f/5.6 and shutter speed of 20 seconds. We’re all set!
Bear in mind that these exposure settings are only suggested initial values. We may choose to decrease the exposure time and increase the ISO if we detect the slightest star trails with a 20 second exposure. Alternatively, we may decide to try a smaller aperture, e.g. f/8 with a higher ISO if we detect any fuzziness to the foreground. Creative, on-the-fly adjustments are part of the excitement of landscape astrophotography; breaking the rules can also yield stunning results!
Here is a summary of our plans so far. We have decided to leave the trailhead at 4:00 am on Saturday, November 10, 2012. We will have mounted our 14–24 mm lens on the camera. Our initial exposure settings are as follows: ISO is 400, aperture is f/5.6 and a shutter speed is 20 seconds. We expect to adjust the exposure settings as the sky brightens. The final step is to set the alarm clock early enough that we arrive at the trailhead by 5 am, hike in, set up and enjoy a beautiful morning creating dozens of spectacular images!
The as-shot image contains all the elements of the pre-visualized image, shown in Figure 23.5(a). Orion is correctly positioned at the ideal moment within pre-dawn astronomical twilight with the added bonus of a few clouds spilling over the ridgeline of the Sierra crest. The image was made with a 21 mm focal length, and an ISO of 1000, aperture of f/2.8 with a 15-second shutter speed, corresponding to a scene EV of −4, Figure 12.1, which is slightly darker than our initial estimate of −2.
The final step is to post-process the image to bring out the appearance of Orion as well as add a little mystery to the scene, Figure 23.5(b). This is accomplished first with a minor crop, and then by adjusting the color temperature, hue, contrast, and brightness in Lightroom and Photoshop. The final step is to make slight modifications using the filters within the Nik plug-in collection.

23.5
The result: (a) as-shot; (b) post-processed.
Case Study Summary:
Orion Over Mt. Whitney and Through Möbius Arch
Planning
- Conceive and pre-visualize image concept
- Obtain possible months for when Orion is at this position in the morning from planetarium simulation
- Obtain times of pre-dawn astronomical twilight and confirm azimuth from planning software; select November
- Determine dates of new moon within November
- Decide on preliminary trailhead departure time
Day Scouting
- Confirm travel time to shooting destination from trailhead
- Select focal length, tripod position from images made during day scouting reconnaissance
Fine-Tuning the Plan
- Determine minimum acceptable aperture to ensure adequate DOF from this tripod position
- Determine maximum possible shutter speed to avoid star streaking
- Estimate scene EV from Figure 10.6
- Determine correct ISO to match camera LV to scene EV from Figure 12.1, coupled with candidate aperture and shutter speeds
Day of the Shot
- Create image(s), adjusting ISO, aperture and shutter speed as necessary
Post-processing
- Crop; adjust contrast, color balance, add effects
Case Study Supermoon Over Mt. Whitney

23.6
The largest, nearly full moon of the year, or “supermoon,” sets directly behind Mt. Whitney, California; the tallest mountain in the continental U.S., in May, 2012. The key elements of this image are its juxtaposition of a “special” similarly sized moon with the actual peak of the mountain. The diameter of the moon was scaled to the dimensions of the mountain by creating this image from a vantage point over 15 miles away. Knowing the precise shooting location ahead of time was essential; being even just a few hundred feet away would preclude this exact alignment. Coupled with the fact that it only takes a few minutes for the moon to set meant that there was no time to relocate if the shooting location was wrong. Finally, since the supermoon only occurred on one day out of the entire year, this image necessitated careful planning and thorough preparation to ensure success.
The supermoon is a now familiar, much anticipated phenomenon. It regularly occurs whenever the moon is simultaneously full and at its perigee, or its closest point to Earth, during its monthly orbit, Figure 5.12. The supermoon in May 2012, was one such case. I suspected it might be possible to create an image of it setting over Mt. Whitney, thus combining the largest full moon of the year with the tallest mountain in the continental U.S., Figure 23.6. Here’s how this image became a reality.
Although there are elements of a foreground-priority shot here, the dominant feature is the setting of the supermoon. This qualifies it as a sky-priority image, Figure 16.1, with a known date of May 5, 2012, Figure 23.7(a). Therefore, the first step was to obtain the setting moon’s time, Table 23.1, and approximate azimuth of 260°, with the help of the planning tools shown in Figure 23.7(b).

23.7
(a) Determining the date of the May 2012 “Supermoon” and (b) the setting moon’s time, and appearance for the azimuth of 242° from Distant Suns. The moon appears above the horizon and slightly to the right of the center of this image, consistent with its predicted azimuth of 260° at the moment of moonset.
Source: Distant Suns, http://www.photopills.com

The next step was to choose a shooting location based on this azimuth. Now in this image, I wanted the moon to clearly stand out as a dominant theme above the mountain. This outcome required the use of a very long focal length lens, otherwise, while the moon would be visible within the composition, its size, and hence “supermoon” qualities would be diminished, e.g. Figure 5.16.
My first choices of potential shooting locations were relatively close to the mountain’s base. However, I soon realized that the full scale of the mountain would not fit into the scene from such close proximity locations with the long focal lengths I wished to use. Instead, only its tip, or perhaps its shoulder, would be visible. This was not consistent with my pre-visualized concept; I wanted the entire mountain and its neighbors to fit into the scene along with a substantially sized moon. I quickly realized these dual requirements dictated a shooting location of several miles away, Figure 23.8.

23.8
This image illustrates how the precise coordinates were obtained for the shooting location, simply determined to be the point of intersection between a fortuitously located road and a line through Mt. Whitney with the correct azimuth of 260°. The correct azimuth was obtained after taking into account the effects of the mountain’s altitude on moon azimuth and timing during moonset behind Mt. Whitney, compounded with the 15-mile subject distance. Local moonset was predicted to occur at 6:16 am on May 7, 2012.
Source: http://app.photoephemeris.com/
Luckily, there was a fortuitously located dirt road, approximately 15 line-of-sight miles away from Mt. Whitney. The road was oriented parallel to the mountain range, thus allowing the pinpoint selection of a shooting location somewhere along its length. The precise shooting location was then simply determined to be the point of intersection between this road and a line through Mt. Whitney with the correct moonset azimuth of 260°, Figure 23.8, using The Photographer’s Ephemeris (TPE). The GPS coordinates of this point were noted for field navigation, since there was no cell coverage in this area at the time.
The next step was to estimate candidate exposure settings based on the anticipated LV of the pre-dawn twilight. Noting that moonset occurred only 15 minutes after sunrise on May 6, 2012, Table 23.1, the LV for this time was estimated to be approximately +8, Figure 10.6. Since this is a relatively bright scene, the relatively low ISO of 200 was thus selected as a starting point.
To determine the aperture, I needed to consider the specific details of the lens system I was using. To make this image, the camera was fitted with a 1.7X teleconverter attached to a 4-inch telescope with a 400 mm focal length. This combination resulted in an effective focal length of 680 mm. Noting that the entrance diameter of the telescope was 4 inches ~ 100 mm, the aperture was calculated to be 680 mm/100 mm = f/6.8. This aperture was deemed perfectly suitable, since DOF is not a consideration for such a large subject distance.
For a scene LV of +8, an ISO of 200, and an aperture of, say f/8 (close to f/6.8), consultation of the EV tables in Figure 12.1 indicates a shutter speed of approximately 0.1 seconds for a correct exposure. This should be satisfactory, since the moon should not move perceptibly in this short time interval. Our final exposure settings, therefore, are ISO 200, approximate aperture f/6.8 with a shutter speed of 0.1 seconds.
Having identified its exact GPS coordinates, and preliminary exposure settings, the next step was simply to drive to the shooting location, confirm its location with my hand-held GPS device, set up, and await moonset on the morning of May 6, 2012. There was no need to account for travel time from a trailhead, since the shooting location was right next to the parked car. It was necessary, however, to allow approximately an hour for unpacking, assembling, aligning and focusing the telescope/camera assembly, thus necessitating an arrival time at the shooting destination of 5:00 am.
Two major problems emerged that morning, Figure 23.9(a), both of which originated from my failure to account for the effects of the mountain’s altitude on moon azimuth and timing during moonset along the Sierra crest. I had selected the shooting location based on the time when the moon set beneath the sea level horizon, not when the moon slipped behind the 14,494 feet tall peak of Mt. Whitney from my shooting location which was 3,720 feet above sea level. Compounded with the 15-mile subject distance, this significant error resulted in the moon intersecting the wrong portion of the Sierra crest, far to the south, or left, of Mt. Whitney. Second, this error resulted in the moon intersecting Mt. Whitney over 40 minutes earlier than expected—during the final stage of nautical twilight, rather than just a few minutes before sunrise. The result was an unacceptable brightness difference between the moon and the mountain, Figure 23.9(a). Thus, a juxtaposed image of the Sierra crest and the moon both correctly exposed in a single exposure was impossible that morning, owing to the enormous difference in LV between the full moon and the Sierra crest. High dynamic range (HDR) processing of multiple images would have been a difficult challenge, owing to this extreme difference in LV coupled with the significant flare around a badly overexposed moon in the image correctly exposed for the foreground, Figure 23.9(a).
The lesson learned is to compensate for the effects of local horizons and shooting locations of different altitudes during the planning process. This process is straightforward in both TPE and PhotoPills (PP), for any combination of target and shooting location. Doing so allows you to determine the actual azimuth and time of moonset/rise as well as sunset/rise. As you have seen, these effects can be critical!
A second attempt was made the following morning, May 7, 2012, when the moon was still nearly full (98.3 percent) but intersected the mountain’s crest about an hour later, shortly after sunrise, Table 23.1. This difference in time created a far more pleasing similarity between the LV between the moon and the mountain. The setting moon and the peak of Mt. Whitney were also successfully aligned simply by relocating the shooting position to a new location based on properly accounting for the effects of the mountain’s altitude on the location of the moon’s point of intersection with the Sierra crest.
It was impossible to know with utter certainty the exact point of intersection or “best” composition ahead of time. Consequently, as the near-supermoon approached, intersected and finally set behind Mt. Whitney and the Sierra crest, a series of images with different orientations and compositions were made throughout the event, Figure 23.9(b), constantly monitoring the histogram and focus quality of the images.
Post-Processing
The final step in the creation of this image is the elimination of the haze resulting from the 15-mile distance between the camera and the mountain, Figure 23.10(a), as well as the significant lens vignetting, especially in the upper right corner. Judicious application of contrast adjustments, slight color correction, and minor cropping produces the pleasing final result, Figure 23.10(b)

23.9
(a) May 6, 2012: the morning after the night of the supermoon. Unfortunately, two problems emerged: (i) The shooting location was incorrect, as I had failed to account for the effects of the mountain’s altitude on moonset location and timing; and (ii) the moon intersected the mountain peak within nautical twilight, resulting in a too-great brightness difference between the moon and the mountain for a good image. (b) May 7, 2012: the following morning, when the moon was still nearly full (98.3 percent) and intersected the mountain after sunrise, creating a far more pleasing similarity in brightness between the moon and the mountain. The effects of the mountain’s altitude have also been compensated for, allowing a successful alignment between the setting moon and the very tip of Mt. Whitney. The image at the lower left was made at 6:14 am, May 7, 2012, which agrees very well with the predicted time of 6:16 am.

23.10
The final result: (top) as-shot; (bottom) post-processed.
Case Study Summary:
Supermoon Over Mt. Whitney
Planning
- Conceive and pre-visualize image concept
- Determine the date of the supermoon
- Confirm azimuth from planning software and select precise GPS coordinates of suitable shooting location
- Determine moonset time to be close to sunrise from planning software
- Estimate scene EV to be ~8 from Figure 10.6 for typical sunrise
- Choose ISO of 200; minimum available aperture is ~f/6, and a shutter speed of ~0.1 seconds.
Fine-Tuning the Plan
- Experience errors in location and timing on May 6
- Compensate moonset time for altitude of Mt. Whitney, adjust exposure settings for sunrise the following day; select new GPS coordinates
- Relocate shooting position; repeat second day
Day of the Shot
- Create multiple images in landscape/portrait orientations throughout moonset event
Post-Processing
- Adjust contrast, color balance, and crop to remove lens vignette
Case Study Star Trails Over Split Rock Lighthouse

23.11
Star trails over Split Rock Lighthouse—a beloved Minnesotan landmark along the north shore of Lake Superior.
Split Rock Lighthouse is a beloved Minnesotan landmark along the north shore of Lake Superior. Its rugged construction atop the top of a sheer cliff amidst a scenic forest backdrop makes it a highly photogenic subject. Although it is no longer in regular use, it is lit once each year, on November 10, to honor the tragic sinking of the Edmund Fitzgerald in 1975. However, there are few, if any, images made of it with accompanying star trails. I felt that a viewpoint from a location to its west would yield a satisfying composition of star trails arcing upwards at an angle with the vertical equivalent to its latitude, ~47°, over the serene surface of a calm lake. A moonless night would allow the greatest number of stars to be visible. Let’s go through the process.
Since we are starting with a specific subject in mind, in this case the Split Rock Lighthouse, this image concept clearly qualifies as a foreground-priority image, Figure 16.1. Familiarity with the area led to the choice of the general shooting area to be somewhere along the rocky shore to the west of the lighthouse. Having pre-visualized the overall concept, the first step was to establish the azimuth, 76°, between the lighthouse and the prospective shooting location, Figure 23.12(a). A check of the anticipated orientation of the star trails at this azimuth at a similar location using the augmented reality capability of PhotoPills, Figure 23.12(b), confirmed that the star trails should have the desired orientation.

23.12
(a) Using The Photographer’s Ephemeris (TPE) to determine the azimuth, 76°, between the lighthouse and the prospective shooting location. (b) Confirming the anticipated orientation of the star trails at this azimuth using the augmented reality capability of PhotoPills (but with a different lighthouse).
Source: http://app.photoephemeris.com/; http://www.photopills.com
The next step was to determine the dates of the new moon for the target month, in this case, April 2015, Figure 23.13. We find that the evening night skies will be moonless for the dates of April 12–19, 2015. After April 19, 2015, the waxing crescent moon will increasingly become an issue, as will the waning gibbous moon before approximately April 12, 2015.

23.13
Moon phase calendar for the month of April 2015, showing that the dates of April 12–19 would have moonless skies in the evening. After April 19, the waxing crescent moon would increasingly become an issue, as would the waning gibbous moon before approximately April 12.
Source: http://www.photopills.com
Having established a suitable set of dates, a suitable starting time for the star trail sequence was needed based on their times of sunset, civil, nautical, and astronomical twilights. I wanted to initiate the star trail image sequence within the final stages of astronomical twilight so that the first few images would retain some of the sunset colors in the sky. Since astronomical twilight on these dates was from approximately 8:20 pm to 9:00 pm, this corresponded to a start time of around 8:30 pm. Giving myself approximately an hour to set up my equipment, finalize my composition and establish a good focus meant arriving at the shooting destination at 7:30 pm. Coupled with a 15-minute walk from the car and 10 minutes needed to unpack the car and load myself up meant arriving at the trailhead between approximately 6:00 and 6:30 pm.
The next phase was to conduct a series of daytime scouting trips to explore a variety of compositions with different focal lengths lenses, Figure 23.14. After reviewing all the potential images, and since I wanted to maintain nearly parallel star trails, I chose a 50 mm focal length, prime lens. The more restricted field of view of this lens accomplished this, compared to the divergent star trails that would result from a wider-angle lens, for example, Figure 15.22. An added benefit of this particular lens is that its minimum aperture was only f/1.4, meaning that the sharpest image would be expected at an aperture of approximately f/2.8, in other words, at two exposure stops above the minimum aperture.

23.14
Daytime reconnaissance to select the optimum composition and lens focal length.
The next step of the planning process involved selecting the camera exposure settings. We have already chosen an aperture of f/2.8 since it will produce the sharpest stars across the largest area of the image. A 25-second shutter speed was selected next since we are collecting a series of images to combine into star trails. This was the longest exposure time possible using my in-camera intervalometer. Separately, the scene LV can be expected to be approximately only −5, Figure 10.6, since the scene will ultimately comprise only stars under a dark, moonless night. Coupled with an aperture of f/2.8, the result is an ISO of 800 indicated for a correct exposure, found with the help of Figure 12.1. This is good news, since an ISO of only 800 should result in quite noise free images.
An important step is to confirm that the entire image will be in focus for the proposed combination of shooting location and aperture. Here, the distance between the shooting location and the nearest portion of the foreground and the chosen image was determined to be approximately 1,000 feet, measured with the planning tool in TPE in Figure 23.12(a). The DOF tool in PP calculates a minimum, near focus distance of approximately 100 feet for a subject focus distance at infinity with a 50 mm lens set to a f/2.8 aperture. This distance is well below the actual minimum subject distance, thus ensuring that our entire scene will be in focus.
The final set of images was collected starting just before 8:00 pm. After trying several combinations of images with different start times, Figure 23.15, the resultant image was obtained, Figure 23.11. This image was processed using the Saucer mode of the Waguila action described in Chapter 22.
Case Study Summary:
Star Trails Over Split Rock Lighthouse
Planning
- Conceive and pre-visualize image concept; select foreground subject to be Split Rock Lighthouse
- Determine candidate shooting location
- Determine azimuth (76°) between the potential shooting location and the lighthouse
- Confirm desired orientation of star trails for this azimuth
- Obtain times of post-sunset astronomical twilight; select image acquisition start time as 8:30 pm
- Decide on preliminary trailhead departure time as 7:30 pm
Day Scouting
- Confirm travel time to shooting destination from trailhead
- Select focal length, tripod position from day scouting reconnaissance
Fine-Tuning the Plan
- Determine candidate shutter speed (25 seconds) and aperture (f/2.8)
- Estimate scene EV from Figure 10.6
- Determine correct ISO to match camera LV to scene LV from Figure 12.1, coupled with candidate aperture and shutter speeds
- Determine minimum distance to the closest foreground subject to ensure adequate DOF from this tripod position
Day of the Shot
- Create image(s)
Post-Processing
- Adjust contrast, color balance
- Stack into star trails

23.15
Examples of images used to create the star trails. The image creation sequence was initiated within the later stage of nautical twilight to retain some color in the sky.
Case Study Milky Way Over Chumash ‘Ap

23.16
The river of stars in the Milky Way complements the timeless Chumash ‘Ap in the Satwiwa Native American Indian Culture Center of the Santa Monica Mountains National Recreation Area just outside Los Angeles, California.
The Chumash ‘Ap in the Satwiwa Native American Indian Culture Center of the Santa Monica Mountains National Recreation Area just outside Los Angeles, California, stands as an iconic monument to the Chumash and Tongva/Gabrielino cultures. Positioned below Boney Peak, it seemed like a good subject to couple with the rivers of stars within the Milky Way. Owing to its proximity to Los Angeles, it also seemed like an excellent opportunity to demonstrate the visibility of beautiful night sky objects even close to major urban areas. No other such image existed to my knowledge, so I was excited to give it a try. This case study describes how this image came to be.
Again, since we are starting with a specific foreground subject in mind, this concept qualifies as a foreground-priority image, Figure 16.1. Consulting our planning tools, we determine a suitable azimuth for our shooting location to be approximately 220°, Figure 23.17(1), to line up the ‘Ap with Mt. Boney. We also want the Milky Way to rise nearly vertically into the sky next to the ‘Ap, as it is seen to do during the late evenings in the month of August, Figure 23.17(2).

23.17
To determine the date and time of our foreground-priority image, we start with the foreground subject, (1), and desired azimuth to Mt. Boney (2). These form a line which then indicates an area of possible camera position, (3). Consulting our virtual planetarium for our candidate months, we can select approximate dates and time (5) for when the Milky Way intersects the horizon at the correct azimuth of 210°–225° (4).
Source: Distant Suns; http://app.photoephemeris.com/
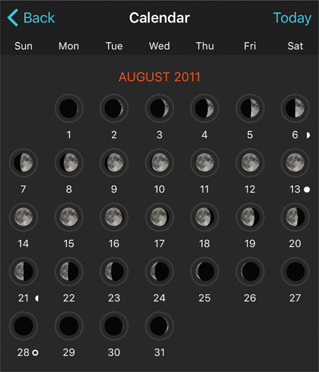
The next step was to determine the dates of the new moon for the target month, in this case, August, 2011, Figure 23.18. We see that we will experience moon-free skies during the last two weeks of the month. Returning to our planning tools, Figure 23.17(2), we can narrow down a precise date and time combination for when the Milky Way will have a suitable azimuth.
23.18
The moon phase calendar for our candidate month, August 2011, allows us to select the nights when the moon is below the horizon at our desired shooting times.
Source: http://www.photopills.com
The next step was to explore a variety of shooting locations with different focal lengths lenses, Figure 23.19. Since this example was done before I fully appreciated the value of day scouting, I wasted valuable time at night experimenting with different possibilities, Figure 23.19. Nonetheless, despite the relentless movement of the Milky Way during this process, I was able to eventually settle on a suitable choice, Figure 23.20(a).
The camera exposure settings were determined in the field through trial and error. Here again, valuable time was lost; knowledge and planning would have allowed me to spend more time fine-tuning the composition and less time testing endless combinations of ISO, shutter speed, and aperture, all while the Milky Way was slowly moving across the sky!
The final choice of settings were an ISO of 3200, an aperture of f/2.8, and a shutter speed of 8 seconds. The relatively short shutter speed was dictated by the unavoidable glow in the sky emanating from the not-too-distant Los Angeles basin. Post-processing allowed me to minimize these effects, Figure 23.20(b).

23.19
These candidate compositions created at night are presented to illustrate the value of day scouting. I created this image project before I fully appreciated the value of daytime reconnaissance, and I hope you are able to see how daytime scouting can help. By having to make these “practice” images at night, I wasted valuable time when I could have been perfecting my exposure and fine-tuning the composition.

23.20
The final result: (a) as-shot; (b) post-processed.
Case Study Summary: Milky Way Over Chumash ‘Ap
Planning
- Conceive and pre-visualize image concept; select foreground subjects to be Chumash ‘Ap coupled with Mt. Boney
- Determine candidate shooting location
- Determine azimuth (~220°) between the potential shooting location and the ‘Ap
- Determine shooting month, date, and time
Day Scouting
- Not performed; lesson learned!
Fine-Tuning the Plan
- Not performed; lesson learned!
Day of the Shot
- Create image(s)
- Trial compositions and exposure settings done during shoot, losing valuable time
Post-Processing
- Adjust contrast, color balance, dodging to reduce light pollution
Bibliography
• https://djlorenz.github.io/astronomy/lp2006/
• www.distantsuns.com/products/