Chapter 15
Working with Photos
Viewing and sharing your pictures on the iPad is truly a joy, due in large part to the beautiful high-resolution screen and the way it instantly flips the pictures around so others can view them. In this chapter, we discuss the many ways to get pictures onto your iPad. We also show you how you to use the touch screen to navigate through your pictures, and how to zoom in and out and manipulate your photos.
TIP: Did you know you can take a picture of the entire screen of your iPad by pressing two keys simultaneously? This is great to show someone a cool app or to prove that you got the high score on Tetris!
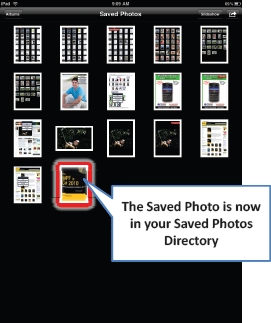
How to get it done: Press both the Home button and the Power/Sleep button on the top right edge. If you have done this correctly, the screen should flash and you'll hear a camera sound. The screen capture you have taken will be in your Saved Photos album in the Photos app.
How to Get Photos onto Your iPad
You have many options for loading photos onto your device:
Sync using iTunes: Probably the simplest way is to use iTunes to sync photos from your computer. We describe this in detail in Chapter 3: “Sync Your iPad with iTunes.”
Receive as e-mail attachments: While this is not useful for large numbers of pictures, it works well for one or a few photos. Check out Chapter 12: “Email on your iPad” for more details about how to save attachments. (Once saved, these images show up in the Saved Photos album.)
Save images from the Web: Sometimes you'll see a great image on a web site. Press and hold it to see the pop-up menu and then select Save Image. (Like other saved images, these end up in the Saved Photos album.)
Download images from within an app: A good example of this is the Wallpaper app shown in Chapter 6: “Personalize & Secure your iPad.”
Sync with iPhoto (for Mac users): If you use a Mac computer, your iPad will most likely sync automatically with iPhoto.
Here are a few steps to get iPhoto sync up and running:
- Connect your iPad and start iTunes.
- Go to the Photo tab along the top row of Sync Options.
- Choose the Albums, Events, Faces, or Places you want to keep in sync with the iPad.
Drag and drop (for Windows users): Once you connect your iPad to your Windows computer, it will appear in Windows Explorer as a Portable Device, as shown in Figure 15–1. Here are the steps to follow to drag and drop photos between your iPad and computer.
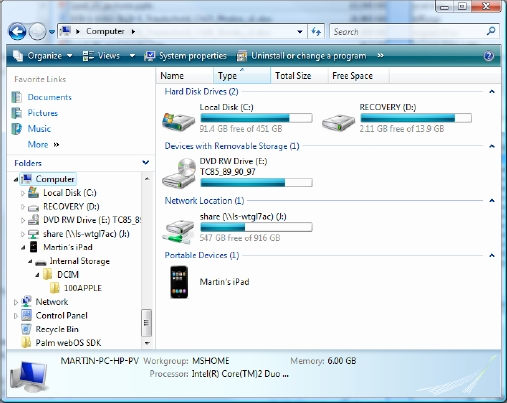
Figure 15–1. Windows Explorer showing the iPad as a Portable Device (connected with USB Cable)
- Double-click on the iPad image under Portable Devices to open it.
- Double-click on Internal Storage to open it.
- Double-click on DCIM to open it.
- Double-click on 100APPLE to open it.
- You will see all the images in the Saved Photos album on your iPad.
- To copy images to your iPad: Select, then drag and drop images from your computer into this folder to put them on your iPad.
- To copy images from your iPad, select and drag and drop images out of this folder onto your computer.
TIP: Here's how to select multiple images in Windows:
Draw a box around the images, or click on one image and then press Ctrl+A to select them all.
Hold down the Ctrl key and click on individual pictures to select them.
Right-click on one of the selected pictures and choose Cut (to move) or Copy (to copy) all of the selected images.
To paste the images, press and click on any other disk or folder, such as My Documents and navigate to where you want to move or copy the files. Then right-click again and select Paste.
Using Your iPad as an Electronic Picture Frame
We show you how to use your iPad as an electronic picture frame when it is in Locked mode, and how to disable this feature, in our Chapter 6: “Personalize & Secure your iPad”.
Viewing Your Photos
Now that your photos are on your iPad, you have a few very cool ways to look through them and show them to others.
Launch from the Photos Icon
If you like using your Photos icon, you might want to place it in your Bottom Dock for easy access if it's not already there (see Chapter 5).
To get started with photos, touch the Photos Icon.
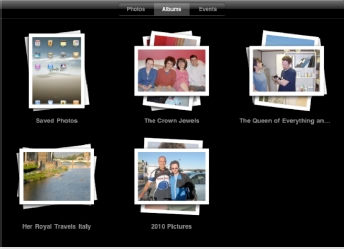
The first screen shows your Photo Albums, which were created when you set up your iPad and synced with iTunes. In Chapter 3, we showed you how to choose which photos to sync with your iPad. As you make changes to the library on your computer, they will be automatically updated on your iPad.
Choose a Library
From the Photo Albums page, touch one of the library buttons to show the photos in that album. We touched the Photo library and immediately the screen changed to show us thumbnails of the pictures in this library.
Tap and drag your finger up and down to view all the pictures. You can flick up or down to quickly move throughout the album.

Preview an Album by Pinching Open
When you're trying to locate a particular image, one of the cool things you can do on your iPad is to preview a particular album by pinching it open.
Place two fingers on the album and slowly “pinch open” your fingers. Notice that all the images spread out across the screen.
If you see the photo you want, continue pinching open to fully open the album. End your pinch with a flick to open the album.

If you don't see the image you want, simply close your fingers again to close the album and then try another one.
TIP: You can close an album that is fully open by “pinching closed” across the entire screen of thumbnails.
Working with Individual Pictures
Once you locate the picture you want to view, just tap on it. The picture then loads into the screen.
NOTE: Usually, your pictures will not take up the full screen on your iPad especially if they were shot in landscape mode.

TIP: The picture to the right was shot in landscape mode, so to see it in a full screen you'll have to turn your iPad on its side or just double-tap it to fill the screen.
Move Between Pictures
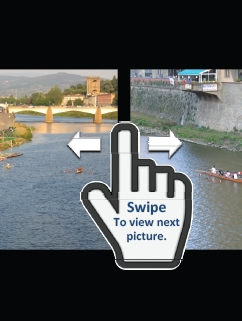
The swipe gesture is used to move from one picture to the next. Just swipe your finger left or right across the screen, and you can move through your pictures.
TIP: Drag your finger slowly to move more gradually through that the picture library.
When you reach the end of an album, just tap the screen once and you'll see a tab in the upper left corner that has the name of the photo album. Touch that tab and you'll return to the thumbnail page of that particular album. You can also pinch to return to the thumbnail page.![]()
To get back to your main photo album page, just touch the button that says Albums in the top left corner.![]()
Use the Thumbnail Bar to Move Between Pictures
Instead of swiping left and right to move between your pictures, you can bring up the soft-key controls on the screen. To do this, simply tap the screen once. Tap it again to make the soft keys disappear.
Along the very bottom of the screen, you'll see a small thumbnail bar over which you can gently slide your finger (Figure 15–2). You can quickly slide through the whole album using this bar. You can also just tap on a thumbnail to see that particular picture.

Figure 15–2. Use the thumbnail bar to advance through pictures
Zooming in and Out of Pictures
As described in the “Quick Start Guide” section of the book, there are two ways to zoom in and out of pictures on your iPad: double-tapping and pinching.
Double-Tapping
As the name describes, this is a quick double-tap on the screen to zoom in on the picture as shown in Figure 15–3. You will be zoomed in to the spot where you double-tap. To zoom out, just double-tap once more.
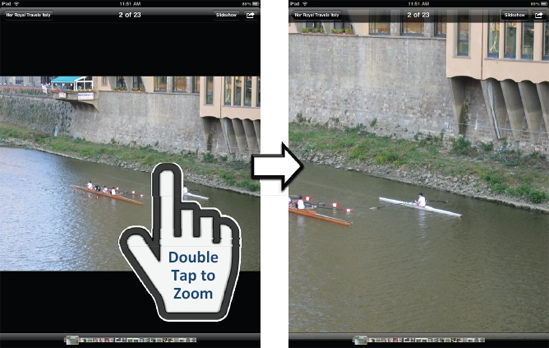
Figure 15–3. Double-tap to a picture to zoom
Pinching
Also described in the “Quick Start Guide” section of this book, pinching is a much more precise form of zoom. While double-tapping only zooms in or out to one set level, pinching really allows you to zoom in or out just a little bit or quite a lot.
To pinch, hold your thumb and forefinger close together and then slowly (while touching the screen) separate them, making the picture larger. To zoom in, start with your thumb and forefinger apart and move them together.
NOTE: Once you have activated the zoom using either method, you will not be able to easily swipe through your pictures until you return the picture back to its standard size.
Viewing a Slideshow
You can view the pictures in your photo album as a slide show if you'd like. Just tap the screen once to bring up the on-screen soft keys. In the upper right corner is a Slideshow button—just touch once to start the slide show. You can start the slide show from either the Photo Library screen of from any picture you are viewing.
Slideshow Options let you adjust the how long each picture remains on the screen, as well as choose music, transitions and other settings as shown in Figure 15–4. To end the slide show, just tap the screen.
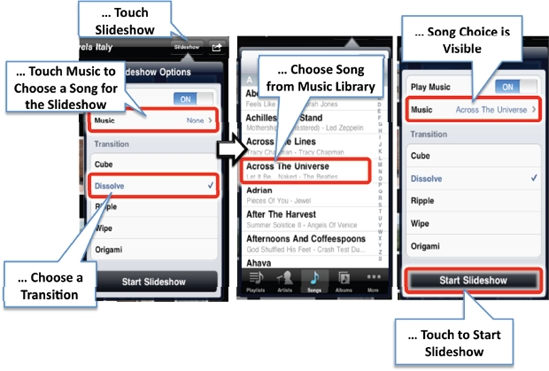
Figure 15–4. Configuring your slide show
Adjusting Slideshow Options

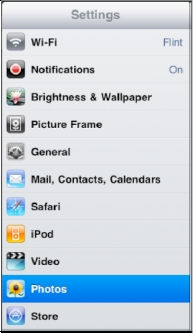
To configure a slideshow, you will need to change your settings. To do so, touch the Settings icon on the Home Screen.
Scroll down to the Photos tab and touch the screen. You will then see the various options you can use, including four options you can adjust for slideshows.
To specify how long to play each slide, touch the Play Each Slide For tab. You can choose a range between 2 and 20 seconds.
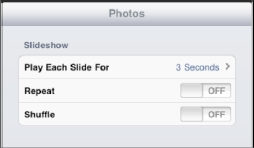
If you want pictures to repeat in a slideshow, just move the Repeat switch to ON.
If you want the pictures to move in an order different from the way they are listed, just choose Shuffle and, just like the Shuffle command on the music player, the pictures will play in a random order.

Using a Picture as Your iPad Wallpaper
We show you how to select and use a picture as your iPad wallpaper (and more wallpaper options) in Chapter 6: “Personalize & Secure your iPad”.
NOTE: You can have different pictures for your Home Screen and Lock Screen or use the same picture for both.
E-mailing a Picture
As long as you have an active Internet connection (Wi-Fi or 3G; see our Wi-Fi and 3G Connections chapter), you can send any picture in your photo collection via e-mail. Tap the Share button on the top right edge of the black bar on the top of your screen. If you don't see the black bar, tap the screen once. (Figure 15–5).
Choose the Email Photo option and the Mail app will automatically launch (Figure 15–5).
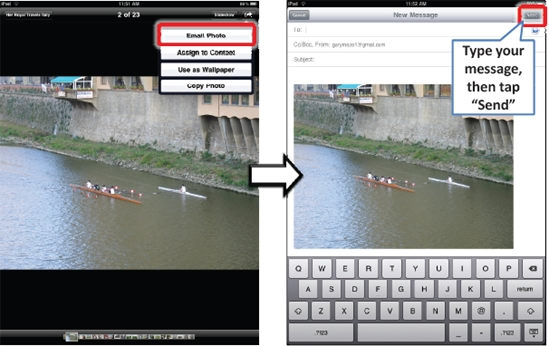
Figure 15–5. Emailing a photo
Touch the To field as you did in the “Email on your iPad” chapter and select the contact to receive the picture. Tap the blue + button to add a contact.
Type in a subject and a message and then touch Send in the upper right corner—that's all there is to it.
E-mail, Copy, or Delete Several Pictures At Once
If you have several pictures you want to e-mail, copy, or delete at the same time, you can do it from the thumbnail view, as shown in Figure 15–6.
NOTE: The copy function allows you to copy and paste multiple pictures into an e-mail or other app. Share renames the image to photo.png; copy-and-paste leaves it with the DCIM folder file name.png. Share also reduces the pixel size of large photos while copy retains the original pixel size.
At publishing time, you could only share or e-mail a maximum of five pictures. This may change with future software. You can, however, copy more than five pictures.
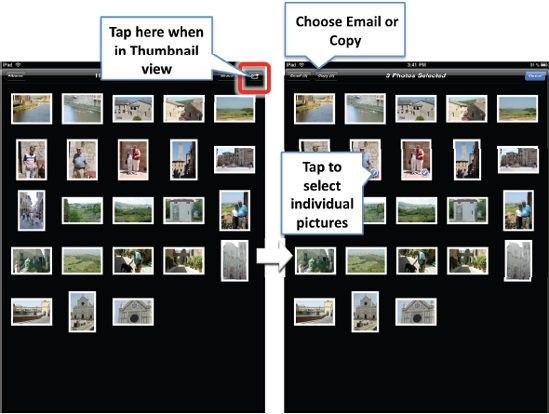
Figure 15–6. Selecting multiple images to e-mail
Assign a Picture to a Contact
In Chapter 13, we talked about adding a picture when editing a contact. You can also find a picture you like and assign it to a contact. First, find the photo you want to use.
As we did with wallpaper, and e-mailing a photo, tap the Options button—the one furthest to the right of the upper row of soft keys. If you don't see the icons, tap the screen once.
When you touch the Options button, you'll see a drop-down of choices: Email Photo, Assign to Contact, Use as Wallpaper and Copy Photo.
Touch the Assign to Contact button.

You will see your Contacts on the screen. You can either perform a search using the search bar at the top or just scroll through your contacts.
Once you find the contact to which you would like to add the picture, touch the name.

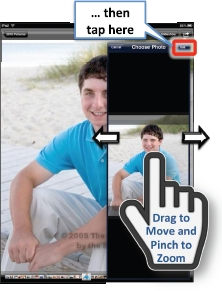
You will then see the Move and Scale screen. Tap and drag the picture to move it; use pinch to zoom in or out.
When you have it just as you want, touch the Use button to assign the picture to that contact.
NOTE: You will return to your Photo Library, not to the contact. If you want to check that the picture did get set to your contact, exit the Photo app, start the Contact app, and then search for that contact.
Deleting a Picture
Why are there some pictures you can't delete from your iPad (the Trash Can icon is missing)?
You'll notice that the Trash Can icon is not visible for any photo that is synced from iTunes. You can only delete such pictures from your computer library. Then, the next time you sync your iPad, they will be deleted.
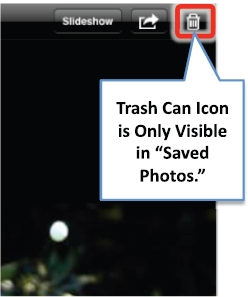
When you are looking through pictures in your Saved Photos (which is not synced with iTunes, but is comprised of pictures you save from an e-mail or download from the Web), you'll see the Trash Can icon in the bottom icon bar. This Trash Can icon does not appear when you are viewing pictures from your Photos Library or other synced albums.
If you don't see the bottom row of icons, tap the photo once to activate them. Then tap the Trash Can icon. You will be prompted with the option to delete the picture.
Touch Delete Photo and the picture will be deleted from your iPad.
Downloading Pictures from Web Sites
We have shown you how you can transfer pictures from your computer to your iPad and save them from e-mails. You can also download and save pictures right from the Web onto your iPad.
Caution We strongly encourage you to respect image copyright laws as you download and save images from the Web. Unless the web site indicates an image is free, you should check with the web site owner before downloading and saving any pictures.
Find a Picture to Download
The iPad makes it easy to copy and save images from web sites. This can be handy when you are looking for a new image to use as wallpaper on your iPad.
First, tap the Safari web browser icon and type a search for iPad wallpaper to locate a few sites that might have some interesting possibilities. (See our Chapter 11: “Surfing the Web with Safari” for help.)

Once you find a picture you want to download and save, tap, and hold it to bring up a new menu of options that includes Save Image (among others), as shown in Figure 15–7. Choose this option to save the picture in your Saved Photos album.

Figure 15–7. Saving an image from a web site.
Now touch your Photo icon and you should see the picture in the Saved Photos album.