
Chapter 6
Personalize & Secure Your iPad
In this chapter you will learn some great ways to personalize your iPad—and how to protect your iPad with passcode security. You can download some great free wallpaper and change the wallpaper for your Lock and Home screens. You can personalize the sounds your iPad makes by adjusting whether you hear a sound when you receive or send e-mail, lock the iPad, type using the keyboard or are alerted before an event on your calendar. You can also customize the Picture Frame settings (This is the app that shows your pictures when the device is locked). You can vary times, transitions, and even select which albums of pictures are shown. Many aspects of the iPad can be fine-tuned to meet your needs and tastes—to give your iPad a more personal look and feel.
Changing your Lock Screen and Home Screen Wallpapers
There are actually two screens you can personalize on your iPad by changing the wallpaper.
The first is the Lock Screen, which appears when you first turn on your iPad, or wake it up. The wallpaper for this screen image is shown behind the Slide to Unlock slider bar.
The next one is the Home Screen. The wallpaper for this is shown behind the icons.
You can use the wallpaper pictures that come with the iPad or you can use your own images.
TIP: You may want the wallpaper for your Lock Screen to be less personal than your Home Screen wallpaper. For example, you might choose to put a generic landscape image on your Lock Screen and a picture of a loved one on your Home Screen.
There are a couple of ways to change the wallpaper on the iPad. The first way is very straightforward.
Changing Wallpaper from your Settings
Touch the Settings icon, then touch the Brightness & Wallpaper tab in the left-hand column. The settings for brightness and wallpaper will appear in the right-hand column.
To begin selecting wallpaper, touch the images of your currently selected wallpaper under Wallpaper on the right side of the screen, as shown in Figure 6–1.
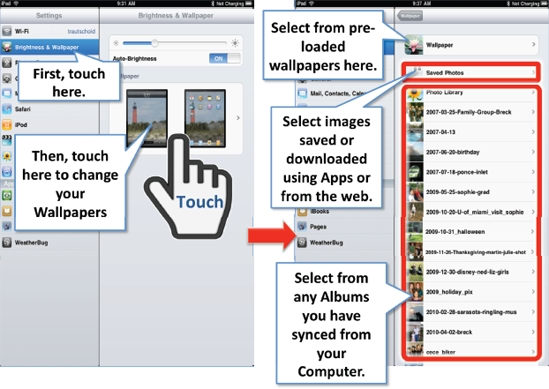
Figure 6–1. Changing wallpaper starting from the Settings icon
On the right side of the screen (Figure 6–1, right image), you'll see some albums or image folders. You have some choices:
- Tap the Wallpaper tab at the top to see all the preloaded wallpaper pictures for the iPad.
- Tap the Saved Photos album, which contains any images you've saved from the Web, from screenshots (which you take by pressing and hold the Home button and Power/Sleep key) or even from wallpaper apps.
- Tap any of the albums displayed below Saved Photos. These additional albums will be visible only if you have synced photos from iTunes.
Once you tap any of the albums, you'll see all the images within that album, as in Figure 6–2.
Tap any of the images in the album to see it on the full screen.
When previewing the image on the full screen, you can:
- Zoom in or out by pinching your fingers open or closed.
- Tap the Cancel button to return to the album if you don't like the image.
- Tap the Set Lock Screen button to set the image only for your Lock Screen.
- Tap the Set Home Screen button to set the image only for your Home Screen.
- Tap the Set Both button to set the image for both your Lock and Home Screens.
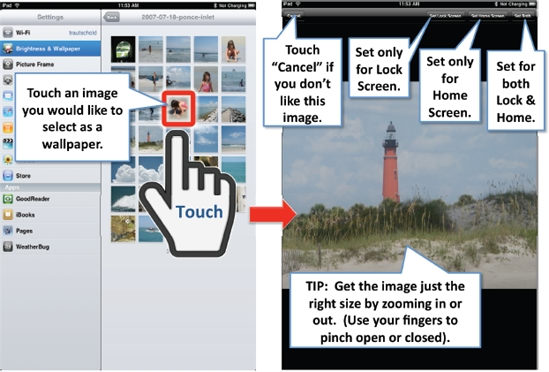
Figure 6–2. Select a picture from an album to change your wallpaper.
Change Wallpaper from any Picture
The second way to change your wallpaper is to view any picture in your Photos collection and select it as your wallpaper.
Tap the Photos icon to get started. To learn more about working with photos, check out Chapter 15, “Photos.”
Touch the photo album you want to look through to find your wallpaper.
When you find a photo you want to use, touch it and it will open on your screen.

After you preview the image, as in Figure 6–3, tap the Set as icon ![]() on the top right corner of the screen and select Use As Wallpaper. Zoom in or out as you desire and then set as either your Lock or Home Screen or both, as described above.
on the top right corner of the screen and select Use As Wallpaper. Zoom in or out as you desire and then set as either your Lock or Home Screen or both, as described above.
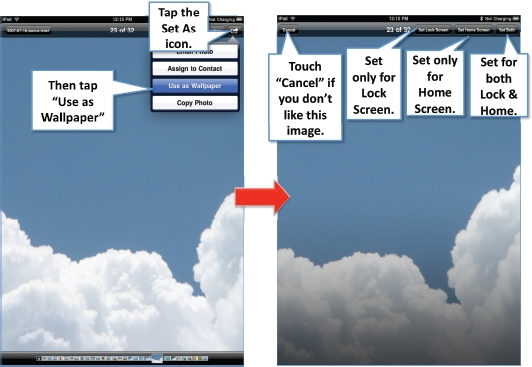
Figure 6–3. Start from the Photos icon to use an existing photo or image as wallpaper.
If you decide you'd rather use a different picture, choose Cancel and pick a different one.
Download Great Wallpaper from Free Apps
Go to the App Store and do a search for Backgrounds. (See Chapter 20, “App Store” for help.) You'll find a number of free and low-cost apps designed specifically for your iPad. In this section we highlight one called Backgrounds HD, which has hundreds of beautiful background images you can download for free to your iPad.
NOTE: With Backgrounds HD, as with most wallpaper apps, you will need a live Internet connection—either Wi-Fi or 3G. Because image files tend to be quite large, you should probably stick with Wi-Fi unless you have an unlimited monthly data plan for your 3G cellular data network.
Downloading the Wallpaper from the Free App
After you download and install Backgrounds HD, tap the program's icon to start it up.
The app has a number of backgrounds to choose from. You can search for a particular background by tapping the Search Backgrounds window in the upper left corner, as shown in Figure 6–4. You can also choose to view Popular or Recent backgrounds using the buttons on the top.
Finally, if you would like to view all backgrounds in a particular category or by a certain artist, you can select those categories in the top right portion of the main screen. Some of the categories at publishing time were Funny, Artsy, Quotes, Love, Nature, Flowers and Animals.
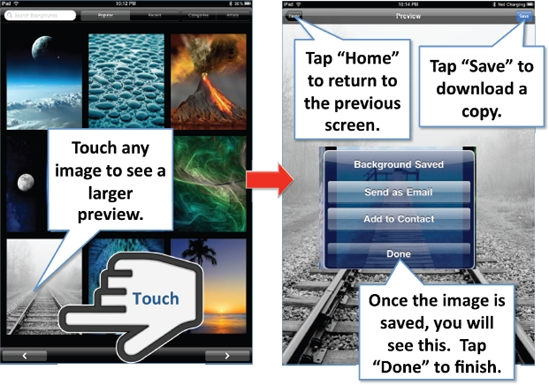
Figure 6–4. Previewing free wallpaper from the Backgrounds HD app
After touching any wallpaper to bring it to a full-screen preview, click the Save button in the upper right corner to save a copy into your Saved Photos album and then click the Done button.
If you don't like the image, click the Home button in the upper left corner to get back to the thumbnail images.
Selecting the Downloaded Wallpaper
Once you've chosen a wallpaper image and saved to your iPad, you'll need to select it using the steps described earlier in this chapter that show how to change wallpaper using the Settings icon.
Be aware that the downloaded wallpaper will be in the Saved Photos album. After you tap Saved Photos to open it, you'll need to flick all the way to the bottom to see your recent entries.
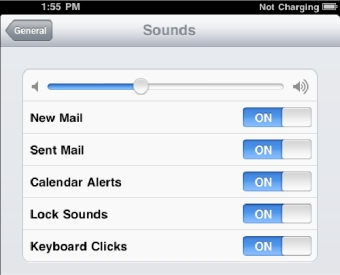
Adjusting Sounds on your iPad
You can fine-tune your iPad so that it does or does not make sounds when you receive new mail, send mail, the caledar alarm rings, the keyboard clicks or the when it is locked. To adjust sounds, follow these steps:
- Tap your Settings icon.
- Tap General in the left column.
- Tap Sounds in the right column.
- Tap any of the switches to turn On or Off the sound when the event occurs.
TIP: On a related note to sounds, you can lock the maximum volume playable from the iPod app. Go into Settings > iPod > Volume Limit > Lock Volume Limit. We show you how to do this in Chapter 7: “Music.”
Personalize Your Picture Frame
Picture Frame is the app that lets you display a slideshow of photos on your locked iPad (see Figure 6–5). We'll describe the many ways you can customize the display.
Starting or Stopping the Picture Frame App
You may have noticed the little icon next to the slide to unlock slider bar when your iPad is locked. This is the Picture Frame icon.
Tap this icon to turn on the electronic picture frame.
Tap the icon again to turn it off.
Picture Frame will cycle through all your pictures, or you can customize it to show only selected photo albums.
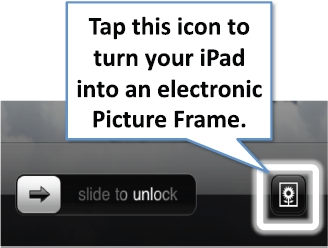
CAUTION: If you have private pictures stored on your iPad, it could get quite embarrassing if Picture Frame accidentally displays these photos while in locked mode. This section shows you how to restrict the albums that are used for the slideshow.
NOTE: You can disable Picture Frame by setting a passcode security lock on your iPad. We show you how later in this chapter on page 182.

Figure 6–5. Picture Frame can present a slideshow when your device is locked.
Customizing Your Picture Frame
Depending on the types of pictures you have stored on your iPad, you will almost certainly want to set up your Picture Frame to display just the albums or photos you want. To do this:
- Tap the Settings icon.
- Tap Picture Frame in the left column.
- Now, you can adjust various settings for the picture frame: (Figure 6–6).
- If you want to show only one picture on the screen at a time, select Dissolve. If you want three to four images at once, select Origami. Origami will show 2-4 images on the screen and them have them fold over on eachother sort of like you are folding paper.
- Zoom in on Faces is selectable only if you've chosen the Dissolve transition. This is a neat feature that will zoom in on any faces detected in the individual photos,
- Set Shuffle to ON if you want Picture Frame to randomly go through the selected photos.
- If you want all your photos to be included in the slideshow (the default setting), select All Photos.
- People often want to keep some photos private. To do so, select Albums, then tap or check the albums to include. (The check indicates that an album will be included.)
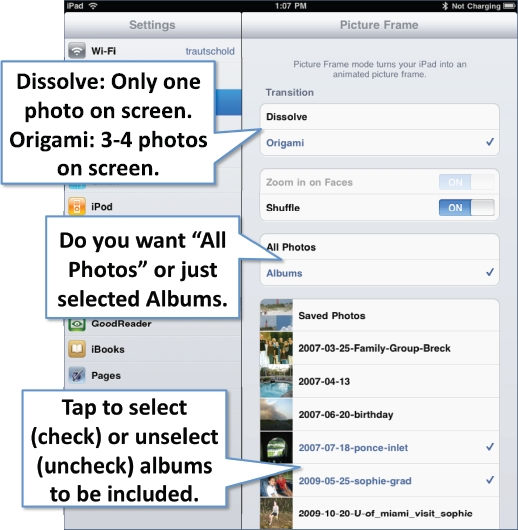
Figure 6–6. Choosing how to customize Picture Frame
TIP: To really control what Picture Frame displays, set up an album on your computer with only the images you are happy to have everyone see when the device is locked. Then sync that album to your iPad using iTunes. For help with this, check out Chapter 3 “Sync with iTunes.”
Keyboard Options
You can fine-tune your keyboard by selecting various languages and changing settings like Auto-Correction and Auto-Capitalization. See Chapter 2, “Typing Tips, Copy/Paste, & Search” for keyboard options and how to use the various features.
How to Secure Your iPad with a Passcode
Your iPad can hold a great deal of valuable information. This is especially true if you save information like the Social Security numbers and birth dates of your family members. It is a good idea to make sure that anyone who picks up your iPad can't access all that information. Also, if your children are like ours, they'll probably pick up your cool iPad and start surfing the Web or playing a game. You might want to enable some security restrictions to keep them safe.
Setting a Passcode to Lock Your iPad
Touch the Settings icon and then the General tab in the left column. Now scroll down and tap on the Passcode Lock item.
Here you have the option of setting a four-digit passcode that prevents unauthorized access to your iPad and your information. If the wrong passcode is entered, however, even you won't be able to access your information, so it is a good idea to use a code you'll easily remember or to write it down somewhere secure. (See Figure 6–7.)
Use the keyboard to enter a four-digit code. You will then be prompted to enter your code once more.
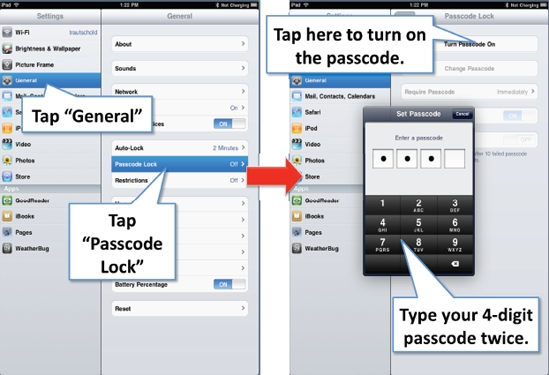
Figure 6–7. Enabling security by setting a passcode
Passcode Options: Change Time-Out, Disable Picture Frame, Erase All Data after 10 Attempts
Once you have set your passcode, you will be presented with a few options:
Turn Passcode Off Change Passcode Require Passcode (Immediately, 1 min., 5 min., 15 min., 1 hour, 4 hours)
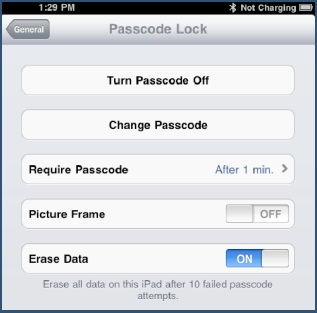
NOTE: Setting a shorter time for Require Passcode is more secure. Setting the time as Immediately, the default, is most secure. However, using a setting of one minute may save you the headache of retyping your passcode if you accidentally lock your iPad.
Picture Frame (default is ON); set to OFF to prevent the pictures from being seen in locked mode.
Erase Data (default is OFF; if this is set to ON, all data will be erased after ten unsuccessful attempts to enter the passcode.
CAUTION: You may want to set Erase Data to OFF if you have young children who like to bang away at the security to unlock the keyboard when it comes out of sleep mode and is locked. Otherwise, you may end up with your iPad being erased frequently.
Setting Restrictions
You might decide you don't want your kids listening to explicit lyrics in music on your iPad. You may also not want them to visit YouTube and watch content you find objectionable. Setting these restrictions is quite easy on your iPad.
Once again, Touch the General tab under Settings and tap Restrictions.
You will see a large button that says Enable Restrictions.
When you touch this, you'll be prompted to enter a Restrictions Passcode—just pick a four-digit code you will remember.
NOTE: This a separate passcode from your main iPad passcode, you could set it to be the same to remember it easily, however that could be problematic if you let your family know the main passcode, but do not want them adjusting the restrictions. You will need to enter this passcode to turn off restrictions later.
Notice that you can adjust whether to allow certain apps at all: Safari, YouTube, iTunes, Installing Apps or Location.
OFF = RESTRICTED
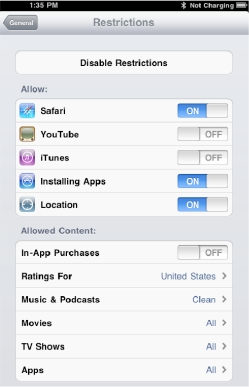
You might think that ON means something is restricted, but it is the opposite. In order to disable or restrict something, you need to touch the slider next to it and change it to OFF. If you look at the word Allow: above all the tabs, then it makes sense.
As you can see, you can restrict access to lyrics for Music & Podcasts to what is Clean.
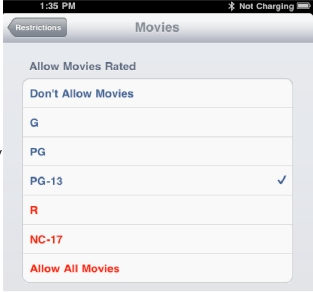
You can also restrict which ratings for Movies, TV Shows and Apps to allow to be played on this iPad.
In the example in the image to the right, only movies with ratings up to PG-13 can be played. Movies with ratings of R and NC-17 can't be played.